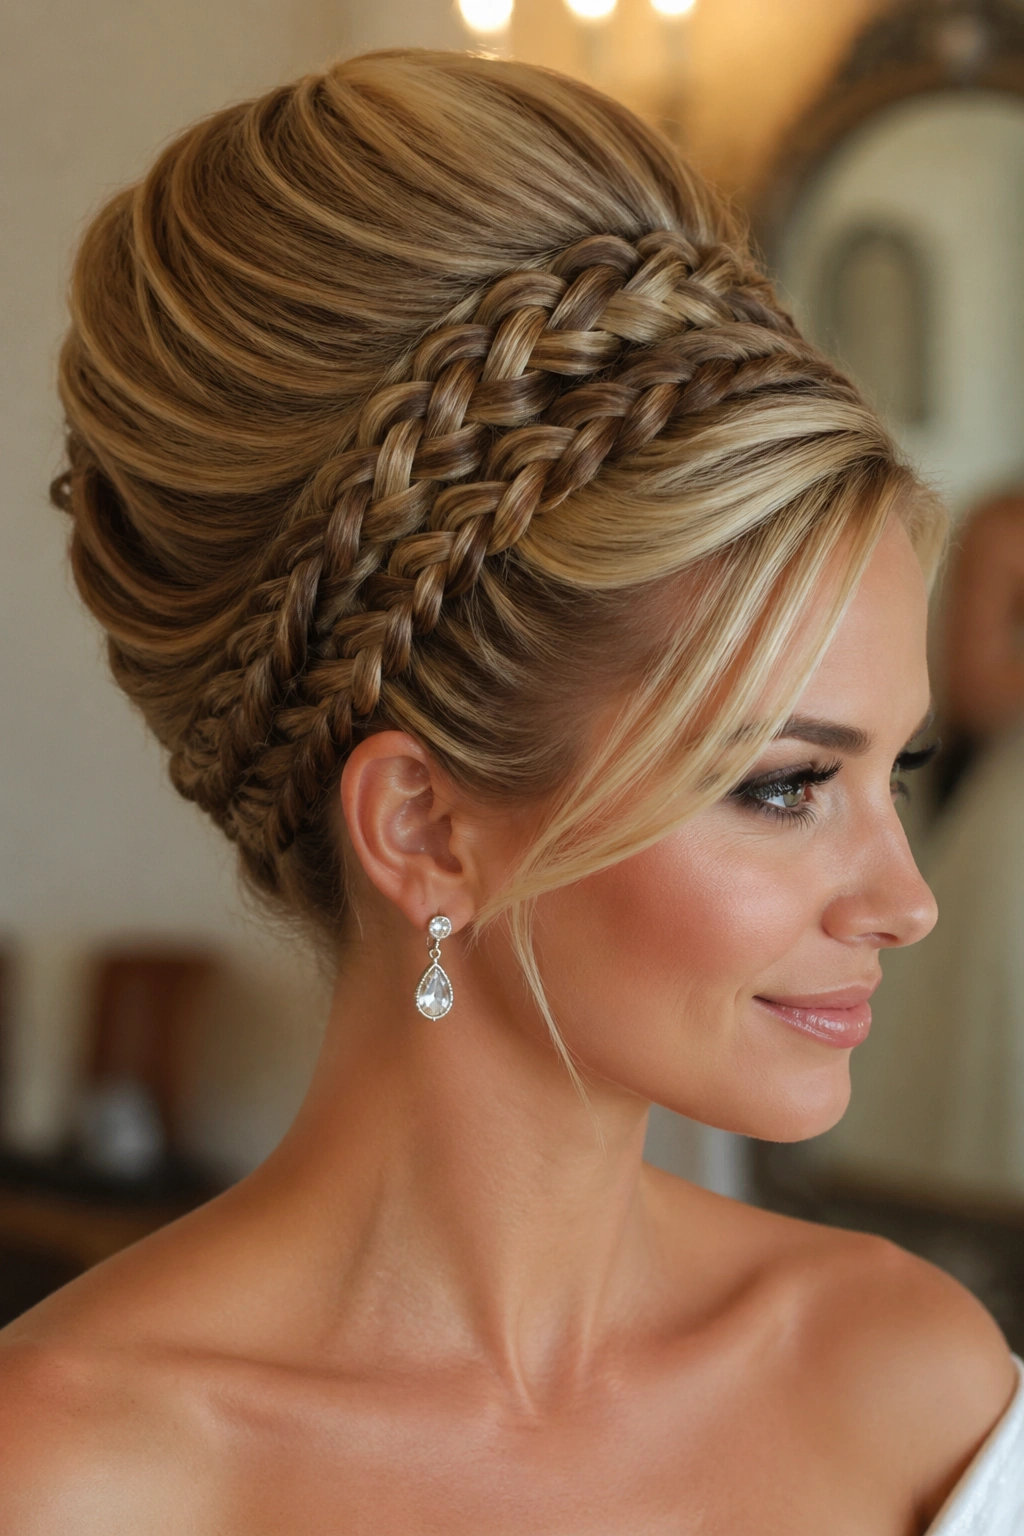
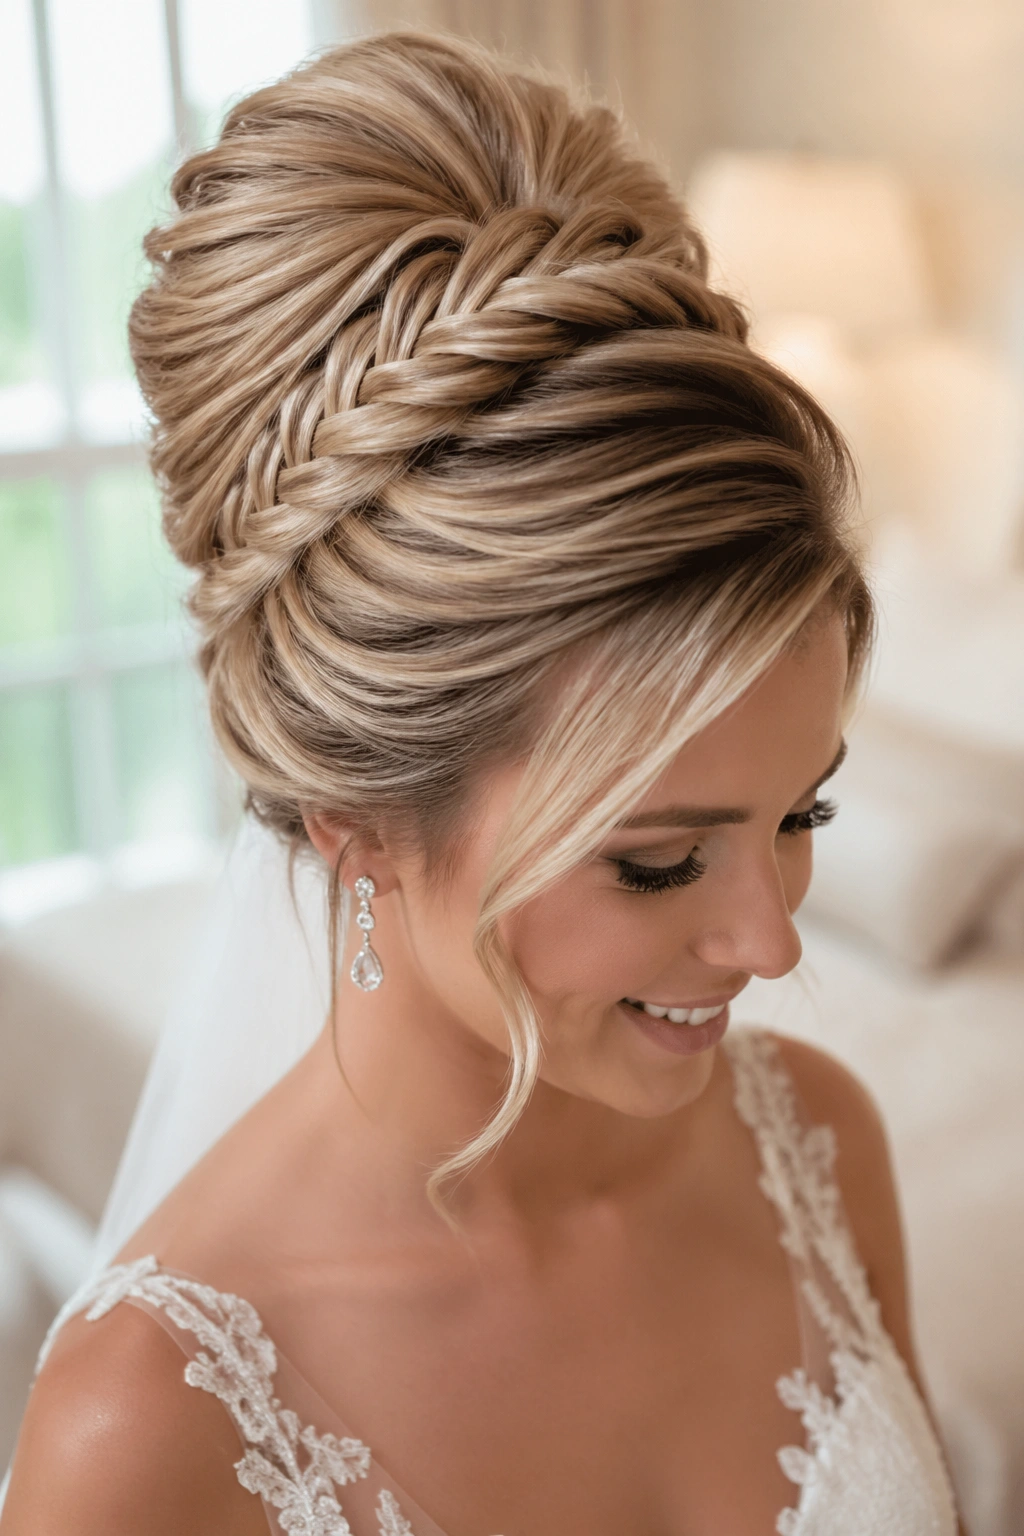
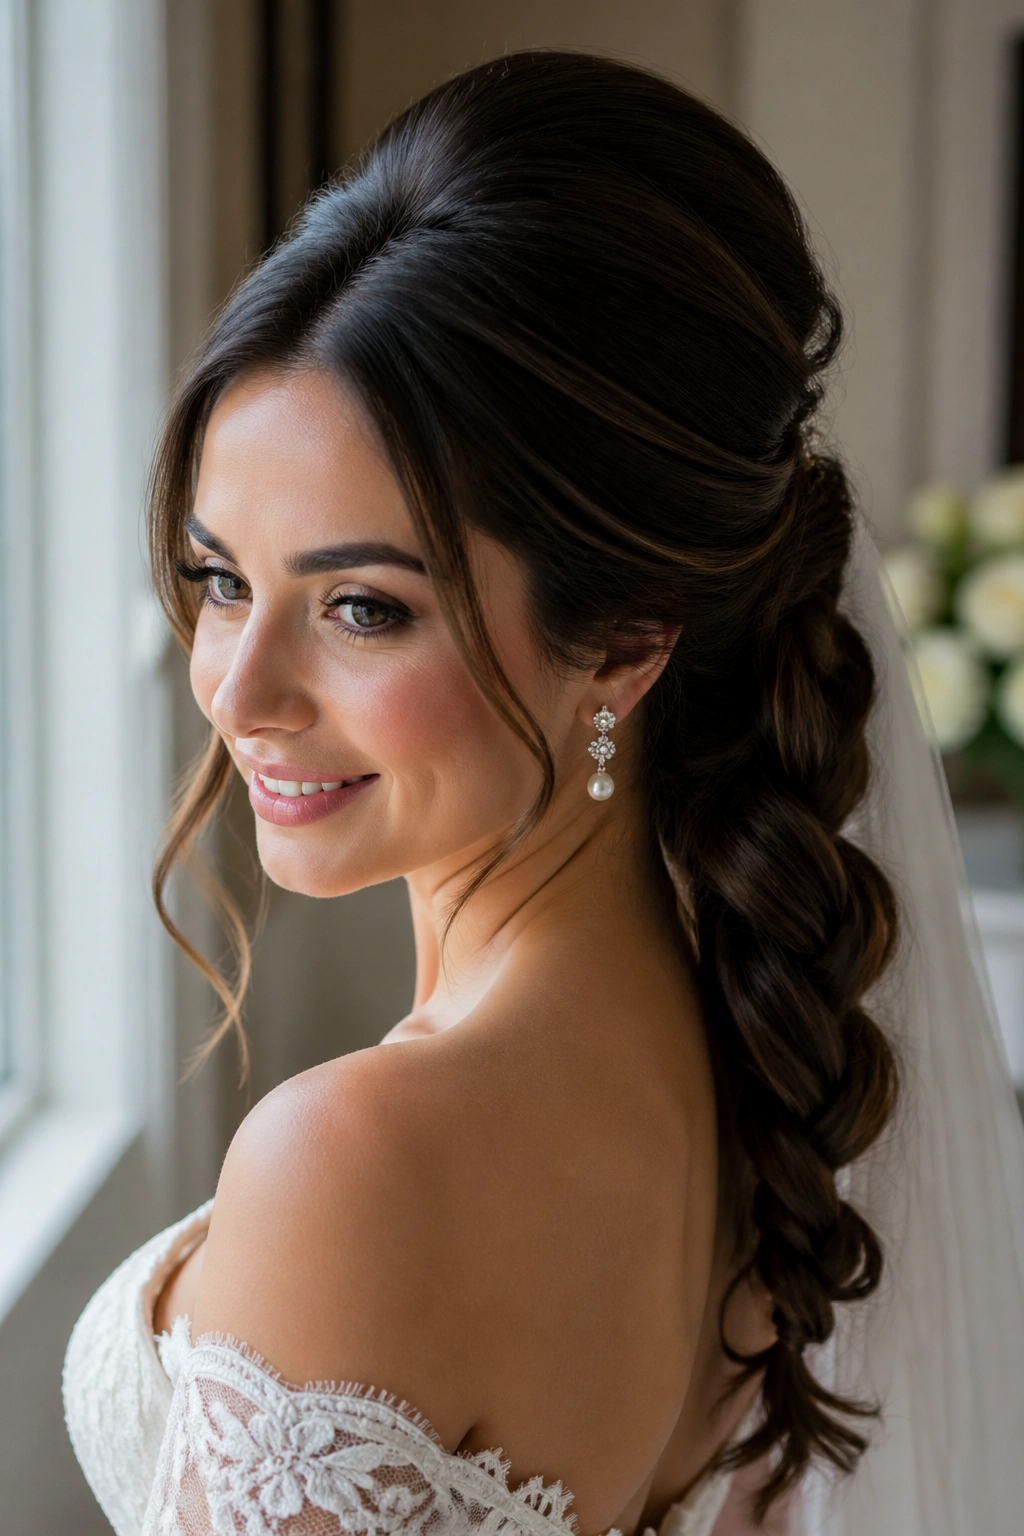
A beehive braid can do something a plain bridal updo often can’t: it gives the hair height, polish, and a little 1960s swagger without turning the bride into a costume. That matters at a wedding, where the dress, the veil, the earrings, and the neckline all have to agree with each other. A good beehive braid for a 1960s wedding look doesn’t shout. It lifts. It frames. It makes the whole silhouette feel intentional.
The trick is that not every beehive needs to be huge. Some of the prettiest versions are only lifted at the crown by a couple of inches, with a smooth top layer and a braid that does the rest of the work. Others go full bouffant and bring real drama, which can be gorgeous with a simple satin gown and a clean bouquet. Either way, the shape matters as much as the braid itself. If the crown is too flat, the style loses its period charm. If it’s too stiff, it starts looking like a themed party instead of a wedding.
There’s also a practical side people skip over. Braids help a beehive hold up better than loose teasing alone, especially when you’re wearing a veil, dancing for hours, or fighting humidity from the minute you leave the house. A bit of backcombing at the crown, a smooth outer layer, and a braid anchored well with pins can stay neat through the ceremony, the photographs, and that moment when somebody hugs you too hard. That’s the sweet spot.
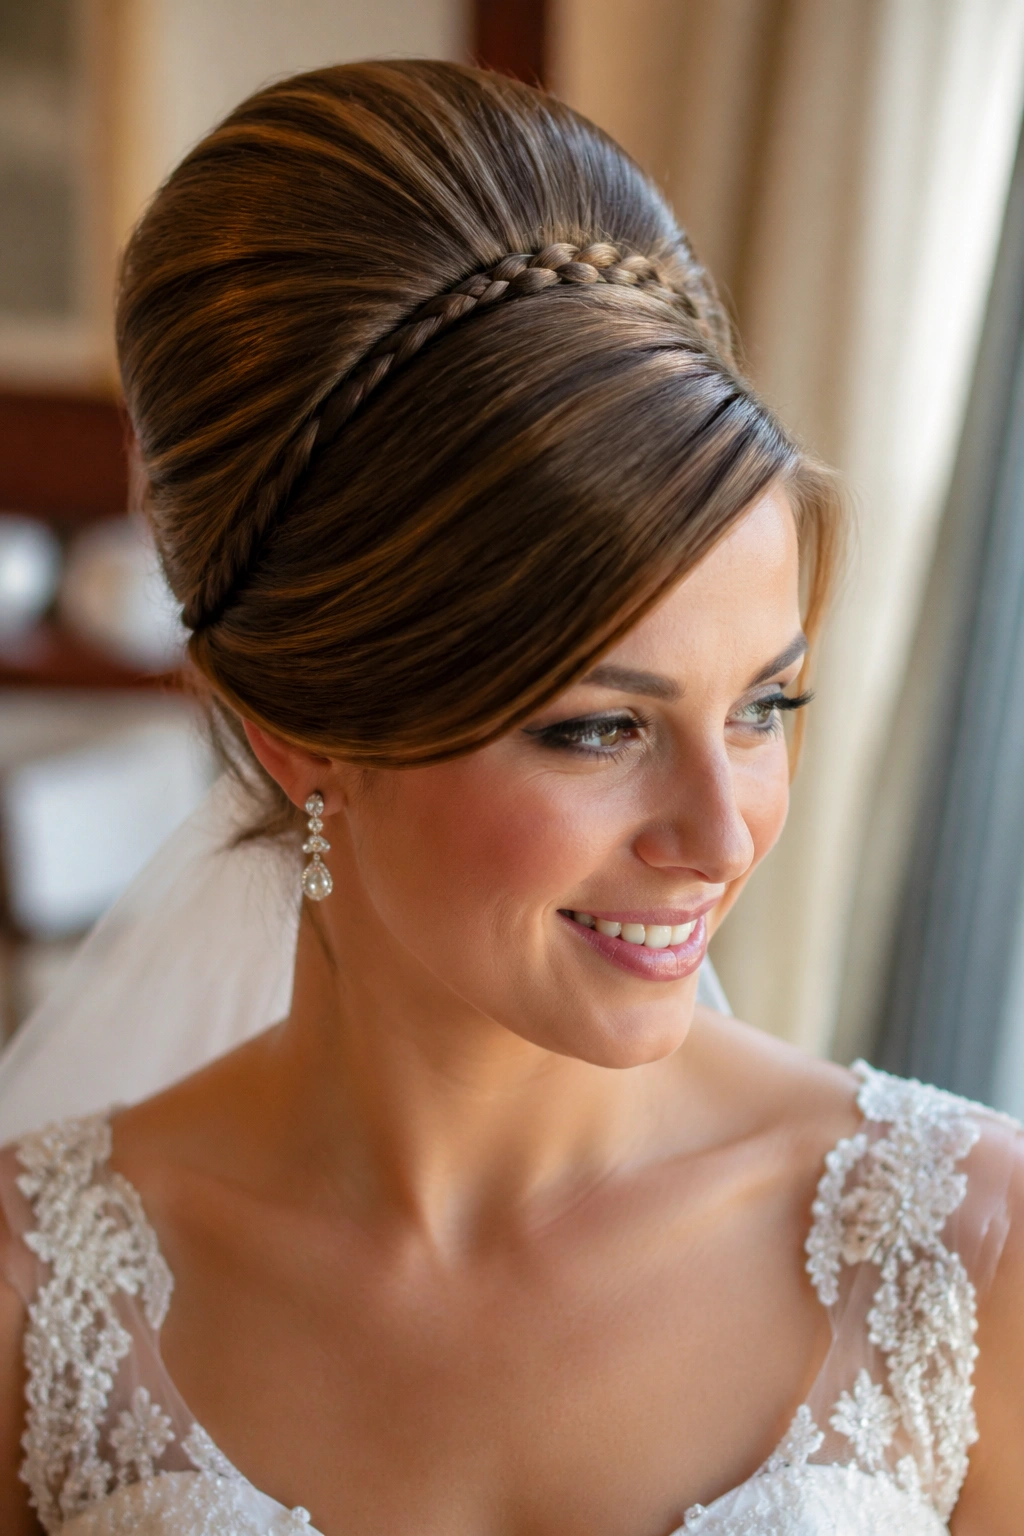
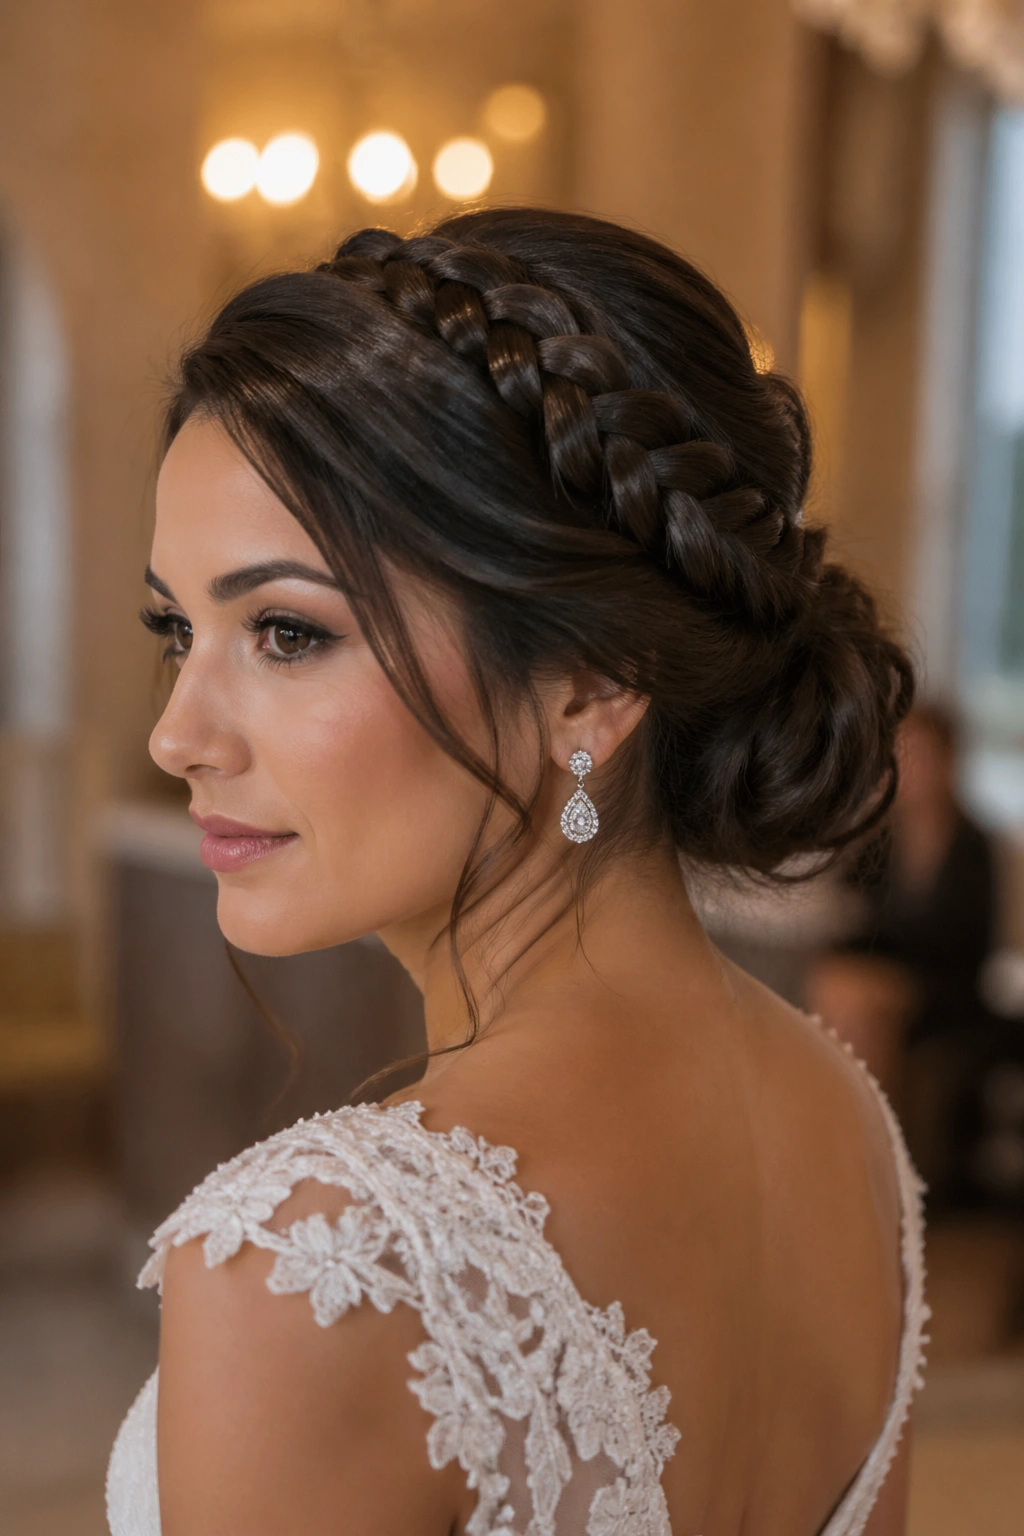
1. Classic Teased Beehive Braid Updo
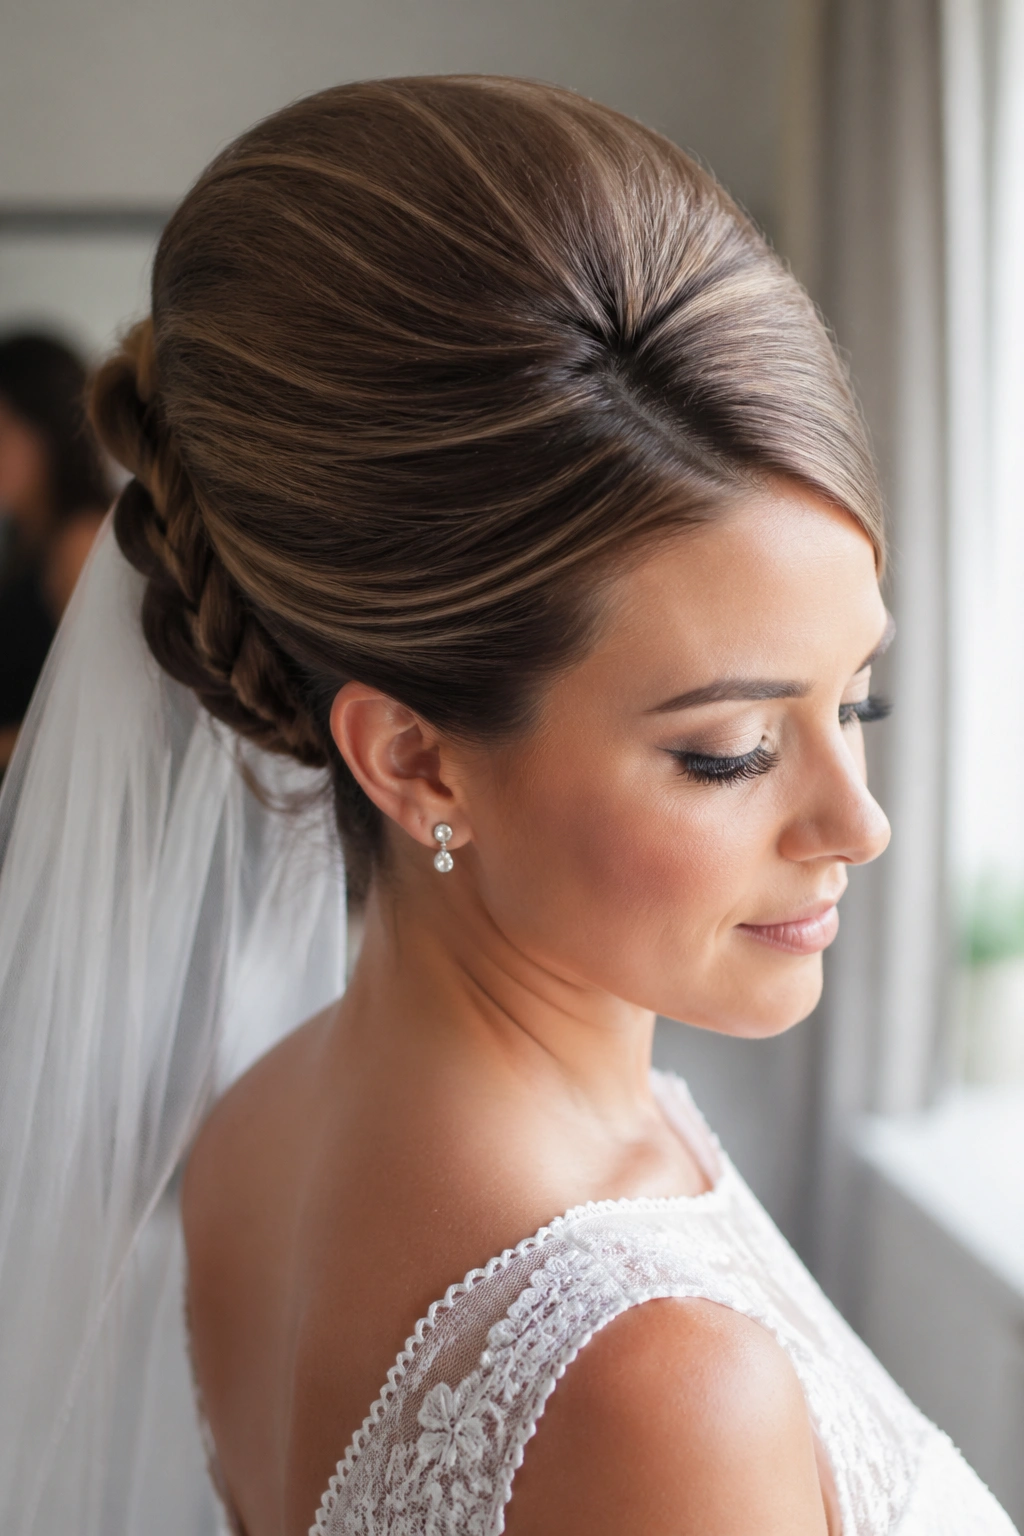
This is the version that feels most honest to the era. The crown gets lifted with backcombing, the top is smoothed over, and the braid disappears into a neat updo at the back. It has that clean 1960s wedding shape that reads instantly in photos, especially if the dress has a boat neckline or a simple portrait collar.
Why it works
The height sits on the crown, not all the way up at the forehead, so it looks bridal instead of theatrical. A medium or long braid tucked into a chignon keeps the finish tidy and gives the style some texture once the veil comes off.
A few things make this version sing:
- Tease the crown in 1-inch sections for control.
- Smooth the top with a boar bristle brush, not a heavy hand.
- Anchor the braid low enough that a veil can sit just under the bump.
- Finish with a mist of strong-hold spray, then press flyaways down with clean fingertips.
Best for brides who want the most period-correct silhouette without looking overdone.
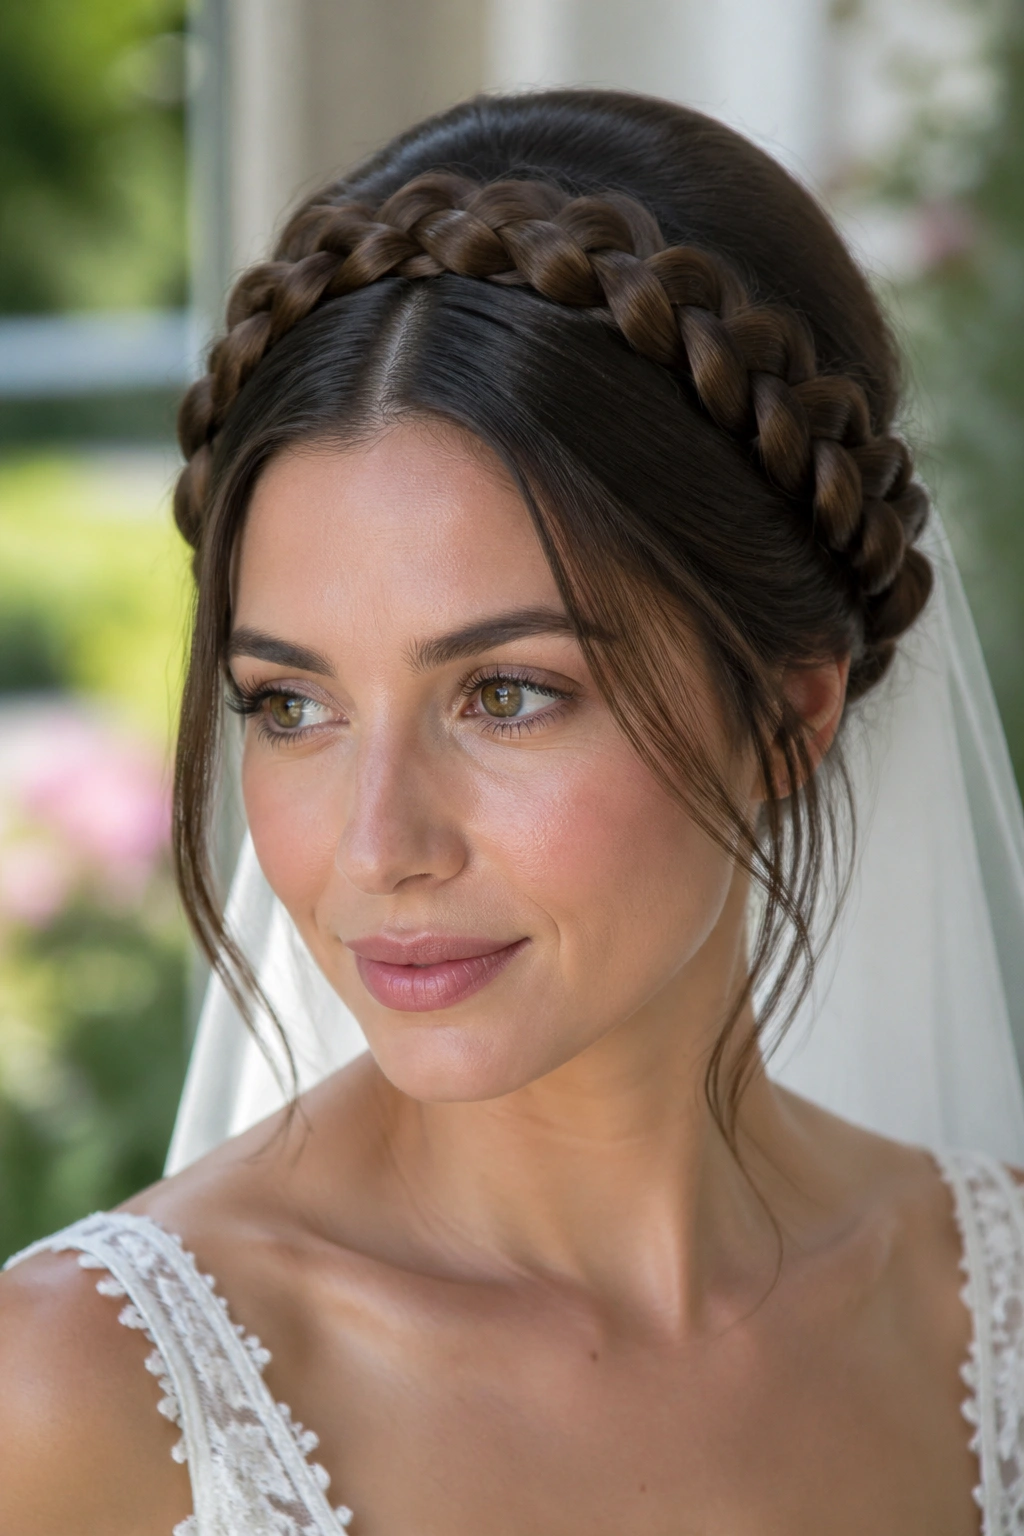
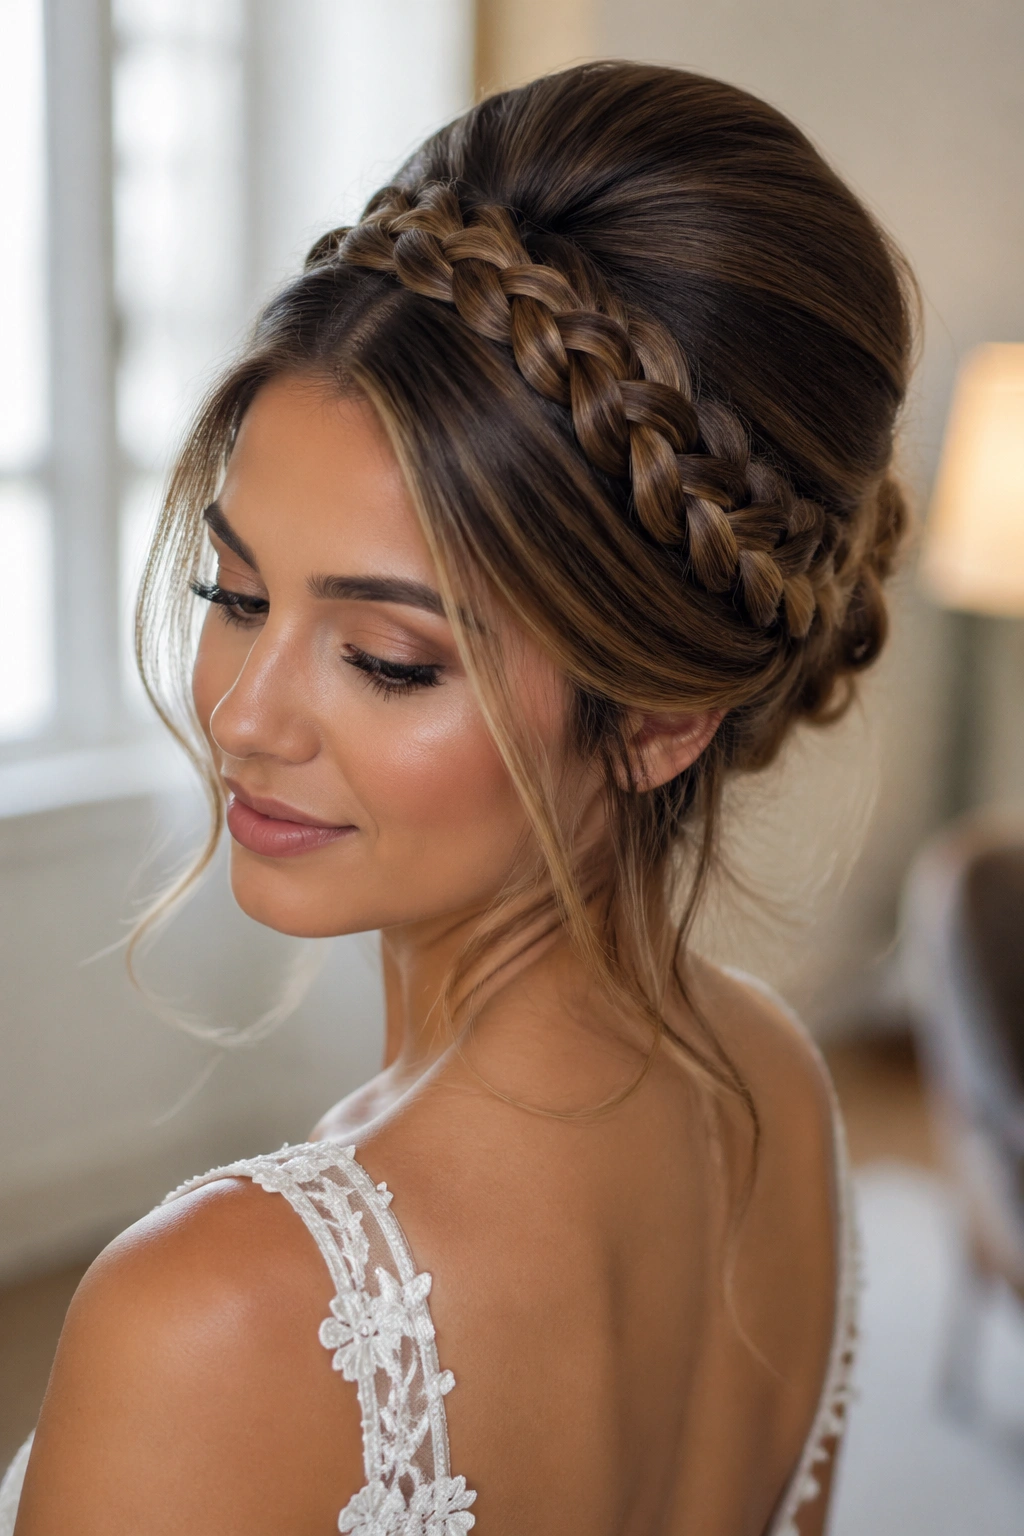
2. Half-Up Beehive Braid With a Veil
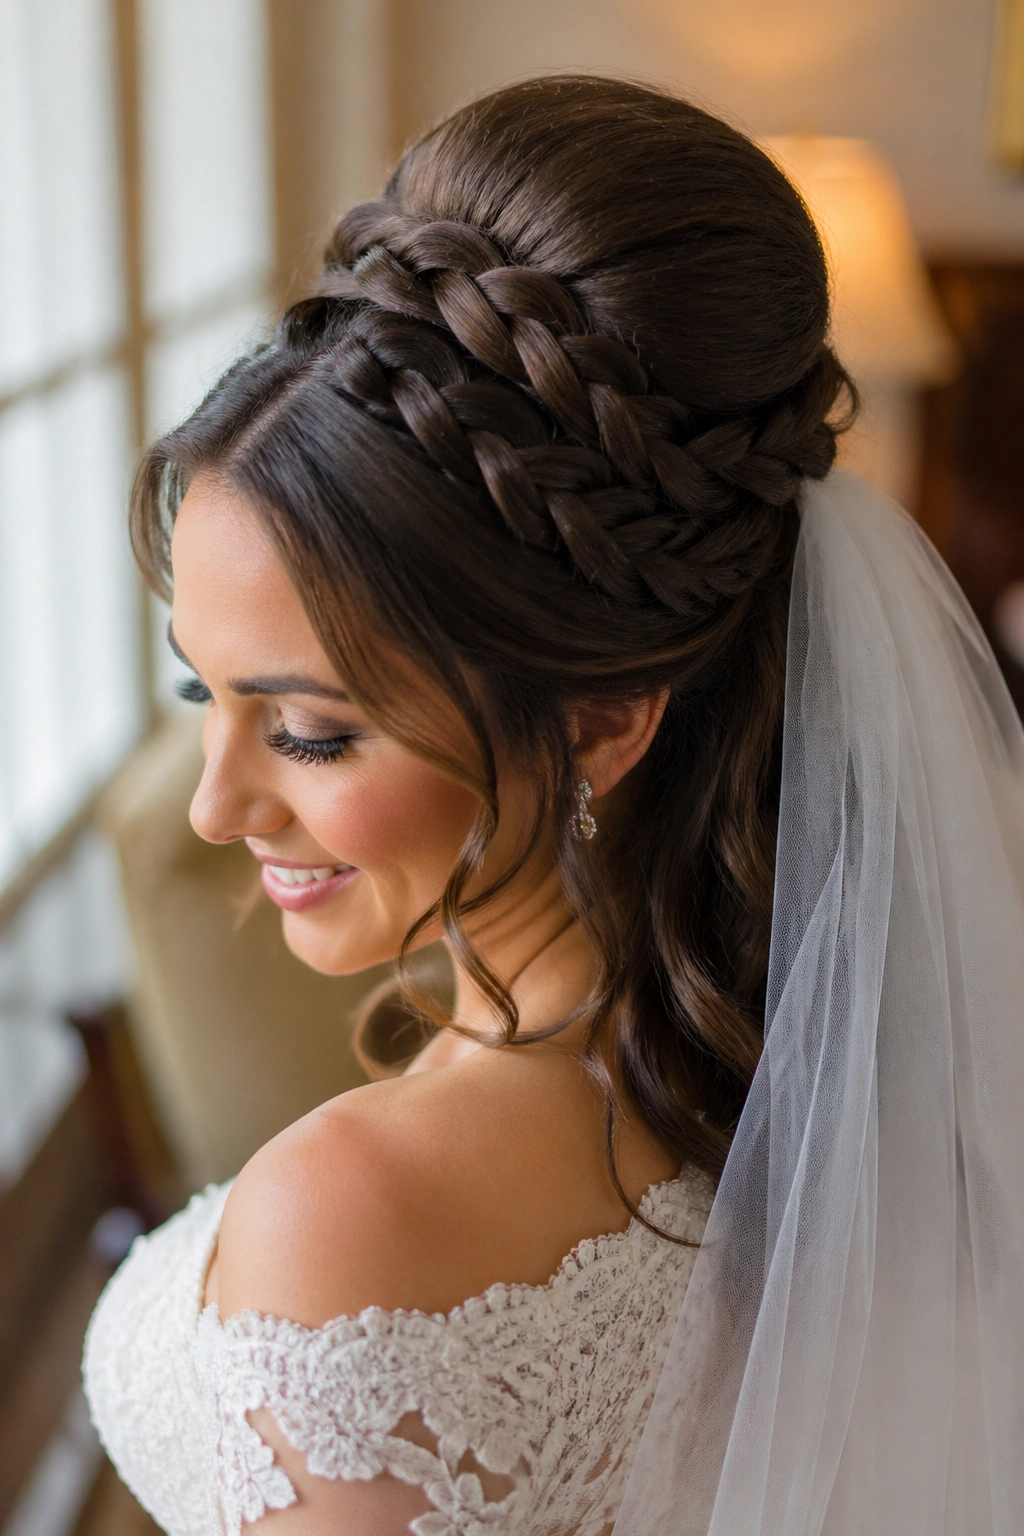
A half-up beehive braid is a softer way to wear the look, and honestly, I reach for it when the dress has a lot going on. Lace sleeves, a detailed back, or a high neckline can all fight with a full updo. This version keeps the crown lifted while letting the rest of the hair fall down in loose, polished lengths.
The veil placement matters here. Pin it below the beehive bump, not into the highest point, or the whole shape gets flattened before the ceremony even starts. Soft curls through the ends keep the style from feeling too rigid. If the hair is very fine, a few hidden pins under the crown braid will give the veil something to grip.
What to ask your stylist for
- A modest crown lift, about 2 to 3 inches
- A braid that blends into the back section
- Loose curled lengths, not tight ringlets
- Veil pins hidden under the first layer of braid
This is one of those styles that looks delicate from the front and more engineered from the side. That contrast is the charm.
3. Side-Swept Beehive Braid Over One Shoulder
A side-swept version changes the mood fast. Instead of centering the braid, the hair is lifted at the crown, then swept into a thick braid that falls over one shoulder. It feels glamorous, but not fussy, which is a nice balance if the gown already has a lot of structure.
The asymmetry is doing real work here. It draws attention to the face, lengthens the neck, and gives you a nice line in profile. Brides with side-parted bangs usually wear this beautifully, because the front pieces can curve back toward the crown before the braid starts. If the dress has an off-the-shoulder neckline, this one is especially lovely.
Not every beehive needs to look straight on. This one proves it.
4. Braided Bouffant Chignon
If you want height without a lot of visible length, this is the move. The top gets teased into a rounded bouffant, then the braid is folded into a low chignon at the nape. The overall shape feels compact, elegant, and a little more formal than a loose braid. It also keeps the hair off the neck, which is a blessing under heavy fabric or a high collar.
Why brides pick this one
The braid gives the bouffant more grip, and the chignon keeps the finish from collapsing halfway through the day. It’s one of the better choices for thick hair because the bulk is controlled instead of spread out. It also works well with a fingertip veil or a small cage veil, since the back stays neat and the crown does the visual lifting.
A pearl comb or a single crystal barrette at the base is enough. More than that can get busy.
5. Milkmaid Beehive Braid
This one feels a little sweeter than the classic beehive, but still fits the era if the crown is lifted well. The braid wraps around the head like a crown, while the top center keeps that gentle beehive swell. It’s a good choice for brides who want a softer, almost storybook version of retro hair.
The danger with milkmaid braids is making them too neat. You do not want a school-uniform look. Leave the braid full, keep the sections plump, and let a few face-framing bits sit lightly at the temples. A center part usually works best here, though a narrow side part can make it feel more vintage and less folk-inspired.
How to keep it wedding-ready
- Keep the braid thick, not skinny
- Add lift only at the crown, not all the way around
- Use invisible pins where the braid crosses behind the ears
- Avoid tiny, tight plaits; they shrink the whole style
The result is romantic, but with enough shape to feel intentional.
6. Low Bun With Braided Crown Height
Sometimes the smartest wedding hair is the one that doesn’t compete with the dress. A low bun with braided crown height gives you the beehive reference without making the silhouette top-heavy. That matters if the gown has a dramatic skirt, big sleeves, or a lot of embellishment at the bodice.
The front and crown should still carry the 1960s feel. A little lift, a smooth shell of hair, and a braid tucked into the bun are enough. This is a style for brides who want polish first and nostalgia second. It also handles fine hair well, because the bun can be padded lightly at the base without looking fake in photos.
If I had to name one quiet advantage, it’s this: it looks good from the back, which is more than I can say for a lot of wedding updos.
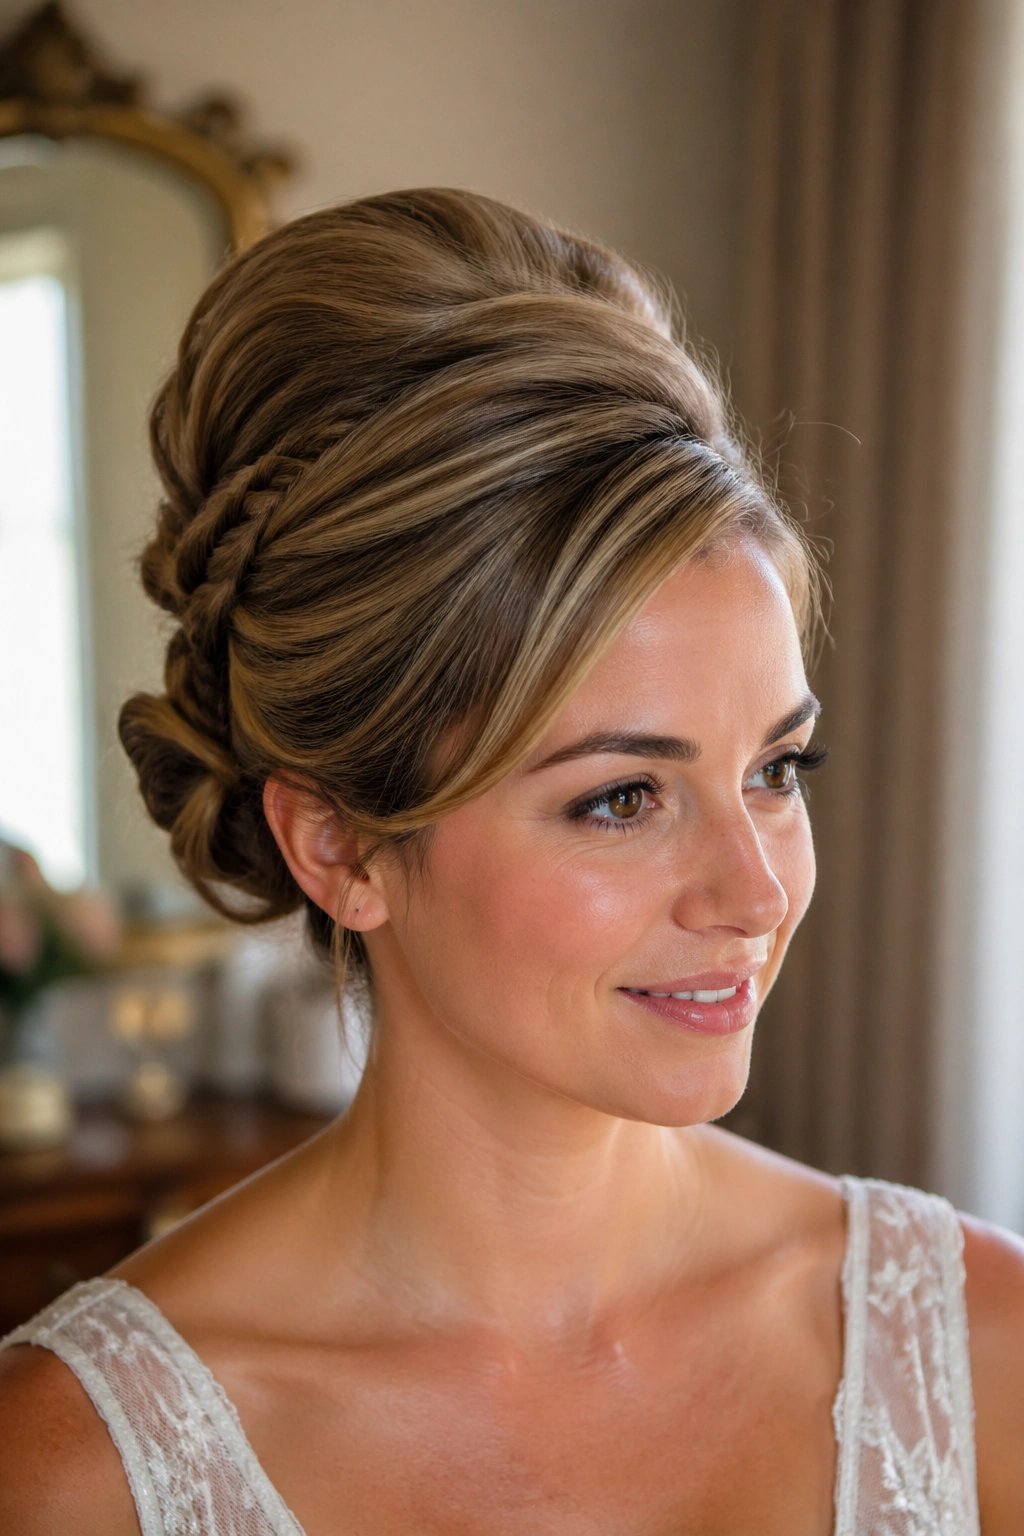
7. French Roll With a Braid Overlay
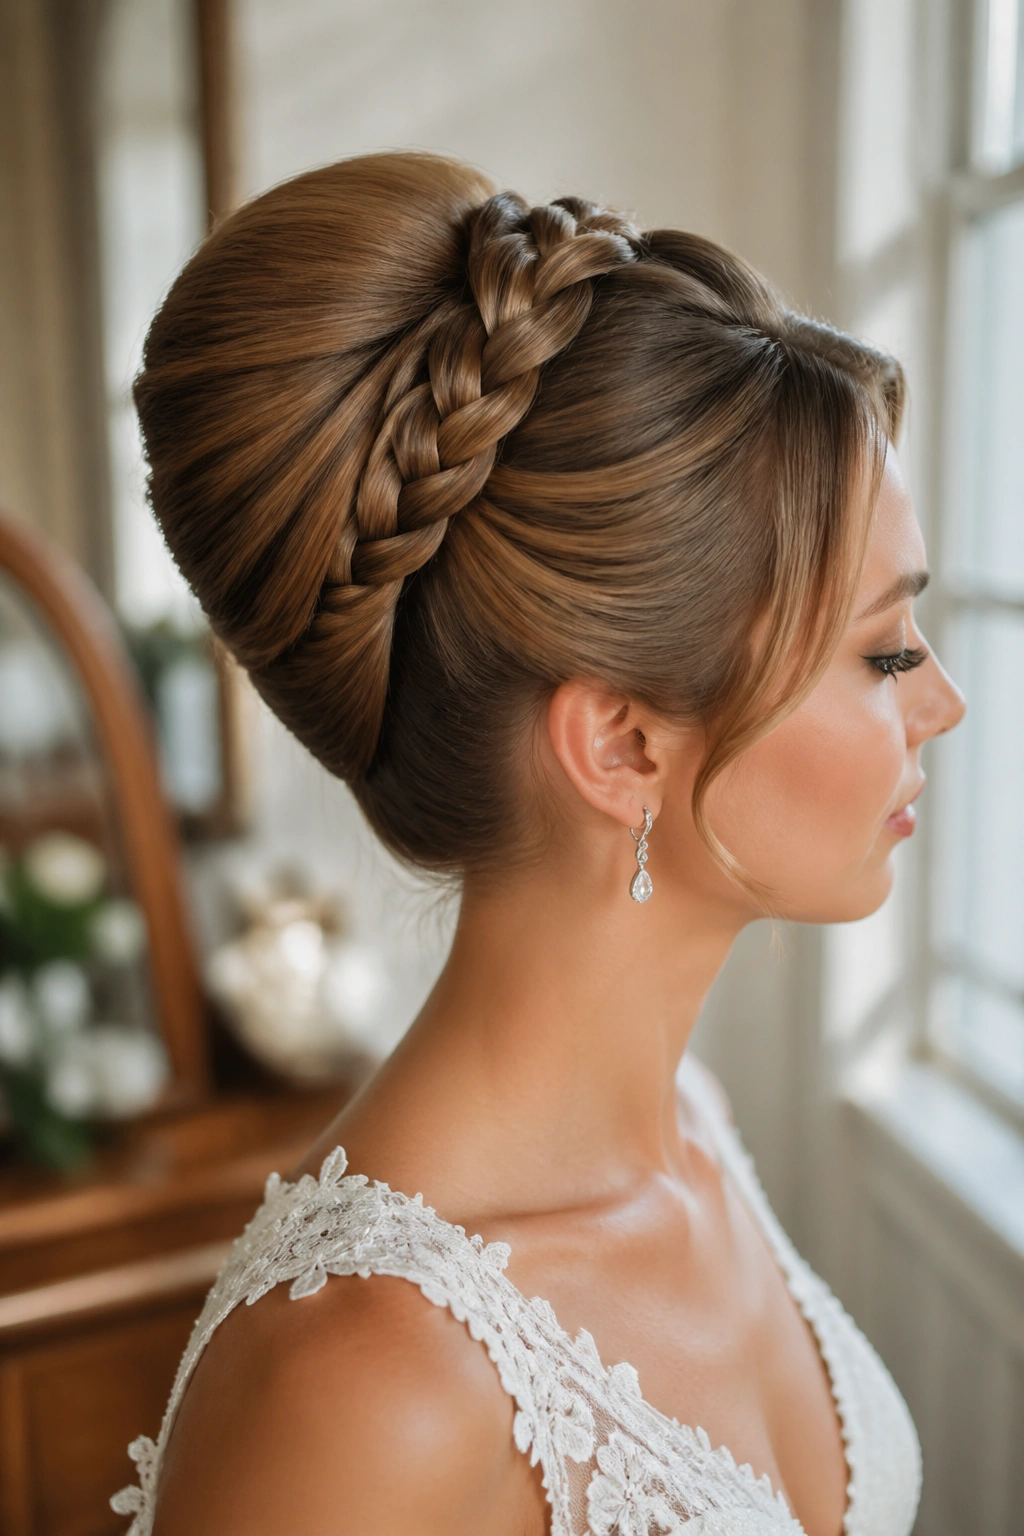
A French roll and a braid make a nice pair because each one brings a different thing to the table. The roll gives the vertical line. The braid softens the finish and gives the style texture near the crown. Together, they create that smooth, sculpted 1960s look that pairs so well with satin, silk, or structured crepe.
This version asks for clean sectioning. If the top is lumpy, the roll loses its elegance. If the braid is too thin, it disappears. The sweet spot is a medium braid laid neatly across the top before the lengths are tucked and pinned. It’s not the easiest style to do on yourself, but it holds up beautifully when done well.
What to watch for
- The roll should sit snug against the head
- The braid should have enough width to show in profile
- Pins need to match the hair color closely
- Spray the finished roll from 12 inches away to avoid stiffness
This one suits brides who like a sharper, more tailored finish.
8. Ribbon-Woven Beehive Braid
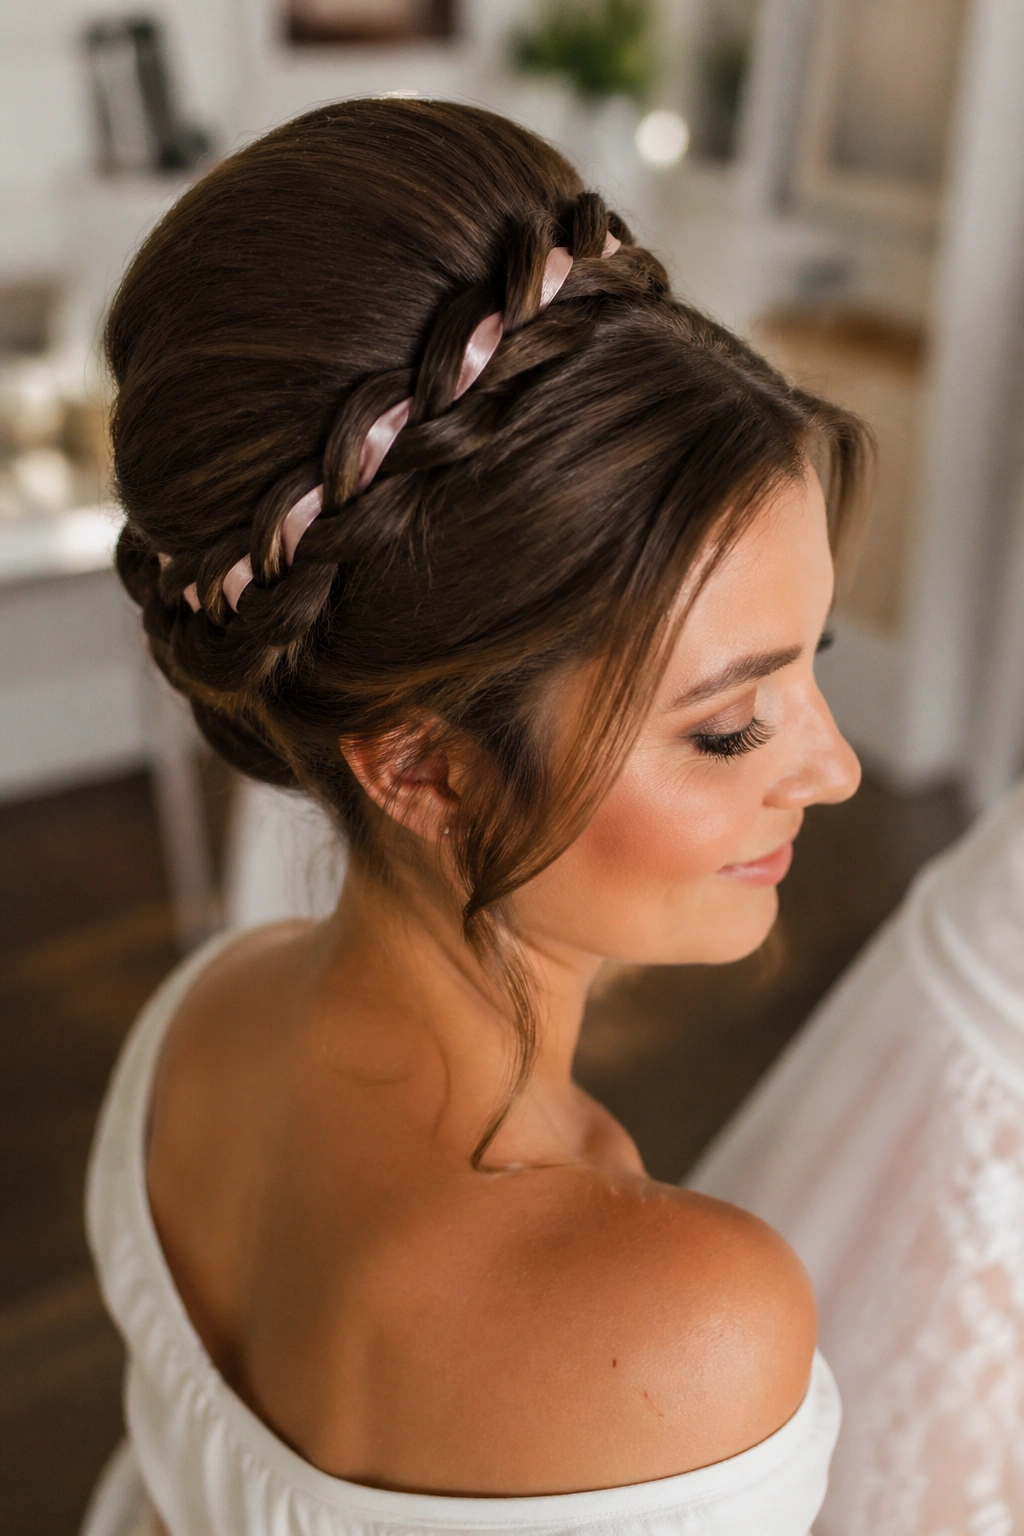
A satin ribbon woven through a braid can change the whole mood. It softens the beehive, makes the braid feel more bridal, and gives you a small color moment that can tie into the bouquet or sash. Ivory, blush, pale blue, and champagne all work well, but keep the ribbon narrow — about 1/4 to 1/2 inch wide is plenty.
The ribbon should not fight the braid. That’s where people go wrong. If it’s too thick or too glossy, the braid starts looking craft-store instead of wedding. Keep the braid in a lifted crown shape, let the ribbon trail through the plait, and secure the ends inside the updo so there’s no awkward bow hanging out unless you want one.
Where ribbon belongs
- Wrapped through one side of a braid
- Knotted discreetly at the base of a bun
- Used as a soft tie for a side braid
- Woven into a low braid when the dress is simple
A ribboned beehive braid works best when the dress is plain enough to let the hair do some talking.
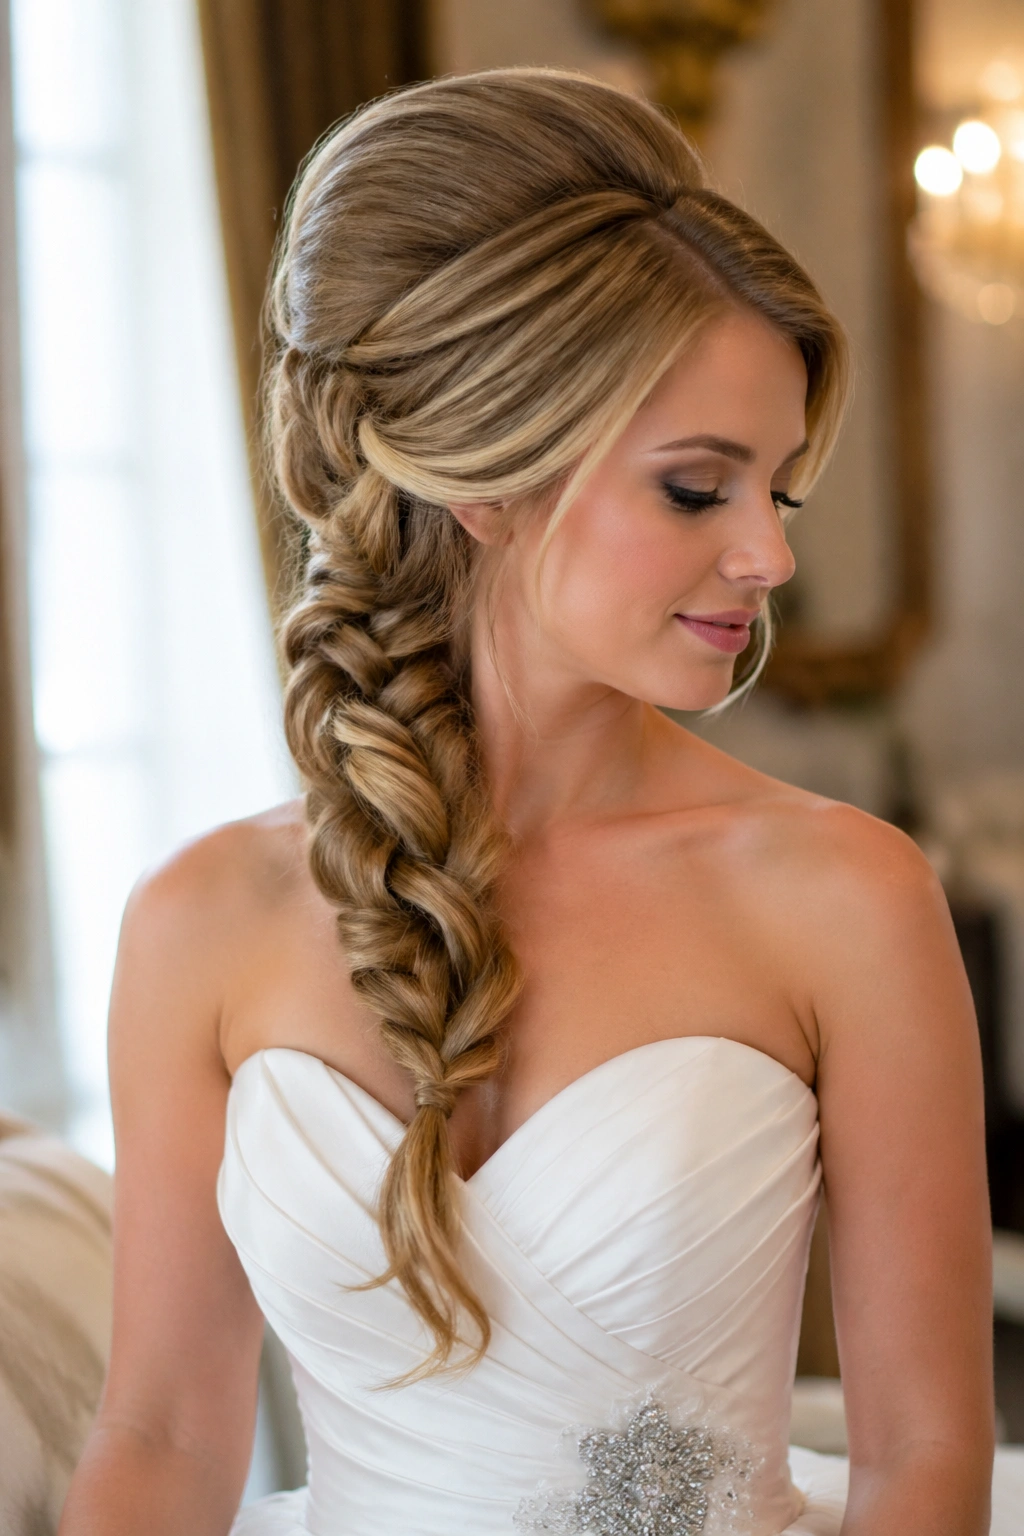
9. Beehive Crown Braid With Soft Ends
This one has a little movement, which I like. The crown gets lifted, the braid circles or crosses the back, and the ends are left soft instead of pinned into a hard knot. Those loose finishes keep the style from feeling too structured, especially if the bride is wearing flowing sleeves or a lighter veil.
The beauty of this look is that it feels decorated without being stiff. The braid can be a regular three-strand braid, a fishtail, or even a rope twist if the hair is long enough. Once the crown lift is in place, the braid becomes more of a frame than a final shape.
It’s especially useful if you want to show some length without letting the hair fall flat down the back.
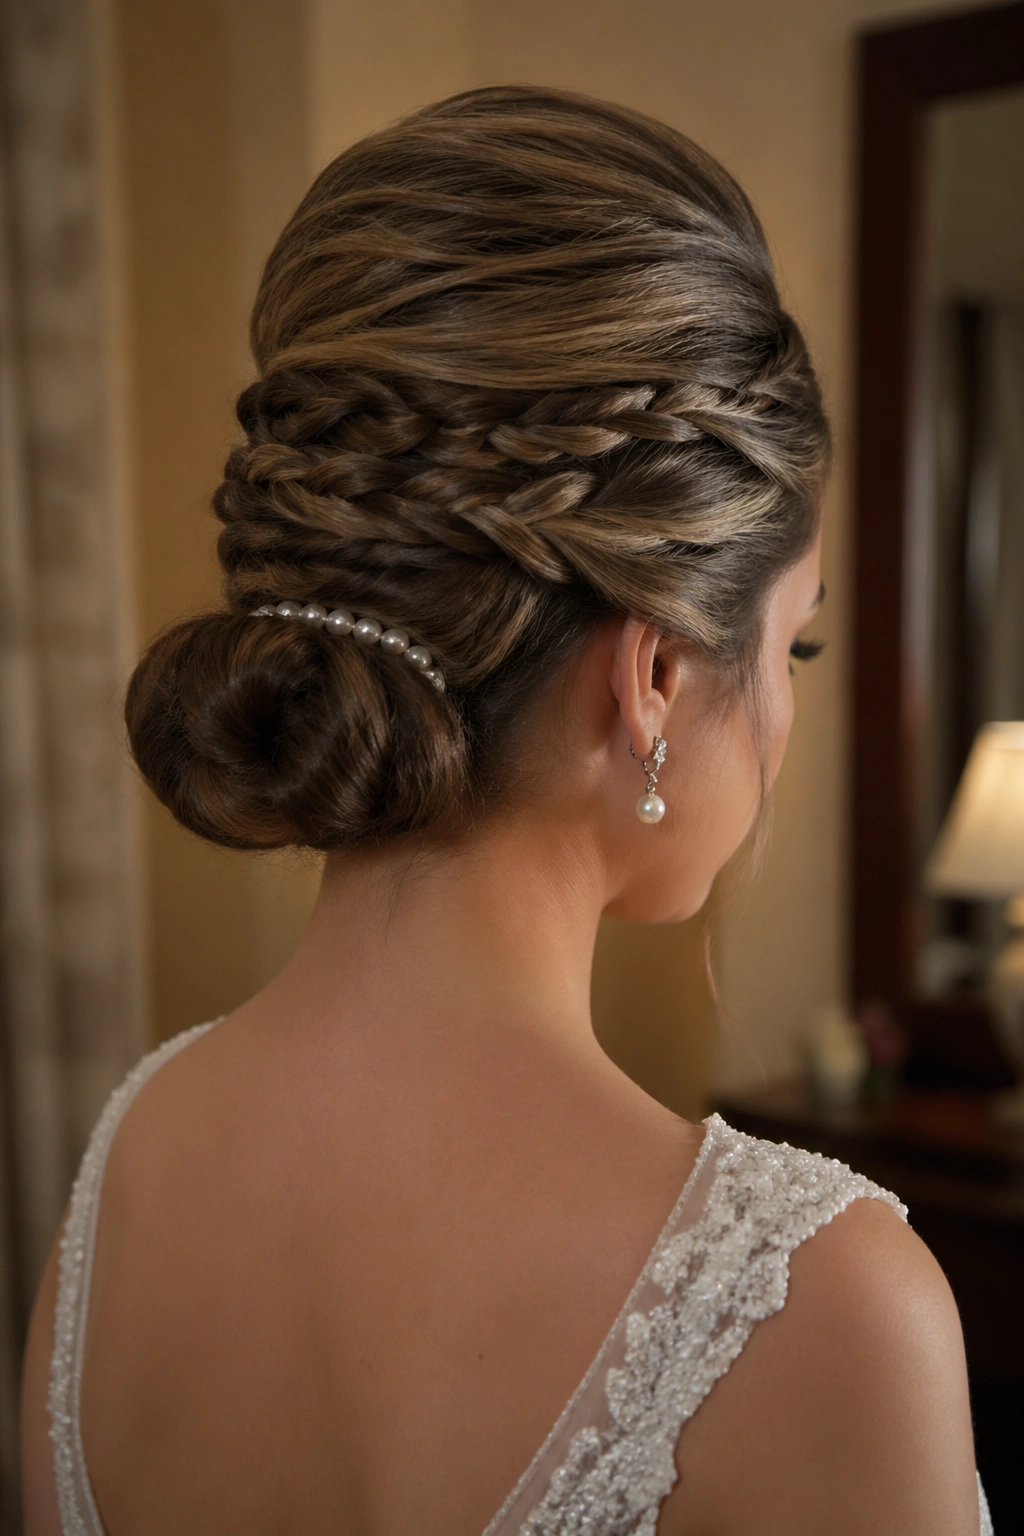
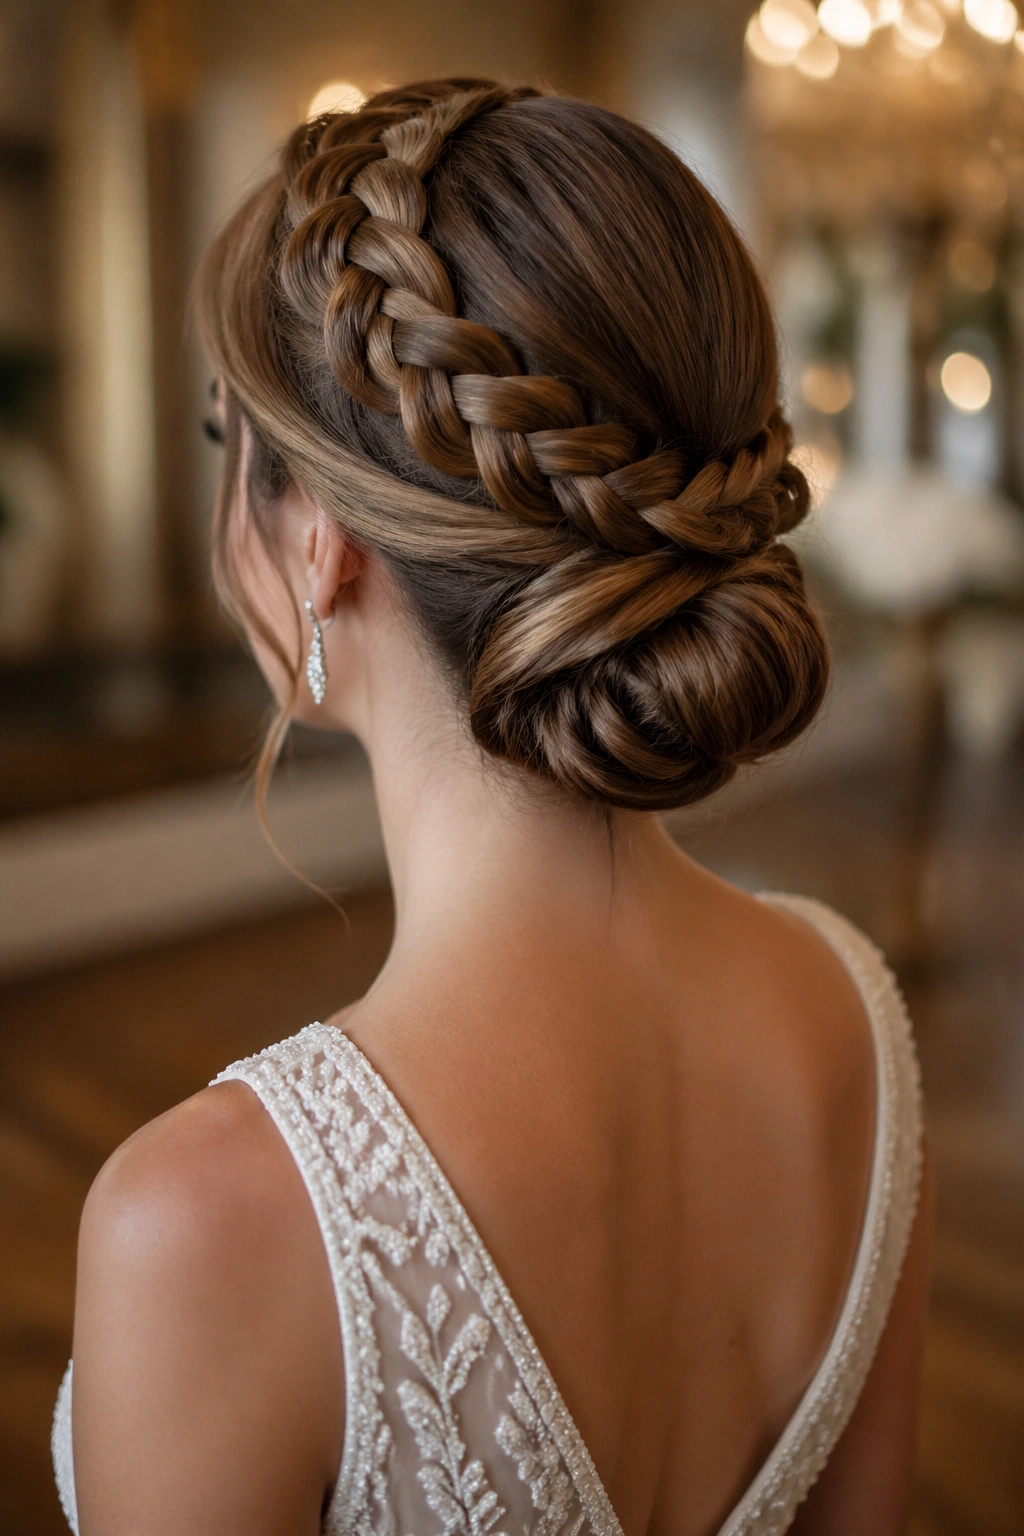
10. Double Braid Beehive
Two braids can look richer than one, especially when they’re crossed or stacked under a lifted crown. A double braid beehive has a bit of built-in drama, but it also solves a practical problem: more anchors mean a sturdier style. That makes it a smart choice for a long wedding day, when you know the hair has to survive sitting, standing, hugging, and dancing.
One braid can travel along the sides and meet at the back. The other can sit higher, almost like a frame under the beehive. The shape feels more complex, but the effect is still clean if the sections are even and the crown is smoothed well.
How it differs from a single braid
- It gives more texture around the head
- It keeps the back from looking empty
- It works well with heavy veils
- It can make fine hair look fuller
The double-braid version is a little more time-consuming, but it pays off in the photographs.
11. Fishtail Beehive Wedding Updo
A fishtail braid brings a finer, more detailed texture than a regular plait. That’s useful when you want the beehive to feel vintage but not rigid. The tiny woven look of a fishtail can make the whole style feel a bit richer, especially if the dress is simple and needs one strong hair detail to balance it.
The crown still needs lift. Don’t skip that. A fishtail alone won’t give you the 1960s reference unless the top has some rounded height. Once the base is shaped, the fishtail can run down into a bun or wrap around the back like a long, polished tail.
This one loves soft shine. A little serum on the ends is enough. Too much, and the braid loses that crisp woven pattern that makes it special.
12. Rolled Bangs and Braided Back
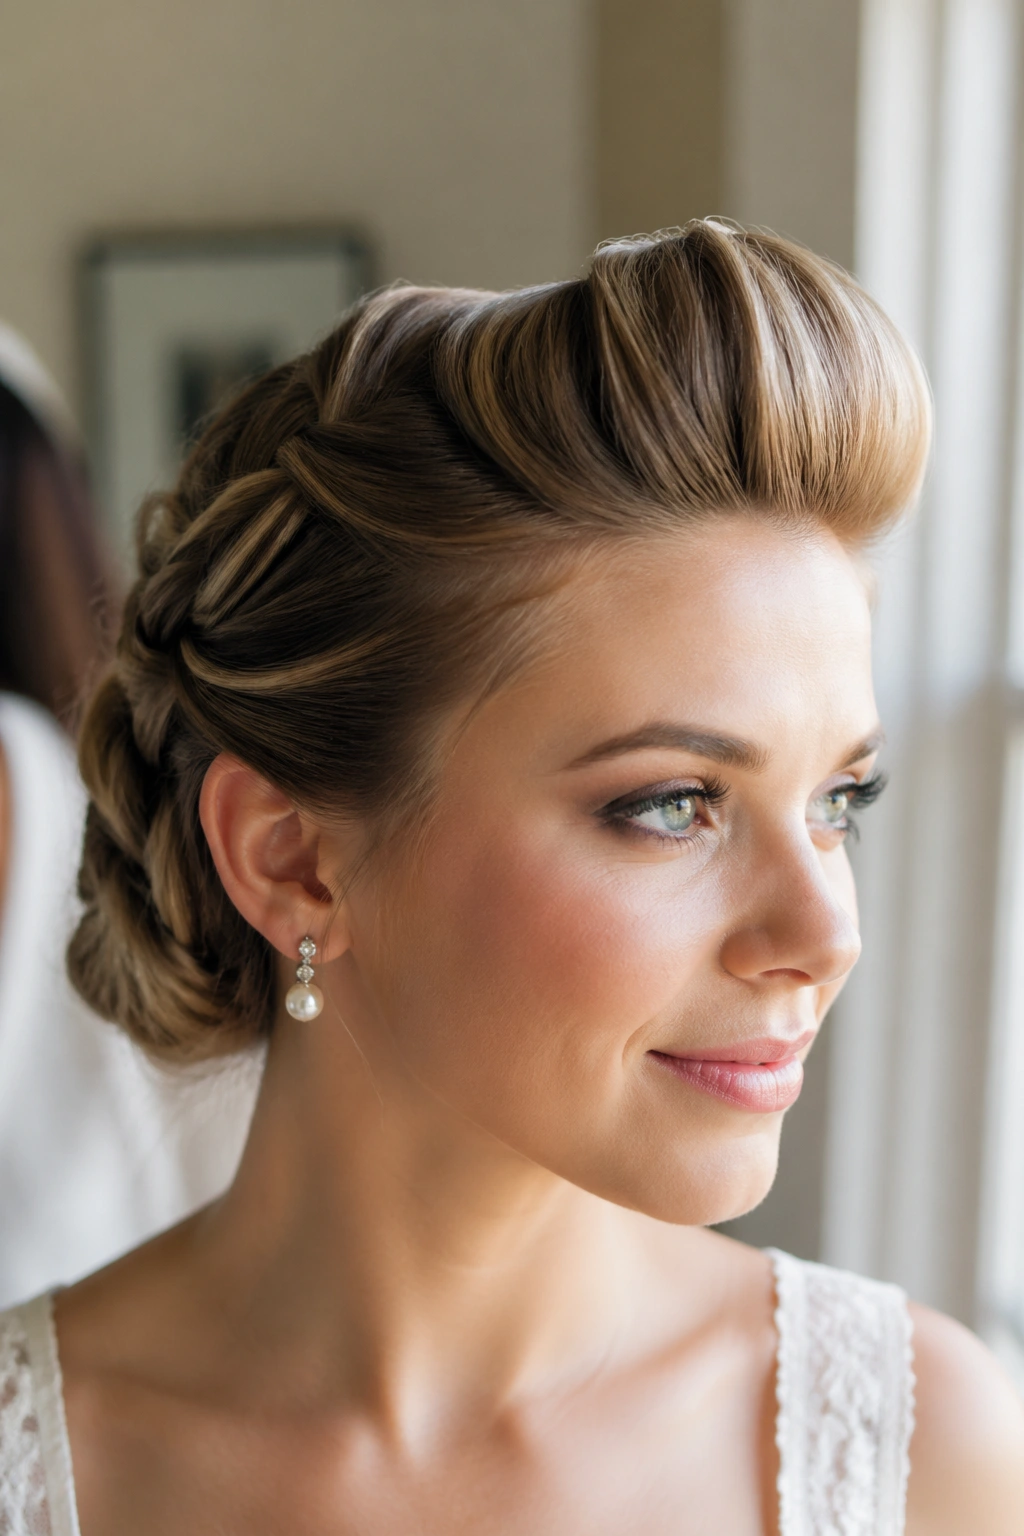
If the bride has bangs, this one deserves attention. Rolled bangs or a soft pompadour at the front can anchor the whole style and give it a strong 1960s profile. The rest of the hair is braided toward the back, where it can be tucked into a bun or twist.
It’s a smart option for anyone who wants the retro nod to be obvious from the front. The rolled section should feel smooth and rounded, not crunchy. The braid behind it can stay fairly simple, because the front is already carrying plenty of character.
Best details to ask for
- A front roll that rises 1 to 2 inches
- A braid that starts just behind the crown
- Pinned ends hidden under the back section
- Light polish near the hairline, not a helmet finish
This look has a little pin-up energy, but it reads bridal when the rest of the styling stays soft.
13. Beehive Ponytail Braid
A beehive ponytail braid is for the bride who wants retro shape without a full updo. The crown still gets height, but the back stays in a lifted ponytail before it’s braided. That keeps the style lighter and a little more relaxed, which can be a good thing if the dress is already formal.
This is one of the most wearable versions for a long celebration. It feels secure, it moves well, and it doesn’t trap heat at the nape the way a dense bun sometimes does. If you want to show off long hair while still nodding to the 1960s, this one lands nicely in the middle.
A curled ponytail braid looks especially good with cat-eye eyeliner and a simple hair accessory. That combination has a very clean line.
14. Rope-Twist Beehive With a Cathedral Veil
Rope twists are a little sleeker than braids, which makes them handy for brides who want less texture and more shine. When they’re paired with a lifted crown, they still give off that beehive shape, but the finish feels smoother. That’s a strong choice for a cathedral veil, because the style stays visible without getting crowded.
Thick hair usually holds rope twists well. Fine hair can wear them too, but the sections need a touch of backcombing or a small hidden pad at the crown so the whole shape doesn’t go limp. I like this version when the dress has long, vertical lines — the twist echoes that length in a quiet way.
The main reason it works
The rope twist creates a tidy line that won’t fray as quickly as a very loose braid. That makes it useful for outdoor ceremonies, windy venues, or long church aisles where the hair needs to stay controlled.
15. Soft Beehive With Face-Framing Waves
Some brides want the reference without the stiffness. A soft beehive with face-framing waves gives you that. The crown is lifted, but the front pieces are left loose and waved, which softens the profile and keeps the look from feeling too severe. It’s a lovely option when the dress is romantic rather than structured.
The key is restraint. Too much teasing and the style starts to look dated in the wrong way. A gentle bump at the crown, smooth sides, and a braid or twisted back section are enough. The waves near the face should be brushed out just enough to feel airy, not fluffy.
This version is forgiving too. If the weather turns damp or the hair relaxes a bit during the day, the look still holds its shape.
16. Side-Part Beehive With a Braided Headband
A braided headband can do more for a 1960s wedding look than people expect. It adds structure at the front, gives the eye a place to land, and keeps a side part from feeling too plain. The rest of the hair can be swept back into a beehive shape or braided into a low twist, depending on how much volume you want.
This style is especially good if you plan to wear statement earrings. The headband braid frames the forehead and temples, so the earrings get a clean space beside the face instead of fighting stray pieces. It also works well with a short veil or no veil at all.
Where it shines
- With a bateau neckline
- With big pearl earrings
- With a sleek sheath dress
- With hair that tends to fall flat at the front
It’s not the loudest option here, but it’s one of the smartest.
17. Braided Crown and Low Bun Hybrid
A braided crown leading into a low bun gives you the best kind of compromise. The top has height and interest. The back stays compact. The braid acts like a frame, almost like a built-in headpiece, and the bun keeps the shape neat from every angle.
This one is good for brides who want the 1960s shape but don’t want the crown to sit too high. It’s also a nice fix for hair that loses volume quickly, since the braid helps disguise the transition into the bun. If your dress has a dramatic back, this style lets the fabric stay visible instead of disappearing behind a bigger updo.
The bun can be smooth or slightly textured. I prefer a little texture, because it keeps the style from feeling too formal.
18. Pearl-Pinned Minimal Beehive Braid
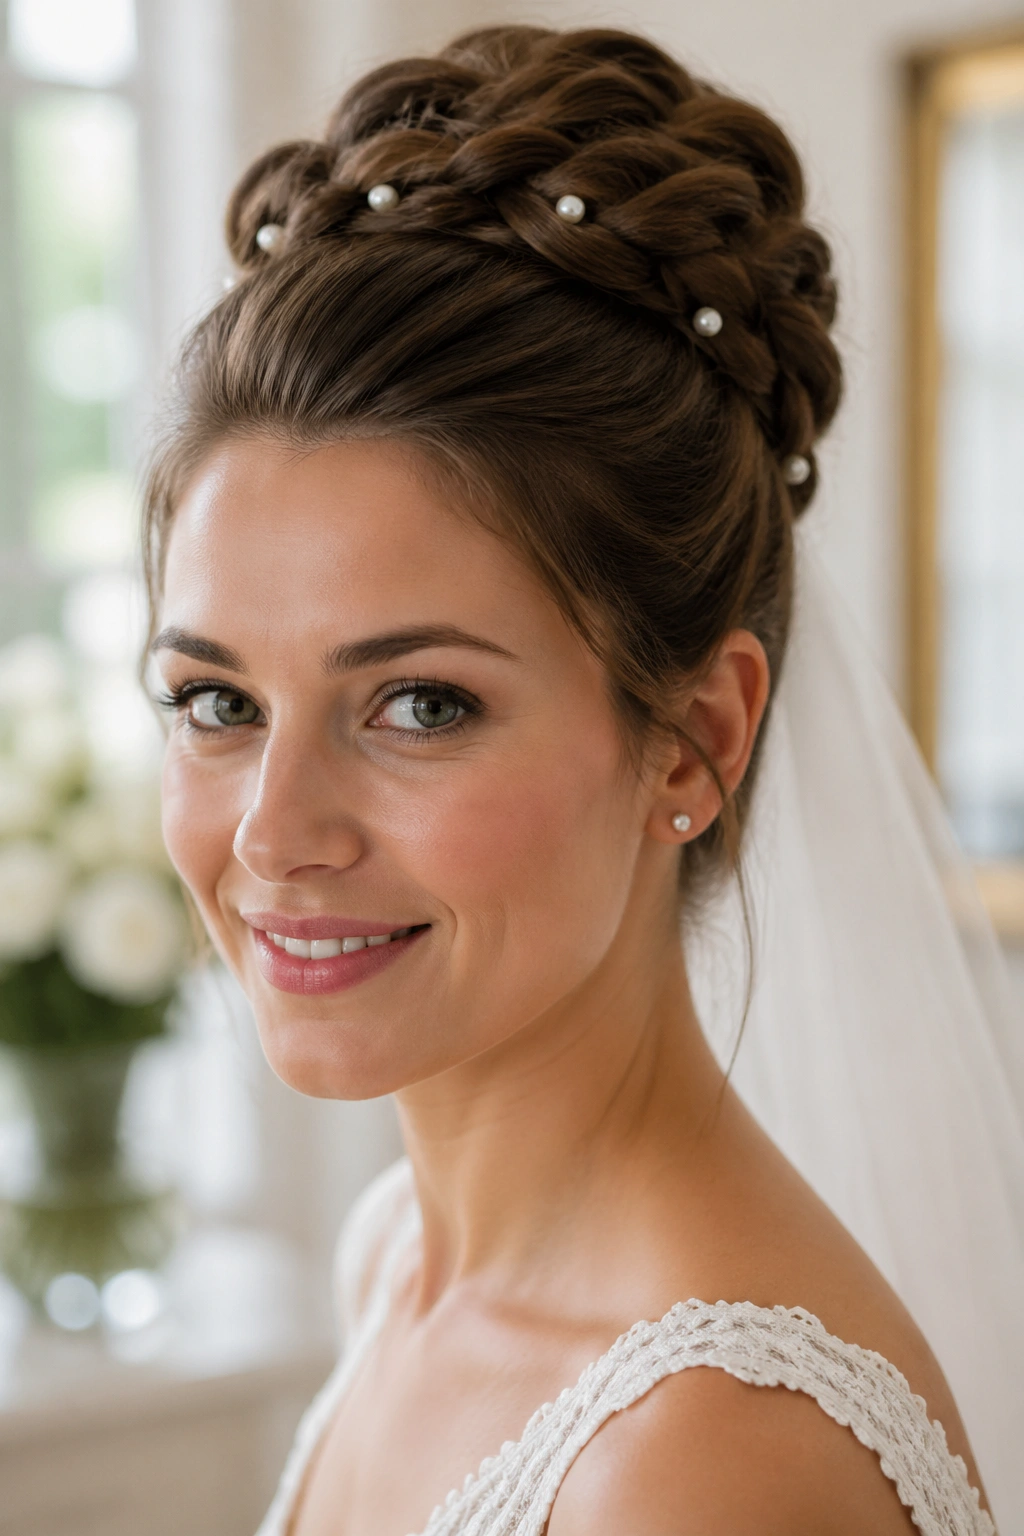
Not every retro bridal look needs to be big. A minimal beehive braid with pearl pins is proof. The crown lift is modest, the braid is sleek, and the decoration comes from a few well-placed pins instead of a full tiara. That makes the style feel clean, polished, and very wearable.
The important part is placement. One pearl pin can disappear. Three or four, spaced deliberately along the braid or around the bun, create a tiny rhythm that reads well in photos. More than that starts to crowd the shape. Keep the braid smooth and let the pearls do the quiet work.
Tiny details that matter
- Use pins in matching pearl sizes, not a random mix
- Place them where the braid curves, not on a straight line
- Keep the beehive lift modest, around 2 inches
- Pair with a simple veil or no veil at all
This is the style for a bride who wants vintage charm without the volume.
19. Faux Beehive Braid for Short Hair
Short hair does not disqualify you from a beehive braid wedding look. It just changes the tools. A faux beehive braid can be built with padding, tucked ends, and, if needed, a small braid extension or chignon piece. The crown gets lifted first, then the braid is created with whatever length the hair can give you, and the rest is pinned invisibly into shape.
This is the one I wish more brides knew about. A bob, a lob, or shoulder-length hair can all work if the base is sturdy enough. The trick is to keep the illusion believable: the front should still have that rounded 1960s lift, and the braid should sit close to the head so the shape feels cohesive instead of pasted on.
If you’re wearing short hair for your wedding, this kind of style can be a lifesaver. It gives you the retro line, the bridal polish, and enough security that you’re not worrying about loose layers every ten minutes. And really, that’s the point.