There are days when clean hair behaves like silk ribbon and refuses to stay in place for five seconds. That’s when undone messy braids earn their keep. They make a flat, tired head of hair look deliberate, and they do it without asking for a blowout, a curling iron, or a long staring contest with the mirror.
I’ve always liked braids that look touched, not staged. A little bend in the strand, a few flyaways around the temples, a loose loop at the nape — that’s the sweet spot. Freshly washed hair can be slippery and hard to control, while day-old hair usually has enough grip to hold shape without turning into a fuzz ball.
The real trick is picking the right braid for the job. Some styles hide greasy roots. Some keep hair off your neck. Some soften awkward layers that never seem to sit where they should. And a few are just there to make you look like you tried harder than you did.
So if your hair is doing that thing where it looks fine enough from a distance and annoying up close, good. That’s exactly the kind of day these braids are made for.
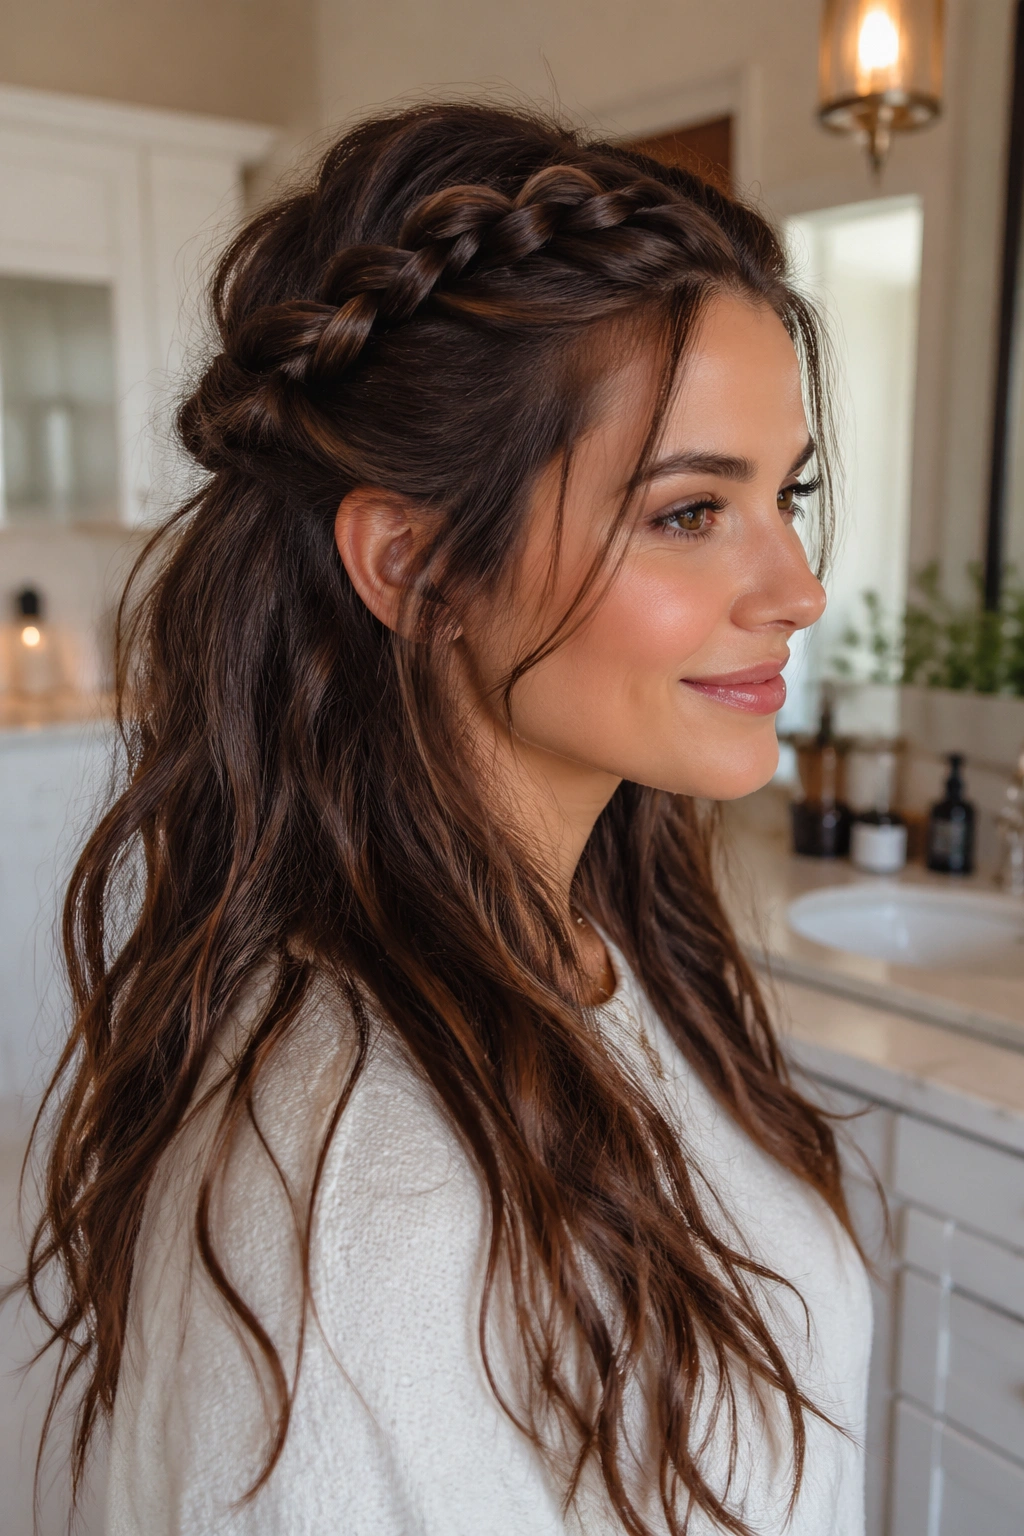
1. Loose Side Braid With Face-Framing Pieces
A loose side braid is the one I reach for when I want my hair to look a little romantic without acting precious about it. It works best when you start low, over one shoulder, and leave two thin pieces near the face so the whole thing feels softer. The braid can be a simple three-strand plait or a fishtail if you want more texture. Either way, the shape lands in that easy place between polished and half-done.
Why It Works
The side position does most of the work. It keeps the braid visible, which matters more than people think, and it gives the style a relaxed slope instead of a stiff straight line down the back. That little angle makes the braid feel less formal right away.
Best on hair that has a bit of bend. Straight hair can still do it, but waves help the braid hold its shape after you loosen the loops. If your ends are a little dry or frizzy, even better. That rougher texture keeps the braid from slipping apart before lunch.
A quick pass of texturizing spray through the mids and ends helps, but don’t drench the roots. You want grip, not helmet hair. Pull the braid apart with your fingertips after securing it, then tug a few pieces loose around the temples and jawline.
Tiny detail, big payoff: start the braid just behind the heavier side of your part. It keeps the front from collapsing as the day goes on.
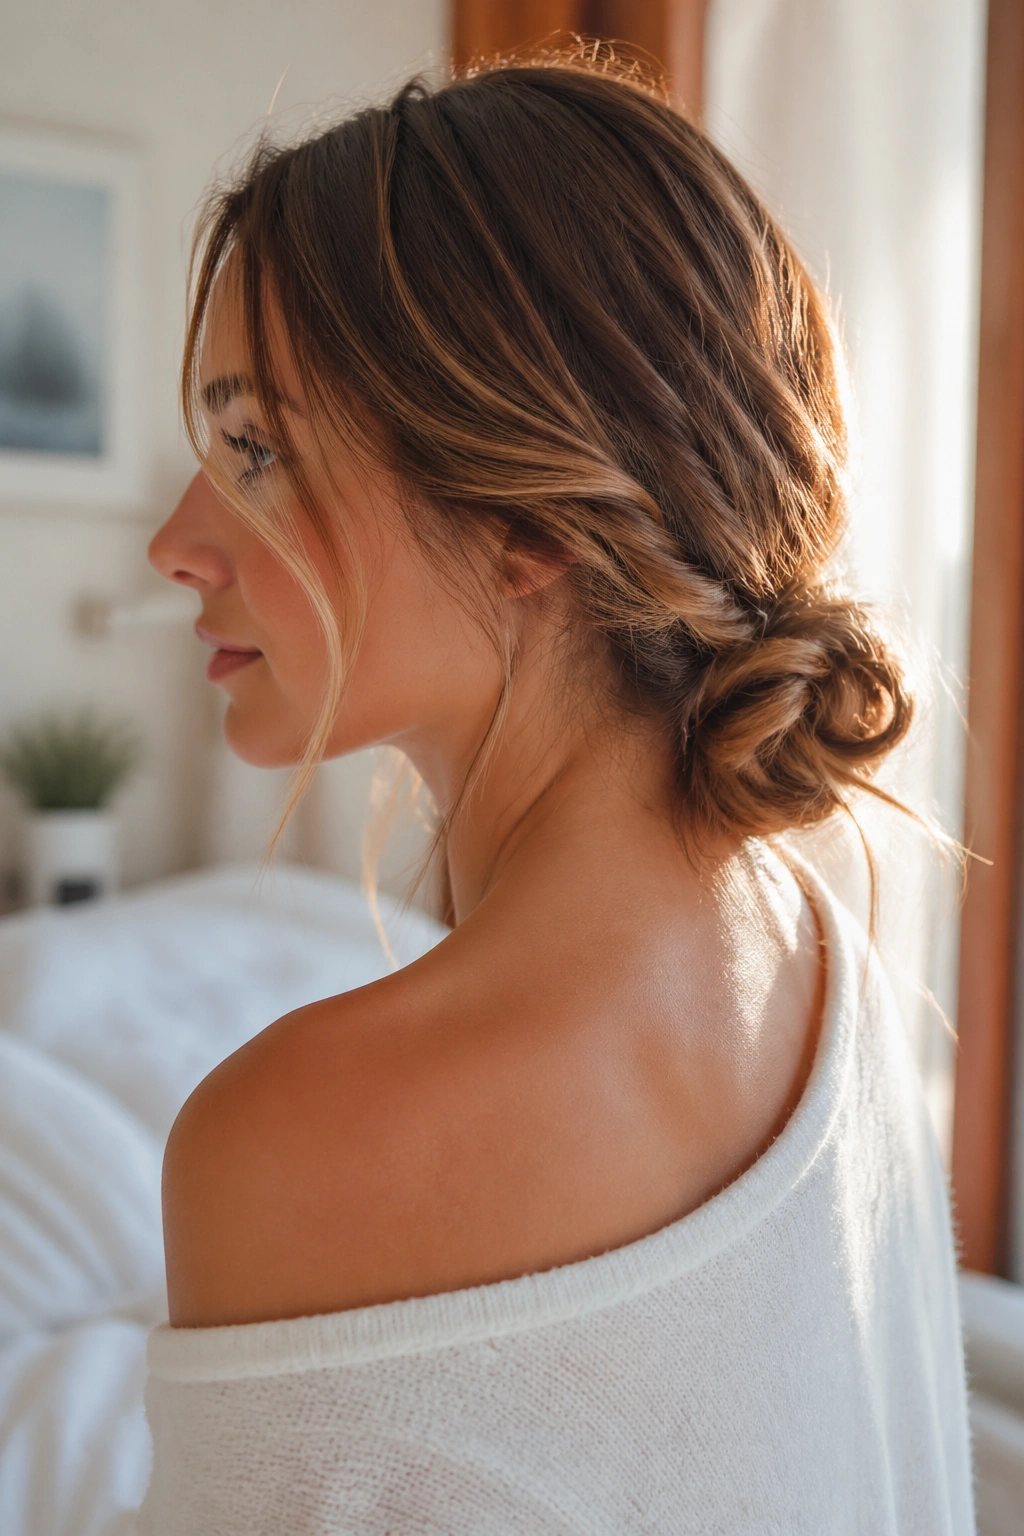
2. Half-Up Messy Braid That Saves Greasy Roots
This is the style I recommend when the roots look flat but the ends still behave. A half-up messy braid pulls the top section away from your face, which buys you a cleaner look without forcing you to deal with every strand on your head. It’s fast, forgiving, and one of the few styles that looks better when you stop fussing with it.
The nice part is that the bottom half can do whatever it wants. Soft waves, natural curls, straight lengths with a few bends from sleep — none of that ruins the braid. In fact, the contrast is the point. A slightly messy braid at the crown and loose hair below reads as intentional in a way that a fully controlled style sometimes doesn’t.
I like to braid from the temples back toward the crown, then stop before the braid gets too tight. Tie it with a small elastic, pinch the outer loops a little, and let the ends disappear into the rest of the hair. If your hair is layered, leave the shorter pieces alone. They’ll fall where they fall.
This style is also one of the best lazy hair day fixes for second-day hair because the crown gets the shape, while the ends stay easy.
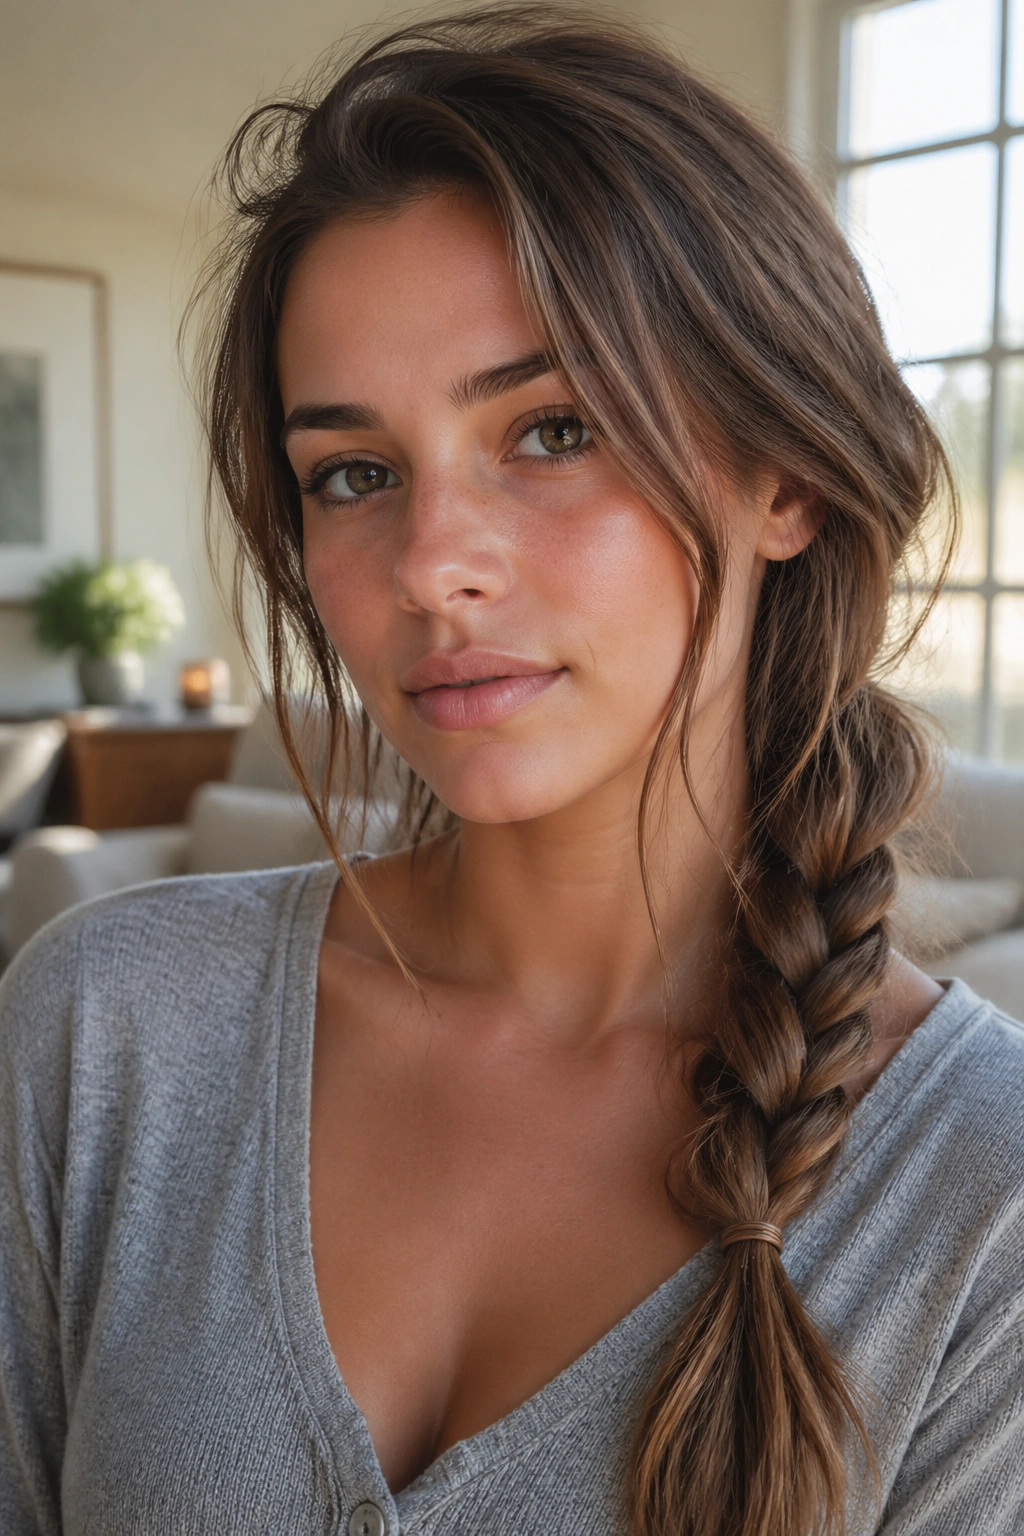
3. Fishtail Braid That Looks Harder Than It Is

Why does a fishtail braid always look like more effort than it actually takes? Because the tiny sections create detail fast. Even when the braid is loose and rough around the edges, people still read it as intricate. That makes it one of the best messy braids for days when you want a little drama and very little work.
The braid itself is simple: split the hair into two sections, take a small piece from the outside of one side, cross it over, then repeat on the other side. The smaller the pieces, the more detailed it looks. The larger the pieces, the more casual it feels. I usually go somewhere in the middle because tiny, perfect fishtails can look a bit precious.
How to Wear It
A low fishtail at the nape feels the most relaxed. A side fishtail is softer and easier to tug apart. A half-up fishtail is the sneaky option if you want the look of effort without giving up the rest of your hair.
- Pull the braid apart after you secure it.
- Leave the ends a little uneven.
- Use a clear elastic if you want the braid to stay the focus.
- Don’t over-smooth the top; a little texture keeps the style from looking stiff.
One good tug is enough. If you keep pulling every section, the braid turns puffy instead of airy.
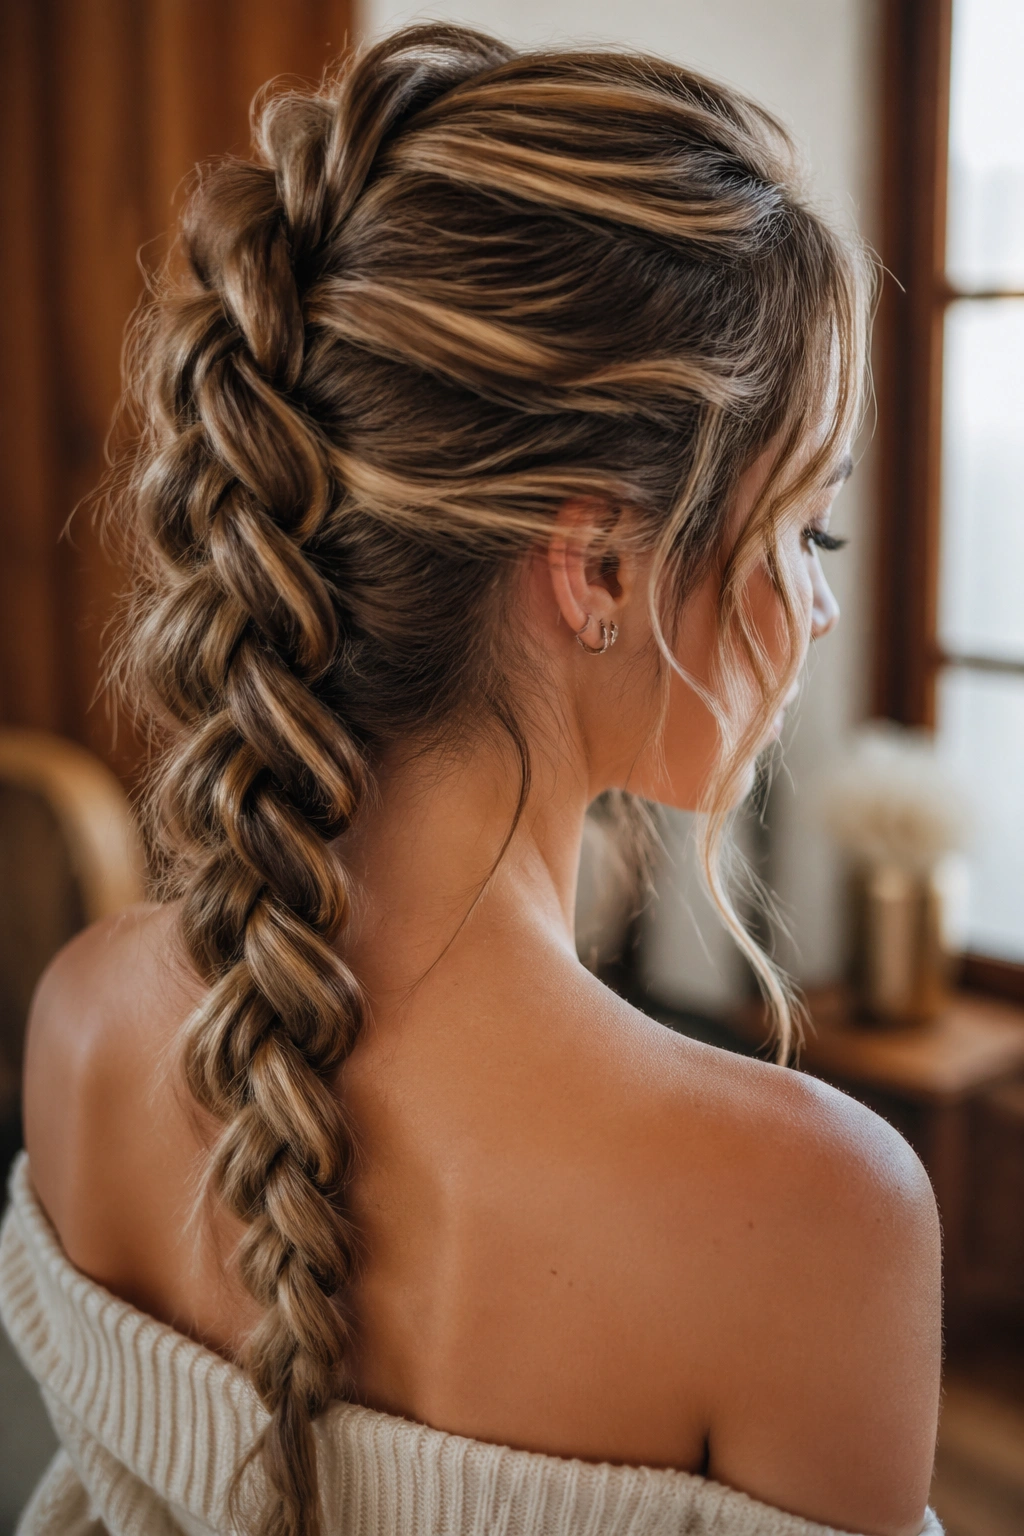
4. Pull-Through Braid For Hair That Won’t Hold a Plait
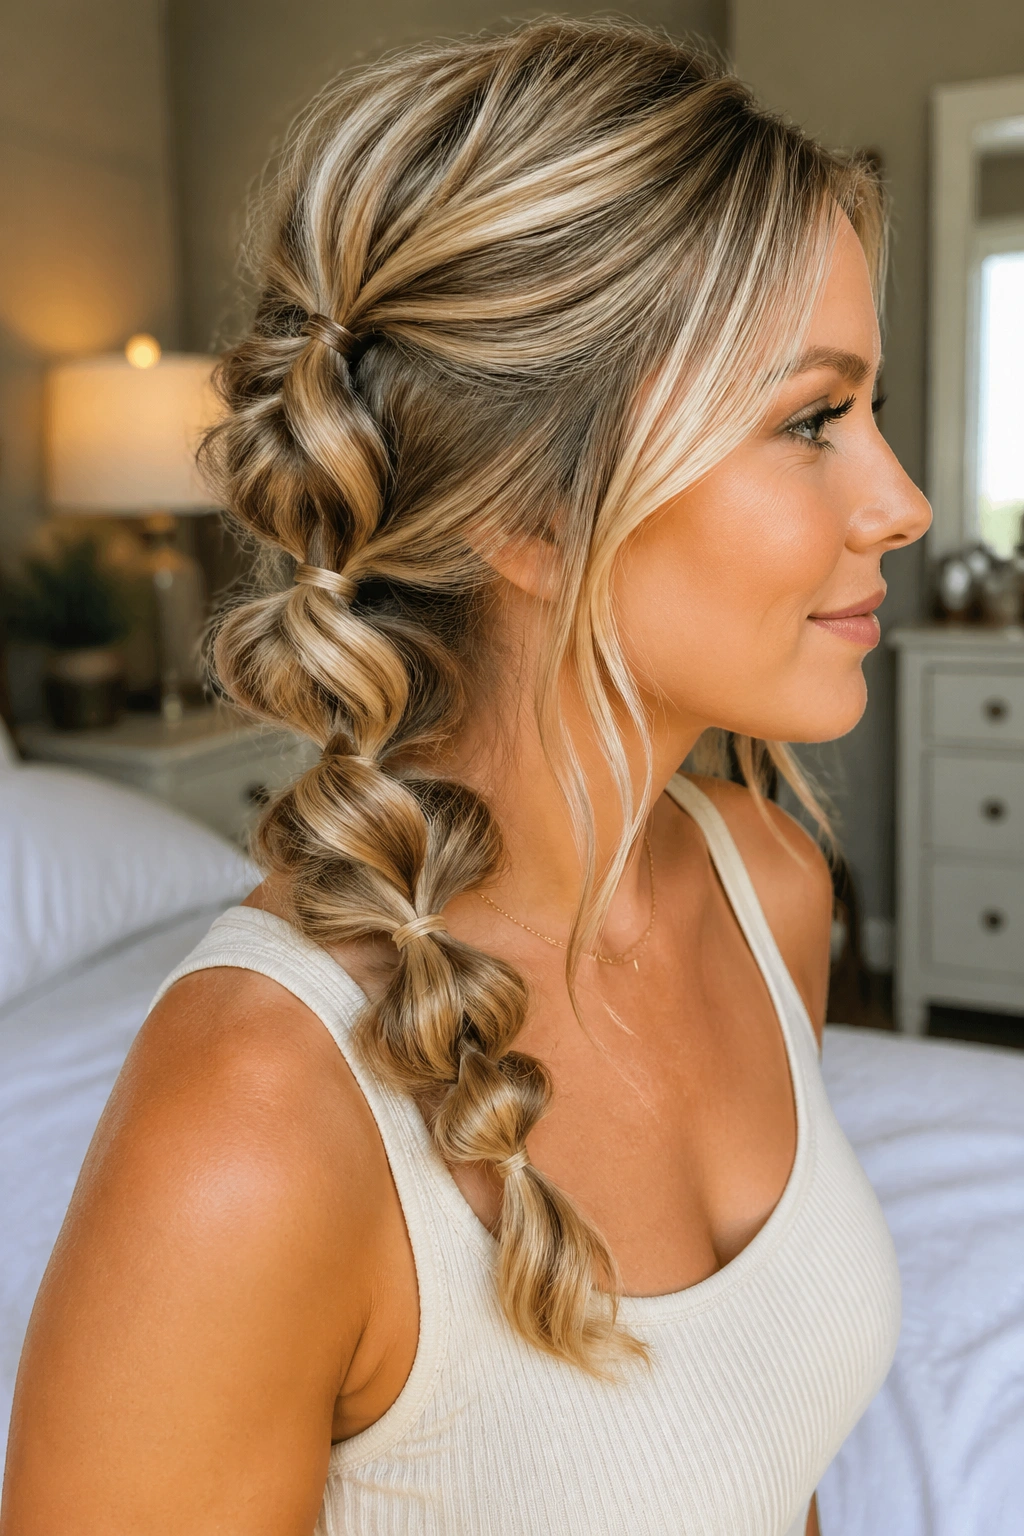
I reach for a pull-through braid when regular braids keep sliding out or the sections look too thin to feel satisfying. It sounds complicated, but it’s really a chain of tiny ponytails stacked on top of each other. The result is thick, full, and a little messy in the best way. Perfect when your hair is fine, long, or both.
The mechanism is simple. You make one ponytail, make another just beneath it, split the top ponytail, and pull the lower one through. Then you repeat. Because the style uses elastics instead of tension alone, it holds shape better than a three-strand braid on slippery hair. It also gives you that chunky, roomy look without needing a lot of skill.
Quick Details
- Use 4 to 6 small elastics for medium-length hair.
- Start with two tight mini ponytails at the crown if you want more lift.
- Keep each loop loose before tugging it wider.
- Wrap a small strand around the final elastic if you want to hide it.
The best part is the finish. A pull-through braid doesn’t need to be neat to look good. In fact, if every section is perfectly even, the style can feel a little stiff. A few uneven loops give it shape and keep it from looking too neat for a lazy day.
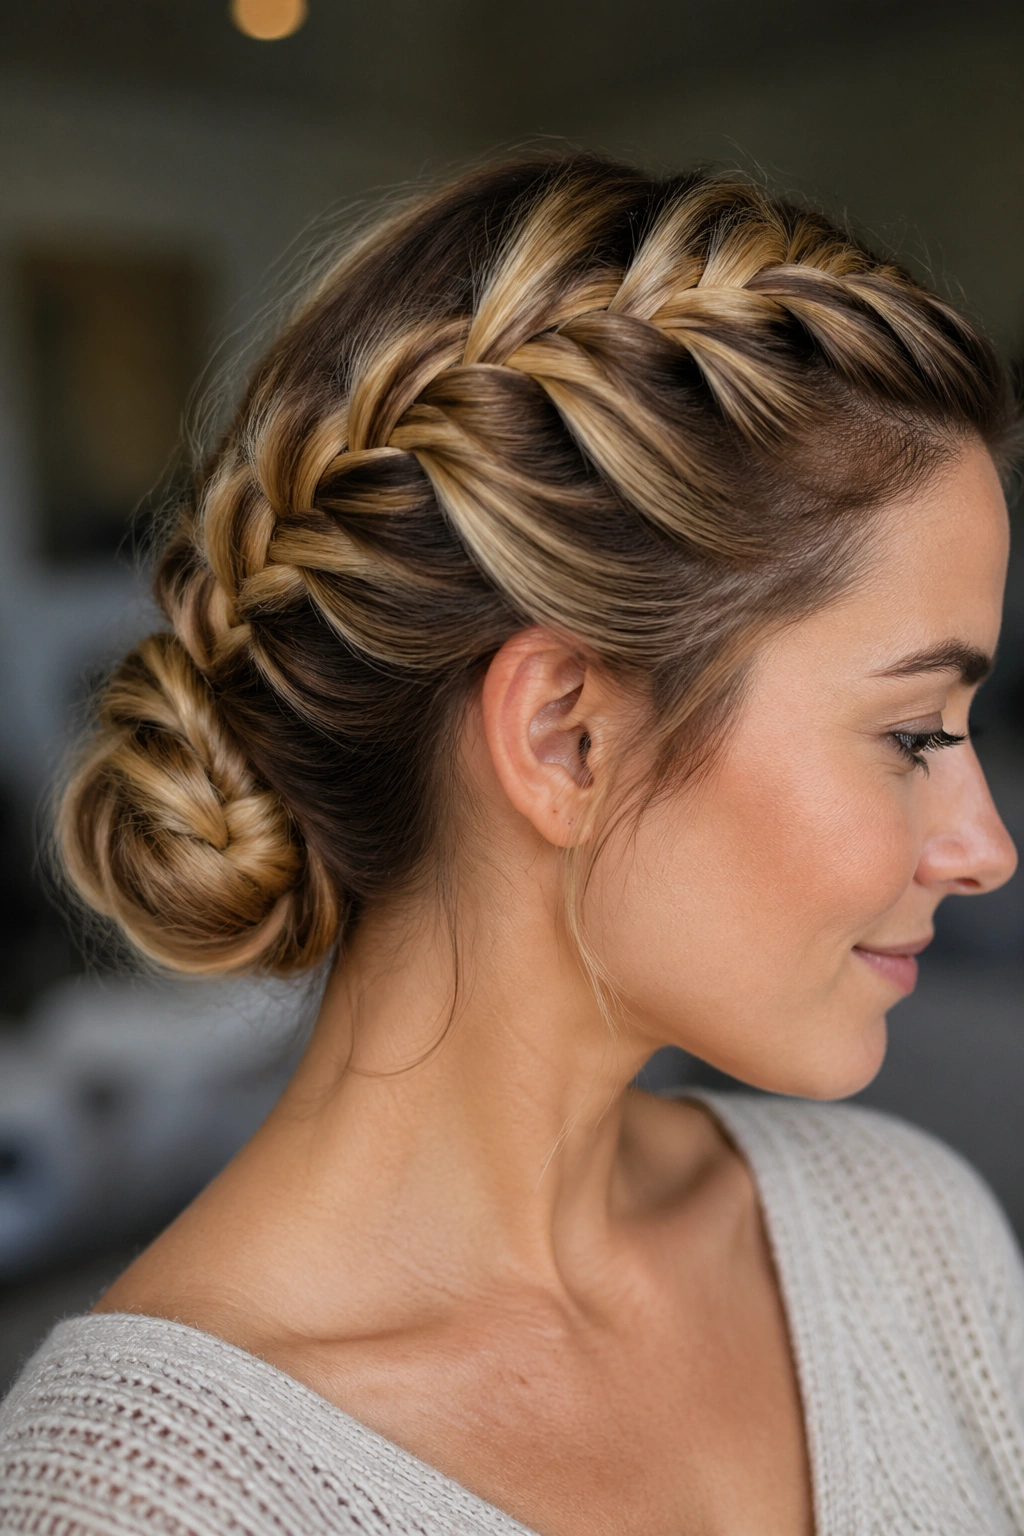
5. Messy French Braid That Stops at the Nape
A French braid that stops at the nape is one of those styles that quietly does a lot. It keeps hair off your face, lifts the crown a bit, and still leaves you with a loose finish that doesn’t feel overworked. I like it because it starts with enough control to look intentional, then loosens into something softer as it goes down.
The key is not braiding too tightly at the top. Use your fingers instead of a comb when you divide the sections, and feed in hair with a gentle hand. A tight French braid can look severe fast. A looser one gives the face a bit of space and lets the texture show through, which is the whole point here.
Once you reach the nape, stop adding hair and finish with a normal braid for a few inches. Tie it off, then pull at the outer edges so the middle line doesn’t look too narrow. If you have layers, some pieces will escape. Good. That’s not a flaw; that’s texture doing its job.
The style works especially well on medium hair that falls right around the shoulders, because the braid has enough length to show off without getting swallowed by the rest of your hair.
6. Crown Braid With Soft Ends
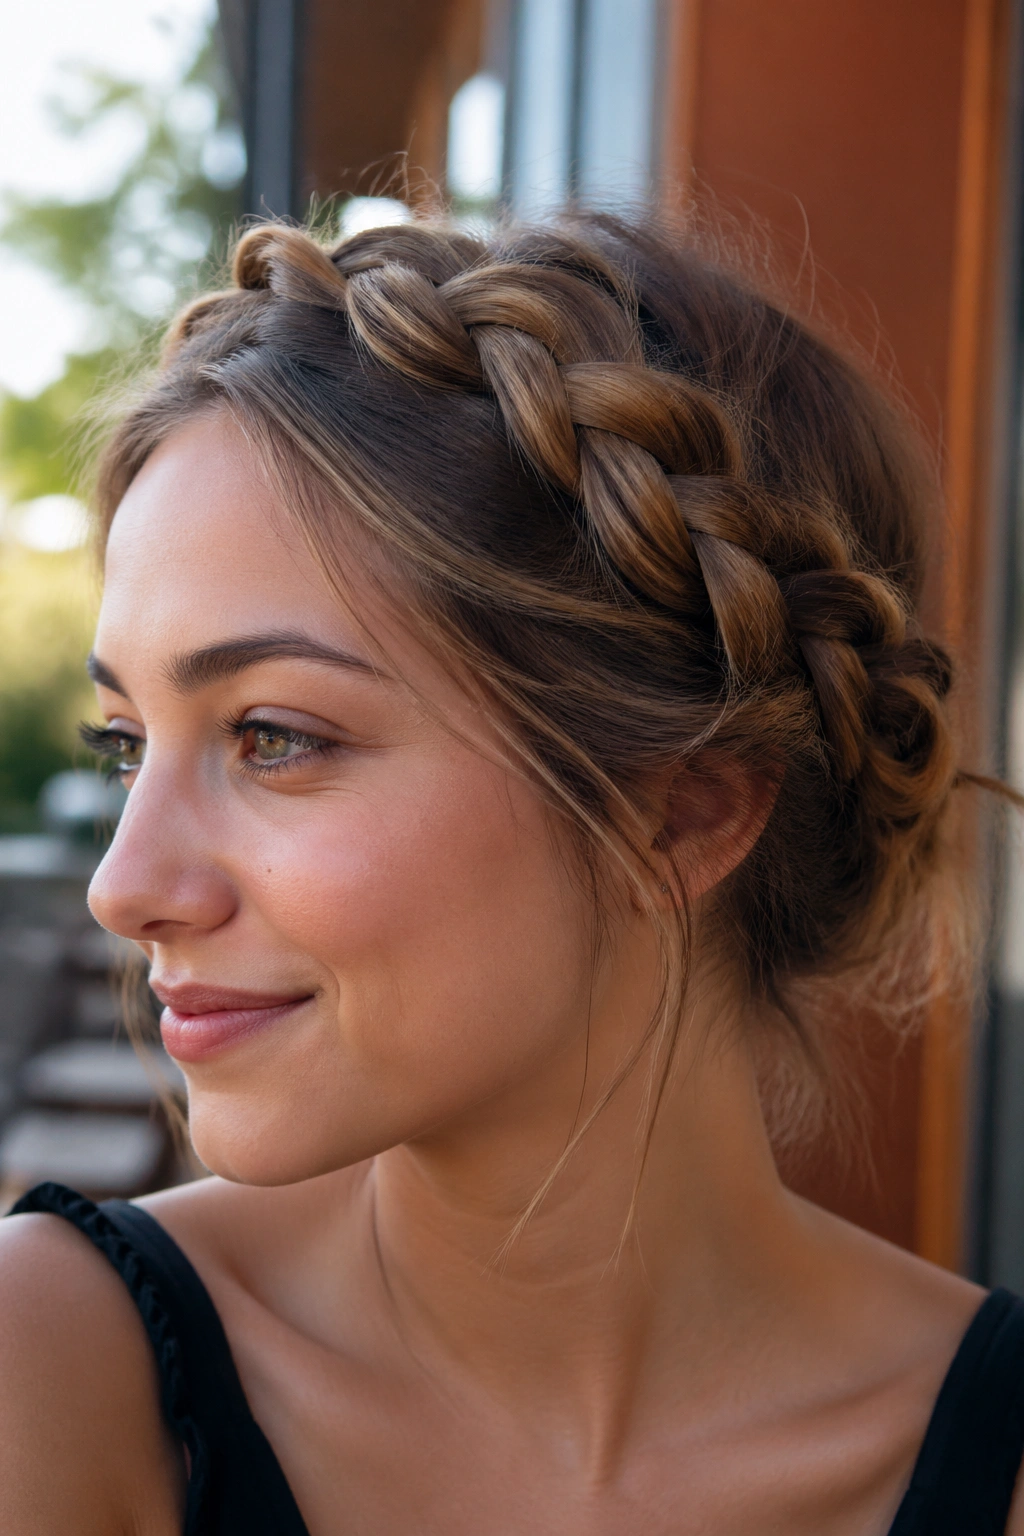
A crown braid looks different from a milkmaid braid the second you loosen it. The shape still wraps around the head, but the finish is gentler, with less of that pinned-back severity people sometimes worry about. I prefer this version because it feels wearable, not costume-y.
Unlike a tight halo braid, the soft crown braid doesn’t need every strand tucked away. Leave a few ends peeking out near the back and pull the braid wide after you pin it in place. That gives the style a fuller edge and stops it from sitting too flat against the scalp. If your hair is thick, that looseness also takes some pressure off the pins.
Who It Suits
This is a smart choice for medium to long hair, especially if you want everything off your neck. It also works well when the hair has a little natural wave, because the texture helps the braid merge into the rest of the style instead of standing apart from it.
- Use 4 to 6 bobby pins to anchor the braid.
- Tuck the end under one side and leave a few wisps free.
- Keep the braid one finger-width looser than you think you should.
- If your part is dramatic, let it show; it adds shape.
My favorite version is the one that looks a little weathered, like you’ve already worn it for an hour and it settled into place on its own.
7. Rope Braid Ponytail With A Loose Wrap
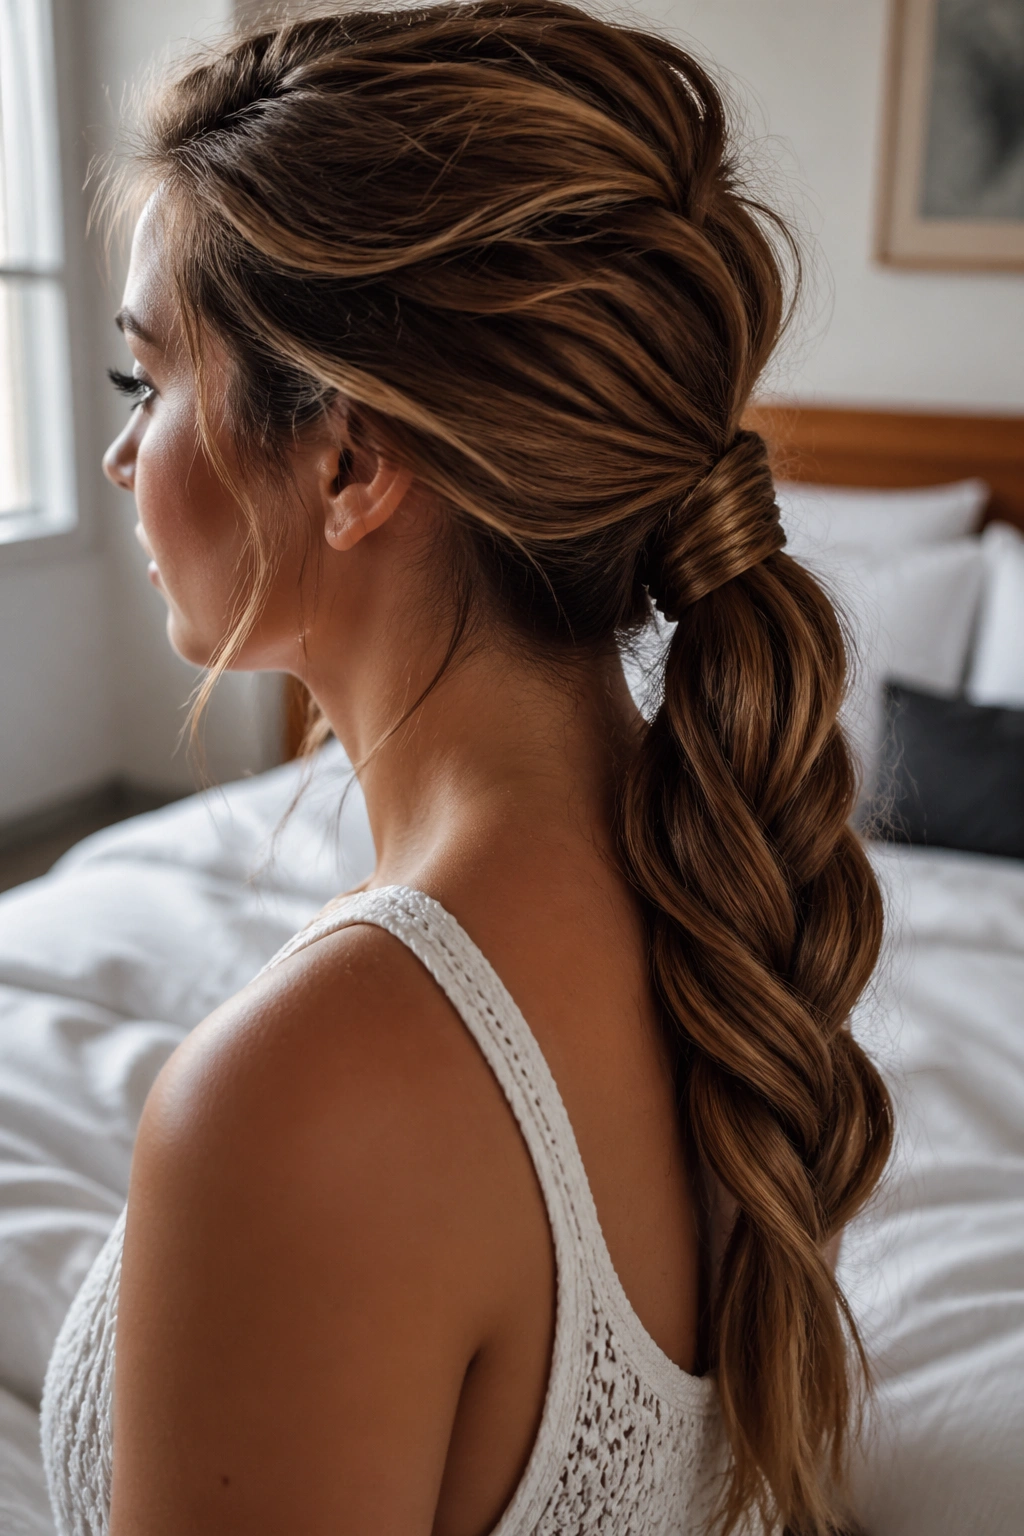
The rope braid has a clean twist, but it still belongs on a lazy hair day because it asks less of your hands than a full braid does. You split the hair into two sections, twist each one in the same direction, then cross them together in the opposite direction. That pattern gives the braid a neat spiral without needing much sectioning.
What I like most is how it behaves at the ends. If you stop twisting before the very tips and then tug the braid apart a little, it picks up that undone look fast. A rope braid also stays tidy better than a loose three-strand braid when your hair is especially slippery, which makes it a smart option for straight textures.
Best On Hair That
- Falls flat at the roots and needs a little shape.
- Is long enough to sit in a low ponytail.
- Has enough texture that the twist won’t unravel too fast.
- Needs the ends hidden with a strand-wrapped elastic.
Add a small wrap of hair around the base elastic if you want the ponytail to look more finished without making the braid itself more complicated. That tiny move matters more than people expect. It takes the style from “I tied my hair back” to “I made a choice.”
8. Twin Braids That Feel Grown-Up Again
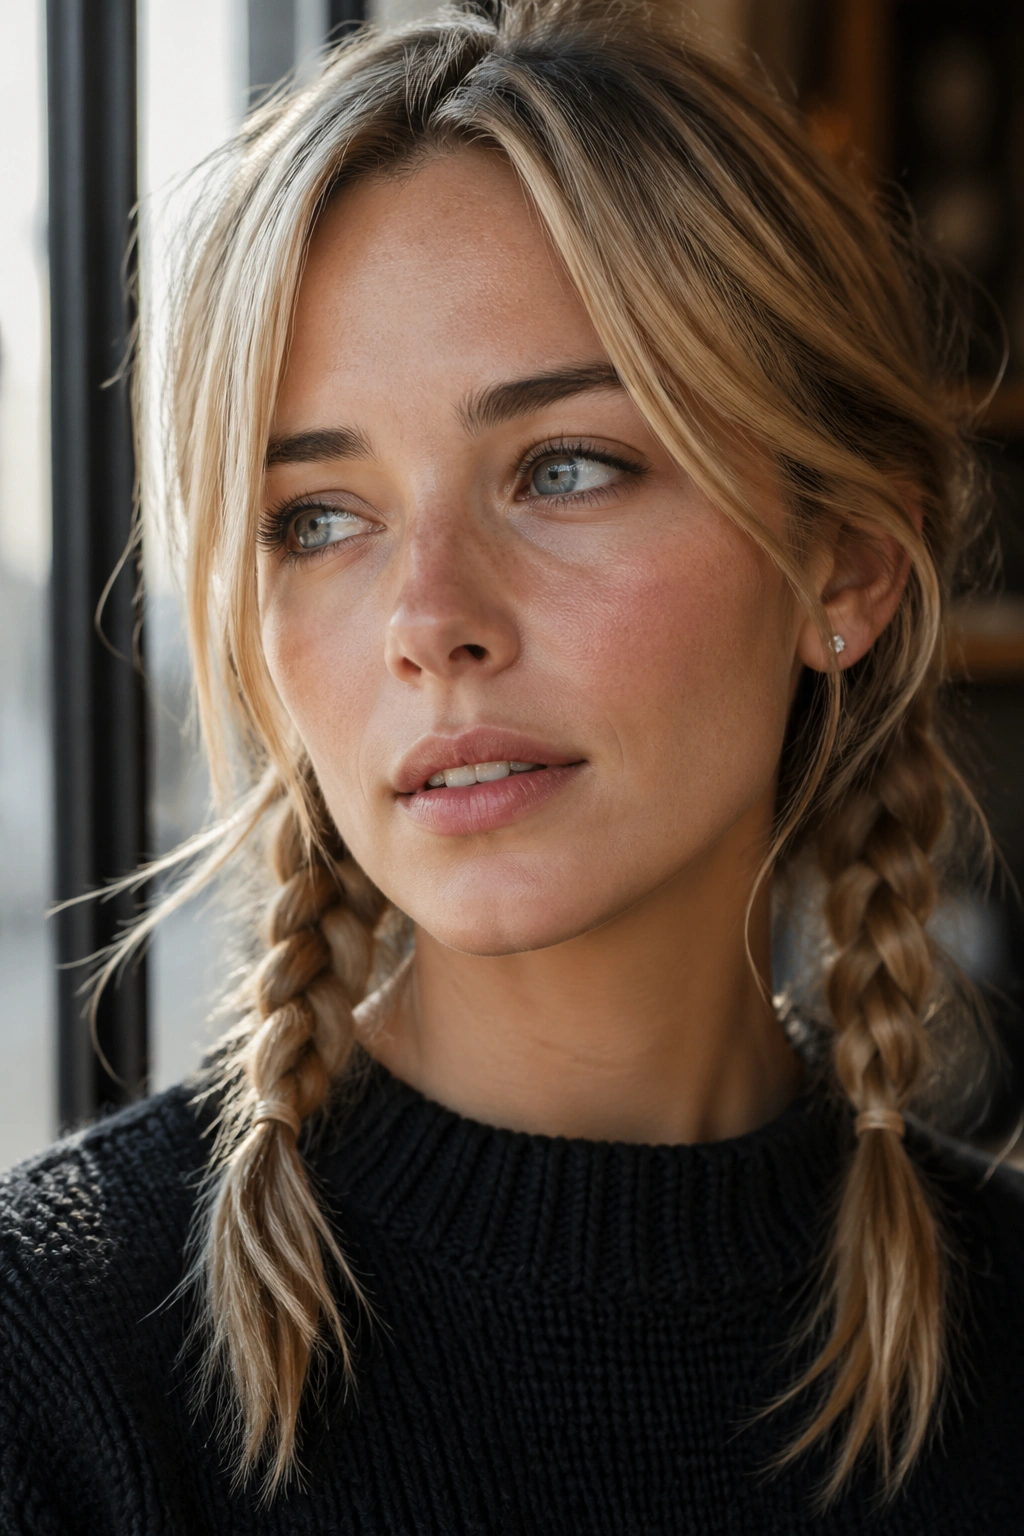
Two braids can look juvenile if they’re tight, shiny, and symmetrical in a school-uniform kind of way. Loosen them, drop them lower, and let the part drift a little off center, and the whole thing changes. Suddenly the style feels easy, a little cool, and much more useful for a day when you need hair out of your face.
The trick is not to over-perfect the parting. A center part can work, but I usually prefer one that’s slightly soft and not ruler-straight. After that, braid each side low and stop once you get past the ears. Pull the outer edges a bit wider, then let the ends sit a little uneven. It keeps the style from looking too neat.
This is one of those hairstyles that behaves better than it sounds like it should. If your hair is thick, the braids become heavier and stay put. If your hair is fine, they can look fuller once you tug them apart. And if your layers tend to escape everything, twin braids keep the shorter pieces contained without trapping the whole head in one solid shape.
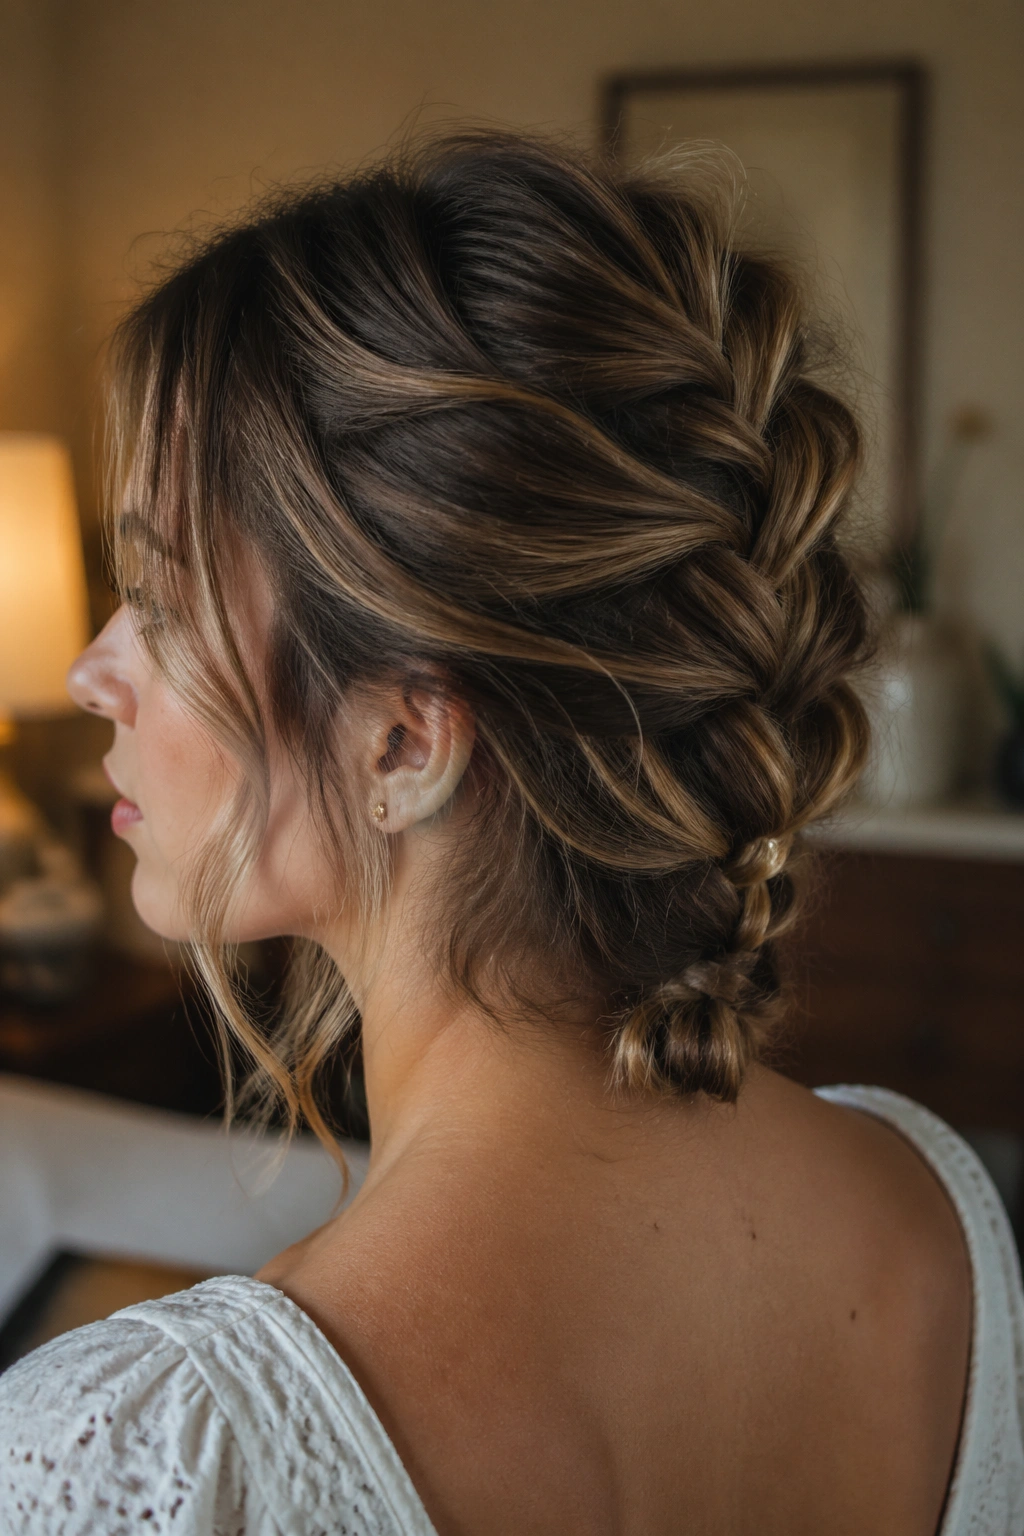
9. Dutch Braid Into A Low Bun
Need your hair off your neck in under ten minutes? A Dutch braid into a low bun does the job without pretending to be formal. The braid adds a raised line through the crown, then the bun keeps the length pinned up where it won’t bother you. It’s practical first, but it still looks styled.
A Dutch braid is basically the inside-out version of a French braid, which means the braid sits on top of the hair instead of sinking into it. That little bit of lift makes a big difference, especially if your roots are flat or your hair feels too soft to hold shape. Once you get to the nape, twist the remaining length into a low bun and pin it in place.
A Few Things That Help
- Keep the braid slightly loose so the bun has room to sit.
- Use one elastic at the nape before twisting.
- Pin the bun from two directions so it doesn’t droop.
- Pull a few strands around the face if you want it softer.
I like this style most on medium-to-thick hair because it has enough density to make the braid visible. Fine hair can still do it, but the bun may need one extra pin or a small claw clip hidden underneath.
10. Braided Headband For Bangs And Flyaways
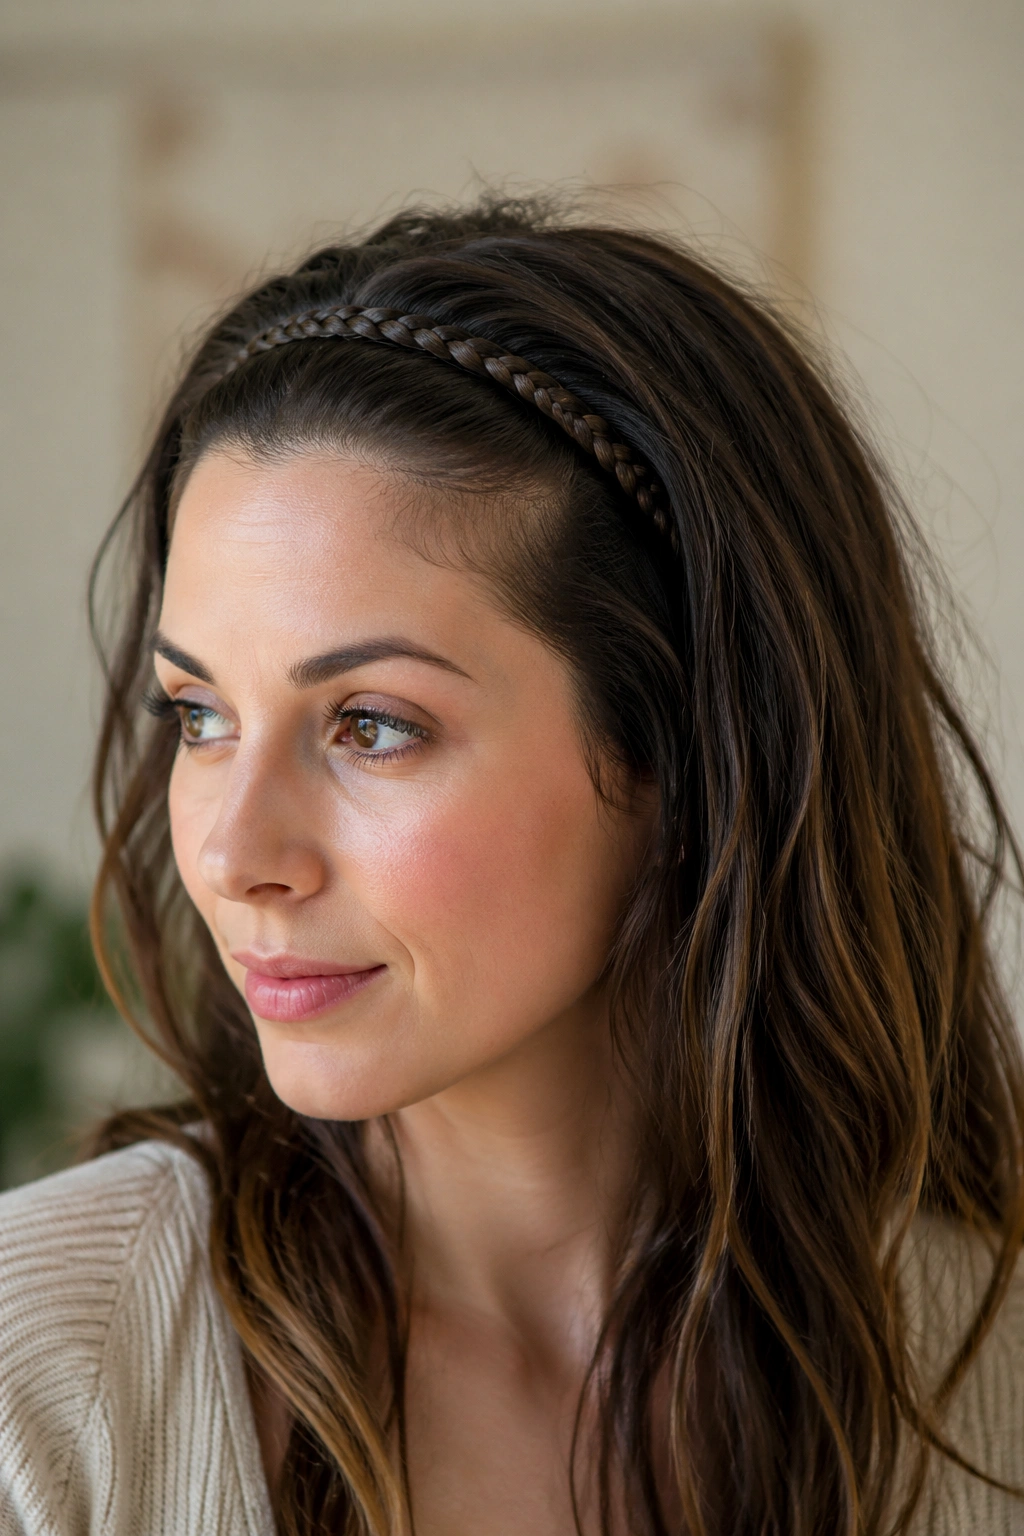
Some days the problem isn’t all your hair. It’s the front section. Bangs growing out, little frizzies near the hairline, short layers that refuse to stay back — a braided headband fixes that without forcing you into a full updo. It’s a small detail, but it changes the whole mood of the hair.
Take a narrow section near one temple, braid it backward along the hairline, and pin it behind the opposite ear. Leave the rest of the hair loose. That’s it. The braid acts like a built-in accessory and gives you a clean frame around the face while the rest of your hair stays soft and unbothered.
Where It Shines
- Growing-out bangs that keep falling into your eyes.
- Shoulder-length hair that doesn’t need a full braid.
- Curly or wavy hair where the front pieces need control.
- Days when you want to look awake without doing much.
The nicest part is the scale. Because the braid is small, you don’t need perfect symmetry. If one side is a little thicker than the other, it still works. In fact, that slight unevenness usually makes it look more natural.
11. Bubble Braid With A Woven Top
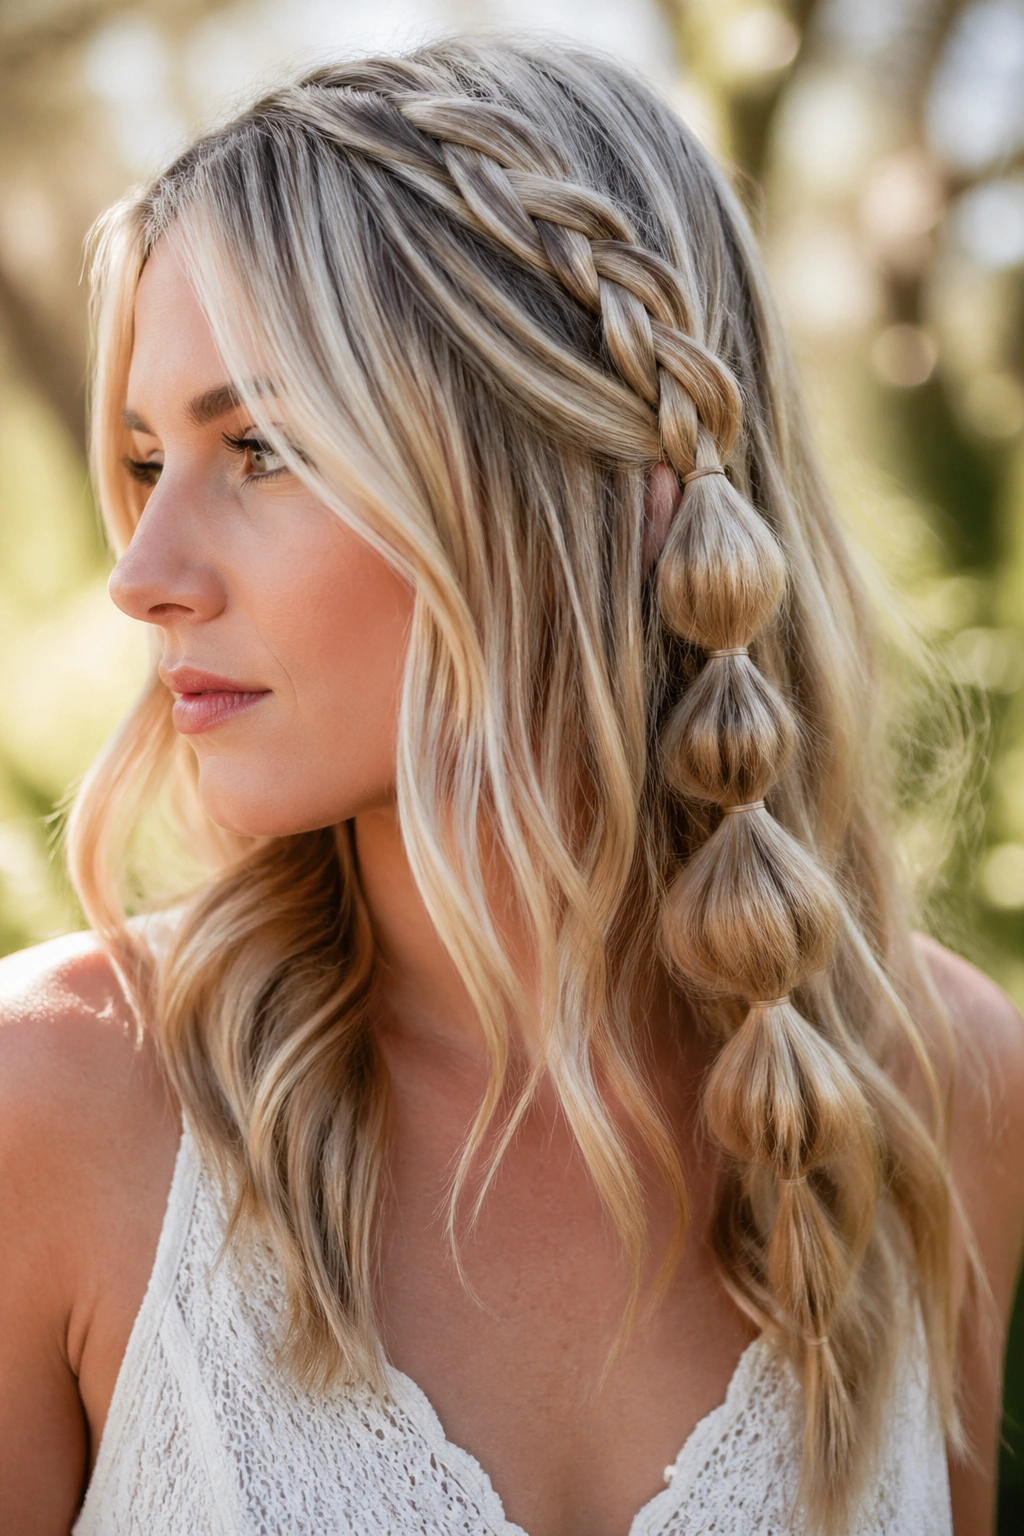
A bubble braid is not a classic braid, and I’m fine with that. It still belongs in this group because it gives you the same kind of low-effort, textured look that messy braids do, just with a different finish. The top can start as a small braid or twist, then the length turns into a series of puffed sections held by elastics.
Why do I like it? Because it looks fuller than a regular braid on hair that doesn’t like to stay woven. The bubbles create shape even when the hair is fine or a little flat, and they don’t demand the same finger control as a fishtail or four-strand braid. That makes it a good choice when you want something playful and don’t care if the sections aren’t all identical.
The trick is to place the elastics far enough apart — usually about 2 inches — so each bubble has room to round out. Then pull gently at the sides of each section. Not too much. You want soft volume, not a bunch of sagging loops. If you start with a small braid at the crown, the top looks more finished and the rest stays relaxed.
12. Side-Swept Waterfall Braid
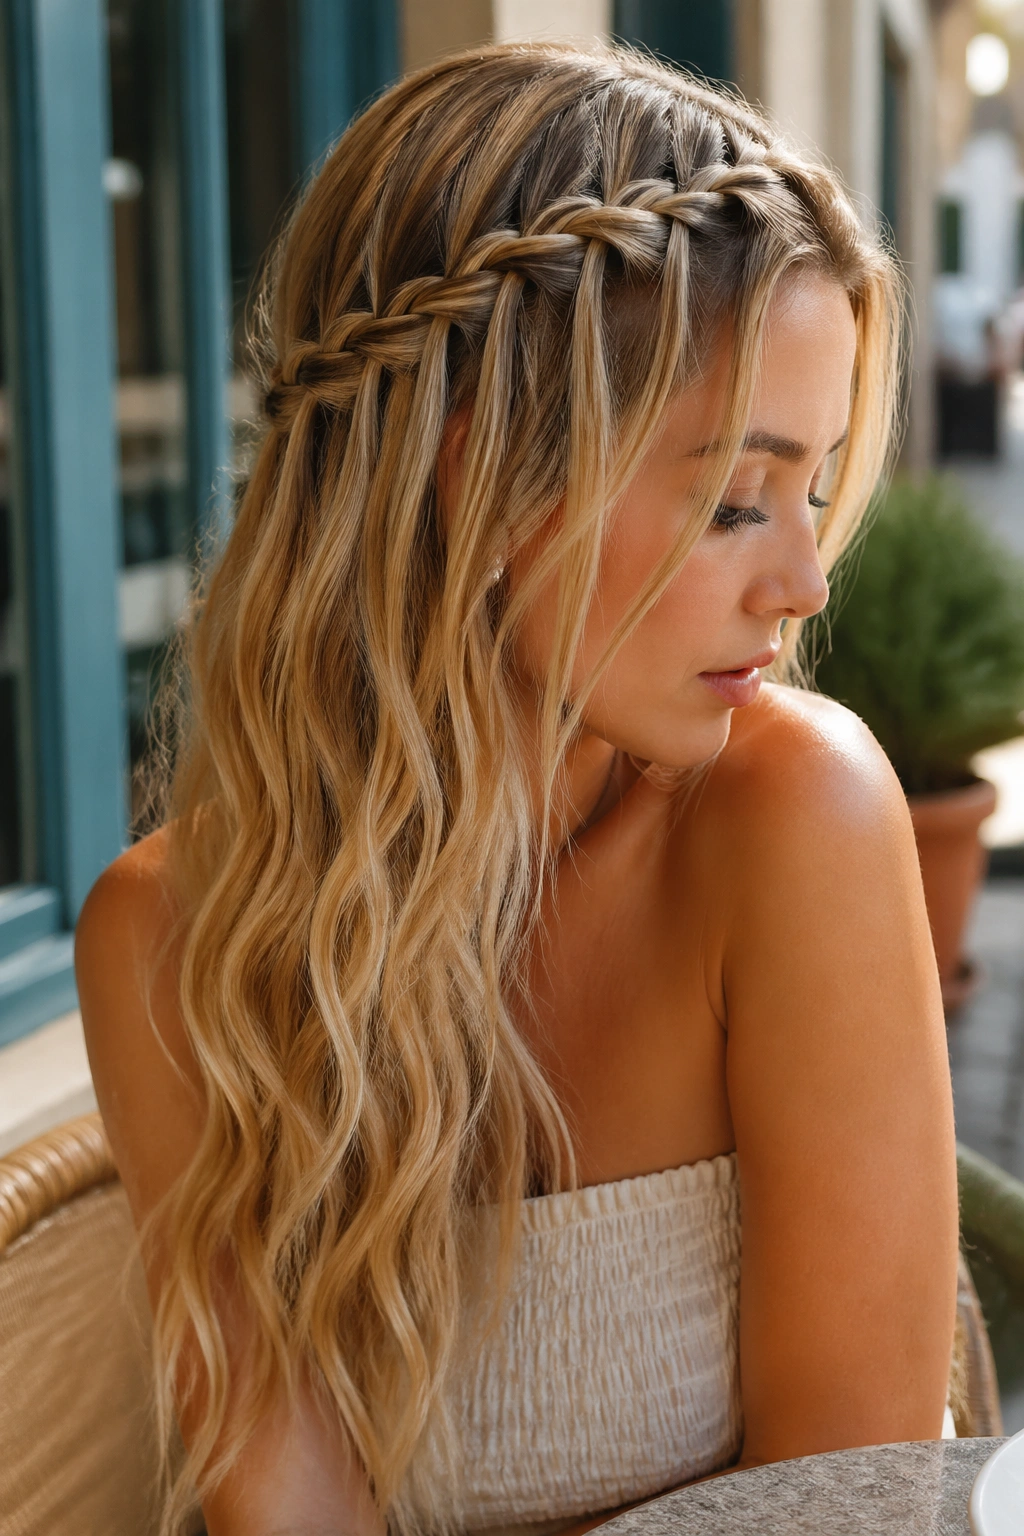
A waterfall braid is what I recommend when you want the illusion of effort with almost none of the heavy lifting. It lets some strands fall through the braid, which is exactly why it looks airy and slightly unfinished. That missing section gives the style movement and keeps it from feeling too strict.
The braid usually starts near one temple and travels across the back of the head or just above one ear. Each time you cross a section, you drop one strand and pick up a new piece from above. The loose strands that fall through become part of the look instead of a problem. On wavy hair, the effect is softer. On straight hair, it reads a little cleaner.
I like this style best when the rest of the hair is loose and lightly textured. If the ends are curled under a bit or bent with sleep, even better. It gives the braid a little body so it doesn’t disappear into the surrounding hair. A waterfall braid isn’t the fastest option here, but it rewards a few extra minutes with a look that feels airy rather than fussy.
13. Tiny Accent Braids In Loose Waves
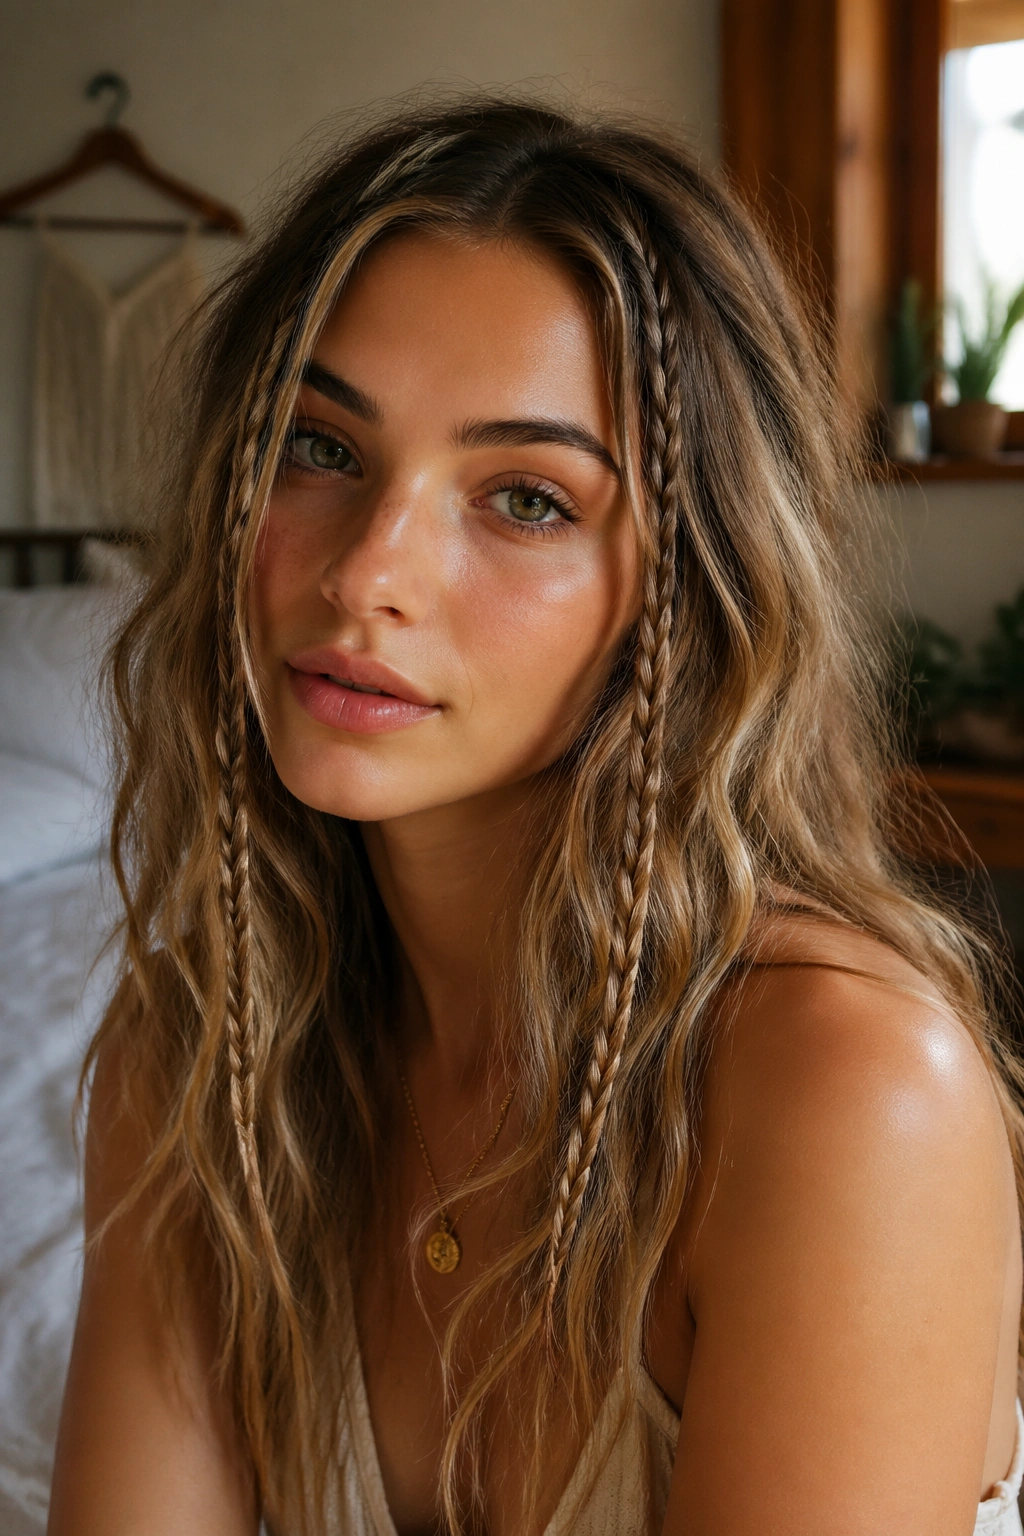
Tiny accent braids are one of the easiest ways to make loose hair feel styled without actually styling all of it. One or two narrow braids near the temples, or tucked under the top layer, can change the whole look. They’re subtle, and that’s the point. You get texture and movement without committing to a full braid.
What Makes Them Useful
They’re excellent for hair that’s already wavy, because the braids sit inside the texture instead of fighting it. They also work on days when the front pieces feel too plain but you don’t want to touch the rest of the hair. You can leave the braids hanging loose, tie them into tiny elastics, or even tuck one behind the ear and let the other fall forward.
- Keep the braids thin, about pencil-width.
- Place them where the hair naturally wants to part.
- Use one braid if you want quiet texture.
- Use two or three if you want a more deliberate look.
Do not overdo the number. A few small braids look intentional. Too many can turn the style busy in a hurry.
14. Messy Milkmaid Braids
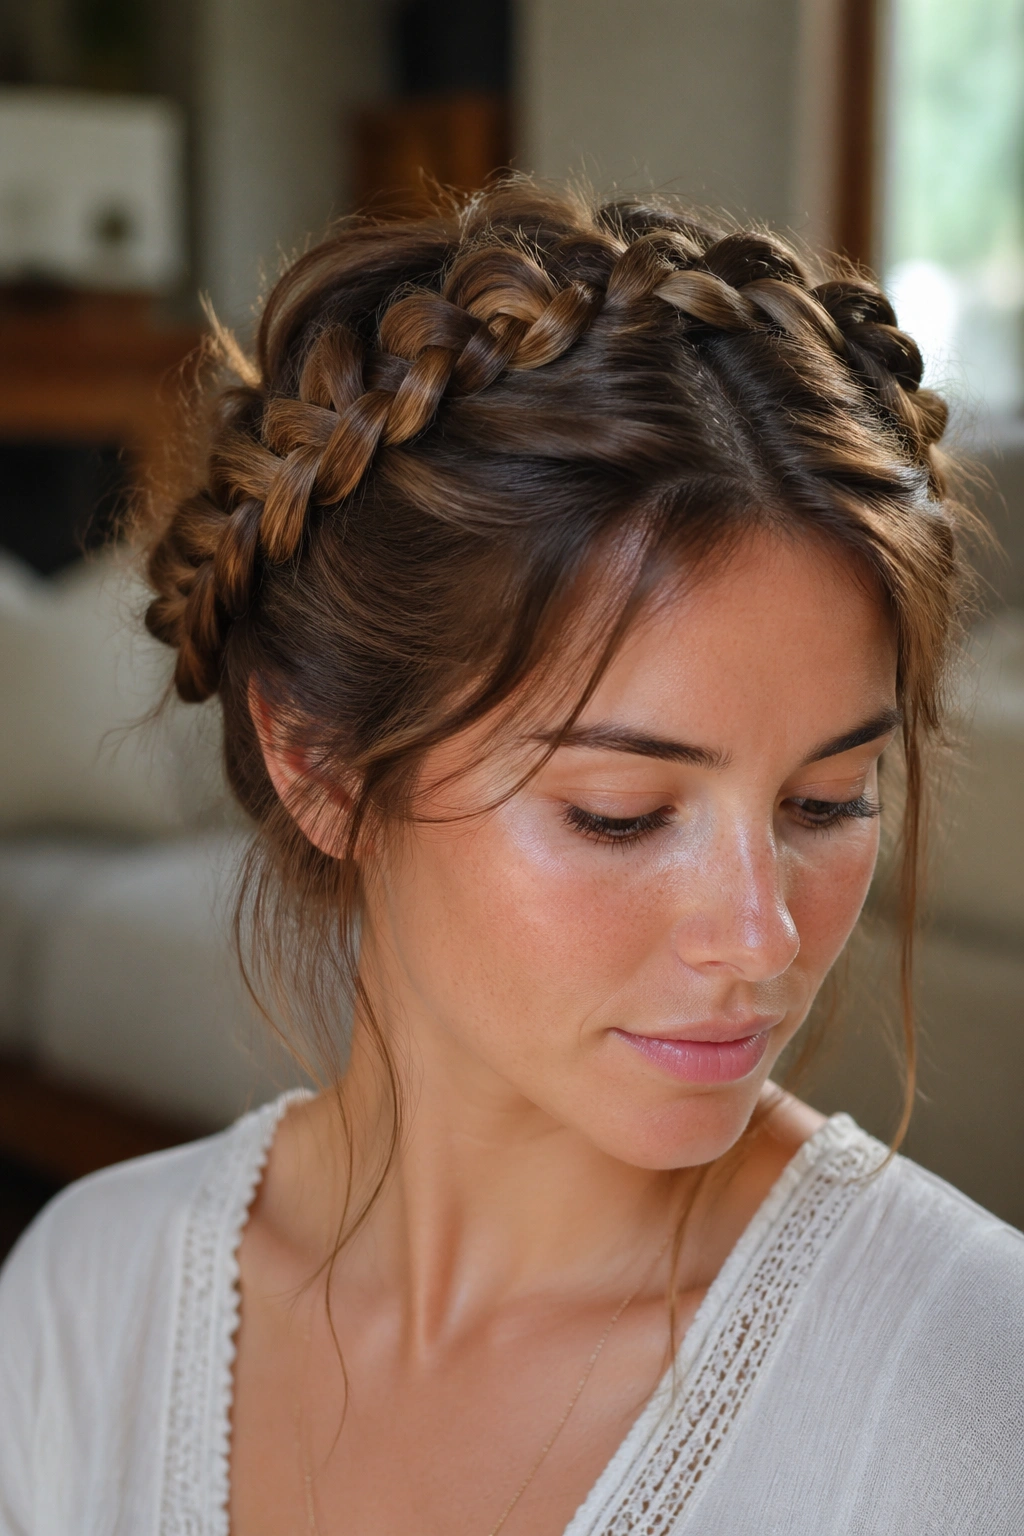
A milkmaid braid usually feels like a polished, wrapped style, but the messy version is much easier to wear. Two braids are wrapped over the head and pinned in place, yet the edges are pulled apart and the finish stays soft. It’s a strong option when you want all your hair up but still want the style to feel casual.
The reason this works so well on lazy hair days is simple: it holds a lot of hair without requiring fancy sectioning. Split the hair into two braids, wrap them over the crown, and let the ends disappear underneath. Then loosen the braids with your fingers. A few pieces can sit free near the ears or the nape, and that softens the whole thing immediately.
This style loves thick hair because there’s enough bulk for the braids to show. Fine hair can wear it too, but the braid may need a little more tugging to look full enough to wrap. I also like the way it keeps the neck clear without looking severe. If a crown braid feels too high or too tidy, this is the more relaxed cousin.
15. Low Braid Knot For Busy Mornings
A low braid knot is what happens when a regular braid and a low bun have a quick conversation and decide not to waste your time. Braid the hair loosely at the back, then twist or fold the length into a knot and pin it. The result is compact, a little undone, and much less boring than a plain low ponytail.
This style makes sense when the ends are dry or uneven and you’d rather hide them than smooth them out. It also works when the hair is a few inches too long for a simple knot but not quite long enough for a dramatic wrapped bun. The braid gives the base some structure, which helps the knot hold.
Best For
- Medium-length hair that needs control at the nape.
- Layers that slip out of buns.
- Hair that feels too heavy for a high style.
- Days when you need one hand free and the other holding coffee.
I like to keep one or two face-framing pieces loose so the knot doesn’t feel too tight or severe. That small bit of softness matters. A strict low knot can look a little severe; a braided one feels more lived-in.
16. Four-Strand Braid With Pulled Loops
A four-strand braid is for the days when you want something a little more interesting without wandering into elaborate territory. The weave looks fuller than a standard braid, and when you pull the sections apart after tying it off, the result gets that plush, lived-in texture people usually want from messy braids. It’s not hard once your fingers know the pattern, but it does ask for a bit more attention.
The real advantage is the width. Four strands make the braid look denser, which is useful if your hair is long but not especially thick. After you secure it, tug the outer edges of each loop and let the weave open up. That’s where the softness comes from. Without that last step, the braid can feel too precise for a lazy day.
I’d call this the style for people who like a little structure in their mess. If you enjoy braids but don’t want the same old three-strand shape, this one has enough difference to feel fresh. It also holds up nicely on long hair because the extra strand gives the braid more visual weight as it moves down the back.
Final Thoughts
The best lazy-day braid is rarely the neatest one. It’s the one that keeps hair out of your face, works with the texture you already have, and doesn’t fall apart the second you move your head. Loose braids win because they forgive mistakes. That’s a rare quality in a hairstyle, and a useful one.
If your hair is slippery, start with styles that build in grip, like the pull-through braid or the Dutch braid bun. If it’s layered, lean into the stray pieces instead of fighting them. Those pieces are often what make the whole thing look soft instead of forced.
I keep coming back to the same practical rule: stop before it feels finished. That tiny bit of restraint is usually what gives messy braids their charm.