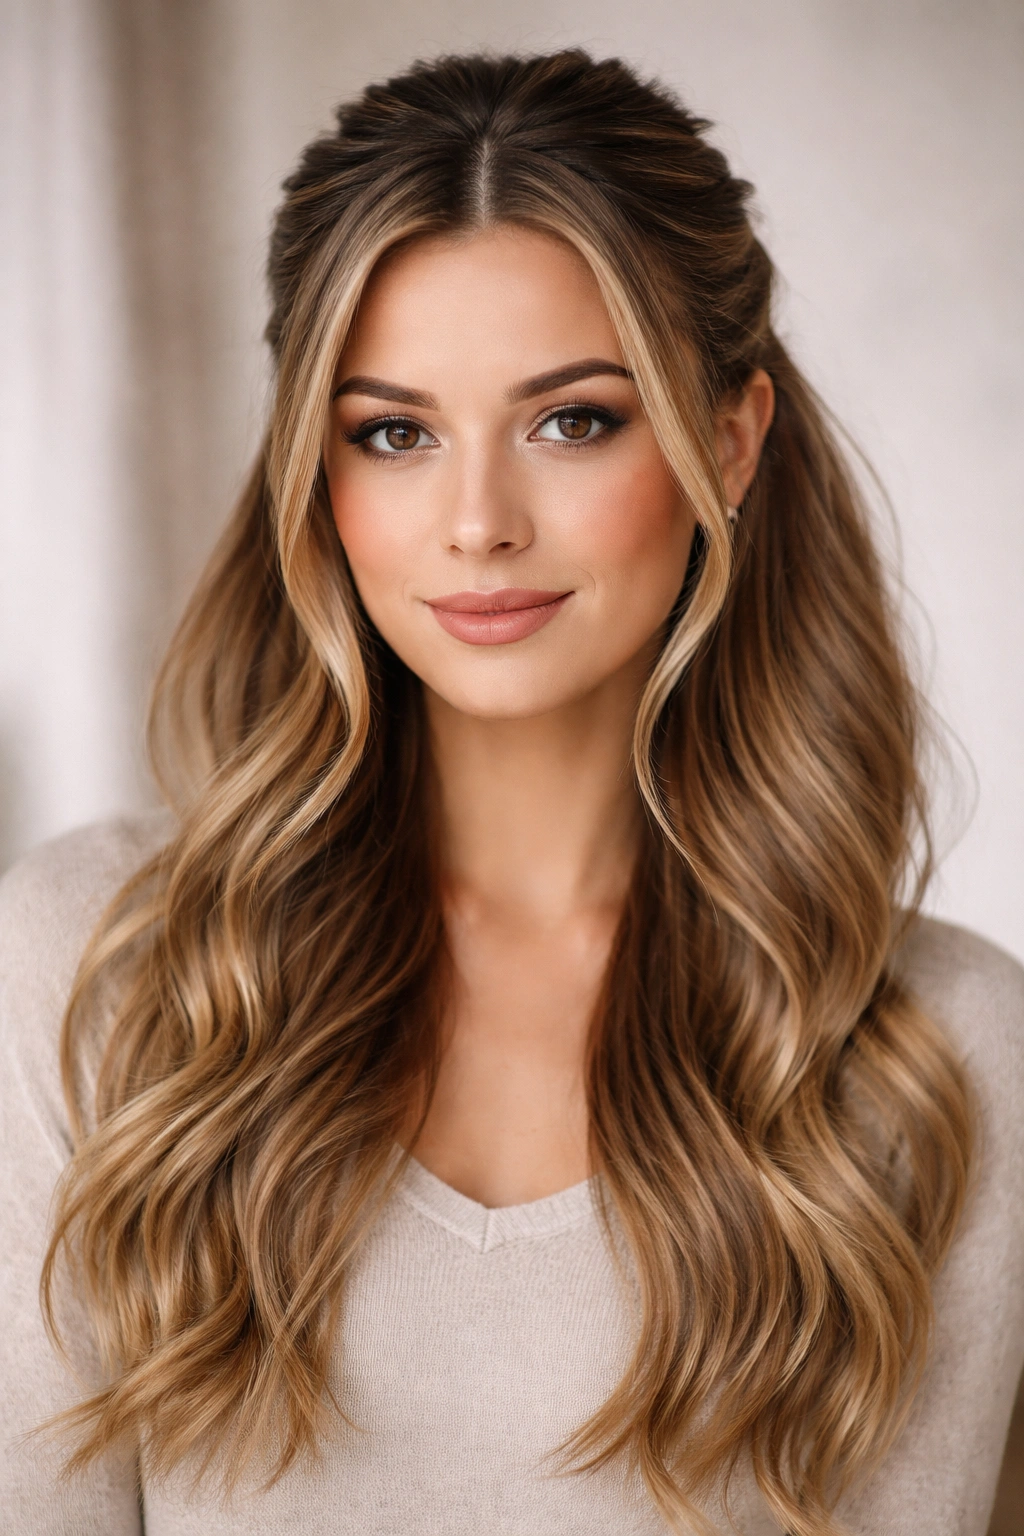
A middle part has this magical way of balancing your face and softening your features. Pair it with a ponytail, and suddenly you’ve got an effortless, face-framing look that works whether you’re heading to the office, meeting friends for coffee, or trying to look polished without actually doing much. The beauty of a middle-part ponytail is that it’s inherently flattering—those strands falling forward along your jawline create definition and draw attention to your eyes rather than your temples or the overall width of your face.
What makes this style so versatile is how many directions you can take it. You can go sleek and structured, textured and romantic, high and modern, or low and undone. A middle part automatically reads as more intentional and put-together than a side part, yet it requires zero extra effort once you understand the technique. Whether your hair is long, medium, or somewhere in between, whether you’re working with straight strands, waves, or curls, there’s a middle-part ponytail variation that will make you feel confident and look genuinely polished.
The secret is understanding how to position your ponytail in relation to the part, how to create dimension with face-framing layers, and which style complements your face shape and personal aesthetic. Let’s dive into ten distinct middle-part ponytail styles that each offer their own flavor and flattery.
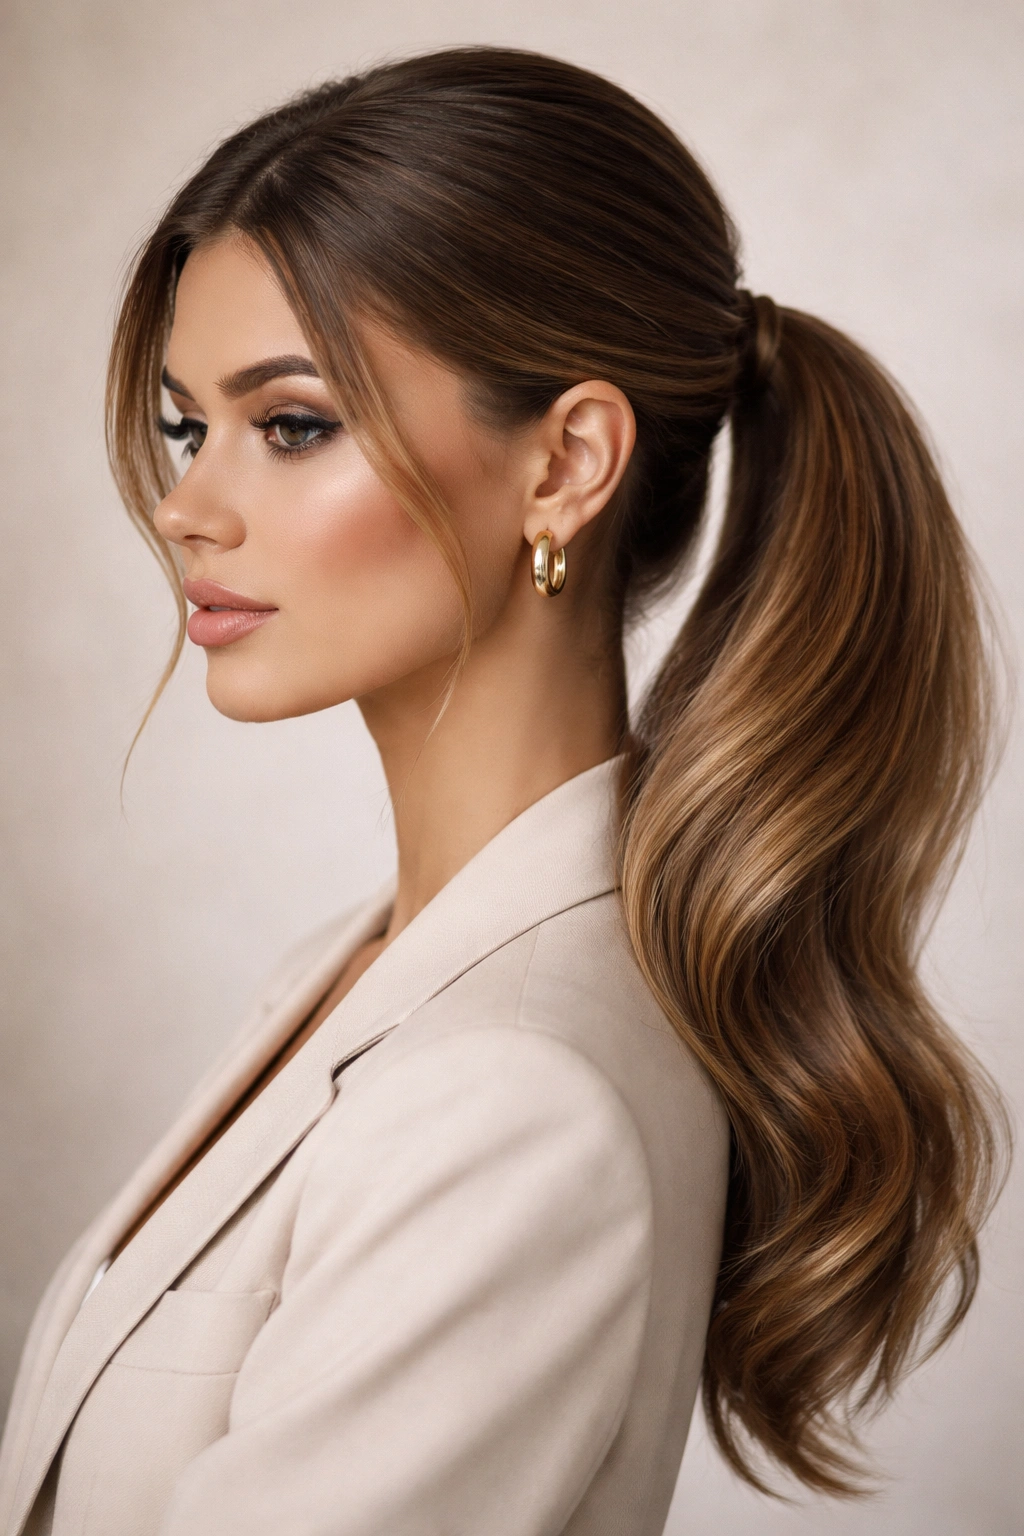
1. The Sleek High Ponytail with Wispy Tendrils

A sleek high ponytail with a middle part is the definition of modern polish. This style pulls hair cleanly away from the face while keeping intentional strands loose around your face—these wispy tendrils are what make it work. The contrast between the smooth, controlled ponytail and the soft pieces framing your features creates a balanced, sophisticated look that suits both professional and casual settings.
How to Style It Like a Pro
Start with completely dry hair (or use a smoothing serum on damp hair before blow-drying). Create a precise middle part by running your comb straight back from your forehead to the nape of your neck. Before gathering into the ponytail, use a straightening iron to smooth any flyaways. Pull your hair high—aim for a position roughly two inches above where your crown naturally peaks. Secure with a clear elastic or a sleek hair tie that matches your hair color. Here’s the crucial step: pull out two thin sections from near your face on each side, and curl them slightly away from your face with a curling iron or by wrapping them around a warm barrel for a few seconds. These tendrils should be loose enough to move and frame your face naturally.
What Face Shapes It Complements Best
- Oval and round faces benefit most from this style because the high placement elongates your features and the loose tendrils add dimension to balance fullness
- If you have a square or angular face, this works beautifully because the soft strands soften hard jawlines
- Heart-shaped faces look stunning with this style since the tendrils draw attention away from a wider forehead
Pro tip: Use a lightweight texturizing spray on the tendrils before curling them—this keeps them from falling flat and gives them more longevity throughout the day.
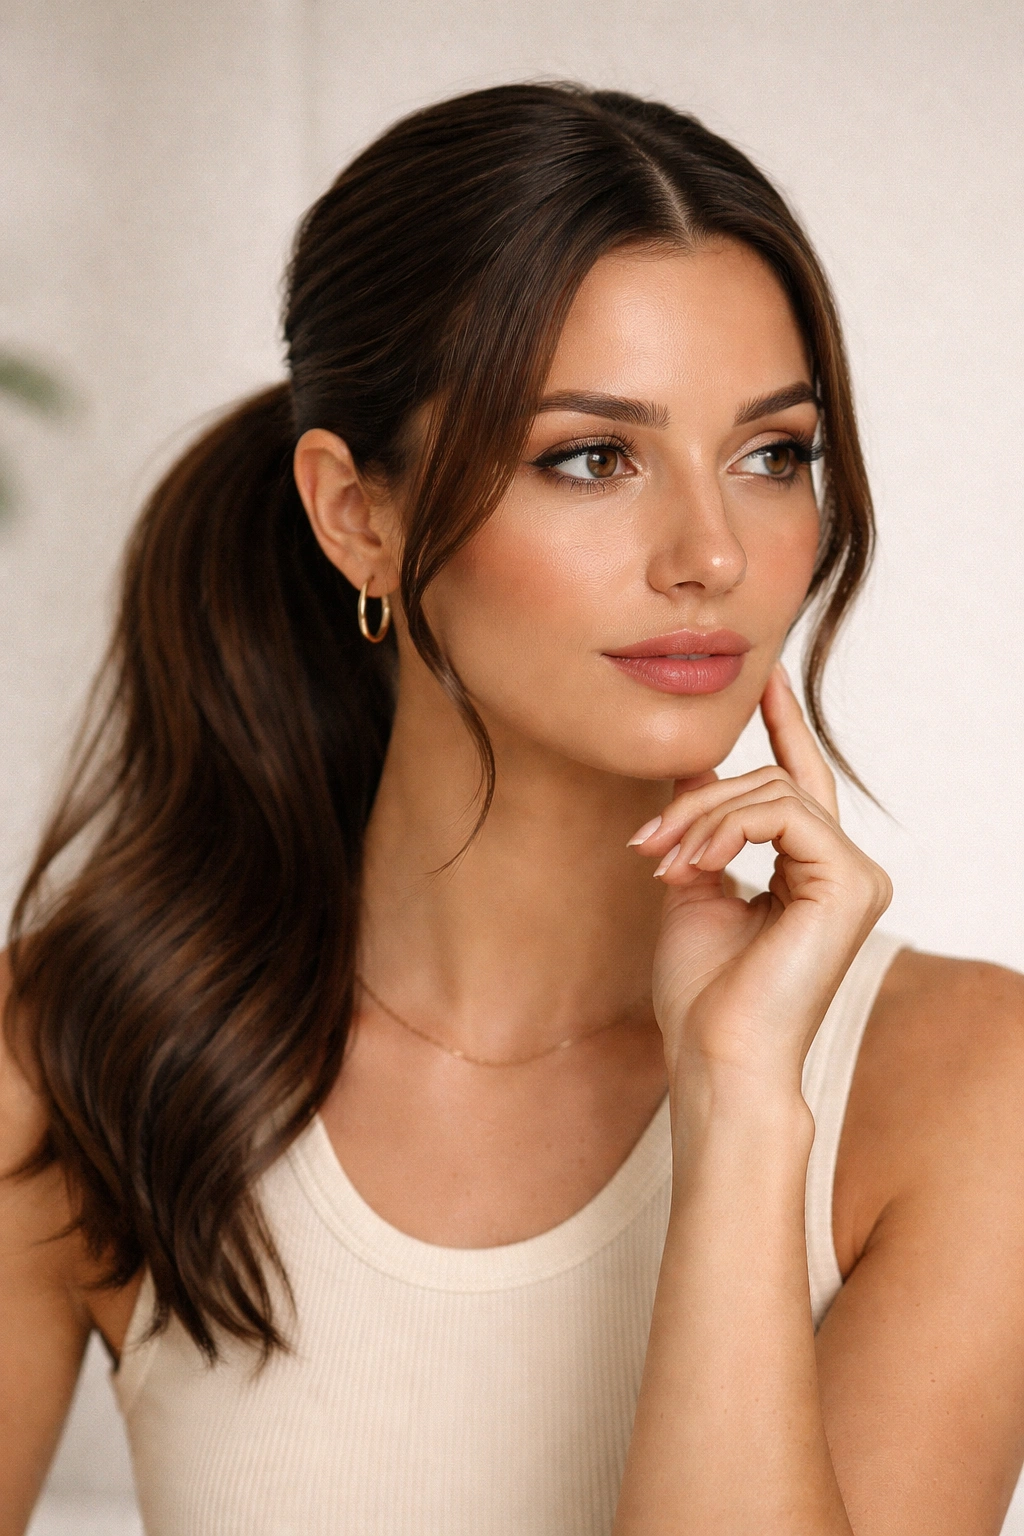
2. The Soft Romantic Low Ponytail
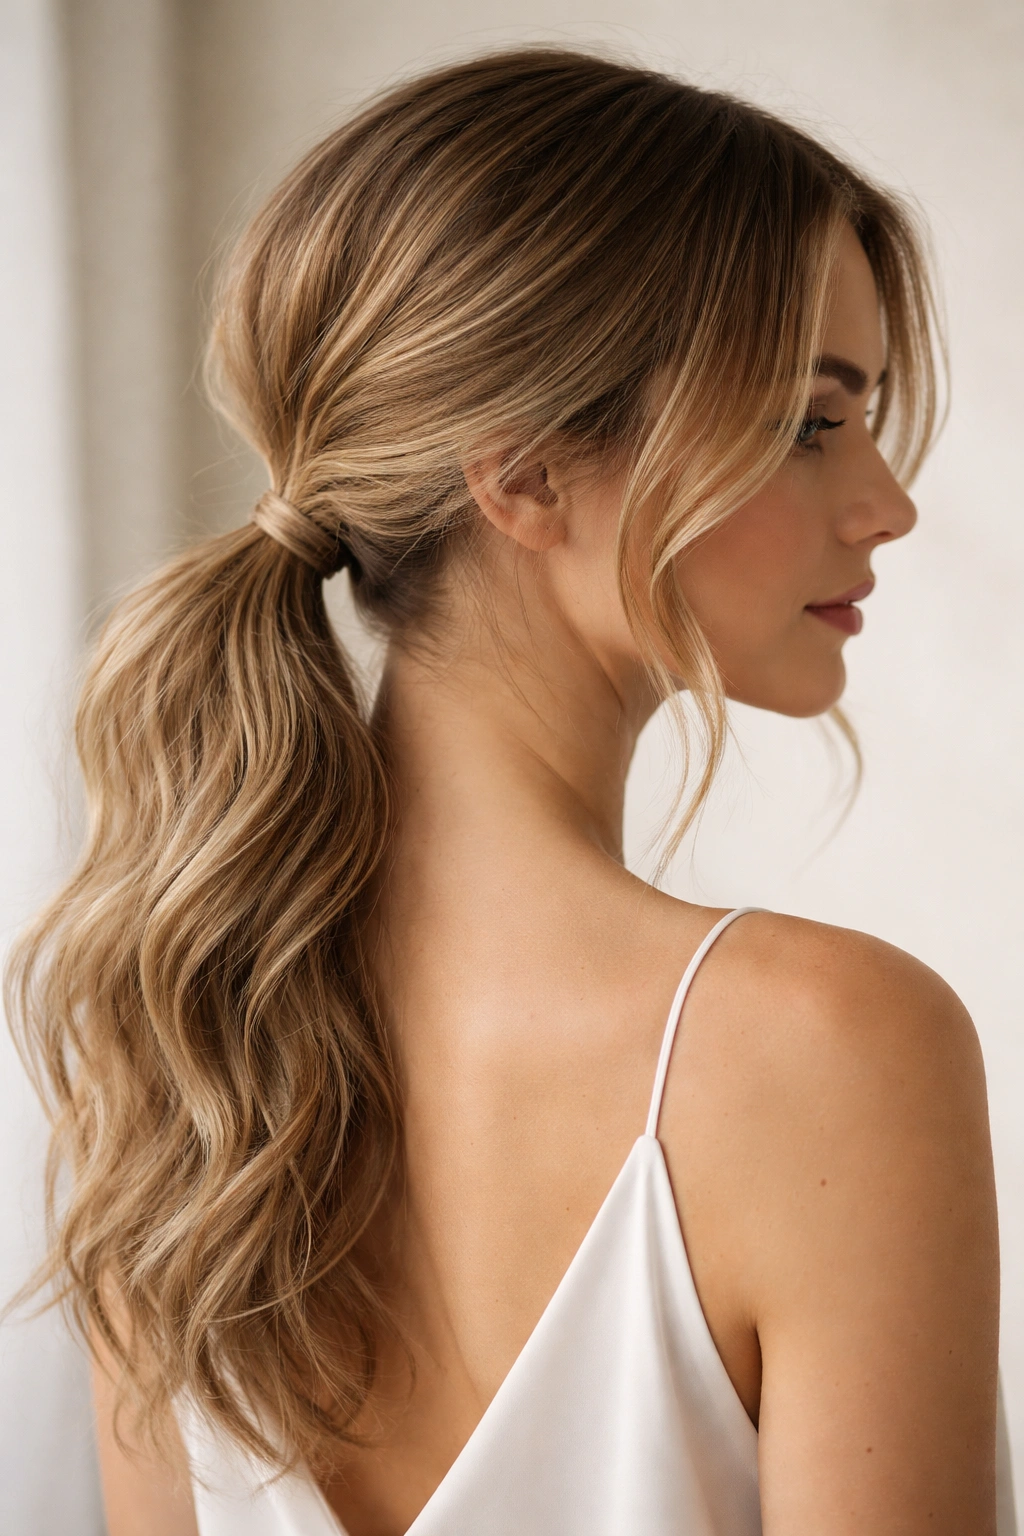
This is the style you wear when you want to look effortlessly beautiful without appearing like you tried too hard. A low ponytail positioned at the nape of your neck with a middle part creates an undone, romantic aesthetic that feels modern yet timeless. The lower placement keeps hair closer to your shoulders, making it ideal if you have a shorter neck or prefer a softer silhouette overall.
Building Texture Into Your Low Ponytail
Don’t start with perfectly smooth hair—this style actually demands texture. Use a sea salt spray on damp hair and scrunch it while blow-drying, or create loose waves with a curling iron before gathering your ponytail. The texture should look lived-in, not meticulous. Once you’ve gathered your ponytail low at the nape, use the tail of your comb to gently backcomb the base to create a subtle cushion of volume. This makes the ponytail sit away from your scalp slightly, giving it dimension and preventing that flat, plastered appearance.
The Middle Part Integration
Your middle part should be visible from your face down to your crown—after that, the part naturally disappears into the ponytail. Avoid creating a super-sharp middle part; instead, use your fingers or a wide-tooth comb to create a softer divide. Leave at least two inches of face-framing pieces on each side of your part, and resist the urge to smooth them back. These pieces should blend with the wave pattern you’ve created throughout your hair.
Best for These Face Shapes
- Long and rectangular faces love this style because the horizontal line of a low ponytail adds width and the loose texture prevents elongation
- Round faces work well with a low ponytail because it creates a longer vertical line from your face to your neck
- Oval faces can wear this beautifully because nearly every ponytail height works with naturally balanced features
Worth knowing: If your hair tends to slip out of elastics, anchor your ponytail with two thin bobby pins crossed underneath the elastic—they’ll be completely hidden by the surrounding hair.
3. The Half-Up, Half-Down Middle Part Hybrid
This style gives you the best of both worlds: the face-framing benefit of down hair with the polished, off-your-face sophistication of a ponytail. You’re essentially creating a partial ponytail that sits at your crown while leaving the majority of your length down. The middle part is crucial here because it creates visual balance and prevents the style from looking like you simply forgot to finish styling your hair.
Creating the Perfect Half-Up Section
Begin with your middle part firmly in place. From the front of your scalp near each temple, take a section of hair roughly two inches wide and gather these sections back toward your crown, leaving the rest of your hair loose. Secure these two sections together with a small elastic or a decorative clip—this is your half-up anchor. The key is not pulling too much hair back; you want the back half of your head to still feel full and down. If you pull too much, the style reads as unfinished rather than intentional.
Styling Choices for the Down Section
The hair you leave down should coordinate with your half-up styling. If you’re going for polished, straighten the length. For a softer aesthetic, create gentle waves or curls throughout. The middle part should be visible down your back—you’re not creating a hidden part here; it’s a design element you’re showcasing. Use a shine serum on the lengths to make the down portion look healthy and intentional, especially if the upper section is sleek.
Who Should Wear This Style
- Heart-shaped faces shine with this style because the volume at the crown balances a wider forehead, and the down hair softens a pointed chin
- Oblong faces benefit from the horizontal line created by the half-up section, which adds apparent width
- Round faces look best when the down portion has texture rather than being completely straight, which adds length
Styling note: If you want the half-up section to look more substantial, gently backcomb at the crown before securing it. This creates a subtle pouf that photographs beautifully and makes the style feel intentional.
4. The Slicked-Back Graphic Ponytail
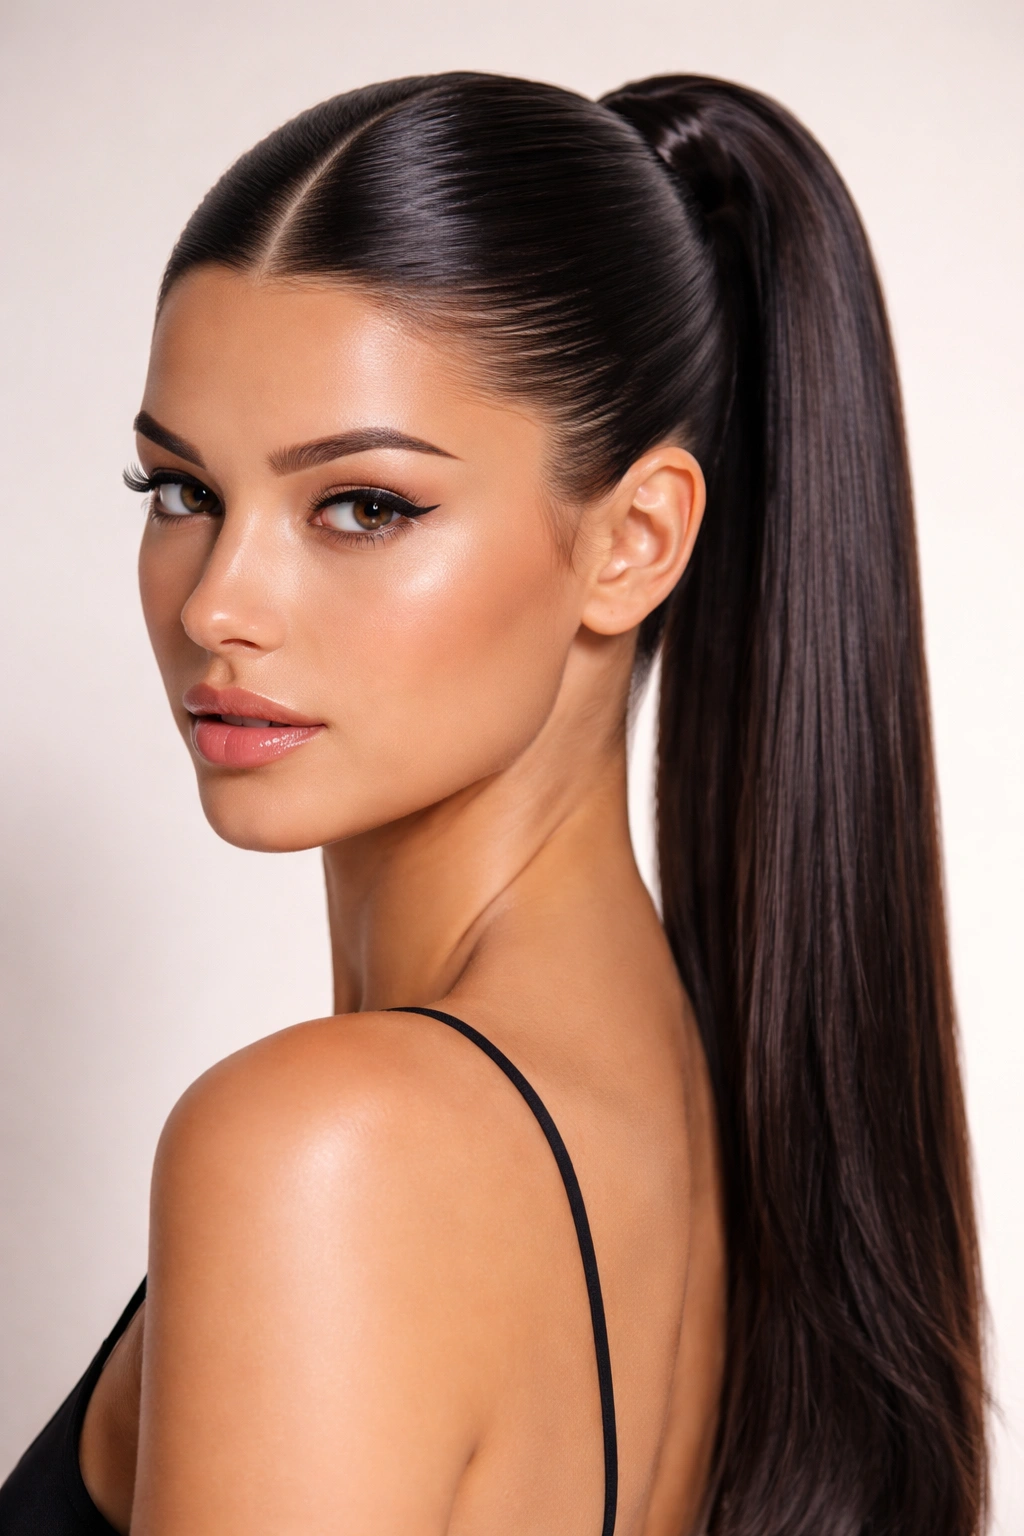
This is your statement style—bold, architectural, and unapologetically modern. You’re creating a middle part, but then sleekly pulling every strand straight back to create a clean, graphic line. There’s no softness here; instead, you’re celebrating the precision and the revealed geometry of your face and head. This style demands confidence and works best on faces with strong features and clear skin (or flawless makeup covering any areas you’d rather downplay).
Achieving Flawless Sleekness
Use a volumizing mousse on damp roots and blow-dry your hair smooth and straight. Once fully dry, apply a gel or slick pomade to your hair, working from your middle part backward. Use a fine-tooth comb to smooth every strand into place, creating a mirror-like finish. Your goal is zero flyaways—this style doesn’t tolerate them. Secure your ponytail tightly; any looseness ruins the effect. This is one style where a tight elastic is actually your friend, not something to avoid.
Middle Part as Design Element
Your middle part is the crown jewel of this style. Make it perfectly precise by using the pointed end of a rat-tail comb and a spray bottle with water and lightweight gel. You should be able to see your scalp clearly down the middle. Some wearers even use a tiny line of glitter gel or a temporary hair chalk along the part for extra definition, though this is optional and depends on the occasion.
Who Pulls This Off Best
- Angular and oblong faces are absolutely made for this style because the slickness emphasizes bone structure
- Oval faces wear this beautifully because clean lines flatter balanced proportions
- Younger faces (or anyone who can carry a very modern aesthetic) pull this off most effortlessly
Critical warning: This style is high-maintenance. You’ll need to refresh it midday if you’re out in humidity, and you absolutely cannot skip the finishing spray. Use a strong-hold hairspray to lock everything in place before you leave the house.
5. The Textured Bubble Ponytail with Middle Part
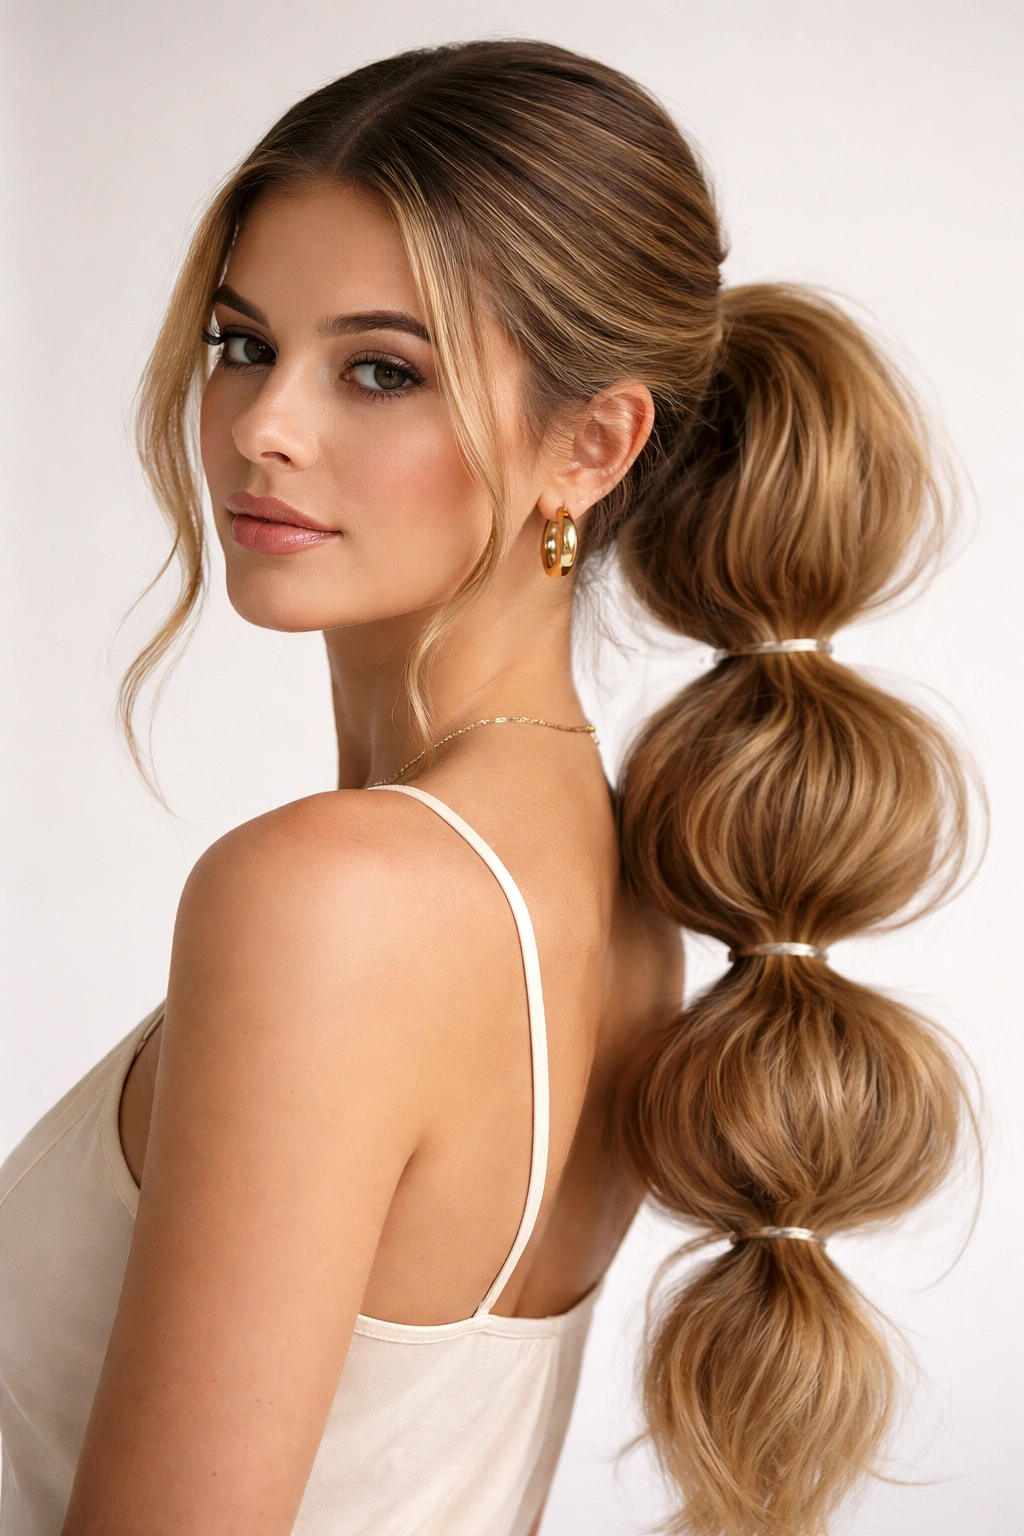
Bubble ponytails have become the poster child for playful, youthful styling—and a middle part makes them feel even more intentional. You’re creating multiple sections within your ponytail using smaller elastics, which creates the “bubble” effect, while the middle part ensures face-framing and overall balance. This style is fun, photogenic, and surprisingly versatile depending on how tight or loose you make each bubble.
Building Your Bubble Ponytail Step by Step
Start with textured hair (waves or curls work best, but you can create texture on straight hair with a curling iron). Create your middle part and gather a high ponytail at your crown, securing it with an elastic. Now here’s where the magic happens: divide your ponytail into 3-5 sections depending on the length of your hair, spacing them evenly down the length. Use a small elastic to secure each section, creating a distinct bubble between each elastic. After you’ve secured all your sections, gently pull on each bubble, fluffing outward to create more volume and dimension. The bubbles should look airy and bouncy, not compressed.
Where to Position Your Bubbles
If you want an extra face-framing effect, position your first bubble closer to your head—this creates more volume right at the crown and draws attention upward. If you prefer a more streamlined look, space your bubbles evenly from root to tip. Experiment with bubble size; larger bubbles create a more dramatic effect, while smaller, more numerous bubbles feel more refined.
Perfect for These Scenarios
- Younger wearers or anyone going for a playful, trend-aware aesthetic
- Round faces benefit from the vertical line created by the bubbles, which elongates features
- Anyone with naturally textured or curly hair, where the bubbles work with your natural texture
Insider tip: Use clear elastics for a cohesive look, or try metallic or colored elastics if you want the bubble ponytail to become an intentional design feature. Some stylists even add small clips or cuffs around each bubble for extra visual interest.
6. The Braided Crown with Middle-Part Tail
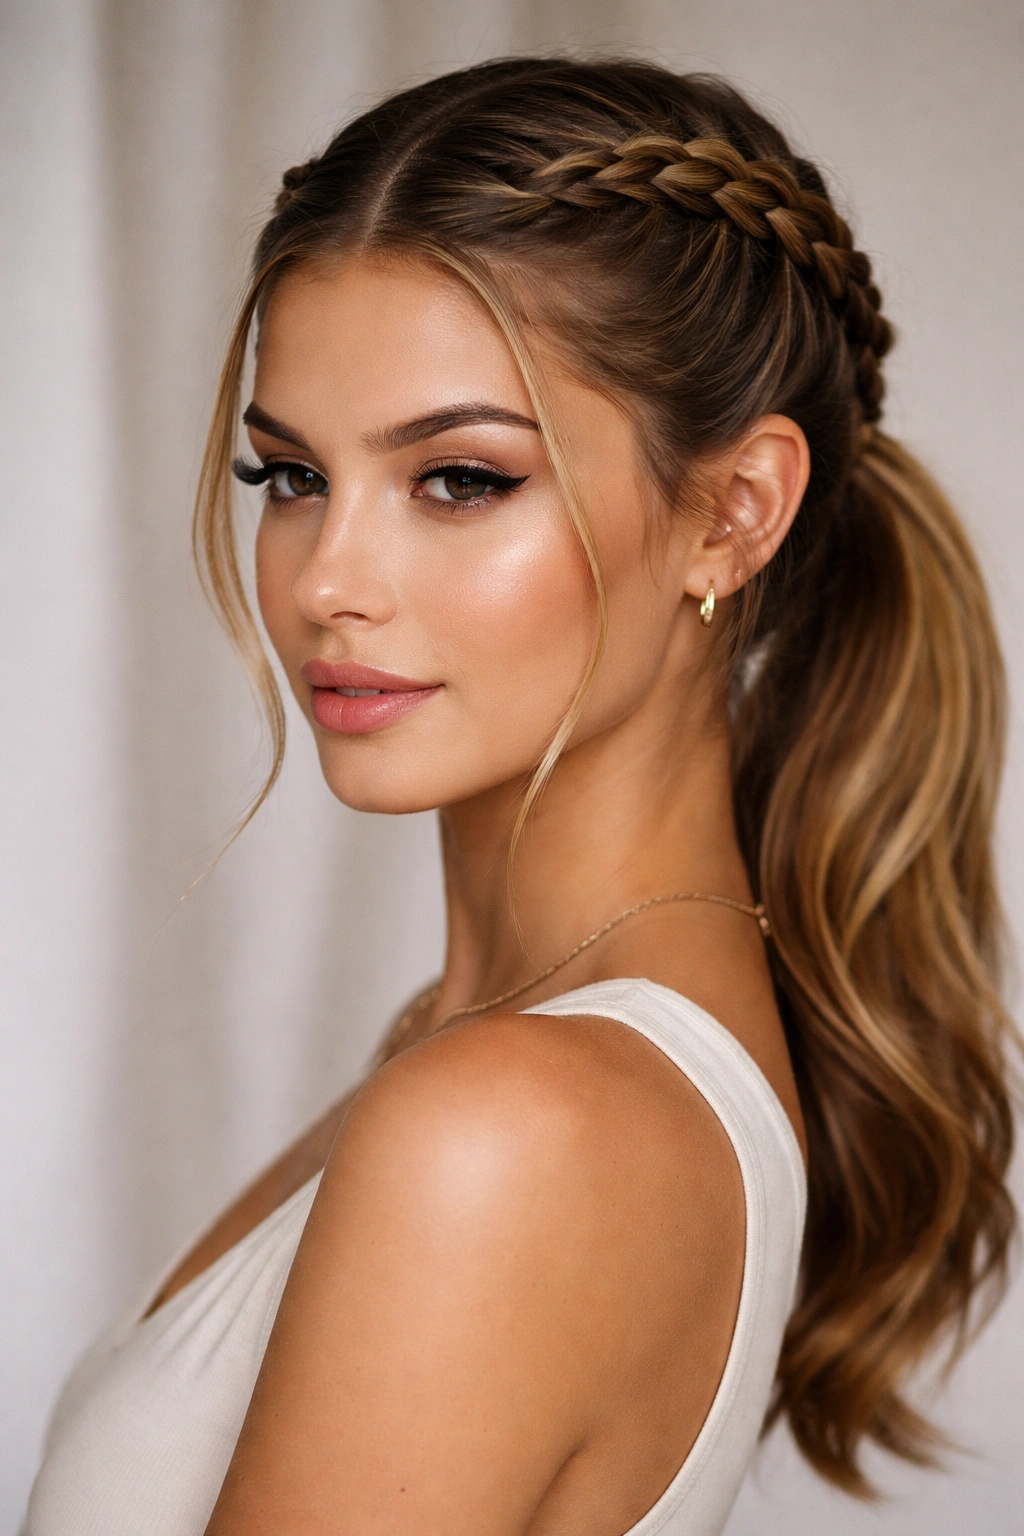
This style combines the romance of a braid with the sophistication of a ponytail. You’re creating a Dutch or French braid that starts at one side of your middle part, travels back along your scalp, and meets a gathered ponytail at the back. The middle part creates the starting line for your braid and ensures balance throughout the style.
Mastering the Braid-into-Ponytail Transition
Begin with your middle part clearly established. Starting on one side near your temple, take a three-strand section and begin a Dutch braid (where you cross strands under rather than over, creating a raised braid). Braid back along your scalp, keeping the braid close to your head and gradually incorporating hair as you move backward. Once you’ve reached roughly ear level, stop braiding and allow the remaining hair to flow freely. Repeat this on the other side of your middle part. Then, gather all your hair—the two loose braids plus the unbraided length below—into a ponytail at your crown or the nape of your neck, depending on your desired height. The two braids will frame your face beautifully while being incorporated into the final ponytail.
Texture and Finish Options
For a soft, romantic look, gently pull on the braid sections to loosen them slightly, creating a fuller, more textured appearance. For a more structured, polished aesthetic, keep your braids tight and neat. You can even wrap a thin section of hair around the base of your ponytail to cover the elastic, which adds a refined, finished touch.
Ideal Face Shapes and Occasions
- Heart-shaped and oblong faces look stunning with this style because the braids add width and softness
- Anyone with medium to long hair (at least 16 inches) has the length needed for proper braids that don’t look stubby
- This style is perfect for weddings, date nights, or any occasion where you want to look romantic and intentional
Pro tip: If braiding feels intimidating, start by practicing on damp hair, which is easier to grip than completely dry hair. Once you’re confident, you can style on dry hair and use a texturizing spray for extra hold.
7. The Sleek Low Bun with Face-Framing Middle Part
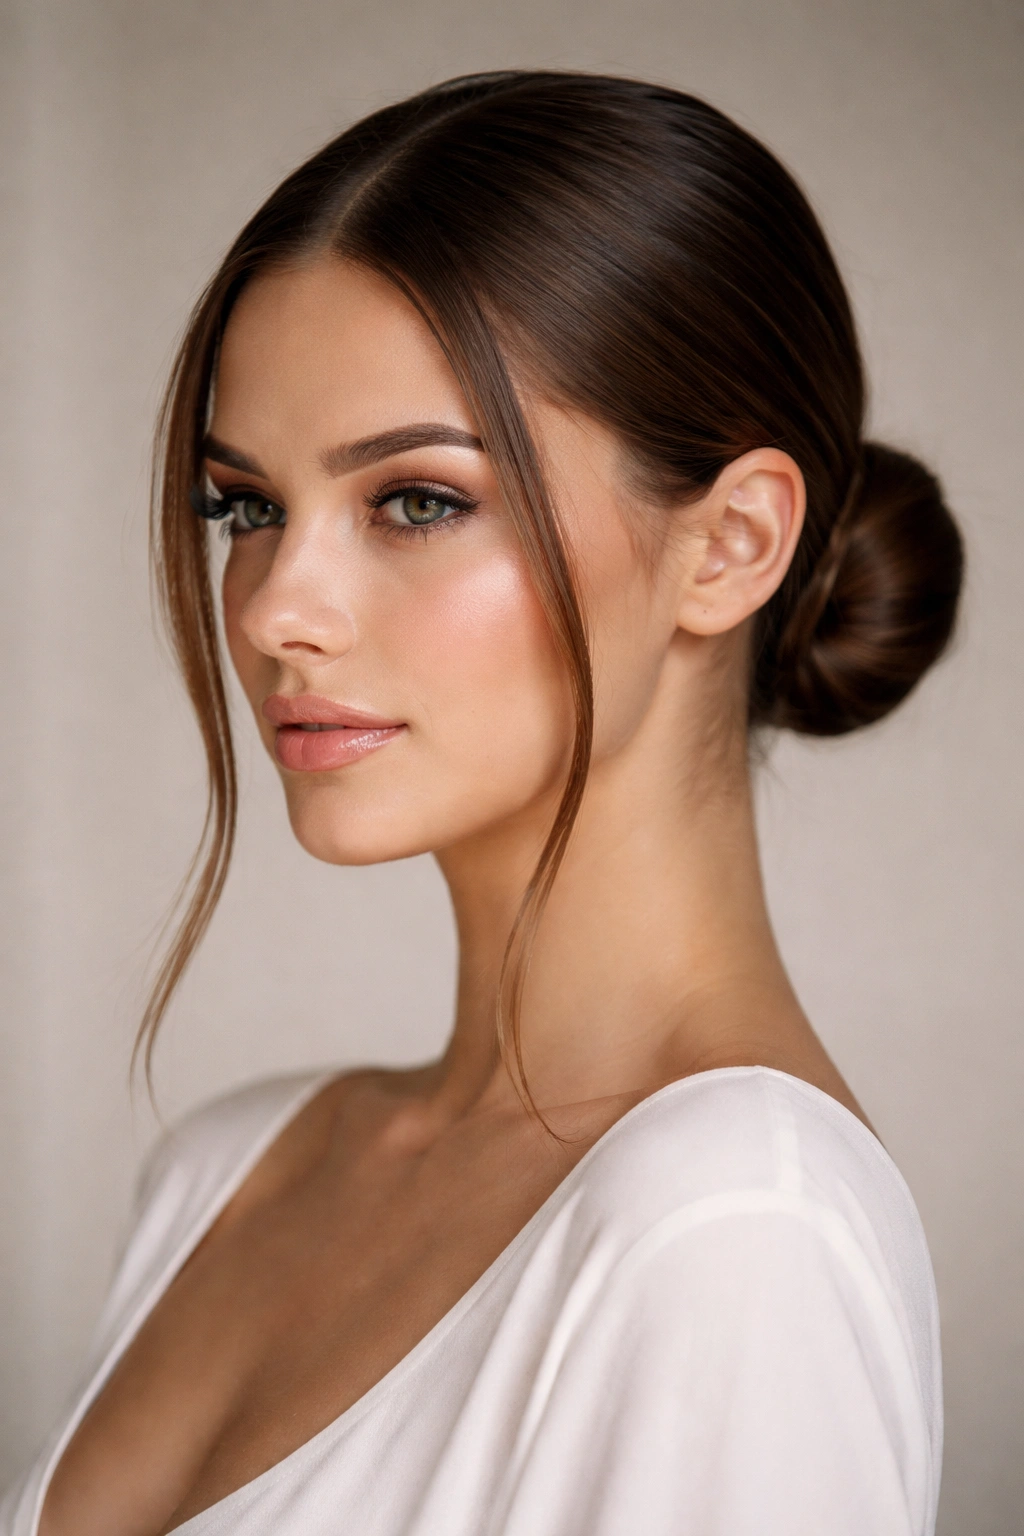
A low bun is inherently sophisticated, but add a middle part and face-framing pieces, and suddenly you have a style that’s elegant without being severe. This is the perfect option when you want every strand contained and polished but don’t want to sacrifice the softening effect of framing pieces. The middle part ensures the bun doesn’t look accidentally messy; instead, it’s clearly intentional.
Creating a Smooth, Secure Low Bun
Brush your hair back into a low ponytail at the nape of your neck (roughly where your hairline meets your neck in the back). Secure with an elastic. Now, twist your ponytail around itself, coiling the length into a spiral, and tuck the end under to secure. Use bobby pins to anchor the bun, inserting them through the twisted section and into your hair underneath—aim for at least 3-4 pins positioned differently for security. Before you finalize everything, pull out two thin sections from each side of your face near your temples; these are your frame-softeners.
Styling the Face-Framing Pieces
These pieces should fall naturally along your jawline and cheekbones. Curl them slightly away from your face using a small curling iron or by twisting them around a warm barrel. The key is keeping them wispy and soft—you don’t want thick, obvious sections, but rather delicate pieces that suggest softness without overwhelming your face.
Who Looks Best in This Style
- Oval and oblong faces wear this style beautifully because the bun creates a horizontal line that balances proportions
- Anyone with a strong jawline or defined cheekbones should definitely try this style, as it showcases these features while remaining professional
- Square or angular faces benefit from the soft framing pieces, which add roundness and prevent a harsh appearance
Worth knowing: If your hair is fine or thin, create volume in your bun by gently backcombing the base of your ponytail before coiling it. This prevents the bun from looking sparse and wispy in the wrong way.
8. The Messy High Ponytail with Piece-y Middle Part
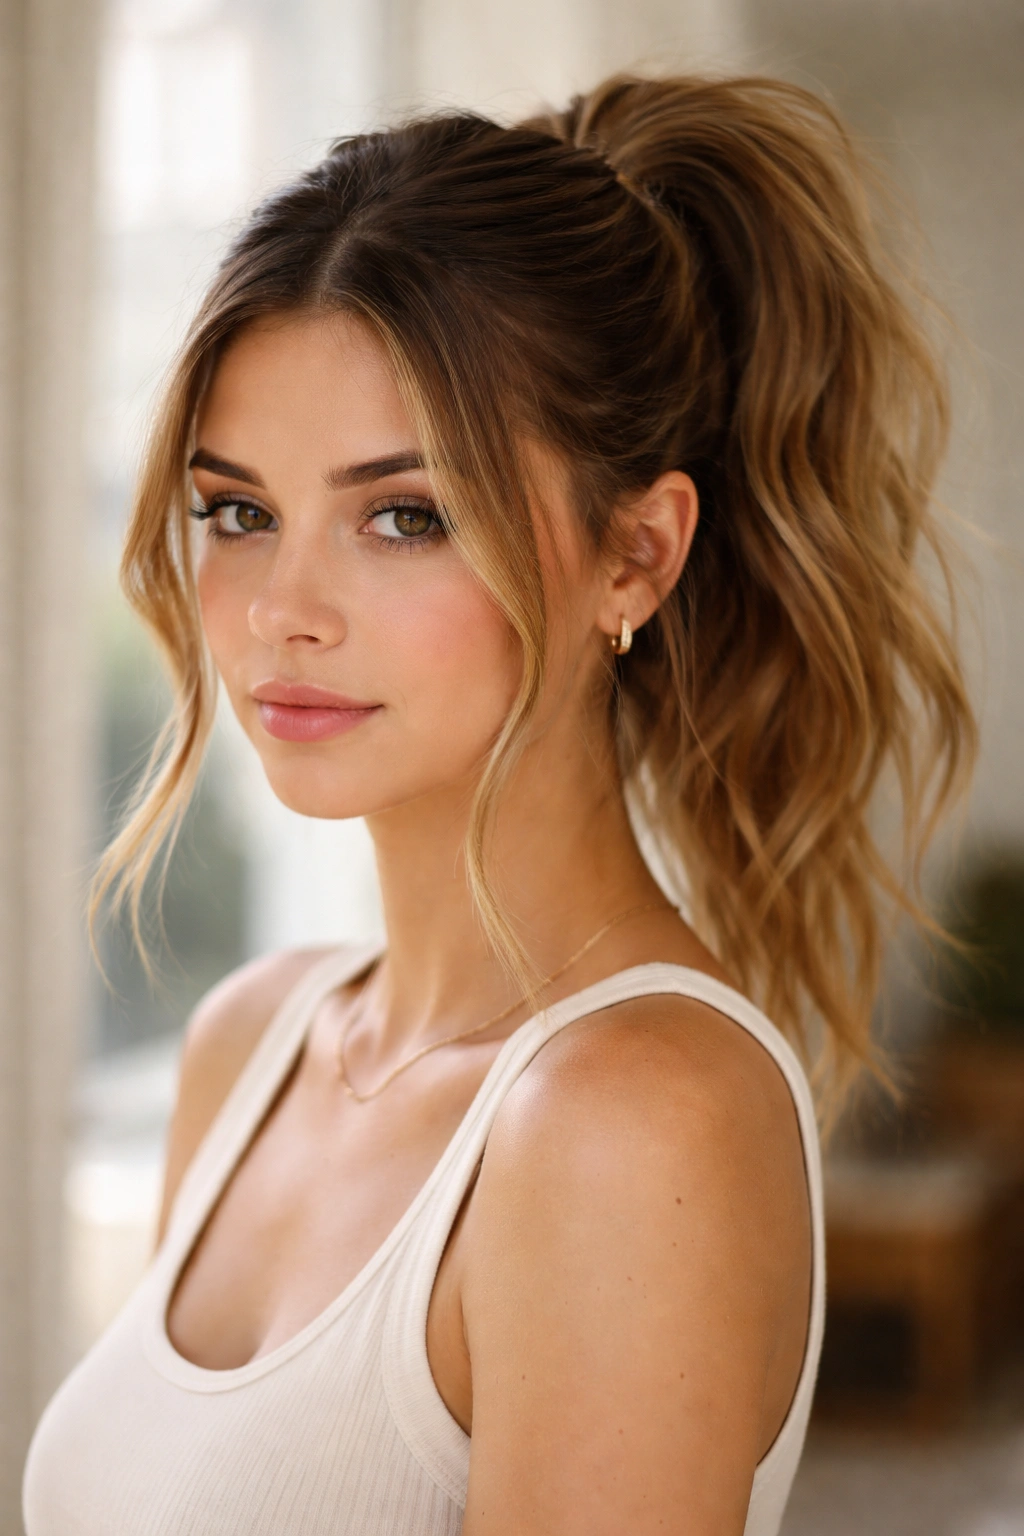
Sometimes the best hairstyle is the one that looks like you threw it together without trying—except you absolutely strategized every element. A messy high ponytail reads as effortless, youthful, and approachable, while a middle part keeps it from looking truly careless. The “piece-y” quality means you’re intentionally leaving some strands slightly out of the ponytail, creating a textured, dimensional effect.
Building Strategic Messiness
Start with textured hair (blow-dry with a texture spray or curl it beforehand). Create your middle part, but don’t make it too severe—this style demands a softer, less defined part. Gather a high ponytail at your crown, but don’t pull tightly; you want a slight cushion of volume. Leave out small sections of hair from near your face on each side—these piece-y strands should blend with the overall texture rather than looking like intentional face-framing pieces. The difference is subtle but important: they should look like they naturally separated from the ponytail rather than being deliberately placed.
The Texture Secret
The texture of your hair absolutely makes this style. If you start with smooth, straight hair, your “messy” ponytail just looks unkempt. Instead, create waves or curls throughout your entire head before gathering your ponytail. Use a texturizing spray on your lengths and roots. Once your ponytail is secured, lightly backcomb the crown area and the base of the ponytail to create subtle volume without it looking teased.
Best for These Situations and Face Shapes
- Younger faces and anyone going for a casual, trend-aware vibe
- Round and square faces benefit from the height and volume at the crown, which adds length
- This is the perfect style for running errands, casual dates, or anytime you want to look effortlessly pretty
Styling note: Use a light-hold hairspray, not a strong one. You want movement and flexibility throughout the day, not a shellacked appearance. The style should look better by evening, not worse.
9. The Sleek Side-Swept Ponytail with Subtle Middle Base
This is a style where your middle part creates the foundation at your scalp and crown, but your ponytail itself is swept to one side, creating a striking asymmetrical silhouette. The middle part ensures balance at the top of your head while the side-swept tail creates drama and directionality. It’s a style that photographs beautifully and works for both casual and formal occasions.
Creating the Middle-Part-to-Side-Sweep Transition
Begin with your middle part clearly visible. Gather your hair back, but instead of securing it in the center, gather it slightly to one side—roughly 1-2 inches off-center. Create volume at your crown before securing to prevent the ponytail from looking flat or unflattering. Use a small elastic to secure your ponytail, then wrap a thin strand of hair around the elastic to cover it, securing that strand with a bobby pin for a polished finish.
Where to Position Your Sweep
If you have a round or square face, sweep your ponytail toward the side of your face that feels stronger or where you want to add definition. If you have an oblong or rectangular face, sweeping the tail to one side adds apparent width and balance. The key is that your middle part remains visible and centered—it’s only the gathered ponytail tail that moves to one side.
Hair Type Considerations
- Straight hair works beautifully with this style because the sleekness emphasizes the geometric quality of the sweep
- Wavy or curly hair can work if you smooth and define the ponytail while leaving some texture in the lengths
- Fine or thin hair needs extra volume at the crown using backcombing or volumizing products
Pro tip: Add a decorative hair cuff, clip, or jeweled elastic at your ponytail base. The asymmetrical positioning of the tail actually makes these accessories more visually striking.
10. The Double-Ponytail with Middle Part
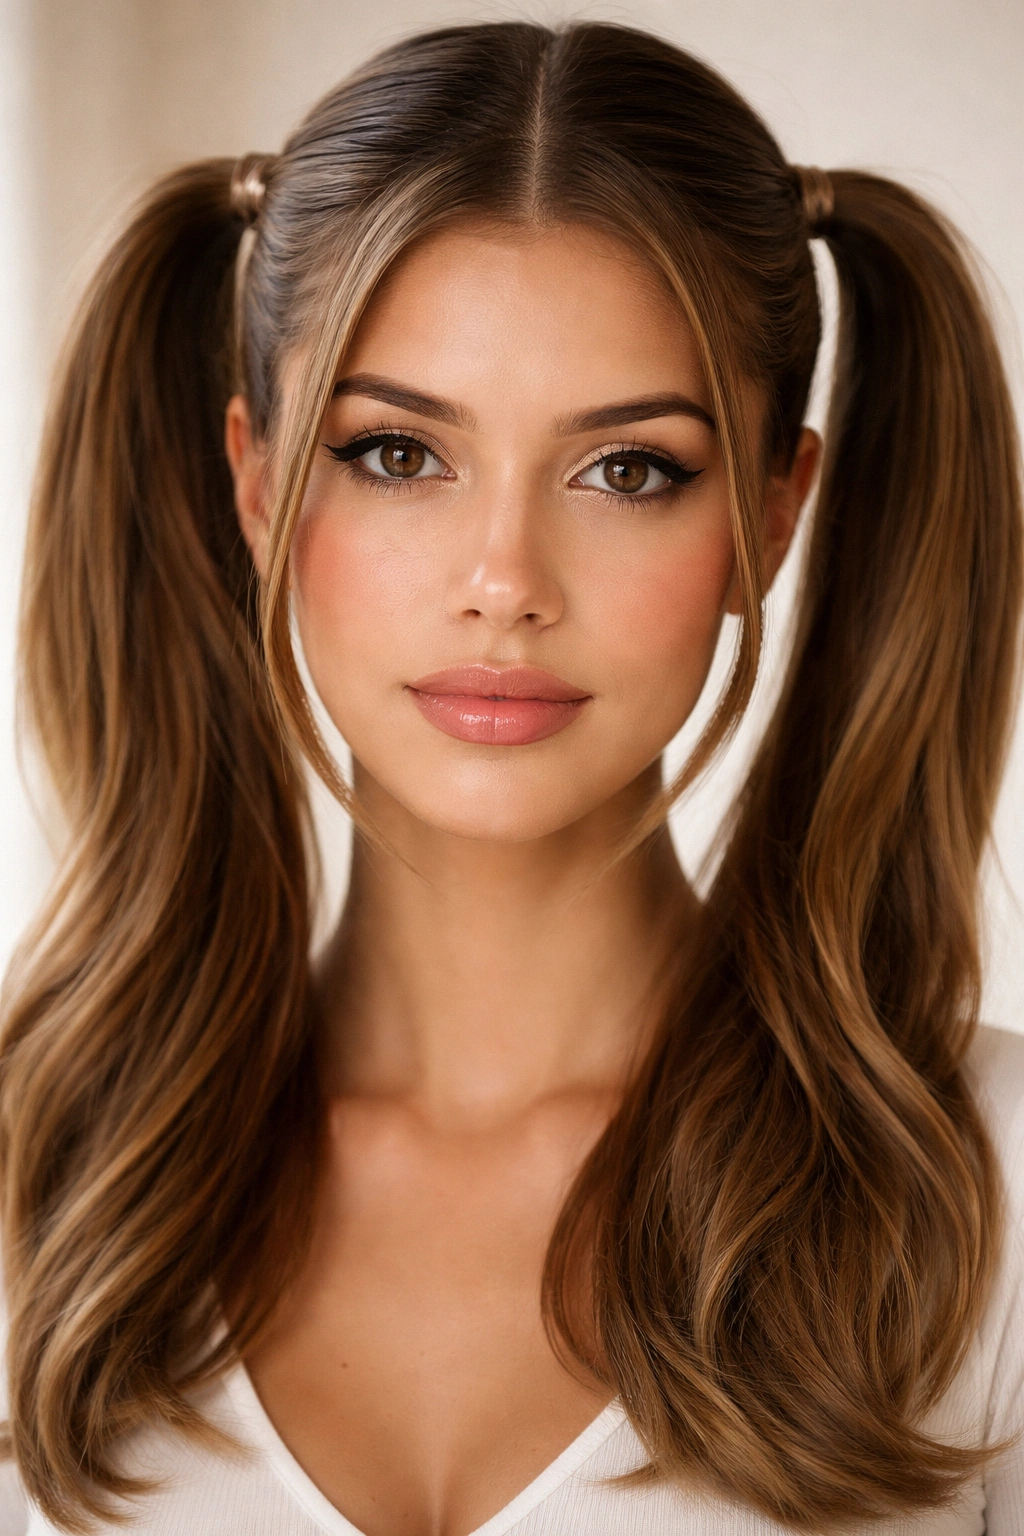
This playful style features two ponytails positioned on either side of your middle part, creating perfect symmetry and a youthful, balanced aesthetic. It’s more modern and sophisticated than it sounds—especially when you execute it with attention to placement and finish. The middle part is the literal dividing line between your two ponytails, making it a key design element rather than just a parting choice.
Positioning Your Twin Ponytails
Create a precise middle part from your forehead to the nape of your neck. On one side of this part, gather all the hair into a ponytail at your desired height (high for youthful, low for more sophisticated). Repeat on the other side, matching the height and position exactly. Your goal is mirror-image symmetry. Use identical elastics in both ponytails so they match visually. The middle part should be clearly visible down the back of your head, running between your two ponytails.
Style Variations Within the Double Ponytail
You can keep both ponytails sleek and smooth for a polished, modern look. Alternatively, create texture in both—waves, curls, or the bubble-ponytail effect we discussed earlier—for a softer aesthetic. Some wearers add different colors or textures to each side (perhaps one side straight and one side curled) to make the style feel more intentional and artistic. You could also add thin braids at the base of each ponytail for extra visual interest.
Who Should Try This Style
- Younger faces and anyone with a playful personal aesthetic
- Heart-shaped and oblong faces benefit from the width created by two side ponytails
- Anyone going for a bold, trend-aware, or editorial look
- This works for fashion-forward styling, casual outings, or anyone confident enough to make a statement
Worth knowing: This style photographs incredibly well and reads as intentional and fashion-forward rather than juvenile, as long as you execute it with polished details. Matching elastics, coordinated textures, and a precise middle part are what elevate it from childish to chic.
Final Thoughts
A middle-part ponytail is one of those hairstyles that offers genuine versatility without requiring professional skill or expensive products. Whether you’re drawn to sleek sophistication, romantic softness, playful texture, or bold architectural precision, there’s a middle-part ponytail variation that aligns with your aesthetic and flatters your unique face shape. The magic of the middle part is that it automatically creates balance and intentionality—you’re not accidentally looking put-together; you’re strategically chosen this parting and this style.
The real secret to making any of these styles work is understanding your face shape, recognizing what textures suit your hair type, and committing to the small details that elevate a ponytail from ordinary to exceptional. Backcomb your crown for volume. Release wispy face-framing pieces. Invest in quality elastics that match your hair. Use texturizing sprays that give you grip and dimension. These aren’t complicated techniques—they’re simply the difference between a style that feels effortless and one that looks effortless.
Start with whichever style speaks to you most, practice it a few times, and don’t hesitate to adapt it based on your hair texture, length, and personal preference. Your hair is unique, and your ponytail should reflect that. Once you nail one middle-part ponytail style, you’ll have the confidence to experiment with the others, mixing and matching elements to create variations that feel entirely your own.