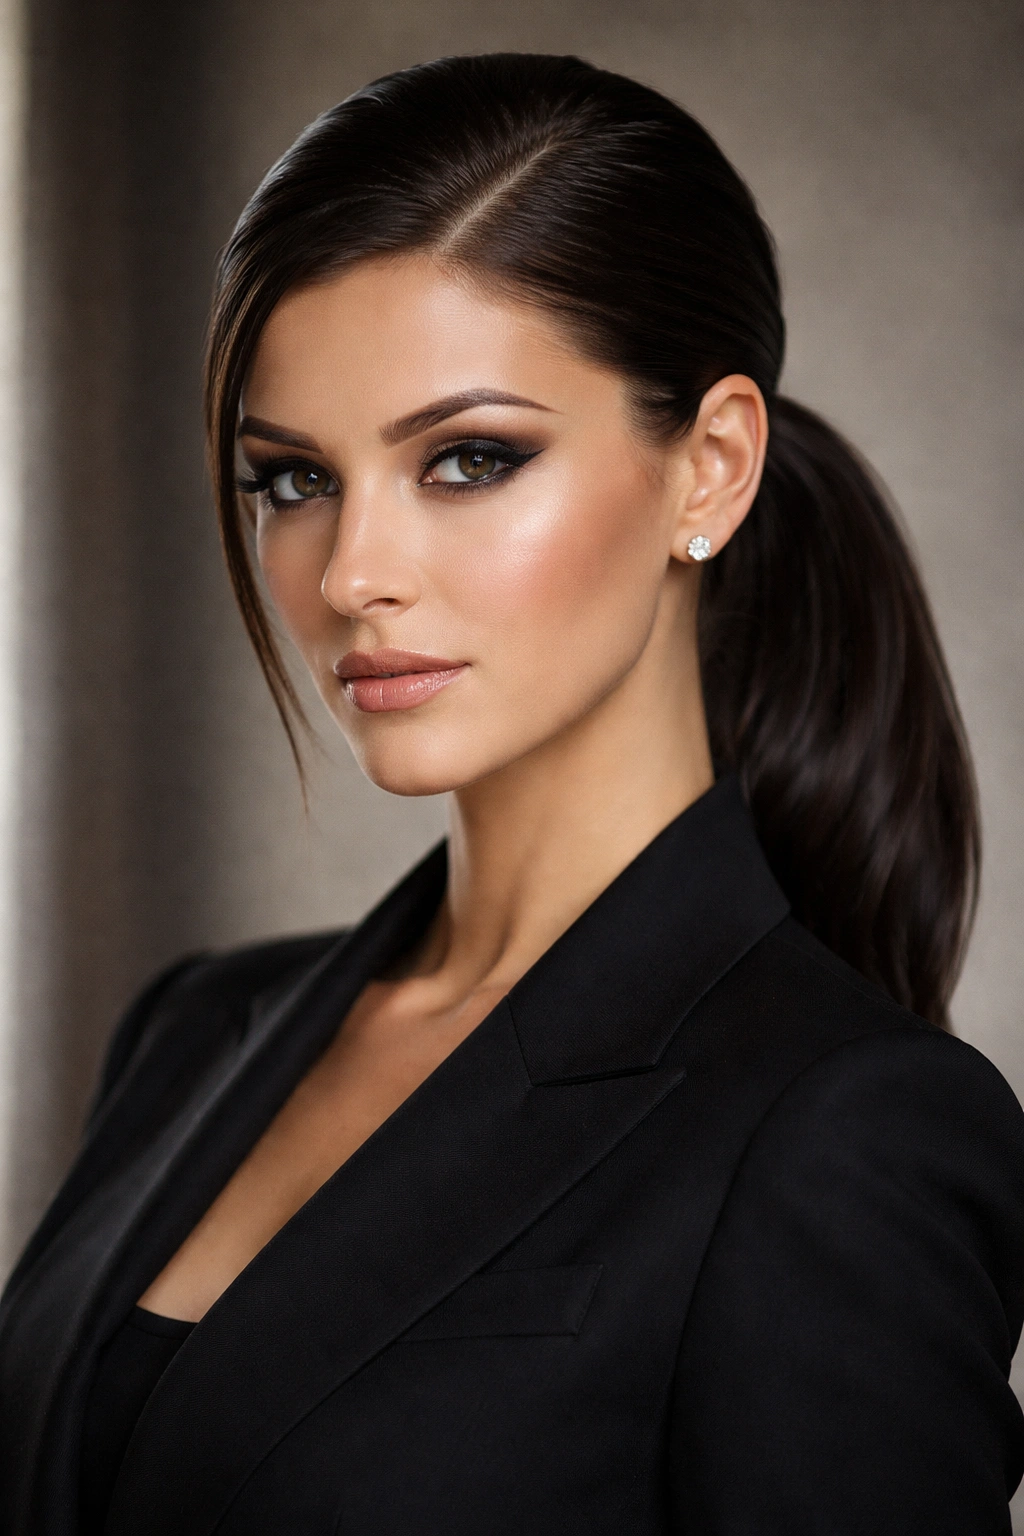
A low ponytail is one of those rare hairstyles that works equally well in the boardroom and at a cocktail party. It’s polished enough to command respect at work, elegant enough for formal events, and flattering enough to feel like you’ve put in real effort—even when you’re doing it on a Tuesday morning in five minutes. But here’s what most people don’t realize: the difference between a low ponytail that looks thrown together and one that looks intentionally chic comes down to the small details. The placement, the finish, whether you add texture or keep it seamlessly smooth, how you treat the base—these subtle choices transform a basic style into something genuinely striking.
The beauty of a low ponytail is its versatility disguised as simplicity. You can dress it up or down, adjust the vibe from sleek to textured, make it look effortlessly undone or meticulously refined. Whether your hair is fine or thick, straight or curly, short or long, there’s a low ponytail variation that’ll make you feel confident walking into any room. The styles that work best tend to share one thing in common: intentionality. They’re not just hair pulled back—they’re styled with purpose, and that’s what makes the difference between ordinary and polished.
In this guide, we’re covering the low ponytail styles that genuinely work for professional settings, special events, and everyday occasions when you want to look put-together. Each one has a specific personality and plays to different strengths, so you can pick the version that matches both your hair type and the occasion. Some prioritize sleekness, some add movement, some introduce unexpected detail—but all of them share that hallmark of effortless sophistication that makes people wonder if you spent an hour at a salon.
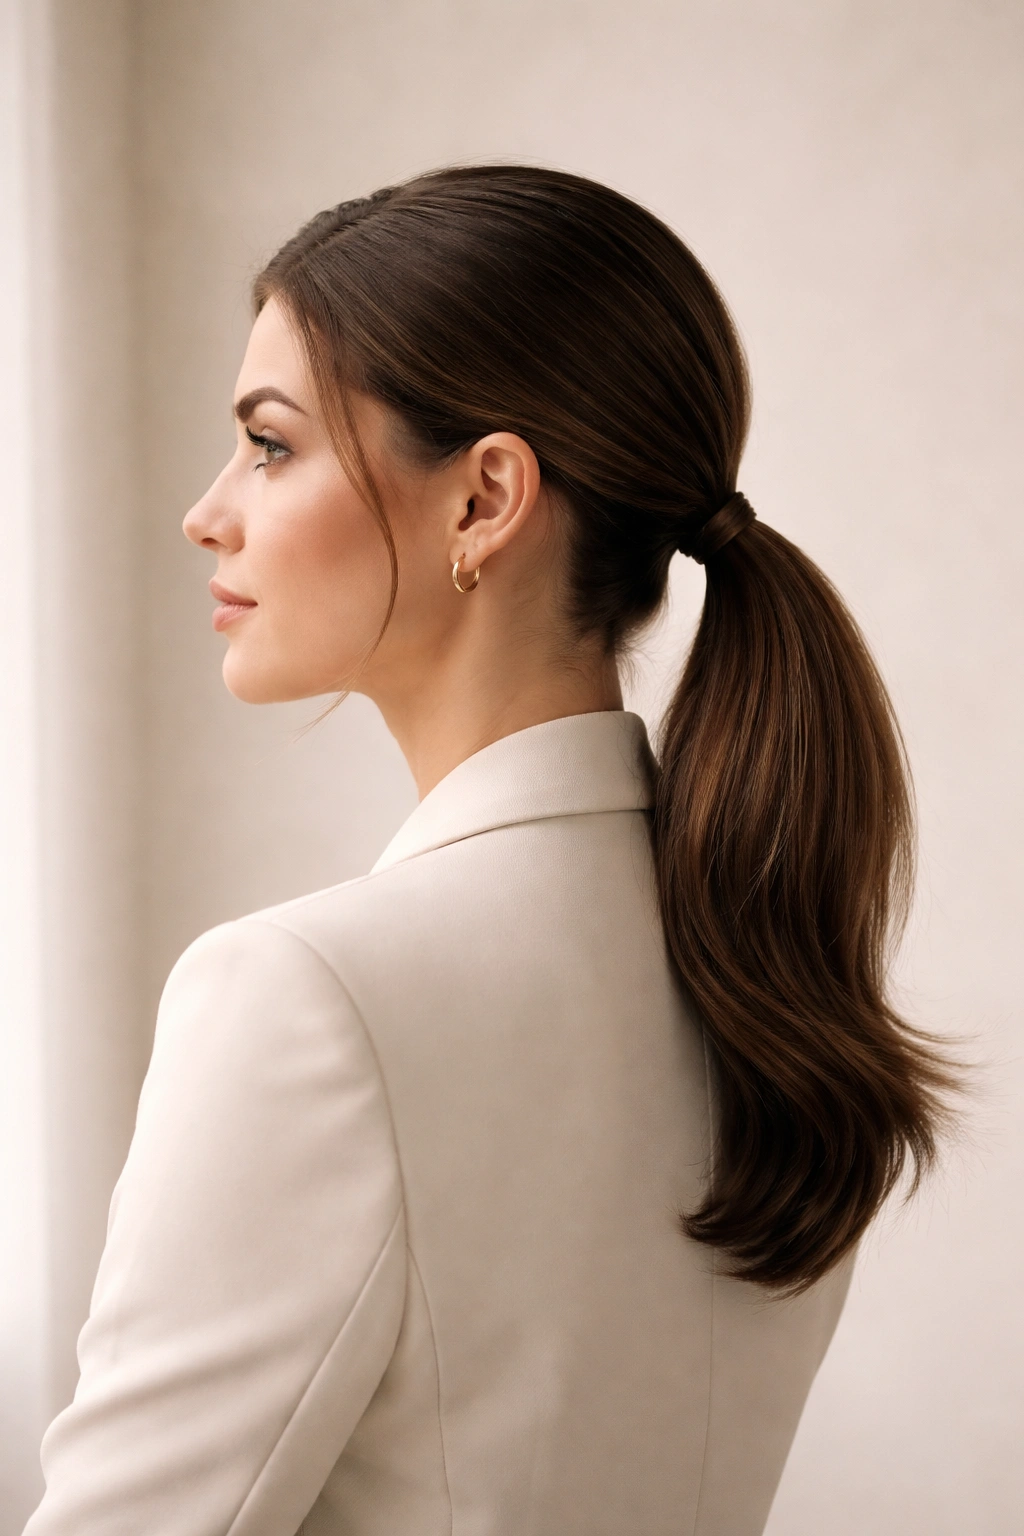
1. The Sleek and Straight Low Ponytail
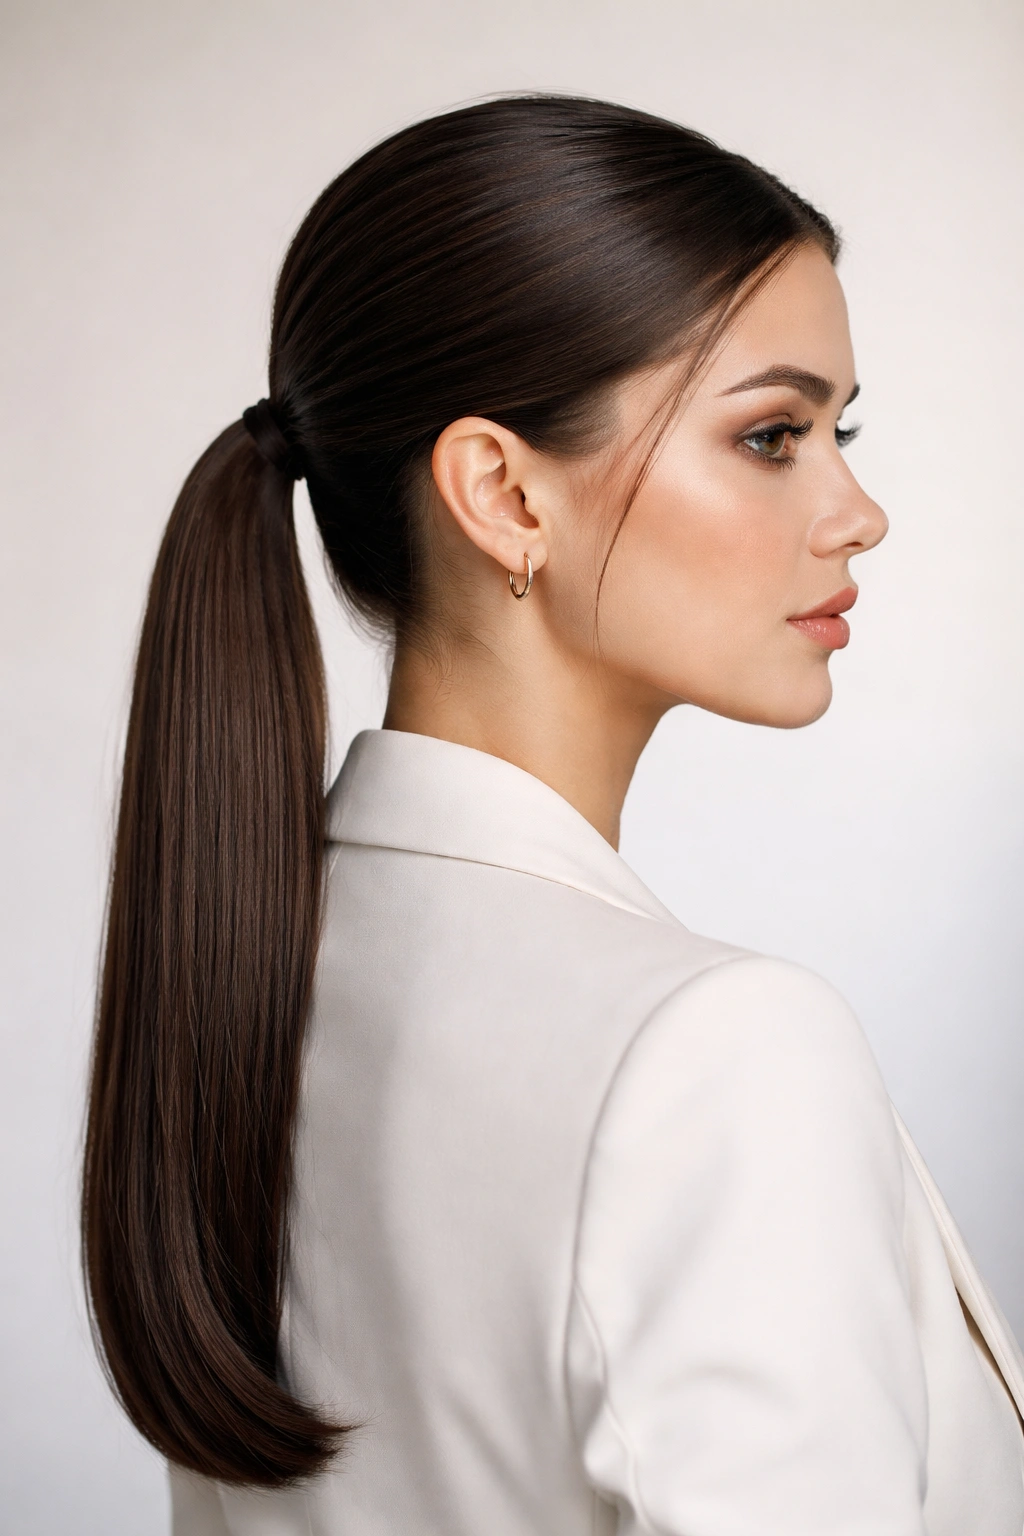
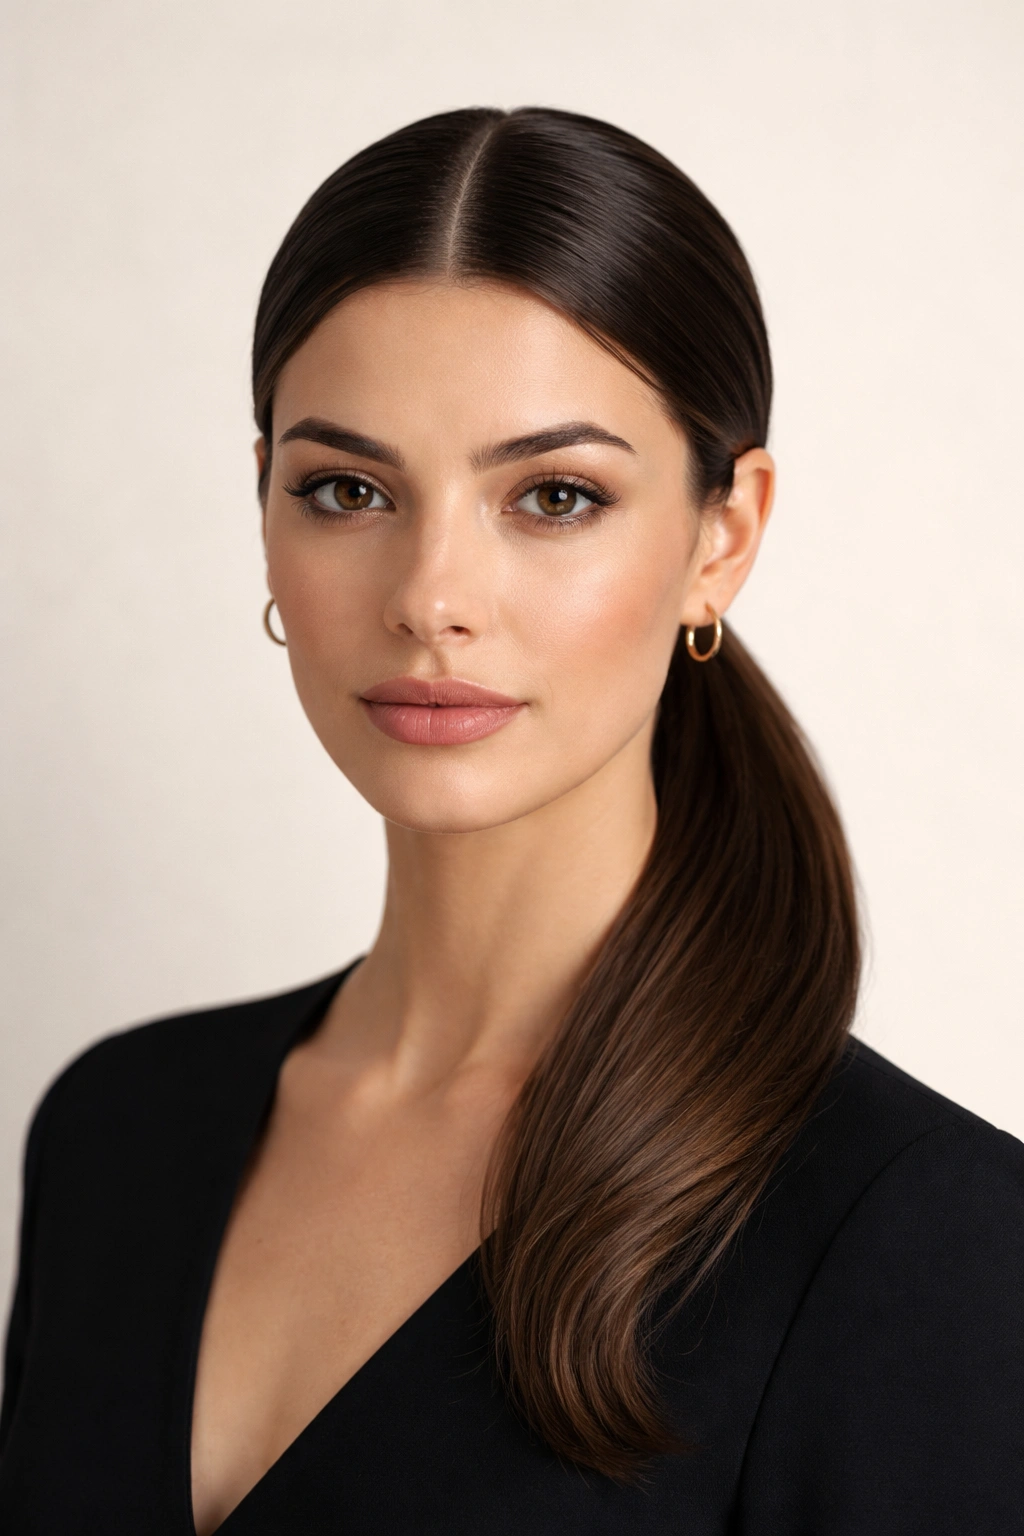
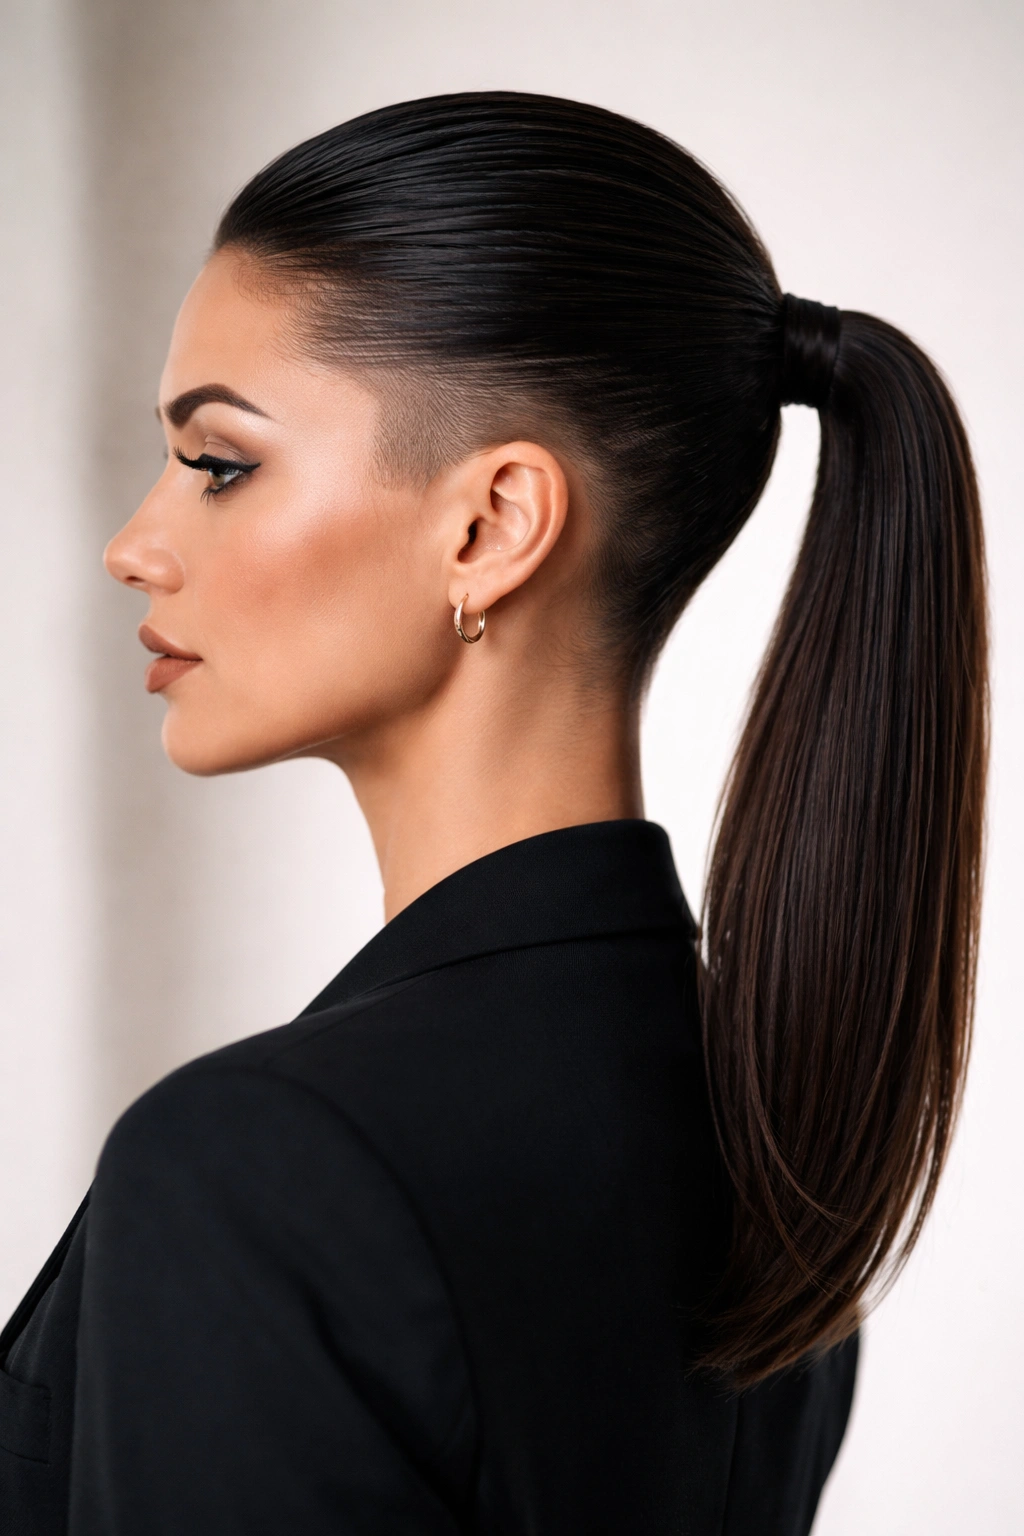
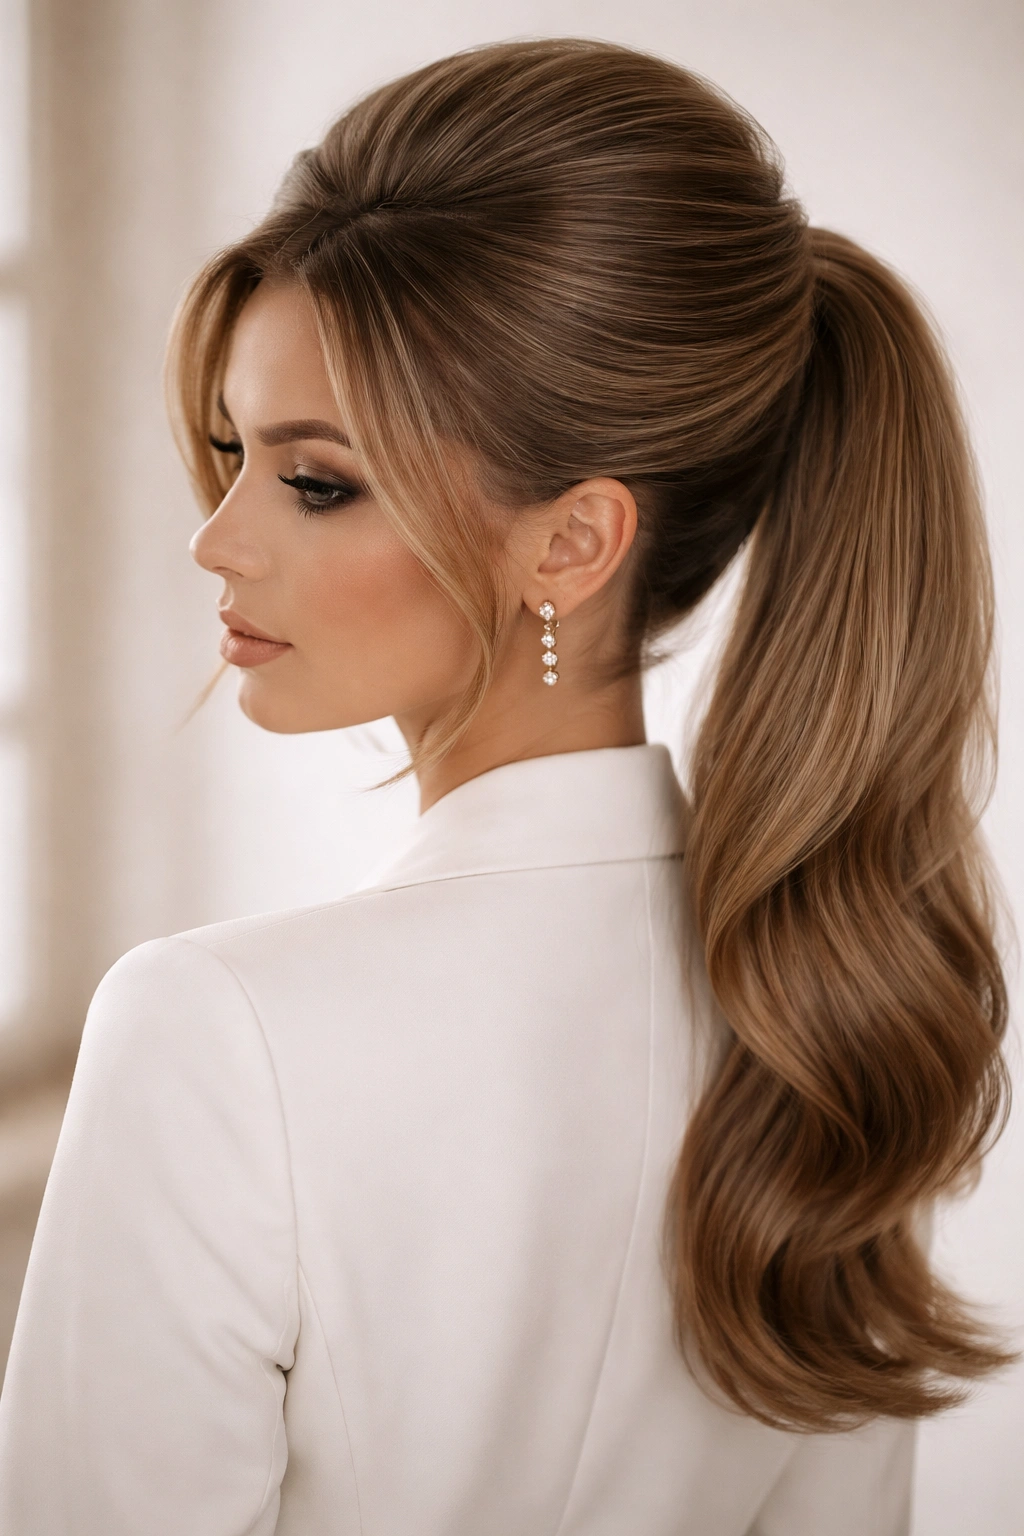
This is the foundation style—the one that works for literally every occasion and every hair type when done right. A sleek and straight low ponytail is what you reach for when you need to look immediately polished without any guesswork. It’s the opposite of fussy; instead, it’s all about perfect execution and clean lines that frame the face beautifully.
Why It’s the Ultimate Professional Choice
The sleek straight low ponytail works because it communicates intentionality and control. The smooth lines draw the eye upward to your face and shoulders, making it flattering for almost all face shapes. When you get the placement right—sitting just at the nape of your neck or slightly lower depending on your hair length and personal preference—it creates an elongating effect that’s deeply flattering. The key is that “sleek” doesn’t mean harsh; it means polished and purposeful, with hair that catches light and looks healthy.
How to Achieve This Look
- Use a smoothing serum or anti-frizz product on damp hair before blow-drying to create a sleek base
- Blow-dry your hair completely straight using a paddle brush and concentrating heat from roots to ends
- Create a deep side part or center part depending on your face shape (deeper side parts work better for rounder faces; center parts suit most face shapes equally)
- Brush hair back smoothly using a fine-tooth comb and a small amount of gel or edge control to tame flyaways
- Gather hair into a low ponytail positioned at the nape of your neck, using a clear or matching elastic
- Wrap a small section of hair around the base to cover the elastic, securing with bobby pins that match your hair color
- Finish with a light hairspray to maintain the sleekness without creating flakiness or visible product buildup
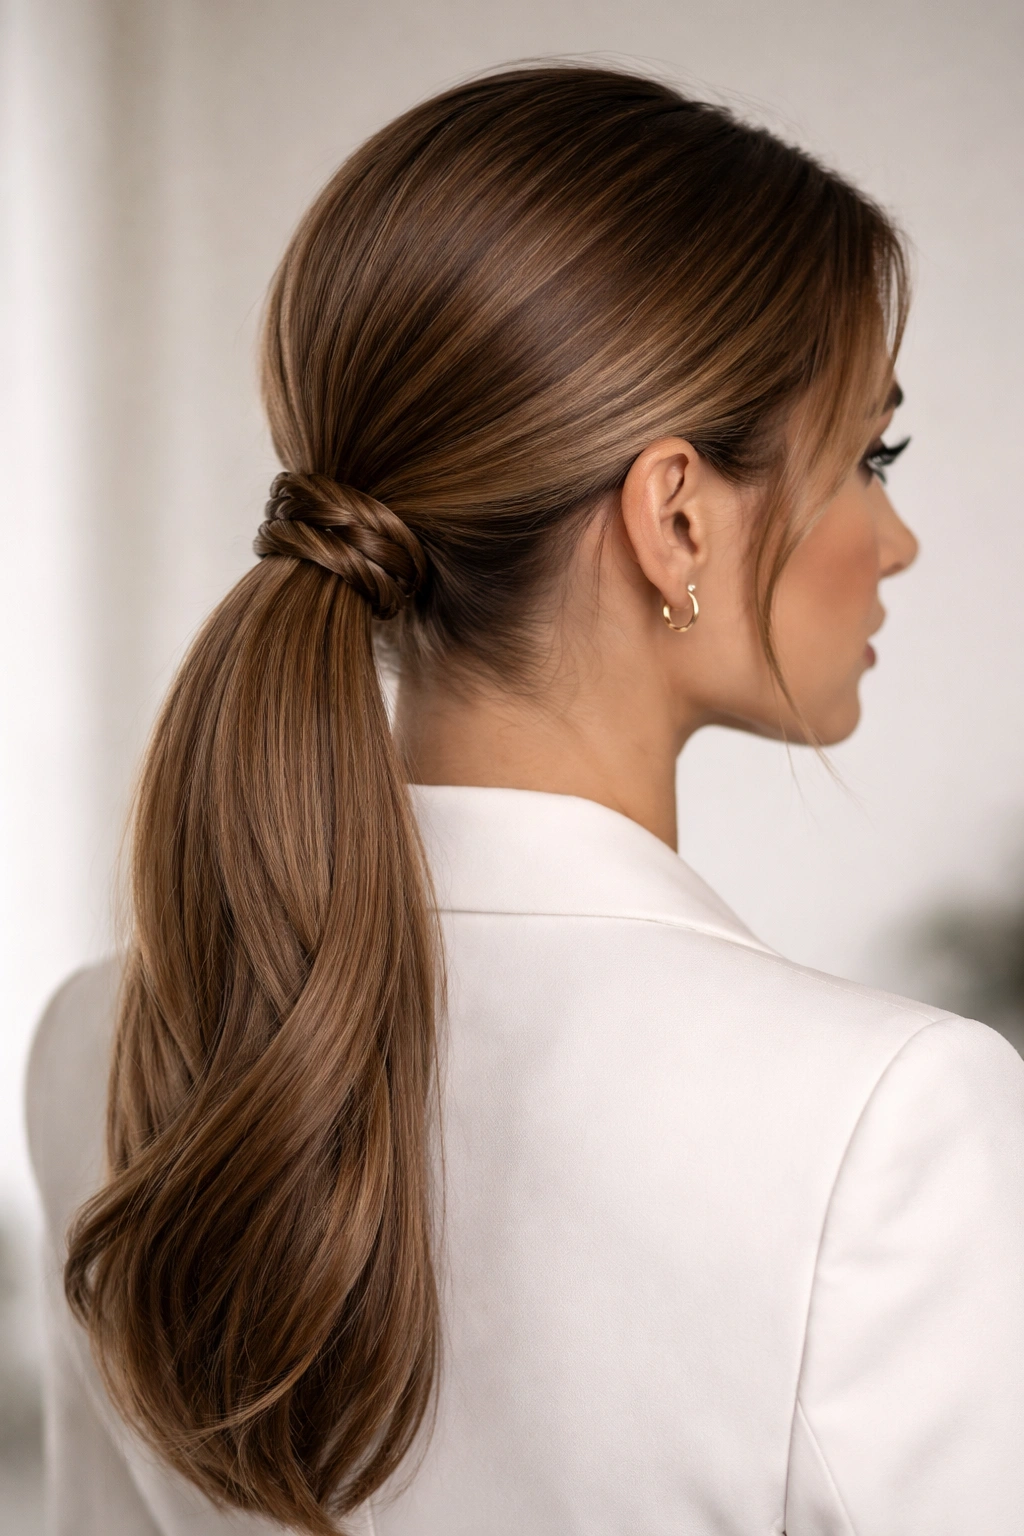
2. The Twisted Base Low Ponytail
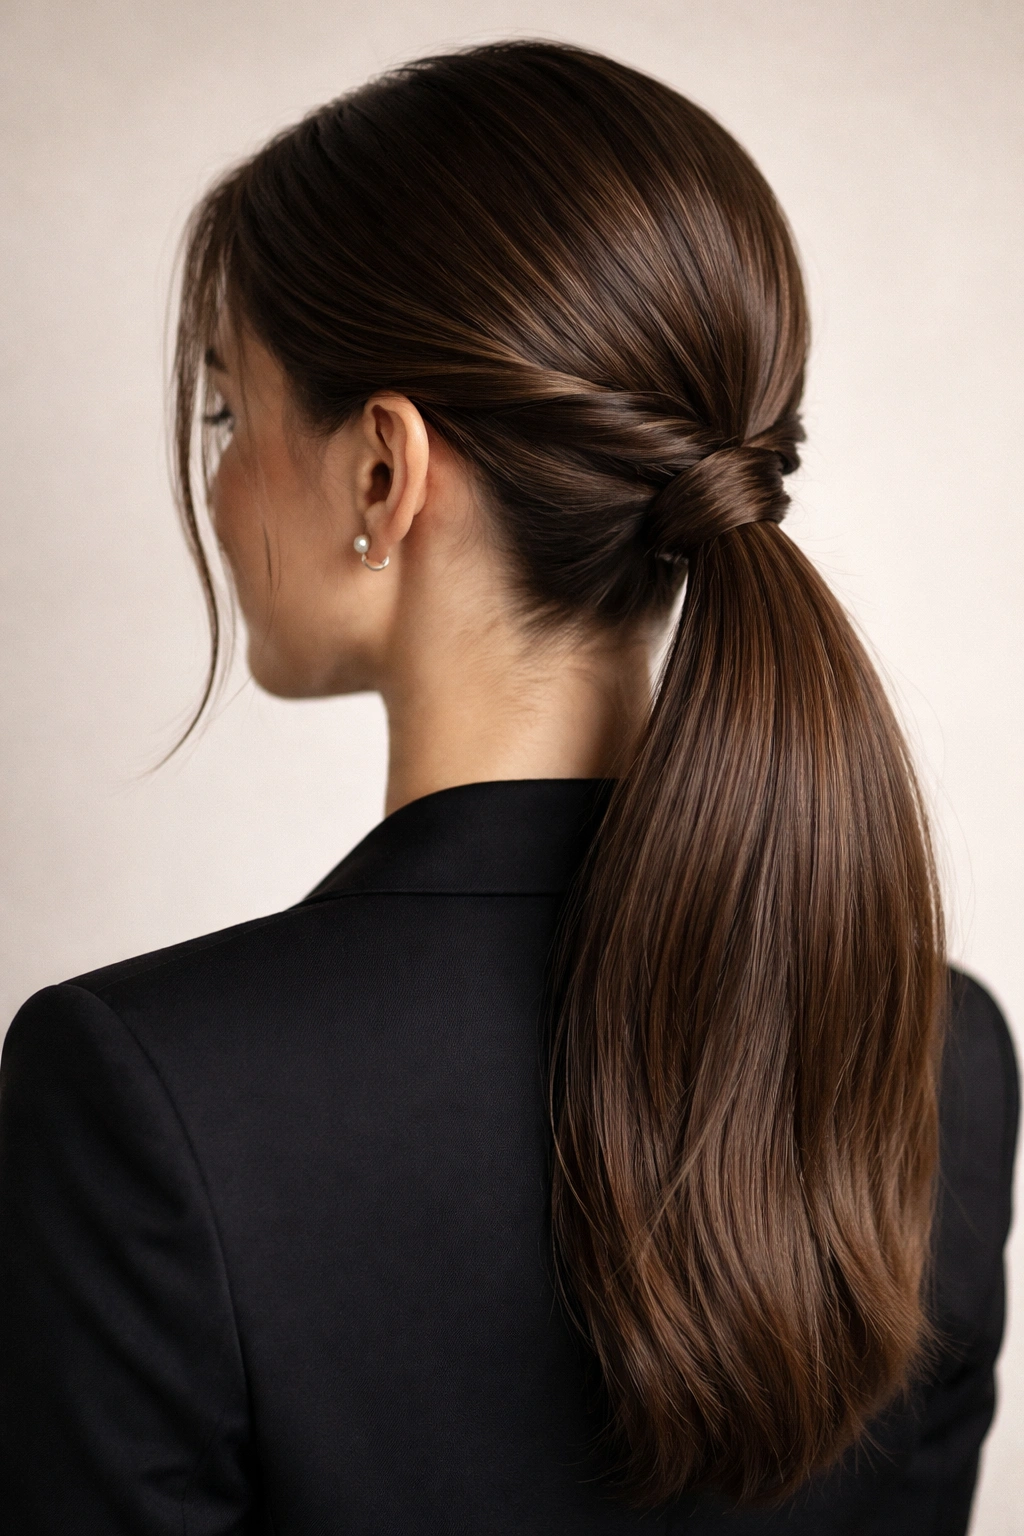
This version takes the simplicity of a basic ponytail and adds just enough detail to make it feel special without requiring advanced skills. Two twisted sections at the crown are wrapped around the ponytail base, creating visual interest and dimension that reads as deliberately styled rather than hastily thrown together.
What Makes It Look More Polished Than Basic
The twist adds texture and movement to what could otherwise feel too simple for a formal event. The twisted sections create dimension when light hits them, giving the impression of more volume and intricacy than actually exists. Because the twists frame the face before gathering into the ponytail, they soften the overall look while still maintaining polish. This style works beautifully for fine hair that might look too thin in a completely smooth style, because the twists add visual weight and interest.
How to Build This Style
- Start with a smooth base by blow-drying hair straight or creating subtle waves
- Create a side part and use edge control to smooth the hairline
- Gather the front section of hair on the side with more volume (the larger section from your side part)
- Twist this section loosely while moving toward the back of your head, creating a relaxed spiral rather than a tight twist
- Gather the opposite section and twist it in the same direction, meeting at the back
- Combine both twisted sections with the remaining hair into a low ponytail at the nape
- Secure with an elastic, then wrap a small strand of hair around the base
- Gently tug on the twists to loosen them slightly, creating a soft, piecey texture that feels romantic and intentional
- Use bobby pins to secure the wrapped section and finish with light hairspray
3. The Braided Wrap Low Ponytail
When you want to elevate a low ponytail for a special event or important meeting, adding a braid detail transforms it into something that feels genuinely dressy. A single three-strand braid wraps around the ponytail base, creating an elegant frame that draws attention to your face and adds sophistication without requiring expert skills.
Why This Detail Makes All the Difference
A braid at the base catches light and creates visual texture that photographs beautifully and looks polished in person. The braid adds movement and detail that suggests you’ve put thought and care into your appearance, even if the entire style takes just ten minutes to execute. Because the braid is positioned at the back of your head where most people are looking at your profile or three-quarter view, it’s visible and creates a complete, finished impression. This is the style that makes people assume you’ve had professional styling, even though you did it yourself.
Steps to Create the Braided Detail
- Blow-dry hair smooth and create your preferred part
- Gather hair into a low ponytail, securing with a clear elastic
- Take a small section of hair from the side of your ponytail (about one inch thick)
- Braid this section using a three-strand braid, keeping it loose and relaxed rather than tight
- Wrap the braid around the base of your ponytail, covering the elastic completely
- Secure the end of the braid beneath the ponytail using bobby pins that match your hair color
- Gently tug on the braid sections to create a softer, fuller appearance with texture
- Spray lightly to hold the style in place while maintaining movement and softness
- For extra dimension, you can lightly tease the ponytail beneath the braid to create subtle volume
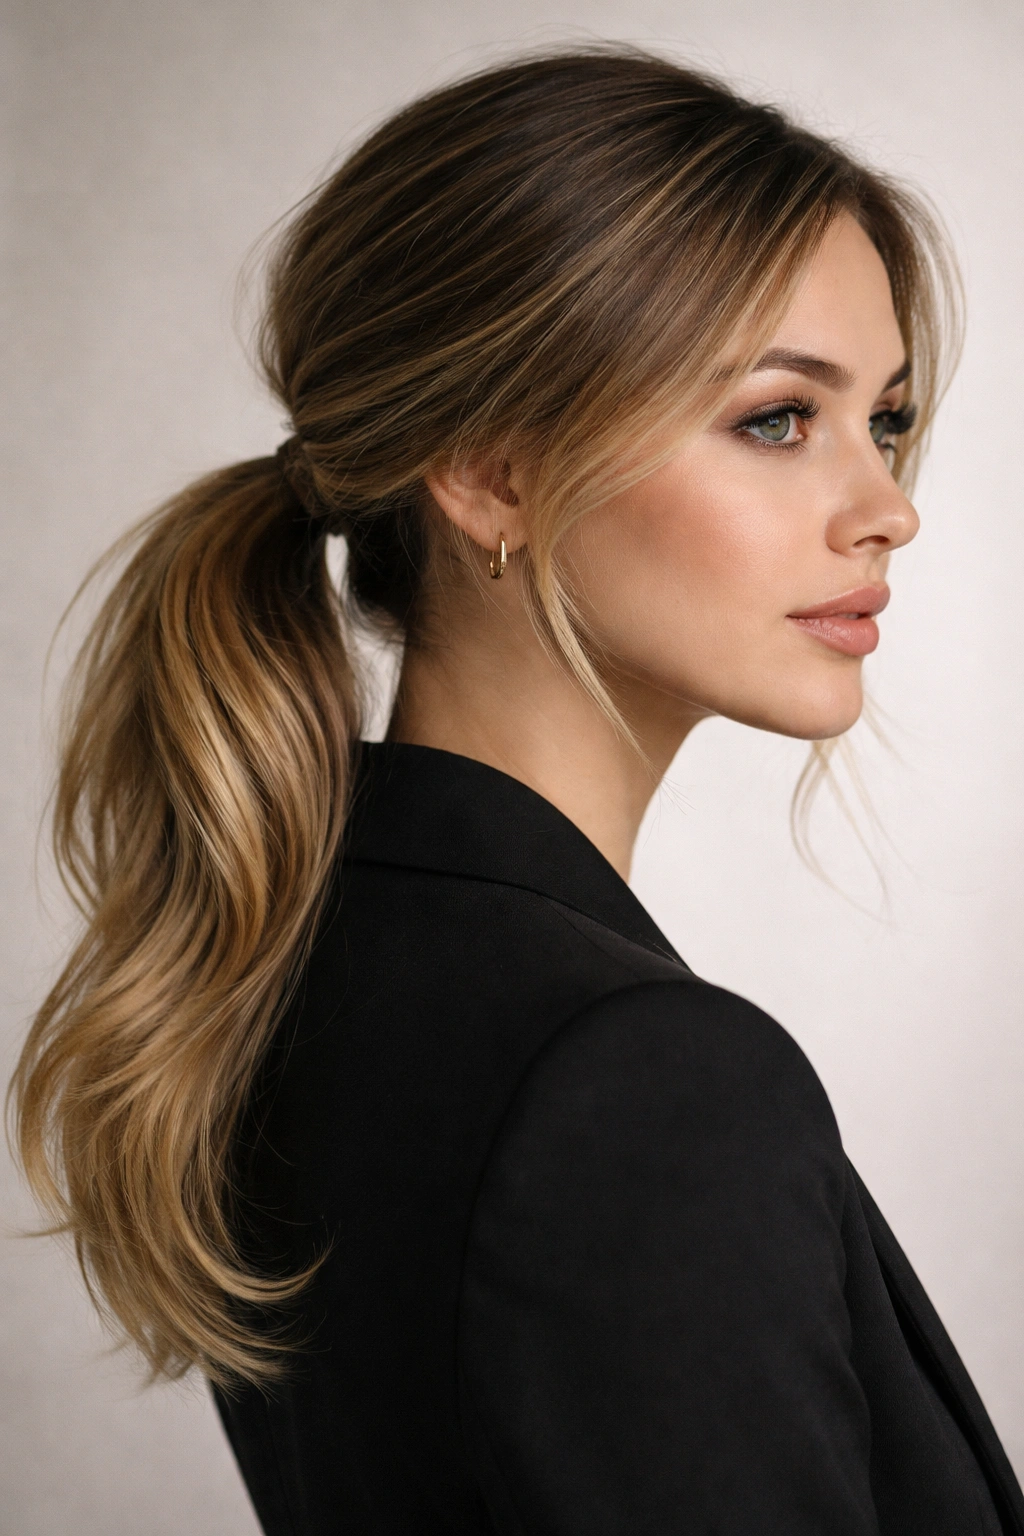
4. The Textured and Tousled Low Ponytail
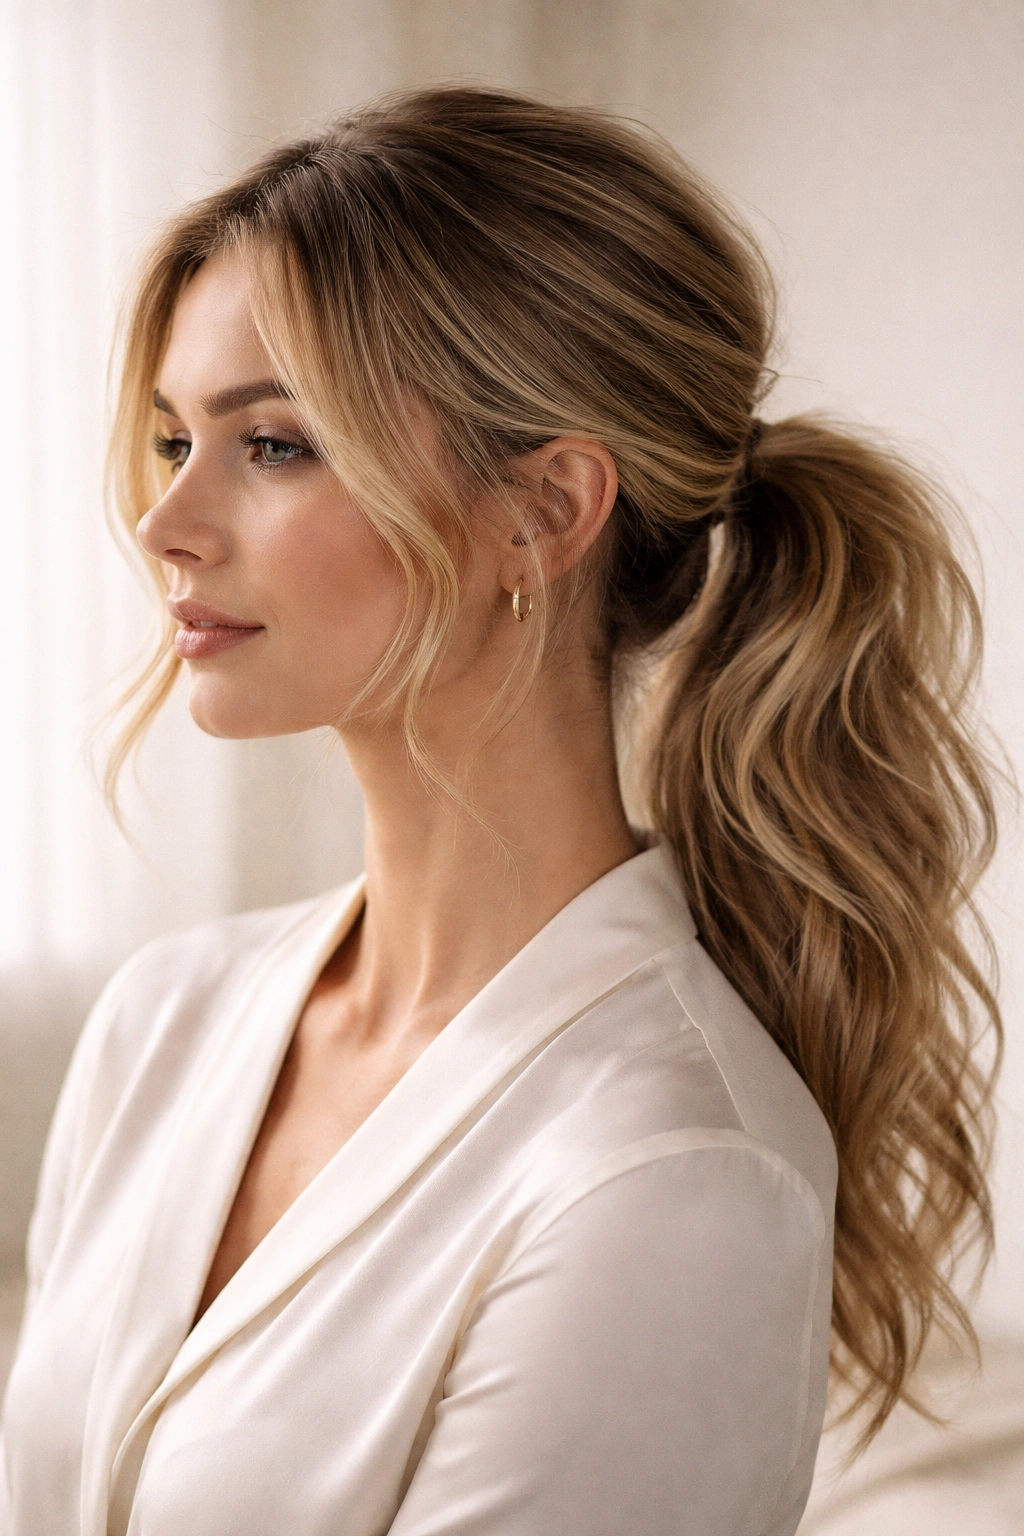
This version prioritizes movement and softness over sleekness, making it perfect when you want to look polished but not overly formal. A textured low ponytail with a slightly undone quality feels modern and approachable, ideal for workplaces with more creative energy or events where you want to look sophisticated but relaxed.
How Texture Creates the Illusion of Effortlessness
The tousled low ponytail works because it suggests you didn’t try too hard, which is paradoxically what makes it look intentional and stylish. Soft waves or gentle texture throughout the hair create movement and catch light beautifully, adding dimension that reads as volume and health. The slightly undone quality makes you seem confident enough to embrace imperfection, which is deeply appealing. This style suits all hair types beautifully, especially curly or wavy hair that naturally has this texture.
Building the Textured Look
- Create soft waves or curls using a curling iron, wand, or braiding method (braid damp hair overnight for heatless waves)
- Use a volumizing mousse or texture spray on damp roots before styling to build foundation texture
- After curling or waving, gently break up the waves using your fingers rather than a brush—this creates a softer, more natural appearance
- Flip your head upside down and use your fingers to gather hair into a low ponytail at the nape
- Secure with a soft elastic, then gently pull and tease sections of the ponytail to create a fuller, piecey texture
- Leave a few face-framing pieces slightly loose for softness around your face
- Wrap a thin strand of hair around the base, securing with bobby pins
- Use a light texture spray or dry shampoo on the ponytail itself to enhance grip and create more visible texture
- Finish with flexible hold hairspray that maintains movement rather than creating a stiff appearance
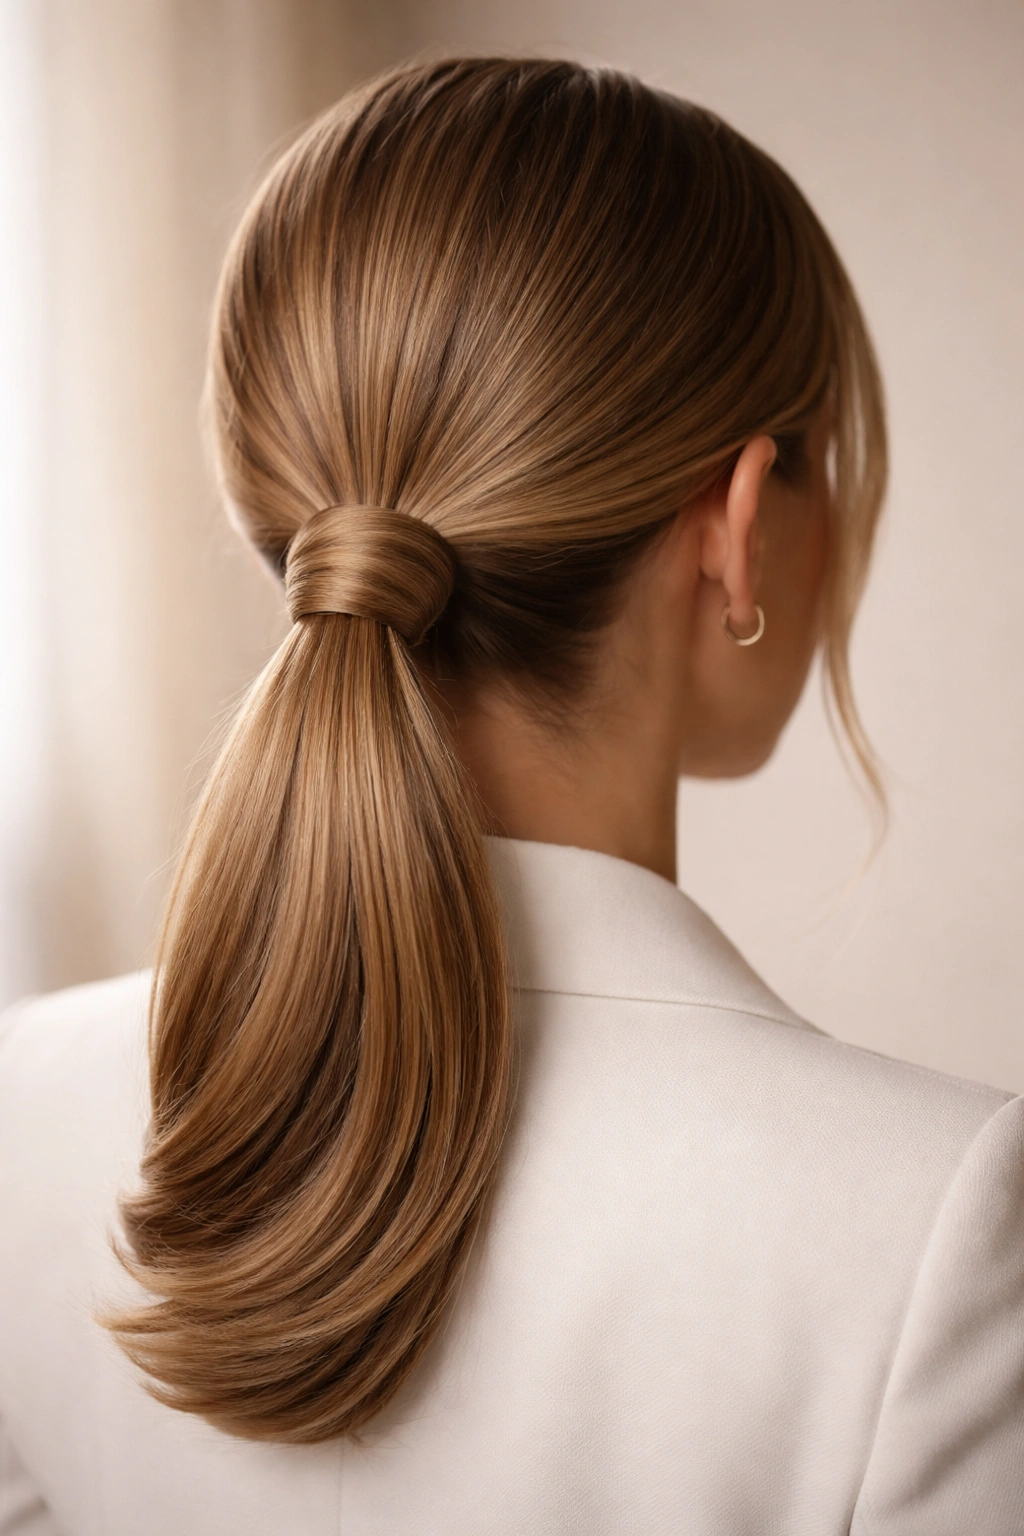
5. The Center-Parted Low Ponytail
The center part is having a major moment because it’s simultaneously classic and modern, flattering on most people, and incredibly easy to execute. A center-parted low ponytail feels balanced and intentional, making it an excellent choice for professional environments or formal events where you want to look both approachable and polished.
Why Center Parts Feel So Intentional
A center part creates visual symmetry that’s inherently calming and organized—perfect qualities to project in a professional setting. It also tends to be very flattering because it frames both sides of your face equally, highlighting your features without drawing undue attention to one side. The center part trends toward elegance because it has historical precedent in classic hairstyling; it automatically reads as refined. This is especially effective when paired with sleek styling, because the symmetry amplifies the polished impression.
How to Perfect the Center-Part Style
- Determine where your natural center part line falls by running your finger down the middle of your scalp
- Use a fine-tooth comb to create a precise center part from your hairline all the way to the crown
- For a sleek finish, use edge control or a light gel along the part line to keep it crisp and clean
- Smooth the front sections on both sides using a paddle brush and smoothing serum
- Brush hair straight back from the part line toward the nape of your neck, using your comb to maintain the line as you work
- Gather all hair into a low ponytail at the nape, making sure the part line remains visible
- Secure with a thin elastic that matches your hair color
- Wrap a small section around the base to conceal the elastic
- Set with light hairspray to maintain the center part definition without creating visible product buildup
- For added polish, you can tease very slightly at the crown to create subtle volume without disrupting the part
6. The Curved Undone Low Ponytail
This style splits the difference between polished and effortless by creating a curved, swept-back silhouette with deliberately undone details. Rather than pulling hair straight back, you create a gentle curve that flows from one side of your head to the other, giving the impression of movement and relaxed elegance. It’s the low ponytail equivalent of “I woke up like this,” except you absolutely didn’t—but nobody needs to know that.
What Makes This Feel Intentionally Undone
The curved undone ponytail works because it acknowledges that perfect polish can feel a little sterile in some contexts. Instead, the gentle curve and slightly loose sections create visual softness and humanity. This style reads as confident because you’re clearly put-together enough to style your hair, but relaxed enough to embrace a little imperfection. The curve also has a flattering effect on face shape because the flow of hair from one side to another can help balance or elongate your features depending on where you position the curve.
Creating the Curved Silhouette
- Start with soft waves or texture created with a curling iron or overnight braids
- Create a side part that feels natural to your hair’s tendency
- Use your fingers to gather hair loosely from the larger side of your part
- Gently curve this section across the back of your head toward the opposite side
- Use bobby pins hidden underneath to anchor this curved section, creating the sweep effect
- Gather remaining hair, including the smaller side section, into a low ponytail beneath or at the point where your curve ends
- The curve should be visible and intentional, not accidental-looking
- Pull out small, delicate sections from around your face and hairline using bobby pins to secure them loosely—these create the undone quality
- Gently tease the ponytail tail itself to create a softer, fuller texture
- Use flexible hold hairspray that allows movement rather than locking everything in place
7. The Sleek Undercut Low Ponytail
This modern variation takes visual inspiration from undercut designs, where you create the illusion of shaved or very short sections beneath a longer top layer. The effect is dramatic and fashion-forward without requiring you to actually cut your hair short. It’s perfect for creative workplaces or events where you want to make a style statement while maintaining professionalism.
Why This Feels Contemporary and Bold
The sleek undercut low ponytail works because it creates visual contrast and plays with proportion in unexpected ways. The gathered ponytail suddenly reveals sleek sides or back sections, creating a double-take moment that feels intentionally artistic. This style has genuine edge without being unprofessional; it reads as sophisticated risk-taking rather than rebellious. The sleekness required throughout the entire style contributes to its polished, fashion-forward impression.
Achieving the Undercut Effect
- Blow-dry hair completely straight using a paddle brush
- Create a side part and smooth the front and top sections thoroughly using edge control
- Gather the top section of hair (from your part forward, including any front pieces) into a high or mid ponytail temporarily, securing loosely
- On the sections that will be exposed (the sides and back lower sections), apply a light smoothing serum
- Use a flat iron to create ultra-sleek, polished sides and back sections
- These exposed sections should be perfectly smooth and shiny, creating strong visual contrast with the ponytail
- Release your temporary ponytail and gather all hair into a low ponytail at the nape
- Ensure the sides remain sleek and exposed as you secure the ponytail
- Use clear elastics and avoid wrapping a strand around the base, as you want the contrast to be visible
- Apply light hairspray only to the exposed sections to maintain their sleekness
- The ponytail itself can be sleek or slightly textured depending on the overall vibe you’re going for
8. The Pearl or Jeweled Low Ponytail
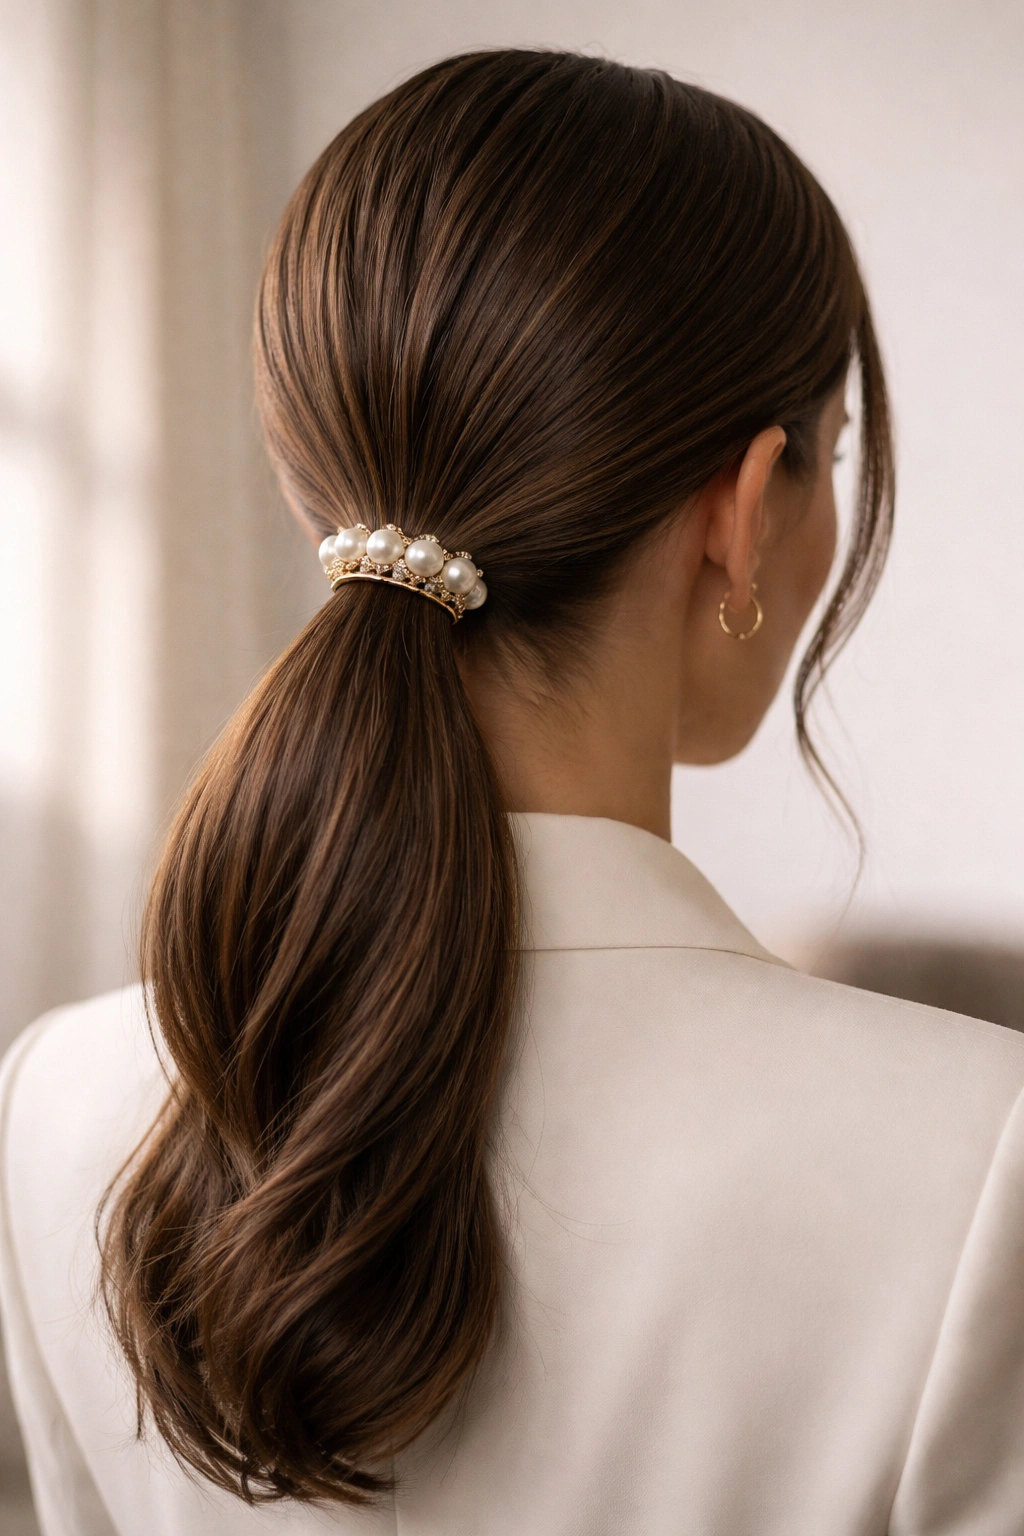
Sometimes the most sophisticated styling choice is adding a single, beautiful accessory that transforms a simple ponytail into something genuinely special. A pearl-adorned or jeweled hair cuff worn at the base of your low ponytail elevates the style instantly, making it appropriate for formal events, weddings, or professional occasions where you want to signal that you’ve taken extra care with your appearance.
How Accessories Elevate Without Overwhelming
Adding a quality accent piece to your low ponytail feels modern and intentional in a way that traditional hair jewelry sometimes doesn’t. A pearl cuff or jeweled band worn at the base draws focus to the back of your head and adds a touch of luxury that doesn’t feel costume-y or over-styled. The key is using one piece rather than multiple accessories; restraint is what makes accessorized hairstyles look sophisticated rather than cluttered. This is especially effective for people with understated personal style, because the accessory does the heavy lifting in terms of adding visual interest.
Styling to Showcase Your Accessory
- Create a sleek or lightly textured low ponytail using whichever base style speaks to you
- Ensure the base of your ponytail is smooth and polished so your accessory sits beautifully
- Rather than wrapping a section of hair around the elastic, use the decorative cuff or band to cover the elastic
- Choose pieces that complement your skin tone and overall coloring (silver or pearl for cooler tones, gold for warmer tones)
- Consider the formality of your event when choosing between subtle pearl and more dramatic jeweled options
- Pair jeweled cuffs with sleek, smooth styles for maximum elegance and impact
- Pair pearl cuffs with textured or slightly undone ponytails for a softer, more romantic impression
- Keep other jewelry minimal so your hair accessory remains the focal point
- Ensure the cuff is secure before leaving the house; test it by gently tugging on the ponytail
9. The Voluminous Crown Low Ponytail
This version prioritizes building visible volume at the crown while maintaining the polished low ponytail placement. The high-volume top creates the illusion of thick, healthy hair even if your hair is naturally fine, and it photographs beautifully from the front while maintaining the understated elegance of a low placement. It’s perfect for events where you want to look glamorous, or for professional settings where a little extra polish isn’t out of place.
Creating Volume Without Artifice
Building volume at the crown is a technique that transforms how a ponytail frames your face and makes your hair look thicker overall. The secret is teasing strategically at the roots rather than attempting to tease the entire crown, which often looks bumpy and unrefined. When done right, the volume looks like naturally thick, healthy hair rather than a constructed style. This technique works beautifully for all hair types, though fine hair benefits most obviously from the visual thickness it creates.
Steps to Build Lasting Crown Volume
- Blow-dry your hair with your head flipped upside down to create maximum root lift
- Flip right-side up and use a teasing brush or fine-tooth comb to gently backcomb the roots at your crown
- Tease only the roots, not the full length of each section—this creates structure without visible bumps
- Smooth the outer layer using a soft paddle brush, maintaining the volume beneath
- Use a light hairspray to set this volume before continuing with your style
- Create your preferred part and smooth the front sections
- Gather hair into a low ponytail, being careful not to smooth down the teased crown
- You can wrap a strand around the base or use a decorative cuff—either works beautifully
- Gently tease the ponytail itself to create a fuller, rounder shape
- Use flexible hold hairspray to maintain the volume throughout the day without creating stiffness
10. The Slicked-Back Low Ponytail with Deep Side Part
This is the power move of low ponytails—completely slicked back with a dramatic deep side part that frames one side of your face while the other side is fully exposed. It’s bold, intentional, and demands confidence, but when executed well, it’s absolutely stunning and appropriate for important professional moments or formal events where you want to make a visual statement.
Why This Style Commands Attention
The slicked-back low ponytail with a deep side part works because it’s unapologetic about showcasing your face and bone structure. By removing all hair from the sides and slicking it all back, you’re saying you’re confident enough to show yourself fully. The deep part creates an asymmetrical balance that’s sophisticated and modern. This style reads as powerful and intentional, making it an excellent choice when you want to project confidence and control in a professional setting.
Achieving the Slicked-Back Effect
- Blow-dry your hair thoroughly straight—any wave or texture will interfere with the slicked effect
- Create a very deep side part by running your comb from just above one ear to the crown
- Use a strong-hold edge control or gel along the smaller side of your part
- Smooth this smaller section completely flat against your head using a fine-tooth comb, creating a polished appearance
- Use the gel to smooth any flyaways and create definition along the part line
- Work the gel or edge control through the larger side section as well, ensuring every strand is smooth and controlled
- Gather all hair into a low ponytail at the nape, maintaining the slicked appearance throughout
- Secure with a thin elastic that matches your hair color
- Wrap a small section around the base, maintaining the sleek aesthetic throughout
- Finish with a strong-hold hairspray, applying it section by section to ensure complete coverage
- Check throughout the day and touch up any flyaways using a fine-tooth comb and light edge control
11. The Bubble Braid Low Ponytail
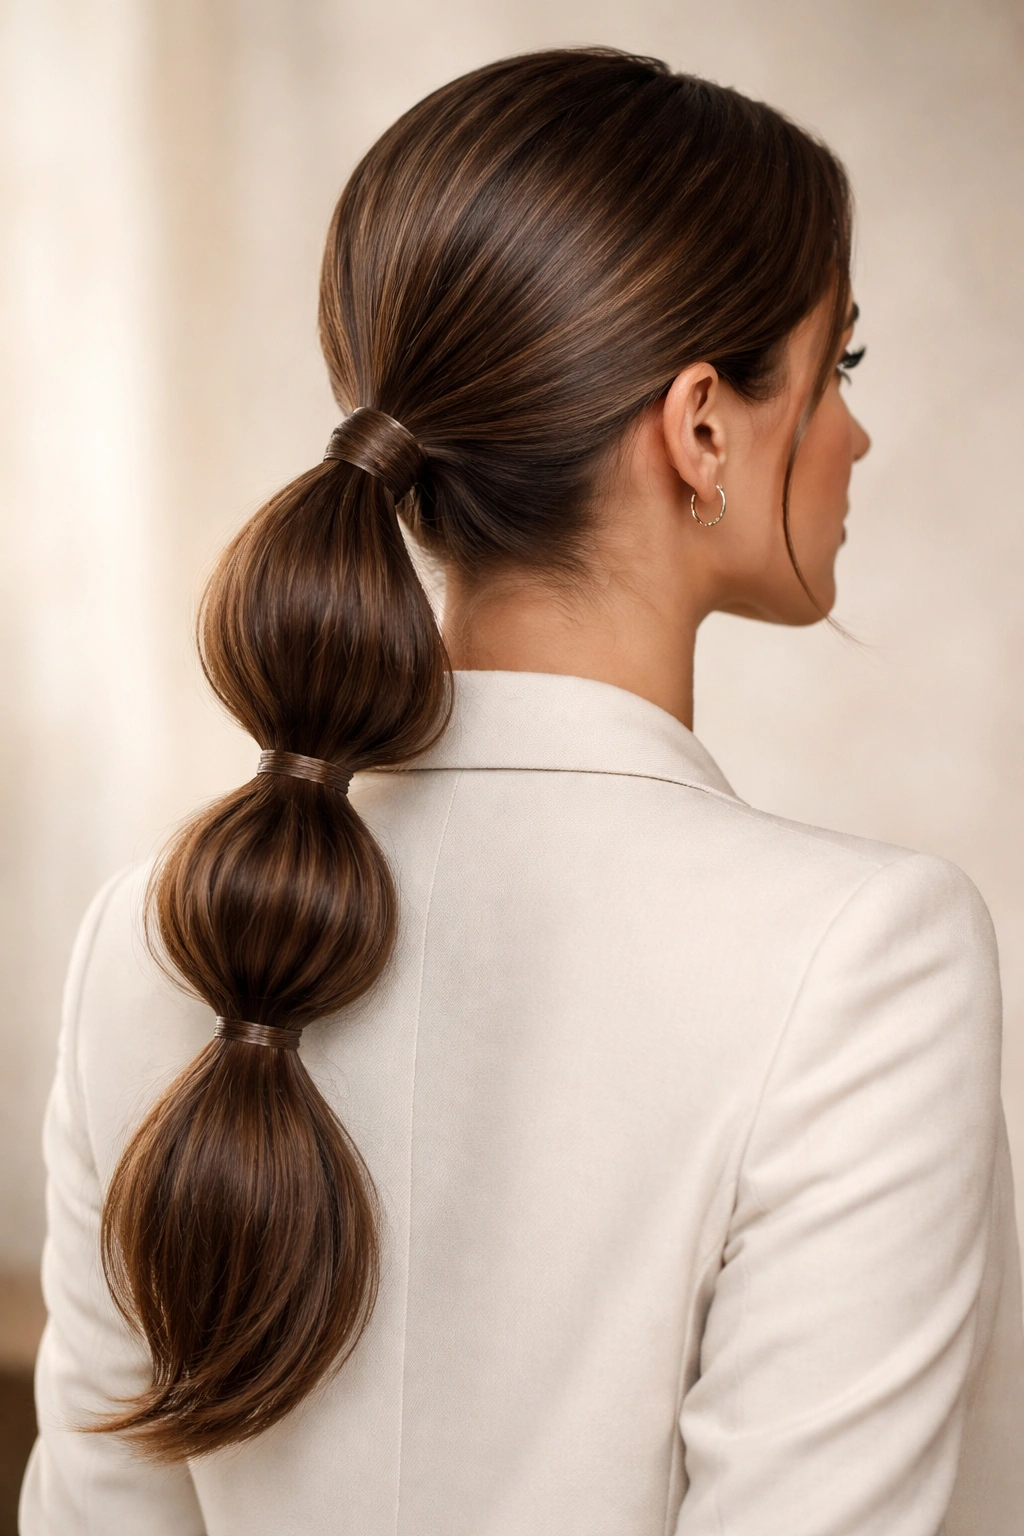
This playful yet sophisticated style combines the structure of a braid with the placement of a low ponytail, creating a visual rhythm down the back of your head. The “bubbles” created by gently pulling and teasing sections of the braid add dimension and texture while maintaining an overall polished impression. It’s perfect when you want to stand out without being inappropriate for professional environments.
Why Bubble Braids Feel Special Without Being Costumey
A bubble braid works because it creates visible structure and dimension that reads as intentionally styled rather than plain. The technique of creating bubbles by teasing between twisted or braided sections adds playfulness without sacrificing sophistication. This style photographs beautifully because the bubbles catch light and create shadow, adding visual depth. It’s unexpected enough to feel special for events, but executed cleanly enough to work in creative professional environments.
Creating Your Bubble Braid Base
- Start with soft waves or texture; the bubble braid works more beautifully with texture than with poker-straight hair
- Create a side part and gather a section of hair at your crown
- Begin a loose three-strand braid at the crown, working downward but not too tightly—loose braiding is key
- As you braid, you’re going to create bubbles, so avoid pulling the braid snug against your scalp
- Braid all the way down to the nape, then gather the remaining hair along with the braid end into a low ponytail
- Now for the bubble creation: gently pull on sections of the braid between each braid intersection, teasing them outward to create volume and texture
- Work from top to bottom, creating approximately 3-5 bubbles depending on your braid length
- The bubbles should be progressively larger as you move downward, creating a visual crescendo
- Once you’ve created your bubbles, secure the low ponytail at the base with an elastic
- Wrap a strand around the base or use a decorative cuff to finish
- Gently tease the ponytail tail itself to create a full, rounded shape
- Finish with flexible hold hairspray that maintains movement
12. The Wrapped and Tucked Low Ponytail
This elegant style involves creating a low ponytail and then tucking the ends upward, wrapping them around the base to create a sophisticated closed loop. The technique is both classic and modern, offering visual interest and a sense of completeness that a traditional hanging ponytail can’t quite achieve. It’s perfect for formal events, professional headshots, or any occasion where you want your hair to look polished and considered.
Why Tucking Creates Visual Completion
The wrapped and tucked low ponytail works because it creates a sense of visual closure and intention that leaves the look feeling finished rather than like a starting point for further styling. The tucked ends create subtle volume at the base without requiring teasing or aggressive styling. This style has historical roots in vintage and classic hairstyling, so it automatically reads as timeless and elegant. The technique is particularly flattering for people with longer hair because the tucking creates beautiful visual texture at the back of the head.
Executing the Wrap and Tuck
- Create a smooth low ponytail using your preferred method (sleek, with part, textured, etc.)
- Secure with an elastic at the nape of your neck
- Divide the ponytail into 2-3 sections depending on the thickness of your hair
- Gently twist or braid each section very loosely
- Take one twisted section and wrap it around the base of the ponytail, tucking the end underneath
- Secure with a bobby pin that matches your hair color
- Repeat with remaining sections, layering them around the base to create a full, polished appearance
- You can wrap sections in the same direction for a cohesive spiral effect, or alternate directions for more texture
- Gently pull on the wrapped sections to create softness and prevent the look from feeling too tight
- Tease very gently at the base if you want to add additional fullness and dimension
- Finish with light hairspray, holding the sprayer at least 12 inches away to avoid creating stiffness
- Secure any loose bobby pins by tucking them completely beneath the wrapped sections
Final Thoughts
The magic of a great low ponytail is that it works for almost everyone and almost every occasion, as long as you pay attention to the details that matter. Whether you’re choosing a sleek, professional version for back-to-back meetings, adding texture and movement for a cocktail event, or incorporating a subtle accessory for formal occasions, the low ponytail adapts to your needs while maintaining its inherent polish.
The real secret to making any low ponytail feel genuinely styled rather than like an afterthought is taking time with your base. A smooth, well-prepared foundation makes every variation look better—invest in a good smoothing serum, learn how your hair responds to heat tools, and use edge control strategically to manage flyaways. These fundamentals matter more than any complicated technique.
Consider trying a different variation depending on the occasion rather than defaulting to the same style every time. The sleek straight version serves you well for important professional moments, textured styles work beautifully for more relaxed social events, and decorative elements elevate your hair game for truly special occasions. When you have multiple versions in your repertoire, you never feel like you’re reaching for the same tired hairstyle, and that variety is part of what keeps your overall appearance feeling fresh and intentional.