A cheer braid has one job: stay there. It has to hold through jumps, sharp head turns, windy sidelines, sweaty warmups, and that one moment when everyone’s ponytail starts looking a little tired except yours.
That is why cheerleader braids work so well when they’re built on a tight foundation. A loose braid may look cute in the mirror, but it starts slipping once the scalp gets slick or the ends are left floating with one flimsy elastic. The styles that survive are the ones that grab the hair at the roots, keep tension even, and lock the ends down before they can swing around.
I care a lot more about that than about fluff. Big, soft braids can be pretty, sure, but on game day I want the kind that still looks intentional after a full routine. A little dry shampoo at the roots, a rat-tail comb for clean parts, and mini elastics every few inches make a bigger difference than any amount of hairspray sprayed from across the room.
Some styles below are clean and sleek. Some are dramatic. A few are old reliables I would trust in a heartbeat if the schedule is packed and the hair has to behave all night. Start with the braids that anchor to the scalp first, because those are the ones that tend to stay neat when everything else starts moving.
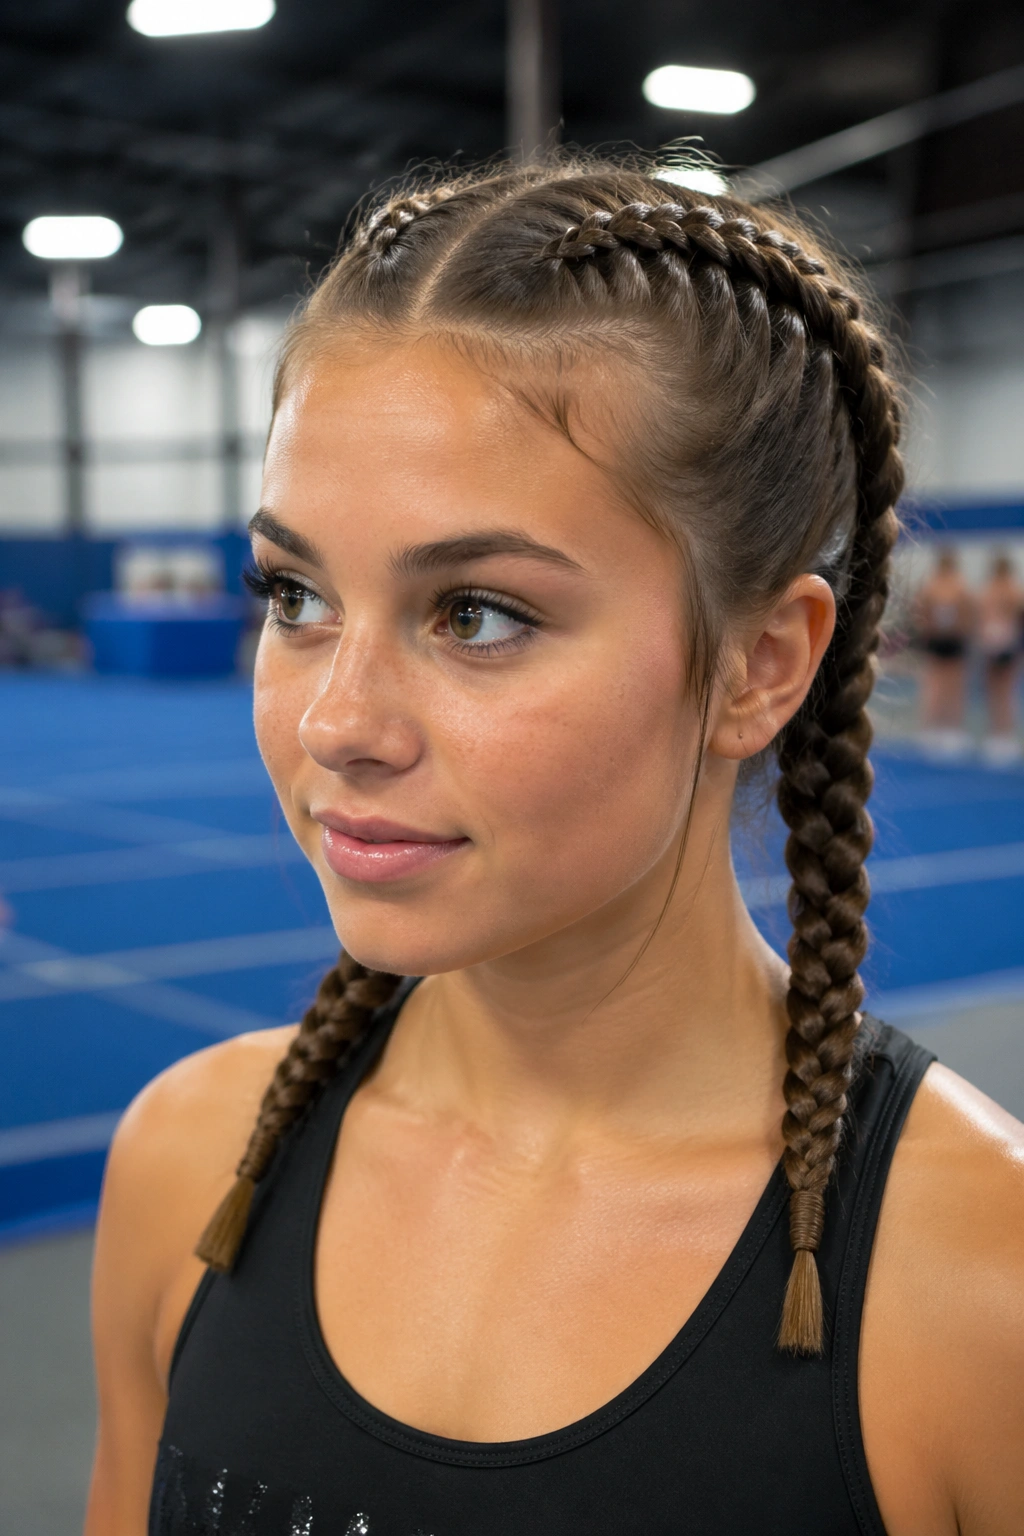
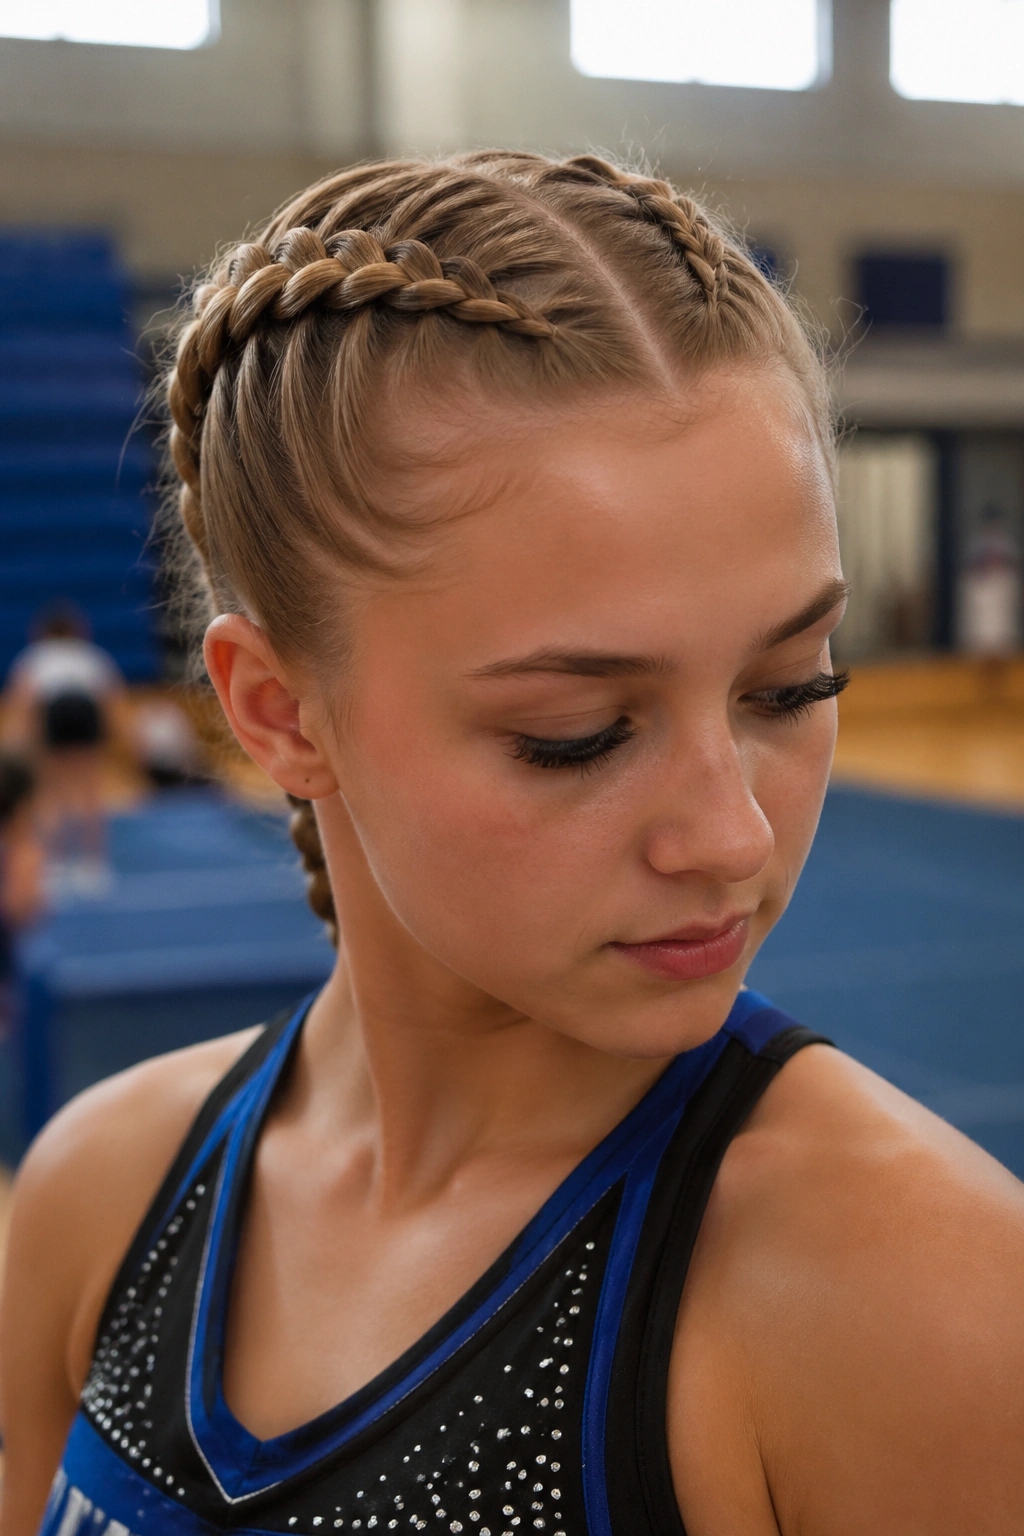
1. Double Dutch Braids
Double Dutch braids are the workhorse of cheer hair. They sit close to the scalp, they split the weight evenly, and they don’t flop around the way a single loose braid can. If you want a style that reads crisp from the first count to the last bow, this is the one I’d reach for first.
Why It Stays Put
The braid crosses under instead of over, which makes it pop off the scalp and grip the head a little harder than a French braid. That extra lift is what gives it structure. It also helps if your hair is fine and slippery, because the braid has more surface contact than a flat plait.
A clean center part matters here. So does tension. Not painful, not yanking, just firm enough that the braid doesn’t puff out by halftime.
- Start with dry hair and a light mist of texture spray at the roots.
- Divide the hair into two equal sections with a rat-tail comb.
- Braid each side tightly from the front hairline to the nape.
- Secure each end with a small clear elastic, then tuck the tails under or leave them to hang if the squad allows it.
Best move: finish with a thin veil of strong-hold hairspray, then smooth the part with the tip of a comb instead of your fingers. Fingers leave little frizz halos.
2. Boxer Braids with Wrapped Ends
If you need the cleanest possible look, boxer braids are hard to beat. They feel blunt and athletic in the best way. No flyaway drama. No soft edges trying to escape the formation.
The braid’s real strength is in the tightness at the crown and the way both sides mirror each other. That symmetry helps the style feel stable even when the rest of the routine is wild. Wrapped ends make it even better because they stop the tail from swinging and snagging.
Use a pea-sized amount of styling cream on your palms before you start. Not more. Too much product turns the hair greasy, and greasy roots slide faster than dry ones. Keep the part sharp, braid down close to the scalp, and tie off each side low enough that the ends can be wrapped into small knots or pinned flat.
The look is bold, but the build is practical. That’s why people keep coming back to it.
And yes, it works especially well on hair that gets frizzy the second a breeze hits it.
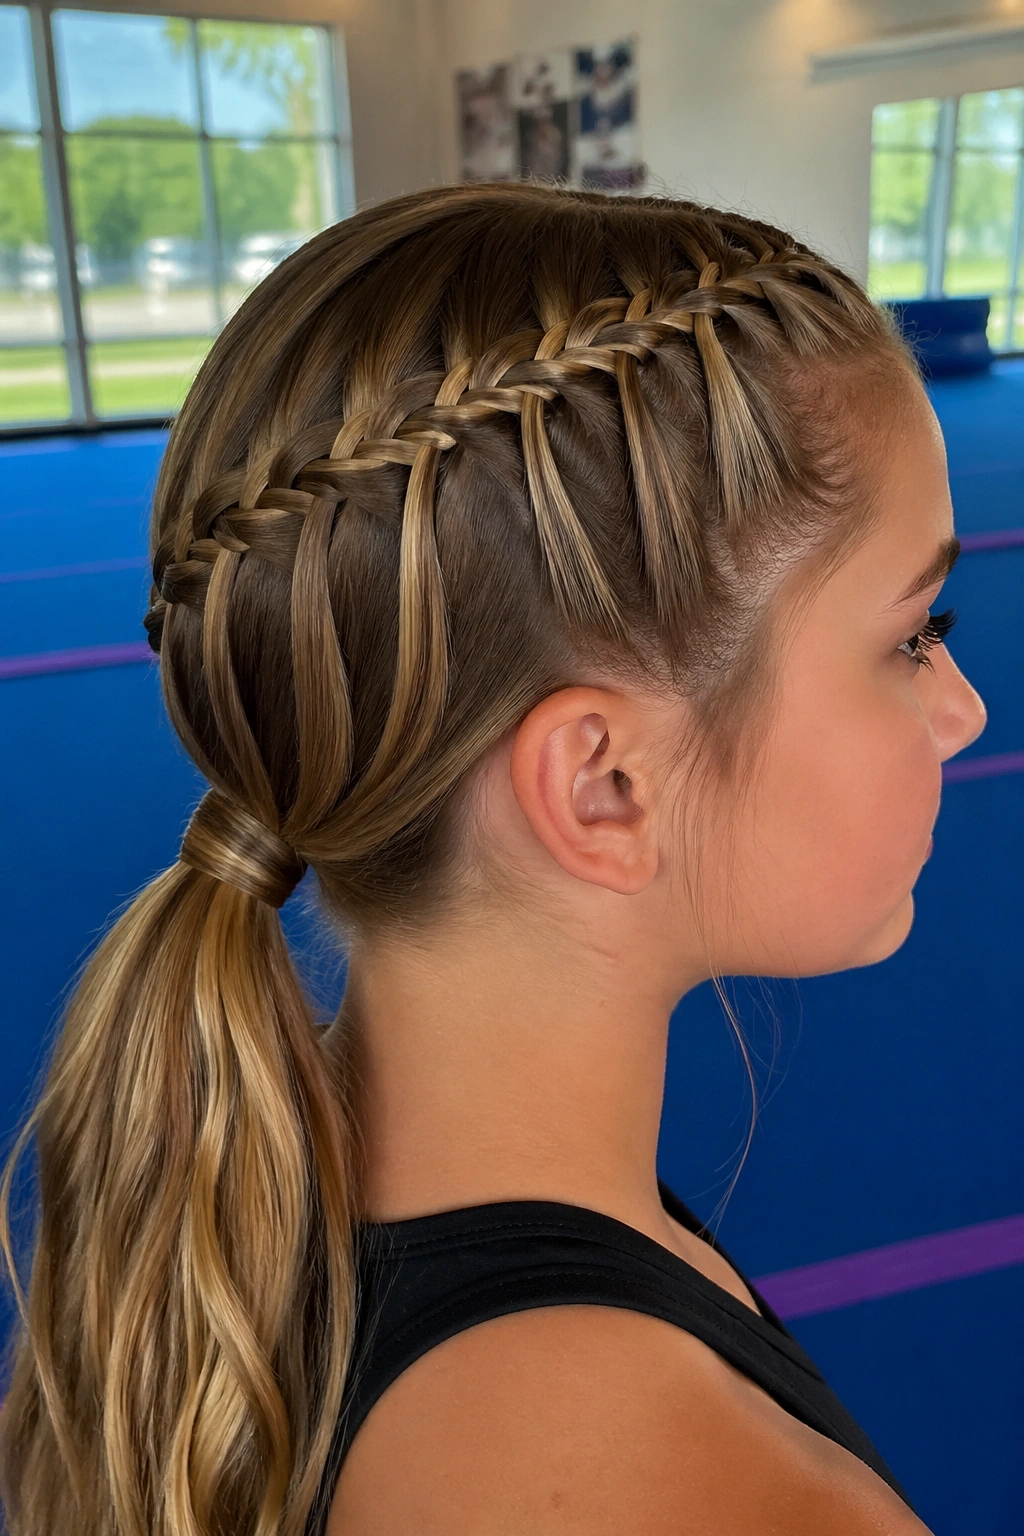
3. French Braids into a High Ponytail
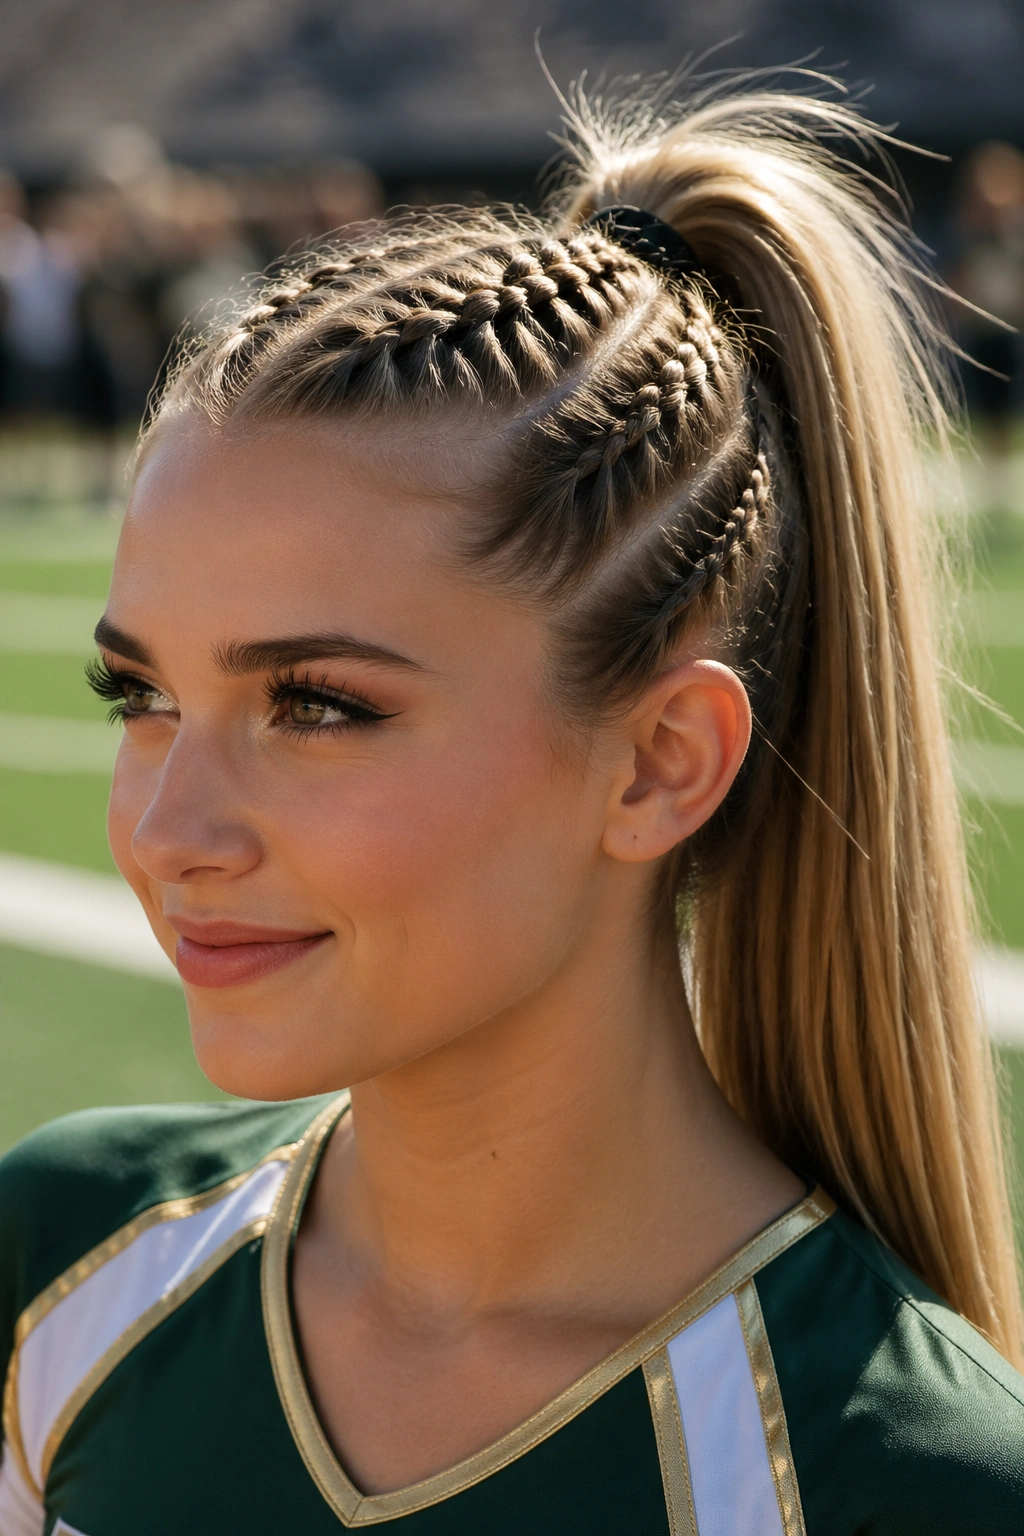
Why does this style hold better than a plain high ponytail? Because the braid acts like an anchor before the hair ever reaches the elastic. The crown stays controlled, the sides stay pulled back, and the pony has less loose hair to fight with later.
That’s the whole trick. A high pony by itself can drift, especially if the hair is layered or very silky. A French braid changes the direction of the pressure. Instead of one stretchy band carrying all the weight, the braid spreads it across the head first.
How to Style It
Start at the top center of the head and French braid straight back, keeping the sections neat and even. When you reach the crown, gather everything into a high ponytail and secure it with a thick elastic. If the hair is extra heavy, add a second elastic an inch below the first. That little move helps more than most people think.
A small ribbon or team bow can sit over the base if the rules allow it. Just don’t bury the whole braid under bulky accessories. You want the braid to keep doing the work.
This is a good style for medium to long hair, especially if the front pieces tend to fall forward during movement.
4. Side-Swept Dutch Braid into a Low Ponytail
A side-swept braid is what I’d choose when the hair needs to stay off one side of the face but still look polished from the front. It’s a little softer than a center-part style, and that matters if the uniform neckline already feels sharp enough.
The braid begins near one temple and travels diagonally toward the opposite ear. That angle matters. It lets the hair fall into a low ponytail without creating a heavy bump at the crown, which can get annoying under headpieces or bows.
- Works well on layered hair that doesn’t stay in a center braid.
- Keeps the front pieces from slipping into the eyes.
- Looks neat on shorter lengths that can’t quite handle a full long braid.
- Needs two pins under the pony elastic if the hair is thick or slippery.
The low ponytail at the end is the quiet part of this style, and that’s why it holds up. Less height means less swing. Less swing means less mess.
A lot of people skip this braid because it looks simple. That’s a mistake. Simple is often what lasts.
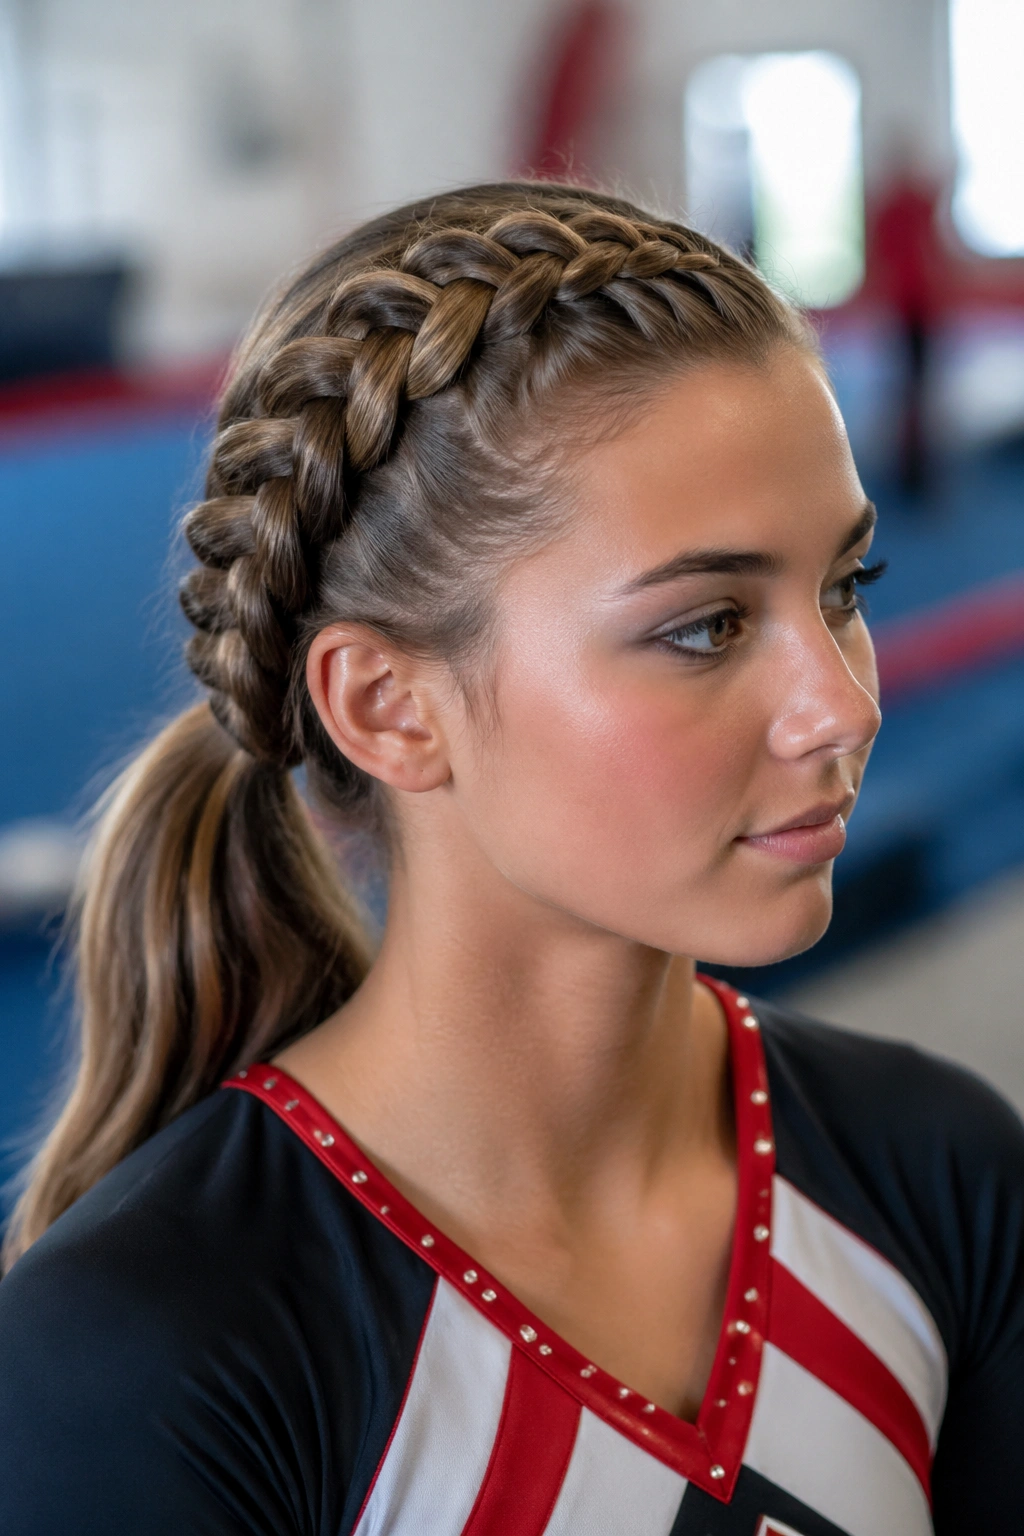
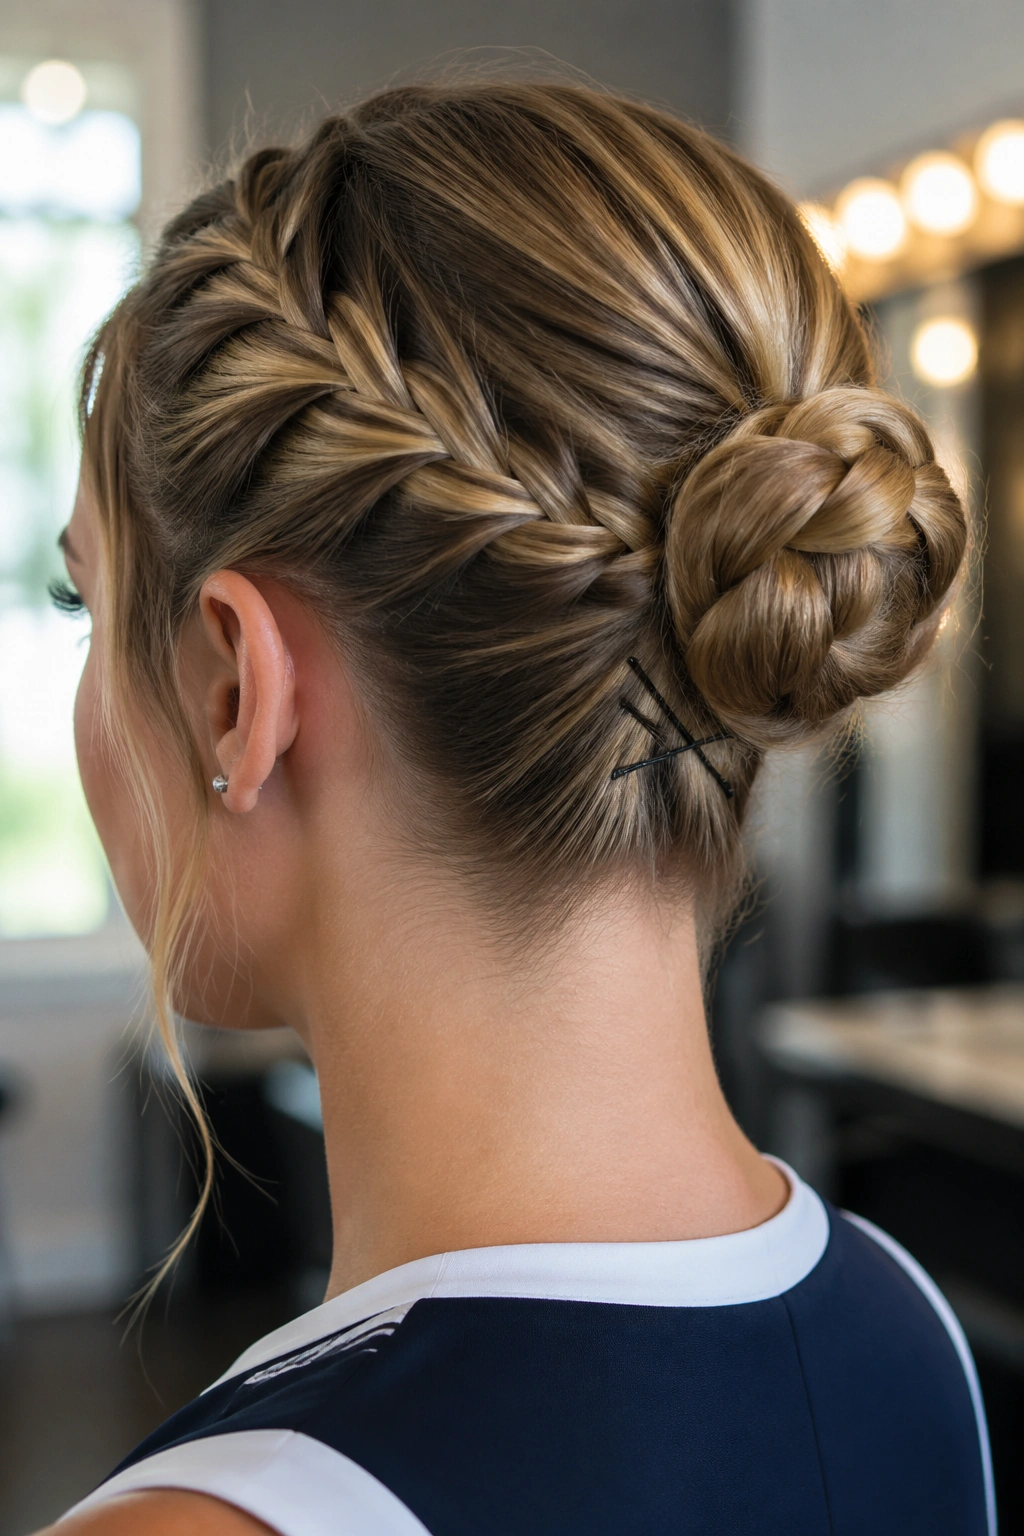
5. Crown Braid with Hidden Nape Tuck
A crown braid can look delicate from a distance, but the good ones are built like little walls. The braid moves around the head, so there’s less chance of one weak point getting all the stress. Then the ends disappear under the braid path at the nape, where they can be pinned flat and forgotten.
The style takes patience. No way around that. But if you want hair that feels controlled without looking stiff, it gives you a nice middle ground. The trick is not to braid too loosely around the crown, because loose loops start sliding once the head starts moving fast.
I like to pin the tuck with two bobby pins crossed in an X. One pin alone can wiggle free. Two crossed pins hold much better and lie flatter against the head.
The shape also works well for thick hair because the braid travels around the perimeter instead of stacking all the weight in one spot. That keeps the style from feeling bulky at the back, which is a problem with a lot of braided updos.
No, it’s not the quickest choice. But it does have a clean, finished feel that survives a long day.
6. Fishtail Pigtails

Fishtail braids are one of those styles that look more complicated than they are. The payoff is a tighter weave and a more locked-in feel, especially if the hair is long enough to make the strands behave. Two fishtails, one on each side, can stay neat for hours without looking too stiff.
Compared with standard three-strand braids, fishtails hold a little more texture in the pattern. That texture gives the braid more bite. It also helps the style look full even when the hair itself is fine.
Use smaller sections than you think you need. Thin pieces give the fishbone effect and keep the braid from falling flat. If you grab too much hair at once, the whole thing turns into a chunky rope instead of a clean fishtail.
This style is especially good for hair that stays smooth after brushing, because the braid pattern shows off clean lines. If the hair is very layered, a light mist of texturizing spray at the ends can help the braid hold its shape.
There’s a reason fishtails show up so often on competition days. They don’t budge much once they’re tied off properly.
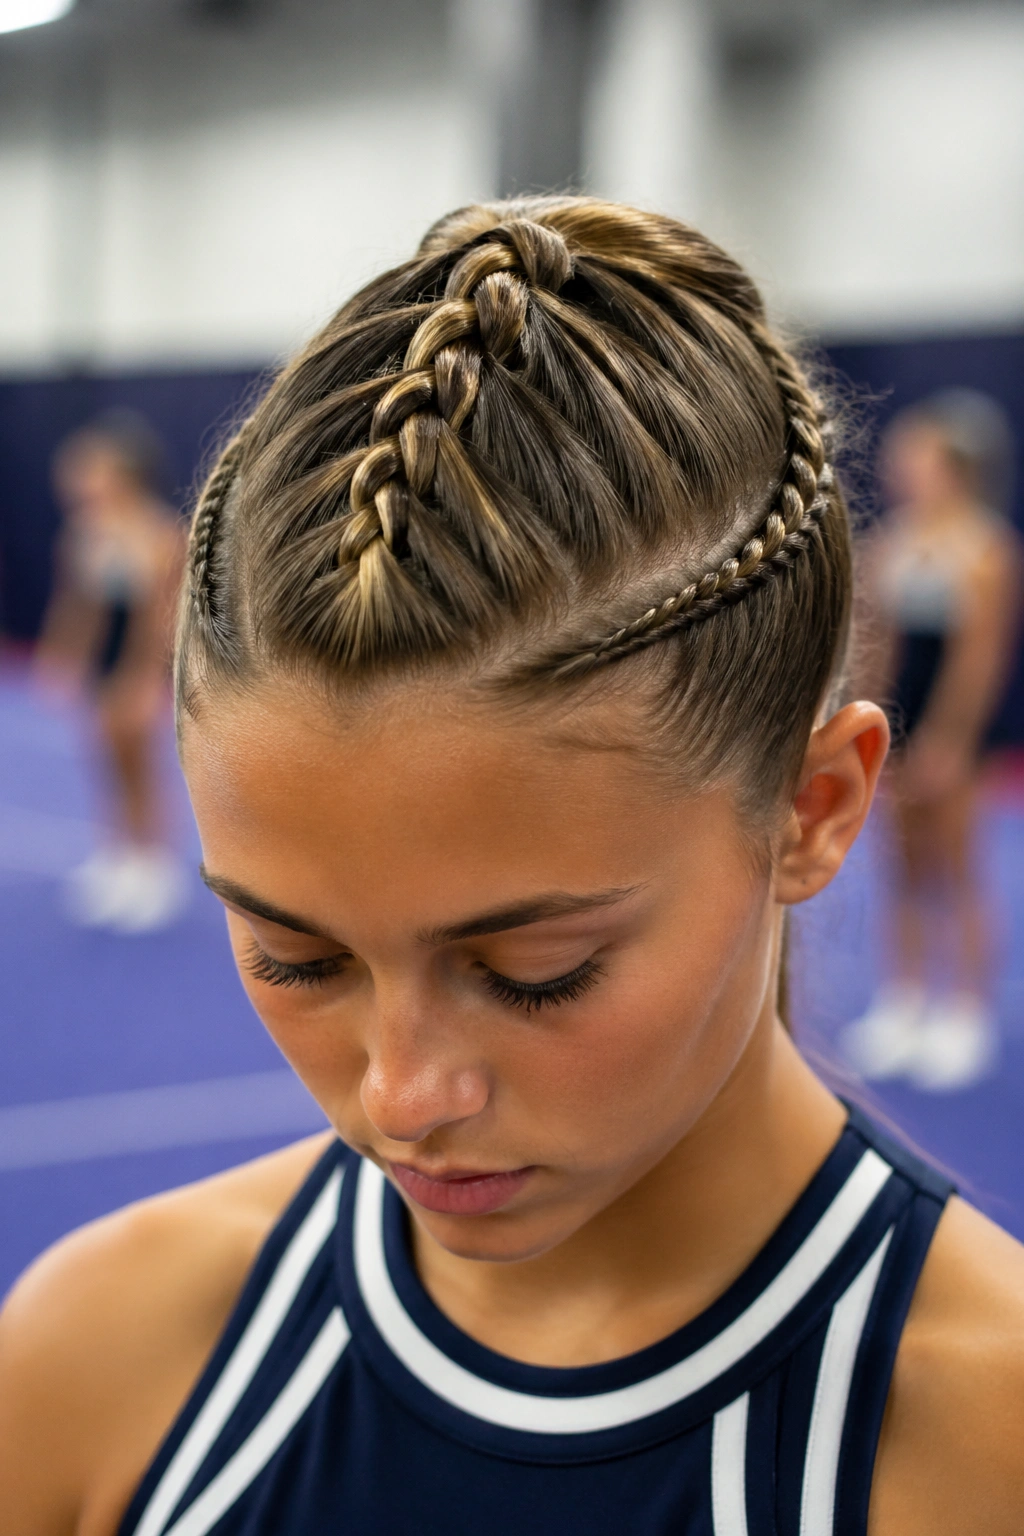
7. Feed-In Cornrow Ponytail
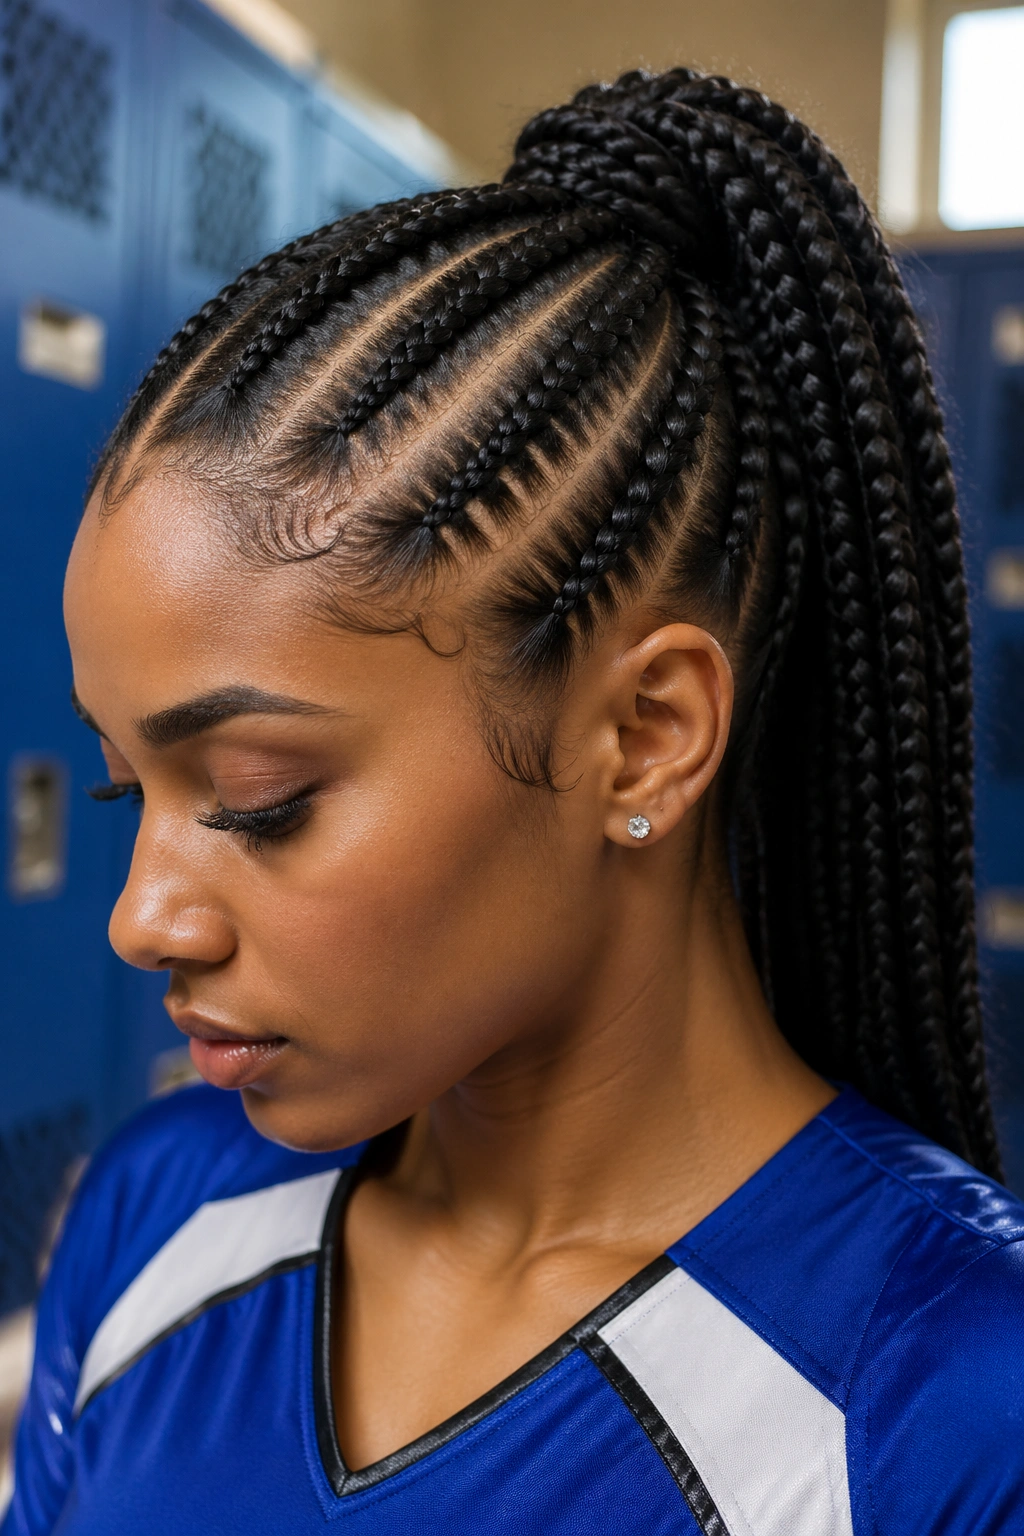
Feed-in cornrows are one of the strongest choices on this list. The braid starts small at the hairline, then more hair gets added gradually, which keeps the base neat and close to the scalp. That gradual build is what makes the style feel secure instead of bulky.
What Makes It Game-Day Friendly
The roots stay flat. That’s the big win. You don’t get that puffy lift at the front that can happen with looser braids, and the style holds up well when the hair is touched, adjusted, or tucked behind the ears between routines.
A little edge control goes a long way here. Use a tiny amount on a brush or fingertip, then smooth the hairline before braiding. Too much product can flake or make the roots look stiff.
The cornrows can feed into one low or high ponytail, depending on the team look. If the ponytail is high, keep the transition tight so the base doesn’t sag under the weight of the rest of the hair.
Small details that help
- Use a fine-tooth comb for clean parting.
- Keep each feed-in section the same width.
- Tie off the pony with a strong elastic, not a loose snag-free band.
- Add a second elastic if the pony is very full.
This style takes more effort, but it gives back exactly what you want: control.
8. Four-Strand Center Braid
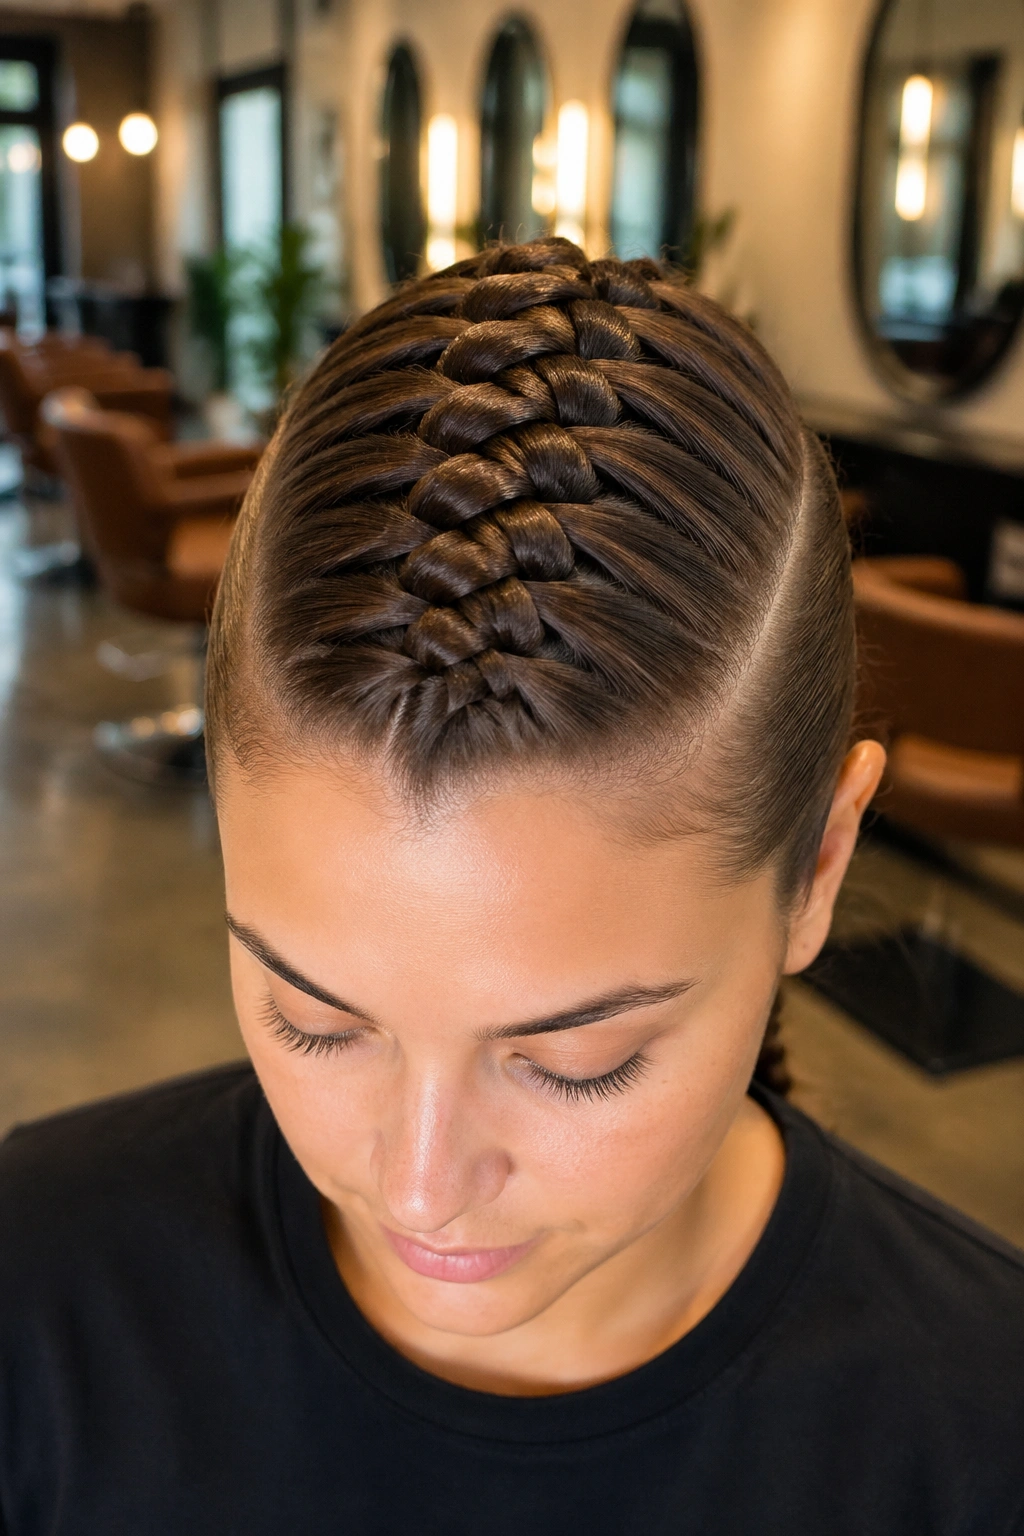
A four-strand braid has more crossings than a basic braid, which means more grip and a denser look. It sounds fussy. It is a little fussy. But the payoff is a braid that feels sturdy and looks more substantial without needing a ton of extra hair.
The center braid keeps the weight balanced down the middle of the head, which is useful if the style needs to stay straight during sharp motion. It also looks good with a bow at the base because the braid has enough texture to hold the accessory in place instead of letting it slip.
I’d recommend this one for medium to long hair, and especially for hair that tends to separate into layers. The additional strand helps contain those layers better than a basic three-strand braid does.
Don’t rush the first few passes. If the sections start uneven, the braid starts looking messy fast, and then you spend twice as long fixing it. Once you get the pattern, though, it becomes one of those styles that feels more complicated than it really is.
A four-strand braid is not the fastest option, but it has a nice, firm finish that holds its shape.
9. Pull-Through Braid Ponytail
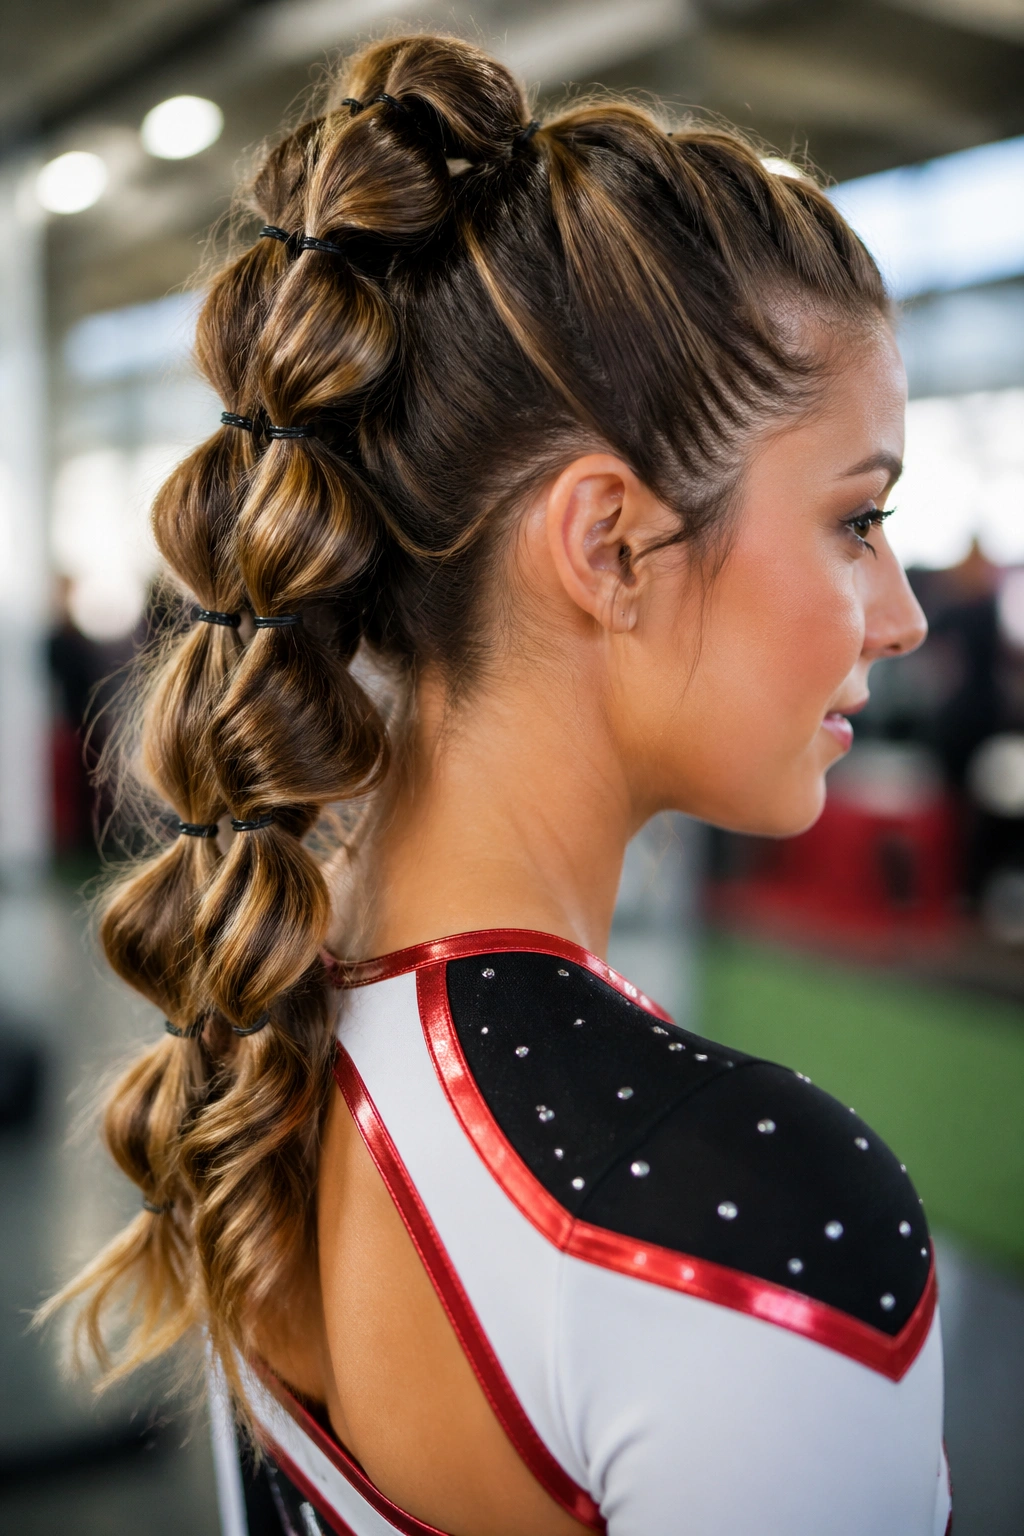
Need volume and hold at the same time? Pull-through braids are sneaky like that. They look big and dramatic, but they’re built from small pony sections, which means every loop gets its own elastic anchor.
That matters because a pulled-through style is less likely to unravel than a braid that relies only on tension from woven strands. Each little ponytail sits in place before the next one gets added. The result is a style that feels almost architectural.
How to Keep the Loops Even
Use tiny clear elastics every 1½ to 2 inches. That spacing keeps the sections from collapsing. If the hair is silky, tease each section lightly before you fold it through. Just a touch. You’re adding grip, not building a nest.
A pull-through braid works well when the uniform calls for a full, high look but the hair itself is too slippery for a traditional braid to stay puffy. It also helps on layered cuts, because the repeated elastics catch shorter pieces that might otherwise poke out.
This one does take a few extra minutes. It’s worth it. The style stays full without looking loose, and that’s a rare combination.
10. Zigzag-Part Braided Pigtails
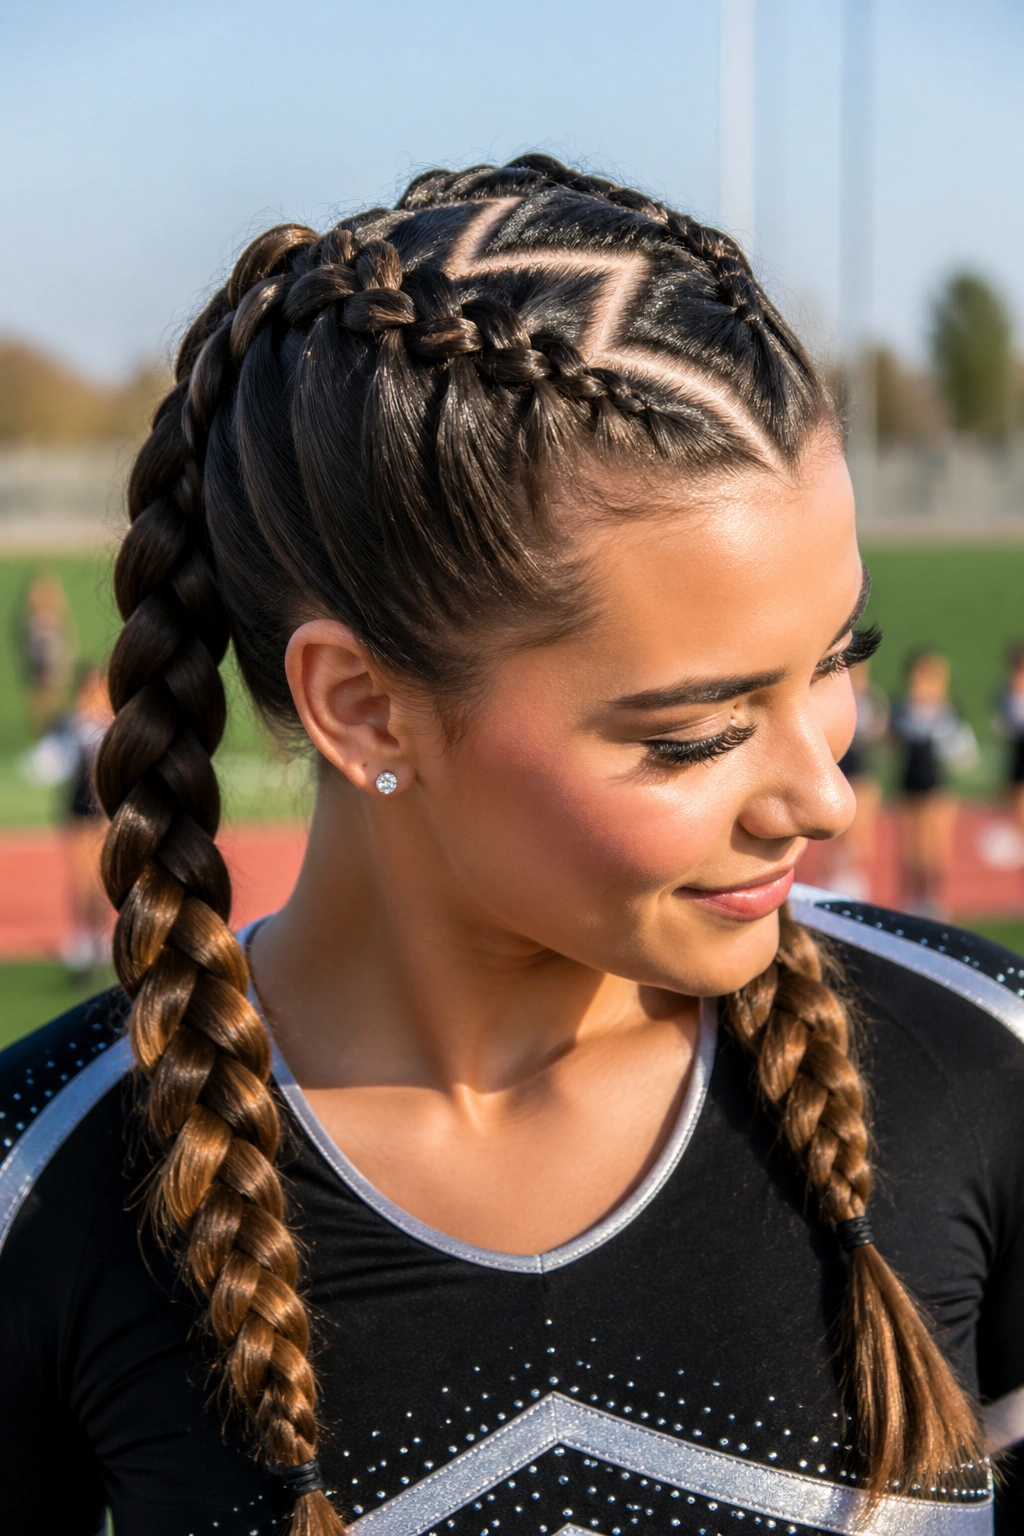
A zigzag part sounds like a small detail, but it changes the whole feel of the style. Instead of a straight center line, the part breaks up the root area and creates more visual grip. That helps pigtail braids feel lively without turning fuzzy.
The braid itself can be a simple three-strand plait or a Dutch braid, depending on how much hold you need. The part is what gives it attitude. It also keeps the top from looking flat when the hair is pulled back hard for movement.
- Best on medium or long hair that needs a little personality.
- Good choice if the team wants a youthful, energetic look.
- Works with bows placed low at each braid base.
- Needs a clean tail comb so the zigzag doesn’t look accidental.
I like this style for squads that want something a little sharper than plain pigtails without getting too fussy. It has enough structure for game day, but it still feels fun.
And that matters. Hair that feels too precious gets destroyed fast.
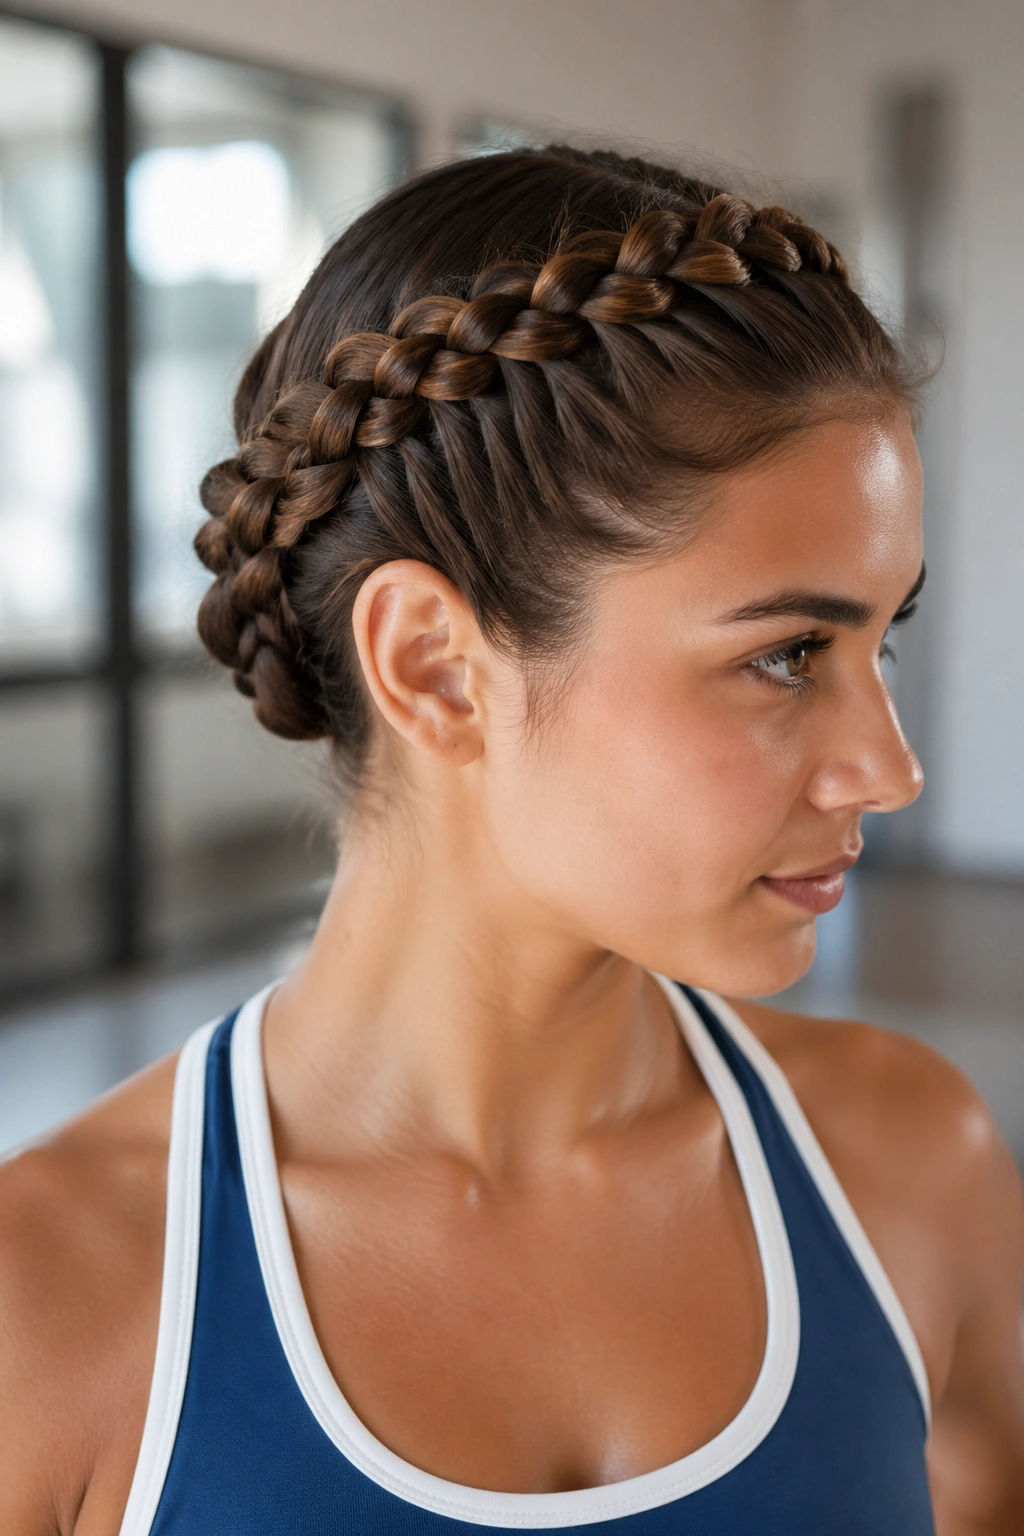
11. Braided Bun with Cross-Pinned Base
A braided bun is one of the safest choices when nothing should swing, bounce, or catch on anything. Start with a braid, wrap it into a bun, and pin the base in crossed X shapes so the whole thing locks down close to the head.
That crossed pinning is the part people skip, and it’s usually the reason the bun starts sliding. One pin in, one pin out, and the style slowly loosens. Crossed pins bite into the hair from two directions, which gives the bun a much better chance of staying in place.
The braid can be centered, side-swept, or even split into two smaller braids before wrapping. A tighter braid makes a smaller bun. A looser braid gives you a fuller shape, though it can feel a little heavier.
This style is especially good when the hair needs to stay off the neck. It keeps sweat from collecting at the nape and leaves the face open.
No stray ends. No swinging tail. That’s the whole appeal.
12. Lace Braid Headband into a Low Ponytail

A lace braid works like a built-in headband. Unlike a full crown braid, it only picks up hair from one side as it moves across the head, which leaves most of the length free but still keeps the front from falling into the face.
That balance is why I like it for layered hair. Bangs and shorter front pieces can be trapped into the braid line without forcing the whole head into a tight updo. The rest of the hair can gather into a low ponytail that sits neatly at the nape.
The braid should start near the temple and travel just above the ear, then stop once it reaches the opposite side. Secure it with a small pin behind the ear before gathering the rest of the hair. That tiny pin is important. Without it, the braid can loosen and separate from the rest of the style.
Compared with a full braid, this one feels lighter and faster. That can be a good thing when the schedule is packed and there is no time for a long styling session.
It’s not the most dramatic braid here. It is one of the most useful.
13. Waterfall Braid with a Tight Back Anchor
A waterfall braid looks airy, but it needs a firm anchor if you want it to survive an active routine. The loose dropped sections are the reason it looks pretty, and also the reason it can start slipping if the back isn’t secured well.
Why It Works
The braid keeps the front and top sections controlled while letting a few pieces fall through the pattern. That creates a soft line around the head. The trick is to tie or braid the lower back section tightly so the style has something solid to hold onto after the waterfall pieces are released.
A small low ponytail, a tucked braid, or a pinned bun works better than leaving the ends loose. Loose ends can get frizzy fast and make the whole style look tired before the second half starts.
How to Keep It Neat
- Curl or smooth the dropped pieces before braiding so they match the rest of the style.
- Use small pins at each turn if the hair is slippery.
- Keep the braid close to the head; a loose waterfall braid falls apart faster.
- Finish the back section with a secure elastic, not a decorative tie alone.
This is the prettiest braid on the list when it’s done well. It just needs more backup than people expect.
14. Mohawk Braid with Side Anchors
A mohawk braid has attitude, and it usually holds better than people think because the braid sits right where the head needs the most control: down the center. The side sections get smoothed back, then braided into one strong middle line that can run from forehead to nape.
That center placement keeps the style from drifting left or right during movement. It also gives the hair a lifted shape without letting the top puff out too much. For cheer, that’s a nice balance. Sharp but not stiff. Bold but still practical.
The side anchors matter here. If the sides are left loose, the braid starts to lose its shape fast. Braid or slick them back tightly into the center section, then secure the whole line with a strong elastic at the end. A few hidden pins near the crown can help, especially if the hair is thick.
This one works well for teams that want a stronger look on field or on stage. It has a little more drama than standard pigtails, and it keeps the face open.
A good mohawk braid stays centered even when the head moves hard. That is the whole point.
15. Micro-Braids into a Sleek Game-Day Ponytail
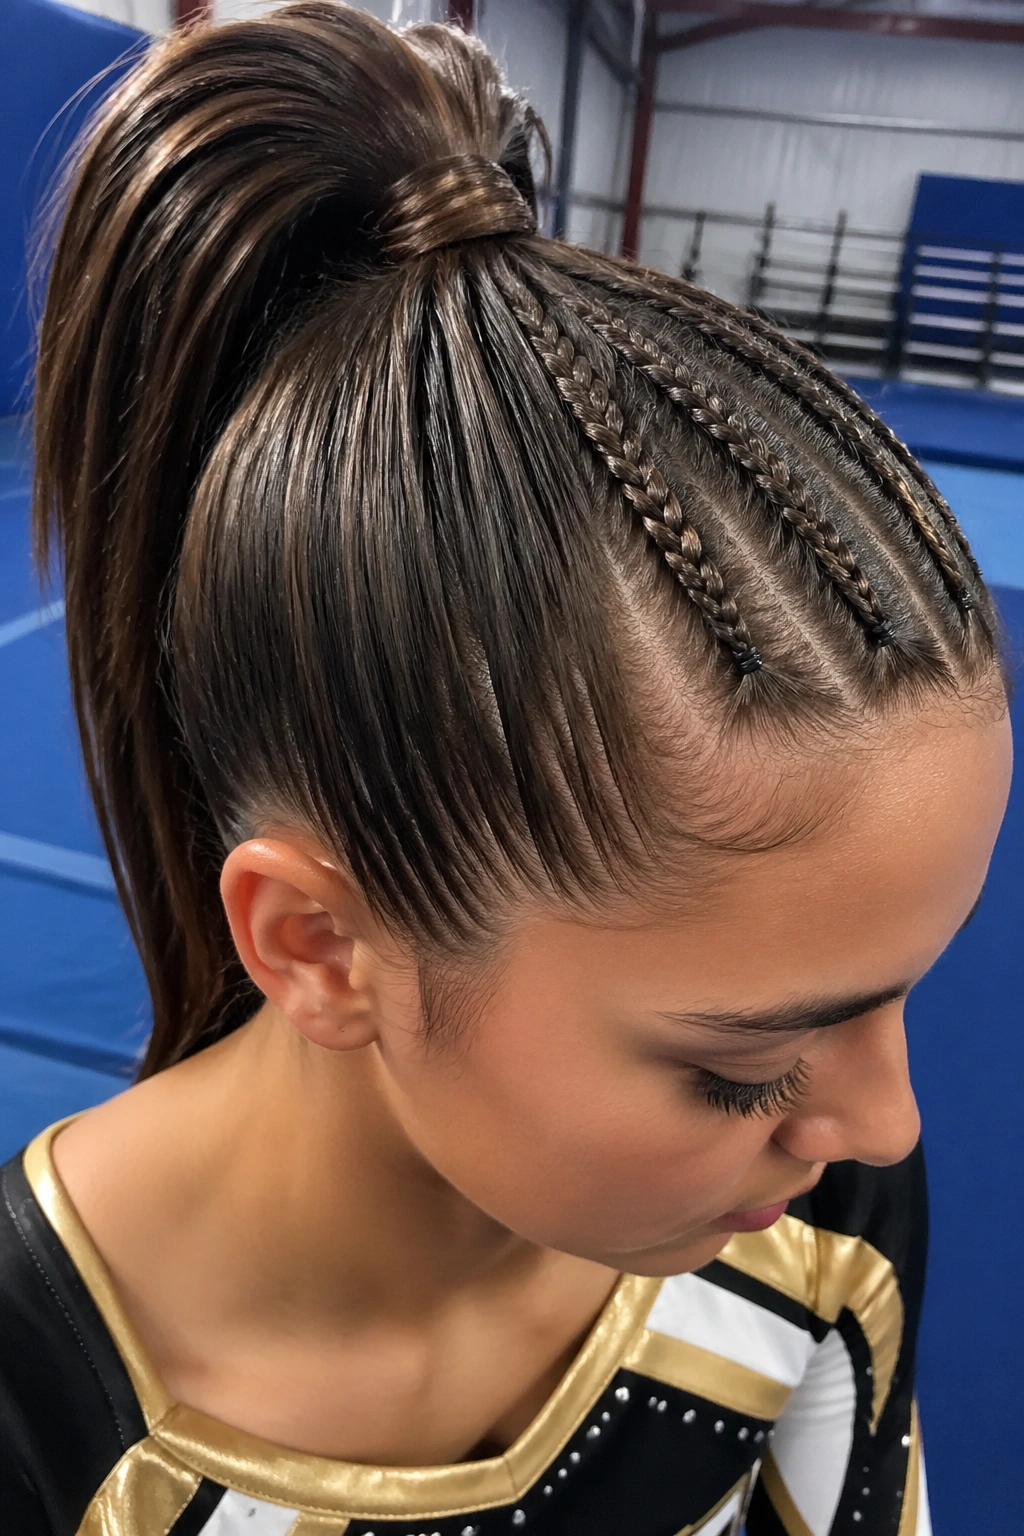
Micro-braids at the hairline do a lot of quiet work. They keep baby hairs down, control the front pieces, and make a sleek ponytail feel much more locked in than a plain pulled-back style. The braids are tiny, but they act like guardrails.
That makes them especially useful for humid conditions or for hair that gets fuzzy after a few minutes of activity. If the front is already secured in narrow braids, the rest of the ponytail can stay smooth without constant fixing. It also helps the style survive repeated outfit changes, warmups, and a few too many head turns.
How to Make Them Stay Smooth
Use sections about ¼ inch wide at the temples and along the front hairline. Keep the braids close to the scalp, and finish each one with a mini elastic before gathering the rest of the hair into a ponytail. A light mist of strong-hold hairspray over a toothbrush or spoolie can tame the hairline without making it crunchy.
If the ponytail itself is long, wrap a small strand of hair around the base to hide the elastic. That little move makes the style look cleaner without adding much time.
This is the style I’d pick when the hair needs to look sharp from every angle. It takes patience, yes. But it keeps giving back all day.
Final Thoughts
The braid that lasts is usually the one with the best base, not the one with the fanciest finish. Clean parting, firm tension, and small hidden anchors do more work than extra shine spray ever will.
Pick the style that matches the hair texture in front of you. Fine hair often needs tighter anchors and texture spray. Thick hair usually needs more pins and smaller sections. If you want a quick test, shake the head lightly after styling and check the nape, the part, and the ends. Those three spots tell you everything.