Clean braids start before the first braid is formed. The parting pattern decides whether the install looks crisp at the scalp or a little tired by day two.
That sounds dramatic, but it isn’t. A straight part that’s measured well can make box braids sit flatter, keep knotless braids from bulking up at the root, and stop feed-in styles from wandering off course halfway through the head. Puffy, dry, un-stretched hair makes every mistake look bigger. Hair that’s been detangled and smoothed into sections behaves.
Flat roots matter.
The nice part is that braid parting patterns are not magic. They’re geometry, patience, and a rat-tail comb with a sharp point. Once you know which sectioning map suits the style, the whole install gets easier to control — cleaner lines, better balance, less redoing the same section three times because the first part drifted two millimeters to the left.
1. The Center Spine for a Cleaner Install
A clean middle part does more than split the head in half. It gives the whole style a spine, and that spine keeps every row, braid, or feed-in section answering to the same line.
That is why I reach for it whenever the style needs symmetry. Middle-part knotless braids, center-part feed-ins, and straight box braids all sit better when the head is divided down the true middle from forehead to nape. If the line wanders even a little, you feel it later. One side starts looking denser, the part bends at the crown, and the style stops reading as neat.
How to Find the True Center
Start at the center of the forehead, not where your eyes want the line to be. Use the tip of a rat-tail comb and trace straight back over the crown, then down toward the nape in one continuous pass. Keep the hair lightly stretched as you go, because fluffy roots make the line look crooked even when the section is fine.
A mirror helps, but two mirrors help more. One mirror in front and one behind lets you see whether the part is actually running true all the way through, especially at the crown where a small curve can hide.
Where the Center Part Goes Wrong
- A part that starts too far left or right makes the whole install look off before the first braid is even finished.
- If you stop checking the nape, the bottom half often drifts without you noticing.
- Heavy product on the comb can smear the line, so wipe the tip between sections.
- A center spine works best on styles that need balance, not on looks meant to fall dramatically to one side.
My rule: if the center part is clean, the rest of the head looks cleaner even when the braid work is average. That’s the power of a good foundation.
2. The Deep Side Part That Keeps Braids Balanced
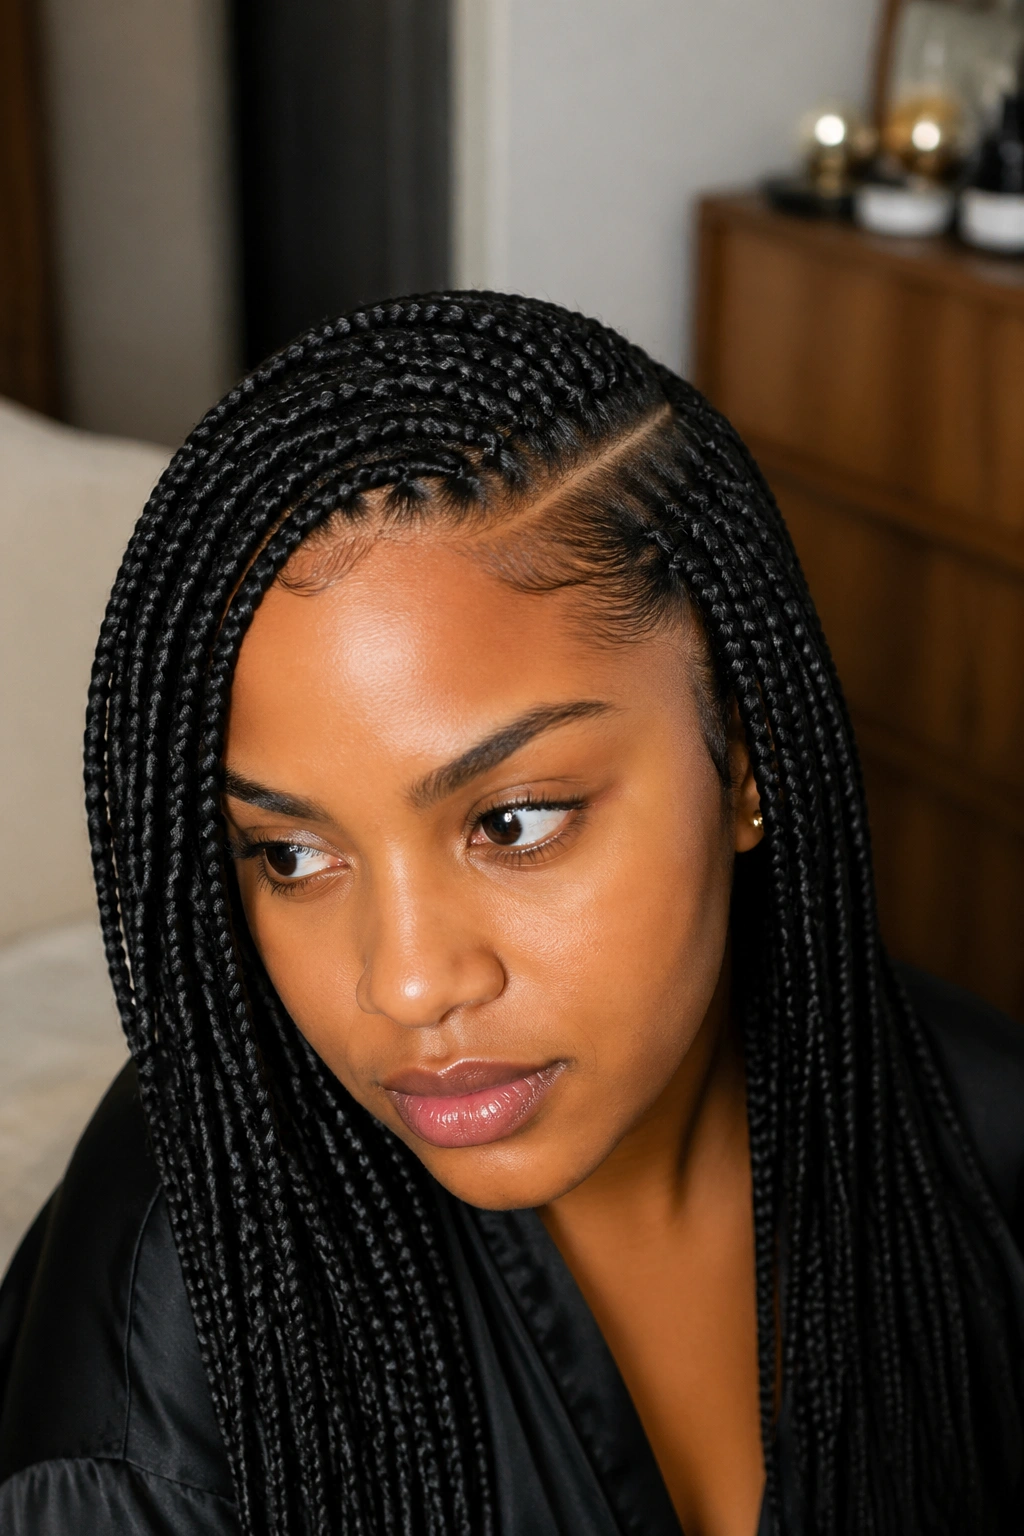
A deep side part does a lot of heavy lifting.
It gives braids a clear direction, frames the face, and takes some visual pressure off the center of the head. That matters on styles like lemonade braids, side-swept knotless braids, and feed-ins that need a little movement without looking messy. The trick is not just making a side part. It’s making one that is deep enough to feel intentional and not so deep that one side looks starved.
I like starting the part near the arch of the eyebrow and taking it back toward the crown in a smooth diagonal. That angle usually gives enough room for the larger side to carry the style while the smaller side still has enough hair to look balanced. If the part is too shallow, it reads bland. Too deep, and the style can pull hard at the hairline.
The best deep side parts also keep the braid size honest. When the part shifts the weight to one side, each section needs to be measured with the same eye. Otherwise the exposed side looks neat and the heavier side starts bunching.
A side part is one of those choices that looks casual but takes real discipline to make clean. It is forgiving from a distance, less so up close.
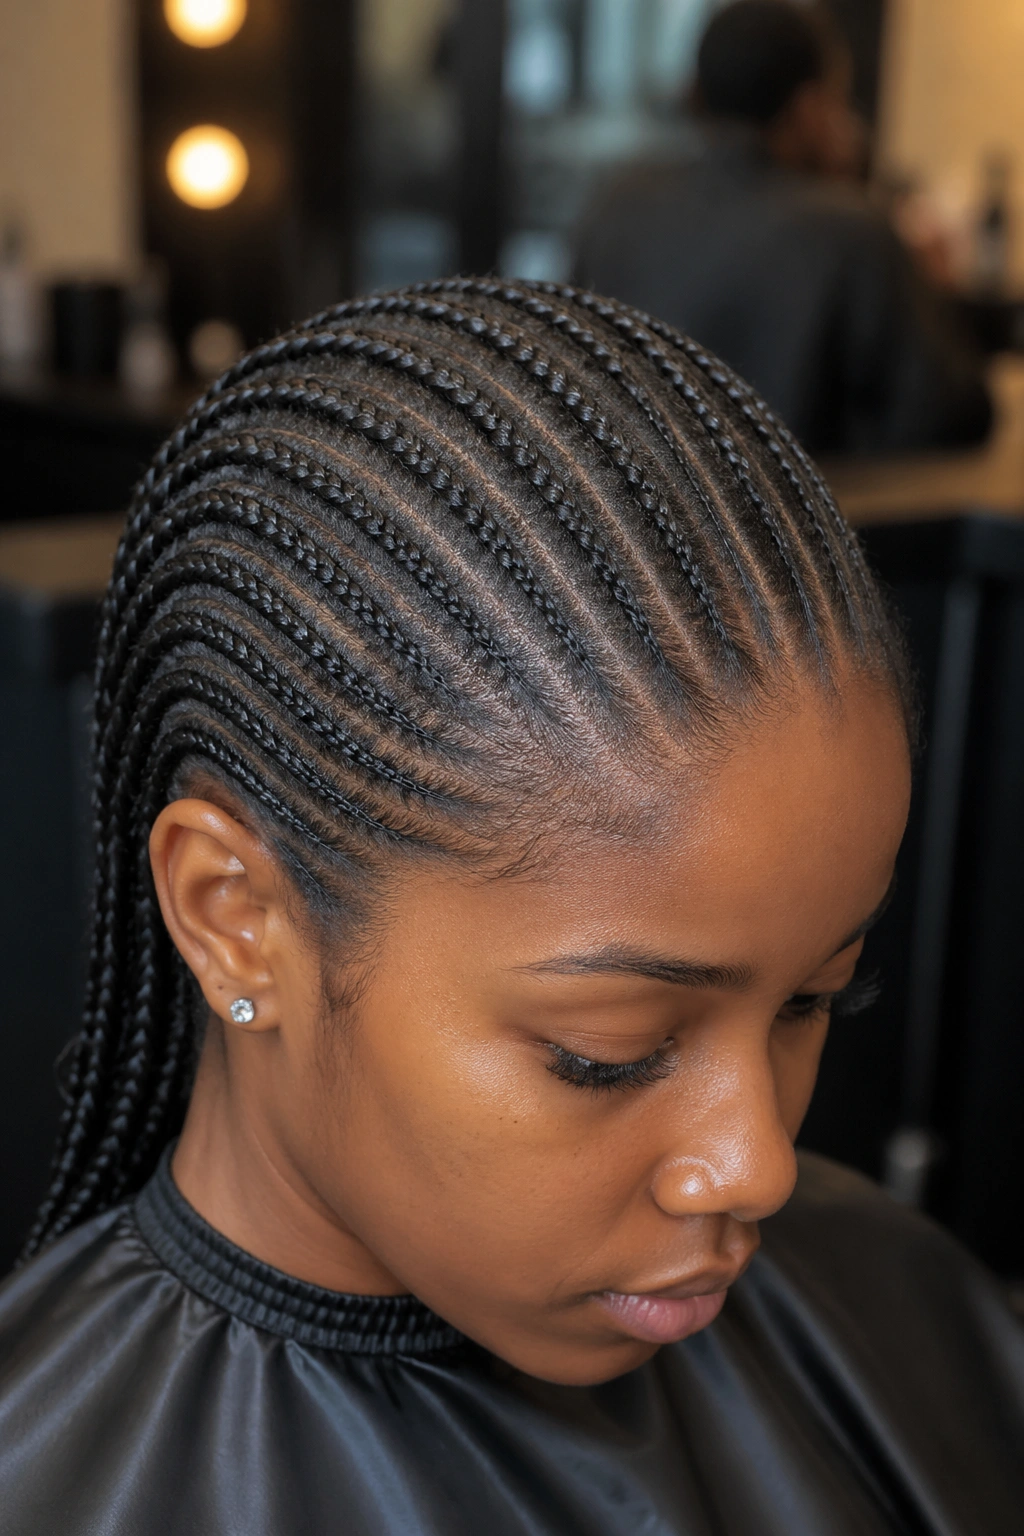
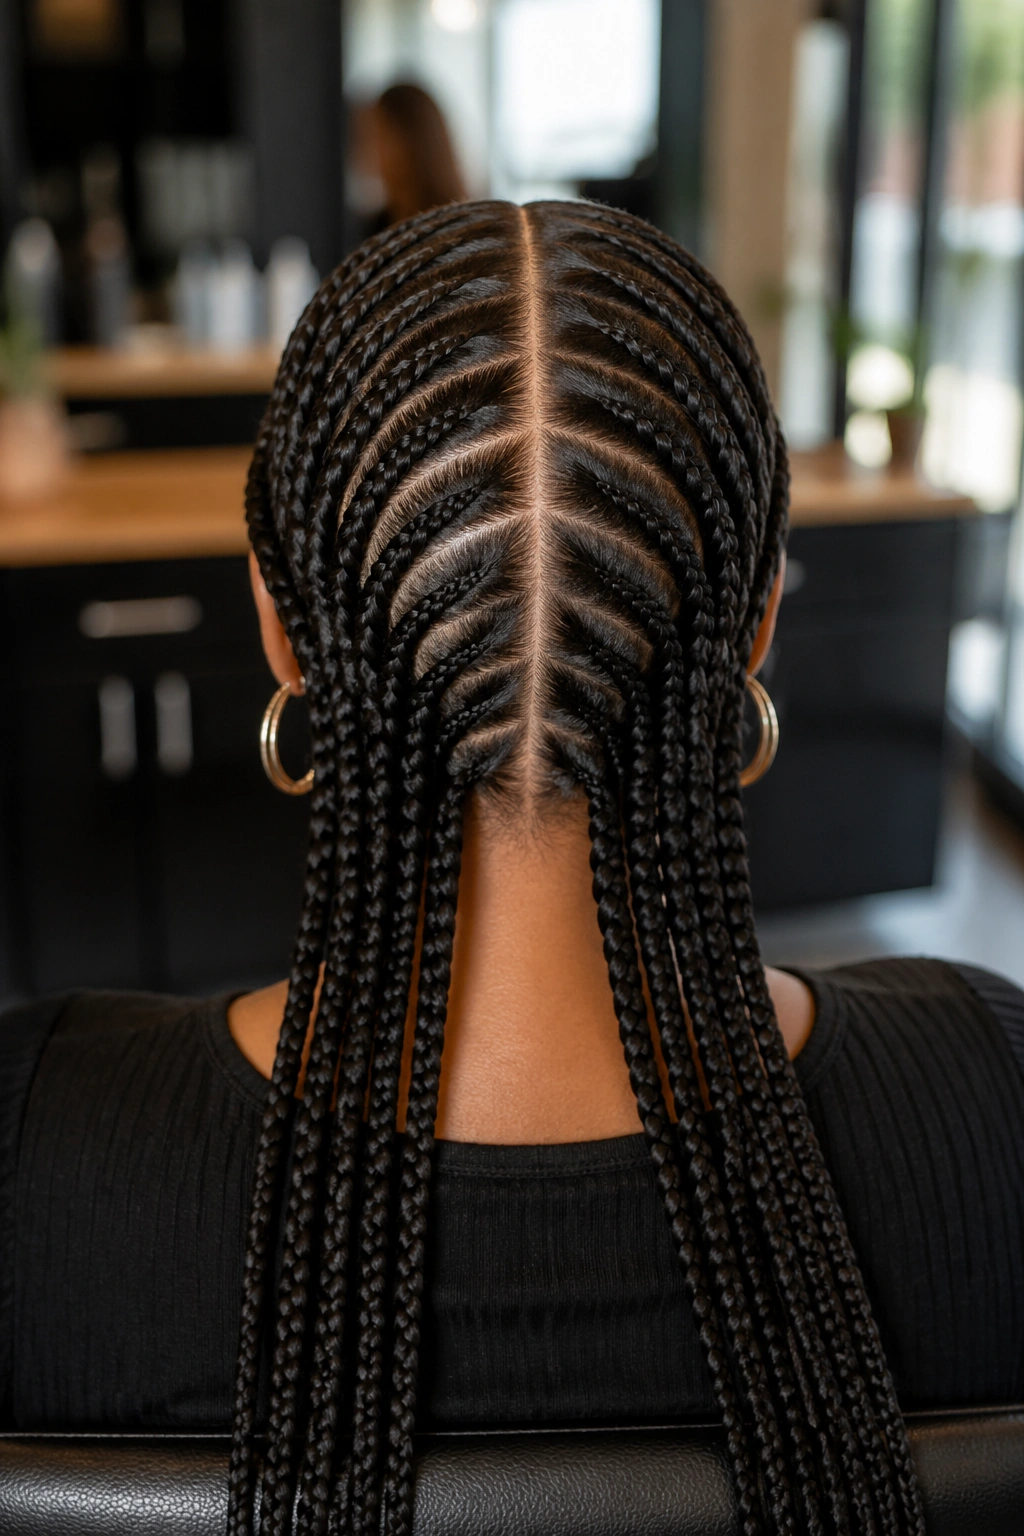
3. Straight-Back Rows for Box Braids and Feed-Ins
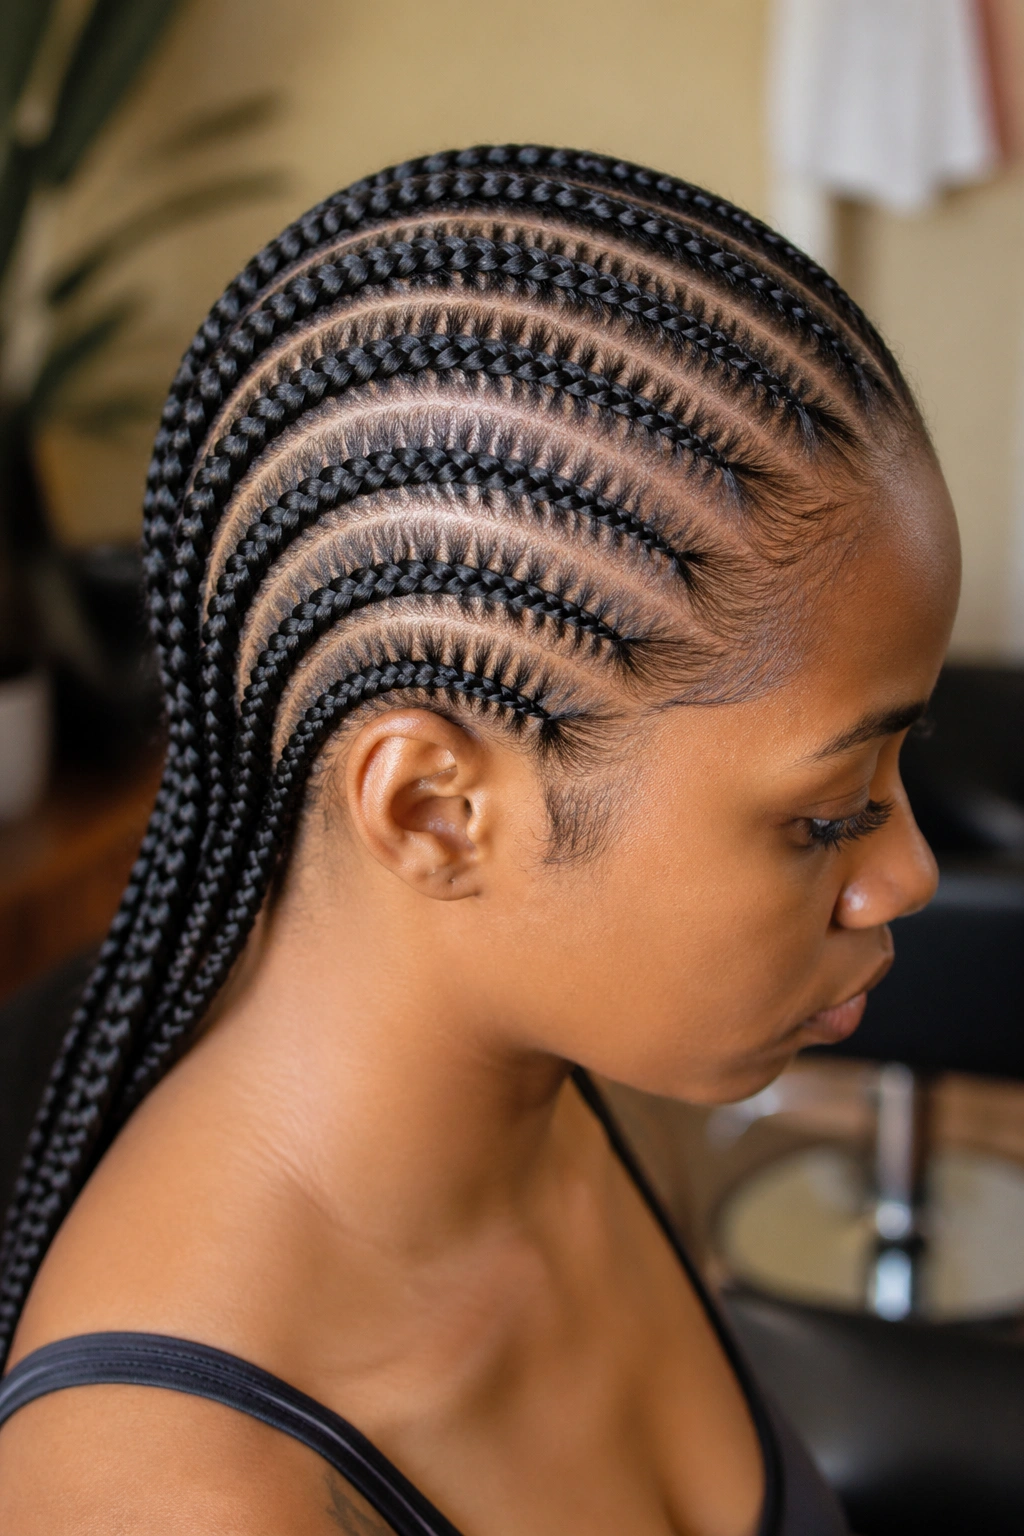
Why do straight-back rows show up so often on neat installs? Because they keep the braid pattern easy to read from root to tip.
Straight-back parting works especially well for medium box braids, feed-in cornrows, and any style where you want the rows to move evenly from the hairline toward the nape. The scalp line stays simple. The eye doesn’t have to decode anything. That alone makes the style feel cleaner, even before the braids are finished.
How to Keep the Rows Even
The first row should set the tone. Section it from temple to temple in a straight path, then clip the rest of the hair away so you are not guessing at the width of the next row. After that, use the width of the finished braid as your guide. If the braid is thick, the row should be thick. If the braid is small, keep the rows narrow and consistent.
Don’t rush the back. That is where straight-back sets usually fall apart. The neck area gets crowded, the last two rows pinch together, and the final braid sits awkwardly on top of the nape. Leave yourself enough space to keep the rows clean all the way down.
Quick Checks That Save Time
- Hold the comb straight across before each new row.
- Match the spacing on the left and right side of the head before moving back.
- Re-section any row that bends near the crown.
- Keep clips on the unused hair so the part line stays visible.
Straight-back rows are boring in the best way. They make the install look disciplined, and that is usually what people mean when they say a set looks “clean.”
4. Brick-Layer Rows for a Cleaner Braid Install
You can see the problem the minute the second row lands directly over the first: the scalp lines line up, the gaps repeat, and the head starts looking boxy.
Brick-layer parting fixes that. Instead of stacking every row in a perfect column, you stagger each section slightly, like bricks in a wall. That small offset makes a big difference on braids because it stops the parts from forming one long visible highway from front to back. The scalp still shows, but it shows in a softer, more broken pattern.
This is one of my favorite braid parting patterns for knotless installs. The rows feel fuller near the roots without actually adding bulk, and the braids settle into the head more naturally. It also helps when the client has a tight crown or a narrower nape, because staggered rows give you more room to work with the shape of the head instead of fighting it.
The practical part is simple: start the next row between the two sections above it, not directly under a previous line. You are aiming for offset, not chaos. If the stagger becomes random, the pattern loses its purpose.
A brick layout is one of those ideas that sounds small until you see it on a finished head. Then it’s obvious.
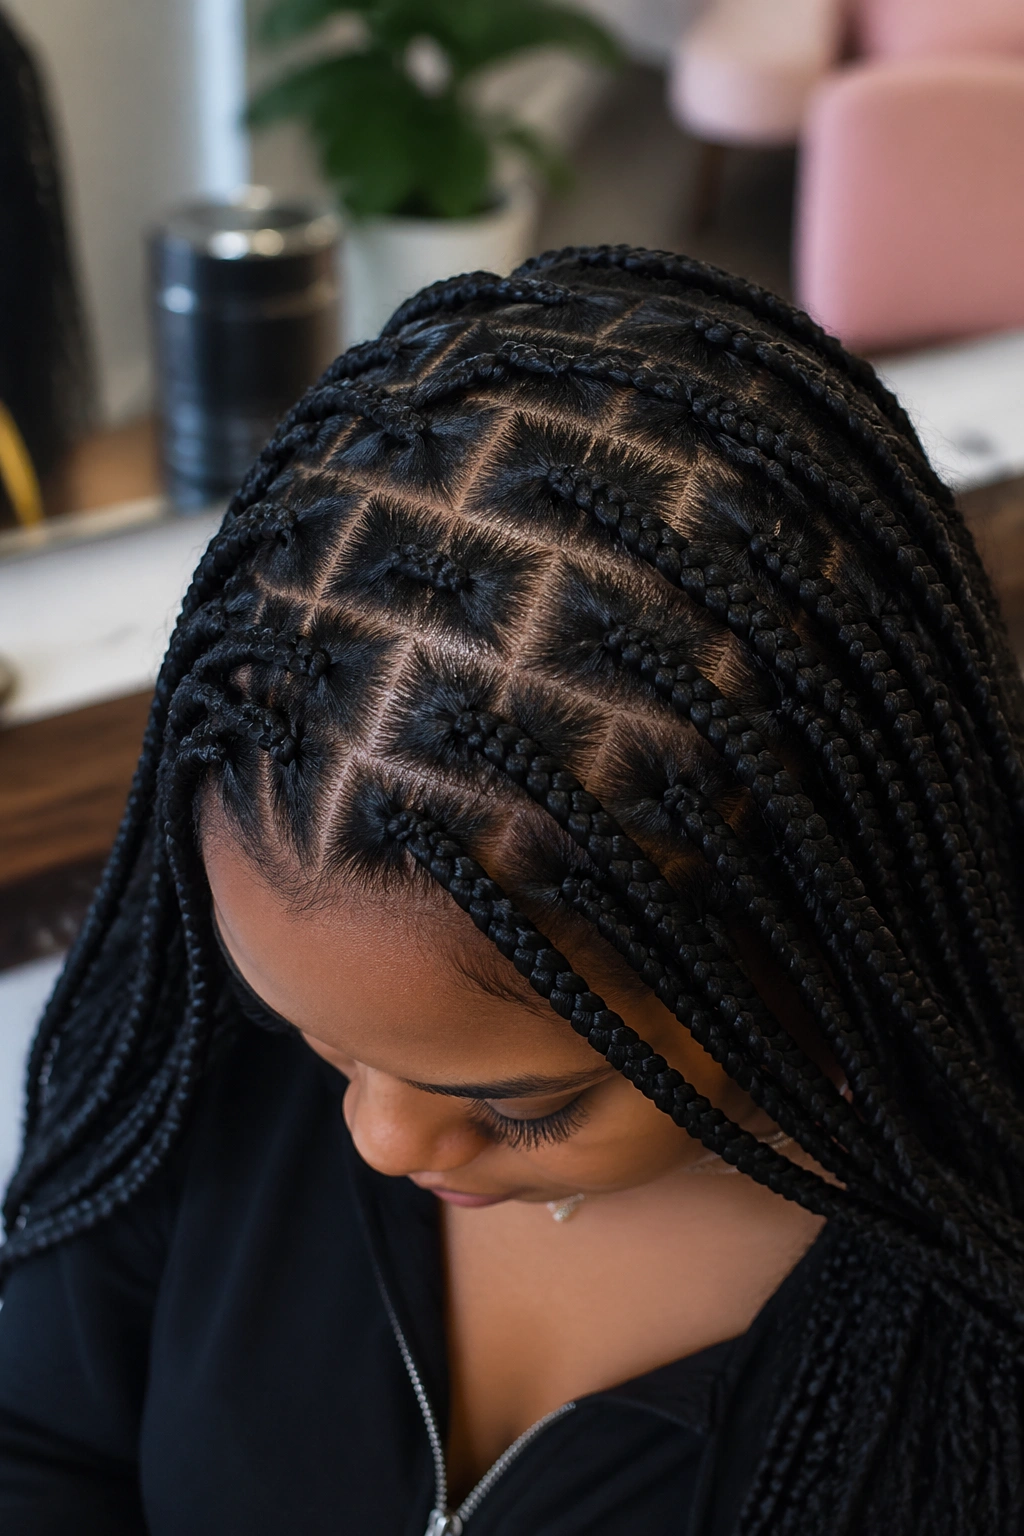
5. Diamond Parts That Make Knotless Braids Look Crisp
Diamond parting has a way of making knotless braids look cleaner than square parts, especially when the braids are medium-sized and the install needs a little visual softness.
The reason is shape. A square part throws hard edges at the scalp, which can look a bit stiff when the braids are large or the hairline is delicate. Diamonds break that up. Each point lands between neighboring sections, so the pattern feels more fluid and less boxed in. The braid bases still stay organized, but the eye doesn’t keep stopping at every right angle.
Diamond parts also help when you want the rows to flow around the crown instead of marching straight across it. They suit heads with a strong curve at the top because the shape mirrors the skull instead of slicing across it. That sounds picky, but the difference shows in photos and in person. A diamond grid tends to look polished without screaming for attention.
The key is keeping the diamonds even. If one point is much sharper than the others, the whole pattern starts to wobble. Use the comb tip to create the top and bottom points first, then connect the sides with short, controlled strokes. Don’t drag the line in one long swipe. That’s how parts get fuzzy.
Best use case: knotless braids, medium box braids, and styles that need a neat scalp pattern without hard corners.
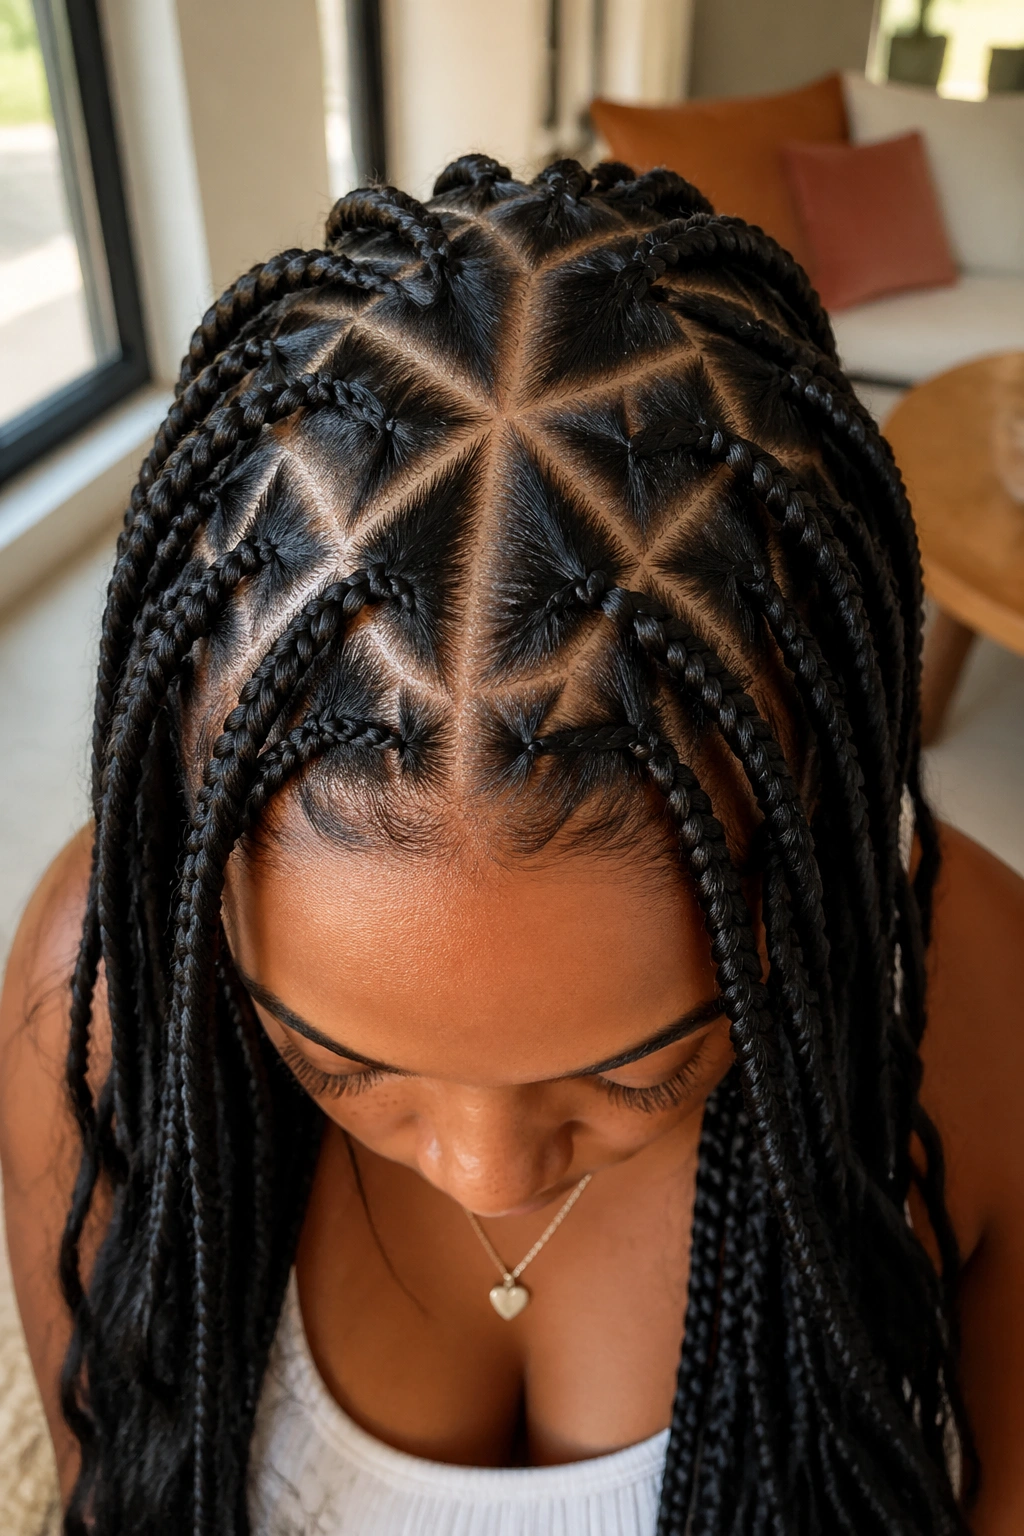
6. Triangle Parting for Small-Scale Braids
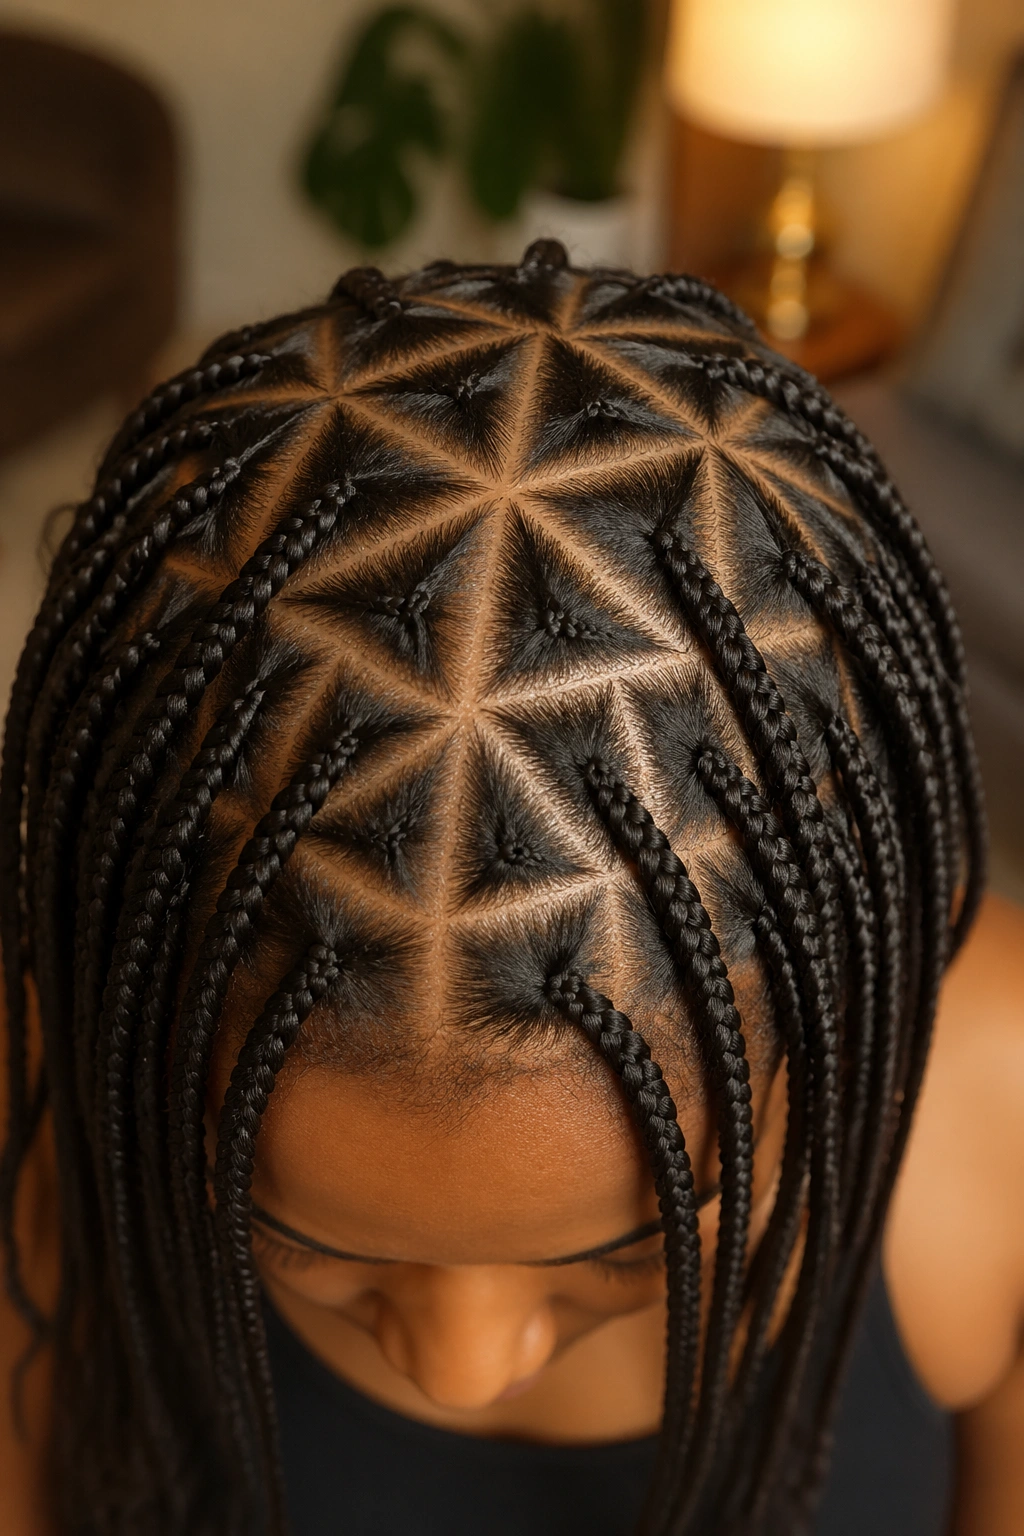
The first time triangle parts are done well, the whole style feels lighter at the roots.
That’s the part people usually miss. Triangle parting isn’t only about looking different. It changes how the braids sit against each other, which helps small-scale braids and mini-feed-ins move without creating a rigid grid. The braids have a bit more swing near the base, and the scalp pattern feels less mechanical.
What Triangle Parts Do Well
- They break up the straight-line look that square parts can create.
- They work nicely for jumbo braids because the wider base supports a fuller braid.
- They help the style look less crowded at the hairline.
- They make the install look more tailored when the head shape narrows toward the crown.
The one thing to watch is size. Tiny triangles can look fussy and overworked if the style itself is large. Keep the angles clean and the edges smooth, or the parting will steal attention from the braids. I like triangle parts most when the sections are big enough to read from a normal viewing distance but still precise enough that you can trace the shape with your finger.
Triangle parting is not the easiest map to set up, but it pays off because the install has movement built into it from the start.
7. Zig-Zag Parts That Soften a Hairline
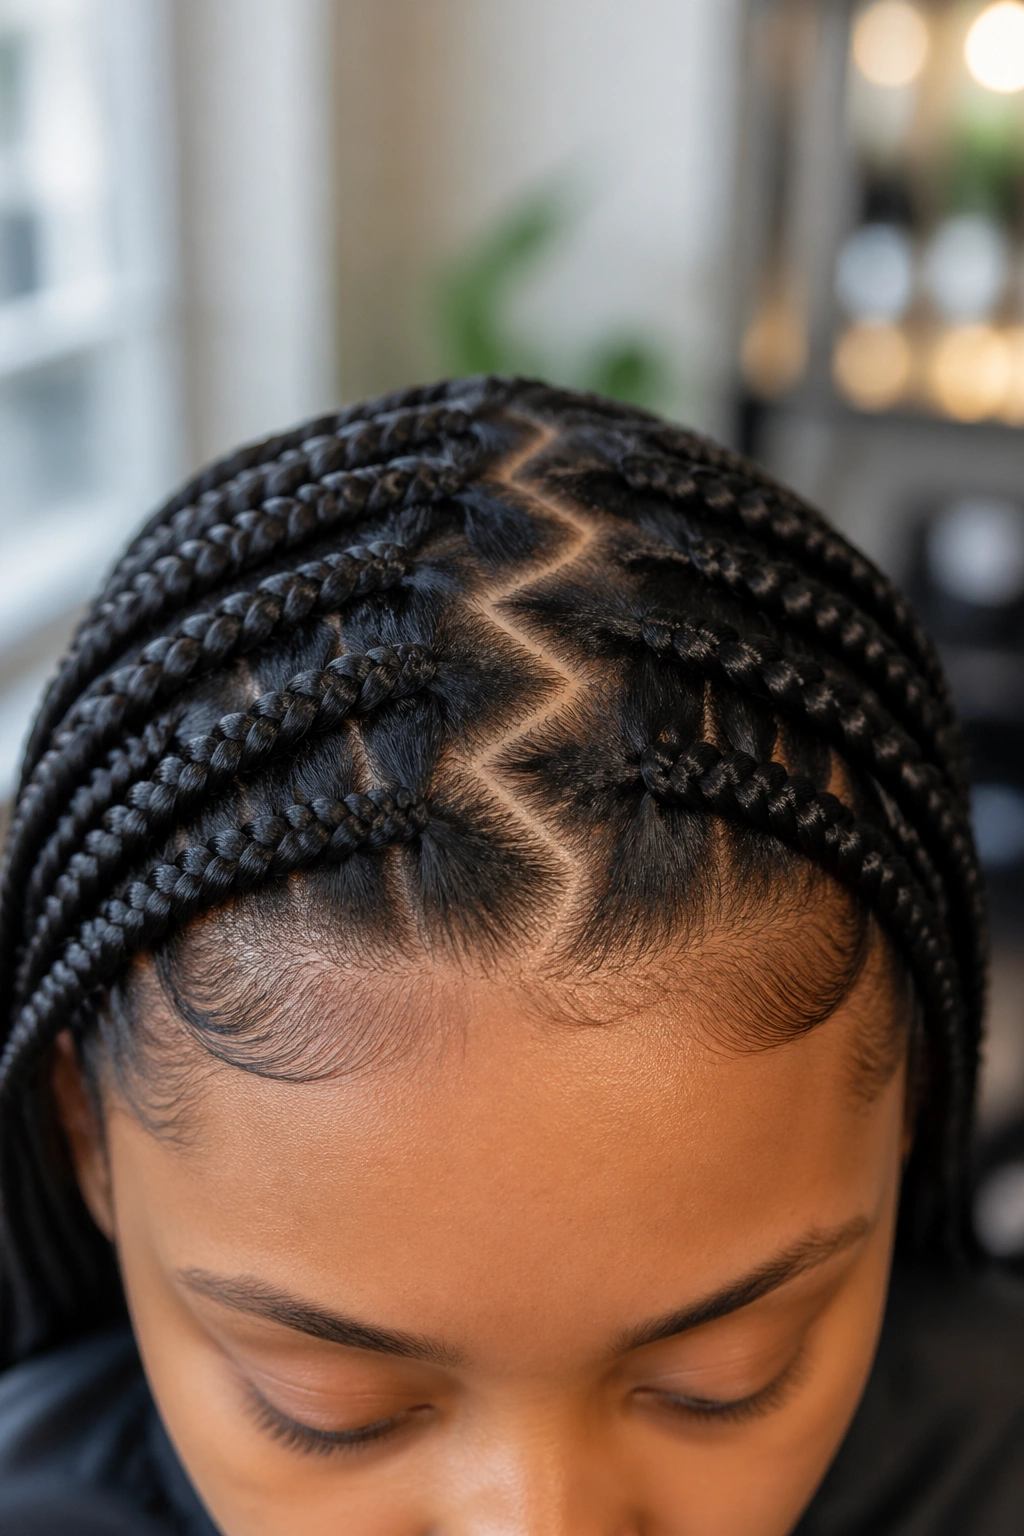
Why does a zig-zag part look cleaner than a straight one in the front? Because it hides the hard edge that sometimes makes the hairline look too drawn on.
A precise zig-zag parting pattern is not messy. It is controlled. The turns are small, the points are even, and the line follows a deliberate rhythm instead of darting around. That makes it useful for feed-in braids, front cornrows, and any braid style where the first inch matters more than the rest.
How to Keep the Zig-Zag Clean
Use the tip of the comb to make short turns, not big waves. Think five to eight subtle direction changes across the front rather than one dramatic squiggle. Each point should be shallow enough to blend, but sharp enough to show the pattern. If the zig-zag gets too wide, it stops looking intentional and starts looking rushed.
A zig-zag front can also soften asymmetry. Hairlines are rarely perfect, and that’s normal. The curved movement of the part gives you a little room to smooth over small differences without forcing the front to look like a ruler line.
This style shines when the goal is a gentler edge. It is less useful if the look calls for bold geometry. Straight parts are still better for that. Zig-zags are for the install that needs a cleaner front without a flat, severe line.
8. Curved Crown Parting Around the Head

A straight line is not always the neatest line.
Around the crown, a curved part often looks cleaner because it follows the roundness of the head instead of fighting it. That matters for beehive braids, halo braids, and any install that wraps around the perimeter. A rigid line can pull the eye outward and make the center feel tense. A curve sits down into the shape of the head and usually settles more naturally.
The practical benefit is control. Curved crown parting helps you decide where the weight of the style should sit. If the braids are going into a ponytail, bun, or wrapped pattern, the curve creates a neat path for the sections to follow. The result is less awkward swelling at the crown and fewer weird gaps where the line should have turned.
I also like curved parts when the client has a prominent crown swirl or a cowlick that fights straight sectioning. Working with the shape instead of against it keeps the part line from separating later.
This pattern asks for patience. Short strokes. Frequent checks. A tiny mistake at the crown tends to multiply as the part travels backward, so it pays to keep the curve smooth from the start.
9. A Circle Part for Ponytail Braids and Top Knots
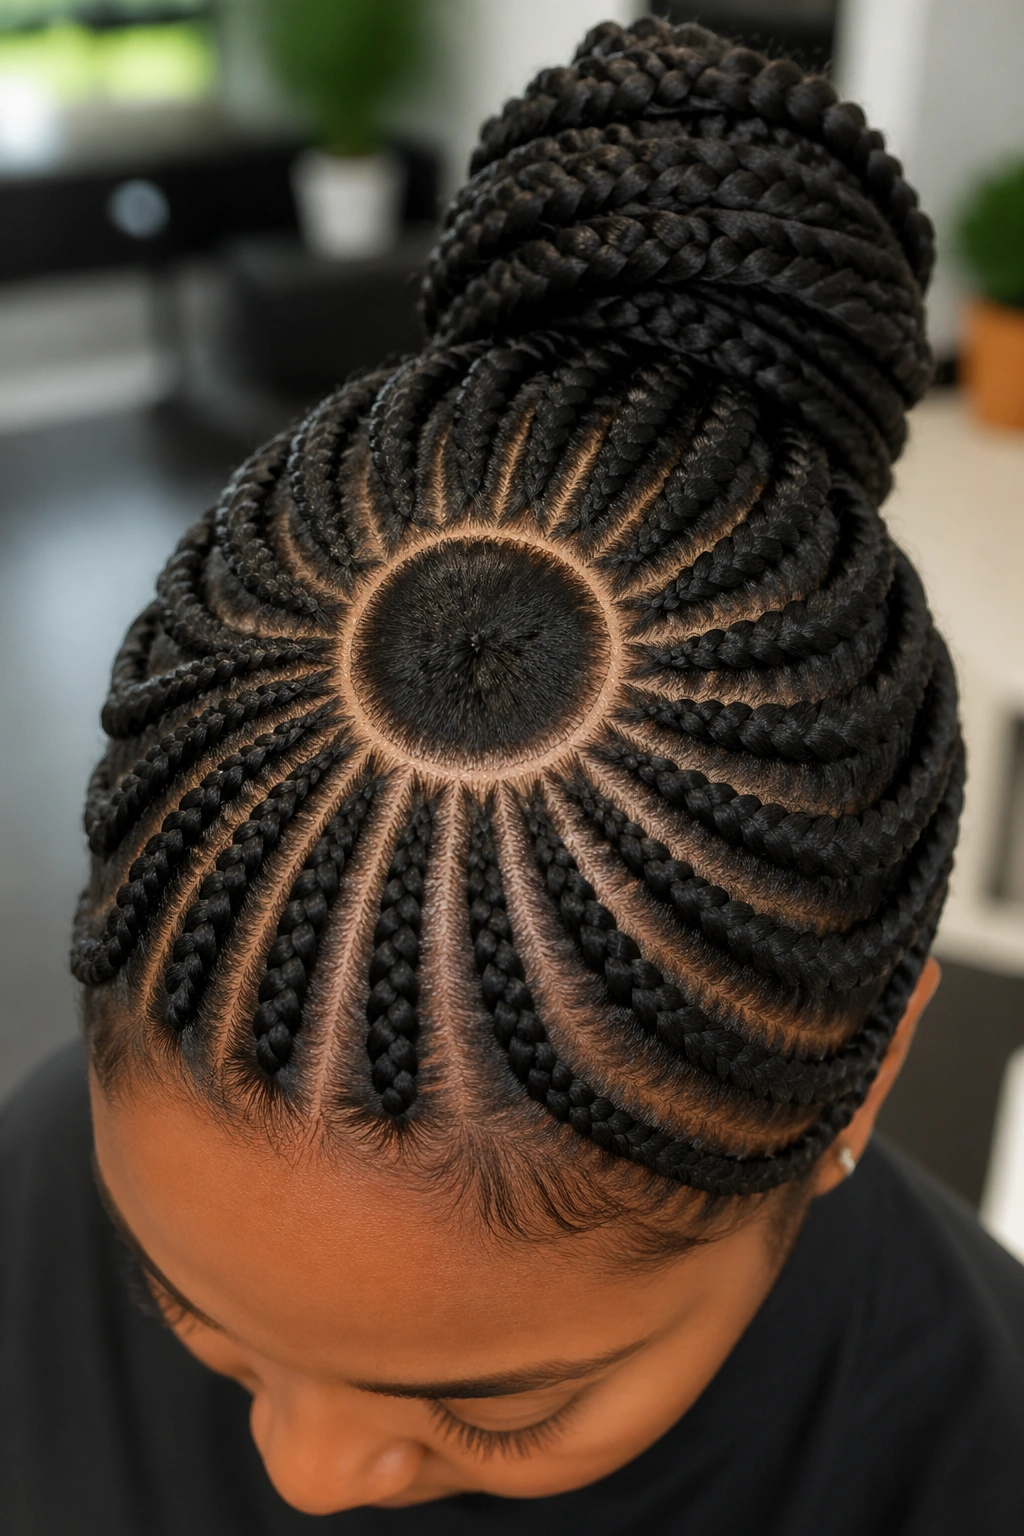
A circle part feels like a clean island at the crown.
That’s the appeal. When the hair is being gathered into a ponytail braid, a top knot, or a wrapped bun, a circular section keeps the anchor point neat and leaves the surrounding hair organized. The perimeter can be braided down, fed in, or slicked back without the center looking chopped up.
Where to Place the Circle
For a small top knot, keep the circle just a little wider than a silver dollar. For a fuller ponytail braid, open it to about the width of your palm. The part should sit where the ponytail will actually live, not where it looks centered in a mirror. That sounds obvious. It is the mistake people make anyway.
The circle itself should stay smooth. If one side dips lower than the other, the ponytail will lean and the finished style will look off even if the braids around it are perfect. Use your comb to trace the outer edge in small sections, checking the curve from front, side, and back.
A circle part is one of those choices that makes sense the moment the hair is gathered. Before that, it looks almost too simple. After that, it saves the whole style.
10. No-Part Cornrows for a Sleeker Finish
No-part cornrows are the opposite of a tidy grid, and that is exactly why they can look so sleek.
Instead of exposing a clean map of squares or triangles, the sectioning gets folded into the braid itself. The scalp lines stay hidden, the look reads smooth, and the design can move in a more sculpted way. This is a strong choice for styles that need a polished surface rather than a visible pattern.
The trade-off is control. Without visible boxes to guide you, each feed-in amount has to be measured by feel. If the sections vary too much, the braid thickness starts changing from row to row and the neat finish disappears fast. So no-part cornrows are cleaner in the final look, but they are less forgiving during the install.
I like this method for people who want the braid design to be the headline, not the parting. Swirls, molded cornrow paths, and simple swept-back styles all benefit from a hidden map. The scalp looks smoother, and the braid pattern becomes the star.
It is not the easiest pattern for a beginner, though. If the hand is still learning how much hair to feed in at each pass, a visible parting map is kinder.
11. V-Shaped Nape Parting for Low Braids
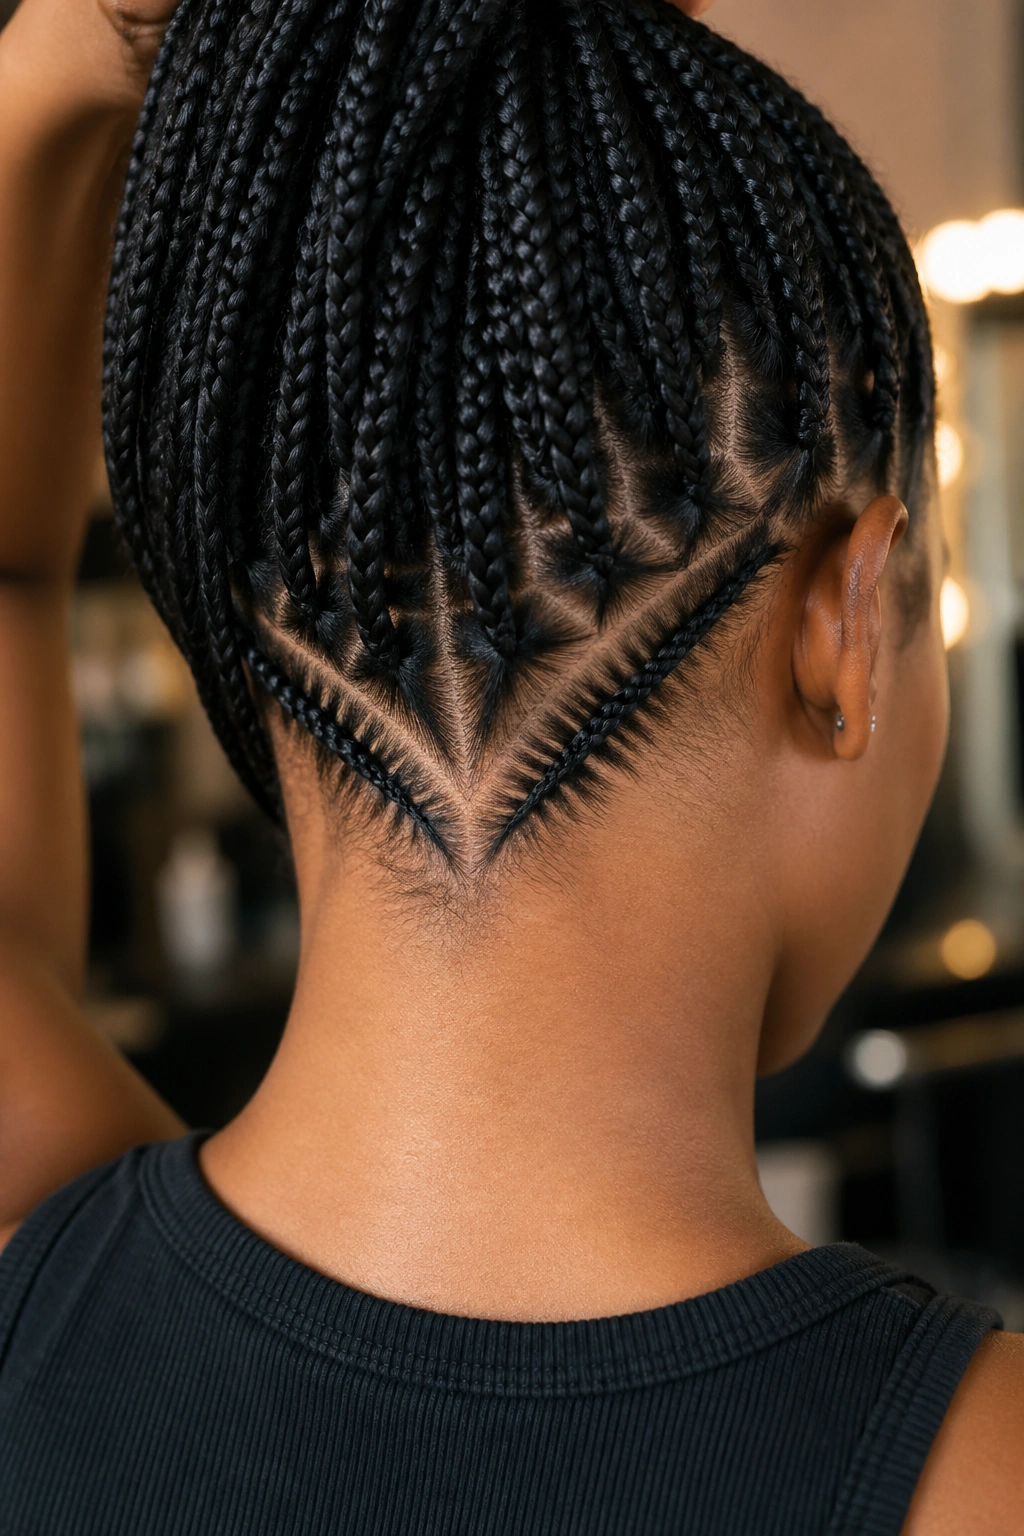
A clean V at the nape can save a low braid style from looking bulky.
That shape gives the lower back of the head a sharp, controlled finish, which matters when the braids are gathered into a low ponytail, low bun, or stitched-back design. A straight horizontal section at the nape sometimes sits too bluntly and makes the base feel heavy. The V breaks that line and lets the style taper inward.
Where the V Should Land
- Keep the apex centered at the middle of the nape.
- Let the arms of the V angle up toward each ear without climbing too high.
- Leave enough room so the low bun or ponytail can sit flat.
- Check both sides in a mirror before you start braiding the lower rows.
A deep V can look sharp, but too much depth steals hair from the lower section and leaves you with a thin-looking base. A shallow V usually works better for thick hair because it preserves more density near the neckline.
This pattern is easy to underestimate. It looks like a small detail while you’re sectioning, then becomes the part everyone notices when the style is pulled up. Clean nape work matters. A lot.
12. C-Shaped Face-Framing Parts for Braids with Bangs

A hard front part can look stiff when the style includes bang braids or face-framing sections. A C-shaped part softens that edge and gives the front of the style room to breathe.
The shape follows the curve of the temple instead of cutting straight across the forehead. That helps the finished braids sit around the face rather than fighting it. I especially like this for styles where a few braids are left loose near the front, because the curve keeps the transition from scalp to braid looking smooth instead of abrupt.
There’s a practical bonus too. A C-shaped front section gives you a clearer lane for parting the next row behind it. The front doesn’t collapse into the rest of the head, which makes the style easier to keep organized while you move back.
The curve should be gentle. If the C gets too tight, it starts looking decorative in a way that can distract from the rest of the install. If it is too wide, the front loses shape and the braids may sit oddly near the temples. Aim for a curve that feels like it belongs to the face, not one that was drawn on top of it.
This is a quiet little pattern, but it can change the whole mood of the front half of the style.
13. Freehand Micro-Sections for a Cleaner Knotless Install
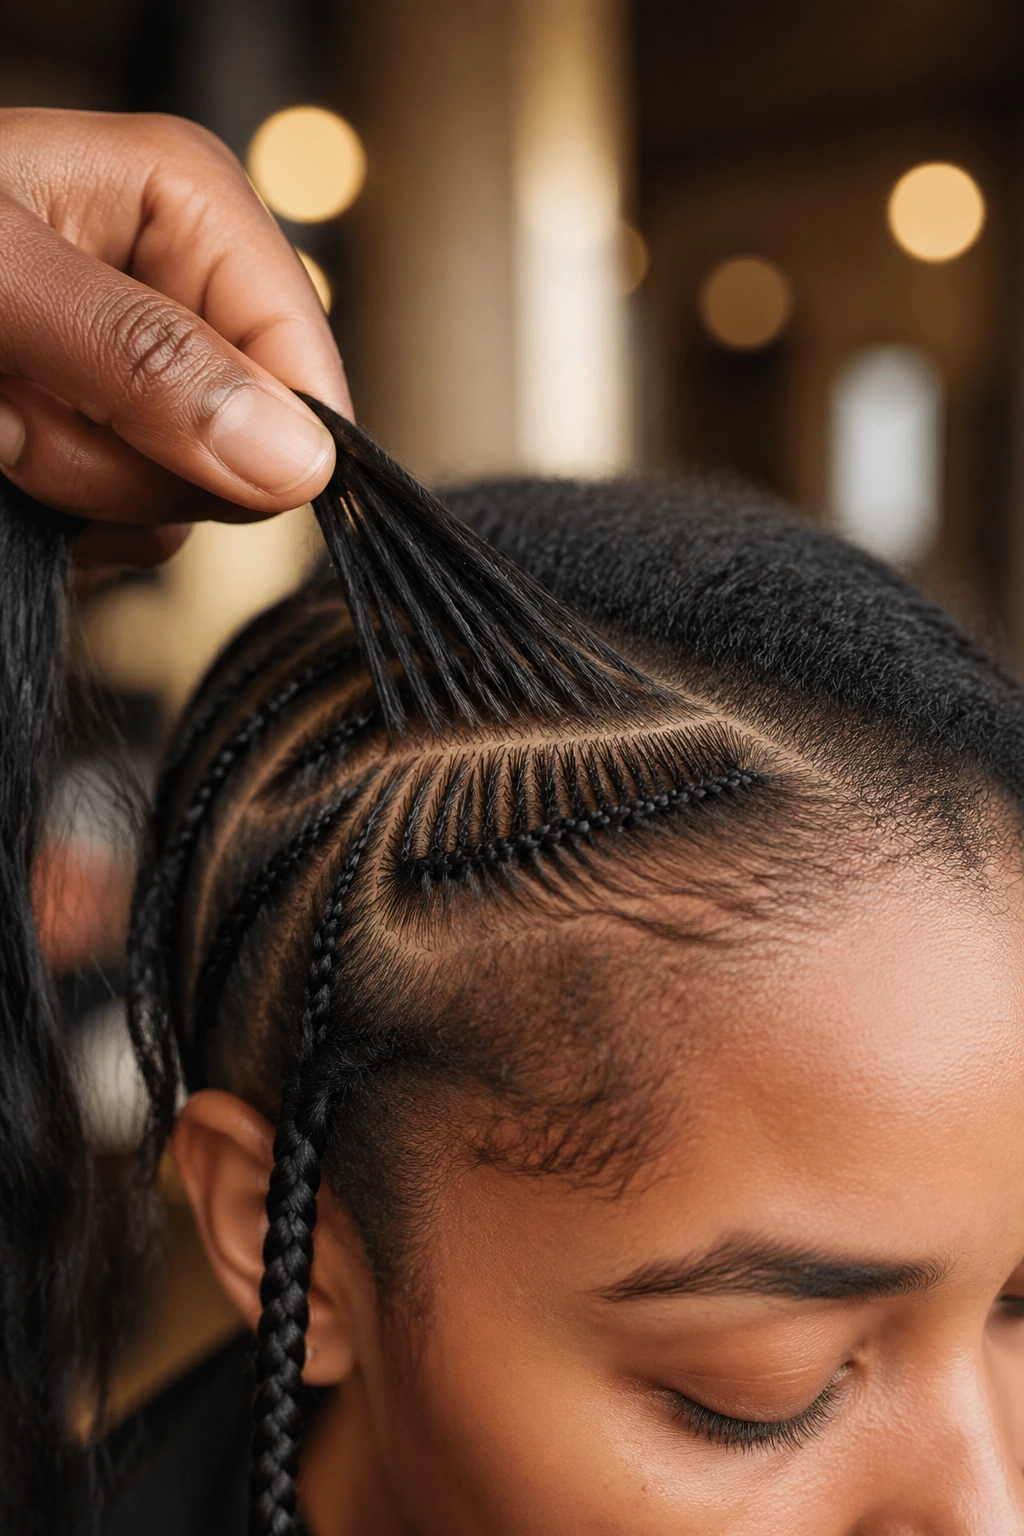
A cleaner knotless install often comes from sections that feel almost invisible while you’re working.
Freehand micro-sectioning is the pattern I reach for when the goal is a natural-looking root with minimal visible grid lines. Instead of chopping the head into obvious boxes, you carve out very small, even sections that match the braid size and the density of the hair at that spot. The lines stay neat, but the head doesn’t look over-mapped.
What Makes Freehand Still Look Tidy
The sections still need a plan. Freehand does not mean random.
- Keep each micro-section close to the same width as the braid base.
- Clip away the surrounding hair so the active section stays crisp.
- Check density at the temples and crown before you decide the size.
- Use two mirrors or a camera view to catch drift in the back rows.
- Match the parting tension from one side to the other so the braids sit evenly.
This method works best when the head shape changes fast — narrow temples, fuller crowns, tighter napes, that sort of thing. The parting can adapt to the client instead of forcing the client to fit a rigid grid.
It also rewards patience. If you rush, the micro-sections turn sloppy and the install loses that clean knotless look. Slow hands make the difference here. Not fancy hands. Just steady ones.
Final Thoughts
The cleanest braid parting patterns are usually the ones that match the style instead of fighting it. A center spine, a staggered brick layout, a curved crown, or a tiny freehand section can each solve a different problem at the scalp.
That’s the part people overlook when they focus only on braid size. The parting map changes the whole finish. It changes how the roots sit, how the style moves, and how long the install keeps looking fresh before the parts start to blur.
If a braid style looks a little off, the fix is often in the sectioning, not the braid itself. Clean the map first. The rest gets easier from there.