A good braid can rescue hair that refuses to cooperate.
The trick is picking styles that look intentional without taking over your morning. That is why easy braids you can do in under 10 minutes matter: they solve the “I have five minutes and a mirror” problem without asking for a curling iron, six pins, or a saint’s patience. A fine-tooth comb, a couple of clear elastics, and a little texture in the hair go a long way.
I have a soft spot for braids that hold shape even when they are not perfect. A slightly crooked plait at the nape looks better than a stiff one that was fought into place. Clean hair can work, but day-two hair usually grips better; if your strands are slippery, a dusting of dry shampoo or a pea-size dab of styling cream changes everything. That little bit of friction is the difference between a braid that slips apart and one that stays put.
The 14 styles below cover the whole range, from the one you can do with your eyes half open to the one that looks fussy but is faster than it seems. Start with the braids that match your length, your texture, and how steady your hands feel that morning. After a few tries, the motions stop feeling like choreography and start feeling automatic.
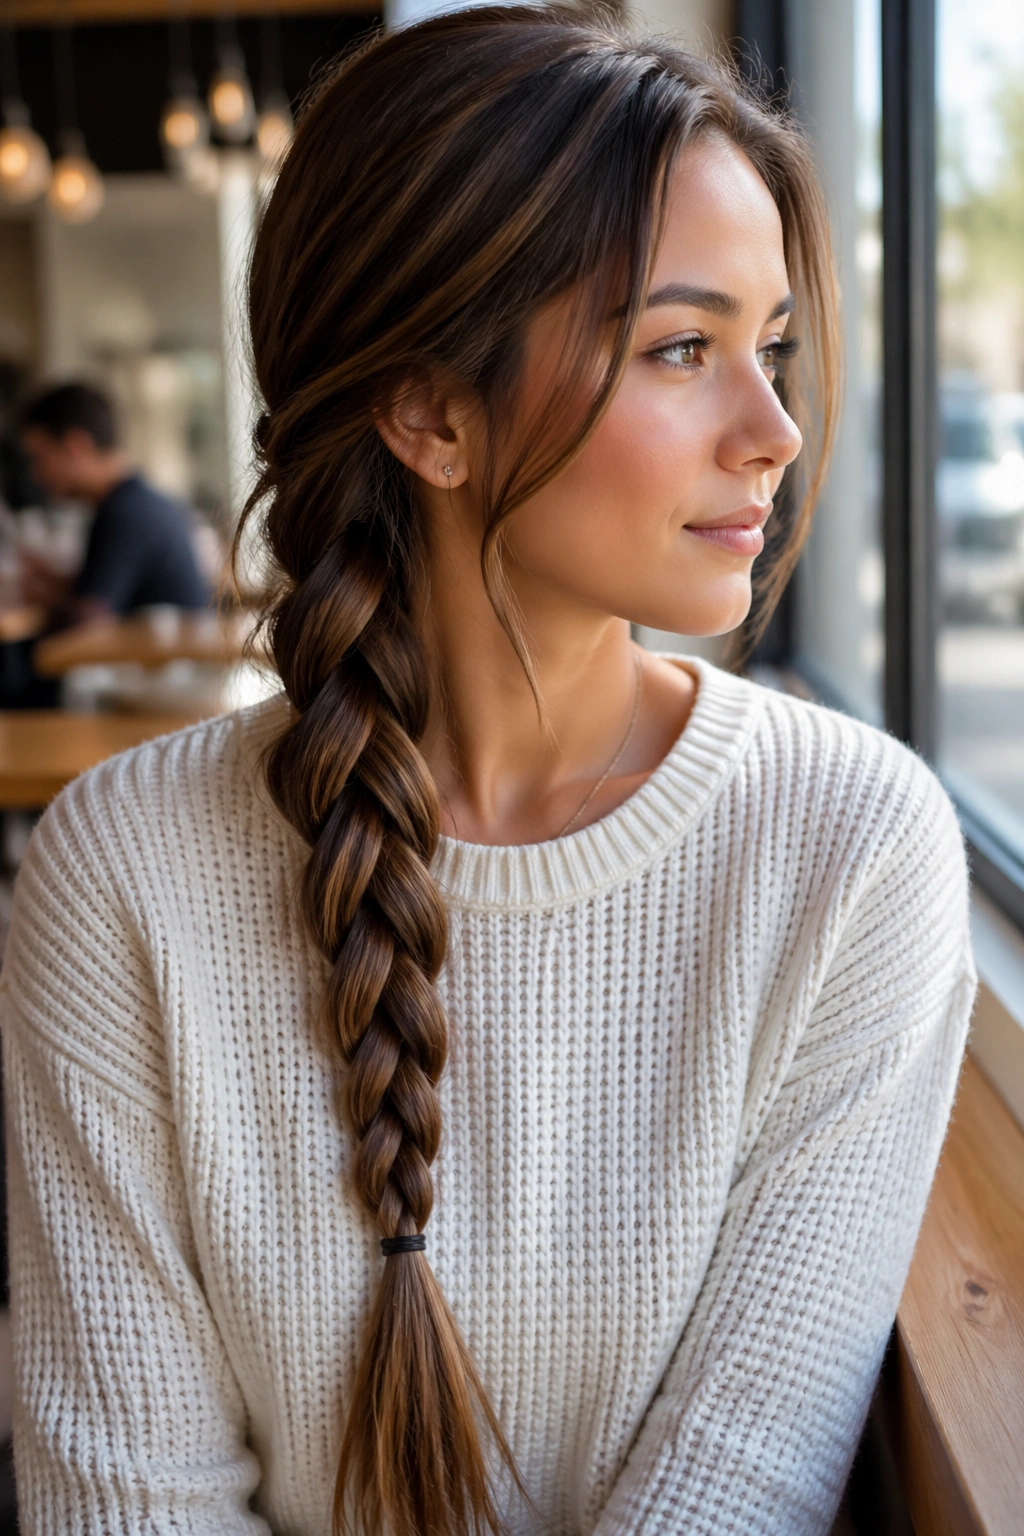
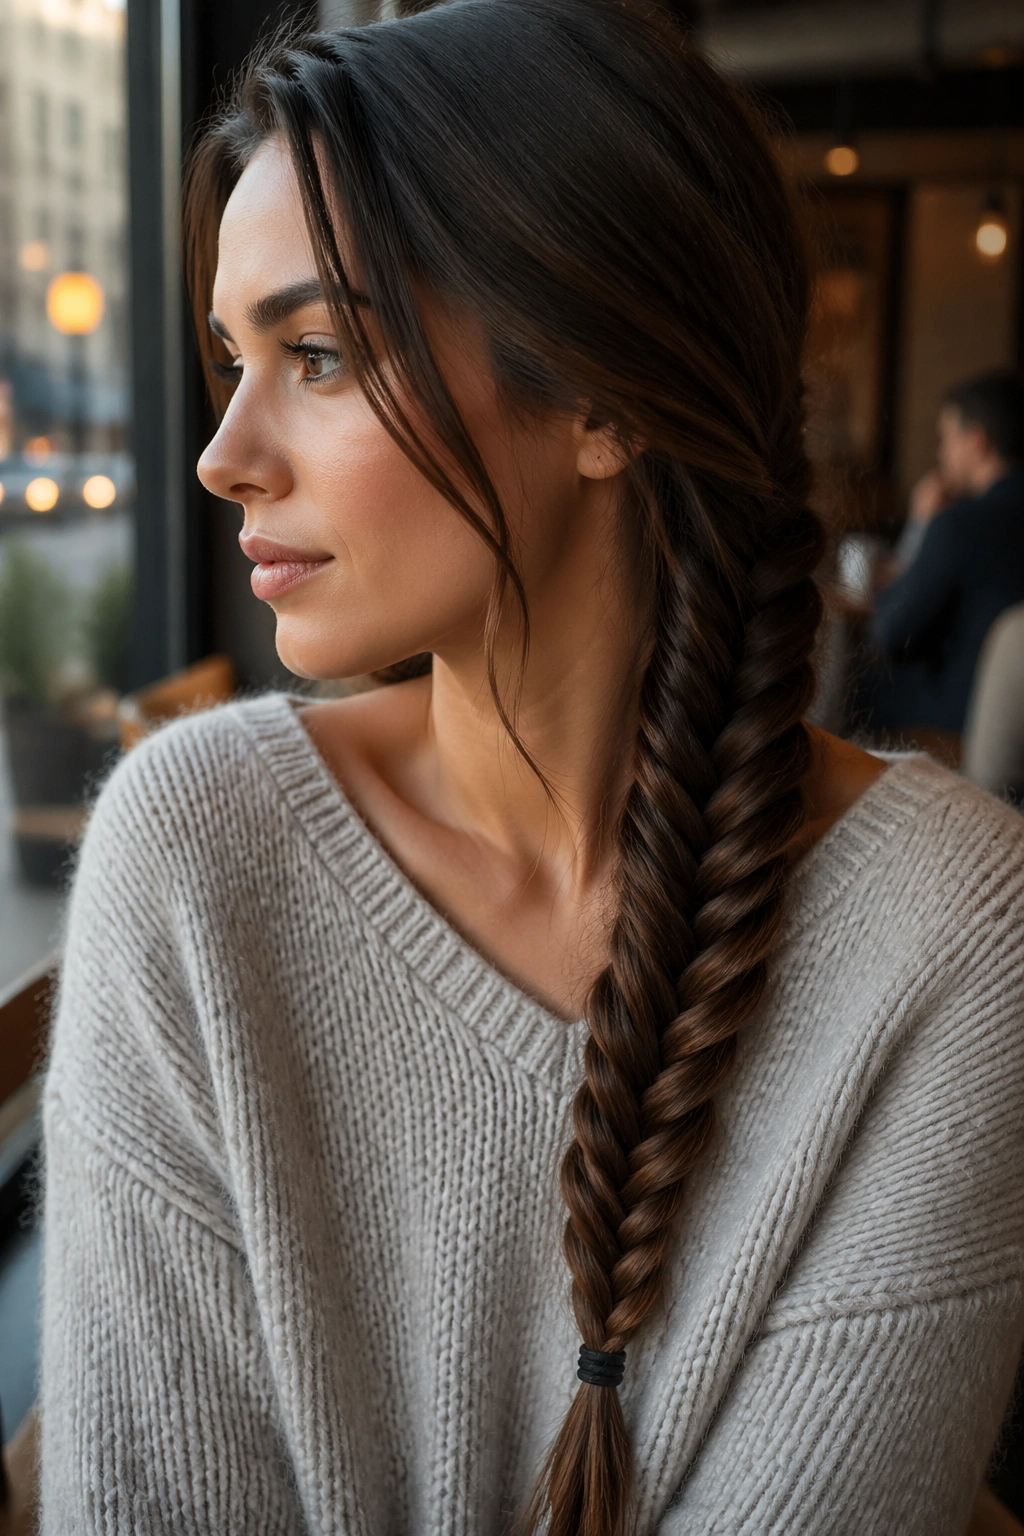
1. Classic Three-Strand Braid

The classic three-strand braid earns its spot because it’s the fastest style that still looks finished. If you can separate hair into three even pieces and cross left over middle, then right over middle, you already know the whole trick. That’s the charm of it. No extra parts, no weird hand positions, no getting stuck halfway through because you forgot which section was which.
Why It Holds Up So Well
A three-strand braid works because the weight spreads out evenly. You’re not asking one tiny section to carry the whole style, so the braid stays calm instead of puffing up into chaos. On hair that reaches the shoulders or longer, it usually takes less than 2 minutes once the sections are clean.
Keep the sections roughly equal at the start. If one piece is twice the size of the others, the braid twists off-center and starts looking sloppy halfway down. You do not need perfect symmetry, though. Close is fine.
- Start with hair that is brushed smooth and lightly damp with leave-in if it tends to frizz.
- Hold the first cross snug, then relax your grip a little so your hands do not cramp.
- Secure the end with a small elastic and leave 1 to 2 inches loose if you want a softer finish.
- Tug the outer edges gently after tying if you want a fuller look.
Best move: braid it low at the nape when you want the style to look neat without trying too hard.
2. Side Braid
Why does a side braid look softer than a braid that hangs straight down the back? Because the diagonal line changes the whole mood. It frames the face, shifts the visual weight to one shoulder, and makes even a basic plait feel more deliberate. I reach for this one when hair is a little flat on top and I want shape without volume-heavy styling.
What Makes It Fast
A side braid saves time because you only have to manage one dominant section of hair. Sweep everything over one shoulder, split it into three pieces, and braid as usual. That simple shift cuts down the awkward reaching behind your head, which is where a lot of people lose time and patience.
It works especially well on medium to long hair, but shorter layers can still play if you keep the braid looser and stop before the ends start bursting out. A deep side part makes it look more polished; a soft off-center part makes it feel more relaxed.
How to Keep It Neat
If your hair has layers around the face, tuck the shortest pieces behind the ear before you start. That tiny move keeps flyaways from escaping right away. Then braid with a little tension at the top and less as you go down.
A side braid also hides uneven ends better than a centered one. That matters more than people admit. Not every morning is a perfect-hair morning.
3. Rope Braid
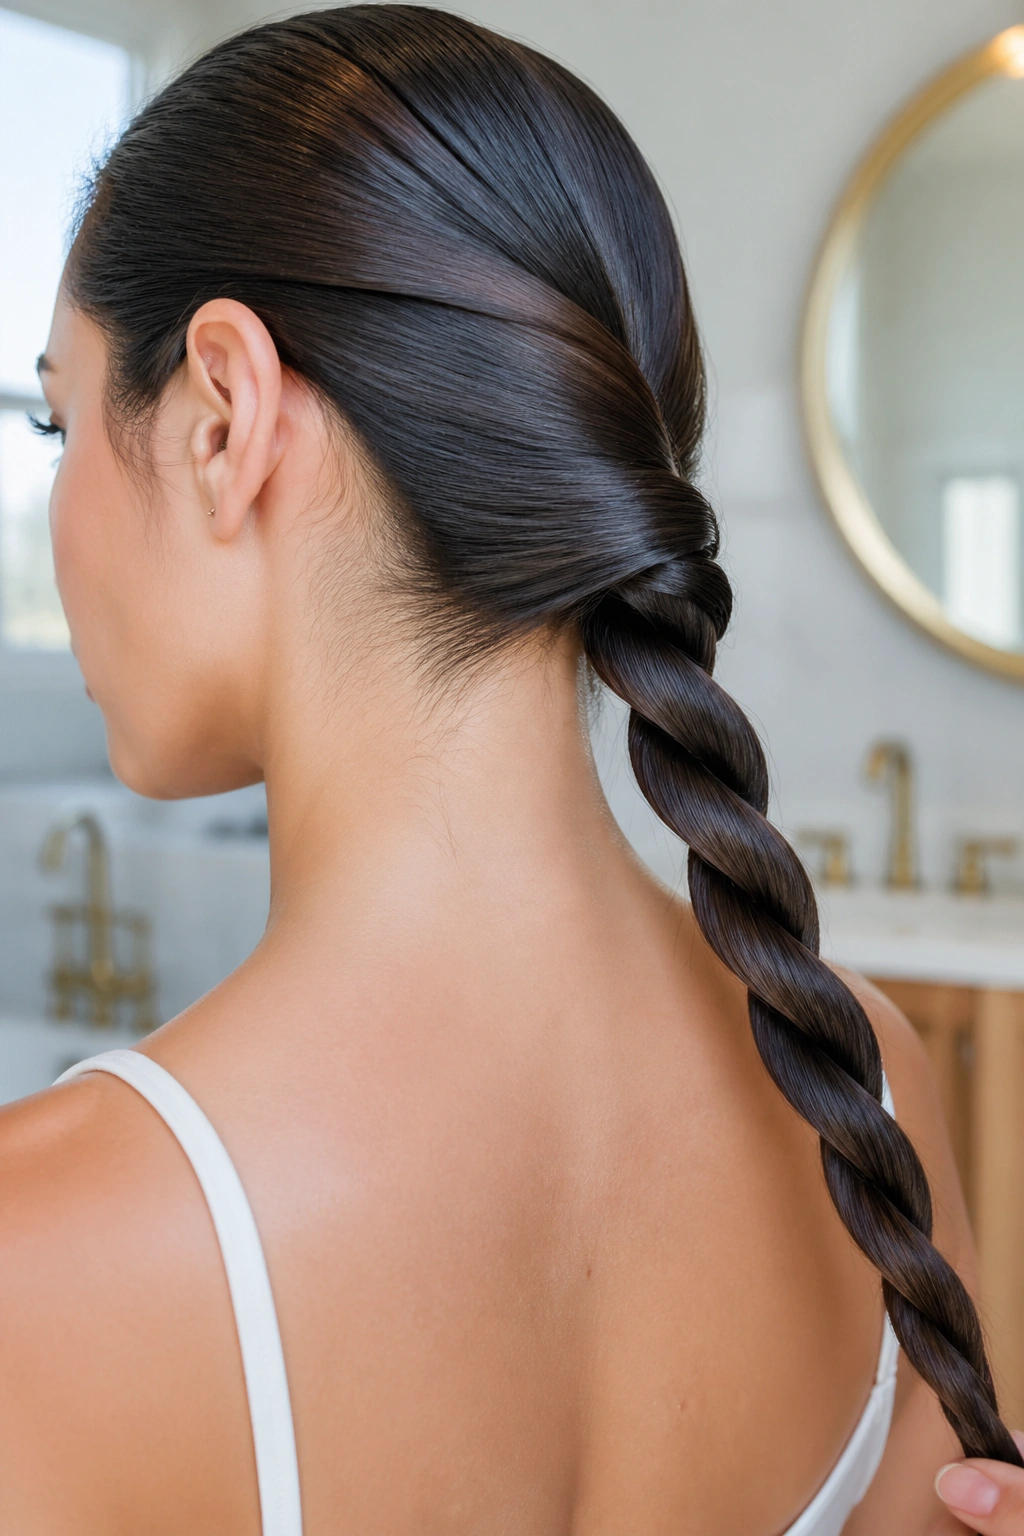
A rope braid is the style I recommend when someone says their hair “never cooperates with braids.” It uses two sections instead of three, and the motion is a simple twist rather than a crossing pattern. Twist both sections in the same direction, then wrap them around each other in the opposite direction. That’s the whole thing.
Why It’s Faster Than It Looks
The braid stays taut because the twisting does most of the work for you. Layered hair often behaves better here than in a regular plait, since the twist holds short pieces in place a little more firmly. It also gives a glossy, clean finish that reads as intentional even if you made it in a hurry.
On long hair, it takes about 90 seconds once your hands know the motion. On shoulder-length hair, it can be even quicker. Use a light styling cream or a touch of mousse if your hair is silky and refuses to hold shape. You want enough grip to keep the twist from unwinding.
Quick Details That Matter
- Divide the hair into two equal sections.
- Twist each section in the same direction before crossing them.
- Keep your fingers moving in a steady rhythm, or the rope starts to loosen.
- Finish with a clear elastic and twist the ends once more if they need extra hold.
A rope braid is plain in the best way. It looks clean, stays neat, and does not demand much from you.
4. French Braid
French braids look fussy on other people and practical on yours. The reason is simple: they gather hair as they go, which means they control flyaways, layers, and that weird puffy crown area all at once. Once you learn the hand motion, a French braid is one of the most useful styles in the whole bunch.
The Hand Motion That Saves Time
Start with a small section at the crown, split it into three pieces, and braid once or twice before adding hair from the sides. The added sections should be about 1 inch wide each time, not giant chunks that wreck the balance. Smaller pieces make the braid flatter and tighter; larger pieces make it look rushed, which can be fine if you want texture.
Your first few attempts may feel clumsy. That’s normal. The braid only gets fast after your fingers stop thinking about each pass. I’d rather see a slightly uneven French braid than one pulled so tight it gives you a headache by lunchtime.
A Few Things That Help
- Start on hair that is brushed and free of knots.
- Hold the braid close to the scalp at the top, then ease off a little toward the ends.
- If you want more grip, mist the roots with dry shampoo before you begin.
- Stop braiding once you hit the nape if you want a quicker half-down finish.
A French braid is the style that teaches your hands what to do next. After that, the rest of the list gets easier.
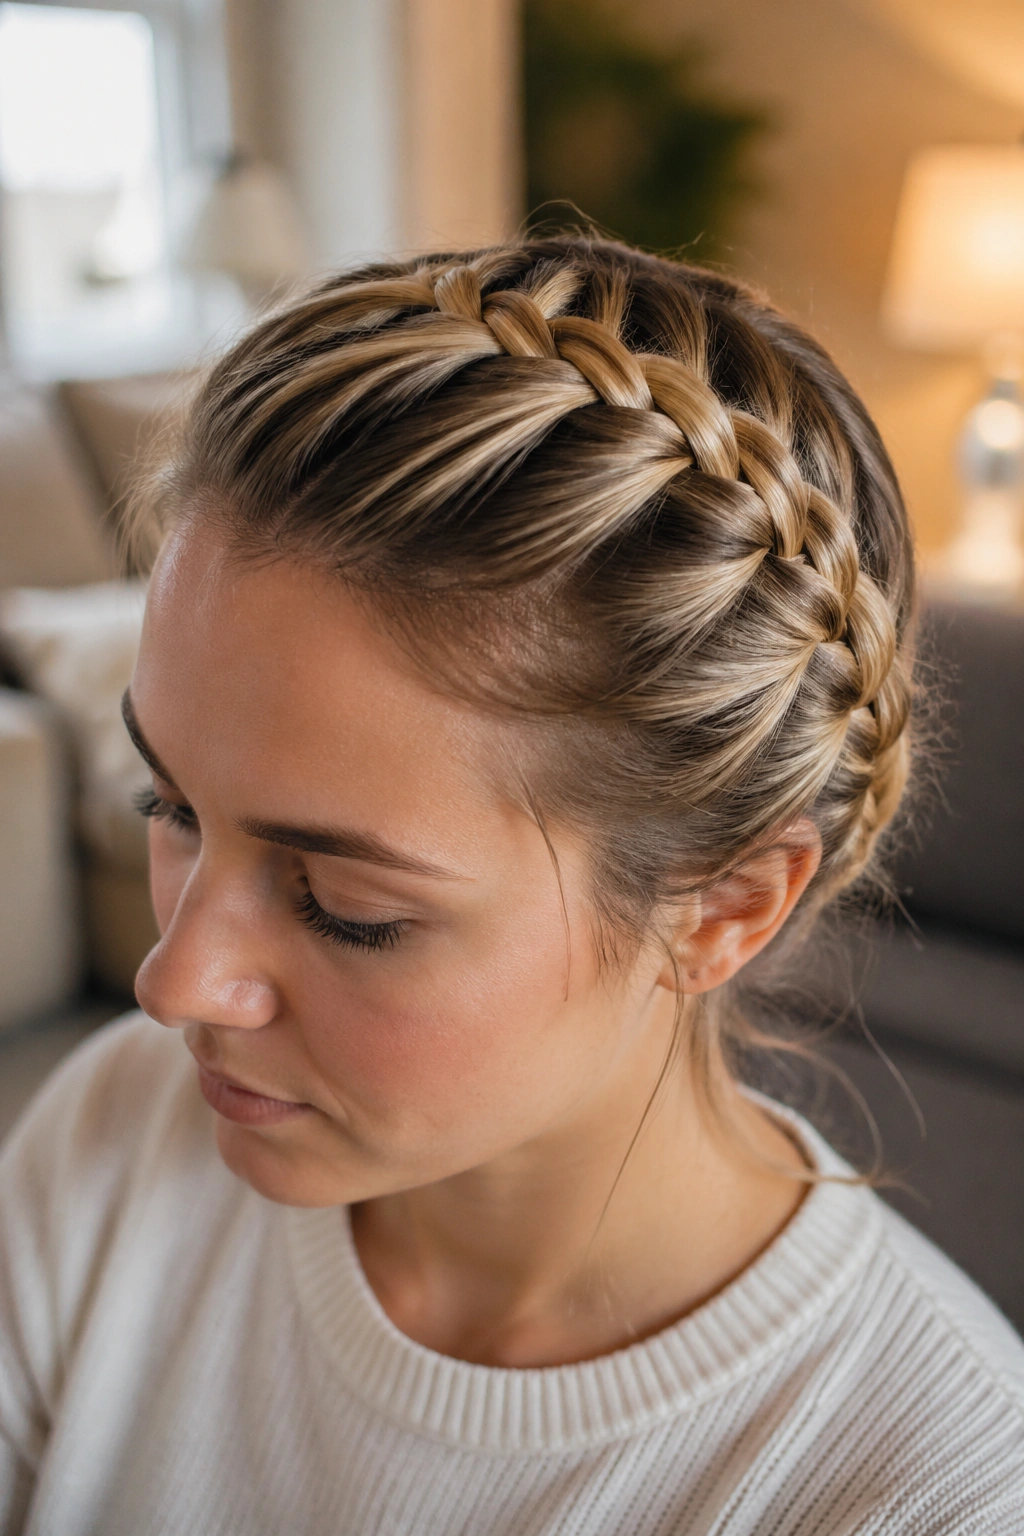
5. Dutch Braid
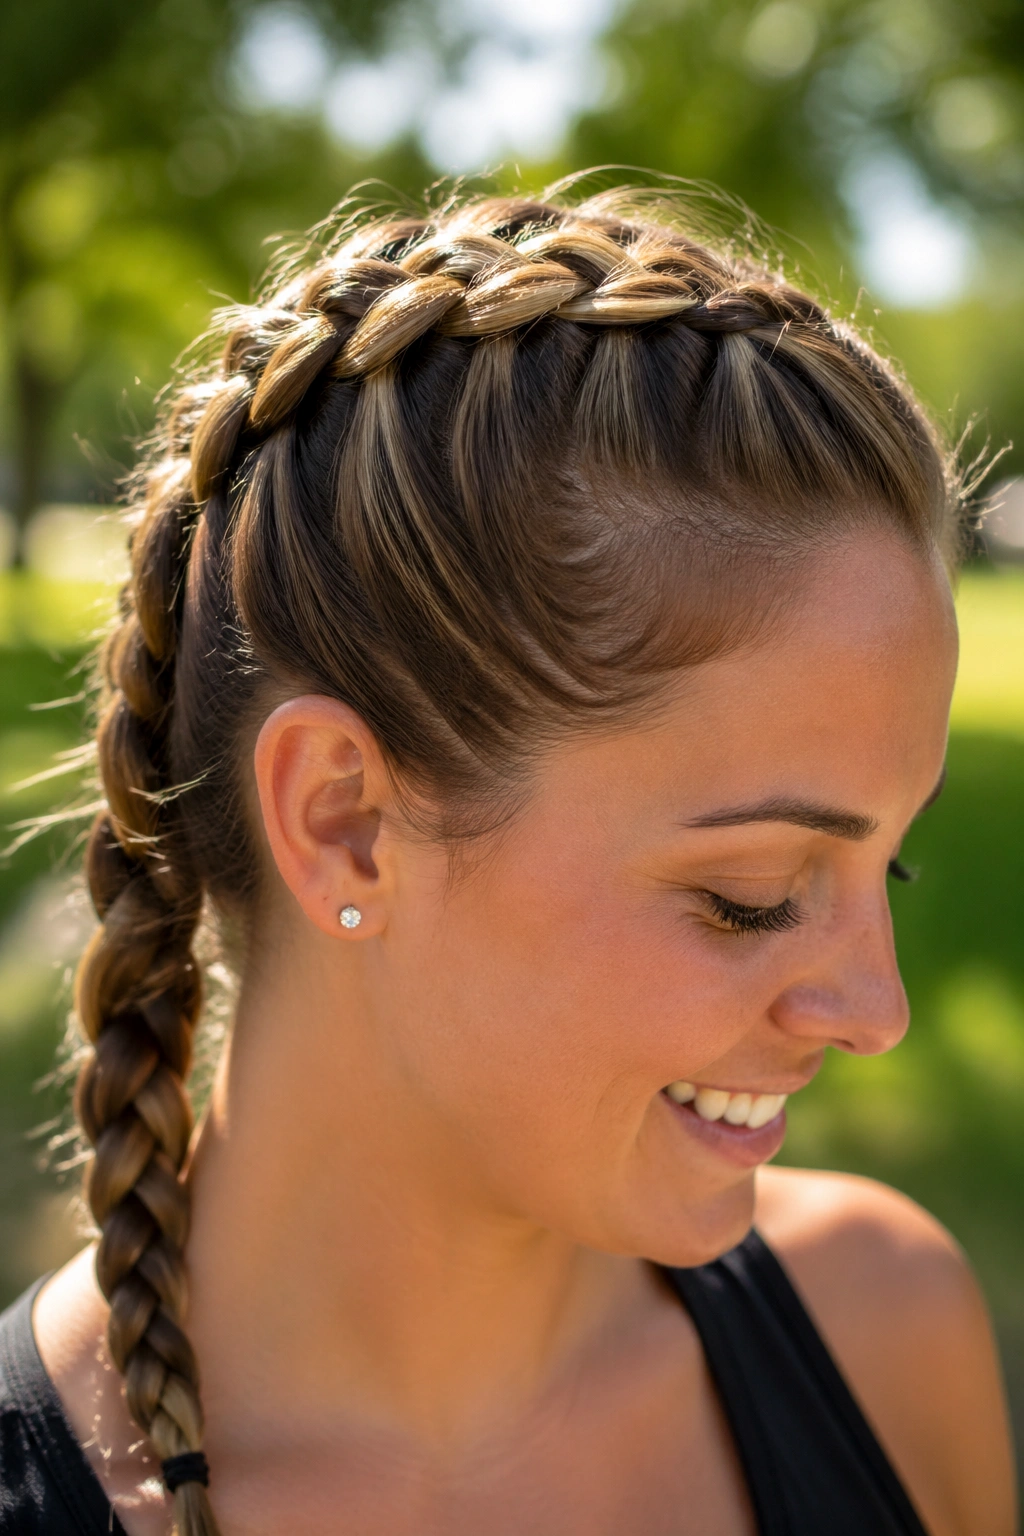
A Dutch braid is not harder than a French braid; it just lives on the other side of the visual trick. Instead of crossing sections over the middle, you cross them under, which makes the braid sit on top of the hair instead of sinking into it. That raised shape gives you more texture and a slightly bolder look.
Why the Braid Pops Up
The under-crossing creates a stronger ridge down the center. On thick hair, that ridge is a gift because it stops the style from disappearing into the rest of the head. On fine hair, it can fake a little extra body without teasing or heavy products.
If you already know how to French braid, the hand motion will feel familiar after about 30 seconds. The order changes, but the rhythm stays the same. That’s why so many people get thrown off for no real reason. The braid is not difficult. It is just wearing a different coat.
When I’d Pick It
- When I want the braid to show from a distance.
- When hair is thick enough that a flat braid gets lost.
- When I want a sporty look that still feels polished.
- When I am making double braids and want the pattern to read clearly.
A Dutch braid likes a bit of tension at the top and a looser finish toward the end. If you keep every section pulled the same way, it can look stiff. Let the lower half relax a little, and it settles into something much better.
6. Fishtail Braid
The fishtail braid feels fiddly for the first minute because the sections are thin and your fingers need a little patience. Then it clicks. You split the hair into two pieces, pull a small strand from the outside of one side, and cross it into the other. Repeat. That is the entire mechanism, and it creates a braid that looks detailed without requiring a complicated pattern.
Chunky Beats Tiny Here
If you want this braid to stay under 10 minutes, do not make the strands too small. Tiny pieces slow everything down and make the whole style look overworked. Thumb-thick sections are the sweet spot for a quick version. They still give you the woven look, but they move fast enough that your hands do not cramp.
This is one of my favorite braids for day-two hair because the texture helps the style hold. Clean, silky hair tends to slide around more than you’d like. A little dry shampoo at the mid-lengths fixes that fast.
Quick Facts Worth Knowing
- Use two sections, not three.
- Keep the outside pieces small and consistent.
- Stop halfway down if your hair is long and you want a looser finish.
- Secure with a clear elastic, then tug the edges slightly for softness.
A fishtail braid is the one people assume took longer than it did. I enjoy that a little.
7. Half-Up Braid
Need your front layers out of your face without rebuilding your whole hairstyle? A half-up braid solves that problem in one small move. You only braid the top section, which means you keep some softness around the shoulders while getting the practical part of the style under control.
A Fast Fix for Front Layers
Start by taking the top third of your hair from temple to temple. That section can be a regular three-strand braid, a rope braid, or even a tiny French braid if you want the braid to sit closer to the scalp. Secure it at the back of the head, around mid-crown, so it feels anchored rather than floating.
This style works on straight, wavy, and curly hair because it does not ask the whole head to behave the same way. If your hair is curly, braid only the top section and leave the rest alone. If your hair is straight, lightly backcomb the crown before you start so the braid has something to grip.
The Small Detail That Makes It Better
Wrap a thin strand of hair around the elastic and pin it underneath. That takes maybe 20 seconds, and it cleans up the whole look. A visible elastic can make the style feel unfinished; hiding it does a lot with very little effort.
A half-up braid is the style I’d pick for coffee runs, video calls, or any day when you want your hair controlled but not pinned back like you’re heading into a swim meet.
8. Double Braids
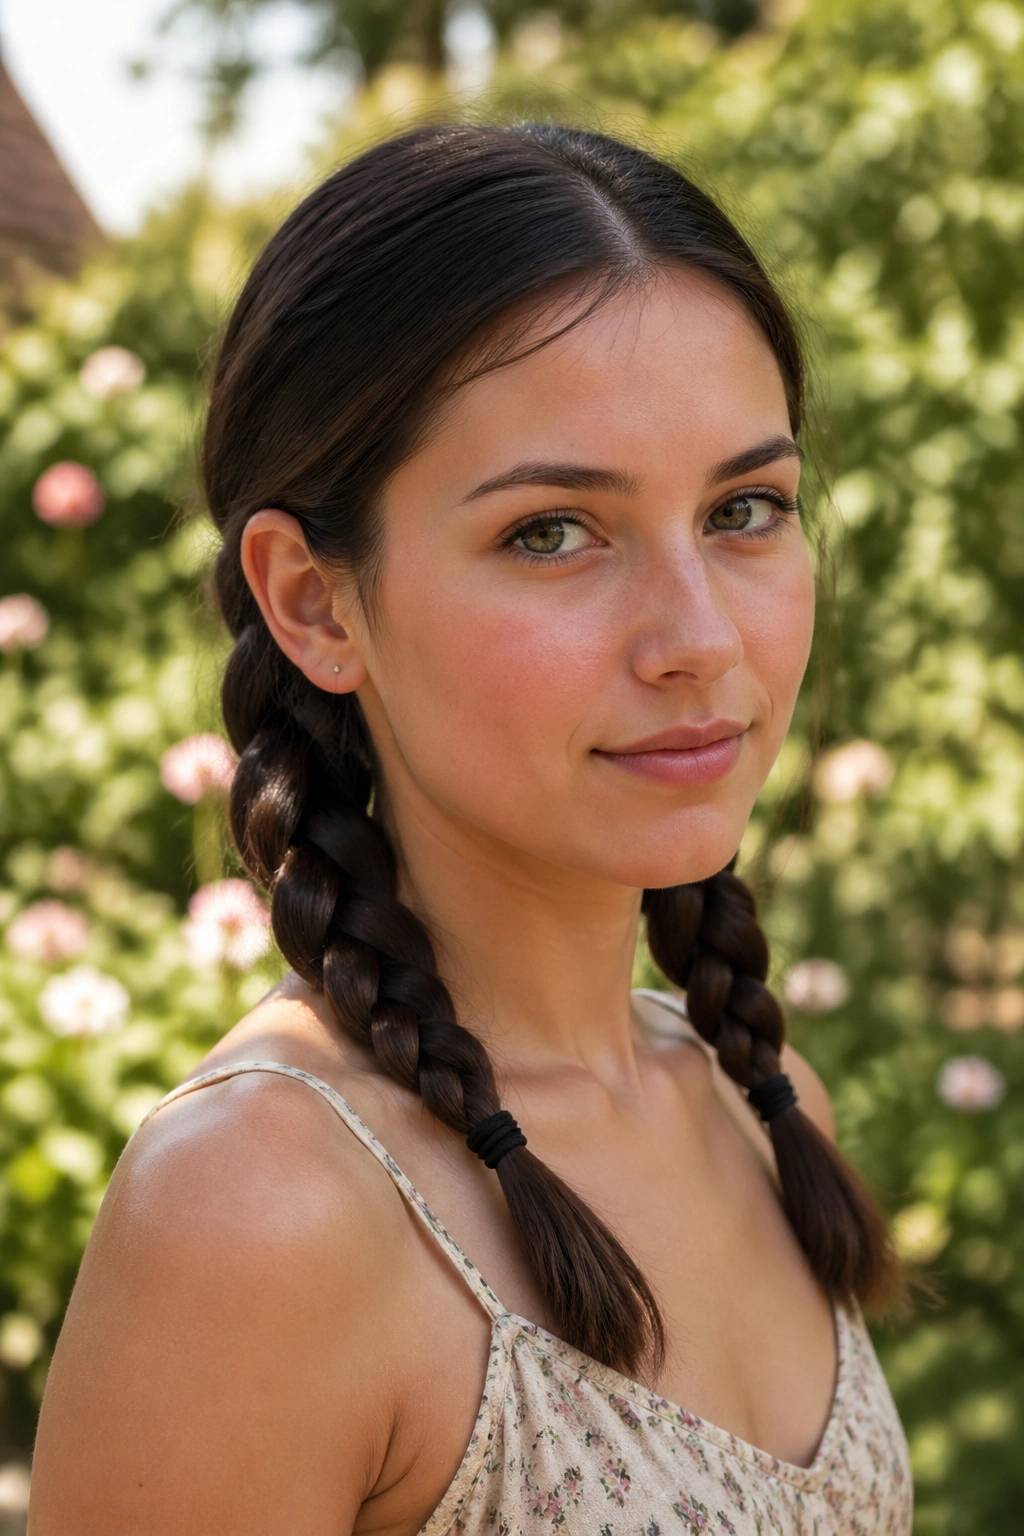
Two low braids can carry a whole day. They keep the neck clear, they tame thick hair, and they stay tidy in wind better than a single braid that swings around and gets in the way. If you wear hats, glasses, or headphones, double braids tend to behave better too.
The Parting Changes Everything
A clean center part makes the style look neat. A soft off-center part makes it feel less school-uniform and more relaxed. Either way, the key is to divide the hair evenly before you start braiding. If one side has a lot more hair than the other, you will notice the difference immediately, and so will everyone else.
I like this style most when the braid starts just behind the ears. That keeps the top smooth and lets the plaits fall low enough to feel practical. It is a good option for long workouts, long walks, or any day when you are tired of hair touching your collar.
A Few Things That Make It Work
- Brush the hair first, or the parts will wander.
- Tie each braid at the same height so they match.
- Leave the ends loose for a softer look.
- Add a tiny amount of oil to the ends if they look dry.
Double braids are straightforward, which is exactly why they keep coming back. They do not need much styling support, and they do the job without acting precious about it.
9. Pull-Through Braid

Pull-through braids are for people who want the braided look without wrestling with three strands. They rely on a chain of small ponytails instead of true weaving, so the technique feels more like stacking than braiding. If your fingers get tangled easily, this style can feel like a relief.
Where the Speed Comes From
You start by sectioning the hair into a series of mini ponytails, each tied with a small elastic. Then you split the top ponytail, pull the next one through the opening, and repeat down the length. The shape builds fast, and the finished braid looks fuller than a regular plait, which is handy if your hair is fine.
Use 4 to 8 clear elastics depending on length. That sounds like a lot, but the whole process moves quickly because you are not crossing strands one by one. You are mostly moving ponytails through ponytails.
What to Watch For
- Keep the ponytails lined up down the center.
- Tighten each elastic enough to hold, but not so tight that the hair dents badly.
- Pancake the outer edges gently if you want more width.
- Hide the last elastic with a ribbon, a scrunchie, or a small wrap of hair.
This style is a bit more structured than the others, which is why I like it for hair that tends to collapse. It stays puffy in a good way.
10. Accent Braid
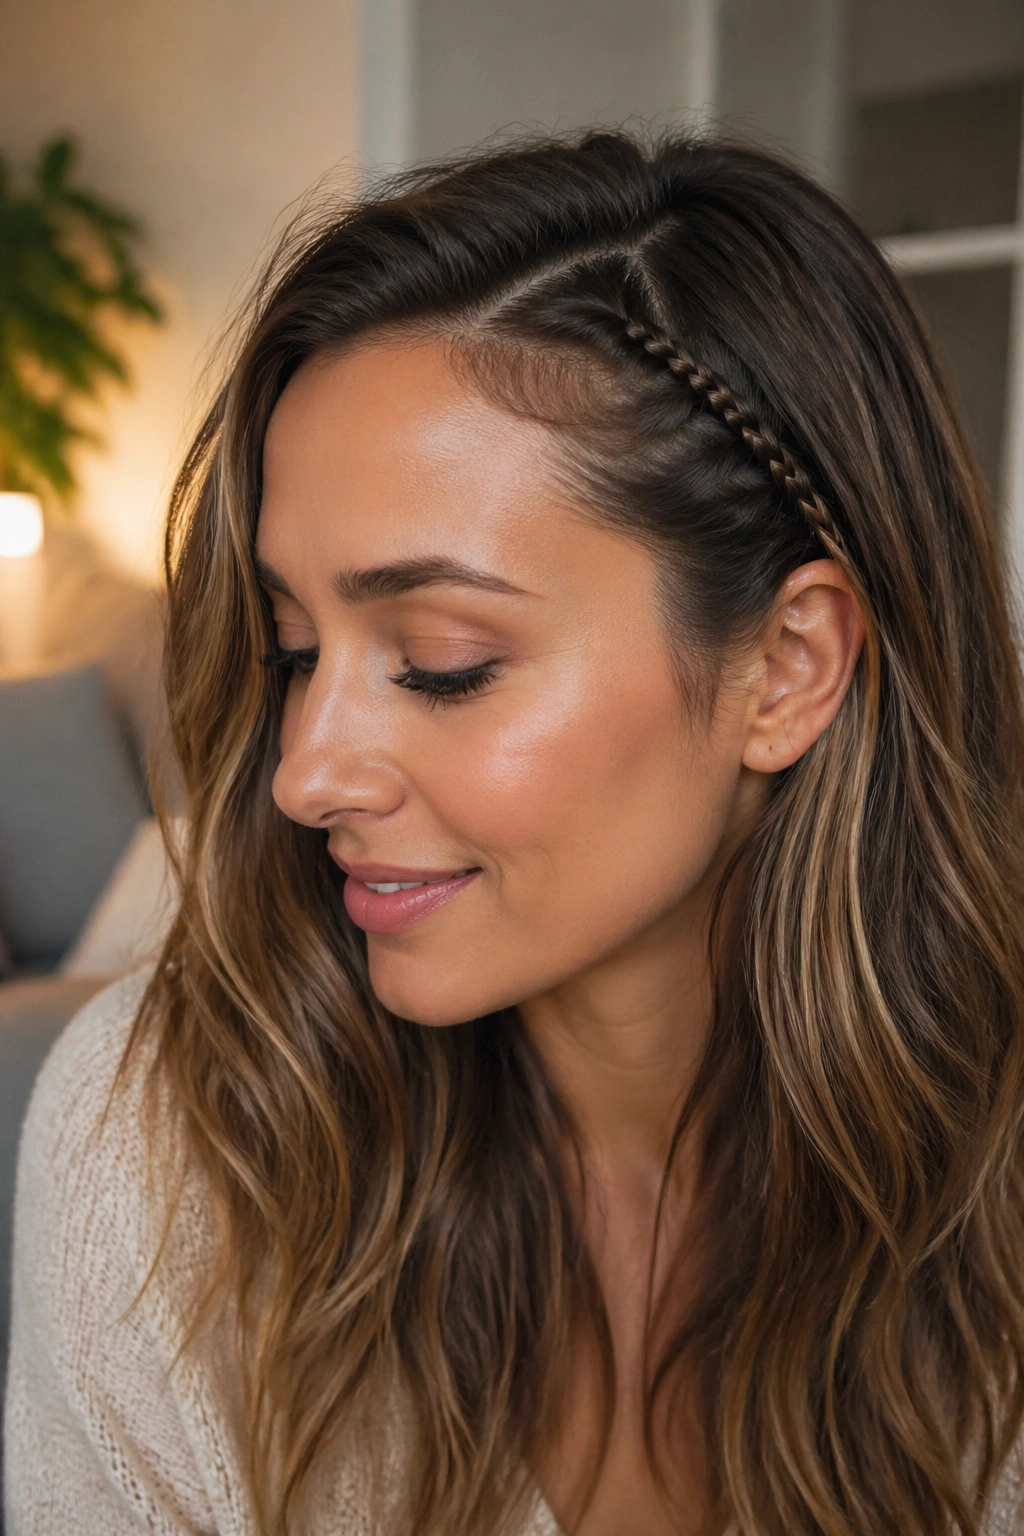
A tiny braid at the temple solves the “I want something, but not too much” problem. It can be tucked into loose waves, anchored into a ponytail, or clipped back beside one ear. That tiny strip of woven hair changes the whole mood of a style without taking over the head.
How to Place It Without Looking Random
Pick a narrow section near the hairline, about half an inch to 1 inch wide, and braid it down a few inches before pinning or blending it into the rest of the hair. If you take too much hair, the braid starts to dominate. If you take too little, it disappears.
This is one of the few braids that works well on shorter hair too. You do not need waist-length strands to make it useful. In fact, on a bob or lob, a small accent braid can look cleaner than a full braid because it fits the proportions better.
Where It Helps Most
- Around the face when you want layers out of the way.
- At the front of a ponytail for a small polished detail.
- On one side of a loose style when the other side feels bare.
- Under a clip or barrette to make the accessory look more intentional.
Tiny braids are underrated. They take almost no time, and they fix a lot of hair problems that are not worth overthinking.
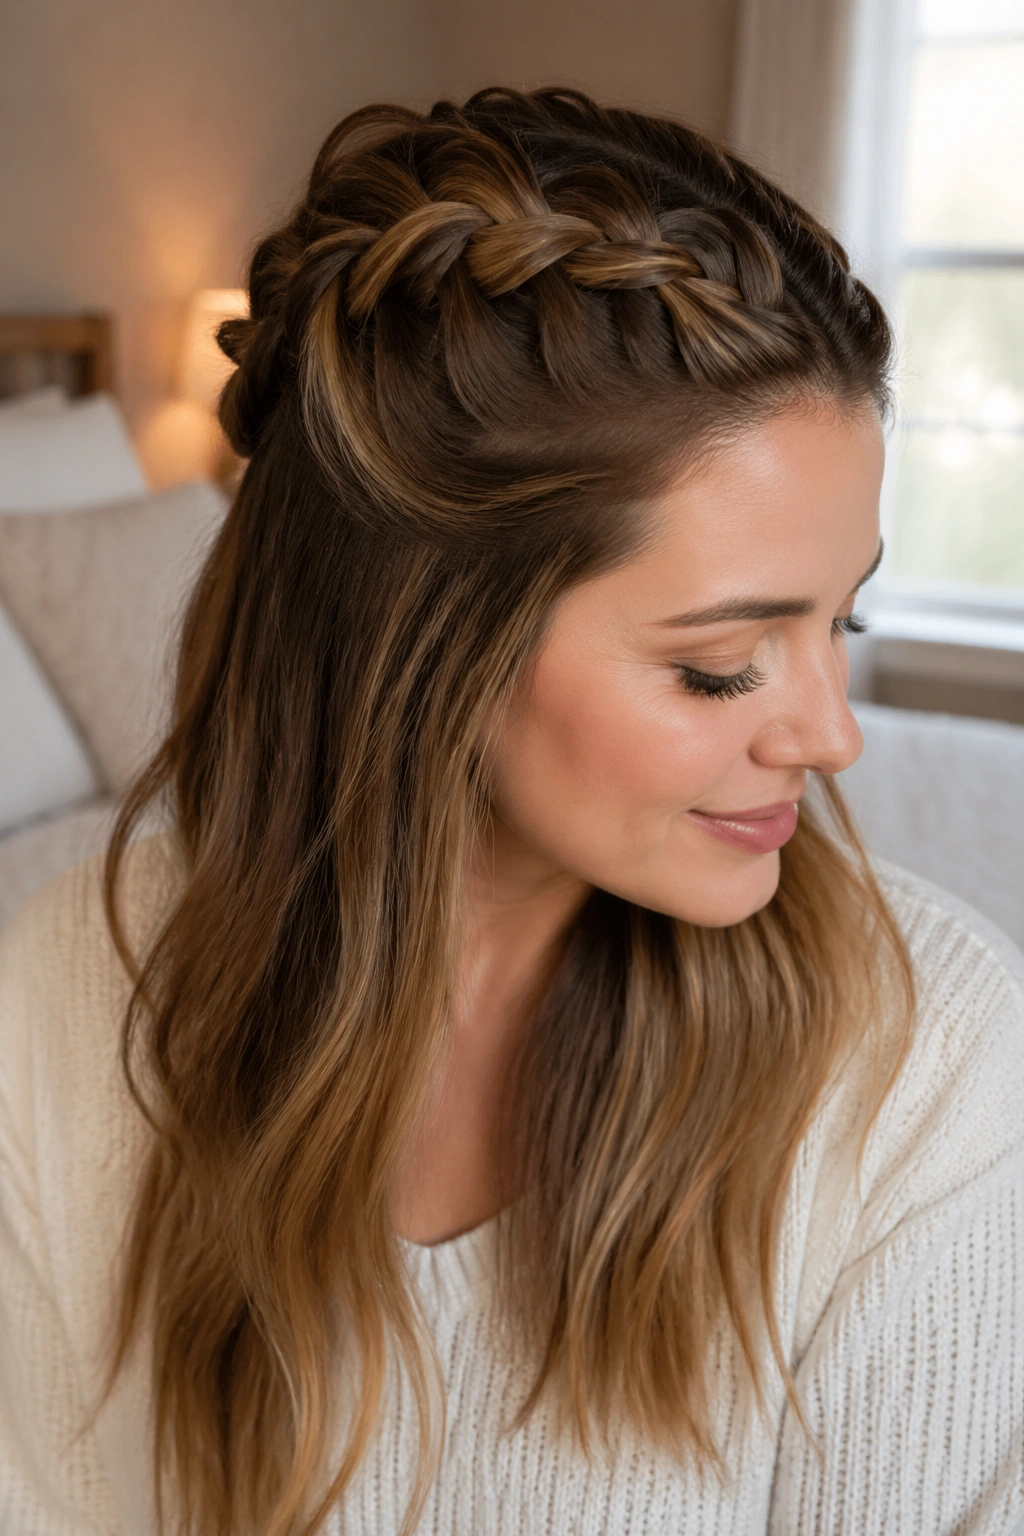
11. Crown Braid
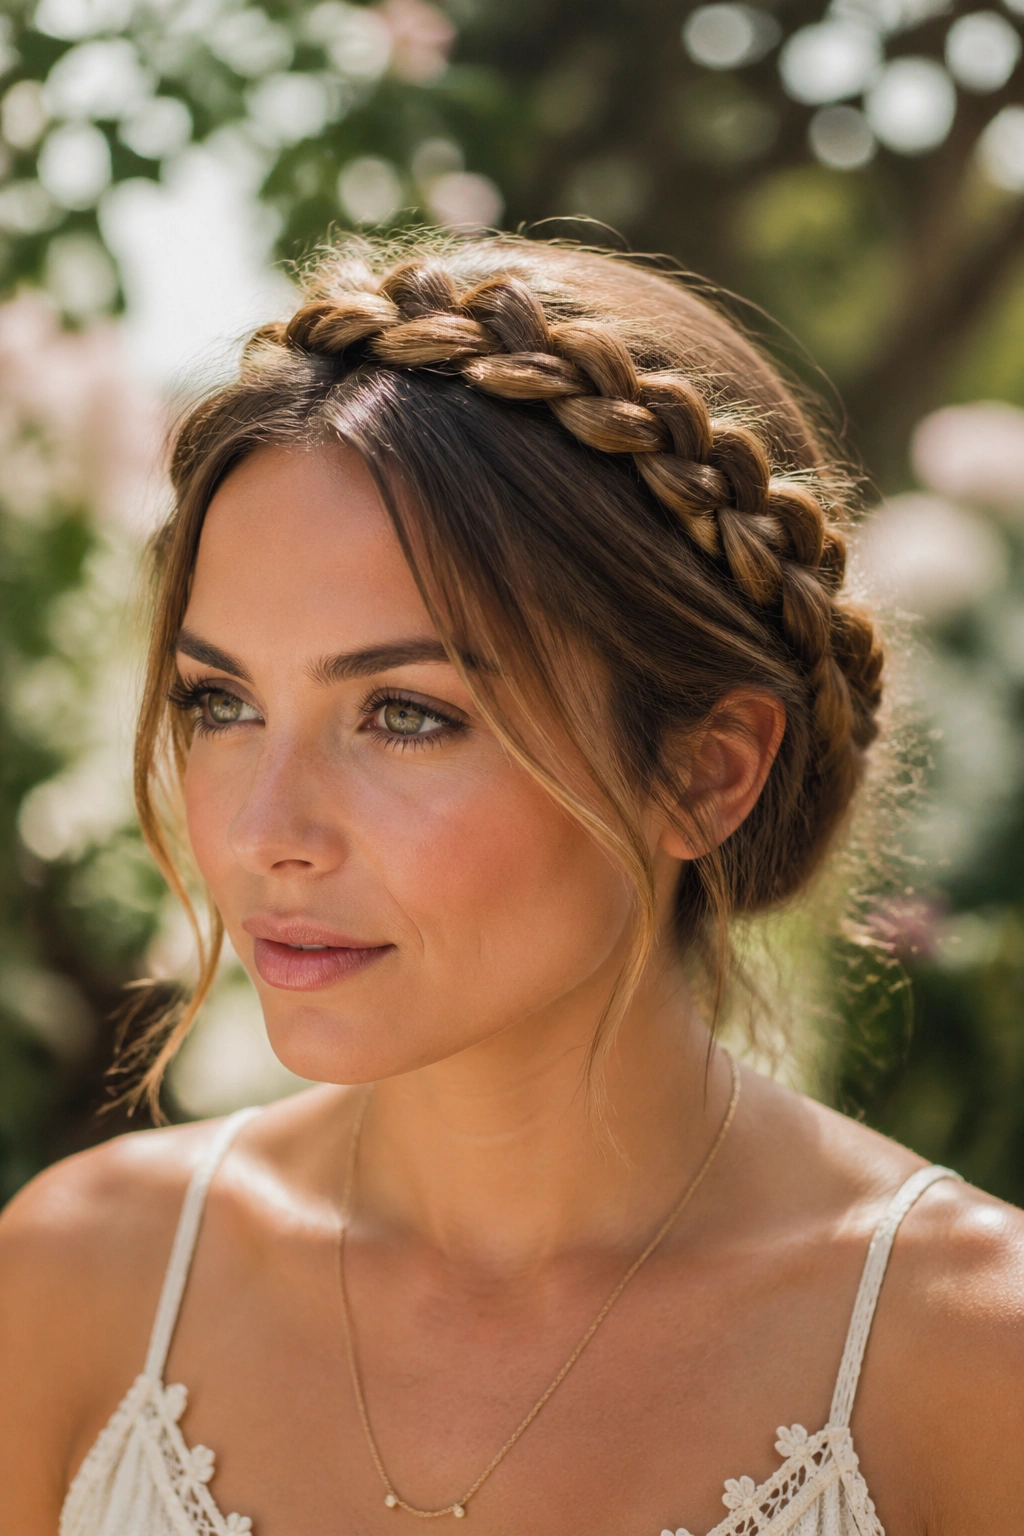
Crown braids do not have to be a wedding-style ordeal. The quick version is much simpler: braid a section along one side of the head, then pin it across the top like a headband. If your hair is long enough to wrap around your head, great. If not, a partial crown still gives the same feel.
The Fast Version That Actually Works
The easiest approach is to make two loose braids, one on each side, and pin them across the crown with three to five bobby pins. Overlap the ends a little so the join sits hidden behind the hairline. You do not need the braid to circle the whole head perfectly. A partial wrap is usually enough to create the effect.
This style likes hair with some texture. Very fresh, very clean hair can slide around and make the pins work too hard. A bit of dry shampoo at the roots and a light mist of hairspray near the pinned areas helps keep the braid from drifting.
Practical Notes
- Use pins that match your hair color if you want them to vanish.
- Cross the bobby pins over each other for a stronger hold.
- Leave a few small face-framing pieces out if you want it softer.
- If your hair is layered, braid a slightly thicker section so the shorter pieces stay inside.
A crown braid sounds formal. The quick version is not. It is just a smart way to use pins and braids together.
12. Waterfall Braid
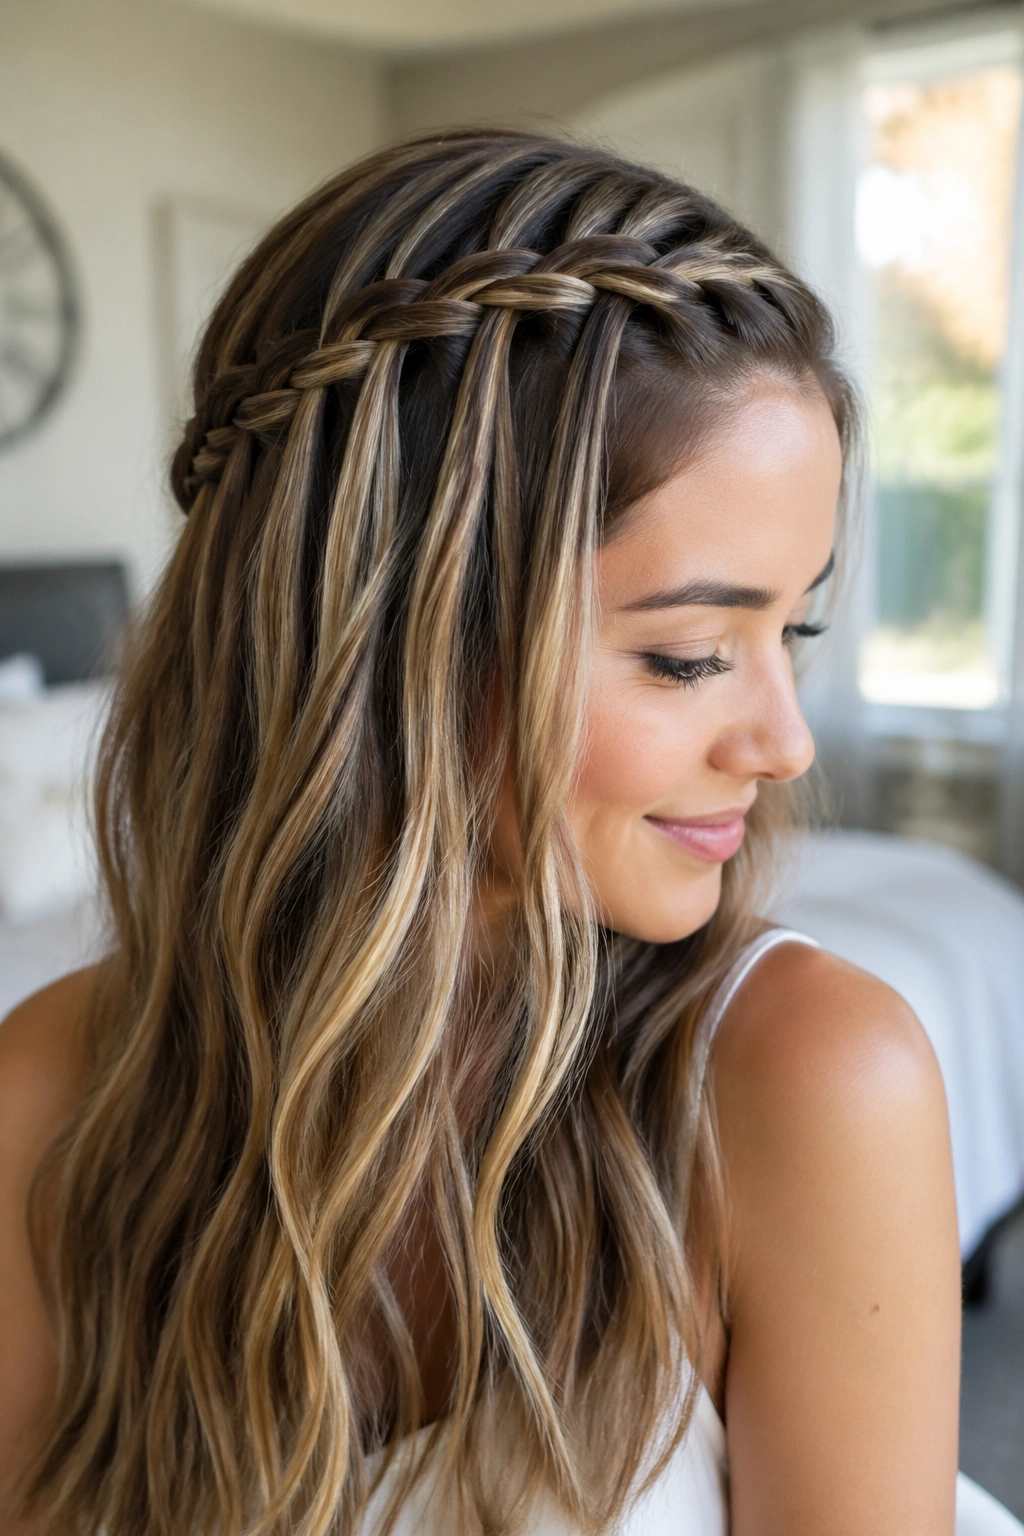
What if you want something prettier than a plain braid but still fast? A waterfall braid is the answer when you want the front and top to look done without pulling every strand back. It drops one section of hair as you braid, which leaves a little “falling” effect through the length.
The Part That Makes It Work
Take a small section near the temple, braid once, then drop the front strand and pick up a new piece from underneath. That repeated drop is what creates the waterfall look. If you keep the sections too skinny, the braid can tangle. Medium pieces move faster and are easier to see.
This style looks especially nice on wavy hair because the loose lengths blend into the rest of the texture. Straight hair works too, but a touch of texturizing spray helps the braid hold its shape. On very layered cuts, I’d keep the braid shallow and stop early so the shorter pieces do not pop out of place.
Keep It Quick
- Work with a narrow section near the front.
- Keep the braid close to the hairline.
- Clip the braid temporarily while you move to the other side if needed.
- Finish with a light spray instead of heavy product.
A waterfall braid can look fancier than it is. That is part of the appeal. It gives you detail without requiring a full head of weaving.
13. Braided Ponytail
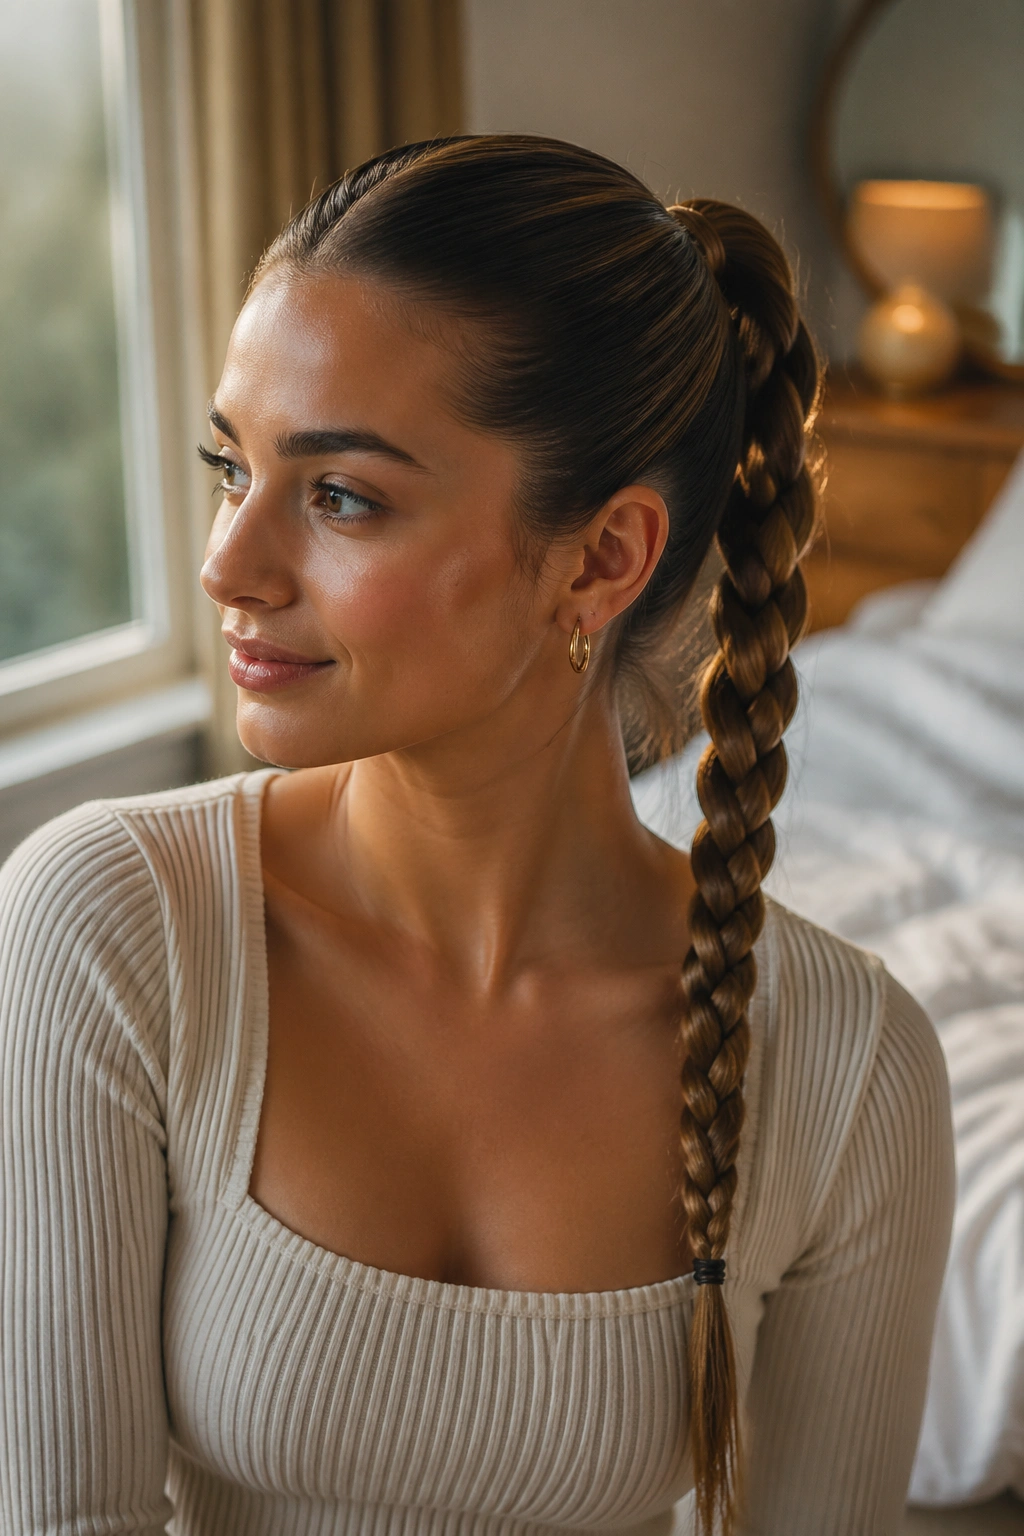
A braided ponytail is the fastest way to make a basic ponytail look finished. Tie the hair back first, then braid the tail. That order matters because it keeps the top smooth and saves you from trying to control loose hair while your hands are already busy.
Why This One Is So Handy
The ponytail gives you a clean anchor point, and the braid does the visual work at the end. That means you can spend less time perfecting the crown and more time making the tail neat. If your hair is thick, this style also keeps the weight contained better than a loose braid that starts at the scalp.
You can braid the whole tail in a regular three-strand pattern, or twist it into a rope braid if you want to shave off another minute. Either way, the base stays clean and the style reads as deliberate.
Small Upgrades That Help
- Wrap a strand of hair around the elastic to hide it.
- Pull a little volume at the crown before tying the ponytail if you want lift.
- Braid the tail loosely for a softer look, tightly for a sportier one.
- Use a strong elastic if your hair is heavy, or the tail will sag.
I like this braid for workdays because it has range. It can look tidy, polished, and a little sporty all at once.
14. Braided Bun
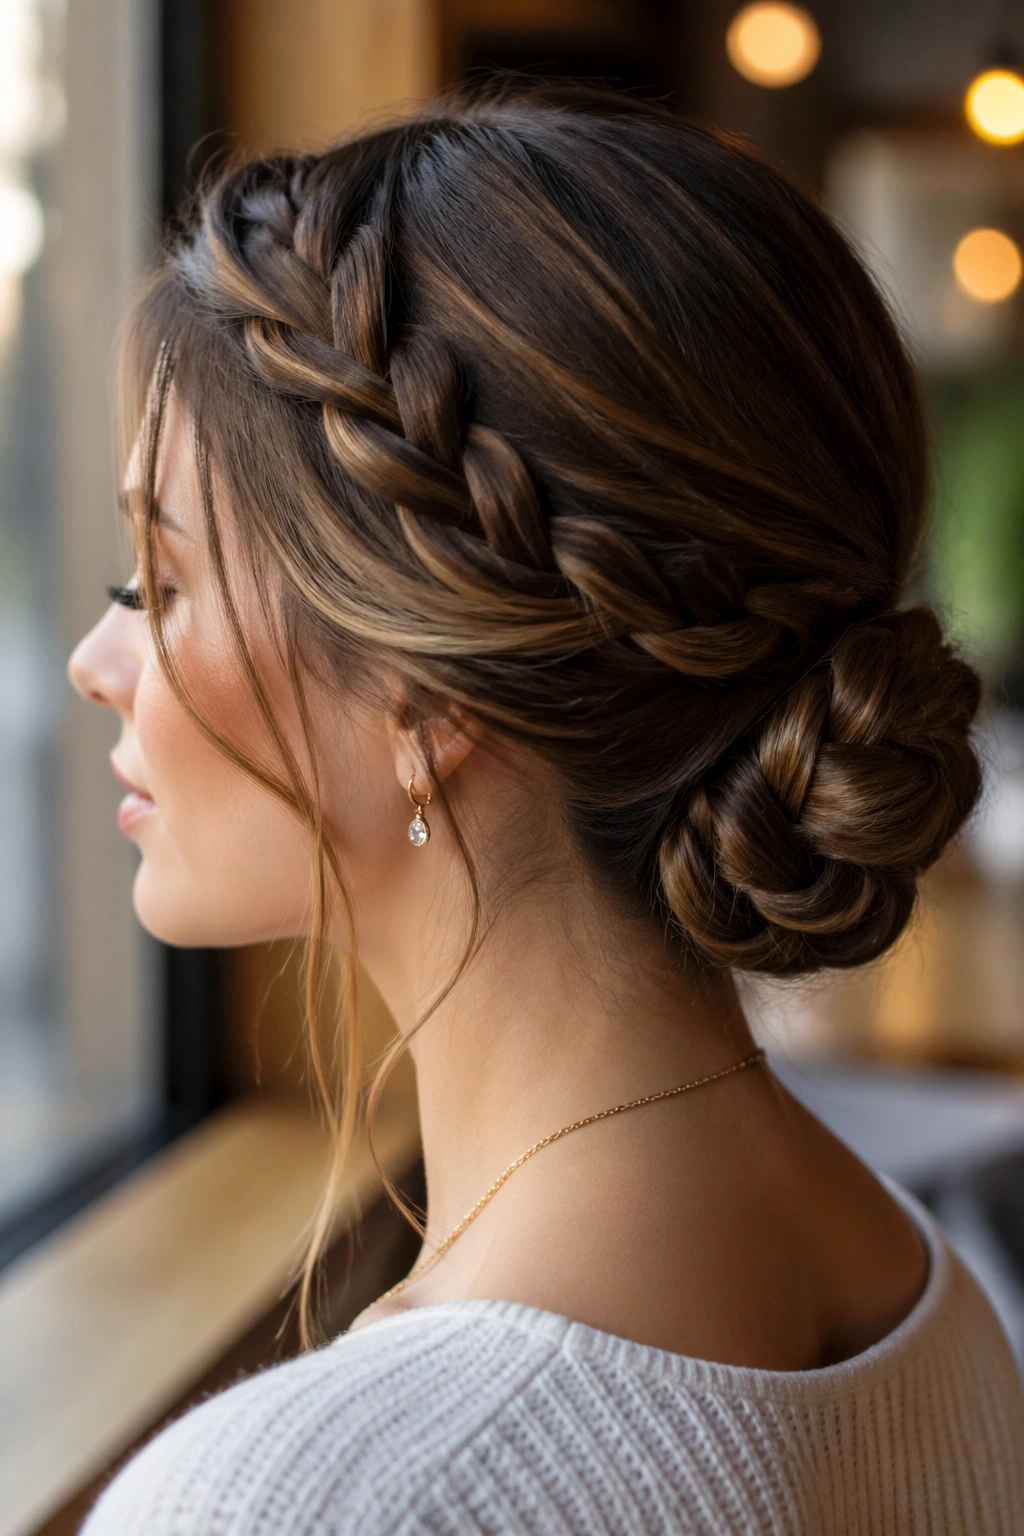
A braided bun is what I reach for when I want hair off my neck and off my mind. It starts as a braid, folds into a bun, and stays put better than a plain twist because the braided texture gives the bun something to grip.
Three Pins Are Usually Enough
Tie the hair into a low or mid-height ponytail, braid the tail, then wrap it around the elastic and pin it in two or three places. If the hair is long, you can coil the braid around itself twice. If it is shorter, a smaller bun at the nape works better and feels less likely to fall apart.
This style is forgiving. A perfectly sleek bun is nice, but a little texture makes the braid hold better and keeps the bun from looking too stiff. I would rather see a bun with a few loose pieces than one that has been scraped so tight it looks uncomfortable.
Where It Shines
- Busy mornings when you need hair fully contained.
- Warm days when loose ends become annoying.
- A clean, practical style for errands or travel.
- Second-day hair that has enough grip to stay pinned.
Use a handful of bobby pins, not a whole pin tin. Too many pins can make the bun feel bulky and weirdly hard. Three good pins placed well usually beat seven shoved in at random.
Some mornings call for neat. Some call for fast. A braided bun gives you both without much drama.
By the time you have tried a few of these, the speed part starts to happen on its own. The braids that feel clumsy the first time usually become the ones you can do while half-listening to a podcast and checking the clock.
And that is the real payoff: not perfection, not salon-level polish, just a set of styles you can trust when your hair has its own opinion.