Fishtail braids have a way of transforming even the simplest ponytail into something that looks effortlessly polished and intricate. The delicate, interlocking texture of a fishtail braid creates visual depth that a traditional three-strand braid simply can’t match—each tiny section catches the light differently, making your hair appear fuller and more dimensional than it actually is. For those with long hair, the possibilities expand exponentially. You can wear the braid sleek and refined for professional settings, or deliberately pull it loose for a relaxed, romantic vibe that works just as well at dinner as it does at a casual weekend gathering.
The beauty of fishtail ponytails lies in their versatility. This isn’t a one-look-fits-all style. Whether you’re styling for a wedding, a workout, or just a Tuesday at the office, there’s a fishtail ponytail variation that matches your mood and the occasion. Some styles emphasize that intricate braid pattern as the hero of the look, while others use the fishtail as an accent detail that elevates an otherwise simple ponytail. The technique itself becomes easier once you understand the mechanics—it’s genuinely simpler than a traditional braid once you get the rhythm down—which means you can experiment freely and develop variations that feel uniquely yours.
If you’ve ever felt limited by the standard ponytail, or you’ve admired that complex-looking braid at the coffee shop and wondered how it’s done, this is your guide. Long hair is the ideal canvas for fishtail styling because you have the length and volume to work with, the braids sit prominently without disappearing into short strands, and you can incorporate movement and layering that shorter styles simply can’t achieve. Let’s explore ten distinct approaches to the fishtail ponytail, each with specific styling instructions and the exact variations that make each one worth trying.
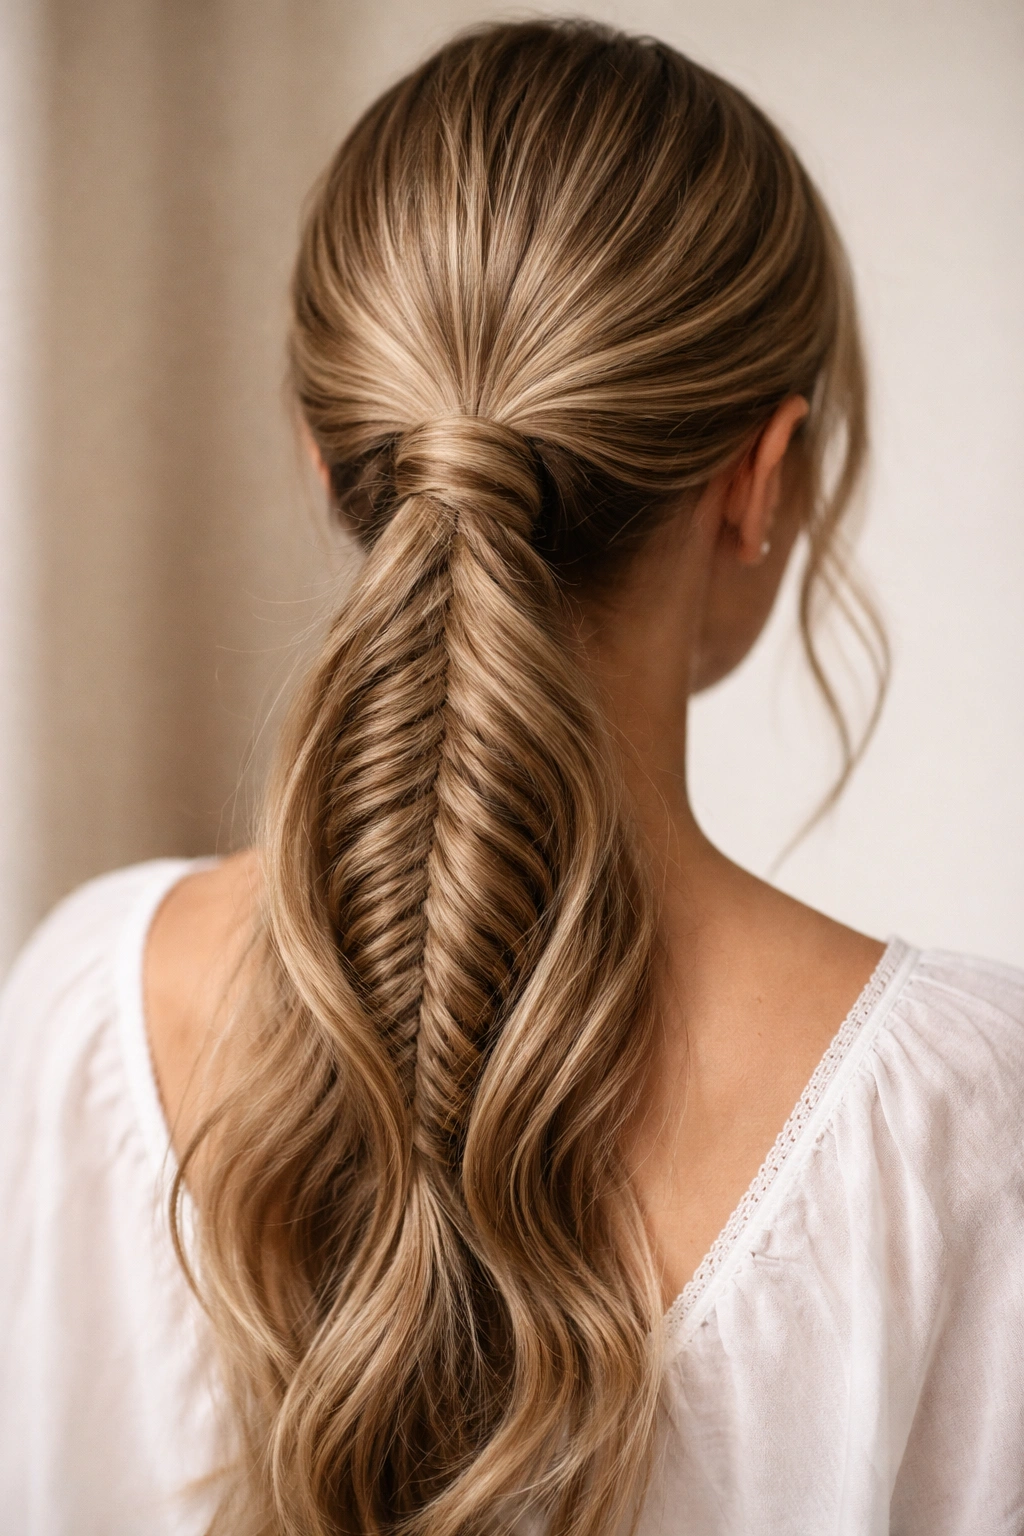
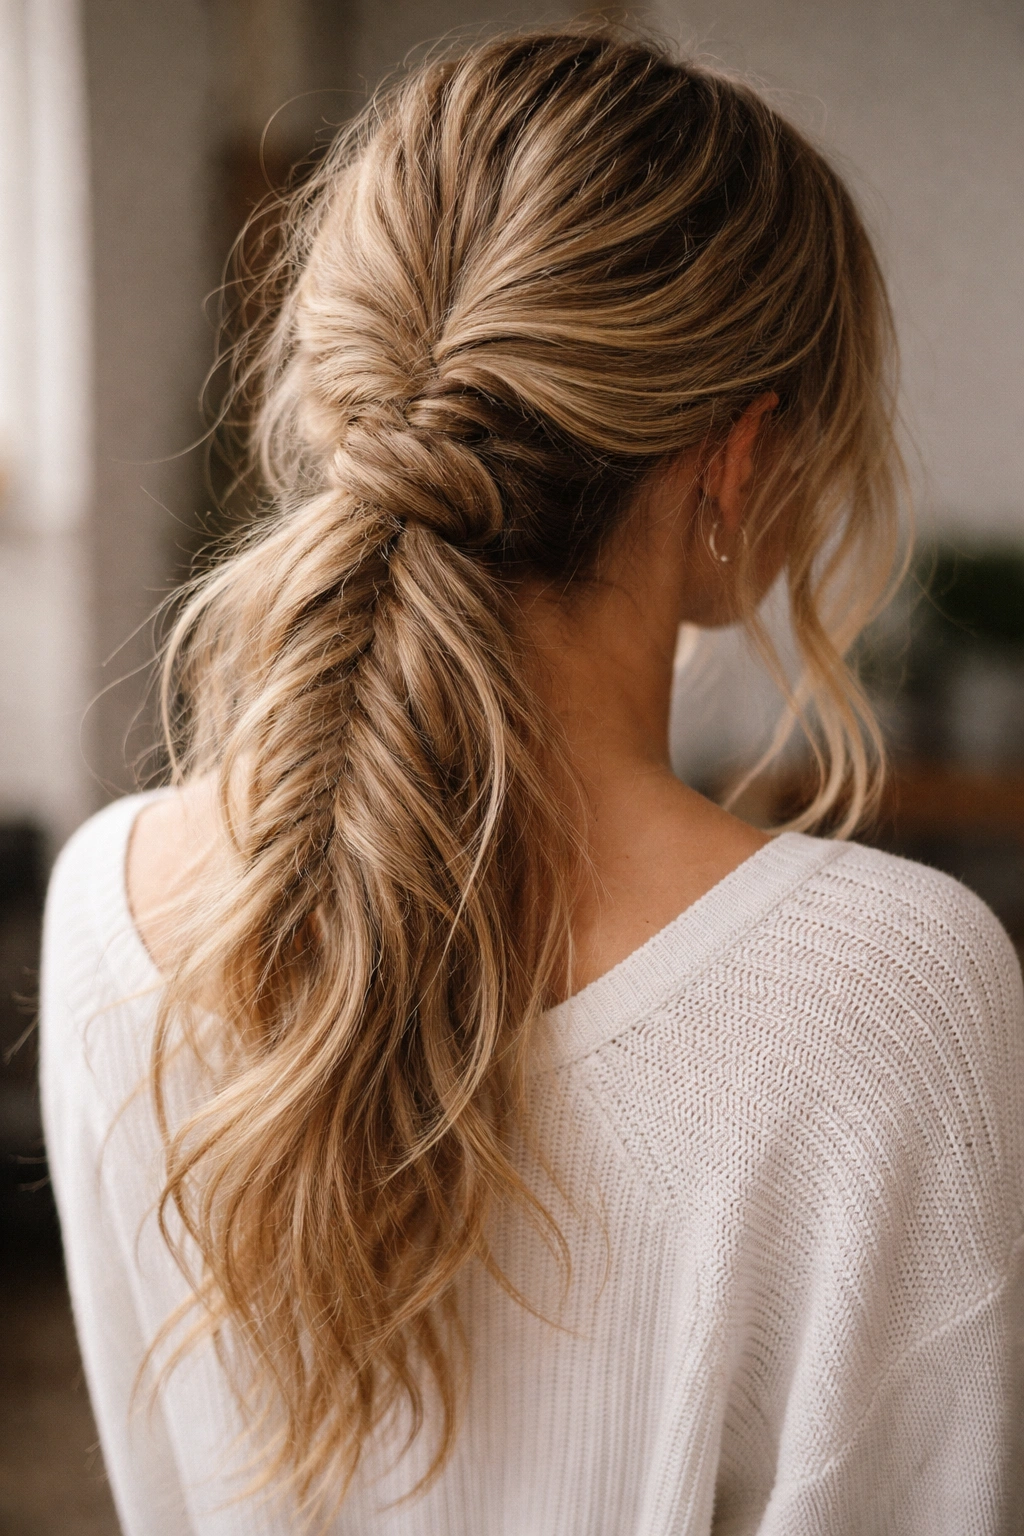
1. Classic Centered Fishtail Ponytail
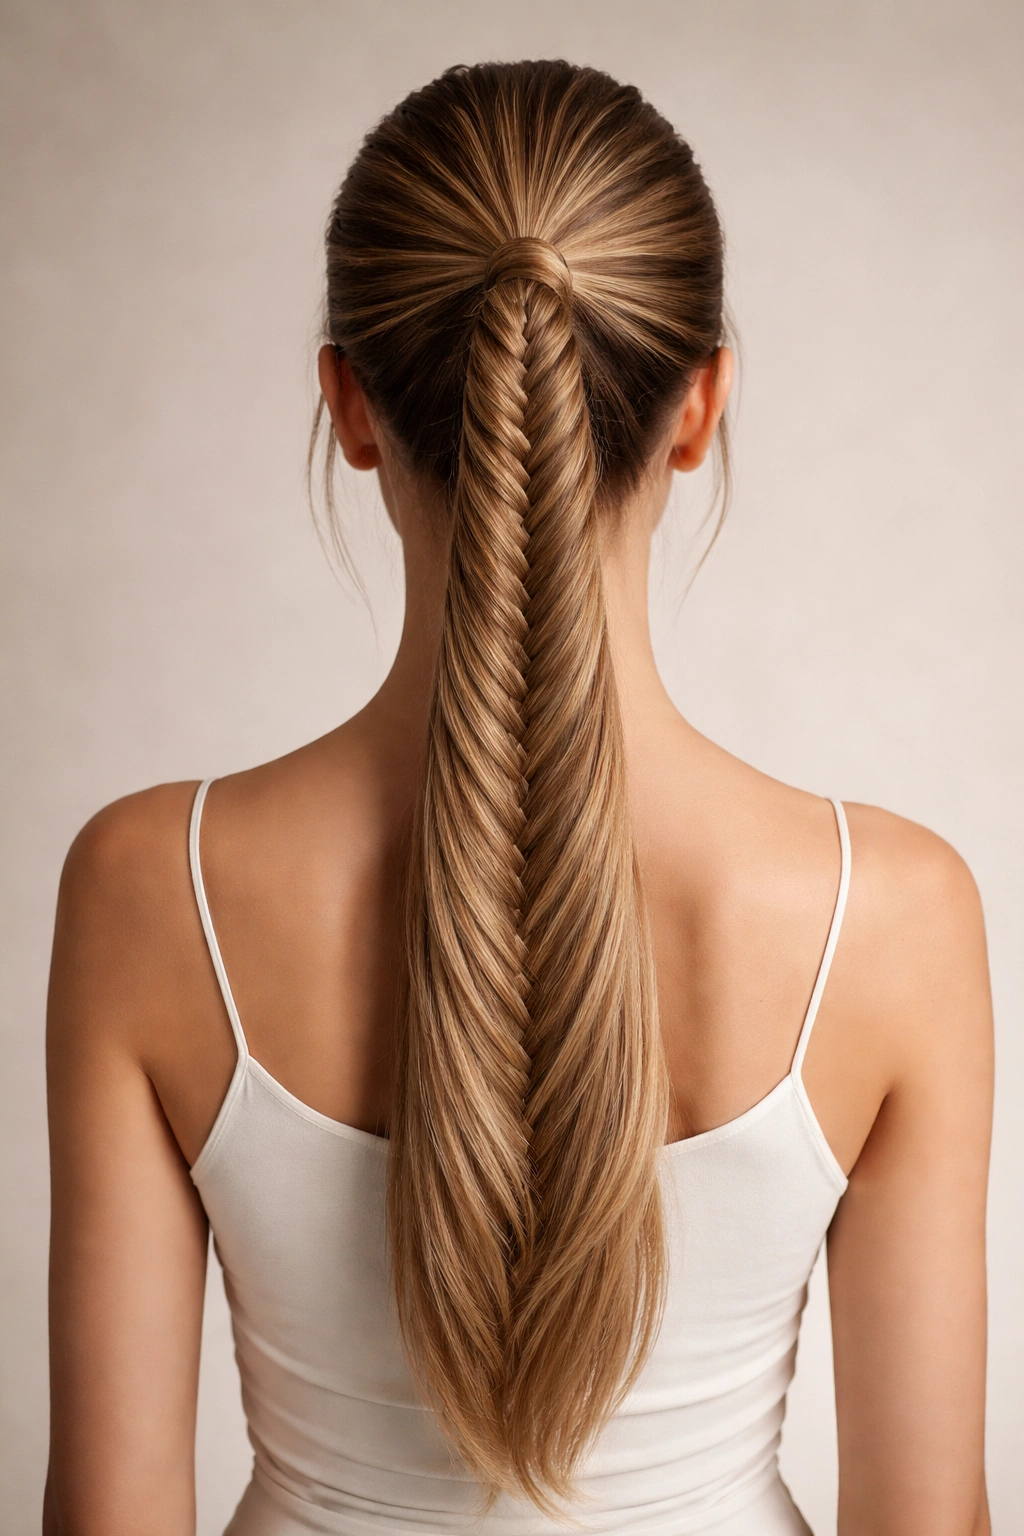
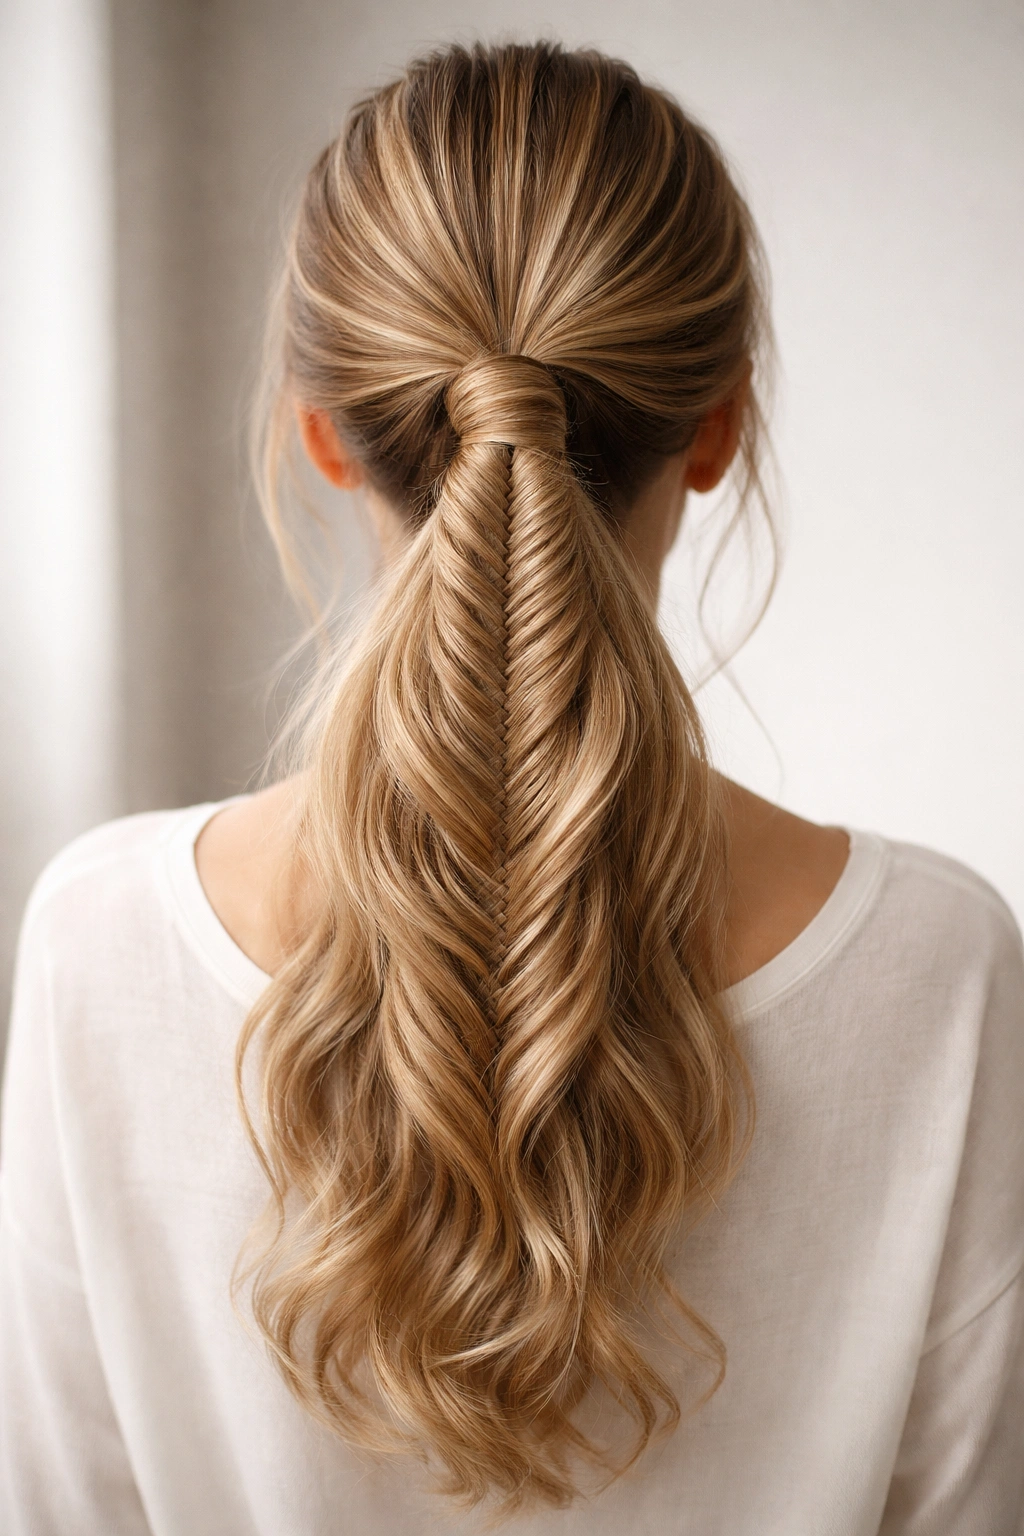
This is the foundational style that makes fishtail ponytails so appealing—a traditional fishtail braid that’s gathered into a ponytail at the center back of your head. It’s the version you’ll see in editorial shoots and on the red carpet because it’s sophisticated, clearly shows off the braid’s intricate structure, and works with virtually any outfit or occasion. The centered placement ensures the braid is the focal point, catching light and drawing attention upward.
What Makes This Style Elegant
The magic of a centered fishtail ponytail is how visible the entire braid becomes when it sits dead center in back. Unlike looser, messier versions, this approach keeps the braid sections tight enough that the fishtail pattern is unmistakably clear, but loose enough that it doesn’t look austere or overly structured. You can wear it sleek for formal events or slightly tousled for a softer, everyday version. The braid runs the full length of your hair from crown to ends, unbroken and intentional.
How to Create the Classic Version
- Start with hair that has some texture—either from overnight braiding, a salt spray, or gentle waves from a curling iron. Completely smooth, freshly washed hair can slip and make the fishtail harder to grip.
- Brush your hair straight back and gather it at the center back of your head, roughly where your natural crown is (not too high, not too low—aim for the middle point).
- Secure the base with a clear elastic, leaving about 4-5 inches of hair free below the elastic to work with.
- Divide that tail section into two equal parts. Take a thin section from the outer edge of the right side and cross it over to the left side. Then take a thin section from the outer edge of the left side and cross it over to the right. Keep alternating, always pulling from the outside edge of each section.
- Continue the pattern all the way down to the ends, then secure with a small elastic that matches your hair color.
Pro tip: Hold the two main sections of your fishtail slightly apart with your thumbs and index fingers as you work—this creates tension that keeps the braid tight and prevents it from looking sloppy.
2. High Fishtail Ponytail for Maximum Volume
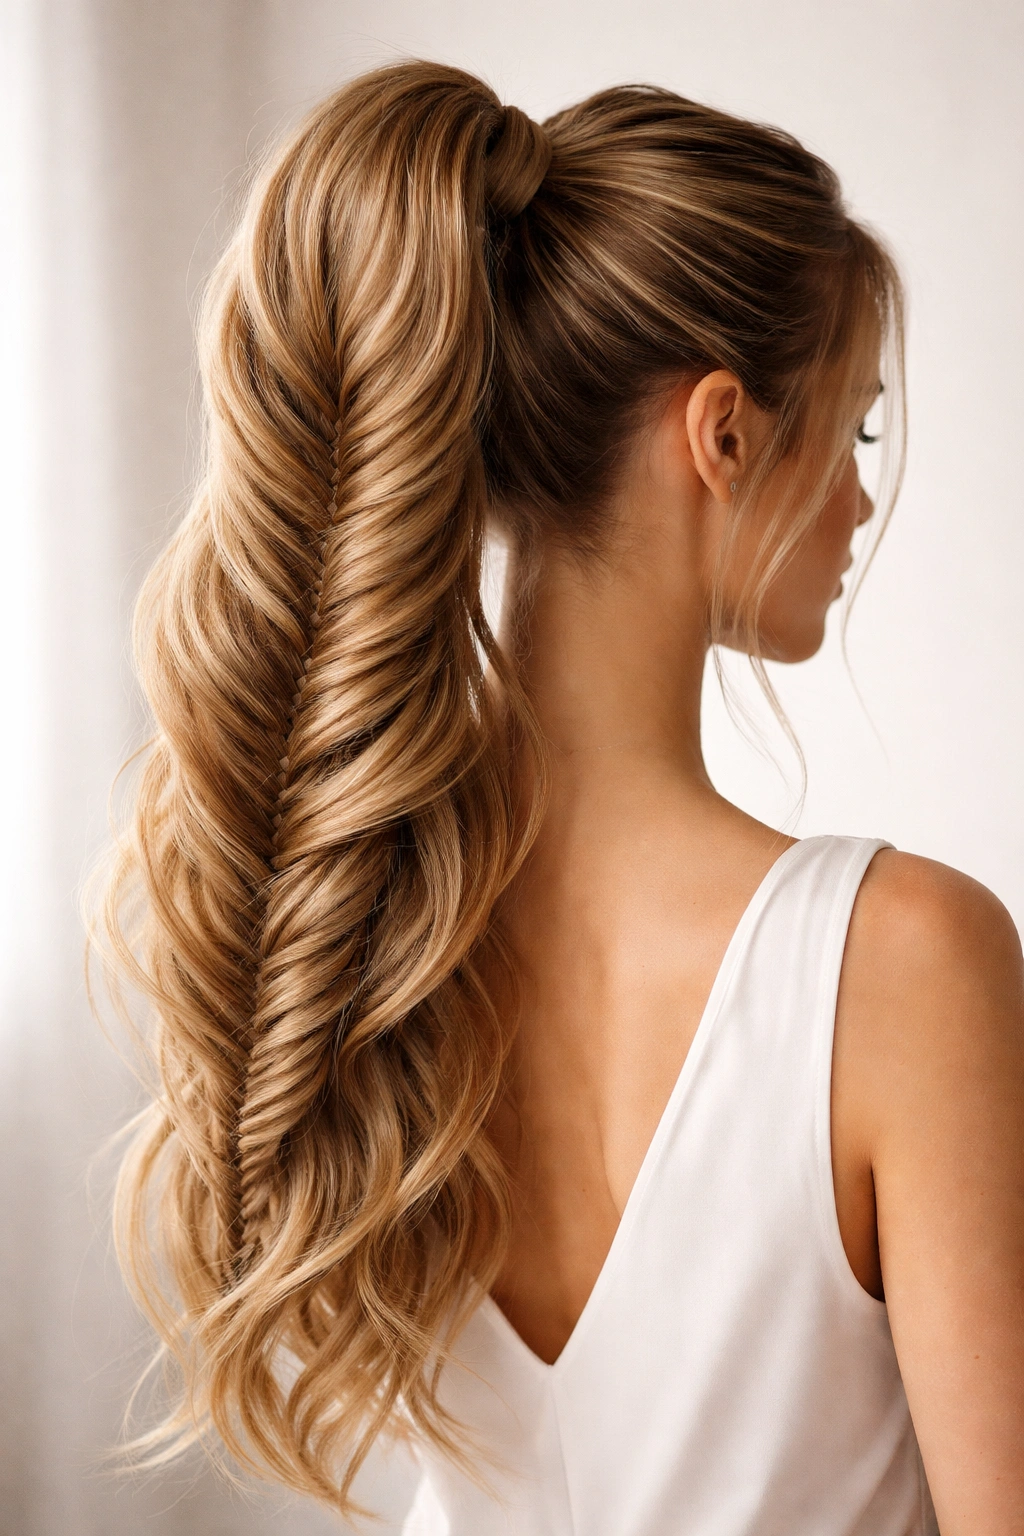
Position the ponytail base at the crown—the highest point possible on your head. This instantly creates a lifted, youthful silhouette and makes your hair appear fuller because of the angle at which the ponytail sits. The high placement also frames your face beautifully because the fishtail braid is positioned prominently at the back crown, not lower on your neck. This is the style choice when you want to make a statement or when you’re styling for photos.
Why High Placement Transforms the Look
A high fishtail ponytail changes not just where the braid sits, but how your entire head shape reads. The elevated placement creates lift at the crown, making your face look more open and your neck appear longer. Photographers and stylists favor this positioning because it’s visually striking from every angle. It also makes thick, long hair look intentional and styled rather than simply tied back. The higher the ponytail, the more dramatic the effect.
Creating a High Fishtail That Stays Put
- Blow-dry your hair straight or lightly wave it for grip and texture.
- Use a fine-tooth comb to brush your hair up and back, smoothing any flyaways as you go.
- Gather at the very crown—imagine a spot directly on top of your head where you’d place a tiara.
- Use a strong elastic (not a stretchy fabric tie, which can slip on thick hair) and secure tightly.
- Once the base is secure, create your fishtail braid starting immediately from that high ponytail base, using the same two-section alternating technique.
- As you braid, gently tug on the outer sections to loosen the braid slightly—this adds dimension and prevents it from looking too tight or harsh.
Worth knowing: Fine hair and high ponytails can be a tricky combination because the weight of your hair pulling down can make the style feel less stable as the day goes on. If this is you, use a texturizing spray at the crown and backcomb gently at the base before securing the elastic—this creates texture that helps everything grip and hold.
3. Loose, Romantic Fishtail Ponytail
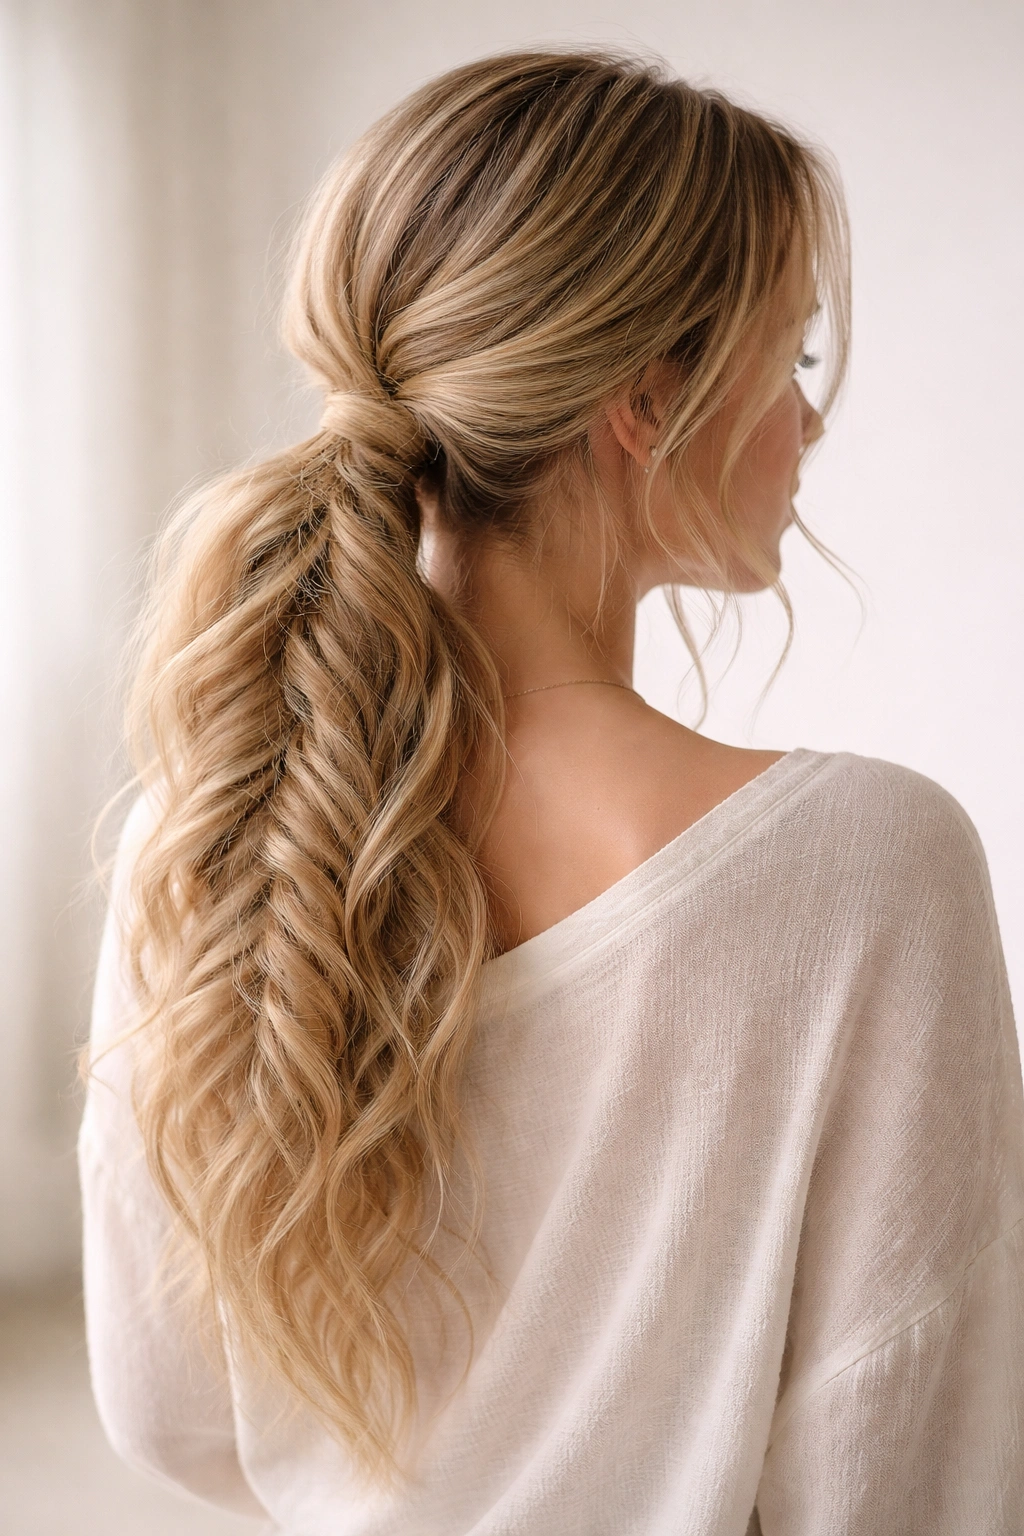
This version prioritizes the softness and flow of your hair over precision and structure. Rather than keeping the fishtail braid tight and defined, you deliberately pull the braid sections outward as you work, expanding the braid to nearly double its original width. The effect is romantic, undone, and surprisingly easier to achieve than a tight fishtail because you don’t need to be quite so precise with your section placement. This style says “I woke up like this” even though you definitely put in effort.
The Romantic Approach to Texture
A loose fishtail feels soft and feminine because the expanded braid creates surface area and movement. Light can play across the loosened sections, making even single-colored hair look dimensional. The looseness also hides any imperfections in your braid technique—slightly uneven sections read as intentional texture rather than mistakes. Pair this with soft waves throughout your hair and you have a style that works for everything from casual brunches to wedding guest outfits.
Steps to the Relaxed Fishtail Aesthetic
- Begin with wavy or textured hair. Straight hair will be harder to keep in a loose fishtail because smooth sections want to slip apart.
- Gather your hair into a low to mid-height ponytail—the lower placement suits the soft aesthetic of this style.
- Create your fishtail braid using the standard two-section technique, but work loosely and deliberately pull outward on each section as you complete it.
- Don’t wait until the very end to loosen it—pull and expand as you go, every few passes of the alternating sections.
- Once you reach the ends, gently tug the entire braid from top to bottom, working systematically to make sure the expansion is even throughout.
- Tease the very ends of your braid with a fine-tooth comb to add a whisper of texture where the braid ends.
Insider note: The key to pulling off loose braids without them completely unraveling is creating tension in your two main sections even as you’re loosening the individual small sections. Keep the two sides of the fishtail somewhat taut while pulling outward on the woven pattern itself.
4. Side-Swept Fishtail Ponytail
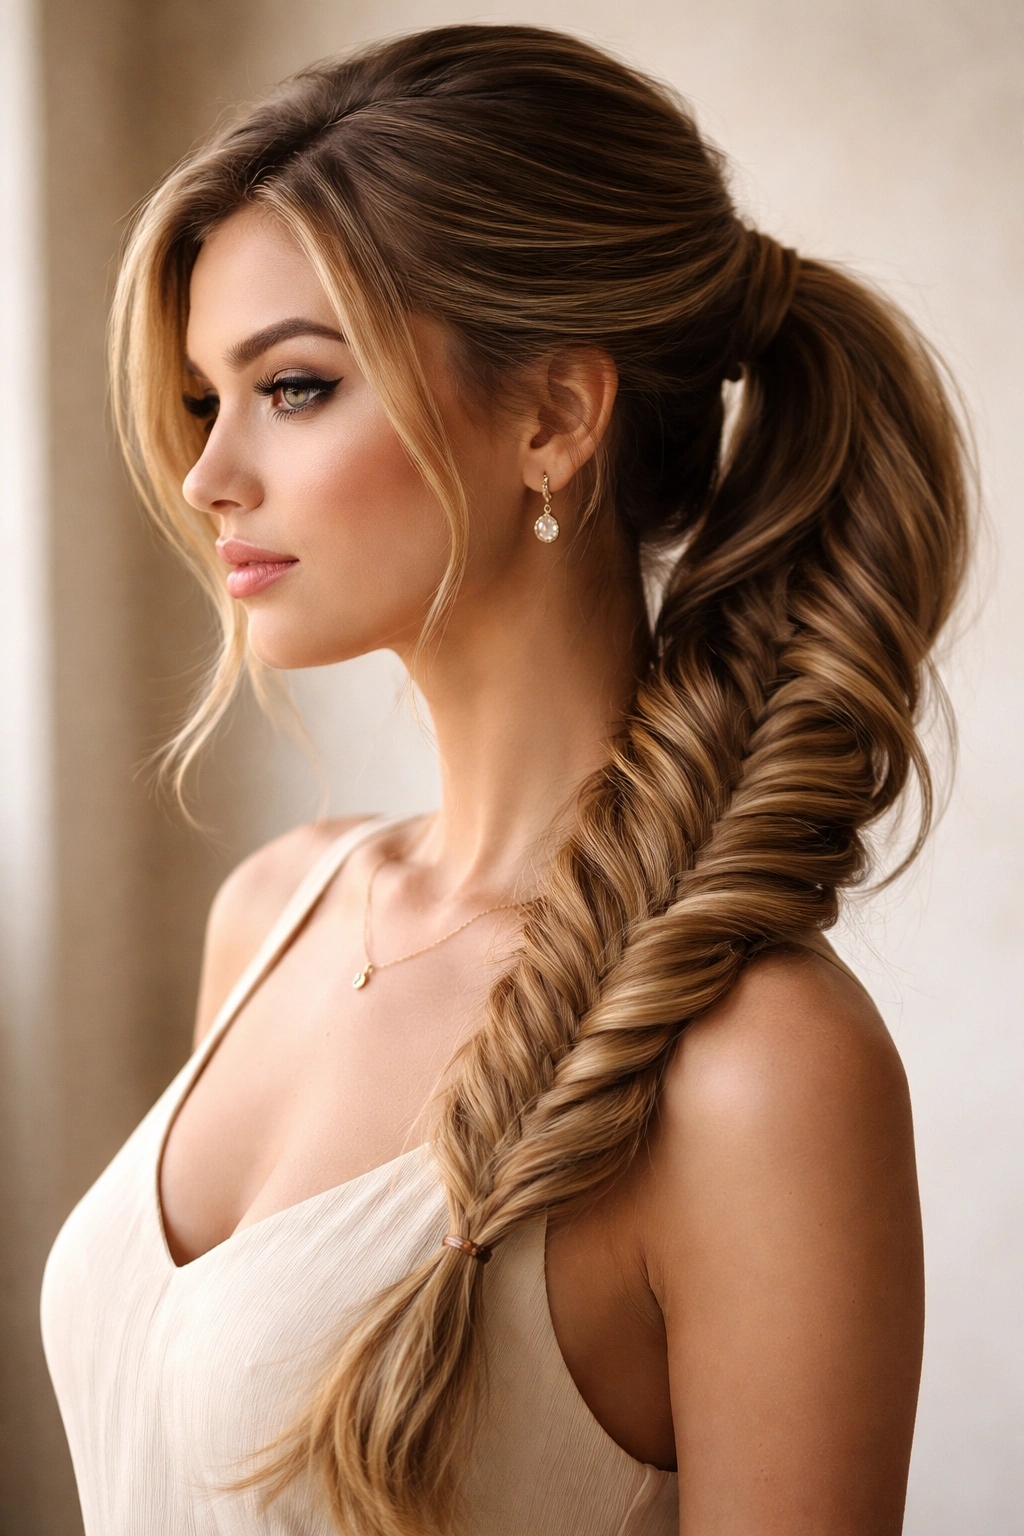
Instead of centering your ponytail, position it to one side of your head—either left or right, swept across like you’re wearing your hair over one shoulder. This immediately creates an asymmetrical, more interesting silhouette than a centered ponytail. The side-swept placement adds movement and romance to your look, and it’s particularly flattering if you want to show off one side of your face or draw attention away from one side you’re self-conscious about. It’s also the style that works beautifully for both formal and casual occasions.
Asymmetrical Styling That Flatters
Side-swept styles have an inherent elegance because they break the symmetry that can sometimes feel formal or stern. Your face appears less framed and more open because the ponytail isn’t pulling at your crown in the center. The braid itself becomes a design element that curves across your back and over one shoulder, creating line and movement. This positioning is particularly effective for longer hair because the full length of your fishtail braid becomes visible as it sweeps across.
Creating the Side-Swept Effect
- Tilt your head to the side and gather your hair as if you’re creating a side ponytail, but position it slightly lower than you normally would—aim for the side of your head at about ear height.
- Secure firmly with an elastic that’s appropriate for your hair thickness and texture.
- Create your fishtail braid starting from that side ponytail base, working the braid down and toward the back.
- As you braid, let the ponytail sit naturally on your shoulder or against your back, rather than forcing it to stay directly at your side.
- Gently loosen the braid as you work (similar to the loose fishtail technique) so it has softness and movement rather than appearing stiff or sculptural.
- Finish by making sure the end of the braid sits cleanly—you can wrap a small section of hair around the base of the final elastic for a polished finish.
Pro tip: A side-swept fishtail works better with some texture in your hair beforehand. The asymmetrical placement emphasizes movement, so waves or curls make this style read as intentional rather than like you simply missed a spot.
5. Bubble Fishtail Ponytail with Defined Sections
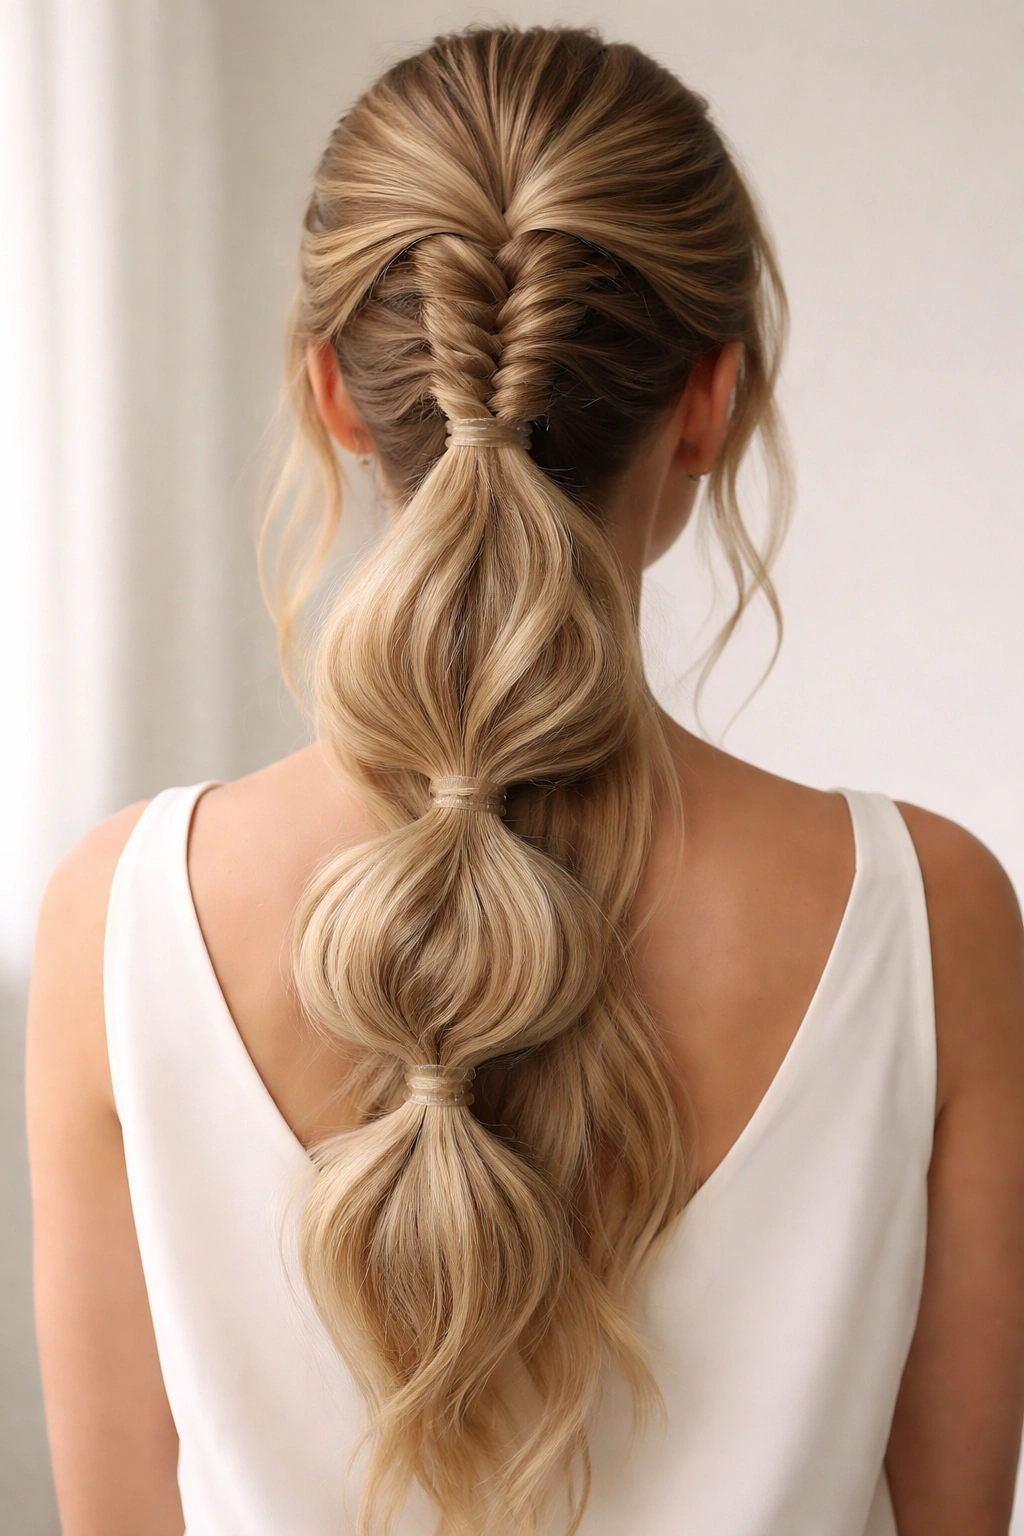
This is a playful, modern variation where you create a fishtail braid ponytail, then use additional small elastics to divide the entire length of the braid into 3-5 distinct “bubble” sections. Between each elastic, you pull gently on the braid to create a puffed-out bubble effect. It’s a style that looks more complicated than it actually is, and it adds height and volume throughout your entire ponytail rather than just at the crown. This approach is especially effective for long, straight hair because the bubble sections create texture and dimension that straight hair sometimes lacks.
The Modern Bubble Technique
Bubble styles have gained popularity because they transform a single braid into a series of visually distinct sections that catch light and create the illusion of more volume. Each bubble creates a little burst of texture, so even moderately thick hair reads as very voluminous. The technique is straightforward once your fishtail braid is complete—you’re simply subdividing it strategically. This makes it a great choice for days when you want something visually interesting but don’t have the time or patience for an extremely intricate braid from scratch.
Steps to Create Bubble Sections in Your Fishtail
- Complete your fishtail braid fully, leaving it slightly loose so you have room to puff out the bubbles.
- Starting about 2-3 inches down from the elastic at the base of your ponytail, place a small clear elastic around the braid, wrapping it around only once so it’s not too tight.
- Hold the fishtail braid above that elastic and pull gently upward to create a bubble—the section of braid between the base elastic and the new elastic will puff out.
- Repeat this process every 2-3 inches down the entire length of your braid, placing elastics and creating bubbles as you go.
- Once all your elastics are in place, go back through and gently tease and adjust each bubble so they’re even and full-looking.
- Finish by loosening the sections of the braid between your elastics if needed—you want the bubbles to stand out, not disappear into tight braid sections.
Worth knowing: The smaller your elastics and the closer together you place them, the more whimsical and playful the look becomes. Space them further apart for a more sophisticated version, or pack them closely for a fun, trendy approach.
6. Fishtail with Twisted Wrap Detail
Create a fishtail ponytail using the standard technique, then wrap a thin twisted section of hair around the base of the ponytail to conceal the elastic and add a finished, polished detail. This wrap transforms a simple fishtail from looking casually styled to looking intentionally designed. The twisted wrap also draws attention to the base of your ponytail, which is particularly effective if you’ve taken time to create a high or well-positioned ponytail. It’s a small detail that communicates you’ve put thought into your styling.
Why the Twisted Wrap Matters
A wrap detail at the base of a ponytail serves multiple purposes: it hides the elastic so your style looks seamless, it adds a visual frame that draws the eye to that area, and it creates a polished, finished appearance that reads as more deliberate than a simple ponytail. The twisted wrap also gives you an opportunity to incorporate another texture—if your fishtail is relatively smooth and sleek, a slightly messier or more textured twist creates visual interest. This detail transforms a good fishtail into a styled fishtail.
Creating the Twisted Wrap
- Complete your fishtail braid and secure it with a clear elastic (or an elastic in your hair color).
- From underneath your ponytail base, take a thin section of hair—about the thickness of a pencil—and gently pull it free.
- Twist that section tightly, working from the inside out and around the base of your ponytail elastic, essentially wrapping it around like you’re wrapping string.
- Once you’ve gone around once, tuck the end of that twisted section under itself or underneath the elastic at the back, securing it so it won’t unravel.
- If you want extra security, use a bobby pin to pin the end in place where it tucks under.
- Gently loosen the twist slightly if you want a softer, less structured look, or keep it tight for something more polished.
Pro tip: The twisted wrap works best if your base ponytail is positioned high enough that you have accessible hair underneath to work with. If your ponytail is positioned too low, you might not have enough hair underneath to create a substantial wrap.
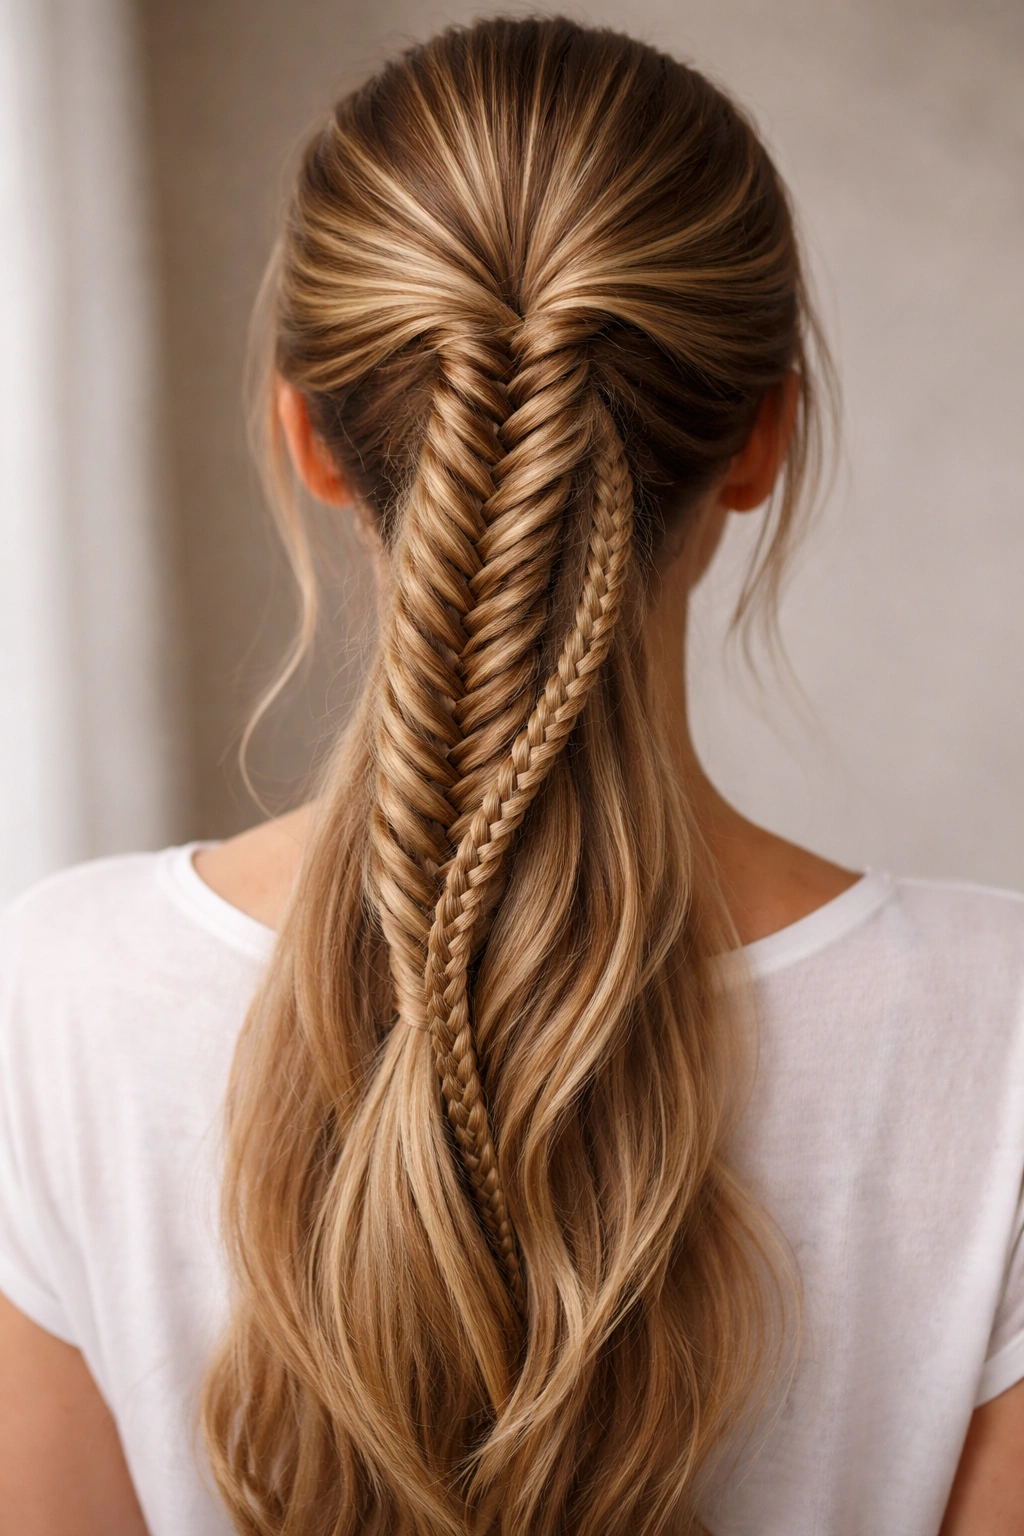
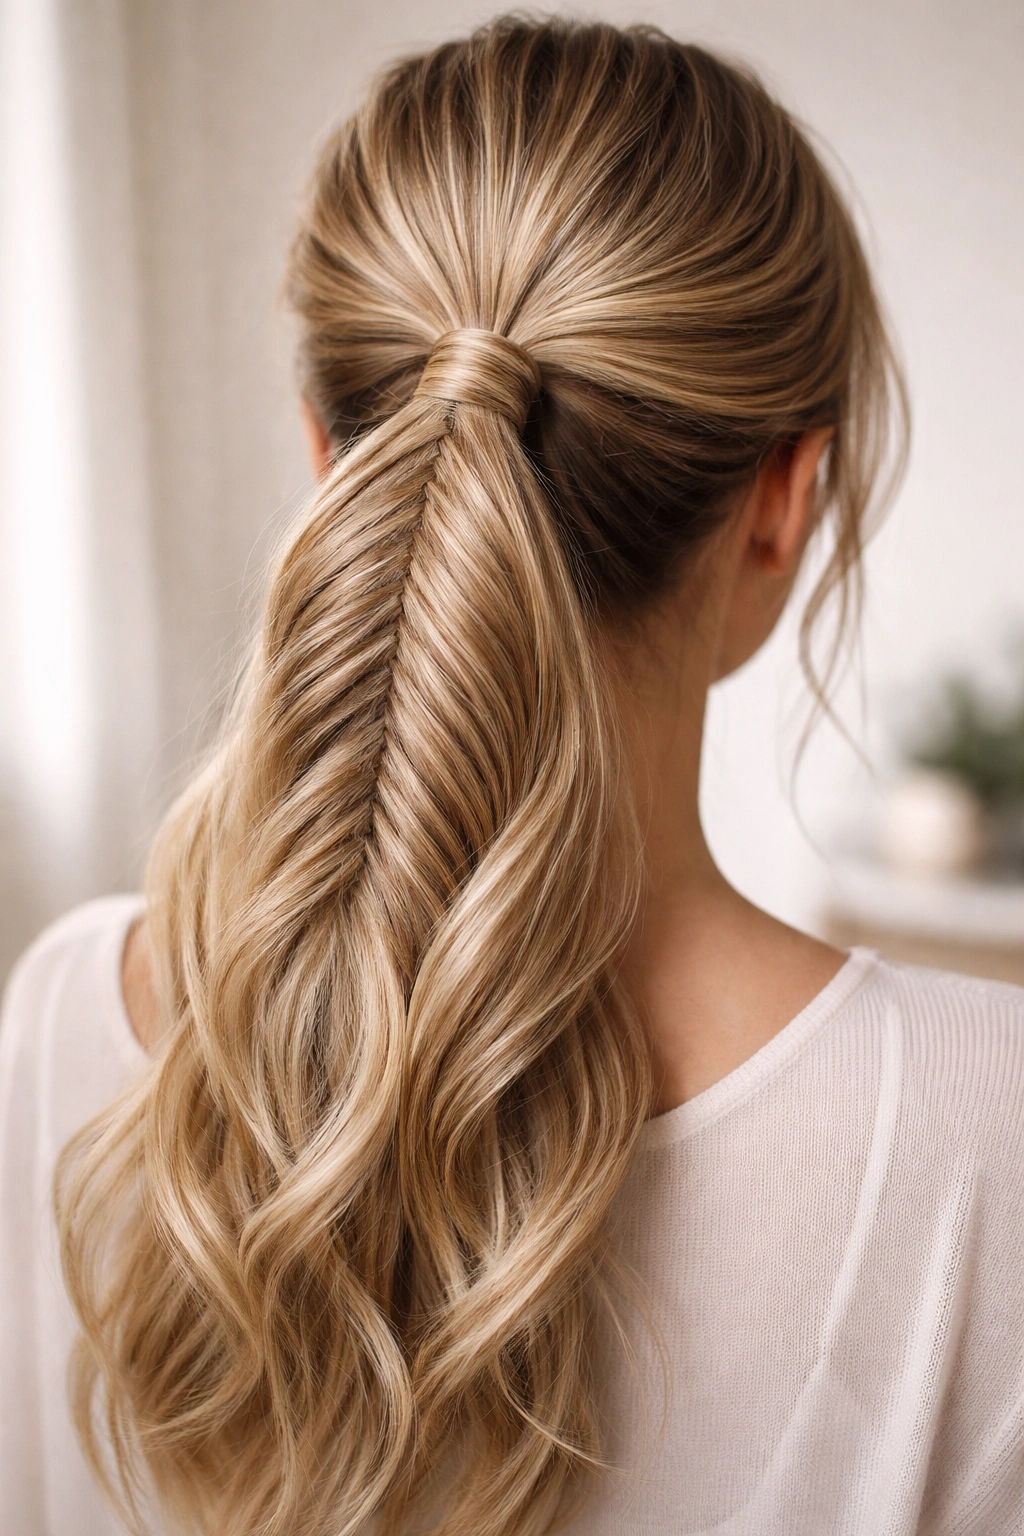
7. Half-Up Fishtail Ponytail for Versatile Styling

Rather than gathering all your hair into a ponytail, take only the top half of your hair—from your crown to roughly ear height—and create a fishtail braid with that section alone. Secure it into a small ponytail at the back of your crown, leaving the bottom half of your hair completely down and loose. This hybrid style gives you the polished, styled appearance of a ponytail with the softness and length of wearing your hair down. It’s perfect for days when you want to keep hair off your face without committing to a full ponytail, and it works beautifully with long hair because the contrast between the styled top and loose bottom creates visual interest.
The Appeal of Half-Up Styling
Half-up styles are the practical choice for anyone with long hair who wants some of it off their face but doesn’t want to sacrifice the length and drama of wearing it fully down. The fishtail in the upper half becomes a visible design detail, while the lower half remains free and flowing. This approach also works well for people with thick hair, because you’re only gathering and braiding half the volume, which makes the braid easier to manage and more visually distinct. The style reads as deliberately styled rather than haphazardly thrown together.
Building Your Half-Up Fishtail
- Separate the top half of your hair from the bottom by running a comb from one ear, over the crown, to the other ear. Clip the bottom section out of the way temporarily.
- With the top section, create a fishtail braid starting at your crown or slightly higher, using the same two-section alternating technique you’d use for a full fishtail.
- Braid only the top section, stopping once you reach roughly ear height.
- Gather the ends of that braid and any loose hair from the upper section into a small ponytail at the back crown, securing it with a small elastic.
- Release the bottom section of hair and let it fall freely—it will partially cover the base of your ponytail, creating a seamless transition.
- Gently loosen your fishtail braid slightly to add dimension and softness to the upper half.
Worth knowing: This style works best when your hair naturally has some texture or when you’ve given it some waves beforehand. The contrast between the constructed fishtail and the loose lower section reads better when the loose section has movement and isn’t completely straight.
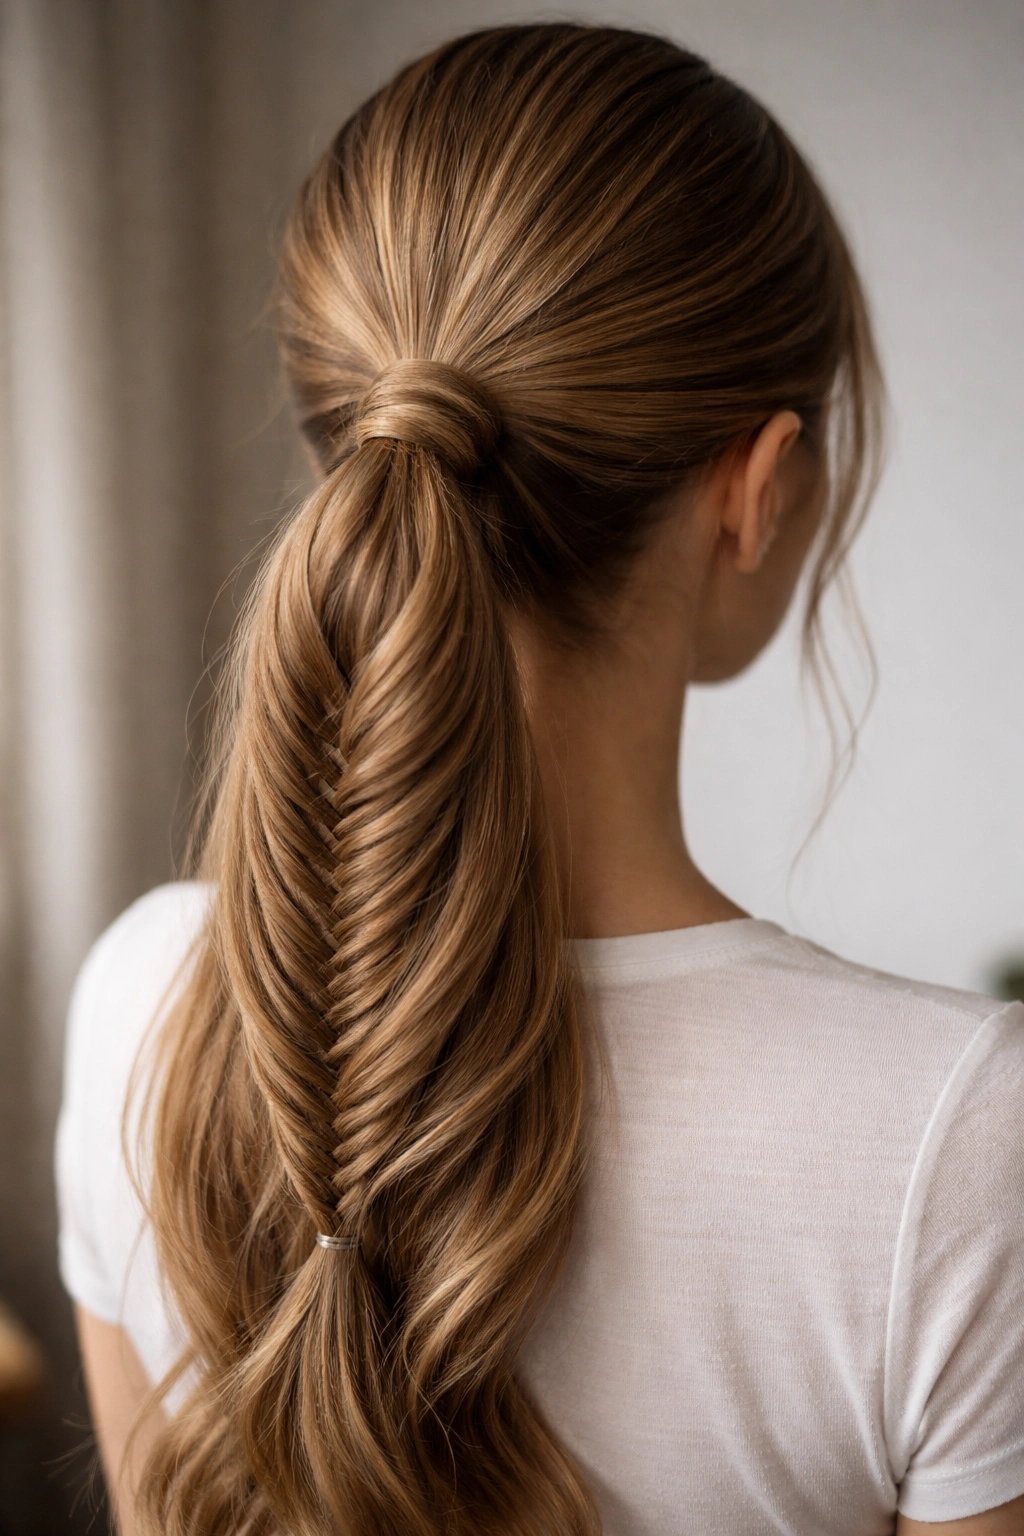
8. Low Fishtail Ponytail with Soft Waves
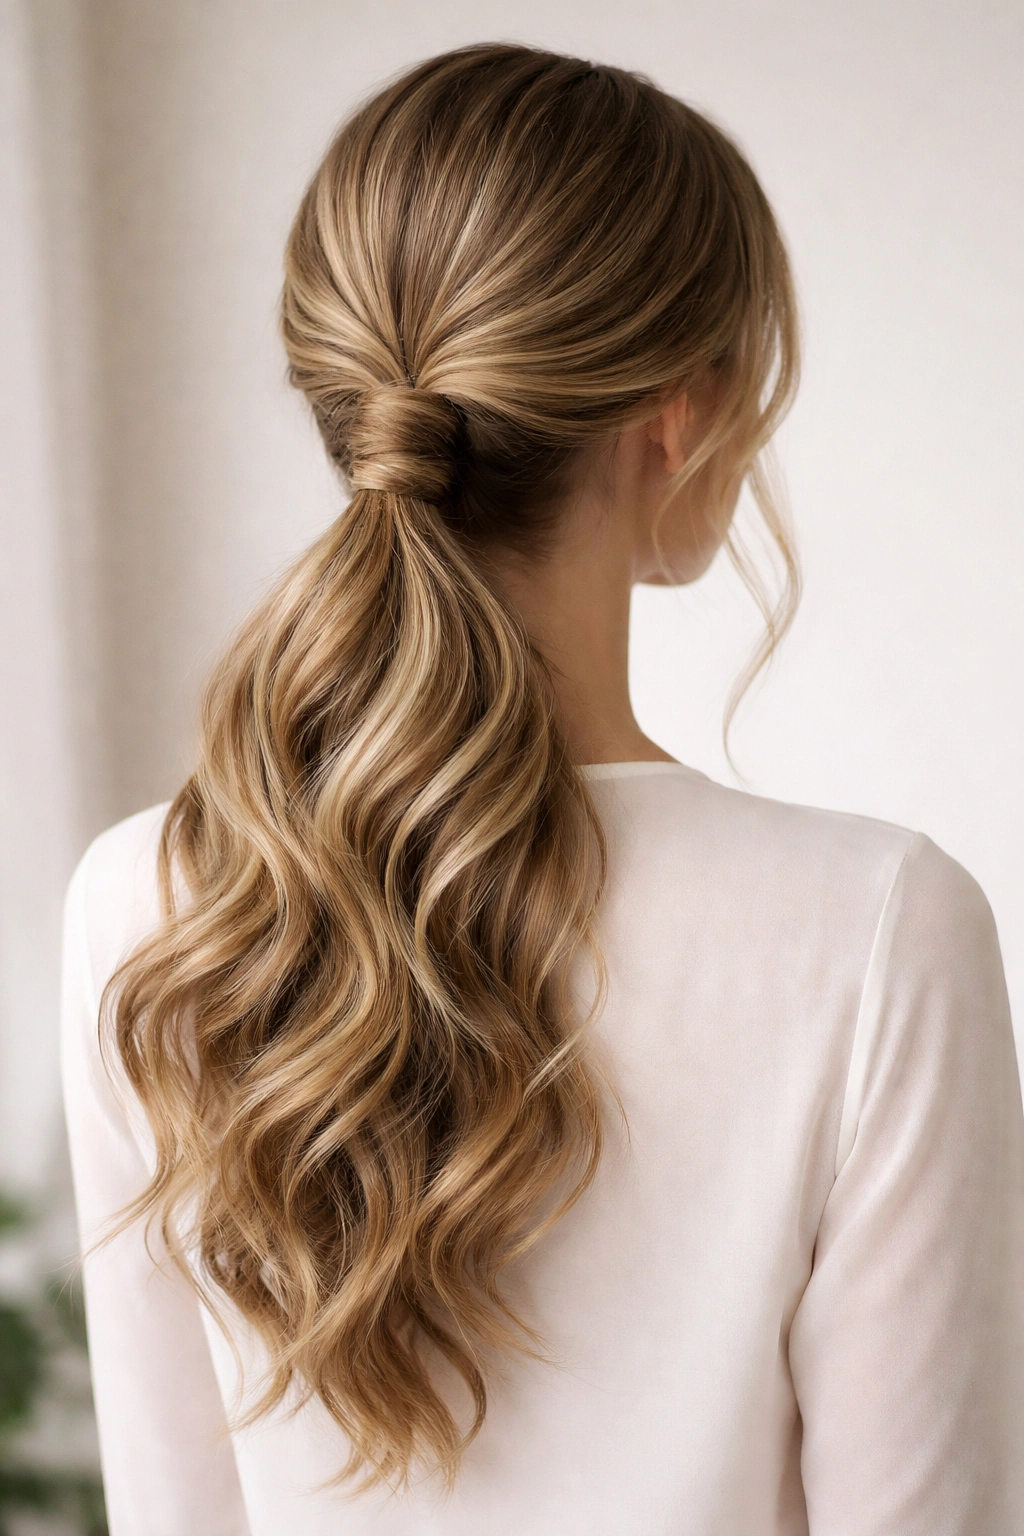
Position your fishtail ponytail low on the back of your head—at roughly the nape of your neck or just slightly higher—and pair it with soft, loose waves throughout your hair. This styling choice emphasizes elegance and ease, perfect for professional settings, dinners out, or any occasion where you want to look put-together without appearing overly formal. The low positioning is inherently sophisticated, and the contrast between the constructed fishtail and the flowing waves creates a balanced, polished look that photographs beautifully.
Low Positioning for Sophisticated Appeal
A low fishtail ponytail reads as more grown-up and polished than high or centered versions. The lower placement frames your face differently, drawing attention to your features rather than to the ponytail itself. When combined with soft waves throughout your hair, the overall effect is effortless elegance—the kind of styling that works for professional settings, nice dinners, or any time you want to appear both relaxed and intentionally styled. The low position also tends to be more forgiving as the day goes on, because the weight of your hair naturally keeps the ponytail secure.
Achieving the Elegant Low Fishtail Look
- Curl your entire head gently with a 1.5-inch to 2-inch curling iron, creating soft, loose waves that fall naturally (not tight ringlets).
- Brush through the waves gently with your fingers to soften them—they should be loose waves, not defined curls.
- Gather your hair low, positioning the ponytail base at the nape of your neck or just slightly above it.
- Secure with an elastic in a shade that matches your hair, then create your fishtail braid starting from that low base.
- Keep the braid relatively tight and defined, contrasting with the softness of the waves throughout your hair.
- As you braid, ensure you’re incorporating any loose waves into the braid sections for a cohesive look.
- Finish by loosely wrapping a thin twisted section around the base as described in the wrap detail style.
Pro tip: Low ponytails benefit from a tiny bit of velcro roller volume at the crown—you don’t need much, just enough to create a slight bubble of height at the top of your head to balance the weight of the low ponytail pulling down.
9. Nested Fishtail Ponytail with Braided Detail
Create a standard fishtail ponytail, then take a thin section of hair from somewhere in your braid and pull it free, creating a second, much smaller fishtail braid using just that thin section. This creates a “nested” effect where a delicate mini fishtail sits alongside or wraps around your main fishtail. It’s visually intricate and technical-looking, but surprisingly manageable once you understand the concept. This style demonstrates serious styling skill and creates a visual focal point that’s completely unique—you’re unlikely to see another person wearing this exact variation.
Creating Visual Complexity
The nested fishtail approach transforms a single braid into a layered design where multiple braids of different scales coexist. The nested braid draws the eye because it represents another level of construction, making even moderately thick hair look like you’ve invested significant effort in styling. The technique also allows you to play with dimension—the thicker main fishtail contrasts with the delicate nested braid, creating visual interest and texture variation.
Steps to Build a Nested Fishtail Design
- Complete your main fishtail braid fully and secure it with a clear elastic.
- Identify a section roughly 6-8 inches down from your ponytail base where you want to incorporate the nested braid.
- Very carefully, using a fine-tooth comb, extract a thin strand of hair from within your main fishtail braid at that point—you’re gently teasing out one small section from the braid.
- Once you have your thin strand extracted, create a tiny two-section fishtail using just that strand (and any additional thin hair you want to include to make the mini braid substantial enough to see).
- Braid this down about 3-4 inches, then tuck and secure the end back into your main fishtail braid using a bobby pin.
- You can create multiple nested braids at different points along your main braid, or keep it to just one or two for a more subtle effect.
Worth knowing: This style is technically advanced and requires patience. The nested braid won’t be perfect or tidy, and that’s actually part of its appeal—it looks like a deliberate, intricate design rather than something overly neat or artificial.
10. Messy Fishtail Ponytail with Texture and Movement
This is the intentionally undone version of the fishtail ponytail—created with lots of loose, flyaway texture, deliberate messiness, and an emphasis on movement over precision. Rather than aiming for a clean, defined braid, you’re creating something that looks like you threw your hair up and somehow it turned into a beautiful fishtail without you really trying. This version works best with thicker hair or with lots of texture already in place, and it’s the perfect style for casual days when you want something that looks good without looking like you spent an hour on your hair.
The Appeal of Intentional Imperfection
Messy fishtail ponytails have become increasingly popular because they feel relatable and wearable—they’re not so polished that they feel unattainable, but they’re still visibly styled. The texture and slight undone quality make this version feel fresh and youthful. Paradoxically, a deliberately messy fishtail often requires more skill than a neat one, because you need to understand how to loosen and adjust a braid intentionally while keeping it from completely falling apart. The balance is tricky but worth learning.
Creating Intentional Messiness
- Start with textured hair—waves, curls, or even a second-day texture. Completely smooth, freshly washed hair won’t cooperate well with this approach.
- Create your fishtail braid using the standard technique, but work loosely from the start and don’t worry about achieving precision.
- As you braid, deliberately leave small flyaways—don’t smooth them down or brush them out.
- Once your fishtail is complete, use your fingers (not a comb) to gently tease and loosen the braid throughout.
- Pull some strands free from the braid itself to add height and texture.
- Focus on creating movement at the crown and where the braid sits against the base of the ponytail, leaving the lower portion slightly tighter for structure.
- Use a light texturizing spray or dry shampoo to add grip and enhance the texture.
Pro tip: The secret to a messy fishtail that doesn’t look unkempt is creating intentional structure despite the looseness. Keep your two main sections of the fishtail relatively taut even as you’re loosening the woven pattern—this prevents the whole thing from looking like an accident.
Essential Styling Tips for Flawless Fishtail Ponytails
Regardless of which fishtail variation you choose, several foundational techniques will dramatically improve your results. The most critical is starting with the right hair texture—completely freshly washed, straight, slippery hair is actually your enemy when creating fishtails because the sections won’t hold together. Aim for hair with some texture, either from overnight braiding, a light wave, or a texture spray applied beforehand. This gives you grip and makes the braiding exponentially easier.
Your elastic choice matters more than you might think. A thin, clear elastic that’s appropriate for your hair thickness will secure your ponytail without creating a harsh line or breaking your hair. For thick hair, a thin elastic can actually snap under the tension—don’t be afraid to use something slightly thicker if needed. And always wrap the elastic around your ponytail base at least twice, or even three times for very thick hair, to ensure security throughout the day.
Sectioning technique is where many people struggle with fishtails. Unlike a traditional three-strand braid where you’re juggling three sections and moving them around, a fishtail asks you to take tiny, consistent sections from the outside edges of two main sections and cross them over repeatedly. If you’re taking sections that are too thick, your fishtail loses definition and looks more like a lumpy three-strand braid. If you’re taking sections that are too thin, you’ll be there forever and the braid will feel floppy. Aim for sections roughly the thickness of a pencil—thick enough to work with, thin enough that the pattern is visibly intricate.
Finishing your fishtail properly transforms it from homemade-looking to professionally styled. Rather than simply securing the end with an elastic, consider wrapping a thin twisted section around the base to hide the elastic. Or use a small clip designed to look like a piece of hair twisted around the ponytail. These finishing touches take thirty seconds but change how polished the entire style appears.
Maintaining Your Fishtail Ponytails Throughout the Day
Fishtail ponytails are surprisingly durable compared to looser braid styles, but they do require a few maintenance strategies to look their best as the day goes on. The fishtail’s interlocking structure makes it resistant to coming undone completely, though individual sections may loosen or shift. If you notice this happening mid-day, simply retuck any loose strands back into the braid or use bobby pins to secure them underneath.
Flyaways become more visible as the day progresses, especially if you’re creating an intentionally tight, defined fishtail. Rather than waiting until the end of the day to address them, use a light-hold gel or flyaway spray first thing when you style. This prevents the flyaways from becoming increasingly noticeable as you move around, and it keeps your ponytail looking as neat at 5 PM as it did at 9 AM.
If you’re creating a deliberately loose or messy fishtail, you actually have more flexibility throughout the day. These versions naturally accumulate a bit more texture and looseness, so they look increasingly styled (rather than increasingly disheveled) as hours pass. The downside is they require more security at the base—don’t skimp on elastics or bobby pins with these versions, or you’ll find your ponytail gradually slipping lower.
For overnight styling, you can sleep in a loose fishtail to set waves throughout your hair for the next day, or sleep in a very loose, low ponytail to refresh your waves without re-creating the braid entirely. This makes fishtail ponytails excellent for extending your style multiple days if you’re traveling or simply want to minimize daily styling effort.
Common Mistakes That Derail Your Fishtail Results
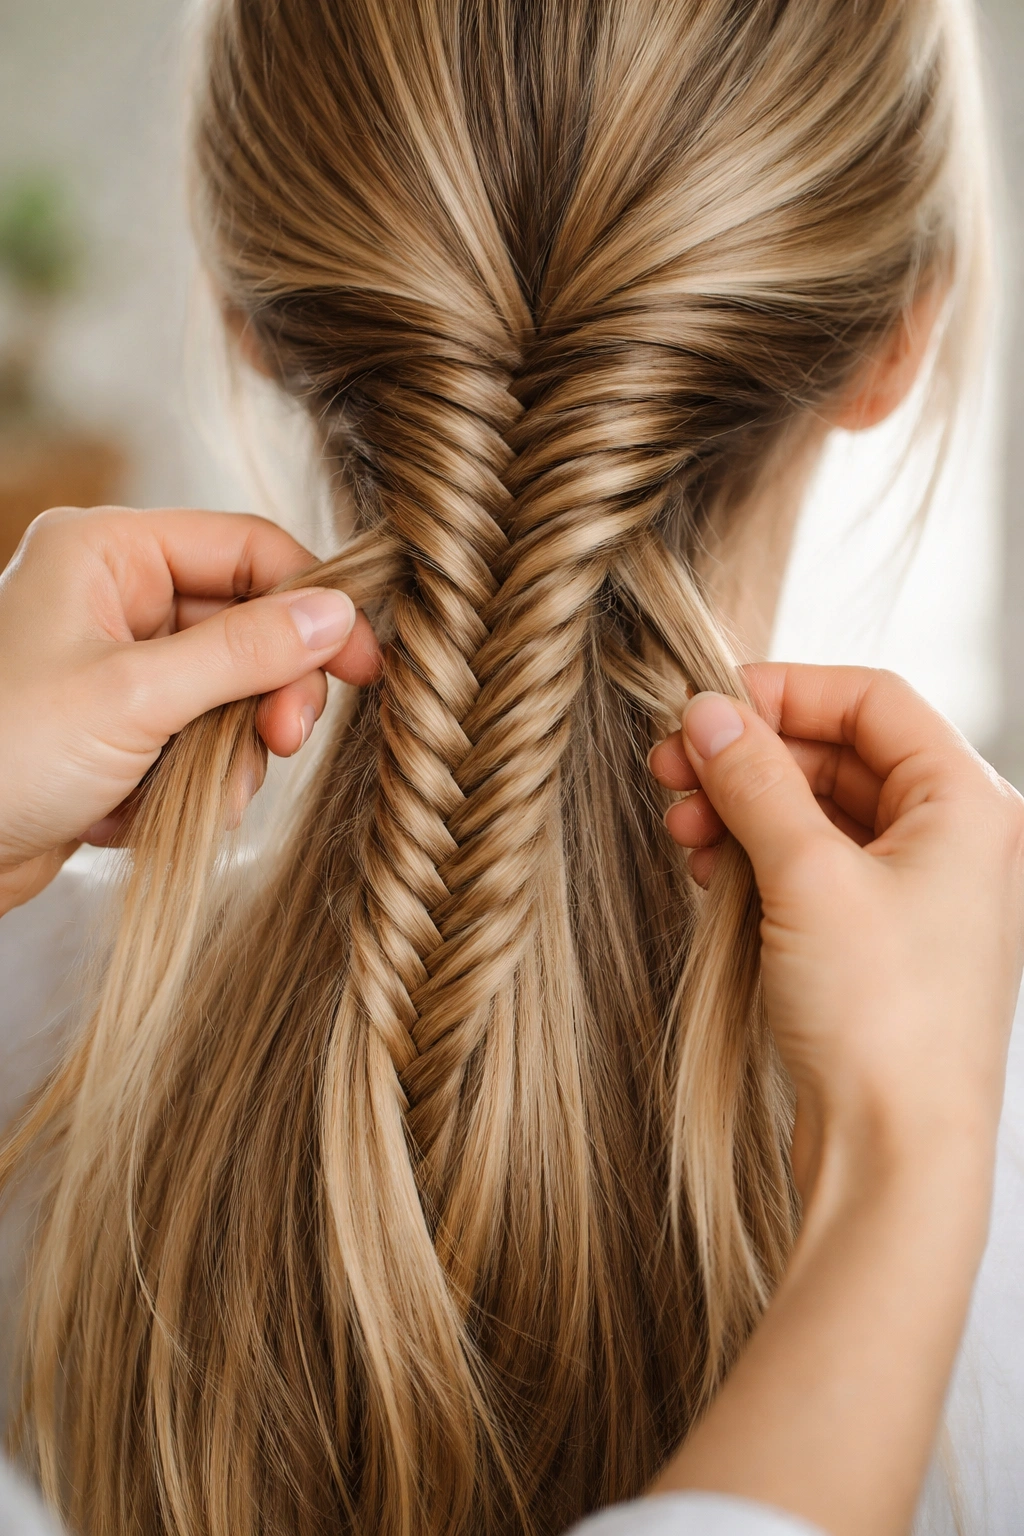
The most frequent mistake people make when learning fishtails is taking sections from the wrong place. The fishtail technique requires taking sections from the outer edge of each main section—not from the middle, not from below, but specifically from the outside edge. If you’re taking sections from anywhere else, you’re essentially creating a different braid entirely. Watch tutorial videos closely to see exactly where the hands are positioned when sections are pulled.
Another common issue is tensioning—applying either too much tension (making the braid uncomfortably tight and difficult to loosen intentionally later) or too little tension (making sections slip and the braid look sloppy). The solution is finding the middle ground where you’re pulling enough to keep sections secure and together, but not so hard that you’re straining your hands or creating an immovable braid. This sweet spot becomes intuitive after you’ve created a few fishtails.
Many people also don’t loosen their fishtails enough, leaving them looking tight and somewhat harsh. Most fishtail ponytails benefit from intentional loosening—going back through and gently pulling on the outer sections to expand the braid and add dimension. This single step transforms a mediocre fishtail into a beautiful one. Don’t be afraid to loosen generously; you can always tighten it back up slightly if you’ve gone too far.
Finally, people often underestimate the importance of prep work. You truly cannot create a beautiful fishtail with completely straight, slippery hair. Commit to adding texture beforehand—waves, curls, texture spray, or even just slightly damp hair makes the entire process easier and the results better. This small investment of time or product transforms your success rate dramatically.
Conclusion
The versatility of fishtail ponytails means there’s genuinely a version for every mood, occasion, and styling preference. Whether you’re drawn to the classic elegance of a centered, defined fishtail, the romantic softness of a loose version, or the playful complexity of bubbles and nested details, the technique remains fundamentally the same—just with variations in placement, tension, and finishing details. Long hair gives you the canvas to explore each variation fully, letting the fishtail braid showcase its detail and texture without disappearing into shorter lengths.
The learning curve for fishtails is far gentler than many people assume. Once you understand that you’re simply taking small sections from the outside edges and crossing them over repeatedly, the rest becomes muscle memory and practice. Your first few attempts might feel clumsy or imperfect, but that’s completely normal and actually valuable—those imperfect attempts teach you how the hair moves and responds. Within a few tries, the motion becomes automatic, and you can create a fishtail ponytail in just minutes.
Start with the classic centered version to build your confidence and technique, then branch out into the variations that appeal to you. You might discover that half-up fishtails become your go-to, or that messy versions suit your aesthetic better than polished ones. You might love the drama of a high fishtail for special events and reserve low, loose versions for everyday wear. The beauty of understanding all these variations is that you get to choose which version matches not just the occasion, but also your personal style and your hair’s natural characteristics. Once the technique is yours, endless styling possibilities open up.