



A messy bun has a reputation for being effortless, but when it’s gracing your wedding day, nothing about it should be haphazard. The right messy bun strikes that delicate balance between romantic and intentional—polished enough to photograph beautifully in close-ups and candids, relaxed enough to feel like you and move naturally as you walk down the aisle or dance with your new spouse. The beauty of messy bun styling is that it works across nearly every wedding aesthetic, from boho-casual backyard ceremonies to formal black-tie affairs, and it’s forgiving enough to hold up through hours of celebration without requiring a stylist’s steady hand every thirty minutes.
What makes a messy bun wedding-appropriate is the difference between “I didn’t try” and “I tried and this is the refined version of effortless.” The texture should feel intentional, the flyaways should be strategic, and the overall shape should flatter your face and neckline. Whether you’re working with thick waves, fine straight hair, super curly texture, or anything in between, there’s a messy bun variation that’ll work with your hair’s natural patterns rather than against them. The key is understanding which style suits your hair type, your wedding dress silhouette, and the vibe you’re aiming for—and knowing exactly how to prep and secure your hair so it lasts the entire day without looking like it’s been through a wind tunnel.
This guide walks you through twelve distinct messy bun styles, each with specific techniques, the hair types they work best for, and exactly how to execute them so they feel authentic to your wedding vision. From romantic low buns with trailing pieces to sleeker high styles with textured volume, you’ll find the perfect foundation for your wedding day hair.
1. The Romantic Low Bun with Face-Framing Wisps
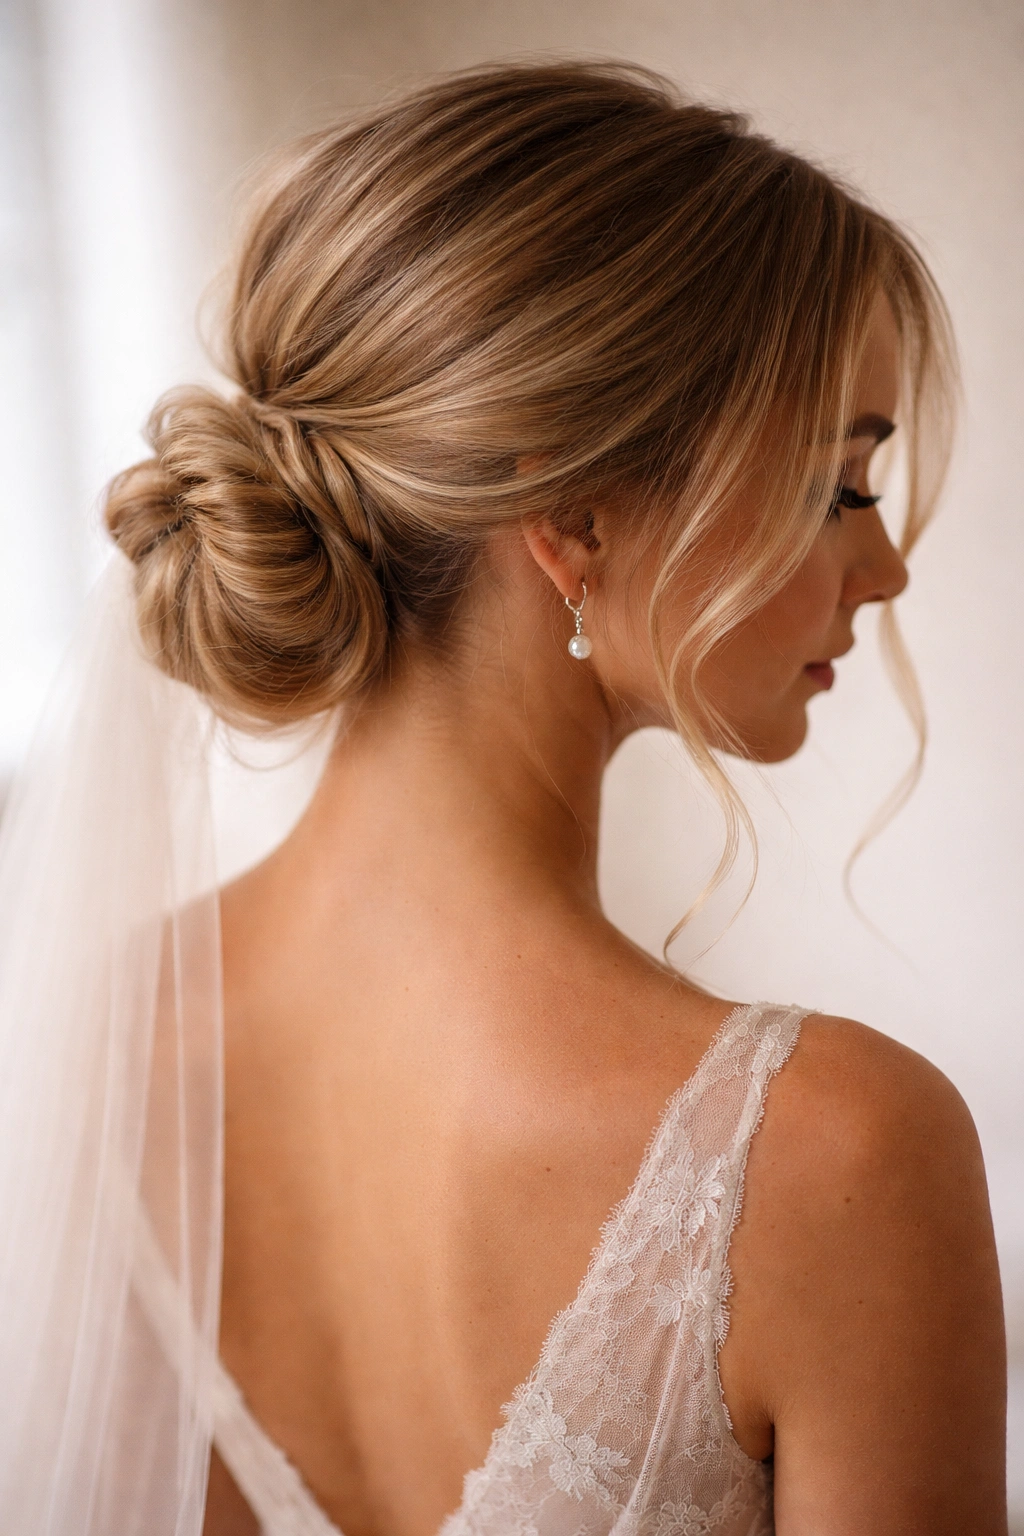
This is the quintessential wedding messy bun—soft, touchable, and inherently romantic. It sits low at the nape of your neck, allowing it to pair beautifully with open-back dresses, strapless gowns, and delicate necklaces. The magic lies in the intentional face-framing pieces that bracket your face and the looser, slightly undone texture throughout the bun itself. This style works especially well if you’re wearing a veil because the low placement allows the veil comb to nestle naturally without disrupting the bun structure.
Why It’s Perfect for Weddings
The low positioning is genuinely flattering for most face shapes because it doesn’t pull everything tightly away from your features. The face-framing wisps add softness and movement, which translates beautifully in photographs and feels feminine without being overly dramatic. This style also photographs incredibly well from behind—which matters if your photographer is capturing ceremony moments and first-look shots. The accessible height means you can still hug guests throughout the evening without worrying about crushing your updo.
How to Create It
- Start with second-day hair or add texture with a sea salt spray or waves created with a curling iron
- Section out two thin pieces from each side of your face near your temples—these will frame your face later
- Gather the remaining hair low at your nape, leaving those framing pieces out
- Twist or loosely braid the gathered section, then wrap it around itself to form the bun shape
- Secure with bobby pins, allowing some texture to escape naturally from the wrapped base
- Release those face-framing pieces and gently curl or wave them if they’re not already textured
- Finish with flexible-hold hairspray that allows movement without creating a stiff helmet effect
Quick Facts
- Best for: Straight to wavy hair, or curly hair that’s been blown out with texture
- Difficulty level: Intermediate — the wrapping technique takes practice, but it’s forgiving if your bun isn’t perfectly round
- Hold time: 8-12 hours with proper pinning and hairspray
- Veil compatibility: Excellent — the low placement gives you plenty of room for veil combs
Pro tip: Create your bun slightly loose before the ceremony, then tighten and refine it just thirty minutes before you walk down the aisle. This timing means the style will feel fresh in photos but stable enough to make it through the evening.
2. The High Textured Bun with Braided Detail
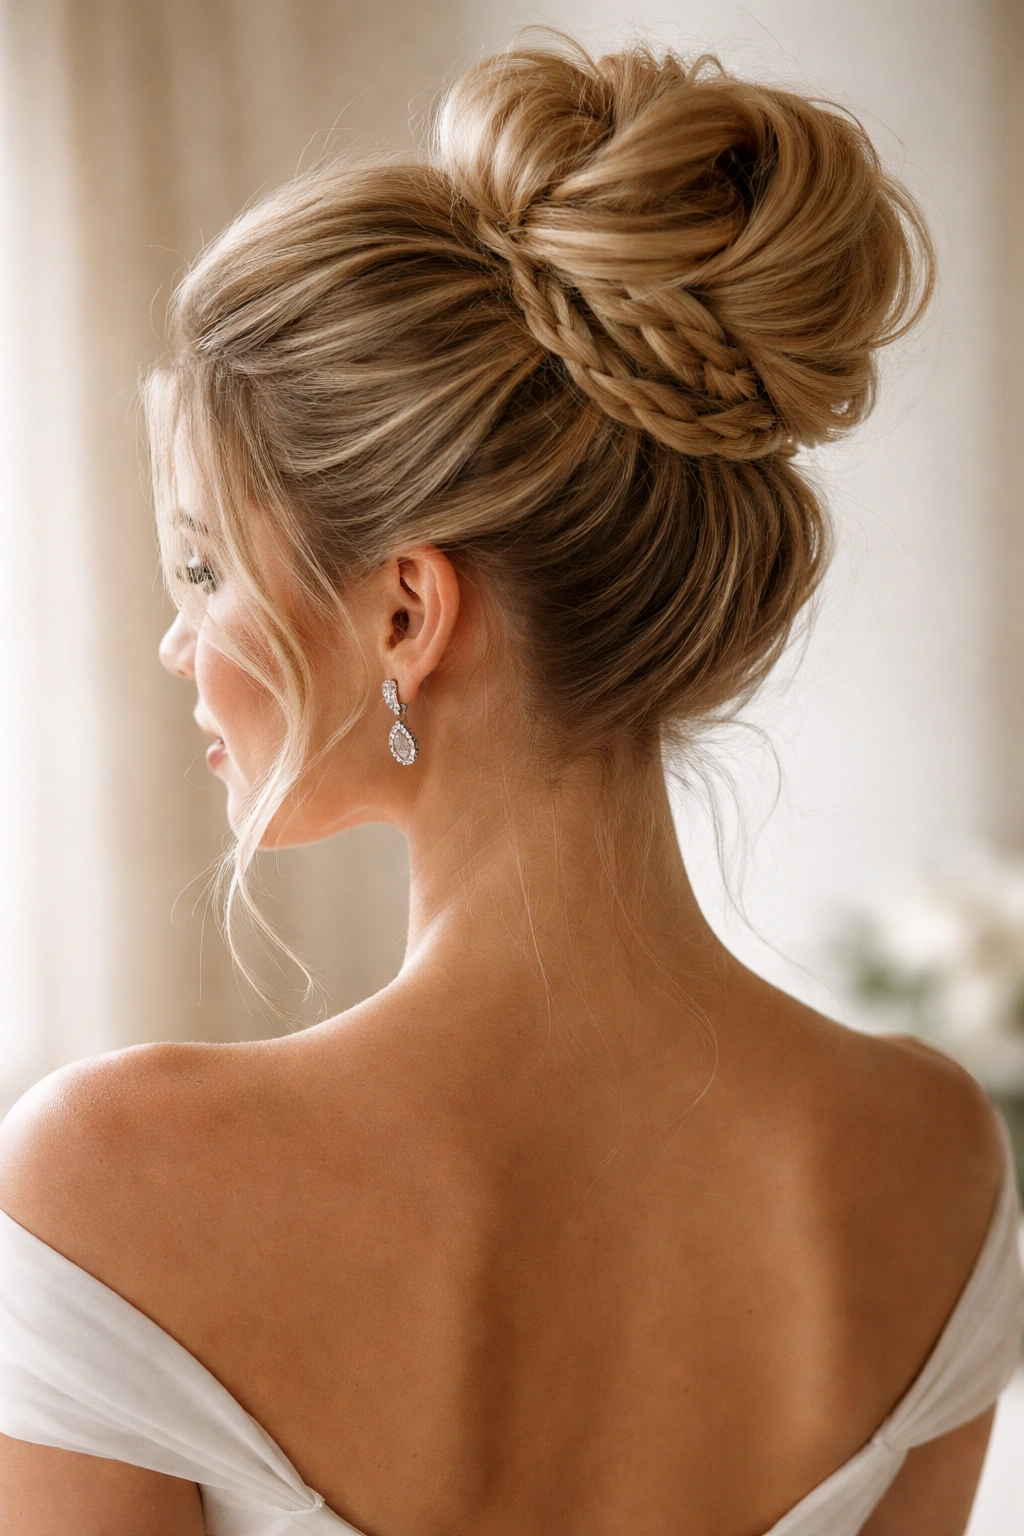
This style works if you want more visual impact and volume. The bun sits high at the crown, drawing the eye upward and creating an elegant elongated line from your neck to the top of your head. The braided detail winds through or wraps around the base of the bun, adding texture and visual interest without requiring a second person to help you execute it. This is a particularly strong choice if you’re wearing your hair down on the sides or if your dress has an intricate neckline that you want to showcase.
Why It Works for Wedding Day
The height of this style creates a sense of elegance and intentionality. It photographs beautifully because it creates dimension when viewed from the side or back—the braided element adds visual interest that makes hair look thicker and more luxurious. If you’re concerned about your hair looking too thin or fine, this style uses the braiding technique to create the illusion of more texture and volume. It’s also ideal if you’re wearing a sleek strapless gown because the high bun elongates your neckline.
How to Create It
- Section hair into two parts: the top section (crown area) and the bottom section
- Backcomb or tease the crown section lightly to create a base for volume
- Create a Dutch or French braid using the bottom section, starting at the nape and braiding up toward the crown
- Gather all hair (braided section plus crown section) at the top of your head
- Twist the gathered hair and wrap it around itself, positioning the bun at your desired height
- Weave the braid around the base of the bun as you wrap, securing everything with bobby pins
- Gently pull sections of the braid to make it slightly fuller and less structured
- Set with hairspray
Quick Facts
- Best for: Medium to thick hair with some natural wave or texture
- Difficulty level: Intermediate to advanced — braiding while creating height takes coordination
- Hold time: 10+ hours; the braid acts as an internal structure that keeps everything anchored
- Veil compatibility: Good — works with side veils or back veils clipped above the bun
Worth knowing: Practice this style at least twice before your wedding day. The braiding technique is the part that takes the most practice, but once you nail it, this style is incredibly reliable and looks more complicated than it actually is.
3. The Sleek High Bun with Wispy Softness
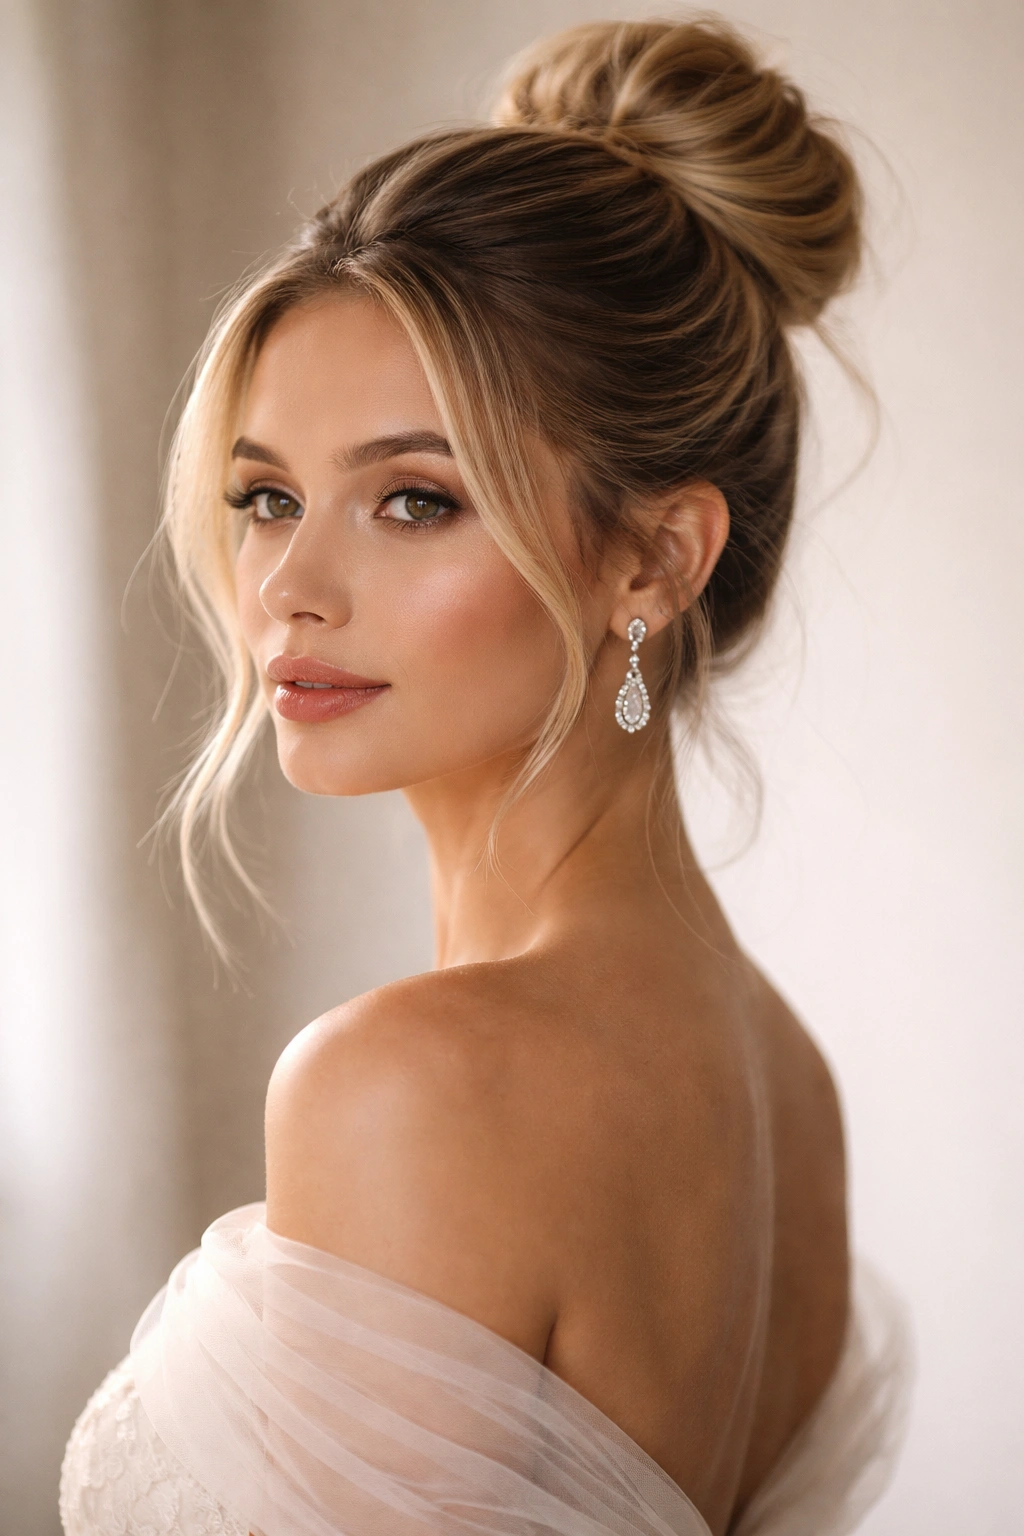
If your wedding aesthetic leans minimalist or modern but you still want softness, this hybrid style delivers. It’s structured and polished where it matters—the high placement and smooth sections around your face—but incorporates loose, wispy texture in the bun itself. This works beautifully with geometric or architectural wedding dresses and pairs well with bold, sculptural jewelry.
What Makes This Style Special
The contrast between the sleekness and the softness creates visual interest. You get the sophistication and elongation of a high, polished style without the severity. This is an excellent choice if you’re worried about looking too austere or severe with your hair fully pulled back—the soft texture in the bun adds femininity and movement. It also photographs exceptionally well in both close-ups and full-body shots because the clean lines flatter your face while the texture in the bun prevents it from looking too rigid.
How to Create It
- Apply a smoothing serum or gel to damp hair, focusing on the front sections and crown
- Blow-dry your hair straight or with minimal texture, using a paddle brush to create sleekness
- Create a deep side part if it suits your face shape, or a center part for a modern look
- Use a fine-tooth comb to smooth the top and sides, tucking any flyaways with a bit of gel
- Gather hair high on the crown, securing with an elastic
- Tease or backcomb just the ponytail section (not the secured base) to create texture
- Wrap the teased ponytail loosely around the elastic, allowing pieces to fall out naturally
- Secure with bobby pins, making sure the smooth sections around your face stay pristine
- Finish with a light hairspray that doesn’t stiffen the wispy pieces
Quick Facts
- Best for: Straight or wavy hair; works on fine hair if you use volumizing products
- Difficulty level: Beginner to intermediate — the sleek sections are easier to master than braiding
- Hold time: 8-10 hours; the smoothing products help everything stay in place
- Best dress pairing: Minimalist, modern, or architecturally interesting gowns
Quick note: The sleek front sections are the hero of this style, so take extra time getting them smooth and flyaway-free. Use a fine-tooth comb and a tiny bit of smoothing gel to get them absolutely pristine.
4. The Romantic Twisted Bun with Scattered Pins
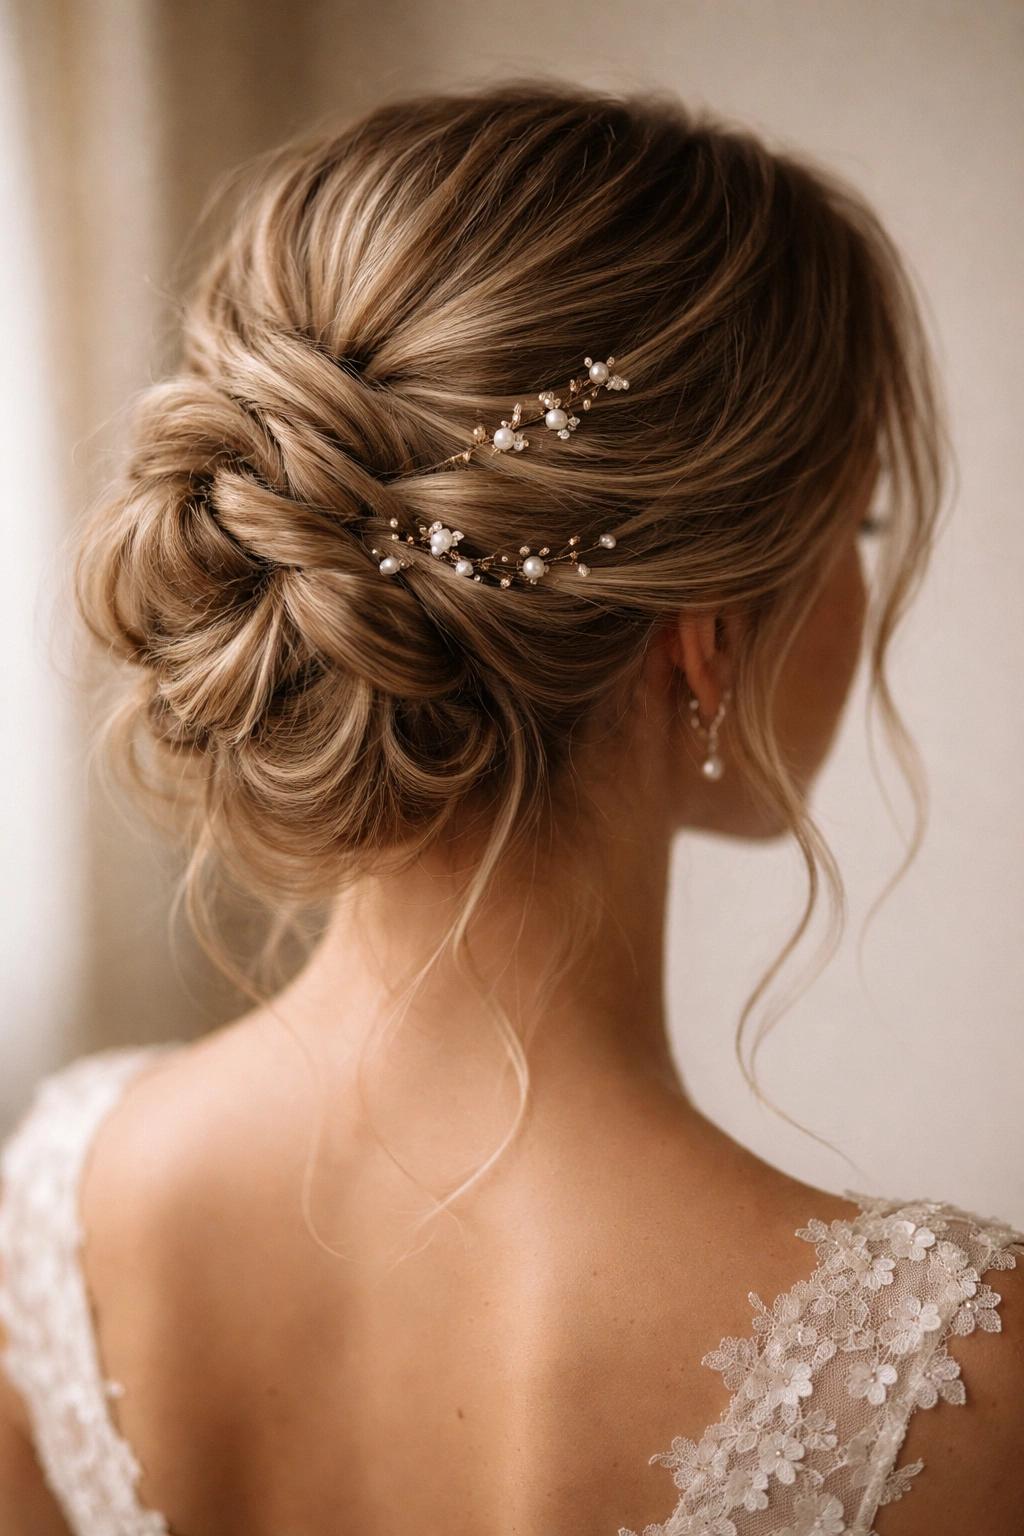
This style leans heavily into the romantic, garden-party aesthetic. Instead of one thick gathered ponytail wrapped into a bun, you’re creating multiple thin twists from different sections of your hair and wrapping them together to form the bun shape. The result looks more intricate and textured than a standard bun, but the technique is actually quite straightforward. Scattered decorative pins or small flowers tucked into the twists add personalized elegance without requiring a hair accessory to do all the heavy lifting.
Why Brides Love This Approach
The multiple twists create more surface area and visual interest, so the bun looks fuller and more deliberately styled—even if your hair is on the finer side. The scattered pins create a whimsical element that works beautifully with boho or romantic wedding aesthetics. This is one of the more forgiving messy bun styles because the texture of the twists naturally hides any imperfect wrapping or uneven sections. It photographs beautifully because the twists catch light differently than a solid wrapped bun.
How to Create It
- Section hair into 4-6 sections depending on your hair thickness (fewer sections for thick hair, more for fine hair)
- Working with one section at a time, twist it loosely from roots to ends
- Gather all the twisted sections at your desired bun height
- Wrap the twists around each other, overlapping them to form the bun shape
- Secure with bobby pins as you wrap, tucking any loose ends underneath
- Once the base bun is secure, insert decorative pins, small flowers, or pearl pins throughout the twists
- Gently tousle the bun to loosen it slightly and create a softer appearance
- Use flexible-hold hairspray to set without stiffening
Quick Facts
- Best for: Wavy or textured hair; works beautifully on curly hair
- Difficulty level: Intermediate — the twisting technique is forgiving, but you’ll do it multiple times
- Hold time: 10+ hours; multiple twists provide excellent anchoring
- Accessory opportunity: Perfect for decorative pins, small flowers, or pearl hair sticks
Pro tip: If you’re adding decorative pins, insert them at slightly different depths and angles rather than all in a row. This creates a more organic, intentional look rather than appearing like you’re marking rows on a graph.
5. The Textured Messy Bun with Undone Layers
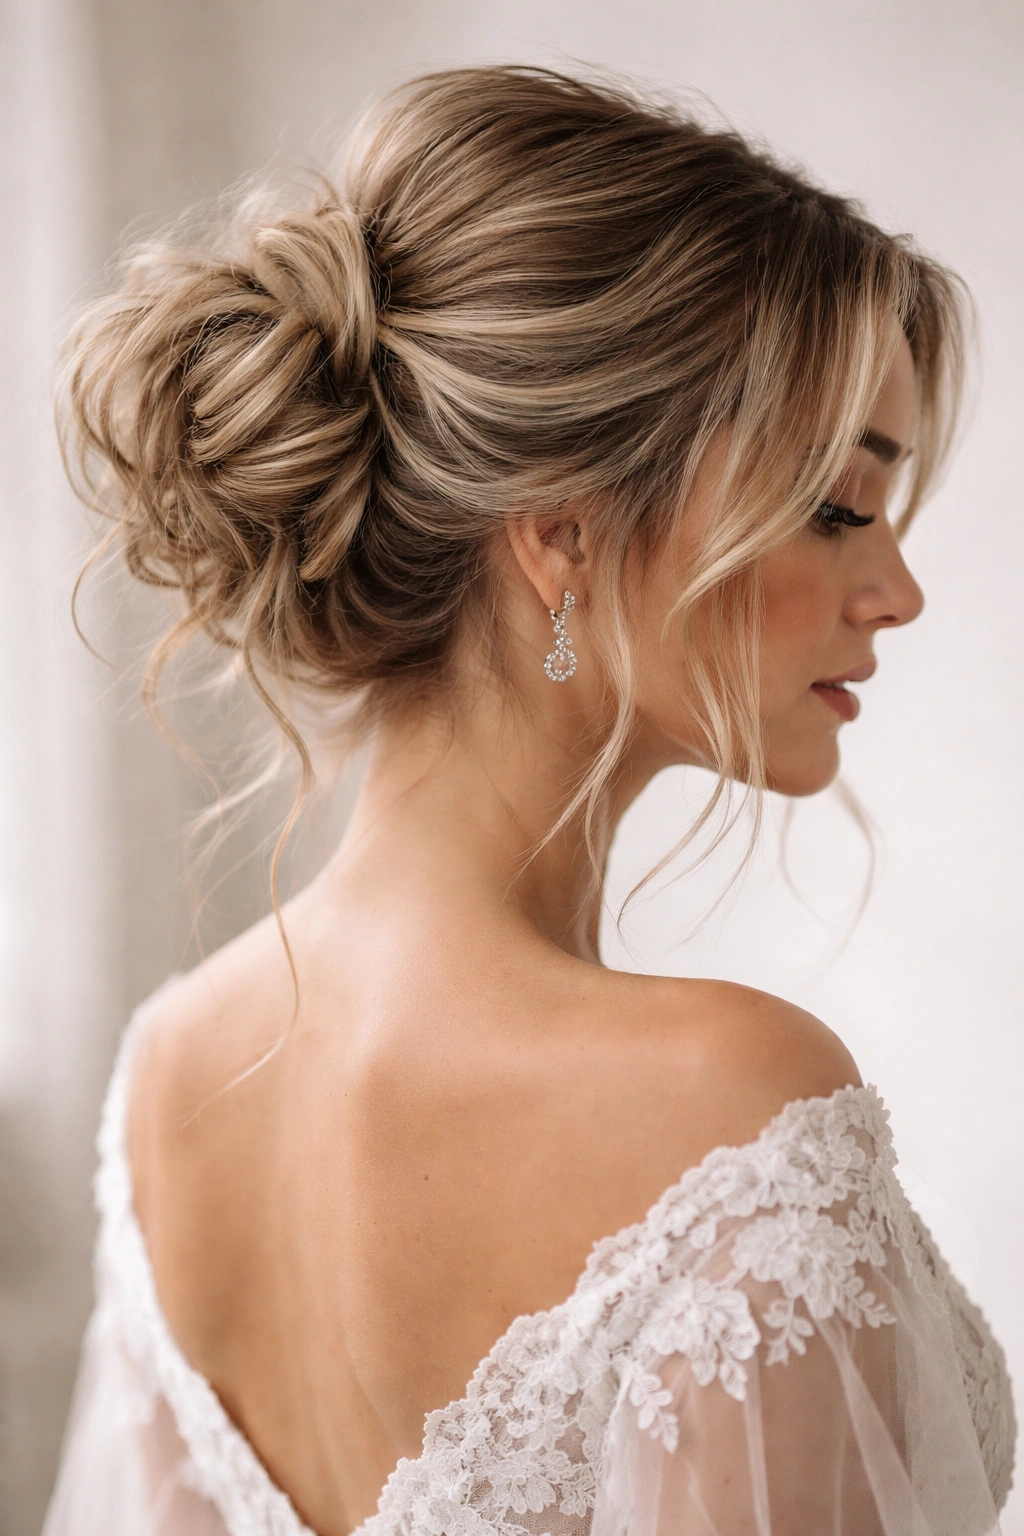
This style is deliberately and beautifully undone—not neglected, but intentionally layered and loose in a way that feels effortless and modern. It’s the messy bun style for brides who want to look like they simply twisted their hair up but somehow ended up looking editorial and polished. Pieces pull out at different lengths, creating depth and visual interest. This works exceptionally well if you’re wearing a sleek, modern dress because the textured, informal bun provides a balance.
What Separates This from Sloppy
The difference between a textured messy bun and one that simply looks like you didn’t finish getting ready comes down to intentionality and texture foundation. You’re not randomly pulling out pieces—you’re strategically creating a bun that has varying heights and depths, and you’re working with pre-textured or waved hair rather than straight hair that’s been hastily gathered. The layers should feel natural to your hair’s movement and should frame your face in a way that enhances your features.
How to Create It
- Create texture throughout your hair using a curling iron or braiding damp hair overnight; you want loose waves or texture, not tight curls
- Apply texturizing spray or dry shampoo to your roots and mid-lengths to enhance grip
- Take a section of hair from one side, twist it loosely, and pin it toward the back of your head
- Repeat this on the other side, overlapping the pins with the first section
- Gather the remaining hair (plus the pinned twists) into a low or mid-height ponytail
- Divide the ponytail into 3-4 sections and twist each one loosely
- Wrap the twisted sections around the base to form the bun, leaving some texture escaping
- Gently pull sections of the bun outward to create a fuller, more undone appearance
- Pin any sections that feel loose, but leave wisps and shorter pieces free
- Finish with texturizing spray (not heavy hairspray) to enhance the lived-in texture
Quick Facts
- Best for: Wavy, curly, or naturally textured hair; works on straight hair if you add wave or texture first
- Difficulty level: Beginner to intermediate — there’s no precise shape to achieve, which is freeing
- Hold time: 8-10 hours; the texture and texturizing spray help everything stay anchored
- Best for: Modern, boho, or garden-style weddings
Worth knowing: This is the most forgiving messy bun style if you’re doing your own hair. The imperfect pieces and varied layers are literally the point, so you can’t really mess it up if you embrace the texture.
6. The Low Braided Bun with Wrapped Detail
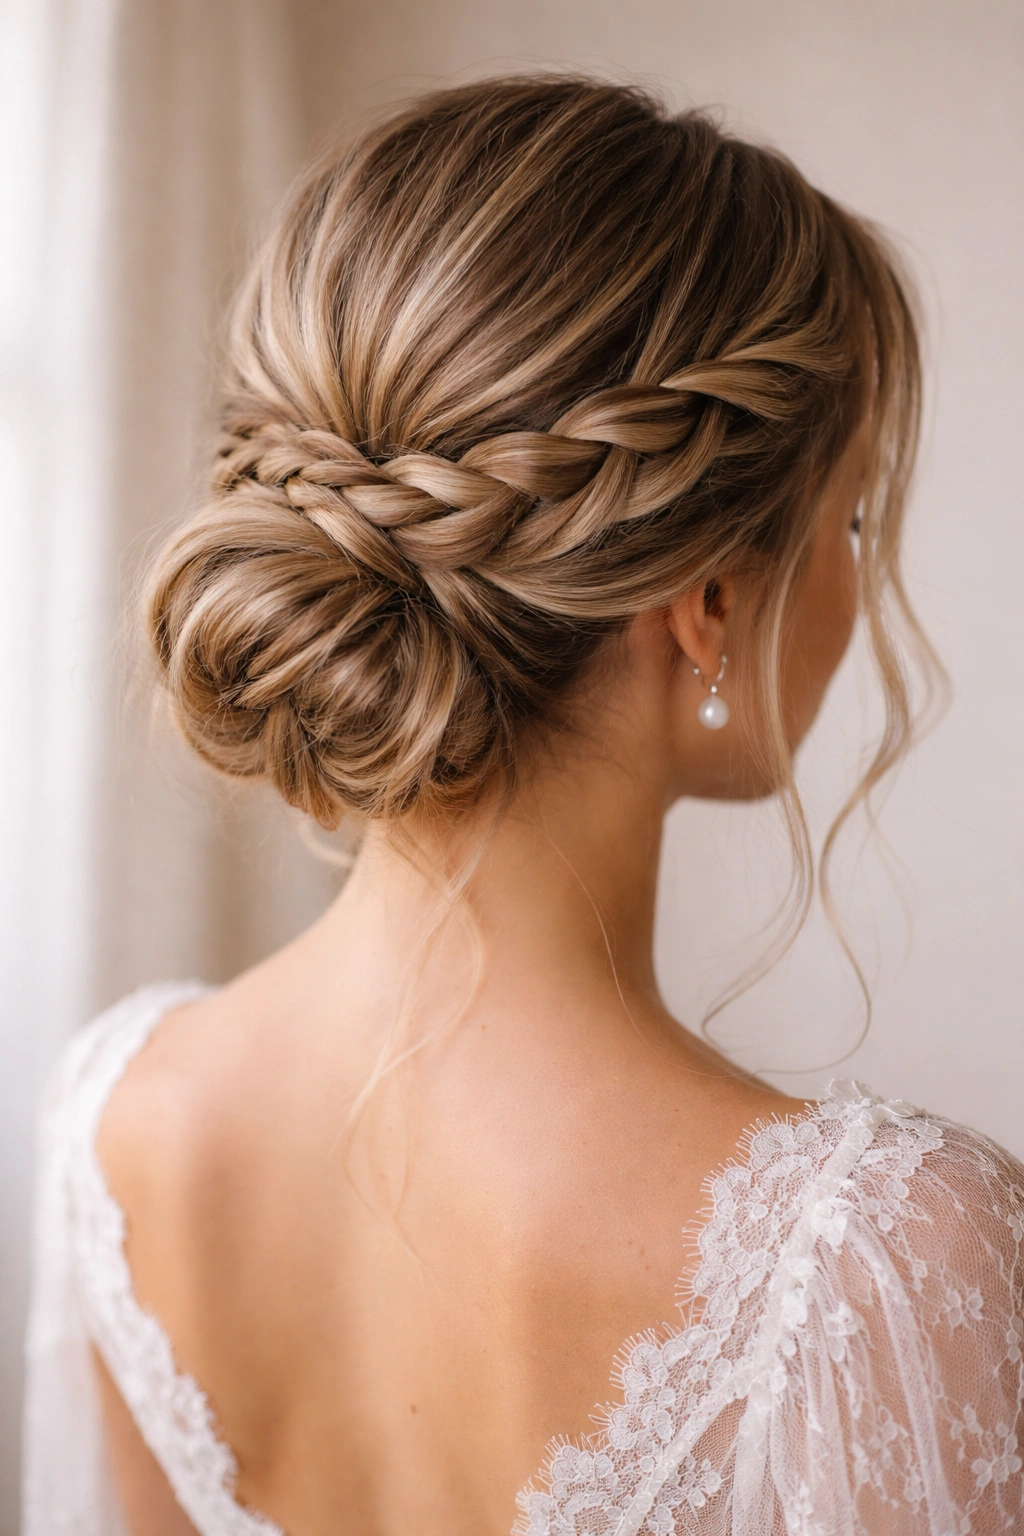
This style combines the romance of braiding with the effortless feel of a messy bun. You create one or two braids that you then wrap around a low bun base, creating a style that feels intricate and intentional but is actually quite simple to execute. This works beautifully if you want an updo that photographs as both romantic and put-together. It’s also an excellent choice if you’re doing your own hair because you can take your time with the braiding without worrying about creating volume at odd angles.
Why Brides Choose This Style
The braiding element adds visual complexity without requiring you to section your hair into dozens of pieces or create an elaborate Dutch-braid crown. The wrapping technique adds texture and covers any imperfections in where you’ve secured your bun. This style works particularly well if you’re wearing a dress with an exposed back because the braided wrap detail adds visual interest without taking away from your dress’s details. It’s also incredibly secure—the braids act as an internal support system for the bun.
How to Create It
- Create soft waves or texture in your hair using a curling iron or overnight waves
- Brush through the waves gently to create a textured but not-curly base
- Create one Dutch or French braid starting at one side of your head, braiding toward the nape
- Gather all hair (including the braid) into a low ponytail at the nape of your neck
- Twist or loosely braid the remaining hair in the ponytail
- Wrap this twisted/braided section around itself to form the bun
- Take your first braid and wrap it around the base of the bun, pinning it in place
- Gently pull the braid slightly to make it fuller and softer
- Tuck any loose pieces underneath and secure with bobby pins
- Finish with flexible-hold hairspray
Quick Facts
- Best for: Medium to thick hair with some natural wave or texture
- Difficulty level: Intermediate — you’re executing two braids, but they’re simple ones
- Hold time: 10+ hours; braids provide excellent structure
- Dress pairing: Works beautifully with open backs, low backs, or any dress where the back detail matters
Quick facts:
- Braid width: Keep your braids relatively thin (about ½ inch) so they look intentional and romantic rather than chunky
- Tousle timing: Gently loosen the braids just before the ceremony so they photograph softly without looking perfectly structured
7. The High Voluminous Bun with Soft Tendrils
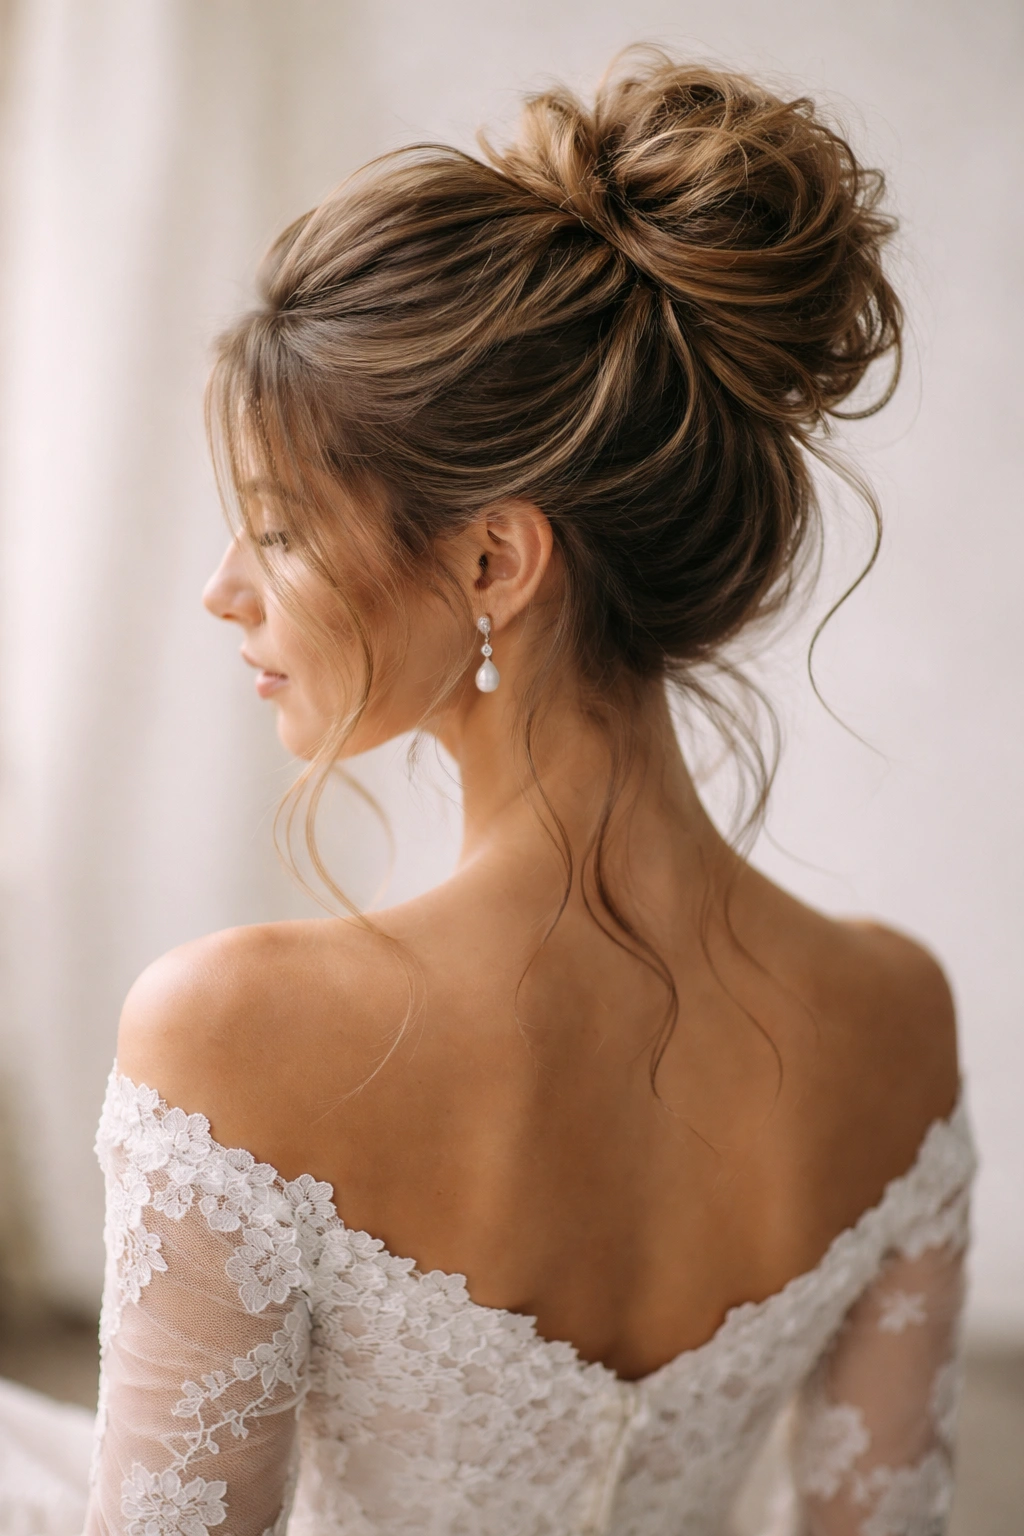
If you want maximum volume and drama, this is your style. The bun sits high and proud, created with teased or backcombed hair that’s been loosely gathered to maintain that volume. Soft tendrils frame your face and neck, adding femininity and movement. This style is particularly striking if you have fine or thin hair because the teasing technique creates the illusion of density and thickness. It’s an excellent choice if you’re wearing a simple dress with minimal embellishment because the hair becomes a major design element.
What Makes the Volume Last
The secret to this style staying voluminous through an entire wedding day is the combination of teasing, the right hairspray, and not over-pinning. Too many bobby pins actually flatten the teased texture. You’re using the teasing to create a framework, then gently gathering and wrapping that teased hair to maintain volume while securing it. The key is using medium-hold hairspray between steps—applying it to teased sections, then to the final style—which allows the teasing to hold its shape without becoming stiff.
How to Create It
- Section your hair into a top section (crown and upper back) and bottom section
- Tease the top section at the roots and mid-lengths using a teasing brush, working in small sections
- Lightly smooth the surface of each teased section with your brush, keeping the volume underneath
- Backcomb the bottom section as well to create grip and volume
- Gather all hair toward the crown, using your fingers to maintain the teased volume rather than pulling too tightly
- Form a high ponytail, still keeping that teased structure intact
- Divide the ponytail into 2-3 sections and loosely twist each one
- Wrap the twisted sections around the base to form your bun, allowing pieces to escape
- Gently pull the bun outward to maintain softness and volume
- Release thin tendrils from the front and sides of your face
- Pin everything securely, then apply flexible-hold hairspray
- Tousle gently with your fingers to enhance the soft, romantic feel
Quick Facts
- Best for: Fine, thin, or straight hair—this style actually works better if you don’t have super thick hair
- Difficulty level: Intermediate — teasing requires patience, but the wrapping is straightforward
- Hold time: 8-10 hours; the combination of teasing and strategic pinning keeps everything in place
- Volume boost: This is the messy bun style that creates the most visual drama and height
Pro tip: Use a teasing brush specifically designed for backcombing rather than a regular brush. The finer bristles grab hair more effectively and create better texture with less damage.
8. The Low Side Bun with Face-Framing Detail
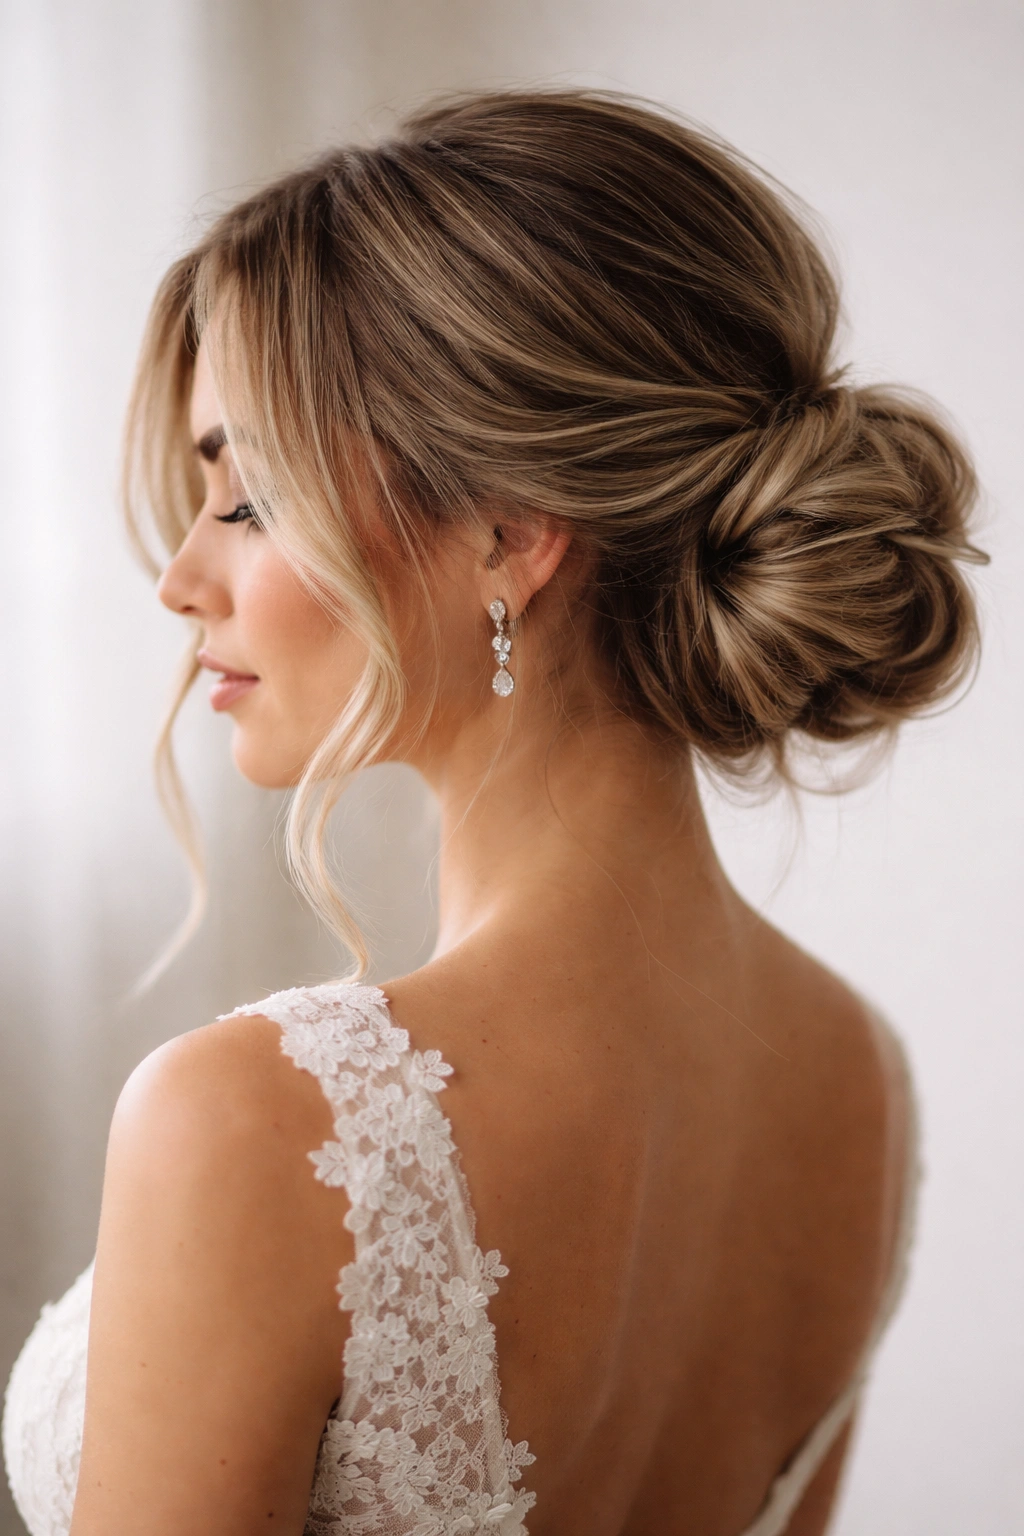
This asymmetrical style has a slightly modern edge while maintaining all the romance of a traditional messy bun. The bun sits low but positioned toward one side of your nape rather than centered, and the opposite side features swept-back hair that creates a sense of movement. Face-framing pieces or a gently curved section of hair creates a soft frame. This style works beautifully if you have a strong face shape because it creates balance and softness without pulling everything straight back.
Why Asymmetry Works
An asymmetrical bun creates visual interest and prevents your style from feeling too formal or rigid. It also allows you to showcase one side of your face more than the other, which is particularly useful if you’re working with a face shape that’s more flattering from a certain angle. This style also offers more flexibility for flower placement or decorative hairpiece positioning. If you’re wearing a veil, the side placement allows the veil to sit beautifully without competing with a centered bun.
How to Create It
- Create soft waves throughout your hair
- Brush through gently to create a textured base
- Take a section from the side of your head (the side where your bun will sit) and pin it temporarily
- Brush the opposite side of your hair back smoothly toward the bun placement
- Gather all hair toward the side where your bun will sit, creating an off-center ponytail
- Twist or loosely braid the ponytail
- Wrap it around itself to form the bun, positioning it to the side of your nape
- Release those initially pinned face-framing pieces and gently curl or wave them
- You can also keep a slightly fuller section on the opposite side of your head, creating a soft sweep
- Pin everything securely and finish with flexible-hold hairspray
Quick Facts
- Best for: Medium to long hair with some natural wave or texture
- Difficulty level: Beginner to intermediate
- Hold time: 8-10 hours
- Best face shapes: Works beautifully on oval, square, or heart-shaped faces
Worth knowing: The asymmetrical placement should feel intentional but not extreme. Your bun should be slightly off-center, not dramatically pushed to one side—think subtle rather than dramatic.
9. The Double-Twisted Bun with Interwoven Pieces
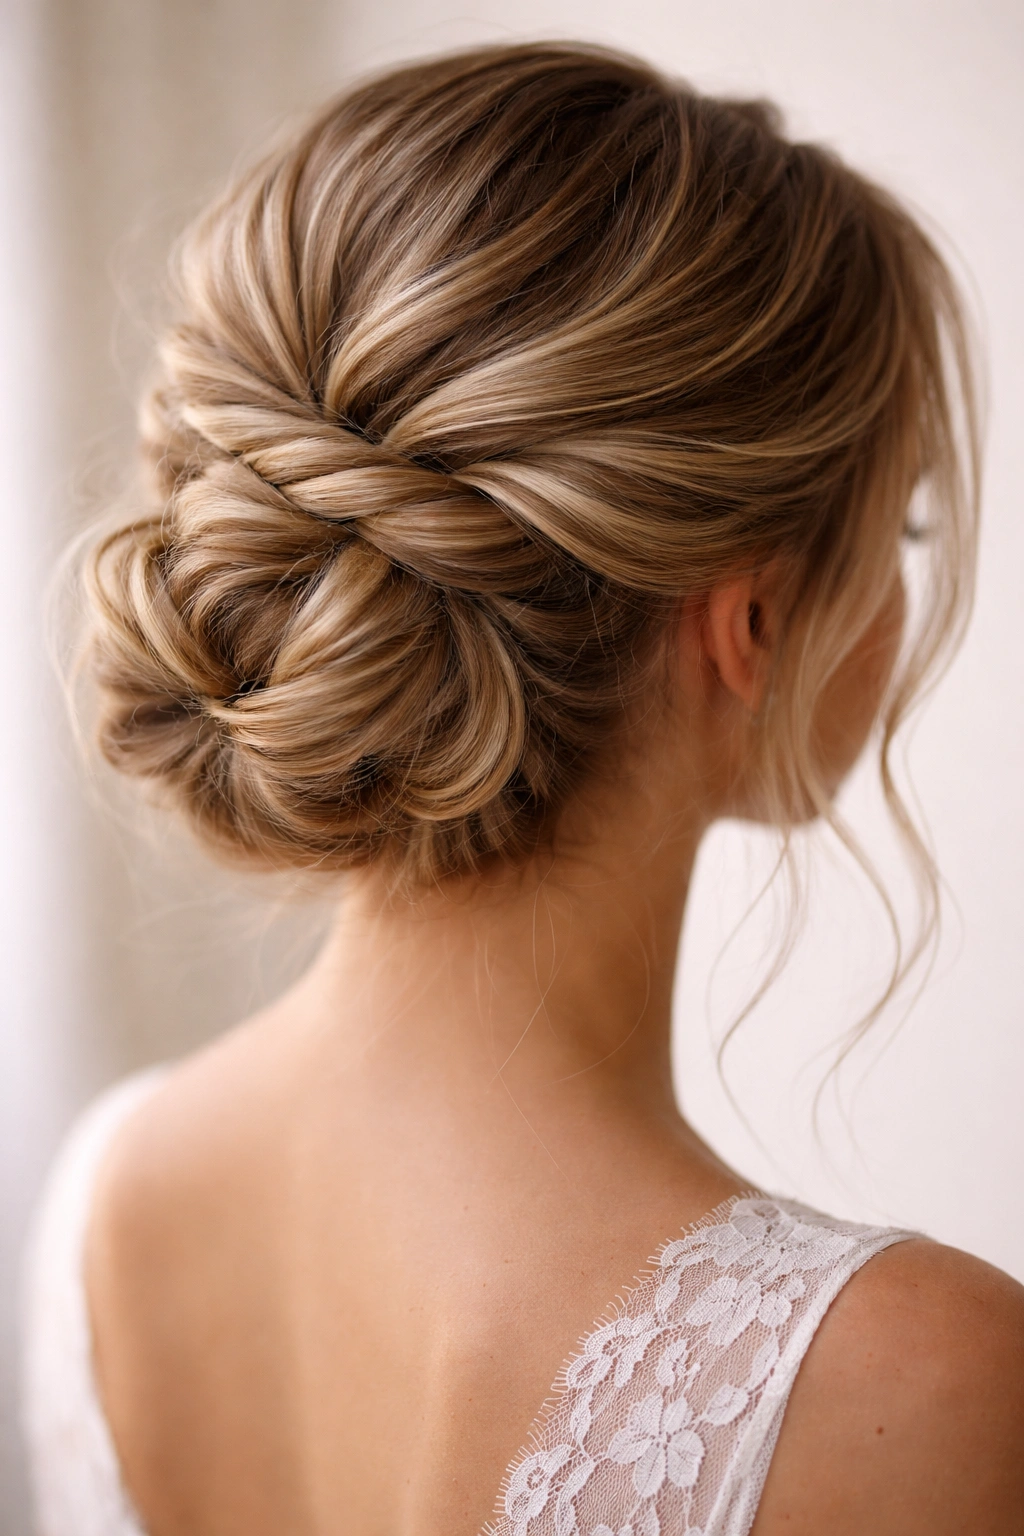
This style creates maximum texture and visual interest by building the bun from two separate twisted sections that interweave with each other. Instead of creating one thick bun from a single gathered ponytail, you’re working with two thinner ponytails that you twist and wrap together, allowing them to intertwine. The result looks significantly more textured and intricate than a single-ponytail bun, and it photographs beautifully because of all the visual movement and dimension.
Visual Impact and Photography
The interwoven twists catch light differently and create shadows and highlights that make the bun look fuller and more luxurious. This is one of the best messy bun styles for photography because it naturally has that editorial, intentionally-styled quality that reads beautifully in close-up shots. If you’re working with fine or thin hair, the double-twist technique is actually better than a traditional bun because it distributes your hair across more area, making it appear thicker.
How to Create It
- Create waves or texture throughout your hair
- Brush gently to create a soft, textured base
- Create a deep side part or center part, depending on your preferred balance
- Section your hair into two clear sections (left and right, from the part)
- Twist one section loosely from the front of your head toward the back, securing the twist temporarily with a clip
- Repeat with the second section, twisting it in the opposite direction (if the first twisted forward, twist this one backward, or vice versa)
- Release both twists and gather them together at your desired bun height
- Begin wrapping one twist around the base while simultaneously weaving the second twist through it
- Continue this interwoven wrapping pattern until all hair is incorporated into the bun
- Secure with bobby pins, tucking the ends underneath
- Gently tousle the bun to loosen it and create a softer appearance
- Finish with flexible-hold hairspray
Quick Facts
- Best for: Wavy, textured, or curly hair; fine or thin hair that benefits from distributed volume
- Difficulty level: Advanced — the interwoven wrapping technique takes practice and coordination
- Hold time: 10+ hours; the multiple twists provide excellent anchoring
- Special note: This style looks more complicated than it is; once you practice it, it becomes quite manageable
Insider note: Practice this style at least three times before your wedding day. The interwoven wrapping pattern is the part that takes the most coordination, but it becomes intuitive with practice.
10. The Low Bun with Embedded Hairpiece or Flower Crown
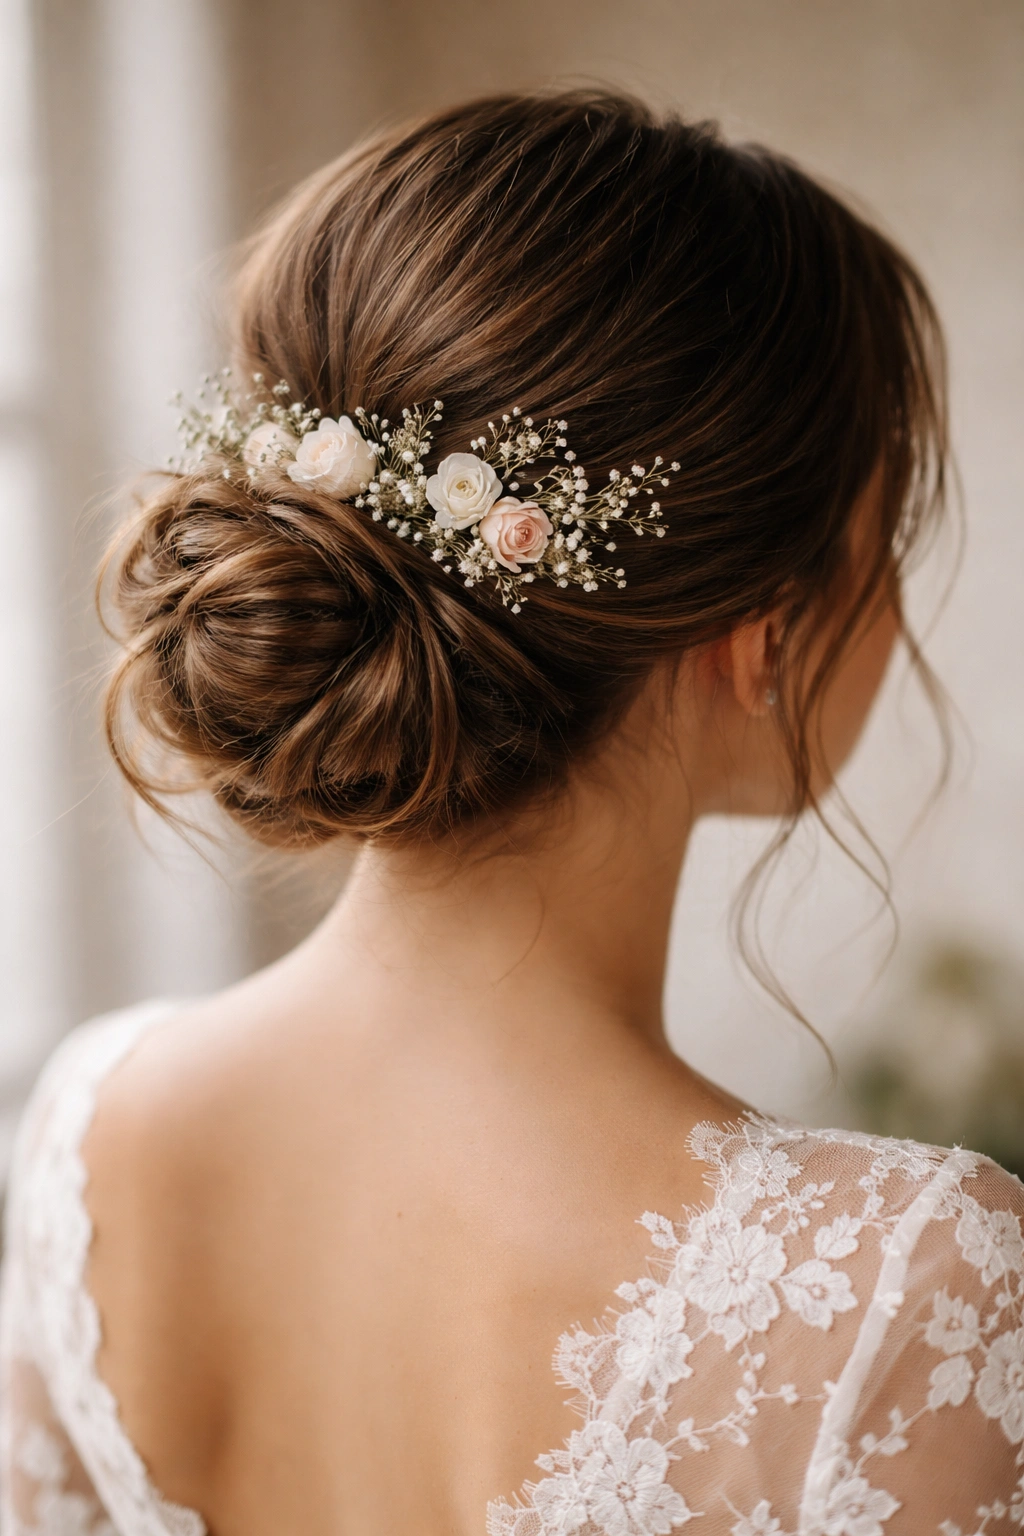
If you want your messy bun to be a statement piece, this is the approach. You’re creating a clean, well-structured messy bun base and then embedding a delicate hairpiece, scattered fresh flowers, or a soft flower crown into it. The bun itself becomes a foundation for your hair accessory rather than the focal point. This works beautifully if your wedding dress is relatively simple because your hair becomes an additional design element. It’s also an excellent choice if you’re working with fine hair because the hairpiece or flowers add visual interest that doesn’t depend on hair thickness.
Securing Flowers and Accessories
The key to keeping fresh flowers or hairpieces secure throughout your wedding day is creating a stable bun base first, then working your flowers or hairpiece into that structure. You’re not trying to make the flowers stay in your loose, textured hair—you’re tucking them into a bun that’s already pinned and secure. This means your flowers and accessories will last through dancing, hugging, and movement, which is critical for a wedding day when you want everything to hold steady.
How to Create It
- Create soft waves or texture in your hair
- Gather hair into a low ponytail, securing with an elastic
- Twist the ponytail loosely and wrap it around the elastic to form the bun
- Secure with multiple bobby pins, making sure the bun is quite firm and stable
- Begin inserting flowers or hairpiece pieces into the bun, working them into the twisted structure
- Tuck the stems or clips of hairpieces into the bun base where they’re well-hidden
- If you’re creating a flower crown effect, you can embed the crown’s base into the bun or let it sit just above the bun
- Make sure everything is secure by gently tugging on it—it should not move
- Finish with flexible-hold hairspray that won’t damage fresh flowers
Quick Facts
- Best for: All hair types; the accessory does a lot of the visual heavy lifting
- Difficulty level: Beginner to intermediate — the bun base is simple, and the flower/accessory insertion is intuitive
- Hold time: 8-10 hours; the stable bun base ensures accessories stay put
- Flower freshness: Fresh flowers will last through a full day but may begin to wilt slightly by evening
Pro tip: If you’re using fresh flowers, have your florist secure them on the day of your wedding. Ask about water picks to keep the stems hydrated, or use flowers like roses, hypericum berries, and eucalyptus that are more resilient than delicate blooms.
11. The Structured High Bun with Detailed Texture
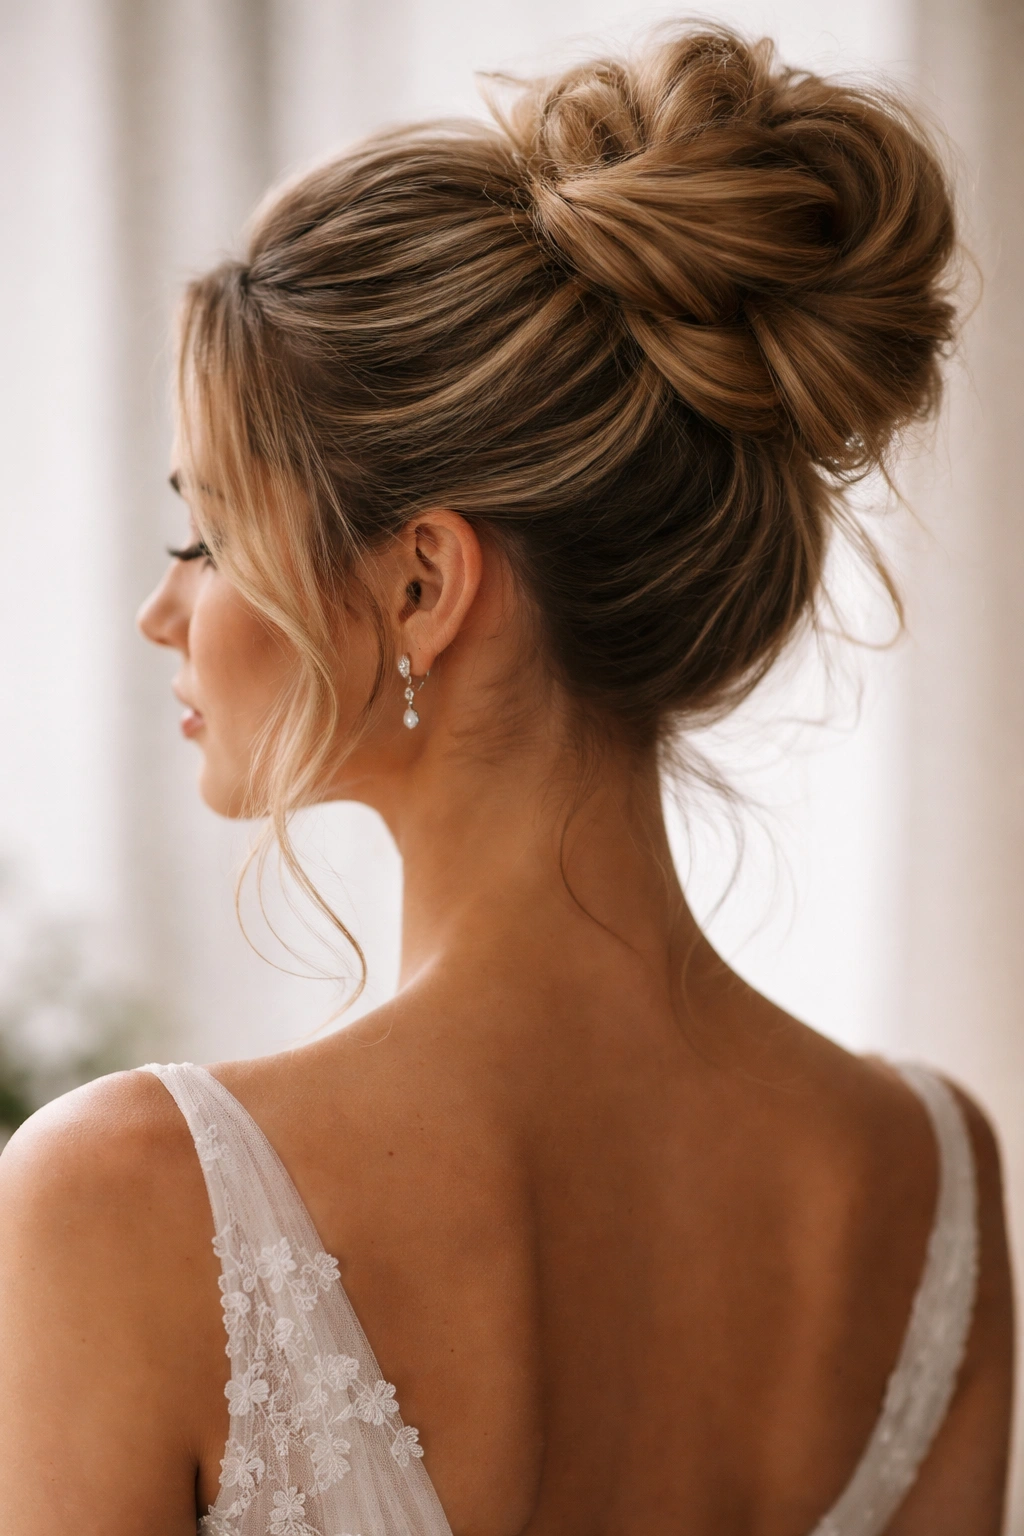
This style sits higher on your head and has more deliberate structure than a relaxed messy bun, but it maintains that softer, touchable texture that feels romantic rather than severe. You’re creating the bun with intention—each section of twisted or braided hair is clearly visible—but you’re not over-smoothing or over-pinning it into a tight, rigid style. This is an excellent choice if you want your hair to look editorial and polished while still maintaining a sense of ease and romance.
The Balance Between Structure and Softness
The difference between this style and a strict, formal updo is that you’re intentionally leaving texture visible, allowing sections of your twists or braids to be slightly loose, and not smoothing every hair into submission. You want the viewer to understand the construction (the twists, the layers, the careful pinning) without the style feeling stiff or artificial. This requires a lighter hand with hairspray and more strategic pinning than simply gathering hair and wrapping it.
How to Create It
- Create soft waves in your hair using a curling iron
- Brush through gently to create texture but not define individual curls
- Section hair into 3-4 sections
- Twist each section loosely from its roots, working toward the crown
- Pin each twisted section toward the crown in layers, allowing the twists to overlap
- Gather any remaining hair and add it to the crown, twisting it as well
- Wrap the final twist around the pinned sections to form the bun
- Gently pull sections of each twist outward to create a fuller, softer appearance
- Make sure the structure is clear (you should be able to see where each twist goes) but not rigid
- Finish with flexible-hold hairspray that allows movement
Quick Facts
- Best for: Medium to thick hair with natural wave or texture
- Difficulty level: Intermediate to advanced — the layered pinning and texture management requires practice
- Hold time: 9-11 hours; the deliberate structure provides good security
- Best for: Formal or garden weddings where your hair should feel thoughtfully styled
Worth knowing: This style requires more practice than some other messy bun styles because you’re balancing structure with softness. Take time to practice and feel how much you can loosen each twist without losing the intentional structure.
12. The Relaxed Wrapped Bun with Loose Tendrils
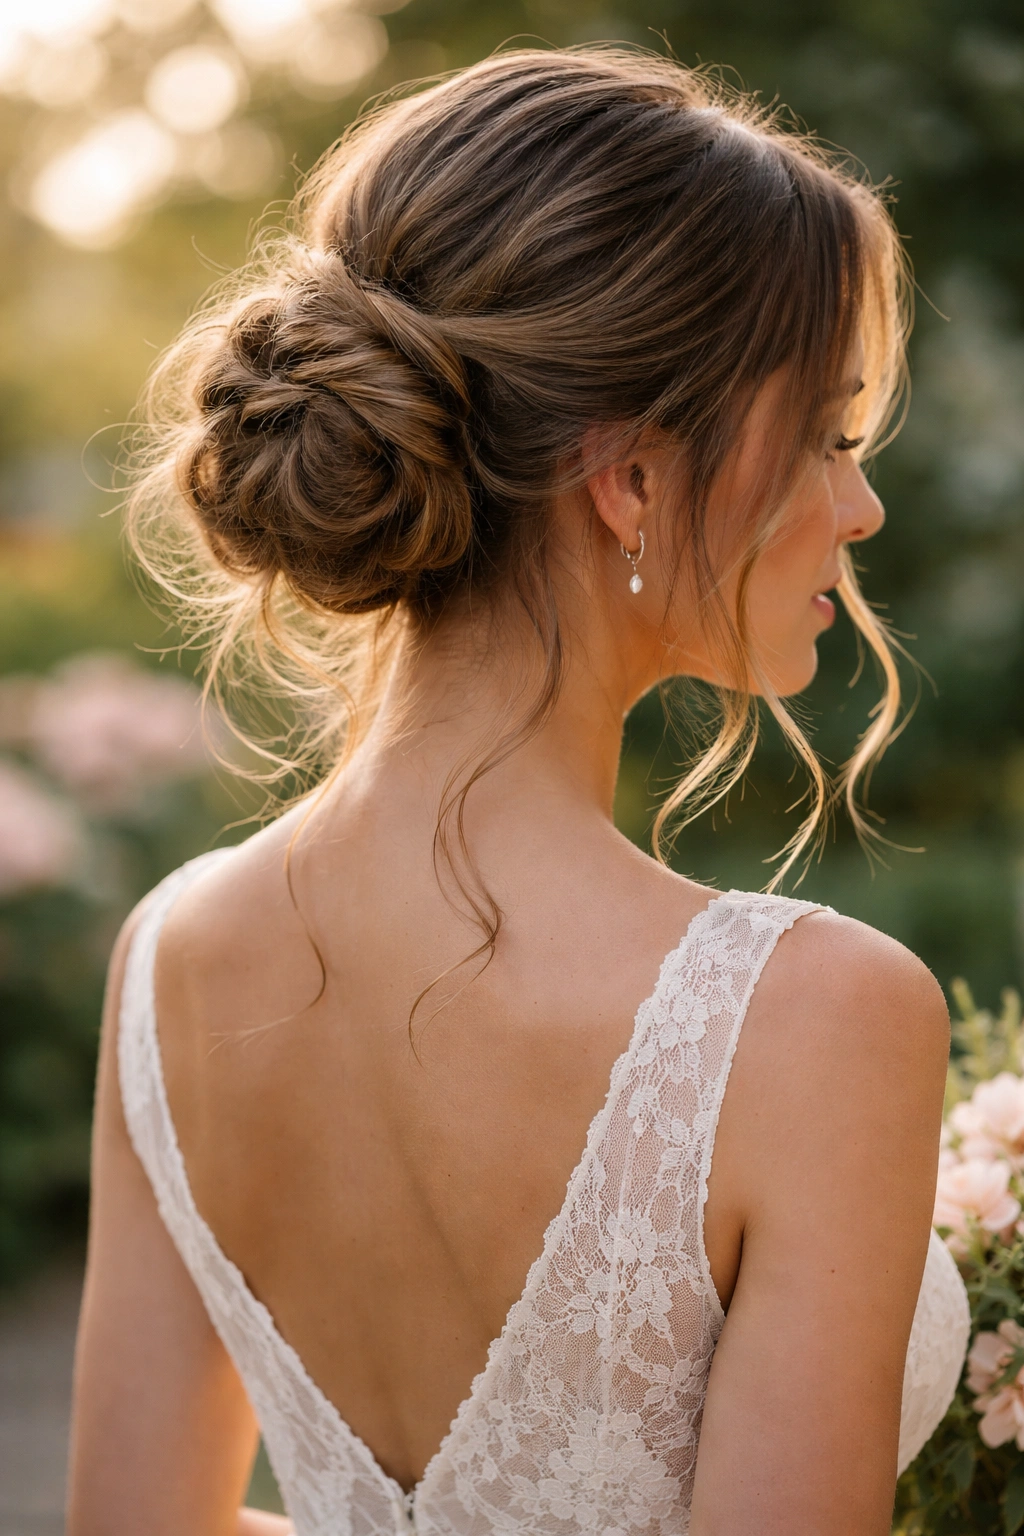
This is the style for brides who want maximum ease and romance—a bun that looks like you twisted your hair up without thinking but somehow ended up looking beautifully put-together. There’s minimal structure here, maximum softness, and plenty of pieces framing your face and neck. This works beautifully with bohemian or garden-style weddings and pairs perfectly with outdoor or informal ceremonies. It’s also the most forgiving messy bun style if you’re doing your own hair, since there’s no specific shape you’re trying to achieve.
Achieving Intentional Ease
The key to this style is starting with textured hair so that even loose, minimal pinning results in something that feels intentional rather than neglected. You’re also being strategic about which pieces you leave out—not just pulling out random strands, but releasing specific sections that frame your face and elongate your neck. The finished style should feel like the most natural version of yourself, not like you’re trying to impress anyone with your styling skills.
How to Create It
- Create soft, loose waves throughout your hair using a curling iron or overnight braiding
- Don’t brush through the waves—keep them defined and textured
- Take a section from each side of your face and pin these toward the back temporarily
- Gather the remaining hair loosely at your desired bun height
- Wrap the gathered hair around itself, not worrying about creating a neat, round shape
- Secure with just 3-4 bobby pins; you want the minimum amount of pinning needed for security
- Release those face-framing sections and let them fall naturally in their curled state
- Leave wisps and shorter pieces free around your hairline—don’t try to smooth or perfect these
- You can also leave a softer, fuller section on one side of your head, letting it fall slightly rather than pinning it all up
- Finish with texturizing spray (not heavy hairspray) so the texture stays visible and moveable
Quick Facts
- Best for: Wavy, curly, or naturally textured hair; works on straight hair if you add waves first
- Difficulty level: Beginner — this is the easiest messy bun style to execute
- Hold time: 7-9 hours; the minimal pinning means more movement, but the texture helps everything stay anchored
- Best for: Bohemian, garden, outdoor, or relaxed wedding vibes
Final note: This is genuinely the most forgiving messy bun style. If your bun isn’t perfectly round or your wrapping isn’t symmetrical, that’s actually the point—the imperfect, organic quality is what makes it work.
Final Takeaway
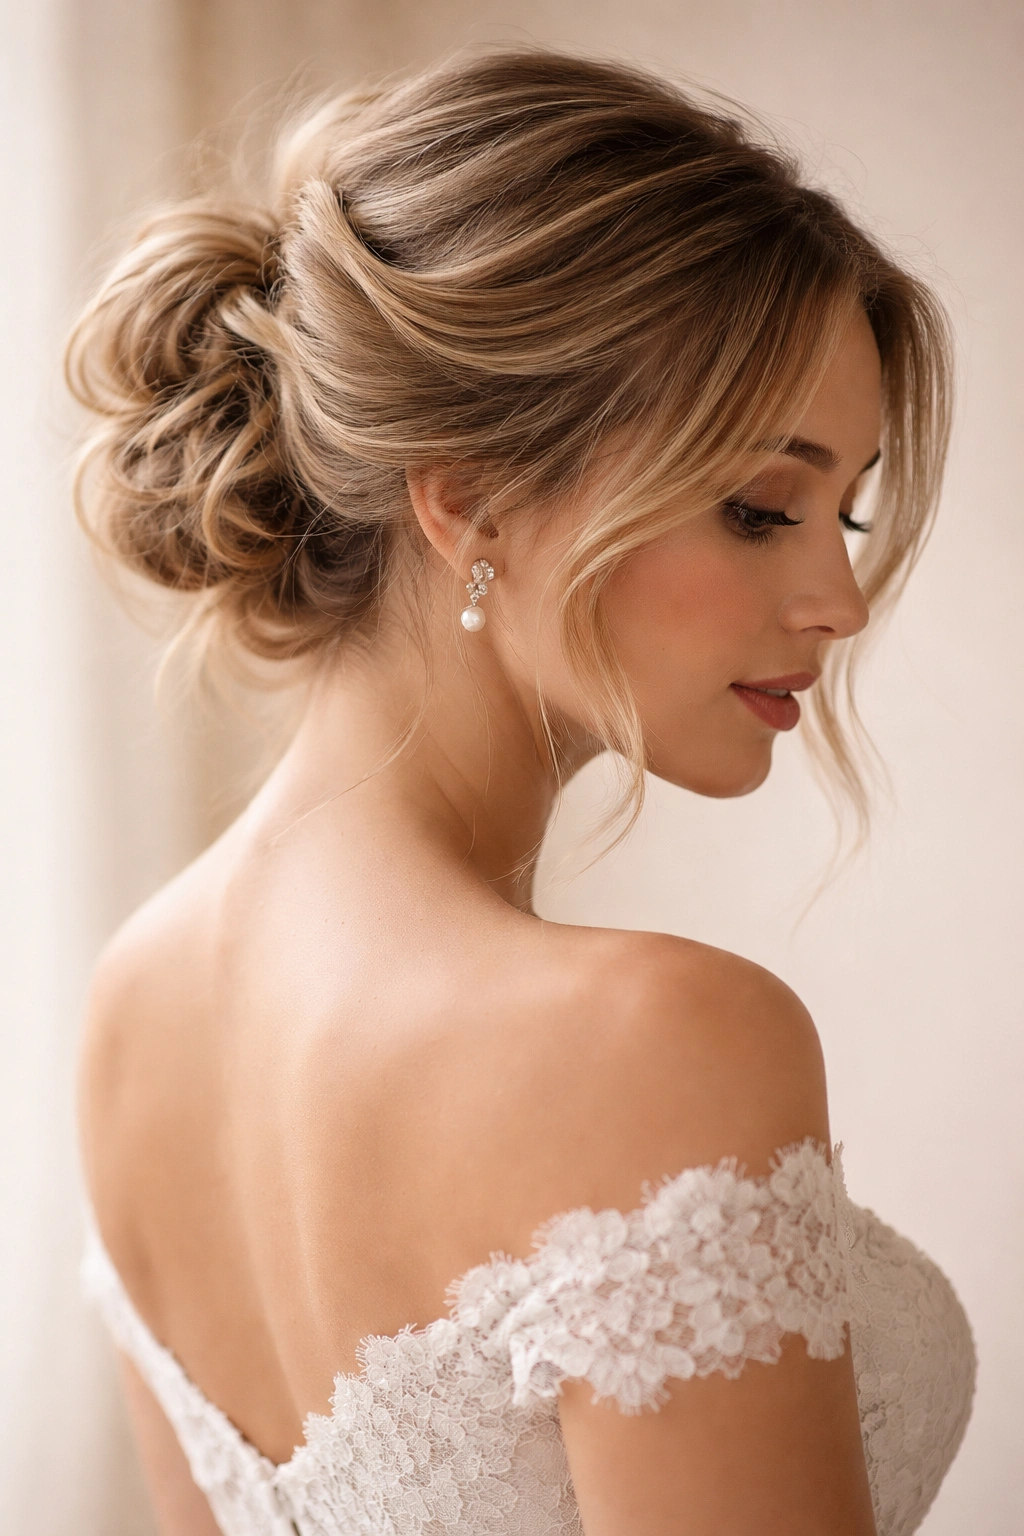
The right messy bun for your wedding day is the one that makes you feel like yourself—just elevated. Whether you’re drawn to the romantic low bun with wisps, the editorial high style with braiding, or the relaxed wrapped version that barely looks done, the best choice is the one that aligns with your wedding aesthetic, works with your hair’s natural texture, and feels secure enough that you can stop thinking about your hair and start enjoying your day.
The execution matters far less than the intention. Practice your chosen style at least twice before your wedding—once to learn the technique and once to build confidence. Consider doing a trial run with your wedding-day hair products and styling tools. On the morning of your wedding, give yourself extra time, use texturizing products or waves as your foundation, and remember that the slightly imperfect pieces are what make a messy bun photograph beautifully and feel authentically romantic.
