With long hair comes endless styling possibilities, and the ponytail stands as one of the most versatile and timeless options in your arsenal. Whether you’re rushing out the door for work, heading to the gym, or getting ready for an evening event, a well-executed ponytail can transform your entire look in minutes. The beauty of long hair is that it gives you the length and volume to create dozens of distinct ponytail variations—from sleek and polished to romantic and undone. Each style communicates something different about your mood and aesthetic, yet they all share that practical advantage of getting hair off your face while looking intentional and put-together.
The challenge, though, is knowing which ponytail style actually flatters your face shape, matches the occasion, and works with your specific hair texture. Not every ponytail works the same way on fine, delicate strands as it does on thick, coarse hair. Some styles photograph beautifully but take forever to create on a busy morning, while others come together in under two minutes and somehow look even better by the end of the day. This guide walks you through 15 ponytail styles that work beautifully on long hair, with the exact technique to nail each one, the best occasions for wearing them, and honest tips on what actually works versus what looks good in theory.
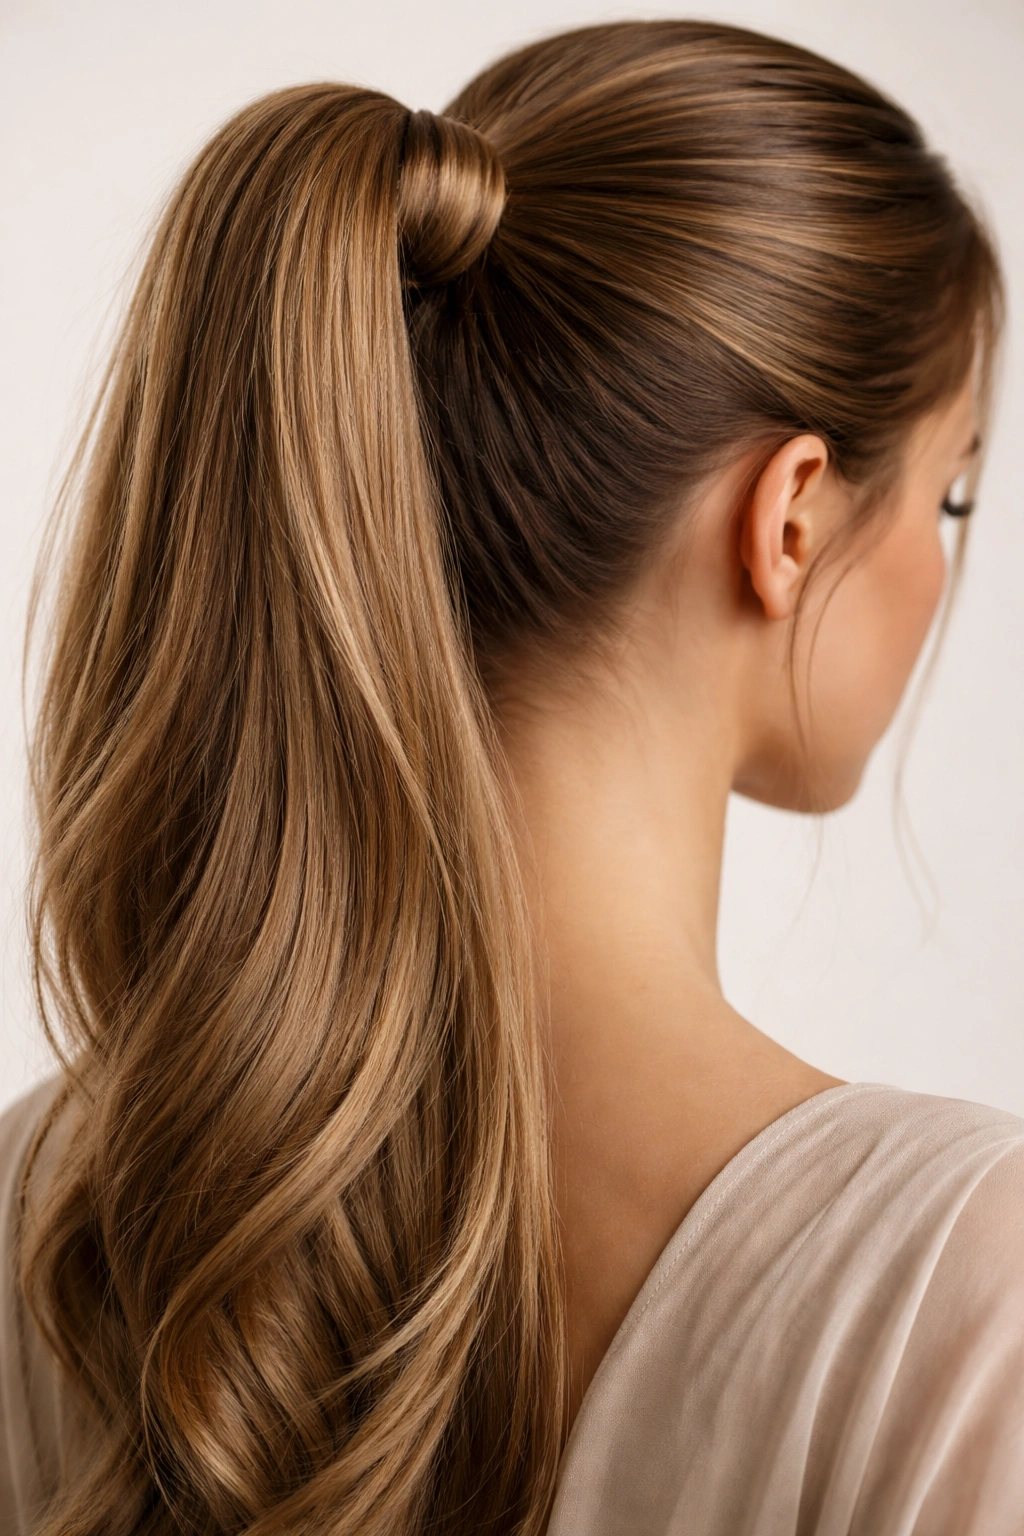
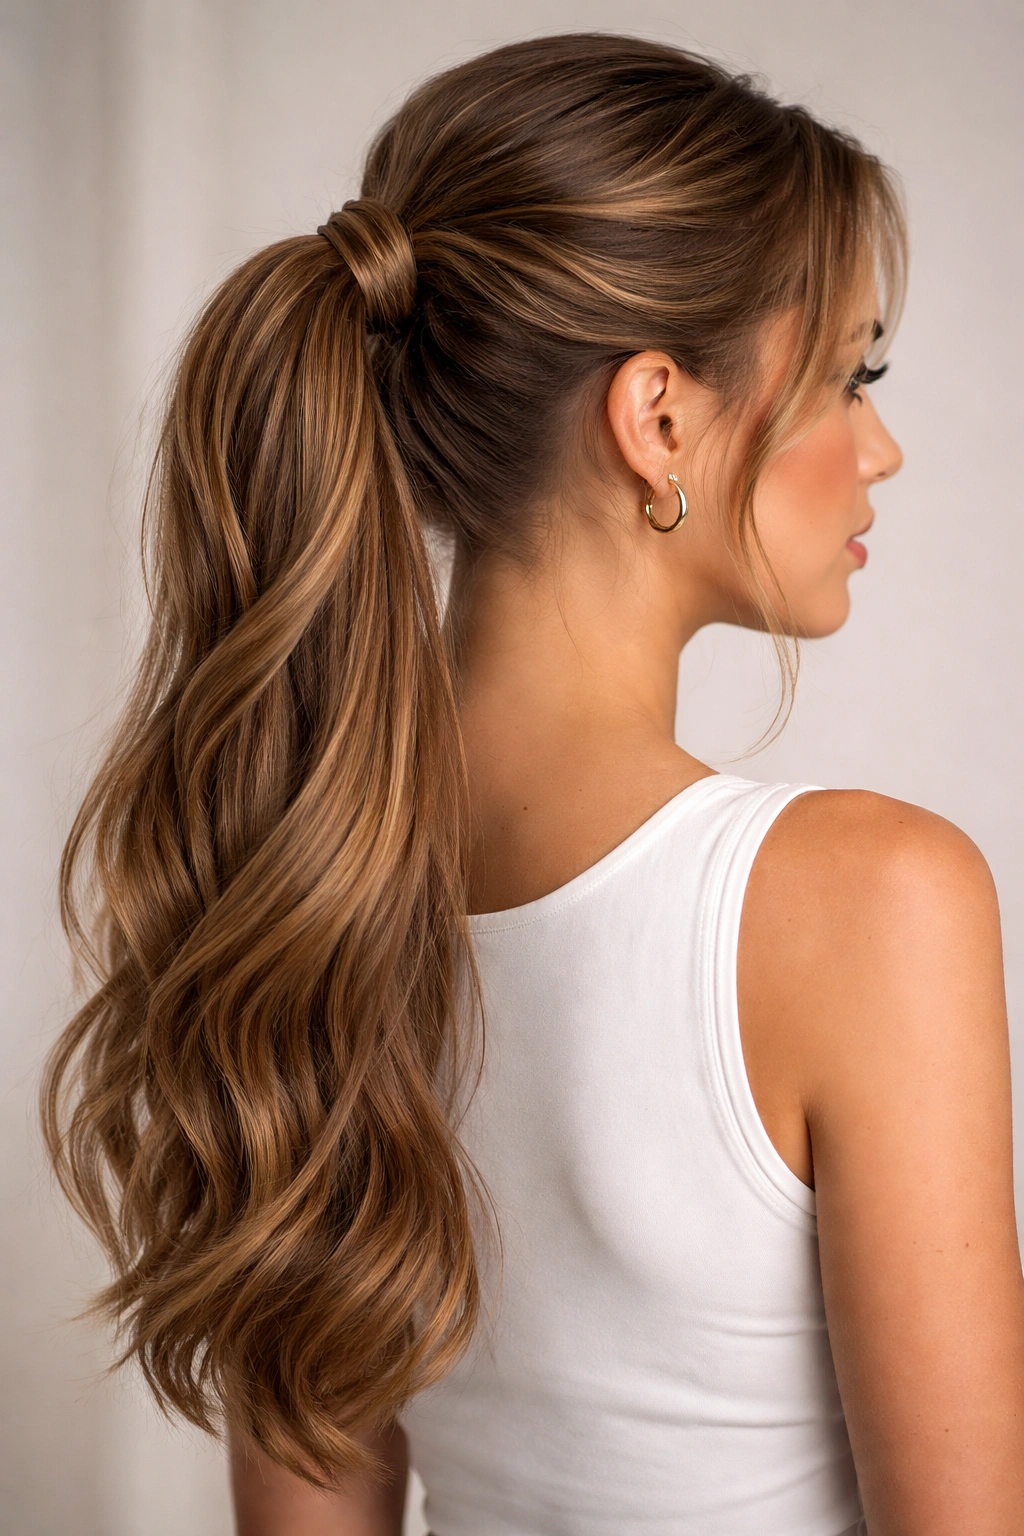
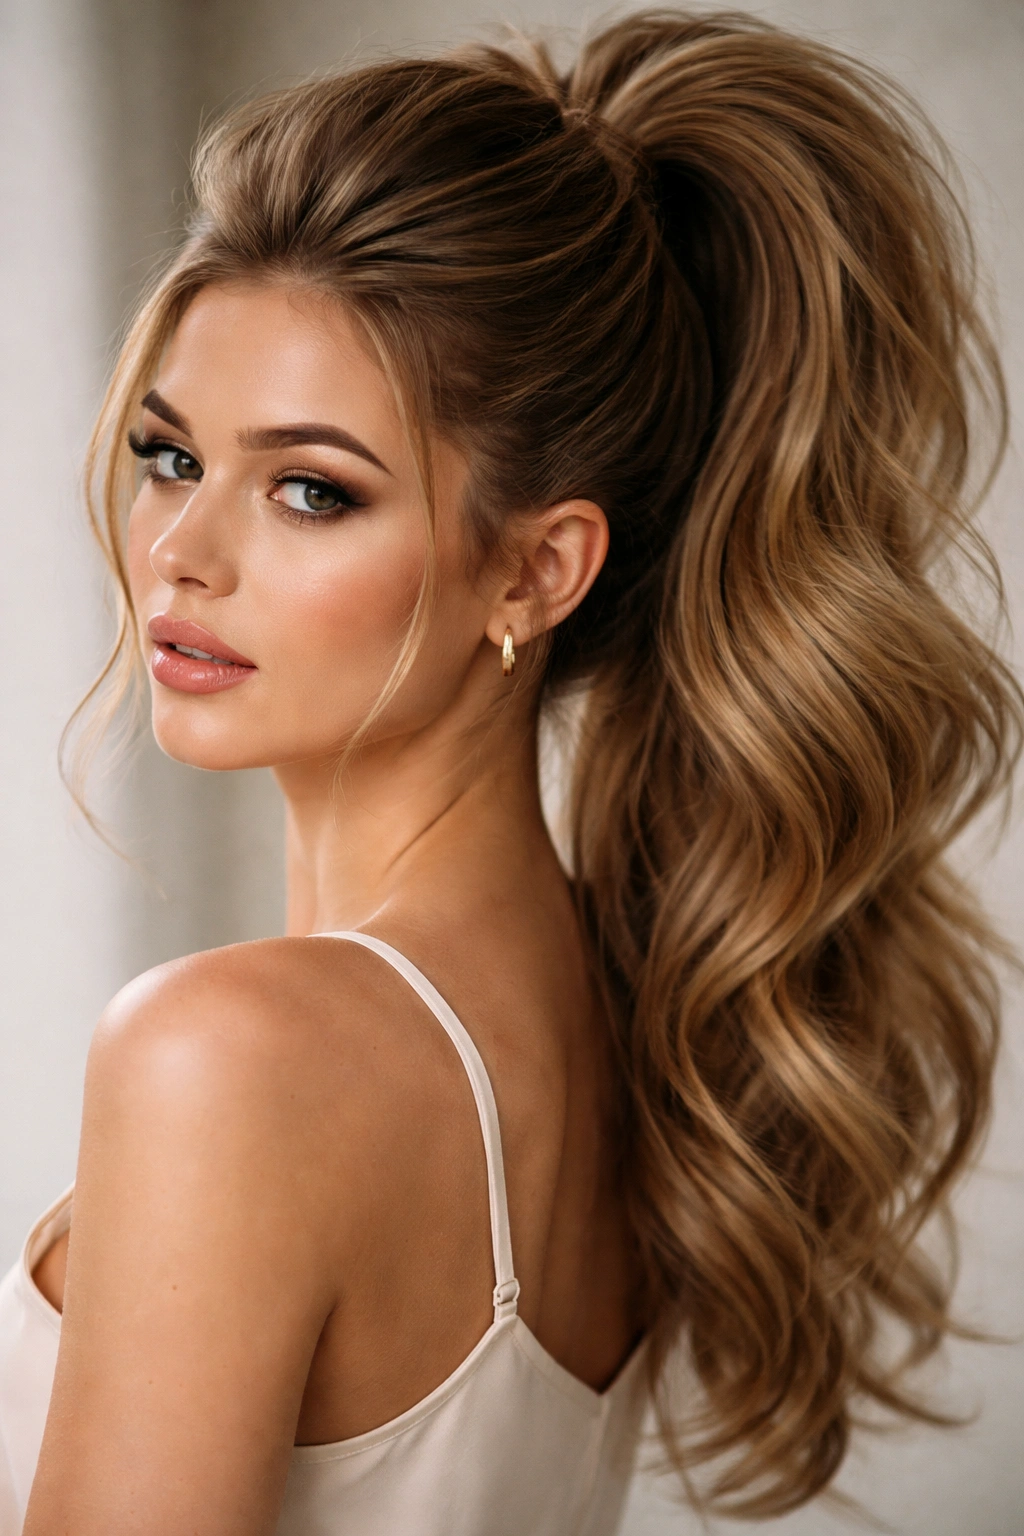
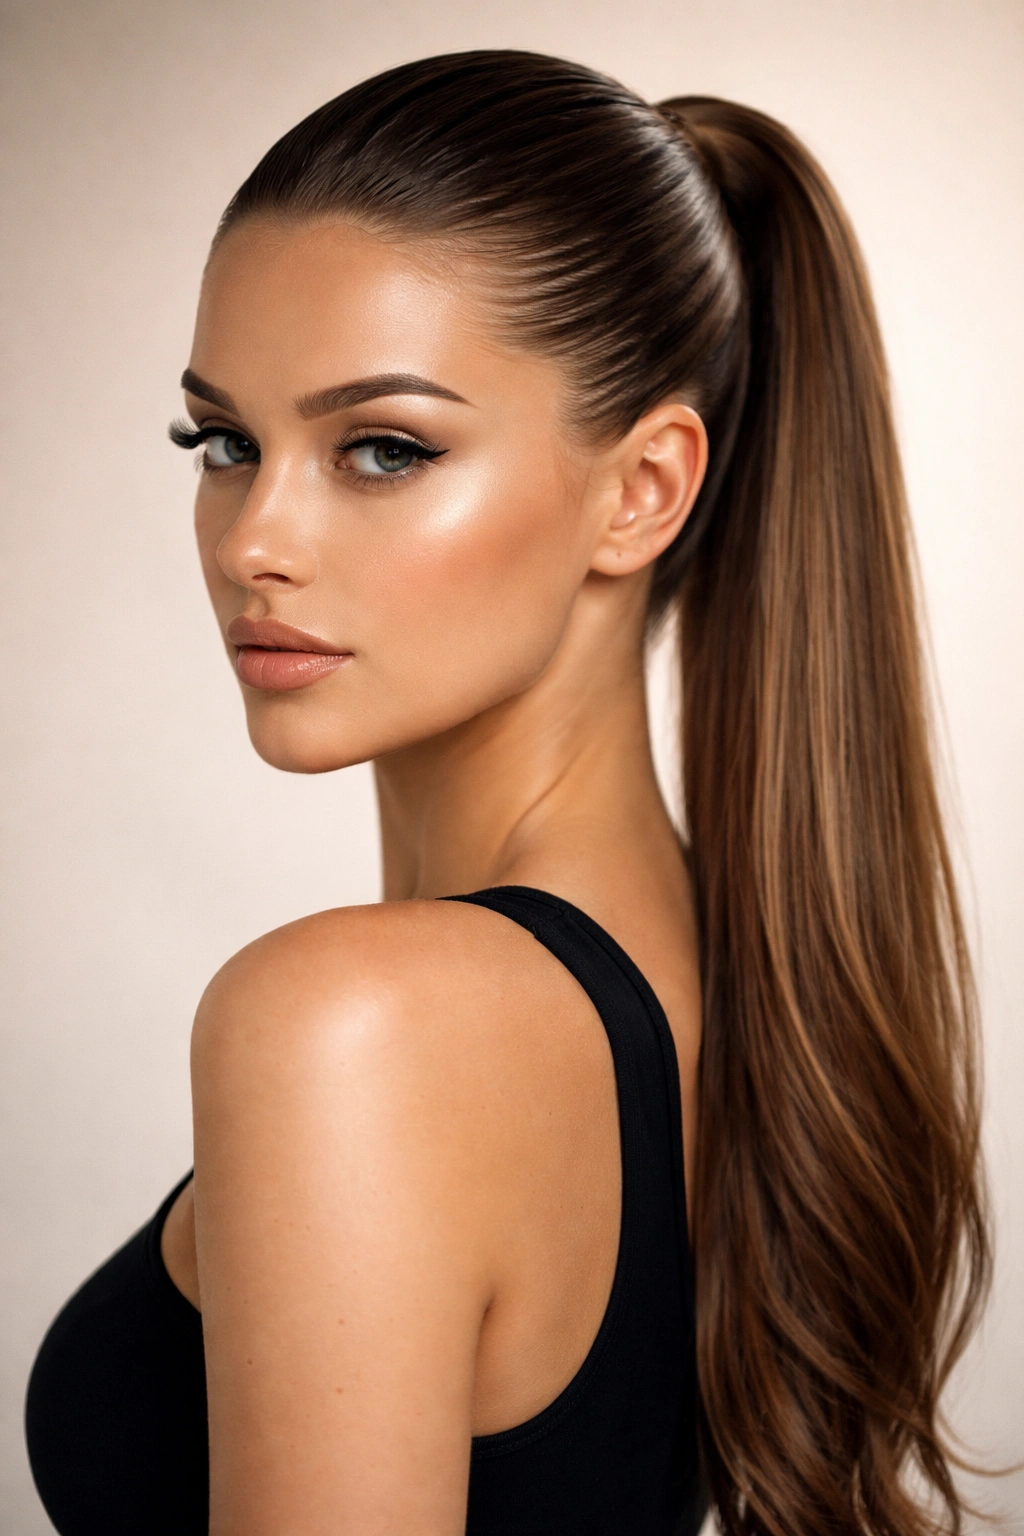
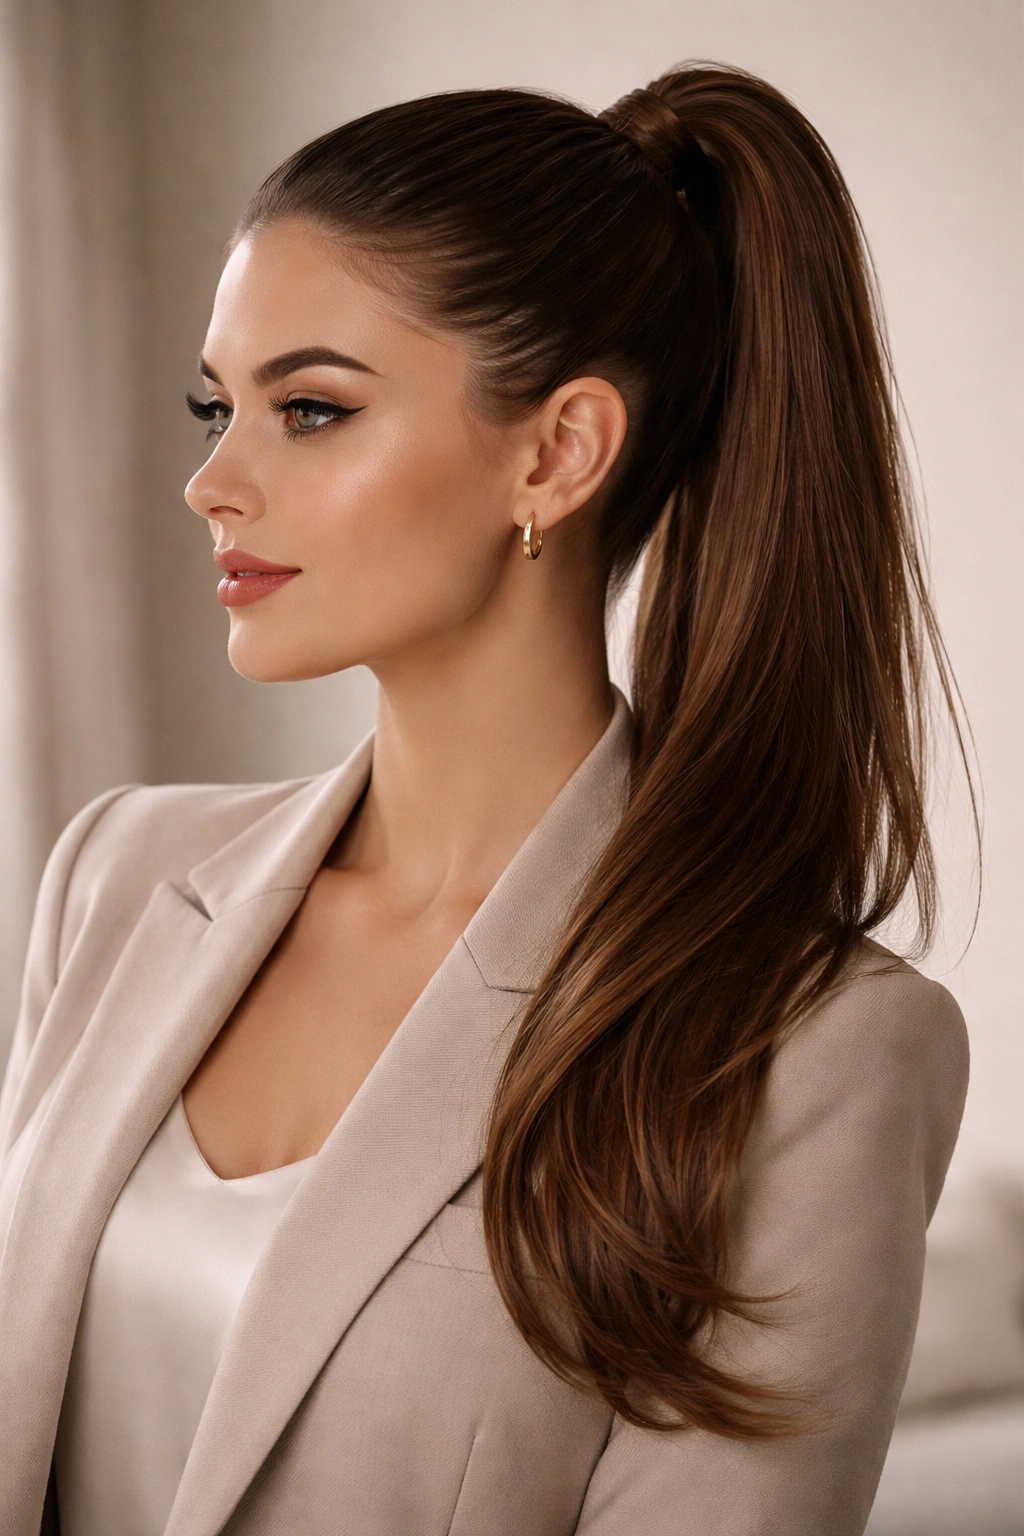
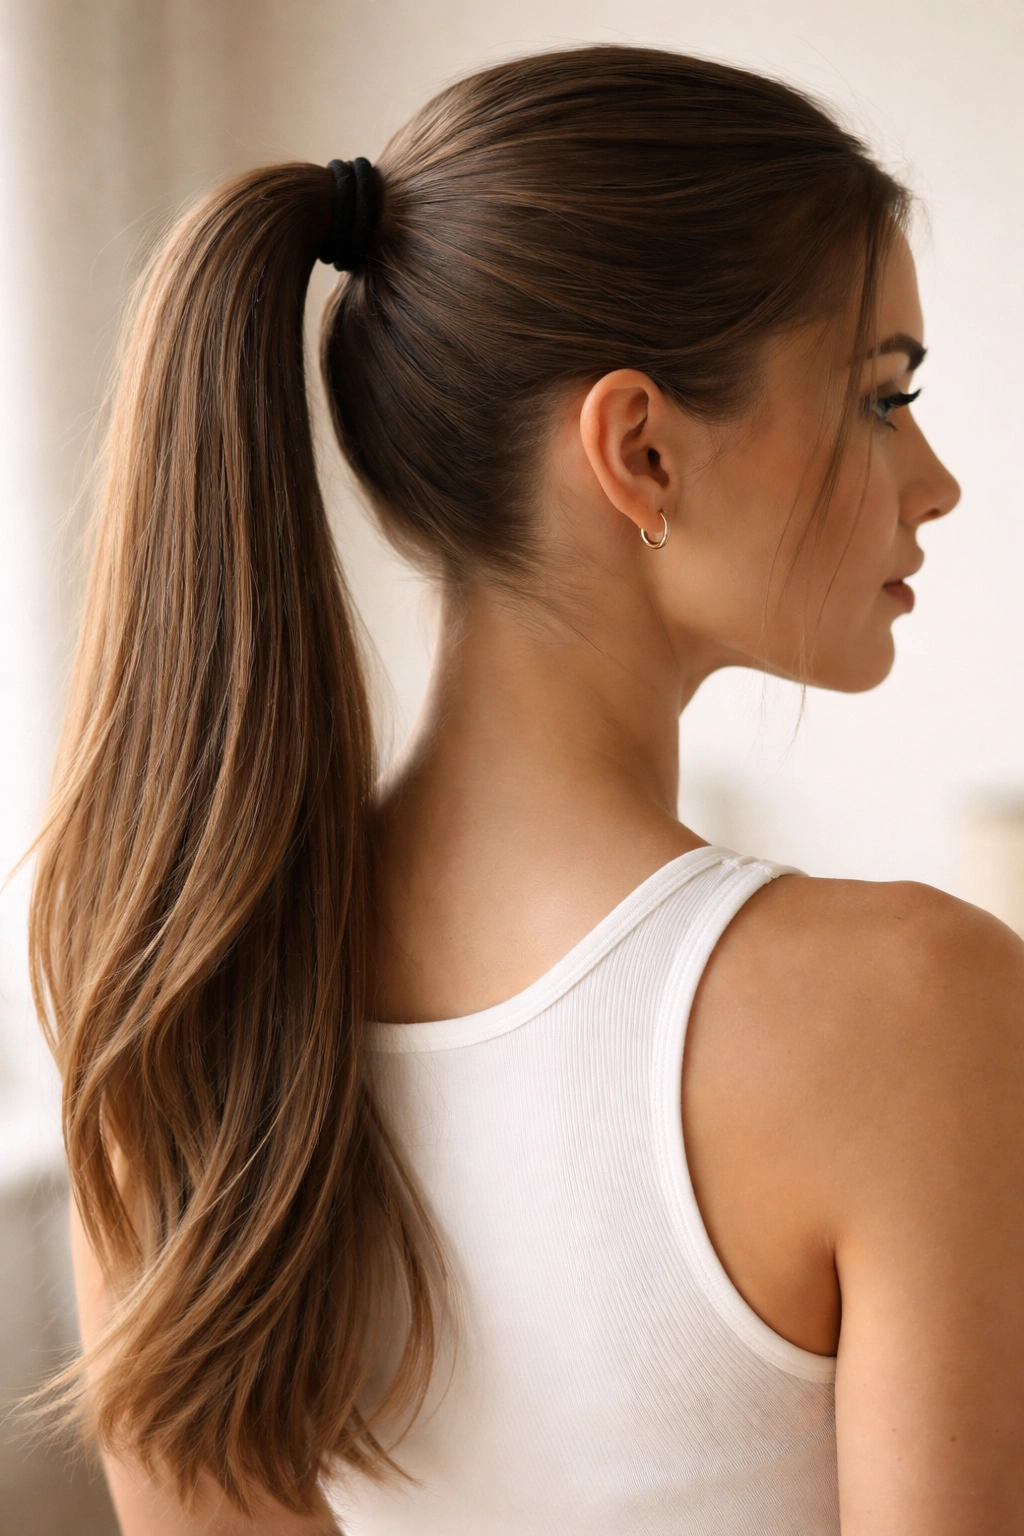
1. Classic High Ponytail
The high ponytail is the foundation style that every long-haired person should master—it’s elegant, energetic, and surprisingly versatile depending on how you finish it. This style works because the height creates an instant lift and makes your face appear fresher and more awake, which is why it’s beloved by both stylists and people heading to the office or gym.
Why It Remains Timelessly Flattering
A high ponytail sits at the crown of your head and works across nearly every face shape when positioned correctly. The elevated placement opens up your face and draws attention upward, creating a lengthening effect that’s especially flattering if you have a rounder or wider face. The key is securing it high enough to feel intentional—aim for the crown, not halfway between your crown and ears, which can actually drag your face down visually.
How to Create the Perfect High Ponytail
- Brush your hair smoothly from front to back, using a fine-tooth comb to catch any flyaways before they become a problem
- Tip your head back slightly and use a firm grip to gather hair at the crown—this helps ensure you’re placing it at the actual highest point
- Secure with a sturdy elastic that won’t slip as the day goes on; hair that slips down throughout the day looks messy rather than intentionally undone
- Smooth down any baby hairs with a light pomade or edge control to keep the look polished and finished
- For extra hold and shine, wrap a thin section of hair around the elastic base and pin it underneath—this hides the elastic entirely and looks refined
Pro tip: If your hair is fine or thin, tease gently at the crown before securing the ponytail to create the illusion of fullness and prevent the style from looking limp.
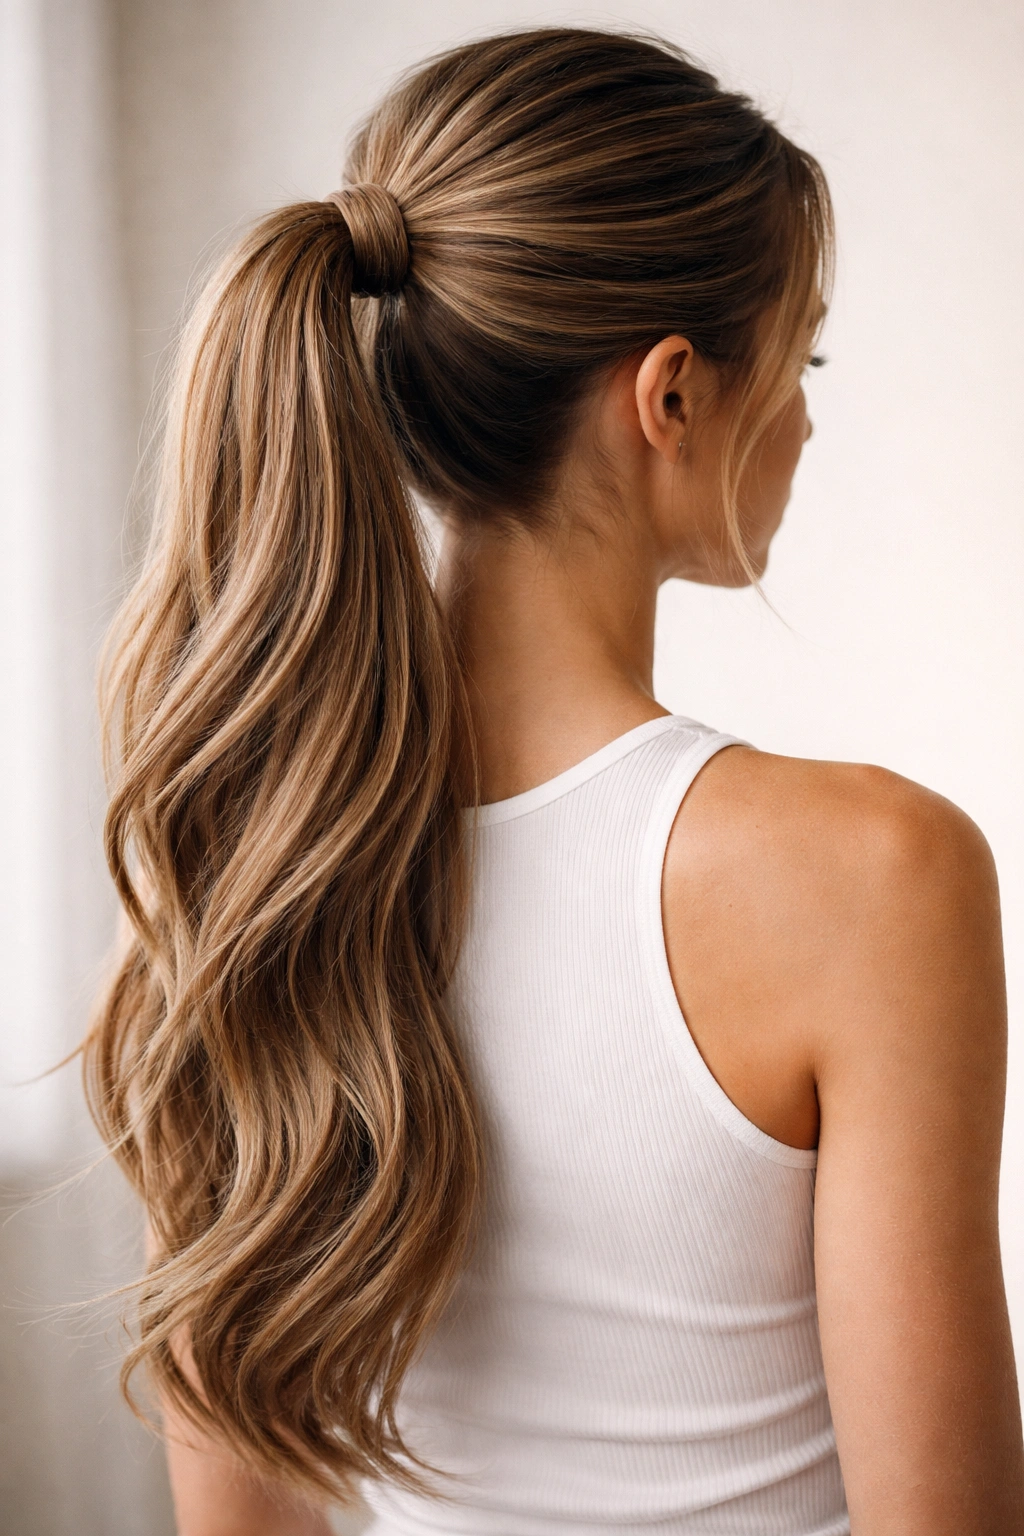
2. Low Sleek Ponytail
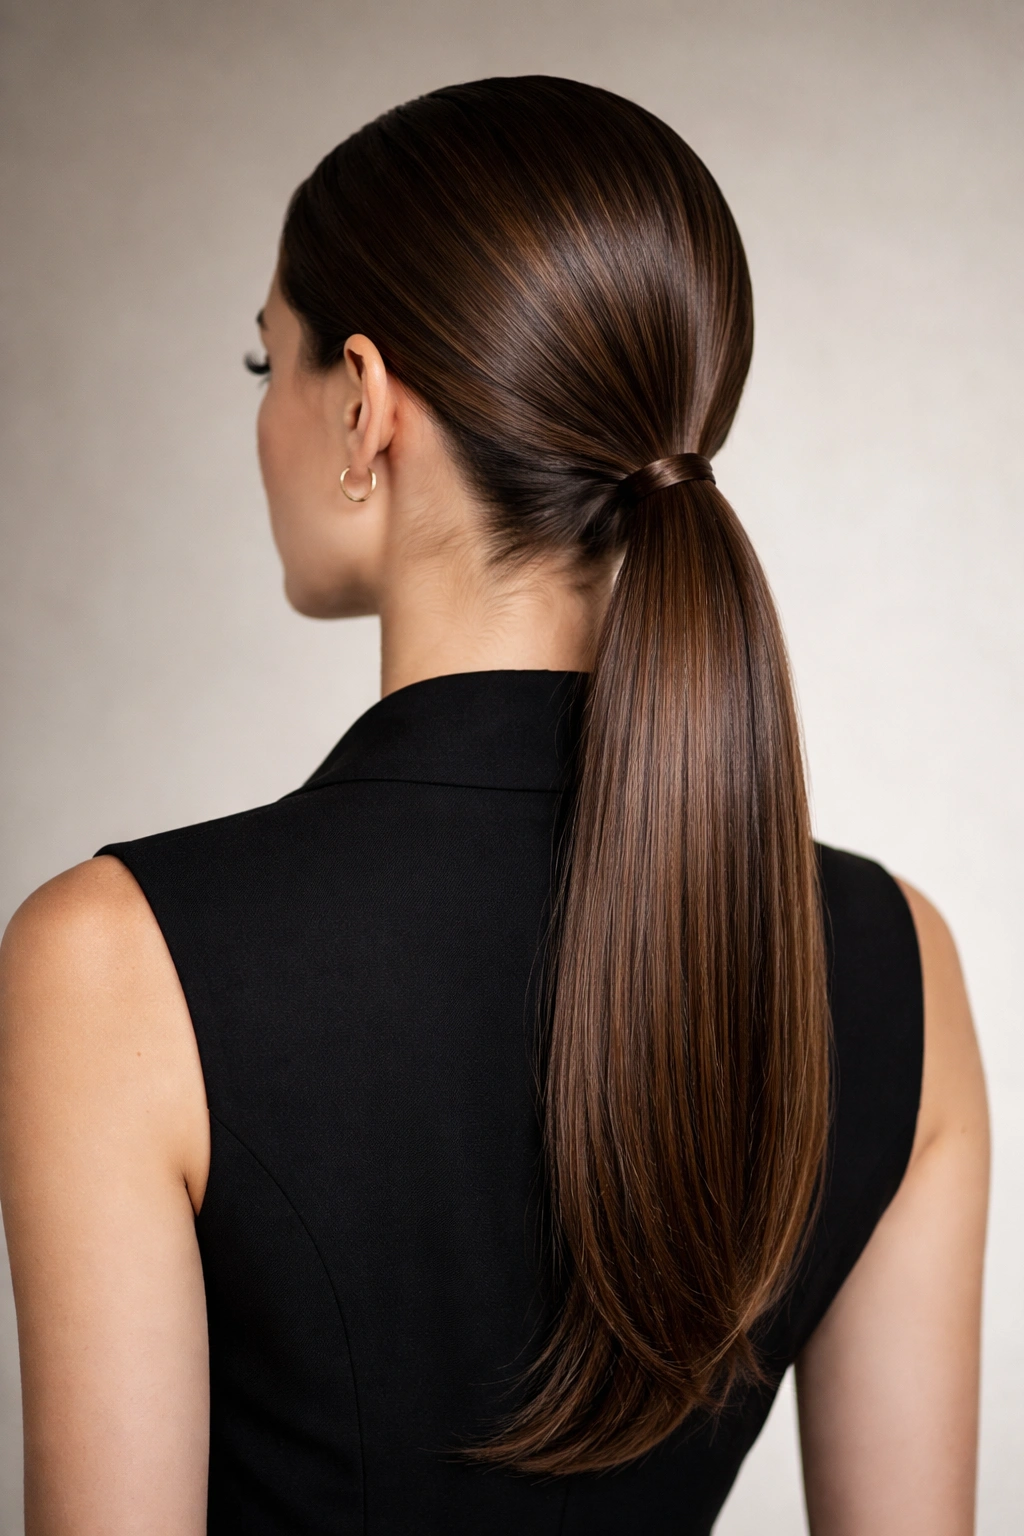
The low ponytail is the sophisticated, polished cousin of the high style—it’s what you wear when you want to look serious, elegant, and completely in control. Positioned at the nape of your neck, this style elongates your face and creates an understated elegance that works for boardrooms, date nights, and professional settings where you want your competence to speak louder than your style.
The Power of Positioning and Sleekness
The low ponytail’s magic lies in its simplicity and the obsessive attention to smoothness required to make it look expensive. Every strand pulled tight, no flyaways, no wisps—this is a style that whispers rather than shouts. It works especially well on longer hair because the length creates drama even when the placement is minimal, and the weight of the hair naturally smooths it into submission.
Creating a Salon-Quality Low Ponytail
- Apply a smoothing serum or anti-frizz cream to damp hair before blow-drying to create a polished foundation
- Blow-dry with a paddle brush, keeping tension on the hair to increase smoothness and shine
- Create a deep side part if you want to add asymmetrical interest, or center-part for classic symmetry
- Brush back into a low position at the nape—the elastic should sit roughly where your neck begins
- Use a fine-tooth comb to smooth the back thoroughly and eliminate any bumps or texture
- Secure with a sleek elastic (consider velvet or silk to reduce breakage), then wrap a thin strand of hair around the base
Insider note: A light spritz of hairspray before securing the ponytail helps keep flyaways at bay for hours, and applying a tiny bit of pomade to your brush before smoothing the back adds both shine and staying power.
3. Textured High Ponytail
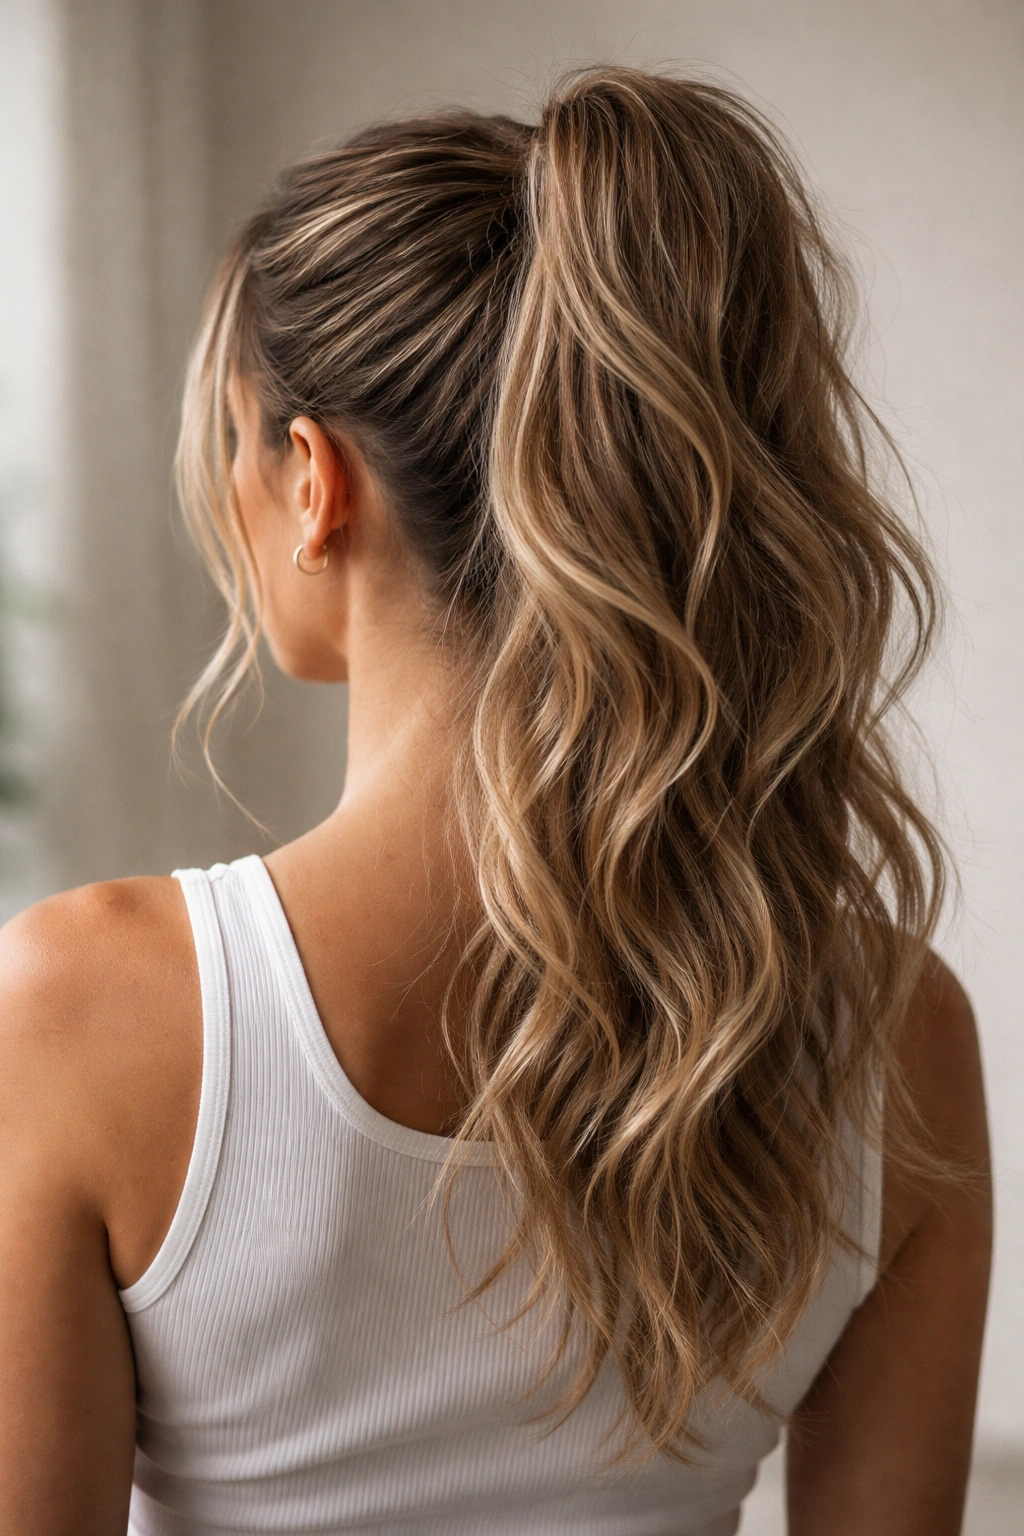
While the classic high ponytail demands sleekness, the textured version celebrates movement, dimension, and a slightly undone energy that still feels intentional. This style works beautifully on long hair because the length shows off waves, curls, or beachy texture without the hair becoming too heavy or frizzy.
Why Texture Adds Sophistication Rather Than Messiness
A textured ponytail occupies this perfect middle ground between “I spent time on this” and “I woke up like this.” The texture breaks up the severity of a sleek style and adds visual interest, while the secured placement keeps everything contained and intentional. It’s the ponytail for people who love their natural wave pattern or who’ve spent time creating gorgeous curls and don’t want to smooth them away entirely.
Building the Perfect Textured High Ponytail
- Start with second-day hair or create waves using a curling iron, focusing on the mid-lengths and ends rather than the roots
- Flip your head upside down and gather the hair loosely, allowing the waves to maintain their shape rather than flattening them
- Secure with an elastic at the crown, but don’t pull it so tight that the texture compresses
- Use your fingers to gently tousle the secured ponytail, separating the waves and fluffing the overall volume
- Take a few small sections from around the sides and wrap them around the elastic base for a softened, less severe look
- Finish with a texturizing spray or dry shampoo to enhance the movement and add grip
Worth knowing: If your waves are loose or subtle, apply a curl-defining cream before the ponytail to intensify the texture, and avoid smoothing serum which can flatten the movement you’ve worked to create.
4. Side Ponytail
The side ponytail shifts the placement dramatically, moving the gathered hair from center to one side and creating an asymmetrical silhouette that’s playful, romantic, and flattering for nearly every face shape. This style works especially well on long hair because the side placement gives the length somewhere beautiful to fall.
Why Side Placement Changes Everything
A side ponytail softens your face in ways a centered style can’t match—it draws attention toward one side of your face while creating gentle movement on the other. This asymmetry is deeply flattering because faces are rarely perfectly symmetrical, and working with that reality rather than against it creates more natural, individualized beauty.
Mastering the Side Ponytail Technique
- Create soft waves throughout your hair using a curling iron or by braiding damp hair overnight
- Tip your head to one side and gather the hair, positioning the elastic about two inches below where your ear sits
- The ponytail should rest on the front of your shoulder rather than directly on your neck
- Pull only as firmly as you want movement—side ponytails look better with a touch of softness than pulled tight
- Take a thin section from the underside of the ponytail and wrap it around the elastic, pinning underneath
- Leave a few face-framing pieces loose on the opposite side to balance the asymmetry
Pro tip: Vary which side you wear the ponytail on throughout the week to prevent repetitive creasing and to protect your hair from always being pulled in the same direction, which can weaken it over time.
5. Half-Up Ponytail

The half-up ponytail bridges the gap between down and up, gathering only the top section of hair while leaving the lower half loose. This hybrid style is endlessly wearable because it gives you the benefit of pulled-back hair without the dramatic change in silhouette, and it works beautifully on long hair because the loose length creates beautiful dimension.
The Strategic Beauty of Partial Styling
A half-up style keeps hair out of your face without fully committing to an updo, making it perfect for workdays, casual hangouts, or any time you want your hair to feel more managed without looking overly styled. The style also works with nearly any hair texture—you can make it sleek, textured, curled, or wavy depending on your mood and the occasion.
Creating a Polished Half-Up Style
- Brush your hair back smoothly and identify the natural line at your temples
- Gather only the top section—starting from one temple, going back and across your crown, and ending at the opposite temple
- Secure this section with an elastic at the crown, positioning it high enough that it’s clearly intentional
- Release the lower section completely so it falls freely and creates the contrast that makes the style interesting
- Smooth any bumps or ridges where the upper section meets the lower section using a fine-tooth comb
- Add movement to the full-length lower section by curling or waving it for maximum visual impact
Worth knowing: If you want more volume at the crown, tease the top section gently before securing it, which lifts the entire upper half and creates a more dramatic silhouette.
6. Braided Ponytail
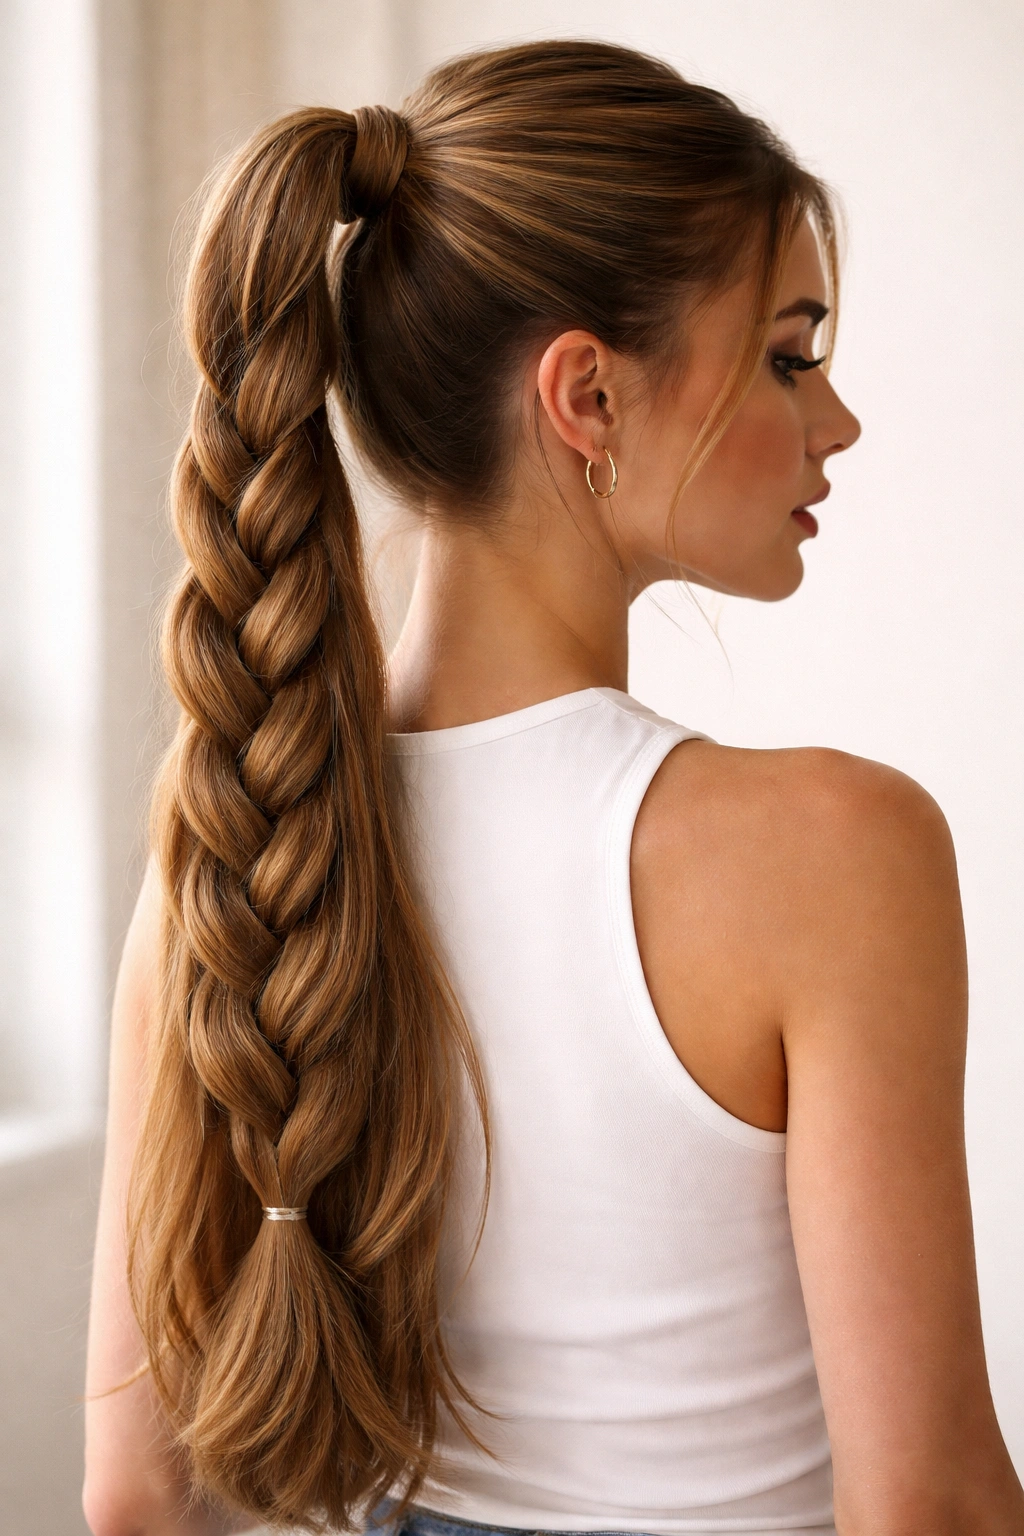
A braided ponytail weaves texture and detail into the secured section, elevating a simple style into something that looks like you spent serious time on it. The braiding adds visual complexity while being surprisingly easy to execute, and on long hair, the length of the braid makes the entire style feel more substantial and intentional.
Why Braids Add Instant Dimension
A braid transforms a basic ponytail by adding texture, movement, and visual interest that catches light differently than smooth hair. Braids also create a subtle traction that helps the ponytail stay secure longer, and they’re forgiving—slight imperfections in a braid actually add to the charm rather than detracting from it.
Your Step-by-Step Braided Ponytail Technique
- Gather your hair into a high or mid-height ponytail using your preferred technique—sleek, textured, side, or center
- Take the full ponytail and divide it into three even sections
- Create a classic three-strand braid, keeping the tension consistent but not so tight that it flattens
- Secure the braid at the end with a small elastic, then gently pull the braid slightly to loosen it and add volume
- For extra dimension, wrap a thin strand of hair around the base of the ponytail before the braid begins
- Finish the braid’s end with a decorative elastic, ribbon, or metallic tie for polish
Pro tip: If you want the braid to appear fuller and more textured, do a Dutch braid (reverse three-strand braid) instead of a regular braid—the inverse direction creates more visual dimension and looks richer.
7. Wrapped Ponytail
A wrapped ponytail takes the elegance of a simple style and adds unexpected detail by wrapping a thin section of hair around the elastic base. This detail transforms an everyday ponytail into something that looks professionally styled and significantly more refined, yet it takes all of 30 seconds to execute.
The Impact of Minimal Details Done Right
The wrap is one of those styling tricks that looks deceptively simple but communicates that you know what you’re doing. It completely hides the elastic, which instantly makes any ponytail look more polished and intentional. The technique works on every ponytail variation—high, low, side, or braided.
The Perfect Wrap Technique Explained
- Secure your ponytail as desired using your chosen method (sleek, textured, high, low)
- Take a thin, one-inch section of hair from the underside of your ponytail, directly below the elastic
- Wrap this section tightly around the elastic base, going around the full circumference
- As you complete the wrap, tuck the end underneath and secure it with a bobby pin that matches your hair color
- The wrap should sit snugly against the elastic without gaps or loose spots
- For extra hold, apply a tiny bit of clear nail polish to the bobby pin before inserting it—this prevents it from slipping
Insider note: Thin-haired people should take a slightly thicker section for the wrap so it’s visible and impactful, while thick-haired people can take thinner sections because even small wraps look substantial against all that volume.
8. Bubble Ponytail
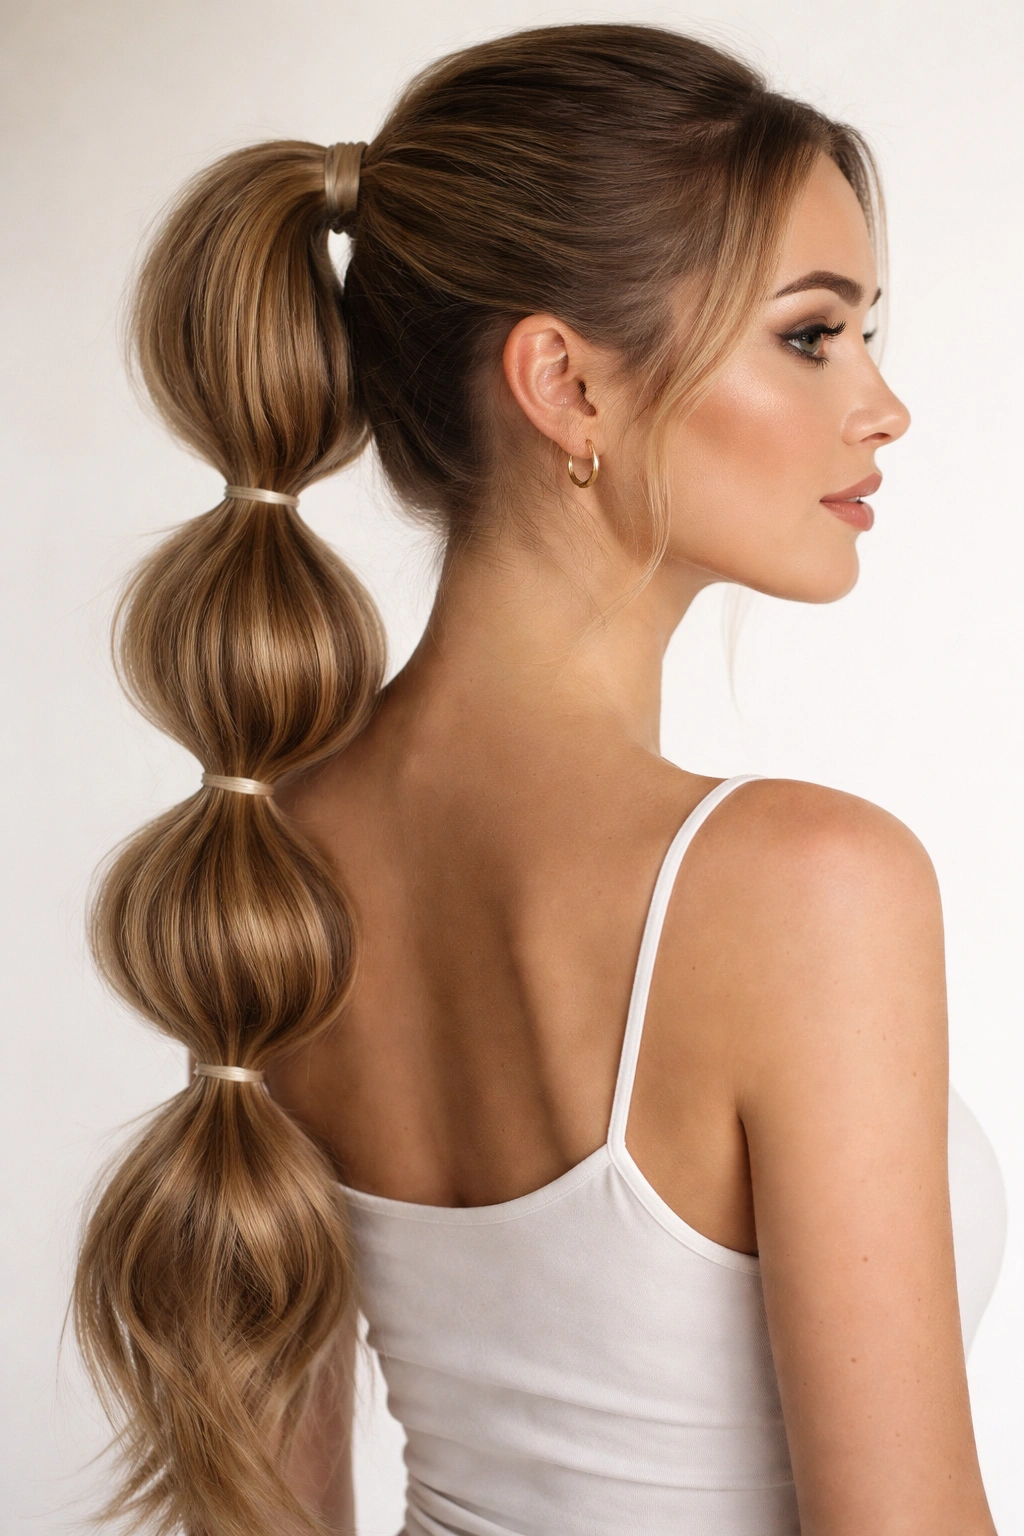
A bubble ponytail divides a single ponytail into multiple segments using strategically placed elastics, creating a playful, dimensional look that’s surprisingly flattering on long hair. Each “bubble” is its own distinct section, creating visual rhythm and catching light beautifully throughout the length of the hair.
Why Bubble Ponytails Deserve More Attention
This style works because it breaks up the visual weight of long hair while keeping everything secured and tidy. Bubble ponytails look modern and fashion-forward without being difficult to execute, and they work on straight, wavy, or curly hair. The segmented structure also makes the ponytail look fuller and more voluminous than a single, smooth ponytail because each bubble has its own dimension.
Building Your First Bubble Ponytail
- Secure a high or mid-height ponytail with your first elastic, keeping it fairly tight
- About two inches below the first elastic, wrap a second elastic around the ponytail
- Gently pull the section between the two elastics outward and slightly upward to create the “bubble” shape
- Position the second elastic so the bubble is visible and intentional, not flat against your head
- Repeat this process down the length of your ponytail, spacing bubbles evenly (usually two to four bubbles depending on hair length)
- Each new bubble will naturally incorporate the previous section, creating seamless transitions
- After placing all elastics, go through and gently tousle each bubble to add volume and texture
Worth knowing: Bubble ponytails photograph beautifully and work wonderfully for events, parties, or any occasion where you want a style that’s interesting from multiple angles.
9. Sleek Low Bun

While technically a bun rather than a ponytail, the low bun deserves inclusion because long hair is essential for creating a full, substantial bun that actually looks intentional rather than sparse. A low bun is the ultimate polished style—it works for corporate settings, formal events, and any situation where you want to communicate quiet confidence and complete control.
What Makes a Bun Different From a Ponytail (And Why It Matters)
A bun takes the secured hair and coils it into a knot rather than leaving it as a ponytail, which changes both the silhouette and the energy of the style. Buns feel more formal, more finished, and more intentional than ponytails. On long hair, this means you can create a bun with volume and visual presence that doesn’t look wispy or thin.
Creating a Sleek, Structured Low Bun
- Begin with a smooth, sleek low ponytail secured at the nape of your neck
- Twist the entire ponytail tightly, creating a rope-like structure
- Coil this twist around the base of the ponytail, tucking the end underneath
- Secure with bobby pins inserted strategically to hold the shape—aim for at least three to four pins
- Smooth any flyaways with edge control and a fine-tooth comb
- For extra polish, wrap a thin strand of hair around the base where the bun meets the nape
- Finish with a light hairspray to set the shape for the entire day
Pro tip: If your bun feels loose or wobbly, you haven’t twisted tightly enough—redo it with more tension and it will hold much better throughout the day.
10. Twisted Ponytail
A twisted ponytail combines the simplicity of a basic ponytail with the elegance of twisted sections, creating a style that looks more intricate than it actually is. The twists add visual interest and texture without requiring braiding skills, making this style accessible to anyone.
The Versatility of Twisted Details
Twists can be incorporated into a ponytail in numerous ways—you can twist the entire ponytail after securing it, twist sections of hair before securing them into the ponytail, or create twisted face-framing pieces that feed into a simple ponytail. Each approach creates a different visual effect, from romantic and feminine to modern and architectural.
Three Ways to Create a Twisted Ponytail
- Twisted sections flowing in: Take a section of hair from one side of your head and twist it tightly, then gather it with the rest of your hair when creating the ponytail. Repeat on the other side. This creates face-framing twists that lead into the secured section.
- Twisted around the base: Secure your ponytail as usual, then take small sections and twist them individually around the elastic base, pinning each twist as you go. This creates a textured, sculptural look at the crown.
- Twisted ponytail tail: After securing your ponytail, divide it into two sections and twist each one, then wrap the two twisted sections around each other to create a spiral effect down the length of the ponytail.
Worth knowing: Twisted ponytails photograph beautifully and look especially good on people with wavy or naturally textured hair because the twists showcase the existing movement.
11. Voluminous Teased Ponytail
A teased, or backcombed, ponytail creates dramatic volume at the crown and throughout the secured section—perfect for people who love drama, for special occasions, or for anyone with fine hair who wants their ponytail to look fuller and more substantial than it naturally does.
Why Strategic Teasing Transforms Everything
Teasing creates texture and grip that makes hair appear thicker and fuller immediately. Unlike combing, which lies the hair flat, teasing fluffs each strand and creates air pockets that add visible volume. On long hair, this technique is transformative because even a small amount of teasing at the crown creates a noticeably fuller appearance from every angle.
The Correct Teasing Technique for Long Hair
- Start with dry hair—teasing works best on hair with a bit of natural texture or second-day hair
- Divide the top section of your hair into layers, starting with the very crown
- Take a section from your crown and hold it straight up at a right angle to your head
- Use a fine-tooth teasing brush and brush downward, from the ends of that section toward the roots, creating texture and buildup
- Work through the section until you feel resistance and can see the teasing, but don’t overdo it
- Repeat this process with each layer moving toward the sides, building volume gradually
- Once you’ve teased all the sections, use a regular brush to gently smooth the top surface while leaving the teased texture underneath
- Gather your hair into a high ponytail—the teasing will make it appear dramatically fuller
Pro tip: Tease only the inner layers, not the outer ones—this creates volume without visible texture, and you’ll have clean-looking, smooth hair on the outside while all the volume is underneath.
12. Sleek Slicked-Back Ponytail
The slicked-back ponytail is the ultimate statement style—it’s bold, modern, and requires no apologizing or softening. Every hair is pulled back tight and smooth, the face is completely exposed, and the effect is sophisticated and confident. This style works best on people who love their face shape and want to showcase it.
The Attitude Behind the Slicked-Back Style
A slicked-back ponytail requires commitment because there’s nowhere to hide—it’s all about confidence and clean lines. This style works beautifully on people with strong bone structure, symmetrical faces, or anyone who simply loves the boldness of full exposure. It also photographs incredibly well and looks exceptional on long hair because the length creates a statement without the hair framing the face.
Achieving a True Slicked-Back Look
- Brush your hair back with a firm paddle brush, using tension to smooth every strand
- Apply a smoothing serum or gel to damp hair before blow-drying to create the foundation for slickness
- Blow-dry with a paddle brush, always pulling downward and backward
- Once fully dry, apply edge control or pomade to your hairline and brush firmly back with a fine-tooth comb
- Gather your hair into a high or mid-height ponytail, pulling tight enough that your hairline feels the tension
- Smooth the entire ponytail with the fine-tooth comb and apply another light layer of pomade to ensure nothing moves
- Secure with a strong elastic and wrap a thin section of hair around the base
Insider note: This style requires touch-ups throughout the day—keep a small pomade stick in your bag to smooth any sections that escape as the day goes on.
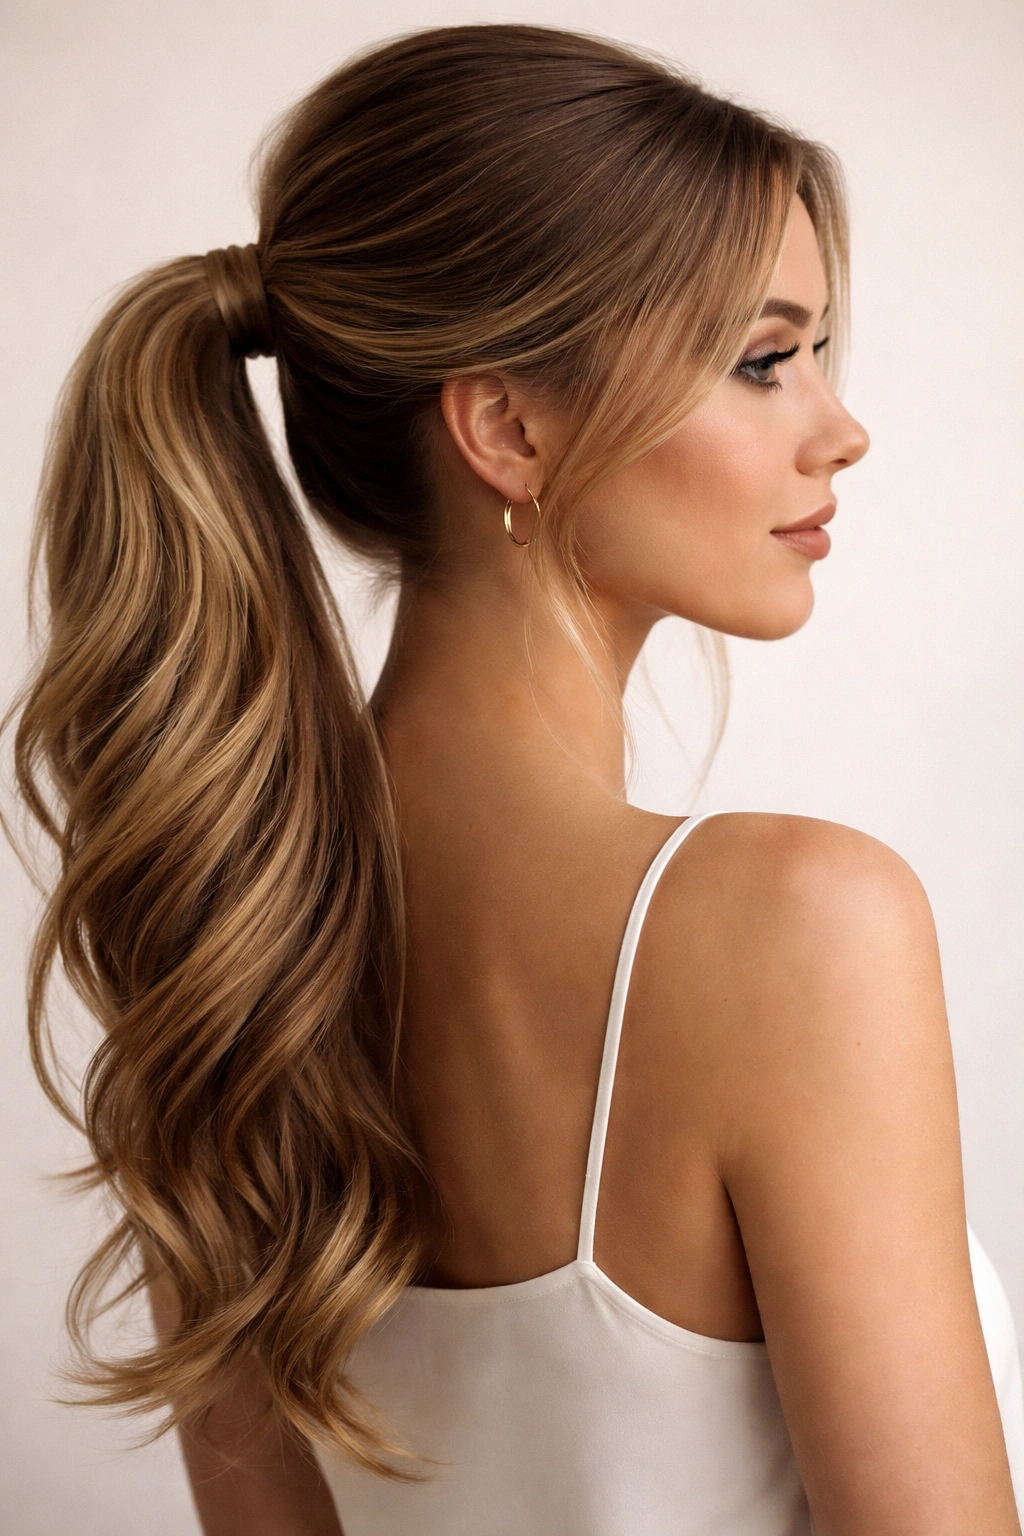
13. Wavy Romantic Ponytail
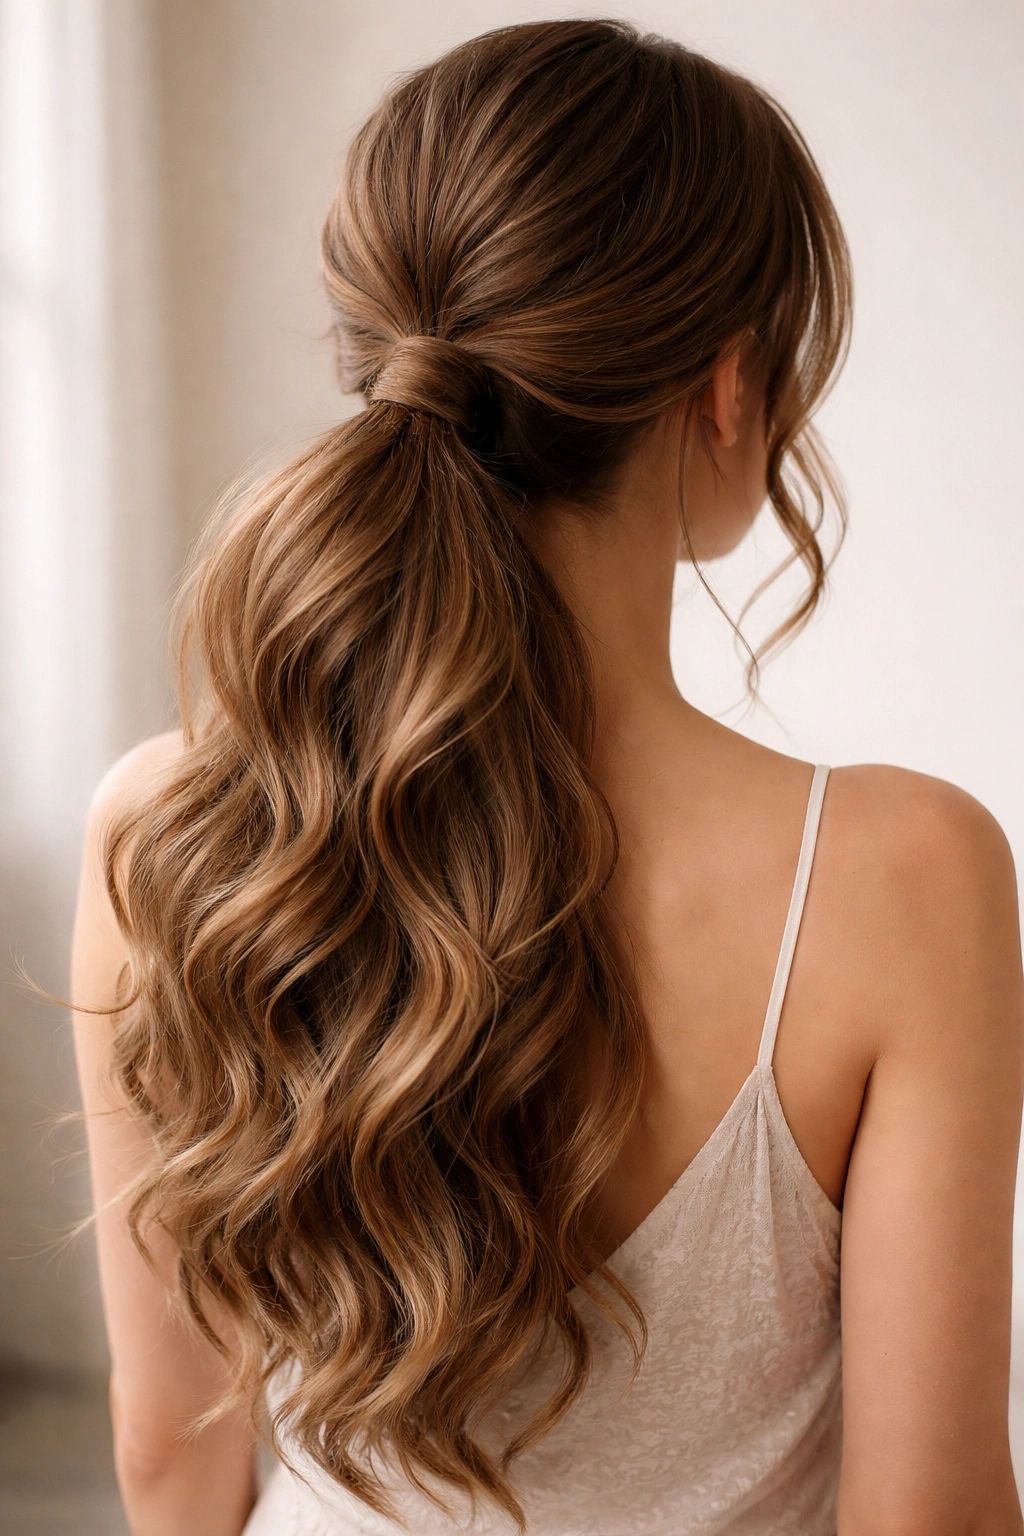
A wavy romantic ponytail celebrates movement, softness, and femininity without sacrificing style. This is the ponytail for date nights, casual gatherings, and any time you want to look effortlessly beautiful and pulled-together. The waves add romance while the secured structure keeps everything intentional.
Creating Intentional Movement With Purpose
This style works because it combines the best of both worlds—the polished, intentional look of a secured ponytail with the soft, romantic vibe of waves and curls. Long hair is absolutely essential for this style because the length is what allows the waves to move and flow beautifully without looking thin or wispy.
Building the Perfect Wavy Romantic Ponytail
- Create soft waves throughout your hair using a one-inch curling iron, curling sections away from your face
- Let the curls cool completely before touching them—this sets the wave pattern and ensures longevity
- Gather your hair into a side ponytail or a slightly off-center high ponytail, keeping the placement soft rather than severe
- Secure with a softer grip than you’d use for a sleek style—you want the waves to maintain their movement
- Take a thin section of hair and wrap it around the elastic, tucking underneath and securing with a bobby pin
- Don’t tousle or fluff aggressively—let the waves maintain their intentional pattern
- Finish with a light hairspray that provides hold without crunch
Worth knowing: Wavy romantic ponytails look even better by the end of the day as the waves loosen slightly and become more effortless-looking, which is why they’re perfect for events that last several hours.
14. Intricate Fishtail Ponytail

A fishtail braid ponytail takes the sophistication of braiding to the next level—the fishtail pattern is more complex than a standard braid, which creates a more ornate, detailed look that’s perfect for special occasions or when you want to impress.
Why Fishtails Look More Complicated Than They Actually Are
A fishtail braid uses only two strands instead of three, which means the mechanics are actually simpler than a standard braid once you understand the pattern. Despite being technically easier, fishtails look significantly more intricate and beautiful, especially on long hair where the braid length showcases the detailed pattern.
Learning the Fishtail Braiding Pattern
- Gather your hair into a high or mid-height ponytail using your preferred technique
- Divide the ponytail into two equal sections, holding one in each hand
- Take a thin strand from the outer edge of the right section and cross it over to the left section
- Take a thin strand from the outer edge of the left section and cross it over to the right section
- Continue alternating, always taking thin strands from the outer edges and crossing them over
- The pattern creates a delicate, woven appearance that looks far more complex than the actual technique
- Secure at the bottom with a small elastic and gently tug the braid to loosen it and add volume
- Finish with a decorative tie, ribbon, or metallic elastic for extra polish
Pro tip: The thinner your strands, the more intricate your fishtail will look—so prioritize taking small sections over large ones for maximum visual impact.
15. Messy Undone Ponytail

The messy ponytail is the art of looking like you didn’t try while obviously having tried. This style celebrates a looser, more relaxed energy while still keeping hair pulled back and managed. It’s perfect for lazy weekends, casual hangouts, or any time you want to look effortlessly cool without looking unkempt.
Why Intentional Messiness Requires Intention
A truly great messy ponytail is paradoxically the most carefully constructed style because it has to look undone without actually being sloppy. There’s a difference between a messy ponytail that looks intentional and stylish versus one that just looks like you didn’t finish getting ready. The key is understanding where the messiness matters and where you need polish.
Creating a Strategically Messy Ponytail
- Start with slightly textured hair—use dry shampoo or texture spray to add grip and volume if your hair is freshly washed
- Create loose waves or curls using a curling iron, but don’t worry about making them perfect—slight imperfection is the point
- Gather your hair into a high ponytail, but don’t pull it tight—leave about a half-inch of slack in the elastic
- Take small pieces from around the ponytail, especially near the face, and gently pull them loose
- Tousle the ponytail itself with your fingers, separating the waves and encouraging movement
- Tease very lightly at the crown to create volume without visible texture
- Wrap a thin section of hair around the elastic base, allowing the wrap itself to look slightly undone
- Finish with a texturizing spray that adds grip and enhances the natural texture
Worth knowing: Messy ponytails work best on people with naturally wavy hair or those willing to put the time into creating waves—truly straight hair can look stringy rather than effortlessly undone with this style.
Essential Tools for Creating Any Ponytail

Your styling tools matter significantly when it comes to executing these 15 ponytail styles with polish and longevity. Quality tools make techniques easier and results better, so it’s worth investing in the right equipment from the start.
The Non-Negotiable Ponytail Toolkit
A fine-tooth comb is absolutely essential—it’s the difference between a smooth, polished ponytail and one with bumps and ridges. Paddle brushes work well for initial smoothing, but the fine-tooth comb creates precision. Elastics matter more than most people realize—invest in elastics that don’t snag or break hair. Silk or velvet elastics reduce breakage compared to regular rubber bands, which catch on strands and cause damage over time.
Bobby pins, especially ones that match your hair color, become invisible in your finished styles. A curling iron or wand is essential if you want to add waves or texture, and a blow-dryer makes smoothing significantly easier. Keep styling products on hand—a light smoothing serum for pre-styling prep, pomade or edge control for slicked styles, and texturizing spray for undone or wavy looks.
Choosing Your Ponytail Based on Face Shape

Different ponytail styles flatter different face shapes, and understanding which styles work best for your face means you’ll always look your best regardless of which style you choose.
Heart and Oblong Faces
If you have a heart-shaped face with a wider forehead and narrower chin, styles that add volume at the bottom and create width lower on the face work best. Side ponytails and wavy romantic ponytails are ideal because they direct focus away from your forehead and create softness around the jawline. Avoid extremely high, sleek ponytails that emphasize the forehead’s width.
Round Faces
Round face shapes benefit from styles that create height and elongation. A high ponytail positioned at the true crown lifts everything and makes your face appear longer. Skip side ponytails and styles that sit too low, which can shorten your face further. Teased ponytails and high styles create the illusion of increased face length through volume placement.
Square and Angular Faces
Strong, angular faces look beautiful with styles that soften their edges. Wavy and textured ponytails add softness without losing definition, while side ponytails create asymmetry that flatters angular features. Messy, undone styles also work well because they soften the overall impression while maintaining sophistication.
Styling Tips for Long Hair Specifically
Long hair presents unique challenges and opportunities when it comes to ponytails—length means volume but also weight, and that weight affects how styles hold and look throughout the day.
Managing Weight and Ensuring Longevity
The heavier your hair, the more important elastic strength becomes. Don’t skimp on elastics—a cheap rubber band will eventually slip down even a perfectly created ponytail because it can’t handle the weight. Position your ponytail at the crown rather than mid-scalp if you have thick hair; the higher placement distributes weight better and creates more visual interest.
Secure with multiple bobby pins if your style includes wrapped sections or braids—long hair has momentum and weight, so one pin simply isn’t enough to keep decorative elements in place. If your ponytail keeps slipping, use a clear elastic as the base layer and wrap a decorative elastic over it for hold plus style.
Preventing Damage and Maintaining Health
Long hair requires consistent conditioning because the ends are older and drier than the roots. Use a deep conditioner weekly and incorporate a leave-in conditioner into your routine. When wearing ponytails regularly, rotate the placement—wear your high ponytail some days and low ponytails other days to prevent repetitive stress on the same hair strands.
Never sleep in a tight ponytail; this causes unnecessary breakage and can even lead to a condition called traction alopecia. If you need your hair secured while sleeping, use a loose braid or a silk scrunchie that won’t snag or pull. Silk pillowcases also reduce friction and breakage compared to cotton pillowcases.
The Best Occasions for Each Style
Understanding which ponytail styles suit different settings helps you always choose the right look for your context.
Professional and Corporate Settings
Sleek low ponytails and wrapped ponytails communicate polish and professionalism in office environments. Avoid highly textured or undone styles in conservative workplaces; reserve those for casual Fridays or creative industries where style flexibility is accepted. Sleek slicked-back ponytails work in corporate settings if your workplace culture leans modern and bold, but traditional environments prefer the softer elegance of a low, wrapped style.
Casual and Social Occasions
This is where you can have fun—messy ponytails, bubble ponytails, and textured styles all work beautifully. Wavy romantic ponytails are perfect for date nights, and side ponytails work wonderfully for casual hangouts. Braided ponytails and fishtail ponytails are excellent for brunches or casual events where you want to look intentional without formal.
Athletic and Active Settings
High ponytails work best for workouts because they keep hair completely out of your face and off your neck. Secure yours with a stronger elastic than you’d normally use—sweating and movement create conditions where loose ponytails slip. A wrapped high ponytail or textured high ponytail works well because the texture provides additional grip. Save low ponytails for after-workout, once you’ve showered and refreshed.
Formal and Evening Events
Sleek buns and formal low ponytails communicate elegance and sophistication at formal events. Fishtail ponytails and intricate braided ponytails work beautifully for weddings, galas, or evening events where you want to showcase styling detail. If you’re wearing an updo, consider a sleek low bun instead of a ponytail for maximum formality.
Making Your Ponytail Last All Day
Once you’ve spent time creating your perfect ponytail, you want it to last without slipping, flattening, or looking disheveled by evening.
Strategic Product Application
Apply hairspray before securing your ponytail, especially on the top section where hair is most likely to slip. This increases grip and helps your elastic stay put. After securing, a light spritz of hairspray around the elastic area helps seal everything into place. Texturizing spray applied to the hair before gathering it adds grip that’s genuinely helpful, regardless of which ponytail style you’re wearing.
For sleek styles, pomade or smoothing serum keeps flyaways down throughout the day. A tiny amount goes a long way—apply to your fingers and smooth flyaways whenever they appear rather than applying it to your whole head, which can look greasy. Carry a small container or stick version with you so you can touch up as needed.
Reinforcing and Touch-Ups
If you notice your ponytail loosening by midday, don’t just tighten the existing elastic—that can cause breakage. Instead, place a second elastic just below the first one, capturing the hair again. This distributes pressure across two elastics rather than stressing a single one. Carry bobby pins with you for any decorative elements or wrapped sections that might slip.
Final Thoughts

Mastering these 15 ponytail styles gives you the confidence to style your long hair beautifully for any occasion, from your most casual days to your most important events. The foundation is understanding the basic techniques—secure placement, strategic smoothing or texturing, and thoughtful finishing—and then you can adapt these techniques across different styles as your mood and context require.
Long hair is a true gift when it comes to styling versatility, and ponytails showcase that length and volume in ways that shorter hair simply can’t match. Whether you’re drawn to sleek elegance, romantic waves, intricate braids, or intentionally undone texture, there’s a ponytail variation that will feel authentically like you while keeping your hair managed and intentional. Start with the styles that appeal to you most, practice until the technique becomes automatic, and then branch out into variations that challenge you to grow your skills. Within a few weeks, you’ll have multiple go-to styles that you can execute confidently without even thinking about the steps involved—and that’s when ponytail styling becomes genuinely effortless and fun.