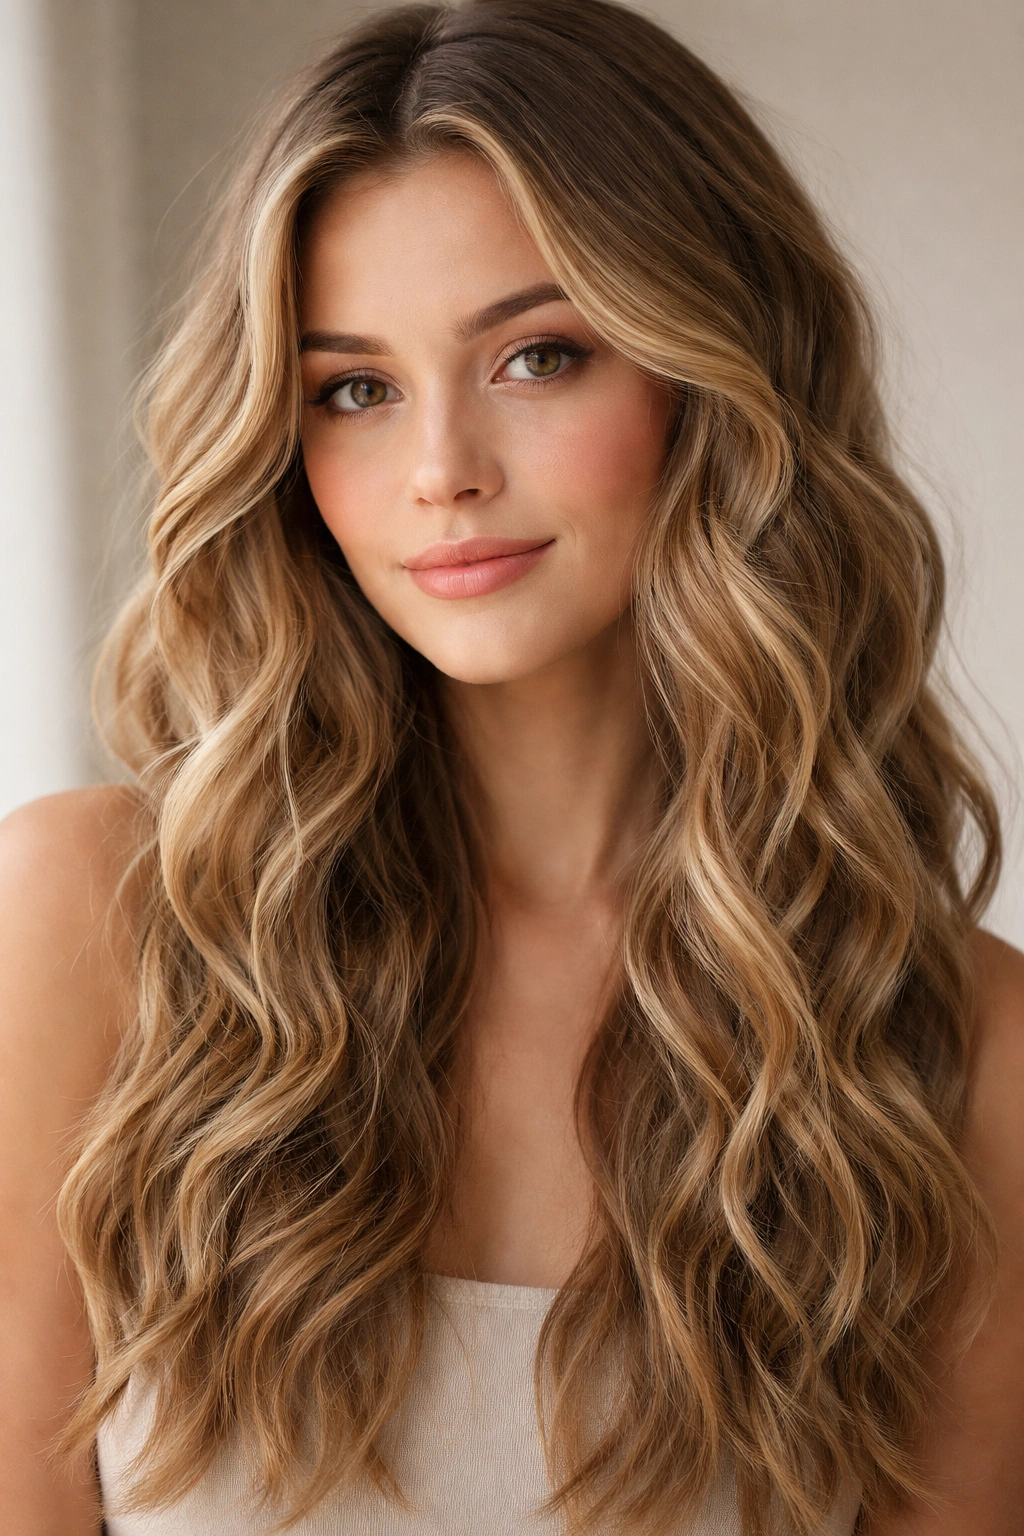
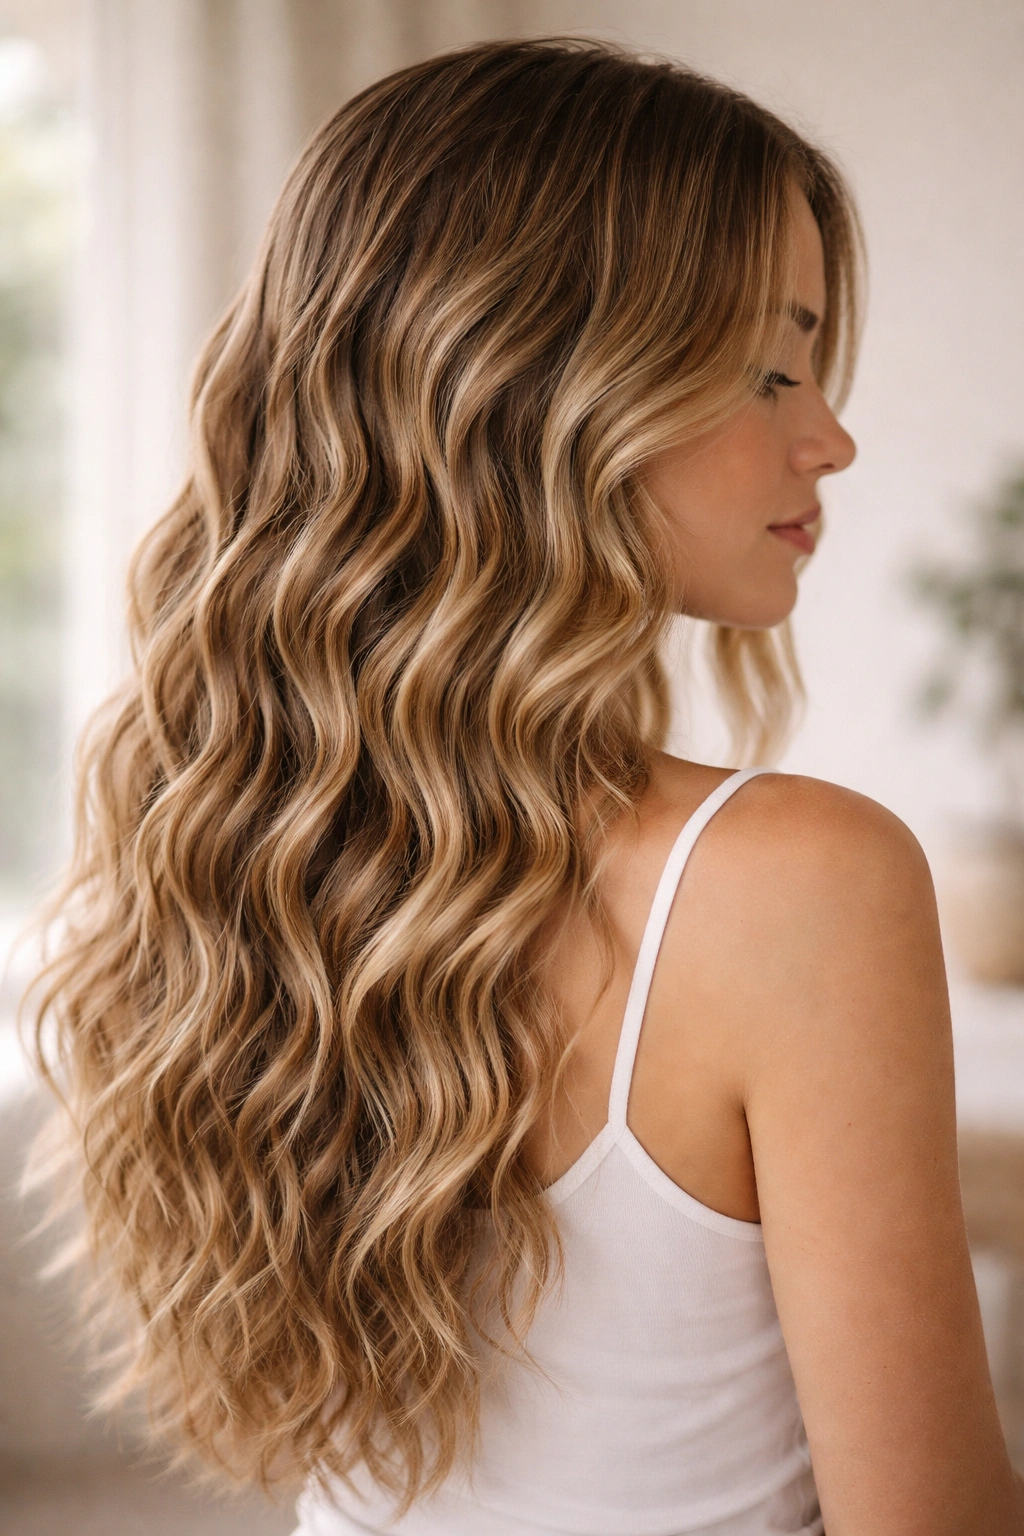
Wavy hair doesn’t have to come from a wand, a curling iron, or a flat iron. In fact, some of the most effortless, textured waves come from simple techniques you can do without applying heat to your hair at all. Heat-free methods not only protect your hair from damage and dryness, but they also tend to produce longer-lasting waves that actually improve the more you use them. Your hair gets healthier, the technique gets easier, and the waves often look more natural and lived-in than heat-styled curls ever could.
The beauty of no-heat wavy hairstyles is that most of them work while you sleep, during a lazy afternoon, or simply while you go about your day. You’re essentially letting gravity, moisture, tension, and time do the styling work for you. Whether you have naturally straight hair, fine waves, or hair that’s resistant to curling, there’s a heat-free method that will work with your hair’s texture. Some create soft, romantic waves; others deliver beachy, tousled texture; still others produce defined, bouncy curls that last for days. The method you choose depends on the look you want, how much time you’re willing to invest, and what tools you already have at home.
What makes these methods so valuable is that they’re genuinely sustainable. You’re not sacrificing the integrity of your strands for style. Your hair stays softer, shinier, and stronger over time. Many of these techniques also require almost no special equipment—just things you probably already own. Let’s explore the most effective heat-free wavy hairstyles that actually deliver results.
1. Loose Waves with Overnight Braiding
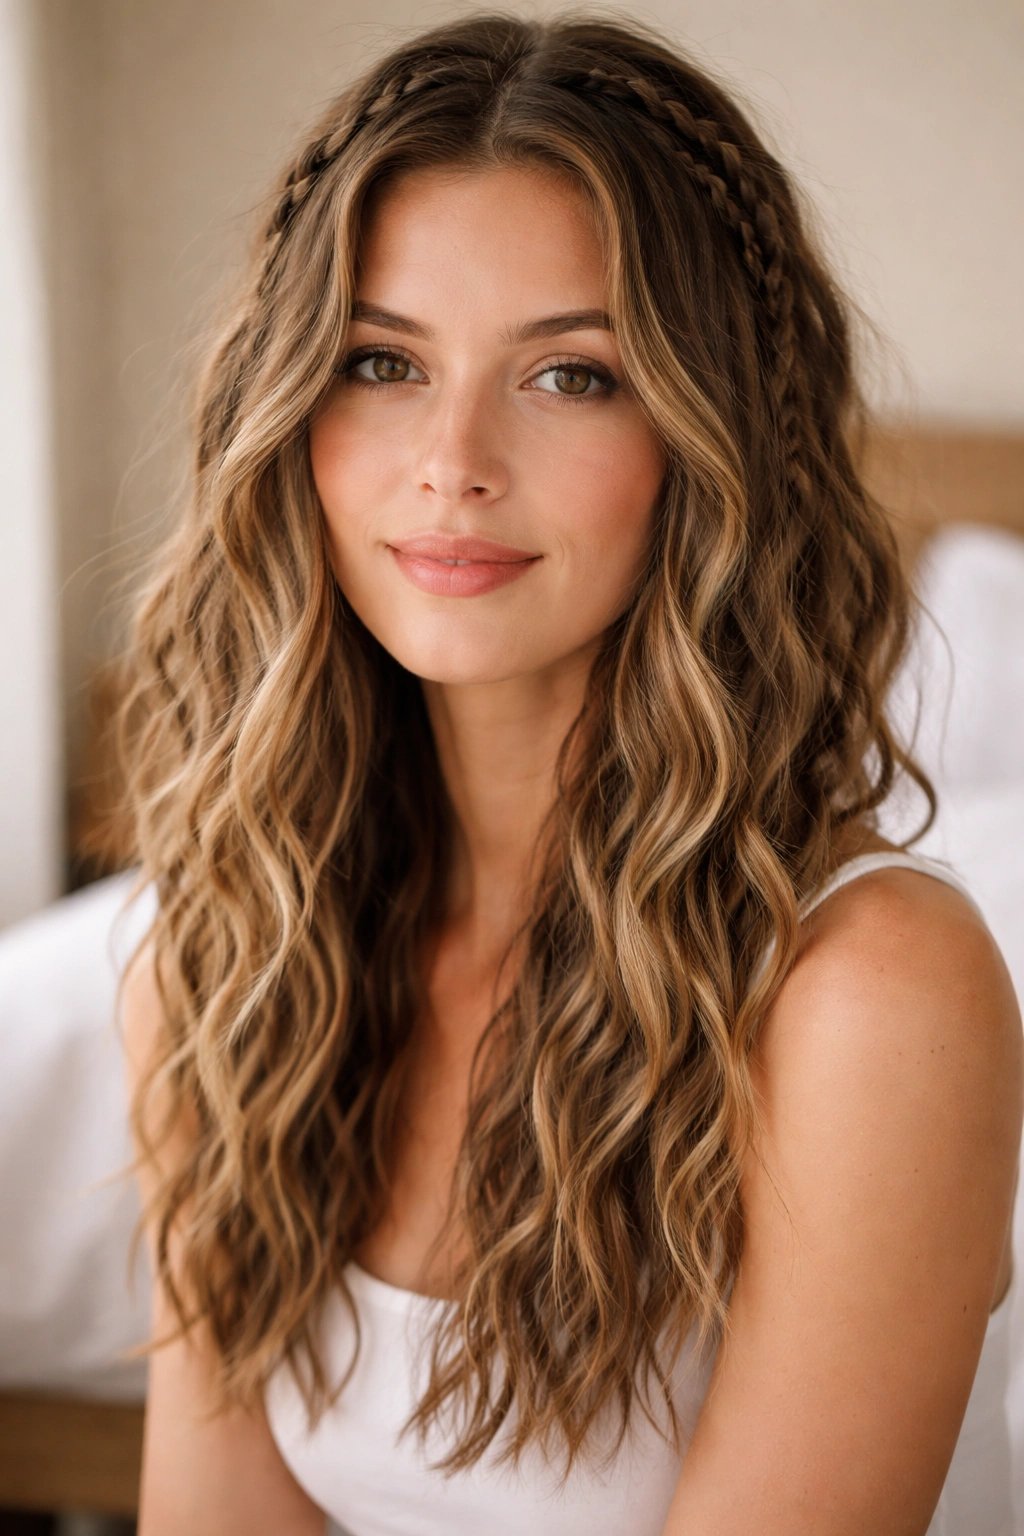
Overnight braiding is the gold standard of heat-free wavy hairstyles, and it’s incredibly effective whether your hair is already wavy or completely straight. Start with damp hair—not soaking wet, but genuinely moist from either a recent wash or a water spray. Divide your hair into two, three, or four sections depending on how much texture you want. Tighter, more sections create tighter waves; fewer sections produce looser, more relaxed waves.
How to Braid for Maximum Wave Definition
Braid each section loosely but securely from roots to ends. The tightness of your braid directly affects the wave pattern—tighter braids yield tighter waves, while loose braids create softer, more fluid waves. The best approach is to braid snugly enough that the braid holds all night without unraveling, but not so tight that you’re straining your roots or creating creases. Secure the ends with a small elastic, preferably a fabric or spiral elastic that won’t create a crease when you remove it.
What to Expect When You Unravel
- Sleep with the braids in place, letting them set as your hair dries completely overnight
- In the morning, unravel each braid gently from the bottom up, finger-combing through the waves as you go
- The closer to your scalp you make it, the more texture you’ll have at the roots
- These waves typically last 2-4 days with minimal touch-ups
- You can refresh them on day two or three with a light water mist and some finger-scrunching
Pro tip: Use a silk or satin pillowcase when sleeping with braids in. It reduces friction, prevents frizz, and helps your waves hold their shape much longer than cotton pillowcases.
2. Textured Waves from Sock Curls
Sock curls are a cult favorite in the heat-free styling world, and once you try them, you’ll understand why. The method is ingenious: you use old socks or fabric tubes to create soft, bouncy curls that translate into gorgeous, defined waves. This technique works on any hair length from chin-length and longer, and it produces less stress on your hair than elastic-based curling methods because the fabric is soft and forgiving.
Creating and Setting Sock Curls
Start with clean, damp hair. Take a section of hair about the width of your mouth and wrap it around a sock (you can cut an old sock to create a tube, or buy fabric hair rollers that work the same way). Roll the section upward toward your roots, then tie the ends of the sock together to secure the curl. This should feel gentle and comfortable—if it’s pulling your hair, your section is too thick. Repeat this process across your entire head, using as many socks as you have sections. Go to bed with them in, and sleep for 6-8 hours while they set.
Sock Curl Results and Longevity
- Upon waking, untie the socks and gently unroll them downward, letting gravity help release the curls
- You’ll have defined, bouncy curls that naturally look like waves once you finger-comb through them
- These waves hold exceptionally well for 3-5 days, even without any product
- The size of your curl depends on the thickness of your hair section and the diameter of your sock roll—thicker sections and larger socks create looser waves
- Your roots will have natural volume from the curl formation, making this method ideal if fine or flat hair is your concern
3. Beach Waves Using Salt Water Spray
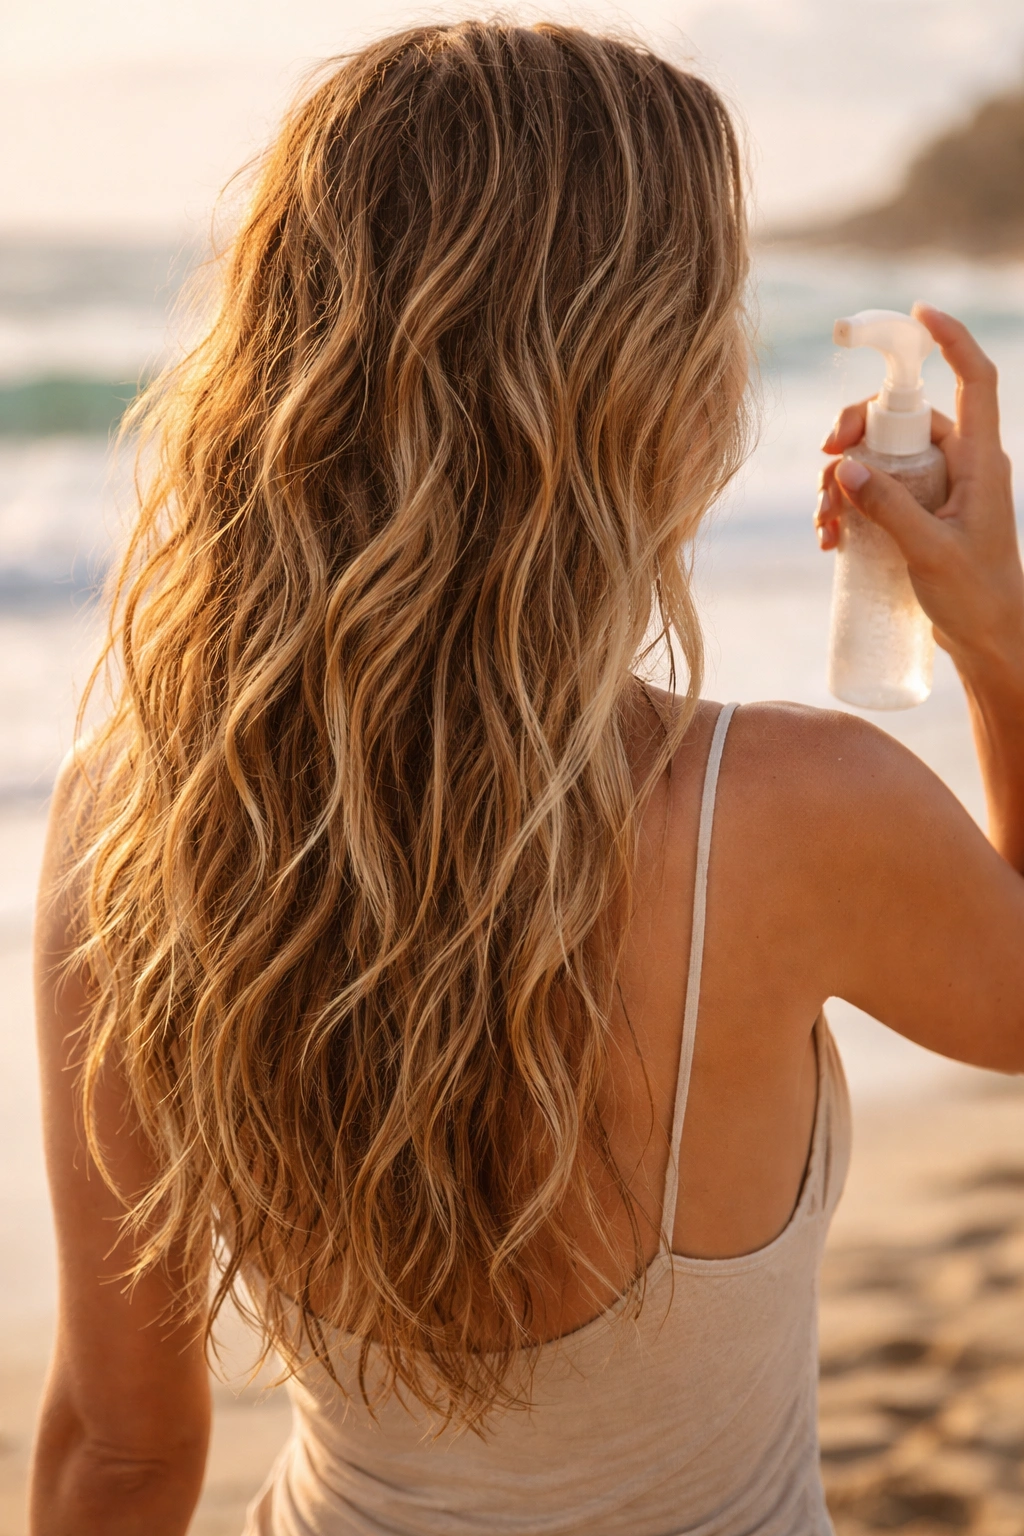
Salt water spray creates that coveted beachy, undone wave texture that looks effortlessly tousled. The salt crystals coat your hair and add grip and texture, making waves hold longer and look more defined. You can buy salt sprays ready-made, or make your own with just three ingredients: sea salt, water, and a tiny bit of oil to keep your hair from drying out.
Making and Applying DIY Salt Water Spray
Mix one tablespoon of sea salt with one cup of water in a spray bottle. Add five drops of coconut oil or argan oil, then shake well before each use. Spray the mixture generously throughout damp hair until it’s noticeably wet. You can apply this to freshly washed hair that’s still wet, or to hair that’s been damp-dried. Scrunch the spray into your hair with your hands or with a microfiber towel, working the salt crystals through from roots to ends.
How Salt Spray Waves Develop
- Air dry your hair naturally, or speed up the process with a cool shot from a hair dryer
- As your hair dries, the salt crystals create texture and definition, encouraging waves to form naturally
- The waves look beachy and undone—perfect for a casual, lived-in aesthetic
- This method works best on hair that already has some natural wave or texture to work with
- Reapply salt spray to refresh your waves on day two or three for a longer-lasting style
- One note: regular use of salt spray can be drying if you don’t use a good conditioning treatment weekly
Worth knowing: Salt spray works particularly well when combined with other methods—apply it to freshly braided hair as it dries, or use it with any of the other techniques on this list for enhanced texture and definition.
4. Defined Waves with a Curling Rod (Without Heat)

This method uses actual curling rods or spiral rollers—the same tools heat stylers use—but with zero heat applied. Instead, you’re relying on moisture and time to set the wave pattern. This is a fantastic approach for creating uniform, bouncy waves throughout your entire head, and it’s surprisingly effective.
Setting Your Hair on Curling Rods
Start with clean, damp (not soaking) hair. You can apply a light wave-setting lotion or mousse if you want extra hold. Take a one-inch section of hair and roll it onto a medium or large curling rod, starting from the ends and rolling toward your roots in a smooth, even spiral. The roller should feel snug but not uncomfortably tight. Secure it with a clip or the built-in fastener. Roll your entire head this way, working systematically from one side to the other.
Drying and Setting Time
- Leave the rollers in place while your hair air dries completely—this typically takes 6-12 hours depending on hair thickness and humidity
- Some people prefer to sleep in rollers for maximum setting time
- Once completely dry, gently unroll each rod slowly, allowing the curl to release gradually
- Don’t brush immediately; instead, finger-comb through your curls to create waves
- The result is uniform, bouncy waves that hold for several days
- Rod size matters: larger rods create looser waves, while smaller rods produce tighter curls
Pro tip: If you’re impatient and want faster drying, a cool shot of air from your hair dryer speeds things up without damaging your hair. The cool air actually helps set the curl more effectively than warm air would.
5. Plopping Method for Natural Waves
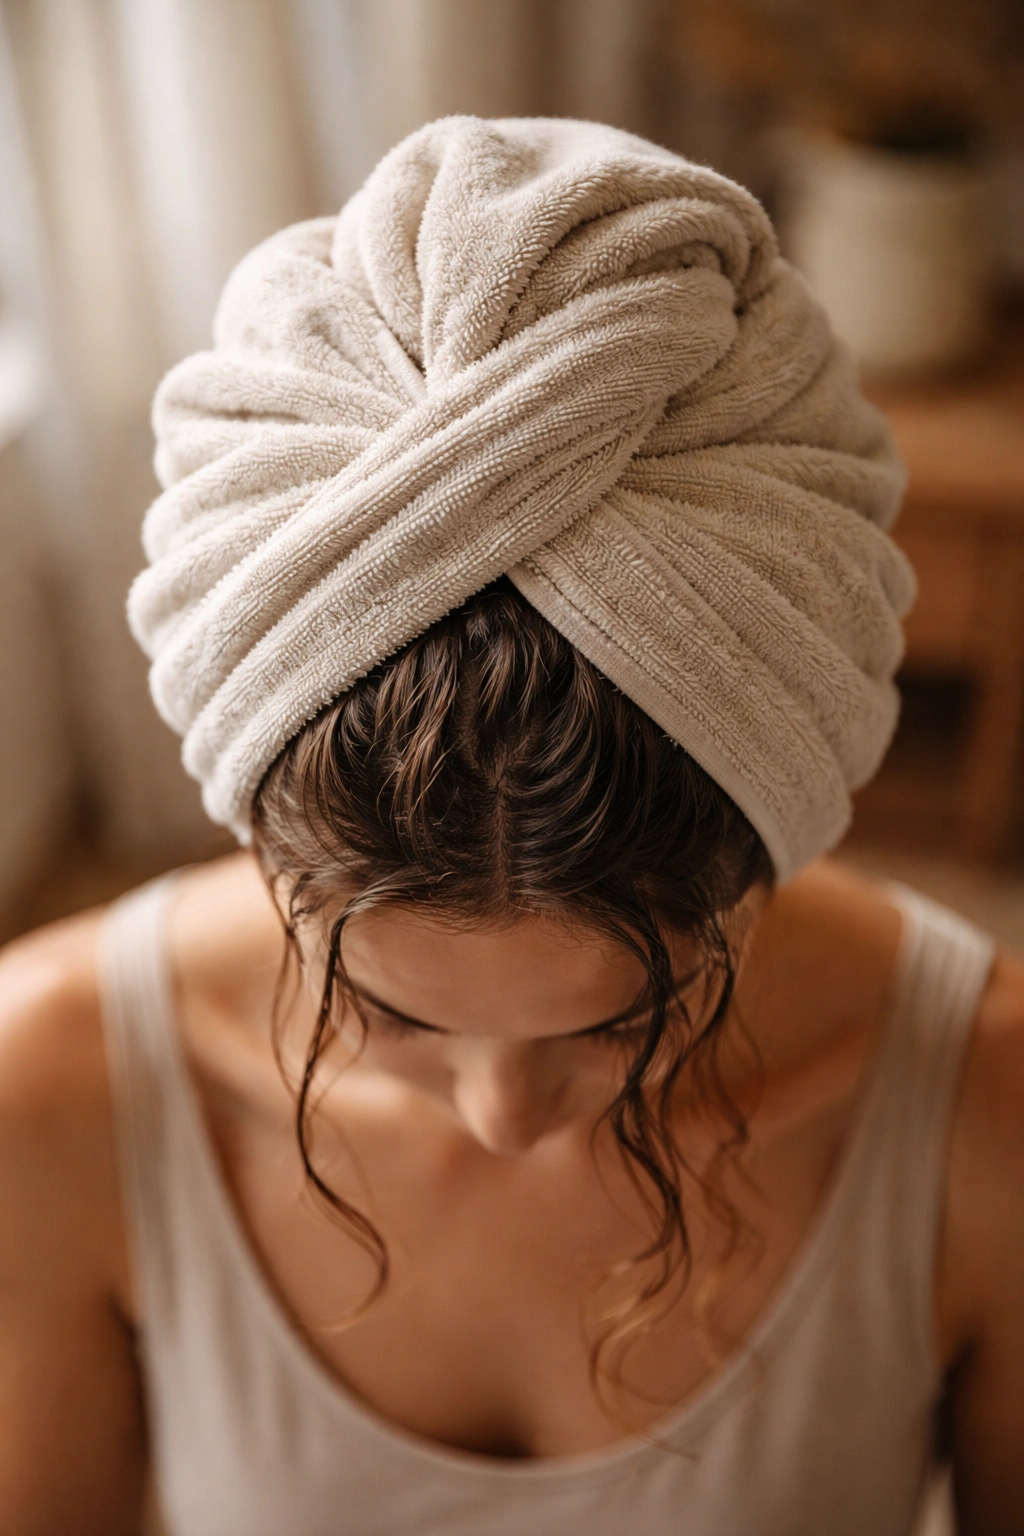
Plopping is a technique borrowed from the curly girl method, and it’s perfect for anyone wanting to enhance their natural wave pattern without any heat or tools. This method is all about how you handle your hair while it’s wet—specifically, wrapping it in a way that encourages wave formation and prevents frizz as it dries.
The Plopping Technique Step by Step
After shampooing and conditioning, gently squeeze excess water from your hair—don’t wring or twist it. Take a microfiber towel or a cotton t-shirt and lay it flat. Lean forward and center the back of your head on the towel, then fold the towel up and around your hair, wrapping it loosely but securely. Tie the two corners at the back of your head to keep everything in place. You’re essentially creating a turban that holds your wet hair against your scalp in a way that encourages natural wave definition.
Drying and Wave Development
- Leave the towel wrapped around your hair for 15-30 minutes while your hair absorbs excess moisture
- Unwrap your hair and allow it to air dry the rest of the way, or use a diffuser attachment on your hair dryer if you want to speed up the process
- Avoid touching your hair while it dries; the less you disturb it, the less frizz you’ll create
- Plopping works best when you apply a curl-enhancing cream or gel to damp hair before wrapping
- The waves that form are true to your hair’s natural texture—not imposed by styling tools, but encouraged and enhanced
- This method is ideal for people with naturally wavy hair who want more defined, pronounced waves
6. Waves from Wet-Setting and Air Drying
Wet-setting is one of the oldest and most reliable heat-free wave methods, and it remains popular with stylists and hair professionals because it actually works. The basic principle is simple: wet your hair, arrange it into the wave pattern you want, and let it dry into that shape. The method requires patience and some practice, but once you master it, you can create salon-quality waves without any heat.
Traditional Wet-Setting Waves
Spray your hair until it’s genuinely wet throughout, not just damp. Using a comb or your fingers, create the wave pattern you want by pushing your hair up and down in an S-curve motion. Use pin curls (described separately below), clips, or your fingers to hold the waves in place as they dry. The key is creating smooth, even curves—think of drawing waves in sand. Every part of your hair should be positioned intentionally.
Setting and Drying Considerations
- This method takes 8-12 hours of air drying, depending on your hair density and the humidity level
- The longer you leave your hair undisturbed, the more deeply the wave sets in
- Humidity helps with wet-setting; dry environments make it harder for waves to hold
- You can sleep with your waves set this way—just sleep on your back or on a silk pillowcase to minimize disturbance
- Once dry, gently release your curls and finger-comb through them to create soft waves
- Wet-set waves last surprisingly long—5-7 days is typical with proper care
- This method works on any hair type, though finer hair may need lighter products to avoid weighing waves down
7. Twisted Sections for Soft Waves
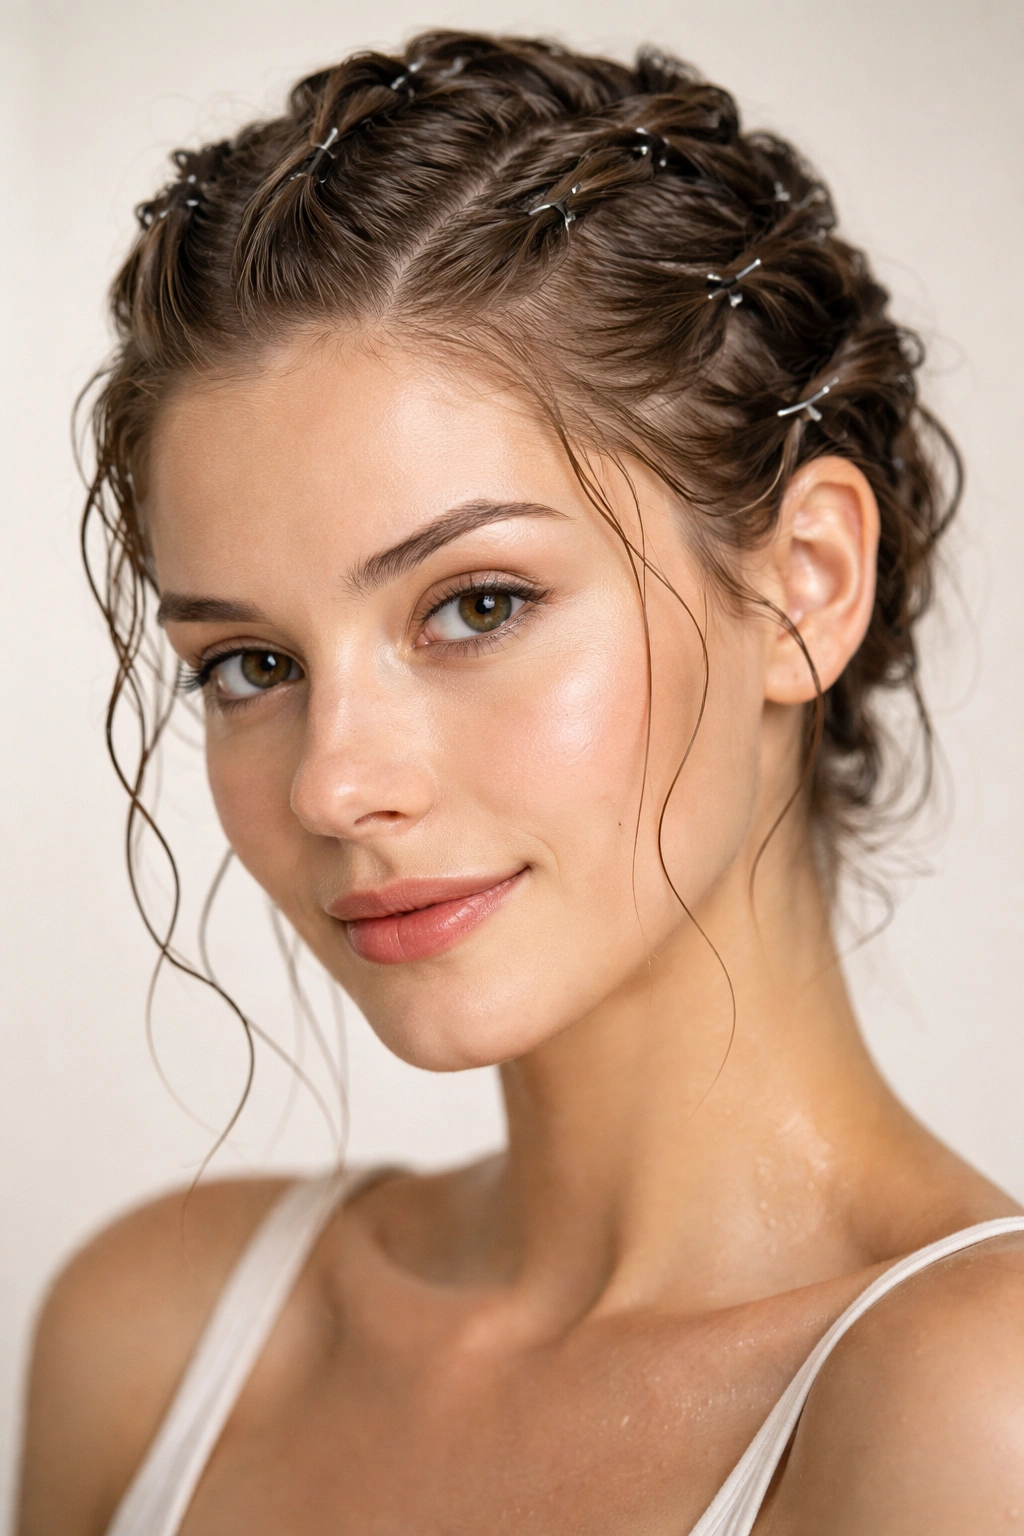
Twisting is a gentler alternative to braiding that creates softer, more subtle waves. Instead of weaving sections together, you’re simply twisting each section of hair tightly from root to end and pinning it against your scalp. This method is faster to set than braiding, requires no special skills, and works beautifully on shorter hair.
Creating Twisted Wave Sets
Divide damp hair into 6-12 sections depending on how much wave definition you want. Take one section and twist it tightly from root to end, like you’re wrapping it around your index finger. Pin the twisted section against your scalp using a bobby pin. The pin should hold the twist in place without creating painful tension. Repeat this across your entire head, working systematically from one side to the other.
Twists Set and Release
- Sleep with the twists in place, or go about your day while they air dry
- Full set time is typically 4-8 hours, depending on your hair thickness
- When completely dry, remove the pins and gently unwind each twist
- You’ll have soft, natural-looking waves with volume at the roots
- Twists create less defined waves than braids, which is perfect if you prefer a more subtle texture
- This method works especially well for shorter hair lengths—chin-length and above
- Fine or thin hair looks particularly good with this method because the twists don’t create bulky texture at the roots
Pro tip: If you want more defined waves from this method, twist tighter and use thinner sections. For softer, looser waves, twist loosely and use thicker sections.
8. Pin Curls for Vintage Waves
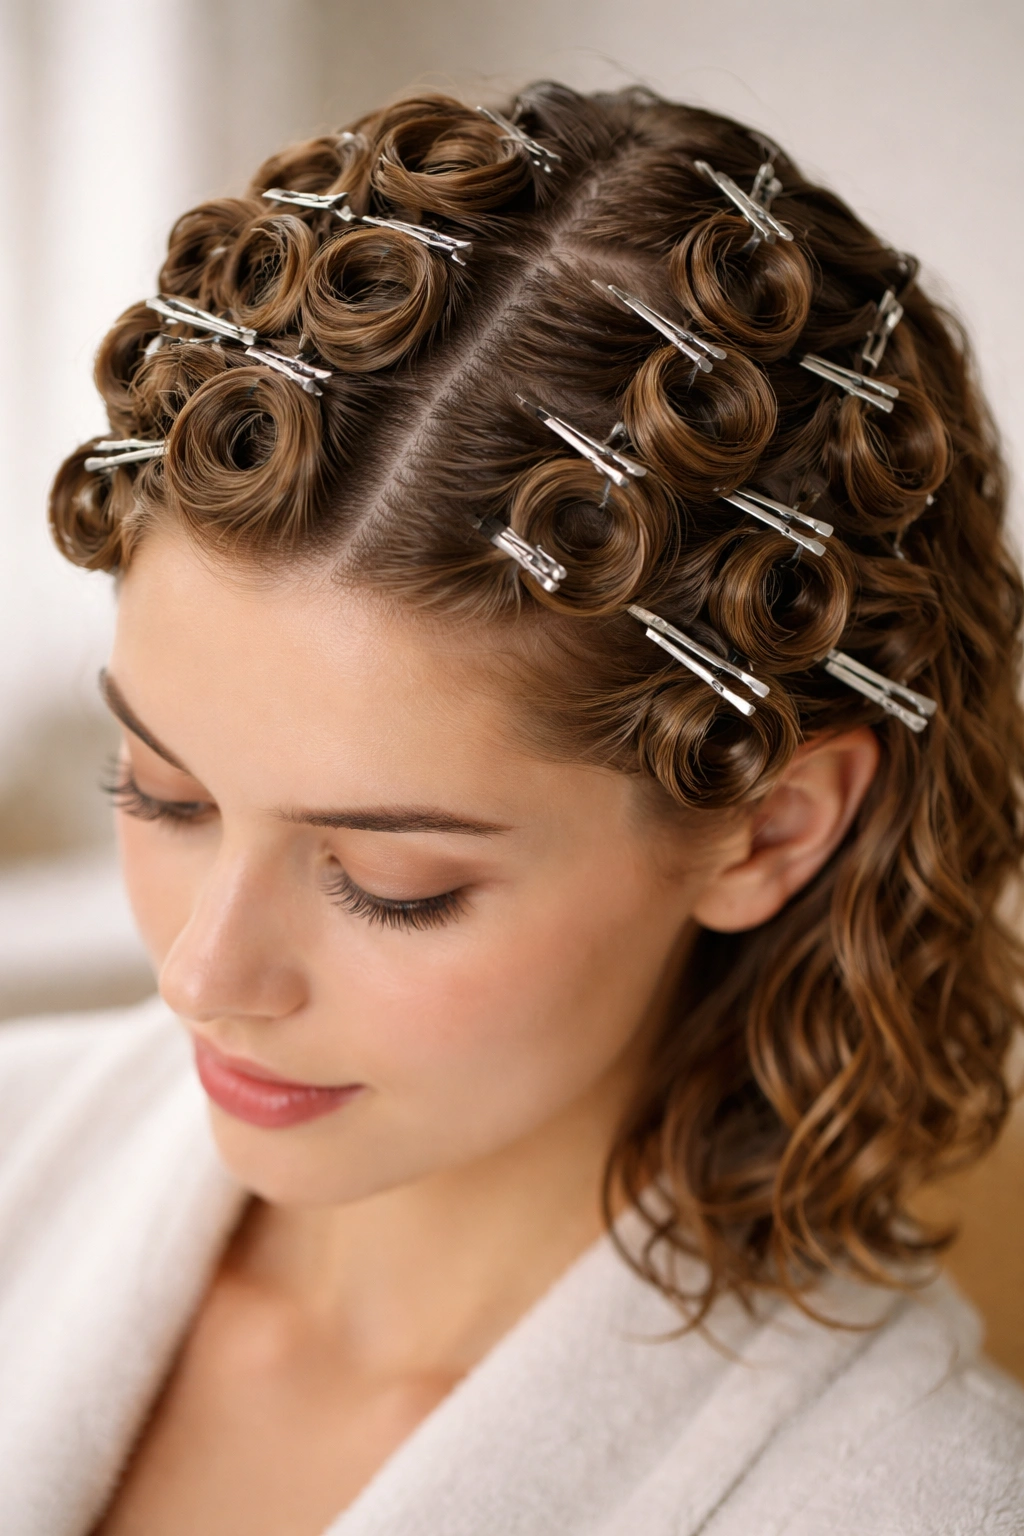
Pin curls are a classic styling technique that creates beautiful, defined waves with a vintage aesthetic. The method is simple but requires patience: you create small curls by wrapping sections of hair around your finger and pinning them in place. Once dry, you release them into glamorous waves. Pin curls were Hollywood’s secret for decades, and they work just as well today.
Setting Perfect Pin Curls
Start with damp hair and apply a light setting lotion if desired. Take a one-inch section of hair and wrap it around your index finger to create a loop. Slide your finger out, keeping the loop intact, and pin the curled section flat against your scalp using a bobby pin. The pin should go through the center of the curl and anchor it securely. Repeat this across your entire head, leaving the pin curls in place while your hair dries completely.
Pin Curl Results and Styling
- Leave curls in for at least 6-8 hours, or overnight for maximum set
- Once completely dry, remove all the pins slowly and carefully
- Gently unwind each curl, being careful not to disturb the wave shape
- Brush through your waves with a soft paddle brush to create a smooth, flowing style
- Pin curls create pronounced, polished waves that last 4-6 days
- The vintage look is perfect for special occasions, date nights, or when you want a more formal aesthetic
- Your waves will have incredible bounce and definition because of how firmly the curl was set
9. Braid-Out Waves with Texture
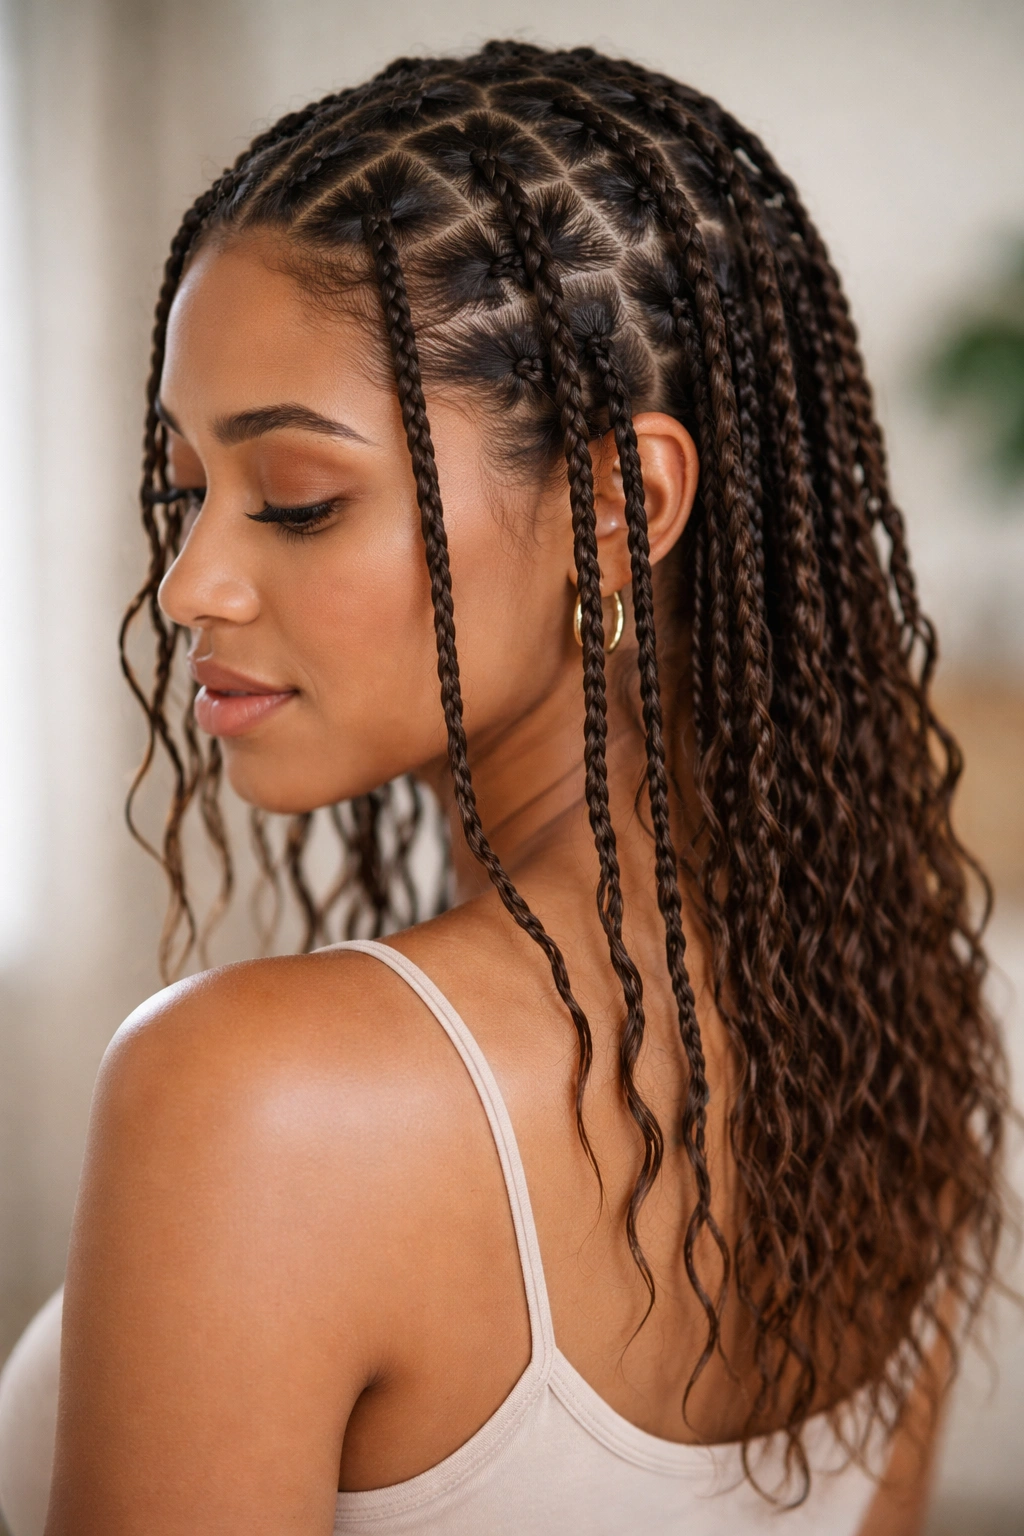
A braid-out is specifically designed to create textured waves with visible texture detail throughout. Unlike loose braids that create smooth waves, a braid-out is intended to be undone in a way that emphasizes the texture and creates a more three-dimensional, piece-y wave pattern. This method is popular with people who have naturally textured hair, but it works beautifully on straight or wavy hair too.
Creating Textured Braid-Outs
Style your hair in braids while it’s damp (two to six braids, depending on how much texture you want). Leave the braids in for at least 6-8 hours, or overnight. The braids should be tight enough to hold, but not so tight that you damage your hair. Here’s the key difference with a braid-out: when you unravel your braids, you’re unraveling them slowly and intentionally, not just combing through them. Unravel each braid carefully from the ends upward, letting the textured waves fall naturally.
Styling and Texture Enhancement
- Once all braids are unraveled, gently separate the waves with your fingers, fluffing from roots to ends
- The result is textured, piece-y waves that look voluminous and lived-in
- You can apply a light curl-defining cream or texture spray to enhance the waves further
- Braid-out waves last 4-7 days if you avoid touching them too much
- This method is excellent for creating big, dramatic texture without making your hair look overly styled
- The texture naturally enhances any wave pattern your hair already has
- Sleeping on a silk pillowcase helps preserve the texture throughout the week
Worth knowing: The size of your braids determines the final wave size—thicker braids create larger, looser waves, while thinner, tighter braids create smaller, more defined waves. Experiment with different braid sizes to find the texture you love.
10. T-Shirt Curl Method for Gentle Waves
The t-shirt curl method is incredibly gentle on your hair because you’re using soft fabric instead of hard tools or tight elastics. This technique creates beautiful waves while minimizing breakage, frizz, and damage. It’s perfect for people with fine, delicate, or damaged hair, or anyone who wants to prioritize hair health while still getting great results.
Rolling Hair in a T-Shirt
Take a clean cotton t-shirt and lay it flat. Starting at the top of your head with a section of damp hair, place it on the t-shirt and roll the t-shirt upward, wrapping the hair inside it as you roll. Continue rolling all the way down your head, gathering all your hair into the t-shirt bundle. Once your entire head of hair is rolled up in the t-shirt, tie the sleeves together to secure everything in place. Your head should feel gently compressed but comfortable—never painful.
Drying Time and Wave Formation
- Leave the t-shirt on for 6-10 hours while your hair dries completely
- Many people sleep in this method; it’s comfortable enough and doesn’t create pressure points
- Once your hair is dry, carefully unroll the t-shirt, working slowly to avoid disturbing the waves
- You’ll have soft, natural-looking waves without any creases or harsh lines
- This method typically creates looser, more subtle waves compared to other techniques
- The waves last 3-4 days and look especially good when you finger-comb through them rather than brushing
- This is the gentlest method on this list for hair that’s prone to breakage or damage
11. Waves Using Velcro Rollers (Air-Dried)
Velcro rollers look like the big barrel rollers that you’d use with a blow dryer, but this method skips the heat entirely. Instead, you roll your hair onto the Velcro rollers and leave them to air dry for hours or overnight. The result is bouncy, voluminous waves with incredible shine and smoothness. This method is particularly effective for creating waves at the roots that add lift and dimension to your entire style.
Rolling Hair on Velcro Rollers Without Heat
Start with damp hair and apply a light styling mousse or setting spray if desired. Take a one-inch section of hair and roll it onto a large Velcro roller, starting from the ends and rolling toward your roots. Roll smoothly and evenly so the section wraps around the barrel with no overlaps or gaps. The roller should feel snug but not painfully tight. If you’re using smaller rollers, use thinner sections; if you’re using jumbo rollers, you can use thicker sections.
Roller Setting and Wave Development
- Leave the rollers in place while your hair air dries completely—typically 8-10 hours
- Overnight setting works well; your hair will be completely dry by morning
- Once fully dry, gently unroll each roller downward slowly, allowing the wave to fall gradually
- Don’t brush immediately; finger-comb through your waves to separate them gently
- The result is bouncy, glossy waves with lots of movement and dimension
- Velcro roller waves last 4-5 days and look particularly good on longer hair
- The volume at the roots makes this method ideal if you want to add lift to fine or thin hair
- Larger rollers create looser waves; smaller rollers create tighter, bouncier curls
Pro tip: If you find sleeping in rollers uncomfortable, set them during the day instead. Roll your hair in the afternoon and leave them in while you do chores, read, or work from home. By evening, your hair will be dry and you’ll have beautiful waves ready for the night out.
Final Thoughts

Heat-free wavy hairstyles aren’t just about protecting your hair—they’re genuinely effective ways to create beautiful, lasting waves that often outperform heat-styled curls. What takes minutes with a curling iron takes longer with these methods, but the trade-off is massive: healthier hair, longer-lasting waves, and the satisfaction of knowing you’ve mastered a styling skill that doesn’t rely on tools or heat.
The best method for you depends on your hair type, the texture you want, and how much time you’re willing to invest. If you have a busy schedule, overnight techniques like braiding or sock curls work beautifully. If you prefer working with your hair during the day, try wet-setting or salt water spray. If you have fine or delicate hair, the t-shirt method and twisted sections are your safest bets.
Most importantly, understand that heat-free waves improve with practice. Your first attempt might not be perfect, but by your third or fourth time using any of these methods, you’ll understand the nuances of how your specific hair responds. You’ll know exactly how damp to make your hair, how long to leave sets in, and how to style the finished waves. Give each method a fair try—at least twice—before deciding which ones work best for your hair. Your healthier, shinier, stronger strands will absolutely thank you.