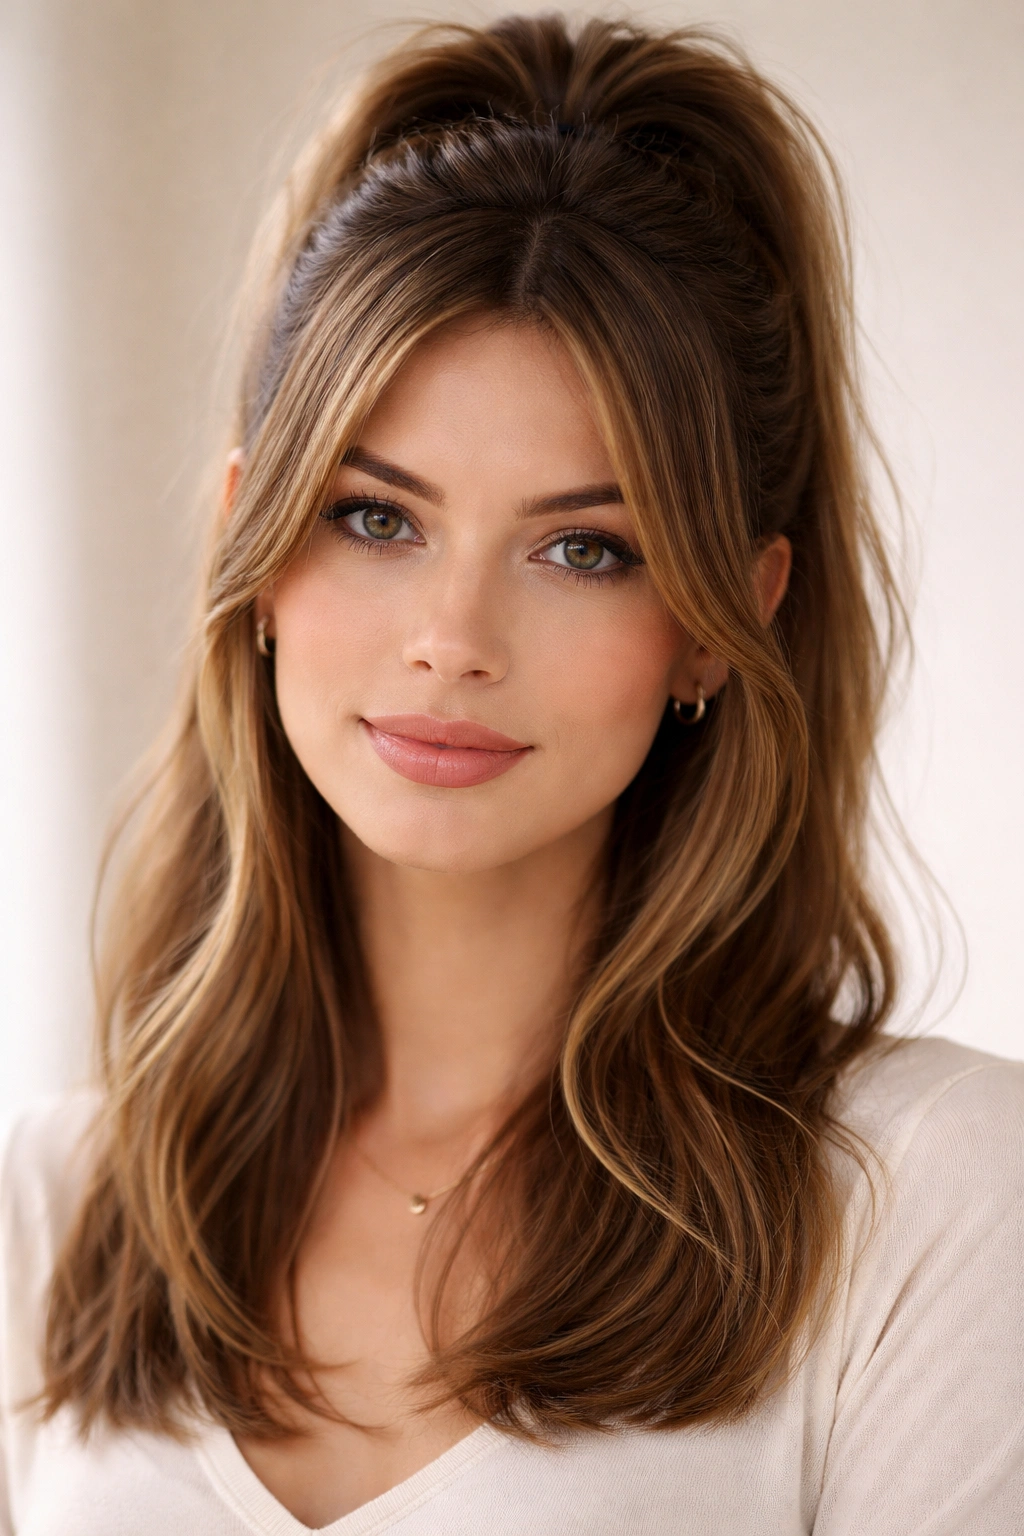
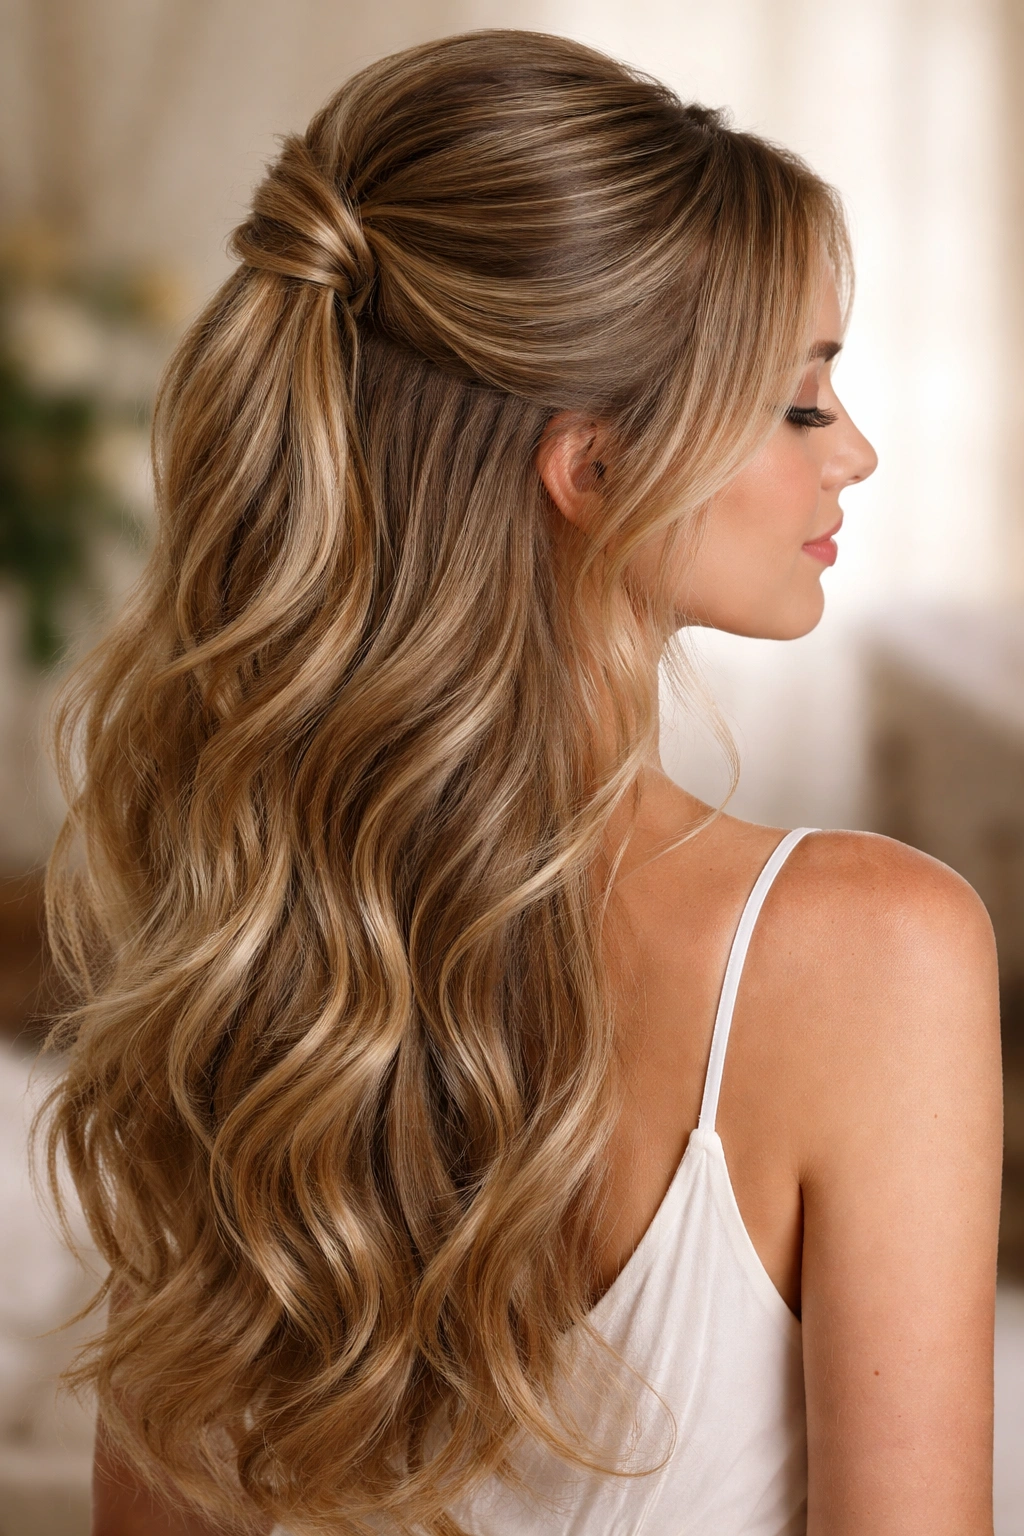
The half-up ponytail holds a special place in the hairstyling world—it’s polished enough for a professional setting, playful enough for casual weekends, and versatile enough to work with almost any hair texture and face shape. For those with medium-length hair, this style is particularly forgiving. You have enough length to create genuine volume and movement, but not so much that the style becomes heavy or difficult to manage. The key to mastering the half-up ponytail isn’t just understanding the basic technique; it’s knowing how to adapt it into a dozen different directions that each feel fresh and intentional.
The challenge most people face with half-up ponytails is that they can fall flat by midday or look exactly the same every single time. Medium hair has its own physics—it’s not quite long enough for some elaborate styles, but it’s beyond the length where you can get away with minimal effort. That’s actually where the magic happens. With medium hair, small tweaks create noticeably different results. Adding texture here, changing your parting there, incorporating a braid or a twist—these adjustments transform the entire look. What started as one basic half-up style becomes a collection of distinct looks, each with its own personality and practical advantages.
This guide walks through 12 distinct half-up ponytail variations designed specifically for medium hair. Each one includes the exact technique to recreate it, the best products and tools that actually make a difference, styling tips that prevent collapse and frizz, and the occasions where that particular version shines brightest. Whether you’re preparing for a job interview, a casual lunch with friends, or just a regular day when you want to look intentional without overthinking it, you’ll find a version here that fits perfectly.
1. The Classic High Half-Up Ponytail
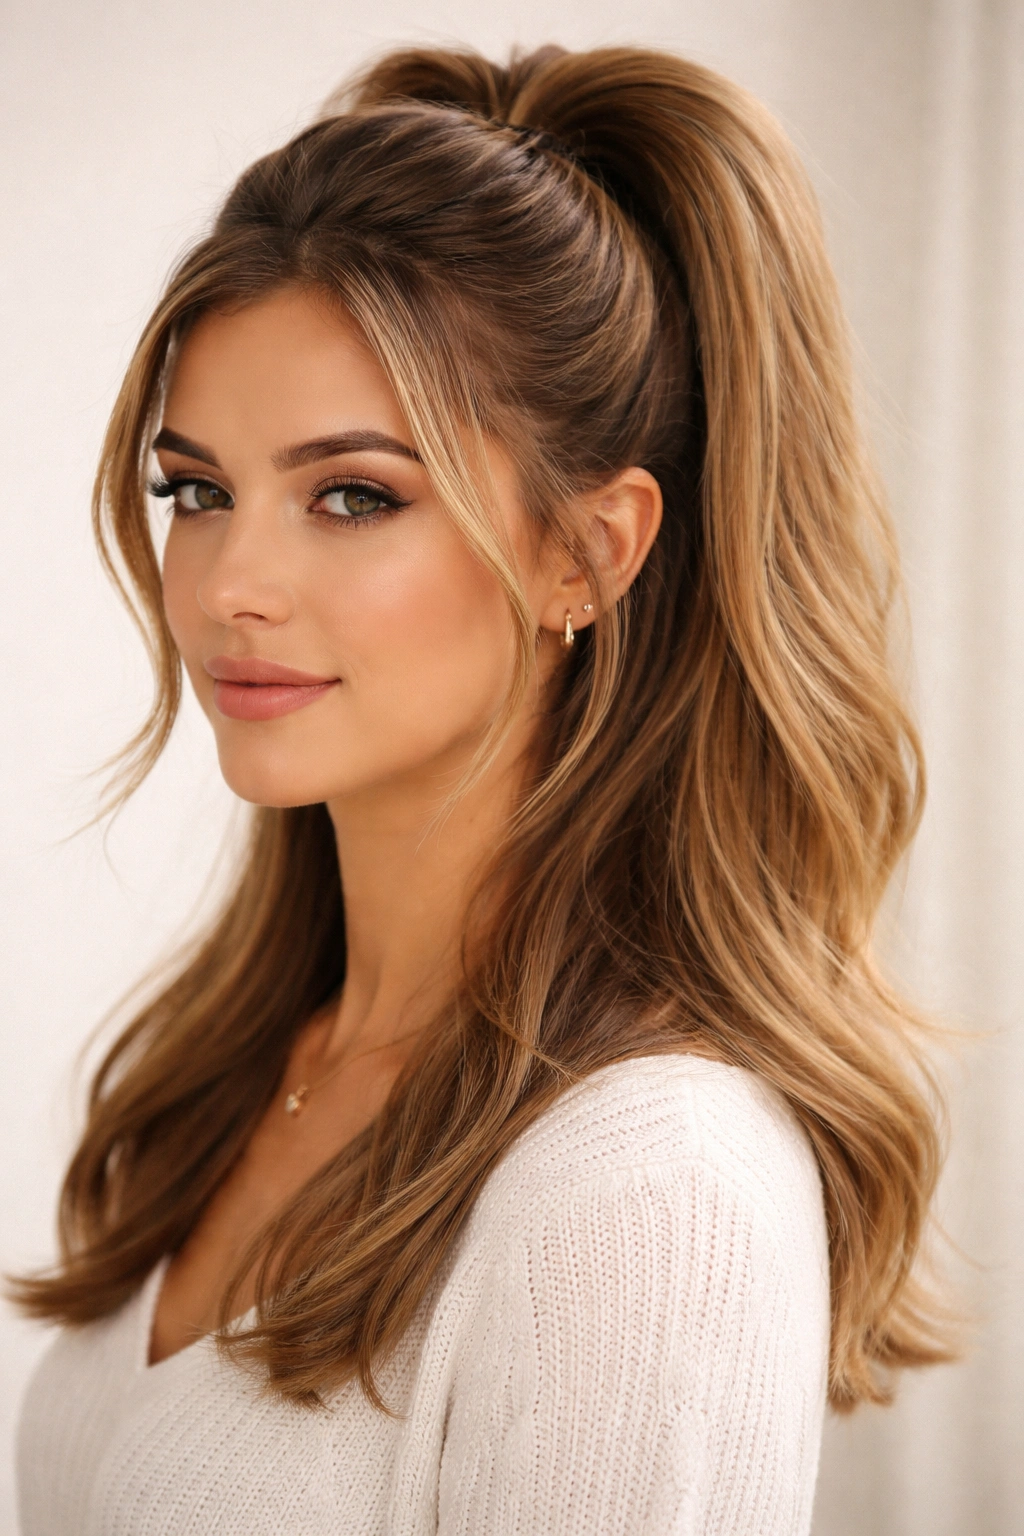
The classic high half-up ponytail is the foundation every other style builds from, and it deserves more credit than it usually gets. This version keeps things simple, clean, and timelessly elegant. The trick is placing the hair tie at the exact right height—high enough to feel intentional and polished, but not so high that it looks like you’re trying to achieve a full ponytail and almost succeeded.
Why This Style Works Best for Medium Hair
The classic high half-up sits at the crown, just slightly above where your ears align horizontally with your head. For medium hair, this placement creates beautiful dimension. The texture and movement in the ponytail section become visible and contribute to the overall style rather than being hidden. The weight of a half-up creates natural volume at the crown when done correctly, which is something people often pay for in salon treatments but can achieve instantly with this style.
How to Perfect This Look
- Section with precision: Use a fine-tooth comb to create a clean horizontal part from temple to temple across the crown. This defines which half stays down and which goes up.
- Smooth the top section: Brush the top section backward firmly, then use a medium-sized paddle brush to smooth flyaways against the back of the head. A tiny bit of anti-frizz serum helps here.
- Secure strategically: Place your hair tie at the crown, slightly above the natural fullness point. Secure with an elastic that matches your hair color exactly—this makes the tie nearly invisible.
- Add dimension: After securing, gently pull two small sections at the front of the ponytail outward, one from each side. This softens the style and adds face-framing movement.
- Finish with hold: A light hairspray on the secured ponytail keeps it in place through an entire day without creating that stiff, over-done appearance.
Pro tip: Tease gently at the base of your ponytail with a small brush before securing it. This creates an anchor that keeps the style from slipping down as your hair relaxes throughout the day.
2. The Textured Half-Up with Loose Waves
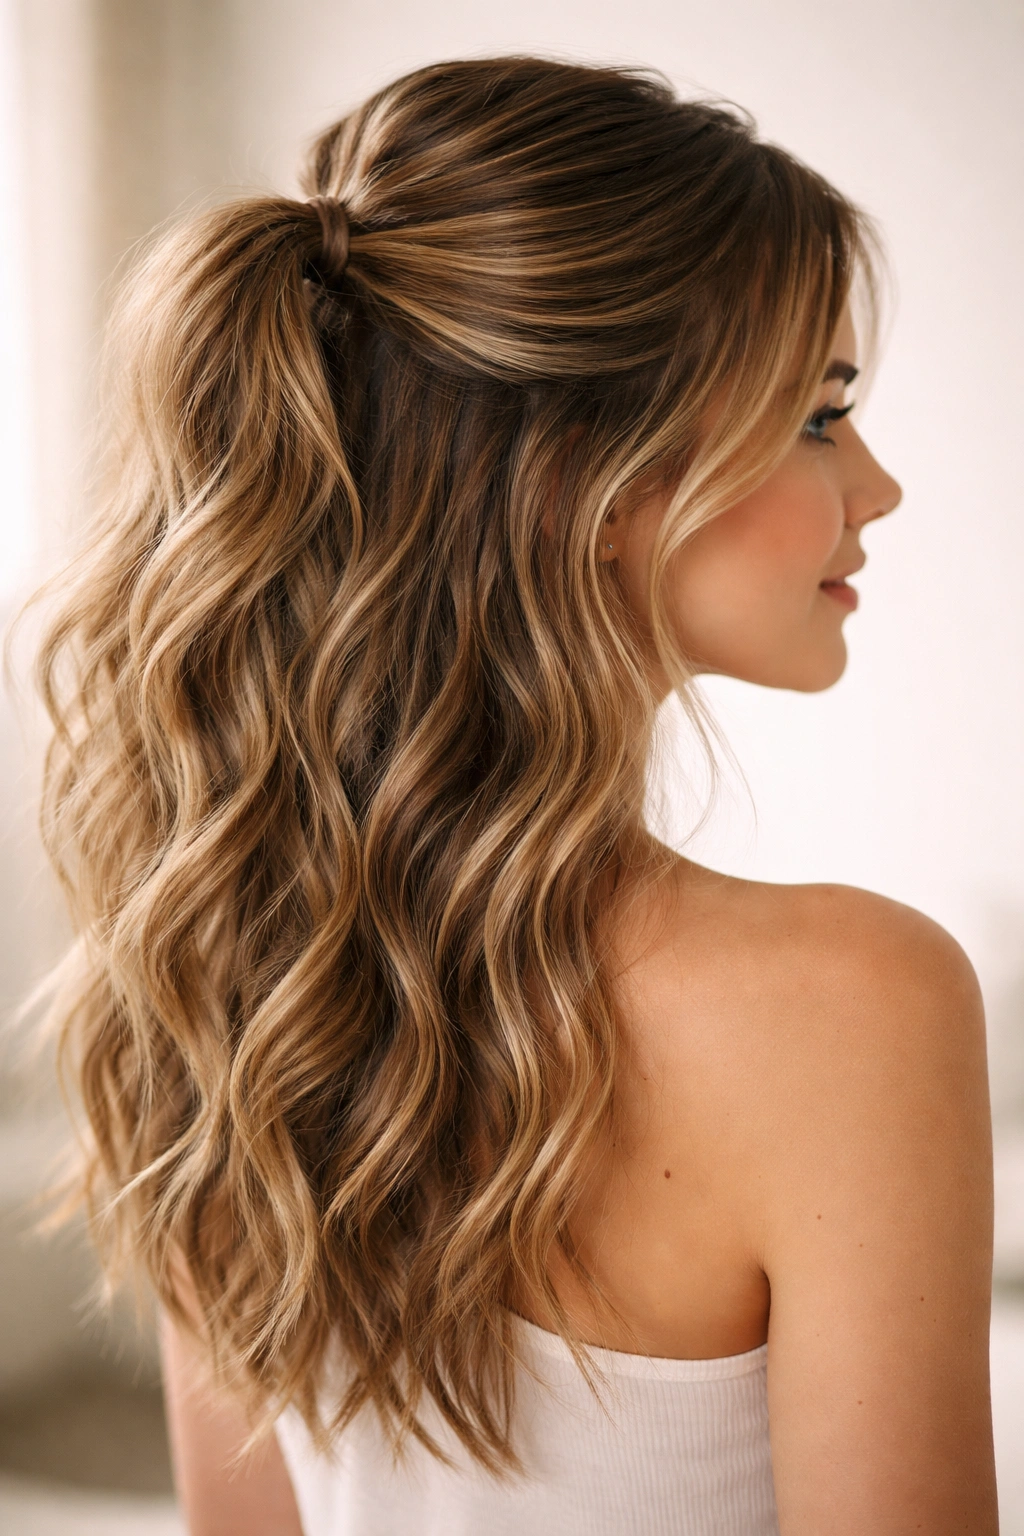
This version brings an effortless, intentional texture that looks like you spent more time on your hair than you actually did. The combination of movement and the secured half-up creates a polished-but-not-trying vibe that works everywhere from casual coffee dates to professional settings.
What Makes Texture Transform This Style
Texture completely changes the energy of a half-up ponytail. Smooth, straight hair in a half-up reads formal and sleek. The same style with soft waves or curls reads relaxed and fashionable. For medium hair, texture also helps the loose bottom section feel fuller and more intentional rather than looking like the hair you forgot to style.
Building Texture That Lasts
- Start the night before if possible: Braid damp hair before bed, or use a texture spray and loosely twist sections. This gives waves time to set without heat.
- Use a curling iron strategically: Curl sections starting from mid-length downward, varying the direction of curls for natural movement. Don’t curl the top section you’ll be pulling up.
- Set with the right product: A sea salt spray gives definition to texture without making hair feel stiff or crunchy. Apply it before securing the half-up.
- Create movement in the ponytail section itself: Pull the ponytail very loosely once secured. Gently tease the edges outward to create a softer, fuller appearance.
- Separate with your fingers: After hairspray, use your fingers to gently separate curl clumps. This prevents a too-polished appearance and adds dimension.
Worth knowing: Medium hair holds texture best when it has some weight to it. If your hair is very fine, setting texture with lightweight mouse before curling helps it stick around longer.
3. The Sleek Low Half-Up Ponytail
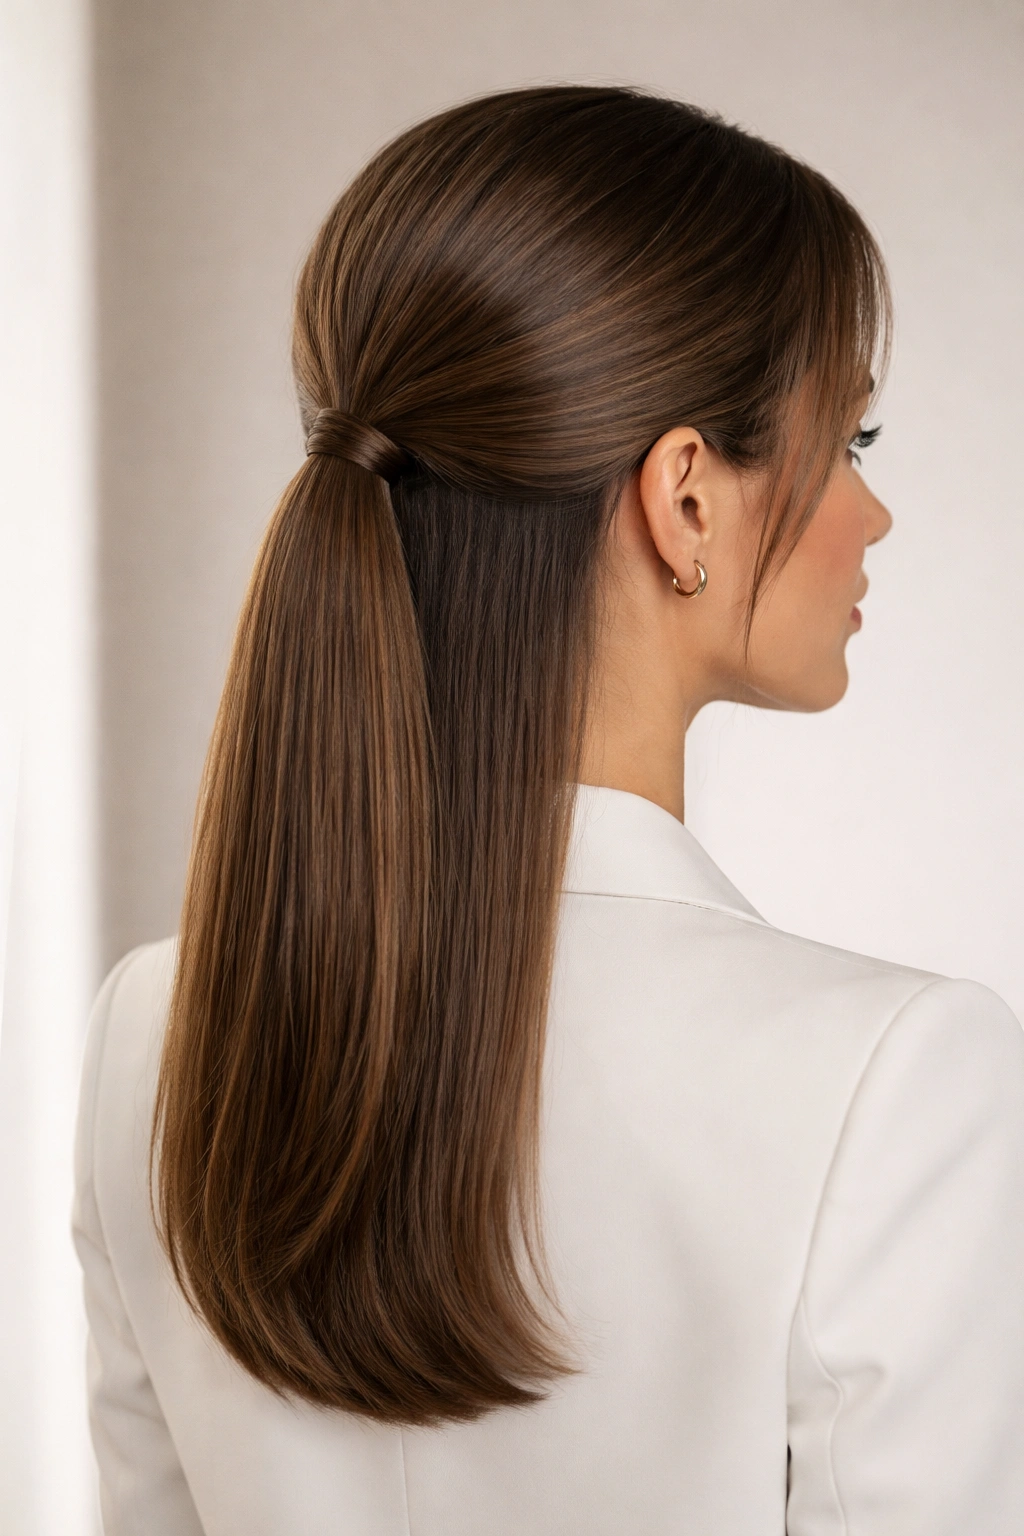
This is the version for days when you want polish without effort. It sits lower, around the nape of the neck, and has a streamlined, sophisticated feel. It works perfectly for formal settings, professional meetings, or anytime you want to look intentionally groomed.
Why Low Half-Up Feels More Formal
The placement dramatically changes how formal the style reads. Higher placements feel youthful and playful. Lower placements feel controlled and refined. For medium hair, the low half-up also creates a subtle elongating effect by not pulling too much hair away from the face.
Achieving the Sleek Finish
- Apply smoothing products beforehand: Use a smoothing serum or lightweight cream on damp hair before blow-drying. This prevents frizz from the start.
- Blow-dry with tension: Blow-dry the entire head downward, using a paddle brush to create smooth, straight texture. This forms the base for a sleek style.
- Create a clean part: Use a fine-tooth comb and a parting tool to establish a clean line from your center or side part down to where you’ll position the half-up.
- Secure at the base of your neck: Position the ponytail about an inch below where your ears end. This feels both modern and refined.
- Smooth the ponytail: Use the smoothing serum again on the ponytail section, then run a fine-tooth comb through it. Pat down any flyaways with a tiny brush dipped in serum.
- Finish strategically: Use a firm-hold hairspray on just the back and sides, avoiding the front where you want to maintain a soft, face-framing effect.
Pro tip: If your hair isn’t naturally sleek, a flat iron on low heat used after blow-drying gives you the polished finish this style requires without damaging your hair.
4. The Twisted Half-Up Ponytail

This style adds visual interest and texture through a simple twist rather than a braid. It’s easier to master than braiding, works with any hair texture (even slippery straight hair), and looks intentionally styled rather than like a basic half-up.
The Appeal of a Twisted Design
A twist catches the eye because it adds movement and pattern to the style. Even if your hair is completely smooth, the twist creates visual depth. For medium hair, a twist also helps integrate the loose bottom section with the pulled-up section, creating a more cohesive overall look.
Executing the Perfect Twist
- Section your hair precisely: Create a horizontal part from temple to temple across the crown, isolating the top half.
- Divide into two sections: Split the top section into two roughly equal halves, one from each side of the center part.
- Twist each section away from the face: Starting at the temple, twist each section loosely back toward the crown. The twists should spiral away from your face, creating a flattering frame.
- Wrap one twist around the other: Once both twists reach the crown, wrap one around the other, creating an interlocking effect.
- Secure tightly: Use a small elastic to secure both twists together at the crown. Bobby pins hidden inside the twist add security if needed.
- Gently loosen the twist: Pull the edges of each twist outward slightly to create a fuller, less tight appearance. This softens the style considerably.
- Release a few face-framing pieces: Let two or three small sections escape from the sides of the twist. These pieces should frame your face softly.
Worth knowing: Twists work best when your hair has some texture or texture product applied. Completely straight hair can slip out of a twist more easily than textured hair.
5. The Half-Up with Face-Framing Layers
This version deliberately frames the face with loose pieces, creating softness and dimension. It’s particularly flattering for round or square face shapes because the framing pieces create vertical lines that balance facial proportions.
Why Face-Framing Changes Everything
Face-framing layers make a hairstyle feel intentional and fashion-forward rather than functional. They also soften the overall effect, preventing a style from looking too severe or pulled-back. For medium hair, face-framing pieces add dimension and prevent the style from feeling too heavy on the head.
Creating Flattering Face Frames
- Pull back the bulk: Create your basic half-up at the crown or slightly above, securing everything except two sections at the temples.
- Choose the right-sized pieces: The face-framing sections should be about 1-1.5 inches wide at the temple. They should frame the cheekbones, not dangle in front of the eyes.
- Create texture in the frames: Curl these sections loosely with a curling iron, or spray them with texture spray. They should have visible movement and dimension.
- Let them rest naturally: Allow the face-framing pieces to curl or fall naturally around the face. Don’t pin them back—they’re meant to be visible.
- Style around your face shape: For round faces, let the pieces be wavy or spiral curls to create vertical lines. For long faces, gentle waves that sit farther back work better.
- Blend with the rest: Make sure the texture and color of the face-framing pieces matches the rest of your hair. They should look intentional, not like an accident.
Pro tip: Don’t make face-framing pieces too thick. Thinner pieces look more elegant and deliberate than chunky sections. You want softness, not volume.
6. The Half-Up Bubble Ponytail
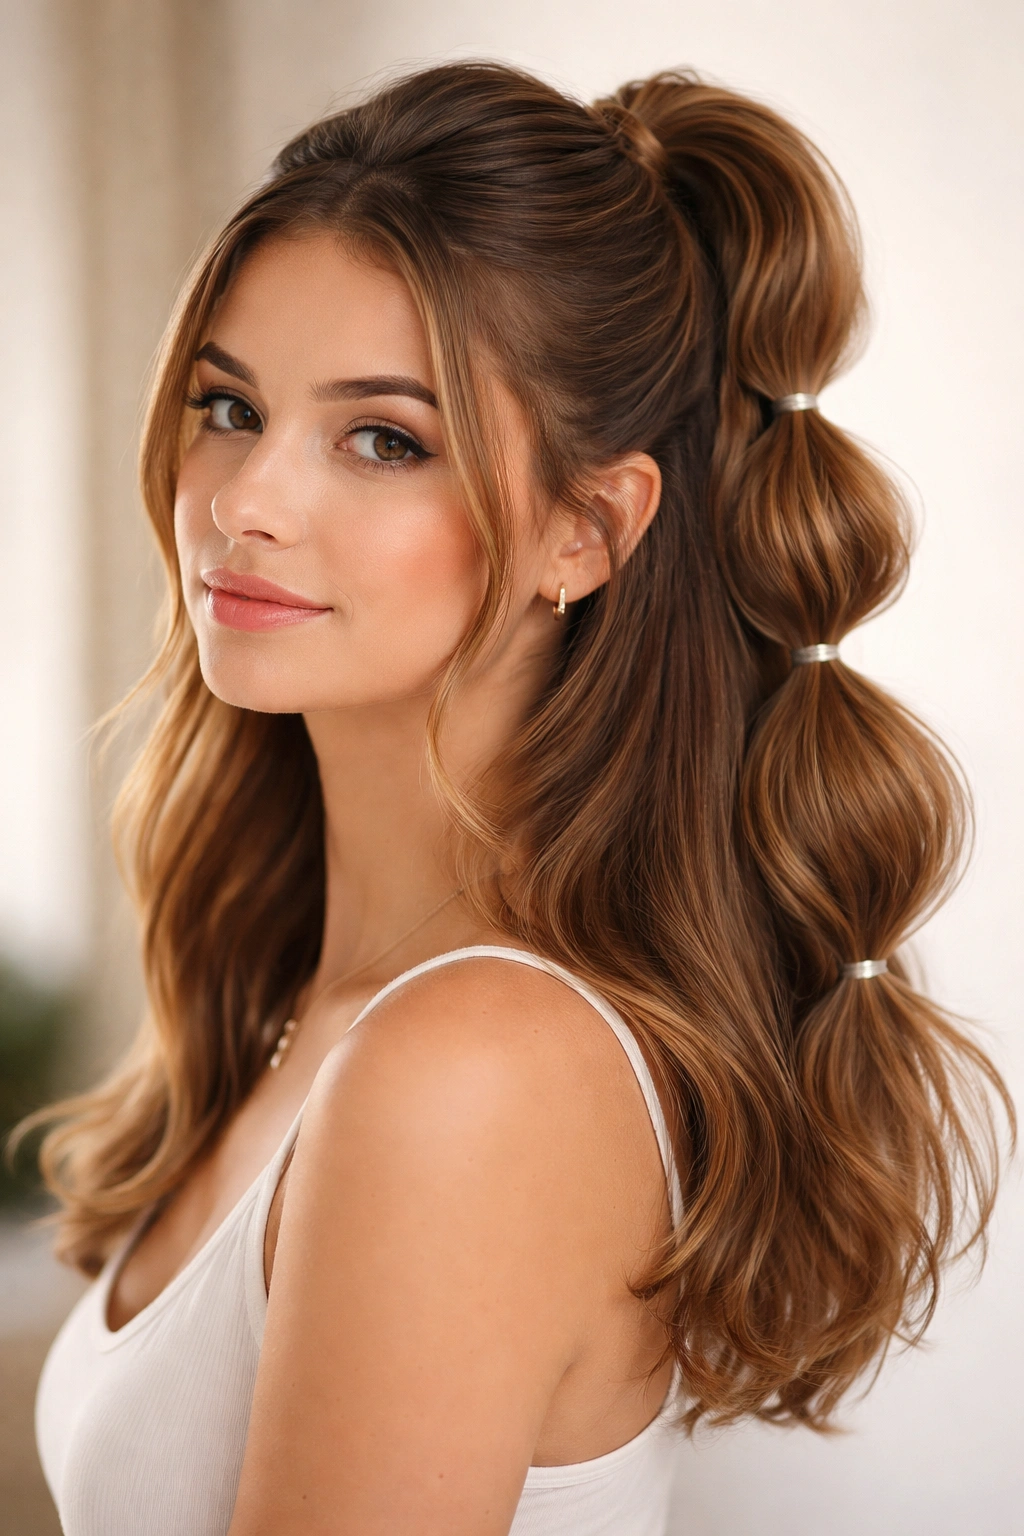
This playful style adds dimension and whimsy through strategically placed elastics that create “bubbles” of puffed-out hair down the length of the ponytail. It works especially well for casual settings, creative work environments, or when you want a style that feels fun and youthful.
What Makes Bubbles So Visually Interesting
Bubbles create rhythm and visual interest down the length of the ponytail. They also make the style feel fuller and more textured than a standard ponytail would. For medium hair, bubbles prevent the ponytail from looking thin or stringy, especially if you have finer hair.
Creating Defined Bubbles
- Secure your basic half-up: Pull the top section back and secure with an elastic at the crown or slightly above.
- Decide on bubble count: For medium hair, 3-4 bubbles down the length of the ponytail looks balanced. Too many bubbles crowd the style.
- Space them evenly: Measure mentally so each bubble sits about 2-3 inches below the previous elastic.
- Create each bubble: Hold the ponytail loosely and secure a second elastic about 2-3 inches down from the first. Gently tease and pull the section of hair between the two elastics outward, creating a puffed effect.
- Repeat the pattern: Continue placing elastics and puffing out sections until you reach your desired number of bubbles.
- Make bubbles uniform: Step back and adjust the size and shape of each bubble so they’re similar in fullness and dimension.
- Hide the elastics: If possible, use clear elastics or match them to your hair color. You can also wrap a small section of hair from the ponytail around each elastic to hide it.
Worth knowing: This style works best on hair that’s been textured slightly. Smooth, straight hair can be stubborn about holding bubble shape. A texture spray or light braiding the night before helps the style last.
7. The Braided Half-Up Ponytail
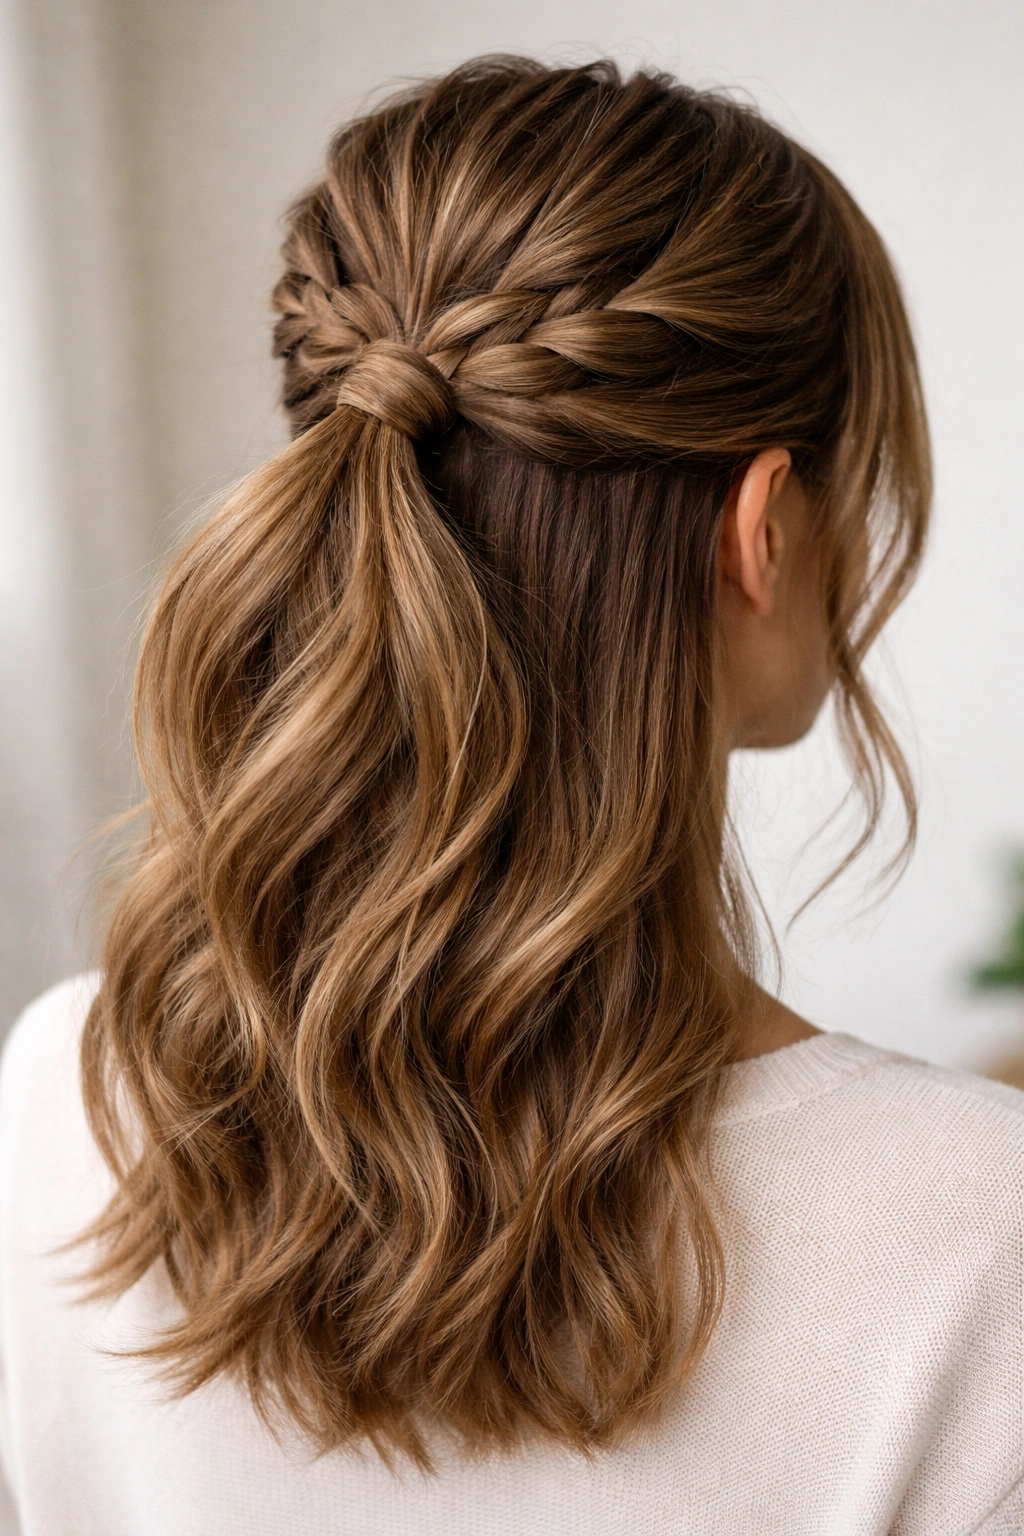
A braid incorporated into your half-up takes the style from simple to sophisticated instantly. A full three-strand braid, a fishtail braid, or even a Dutch braid can anchor the half-up, making it feel intricate and intentionally styled.
Why Braiding Adds So Much Visual Interest
Braids add texture, pattern, and a sense of effort—even if the actual braiding took just a few minutes. For medium hair, a braid also helps secure the style more effectively than a simple elastic, reducing slipping throughout the day. The braid also creates natural volume and thickness that a basic half-up sometimes lacks.
Braiding Into Your Half-Up
- Choose your braid type: A loose three-strand braid feels soft and romantic. A fishtail braid looks modern and intricate. A Dutch braid sits closer to the head and feels more controlled. Pick based on the occasion.
- Section carefully: If braiding from the crown down, section the top portion as you would for a basic half-up. If creating a braid that wraps around, start at one temple.
- Braid loosely: Tight braids look unfinished and can feel uncomfortable. A loose braid that you gently pull apart afterward looks intentional and fuller.
- Incorporate into the half-up: Once your braid reaches the back, secure it together with the un-braided top section using one elastic. The braid becomes the focal point of the ponytail.
- Integrate the loose section: Make sure the un-braided loose hair blends smoothly with the braided ponytail section. If there’s a visible line, gently brush between them to blend.
- Soften the edges: After securing, gently pull the edges of the braid outward to soften it and make it appear fuller.
Pro tip: Practice braiding when your hair is damp or sprayed with texture product. Damp hair is more cooperative than dry hair, and texture product prevents slipping.
8. The Half-Up with a Decorative Hair Clip
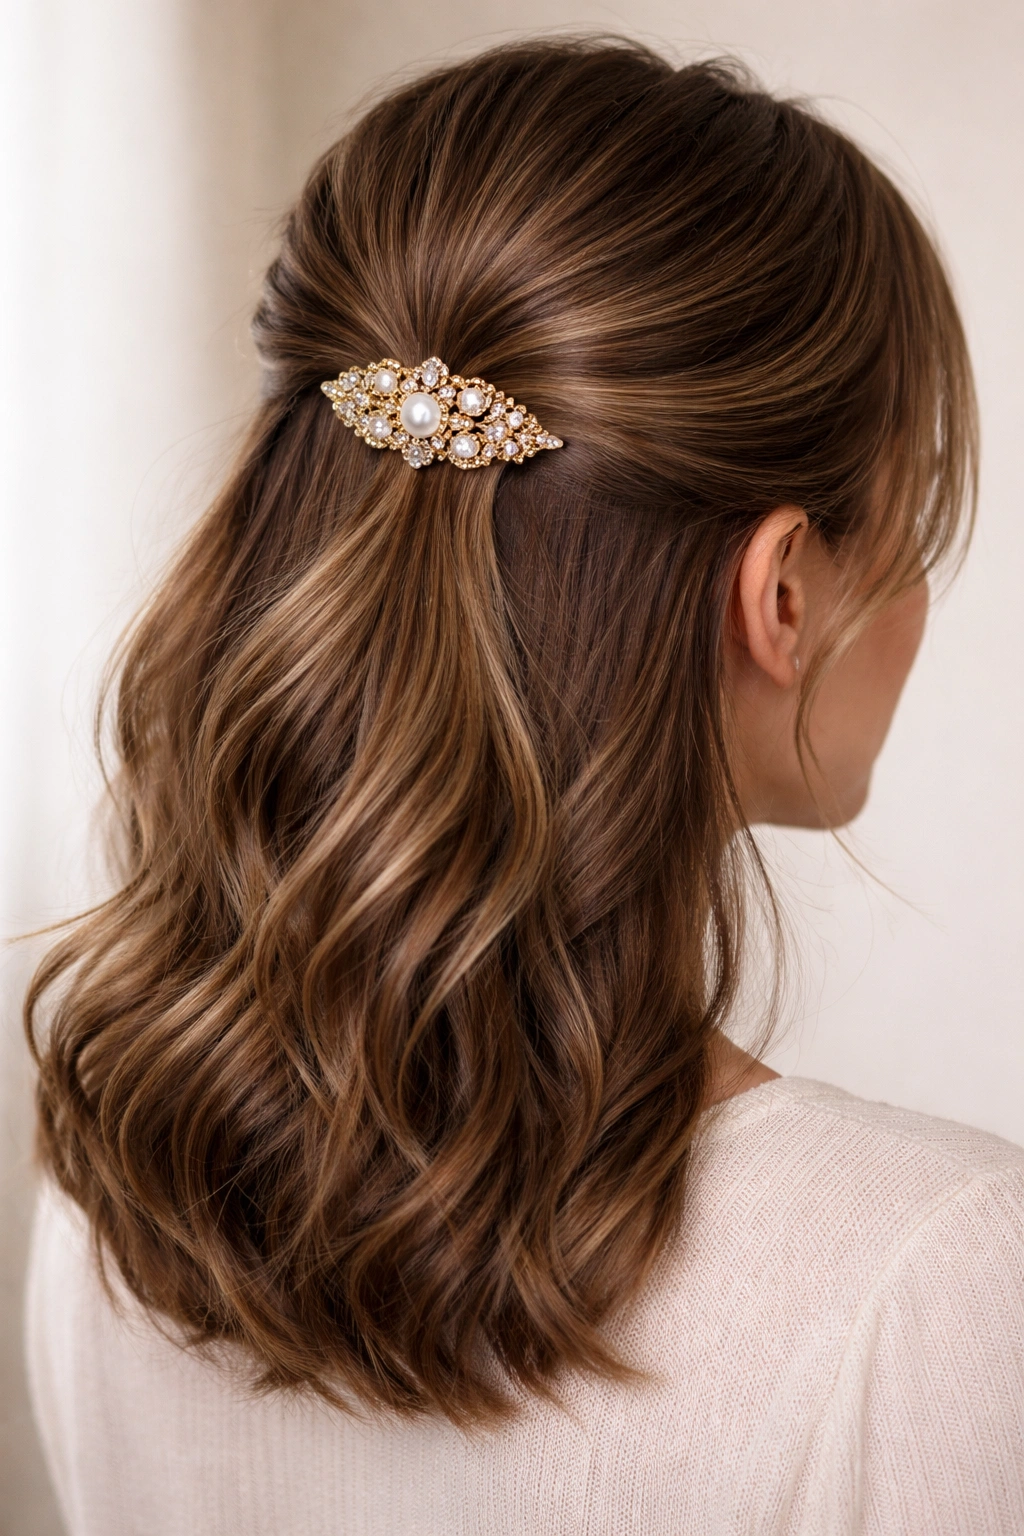
Adding a statement hair clip transforms a simple half-up into something instantly fashionable and polished. The clip becomes the focal point, which means the style itself can stay simple while the accessory does the visual work.
How Clips Elevate the Entire Look
A well-chosen hair clip adds personality and intentionality to your style. It catches light, draws attention, and makes the half-up feel special rather than everyday. For medium hair, clips also serve a practical purpose—they can secure the half-up more firmly than a standard elastic, helping the style last through movement and activity.
Choosing and Placing Clips Effectively
- Select the right size: For medium hair, a clip should be substantial enough to be a visual element but not so large it overwhelms your head. A clip that’s 2-3 inches long works well for most people.
- Match to the occasion: Metal clips feel more formal. Tortoiseshell or colorful clips feel fun and casual. Pearl or gem-adorned clips feel special and dressy.
- Consider placement: You can place the clip at the center back where the ponytail secures, covering your elastic. You can also place it slightly lower, on the ponytail itself, for a different visual effect.
- Coordinate with your outfit: Your clip can match your hair color, match your outfit, provide contrast, or create a specific mood. Think intentionally about this choice.
- Use clips to hide imperfections: If your elastic looks bulky or your ponytail feels less full than you’d like, placing a clip directly over it draws the eye to the accessory instead.
- Layer clips for interest: Using two smaller clips instead of one large one creates a modern, intentional look. Space them strategically for balance.
Worth knowing: The best clips have teeth or gripping mechanisms that truly hold hair, not just rest on top of it. Test your clip’s grip before styling your entire half-up around it.
9. The Half-Up with Underlayer Section

This technique creates the illusion of fuller, thicker hair by securing a bottom layer separately from a top layer. It’s particularly useful if you have finer hair or if you want the half-up to feel more substantial and dramatic.
Why Layering Creates Dimension
Layering the half-up means the secured hair has texture and depth rather than being one flat mass. Light can catch different parts of the ponytail, creating shadow and dimension. For medium hair, layering also prevents the half-up from looking thin or wispy, especially as your hair relaxes throughout the day.
Building the Layered Effect
- Create your first half-up: Pull back the very top section (from your crown) and secure it tightly with an elastic.
- Identify your second section: Below the first secured section, identify a second thicker section—roughly the width from ear to ear. This becomes your underlayer.
- Secure the underlayer separately: Gather this second section and secure it with its own elastic, positioned just below the first one. You should see the top secured section distinctly above the bottom one.
- Blend the layers: Gently tease and pull at the edges where the two secured sections meet, blending them together visually so they appear as one voluminous ponytail rather than two distinct sections.
- Create movement: Pull the secured sections slightly outward and downward to create dimension and prevent a too-tight appearance.
- Adjust balance: The top layer should be slightly thinner than the bottom layer for the most flattering proportions. Adjust your sectioning if needed.
Pro tip: This technique works beautifully with the bubble ponytail style. Create your layered half-up, then add bubbles down the length of the combined ponytail.
10. The Side-Swept Half-Up Ponytail

This version moves away from the classic center placement, instead securing the ponytail to one side. It creates an asymmetrical, fashion-forward look that works beautifully for all face shapes and gives you a distinctly different vibe from traditional half-ups.
Why Asymmetry Feels So Current
Side-swept styles feel intentional and stylish rather than everyday. They also allow you to frame one side of your face while leaving the other open, which can be flattering depending on your facial proportions. For medium hair, the side placement creates natural movement and prevents the style from feeling too balanced or static.
Positioning the Side-Swept Half-Up
- Create a deep side part: Part your hair deeply on one side, bringing most of your hair over to that side. The part should begin at the temple and run straight back.
- Section for the half-up: From the side with more hair, take the top portion and pull it back, but not straight back—angle it slightly toward the opposite side.
- Secure on the opposite side: Place your elastic not at the center back but toward the opposite side. If you have more hair on the right side, secure the ponytail behind the left ear.
- Let the loose section flow: The bottom section (the part not pulled up) should flow naturally down one side, creating a cascading effect.
- Add texture for movement: Curl or wave the loose section so it has visible movement and doesn’t look like flat, straight hair falling down one side.
- Frame your face: Pull a few small pieces from the side part forward to frame your face. These should be visible and intentional.
Worth knowing: This style works best if you’re willing to embrace asymmetry. If you try to keep everything balanced, the side-swept effect gets lost.
11. The Half-Up with Ribbon or Cord
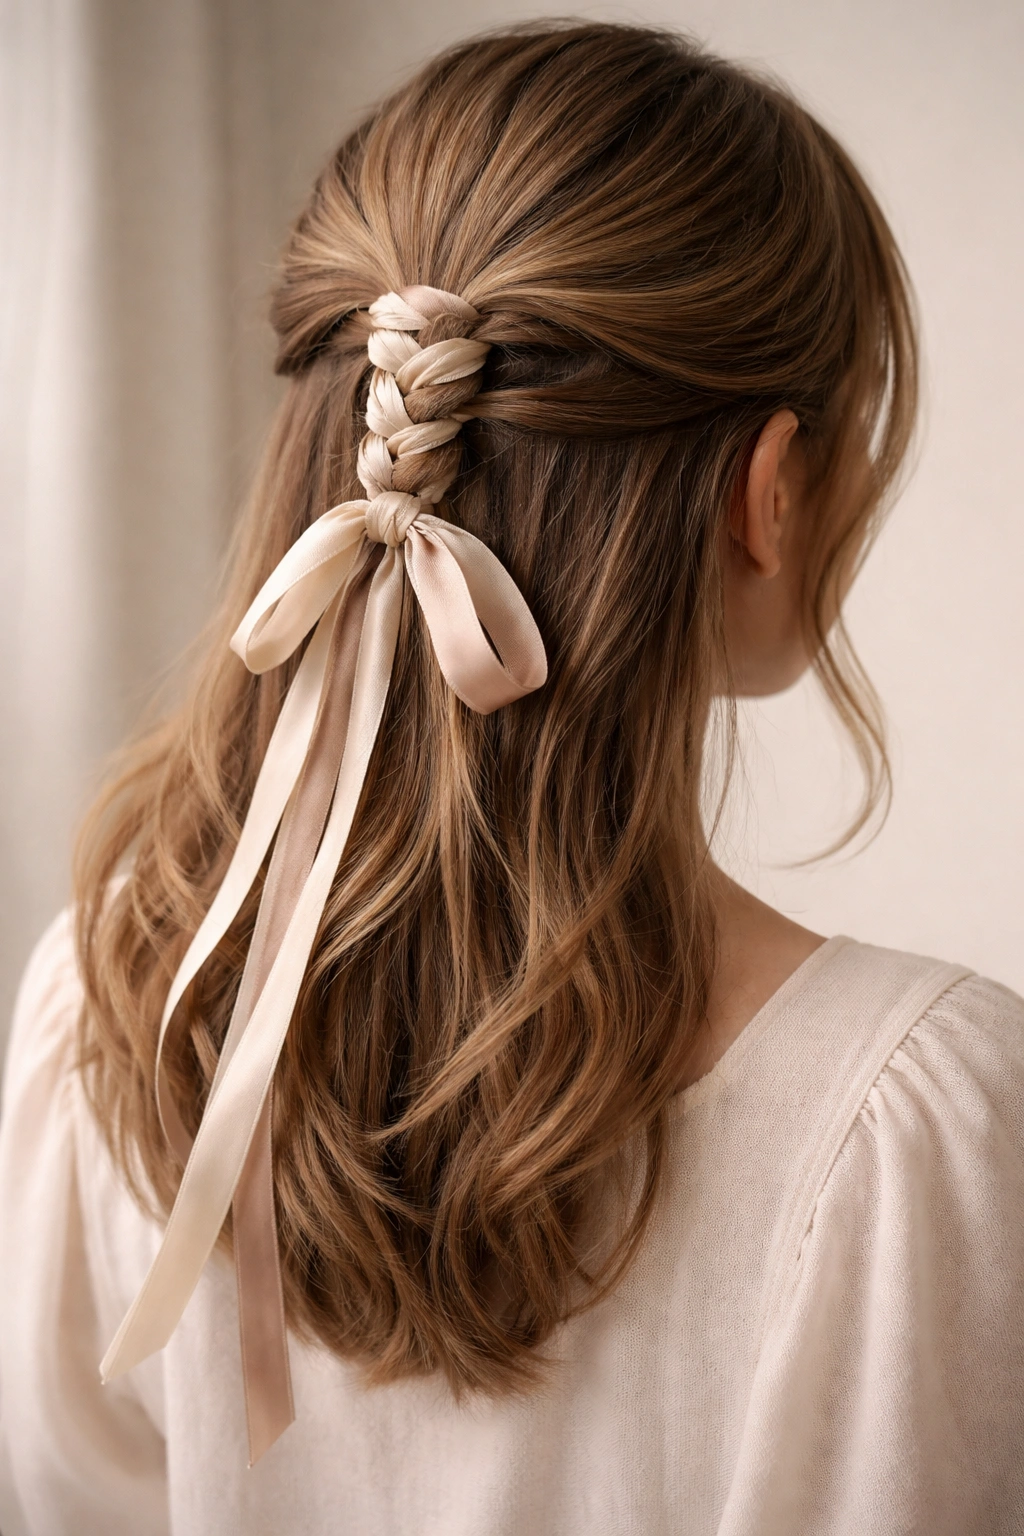
Weaving a ribbon, cord, or even a small chain through your half-up adds luxury and visual interest instantly. This version feels feminine, intentional, and special—perfect for dates, celebrations, or when you want your hair to feel elevated.
How Accessories Transform the Style
A ribbon or cord adds color, texture, and a sense of occasion to a basic half-up. These accessories catch the light and create visual interest that a plain elastic simply can’t match. For medium hair, accessories also create the illusion of fuller, thicker hair when woven through the secured section.
Incorporating Ribbons and Cords Effectively
- Choose the right accessory: Silk ribbons feel elegant. Leather cords feel edgy. Delicate chains feel modern. Match your choice to the occasion and your personal style.
- Select complementary colors: Your accessory can match your hair color, match your outfit, create contrast, or create a monochromatic look with your hair. All approaches work—it’s about intentionality.
- Create your base half-up: Secure a basic half-up as you normally would. This is your foundation.
- Wrap the accessory: Starting at the secured elastic, wrap your ribbon or cord around the base of the ponytail, going around the elastic 1-2 times. This anchors the accessory.
- Weave or braid if desired: You can weave the ribbon through the ponytail itself, creating a pattern. You can also simply wrap it spiraling down the length of the ponytail.
- Secure the end: Tuck the end of the ribbon or cord under the wrapping at the elastic, or secure it with a small bobby pin hidden within the ponytail.
- Create loose waves in the ponytail: The combination of a structured accessory with loose, flowing hair creates the most flattering balance.
Pro tip: If using ribbon, add a small dab of clear nail polish where you cut the ribbon end. This prevents fraying and keeps the ribbon looking intentional.
12. The Romantic Half-Up with Volume
This style emphasizes softness and romance through strategic teasing and loose curls. It’s the version for special occasions, dates, or when you want your hair to feel feminine and effortlessly beautiful.
Creating Romance Through Volume and Texture
The romantic half-up relies on volume, movement, and softness rather than sleekness. It feels less structured than other half-up variations and more like something that naturally happened. For medium hair, romance comes from building volume at the crown and maintaining loose waves throughout both the secured and loose sections.
Building the Romantic Effect
- Prep with texture: Blow-dry your hair with a round brush to build natural volume. Or use a lightweight mousse applied to damp roots before blow-drying.
- Create loose waves: Use a curling iron to create loose waves or curls throughout your entire head, including the section you’ll pull up. Vary the direction of the curls for a natural appearance.
- Tease at the crown: Use a fine-tooth or teasing brush to backcomb gently at the crown area where you’ll place the half-up. This creates an anchor and adds volume.
- Gather loosely: Rather than pulling the hair back tightly, gather it gently, keeping the crown area full and voluminous. The secured section should look relaxed, not pulled-back.
- Secure and soften: Use an elastic to secure the half-up, then gently pull sections of hair around the elastic outward, creating a fuller appearance and softening the line where the hair is secured.
- Release face-framing pieces: Let several small sections escape from around the face, creating a soft frame.
- Add a final texture layer: Spray lightly with texture spray or a light hairspray that maintains movement rather than creating stiffness.
Worth knowing: The romantic half-up looks best when your hair is freshly curled. As waves relax and loosen throughout the day, the style maintains its soft, intentional appearance even when it’s no longer as structured.
Final Thoughts
The half-up ponytail is endlessly adaptable, and these twelve versions barely scratch the surface of what’s possible. The real power of mastering the half-up lies in understanding the fundamentals—placement, section size, securing method, and texture—and then making small adjustments based on your hair type, face shape, and the feeling you want to create. Medium hair is genuinely ideal for the half-up ponytail because it has enough length to create real options without being so long that styles become heavy or require excessive products and tools.
The best half-up looks effortless but isn’t—it’s the result of understanding why each element matters. A half-up placed slightly higher feels younger and more playful than one placed lower. Adding texture changes the entire mood from polished to relaxed. Incorporating twists or braids suggests more effort than simply securing hair with an elastic, even though it’s not significantly more complicated. Once you internalize these principles, you’ll find yourself experimenting naturally, creating new variations that feel fresh and intentional.
Start with whichever style resonates most strongly with your personality and lifestyle. Practice it until it becomes muscle memory—until you can create it in under five minutes without thinking through each step. Then move to the next. Within a few weeks of regular practice, you’ll have a collection of genuinely different styles that all start from the same basic technique. That versatility means you’ll never again feel bored with your hair or stuck wearing the same style day after day.