



Thinning hair after 60 comes with frustration that most people don’t understand until they’re living it. You look in the mirror and notice that fullness you once took for granted has shifted — your scalp shows through more easily, styles that always worked suddenly fall flat, and products that promised volume feel like they’re doing nothing at all. What makes it worse is that not every haircut works with this reality. Some styles demand thick, heavy hair to hold their shape, leaving you feeling deflated when the cut doesn’t translate from the salon to home.
The truth is, the right layered haircut can actually make thin hair look fuller and feel more manageable than it has in years. Layers create the optical illusion of density by breaking up the hair into shorter, texturized sections. They remove weight strategically so hair lifts away from the scalp instead of clinging flat. They work with gravity and with the natural thinning patterns that come with age, rather than against them. And they make styling exponentially easier — many of these cuts look intentionally tousled and piece-y, which means bedhead becomes part of the design instead of something to fight against.
The best layered cuts for thin hair over 60 focus on smart placement rather than just choppy chaos. They work with where your hair is thickest, create lift at the crown where you need it most, and avoid the bulk and weight that can make fine hair look limp. A good stylist who understands how thin hair behaves — how it moves, how it holds texture, where it needs support — can transform the way you feel about your hair in a single appointment.
1. The Face-Framing Pixie
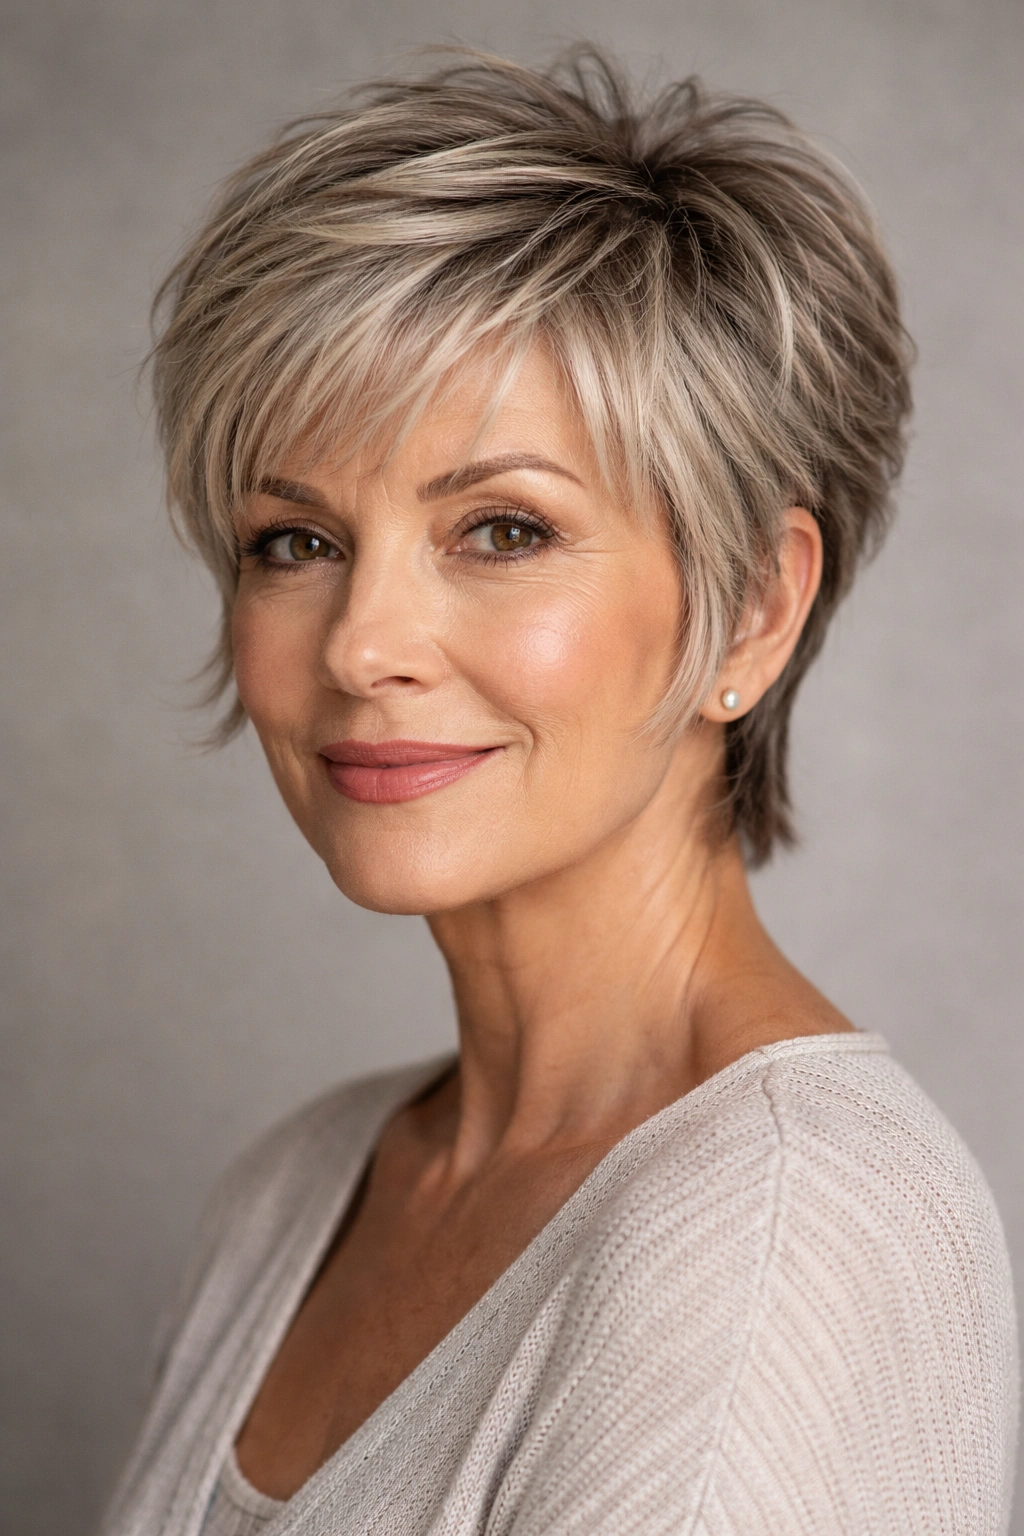
A modern pixie with strategic layers is one of the most liberating cuts you can choose when thinning becomes noticeable. This style keeps the length short — typically one to two inches on top — but layers the crown heavily so it has lift and texture rather than lying flat against your head. The shorter length means fine hair doesn’t have the weight pulling down on each strand, and thinning areas at the crown become invisible because the short layers create perceived volume.
Why This Cut Works Beautifully for Thin Hair
The face-framing pixie removes all the hair weight that would otherwise make thinning areas stand out. Your stylist can create texture throughout the crown using point-cutting or razoring, which means individual hairs stick out slightly and catch light — this is what creates the illusion of density. A pixie also eliminates the awkward middle-length stage where thin hair becomes most noticeable. You go from looking like something is falling out to looking intentionally styled and edgy.
What to Discuss With Your Stylist
- Ask for heavy layering through the crown and sides to maximize volume where thinning is most visible
- Request that longer pieces be left around your face to frame and soften the overall look
- Discuss whether you want the back tapered short or slightly longer for a more feminine silhouette
- Make clear that you want texture and movement, not a blunt geometric shape
Styling reality: A pixie requires weekly or biweekly trims to maintain its shape, and you’ll style it with a blow dryer and light texture product most days. But the cut itself is so forgiving that you can also let it dry naturally and still look intentional.
2. The Textured Lob
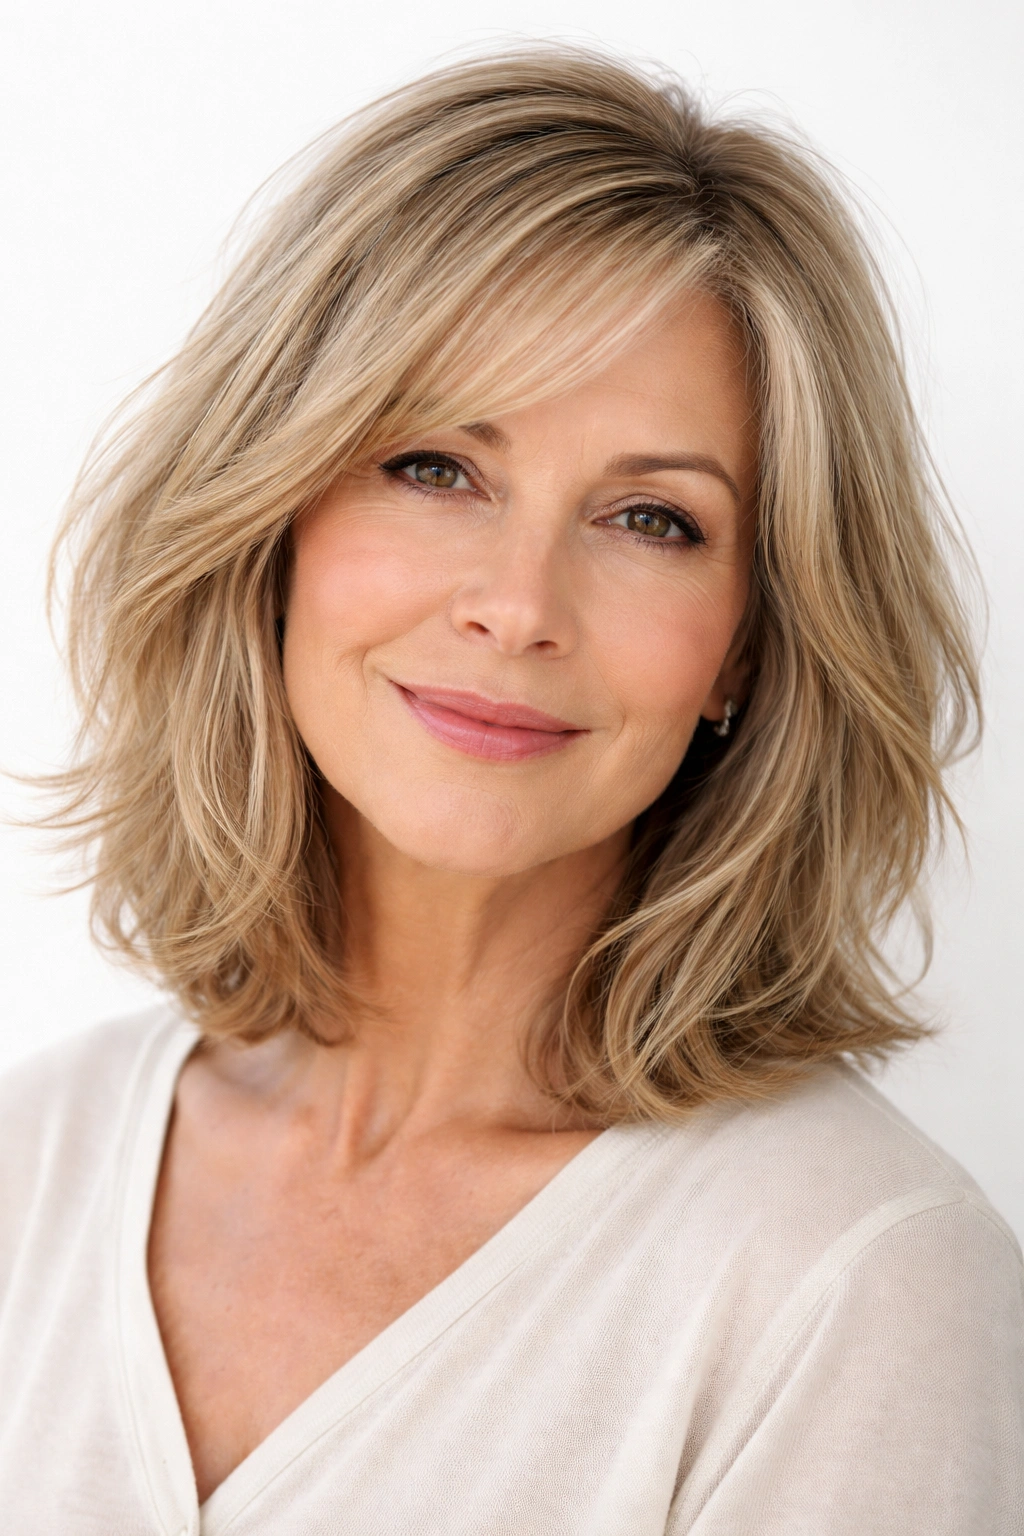
A lob — that’s a long bob hitting somewhere between your chin and shoulders — works beautifully for thin hair over 60 when it’s cut with abundant layers and texture. This length is long enough to feel feminine and familiar, but short enough that the individual layers don’t get weighed down. The key is that the cut should feel choppy and piece-y, not blunt or heavy. You want gaps between the sections of hair, not solid weight throughout.
Why Texture Changes Everything
A blunt lob with one length would cling to thin hair and emphasize scalp visibility. But a textured lob with layers every half-inch or so creates pockets of space. Light passes through these gaps, making the overall look appear denser than it actually is. The texture also means your styling options multiply — you can wear it wavy, piece-y, tousled, or even somewhat undone without looking like something has gone wrong.
Length and Layer Placement
- The longest pieces should hit around chin length or just below, creating a flattering frame
- Layers should start at cheekbone height and increase in density toward the crown
- Ask your stylist to use a razor or point-cut technique, never blunt shears, to create feathered edges rather than blunt lines
- The crown should have the shortest and most abundant layers to create lift
Maintenance note: This cut needs a trim every four to six weeks to keep the layers distinct and prevent the shape from becoming shapeless.
3. The Choppy Shag
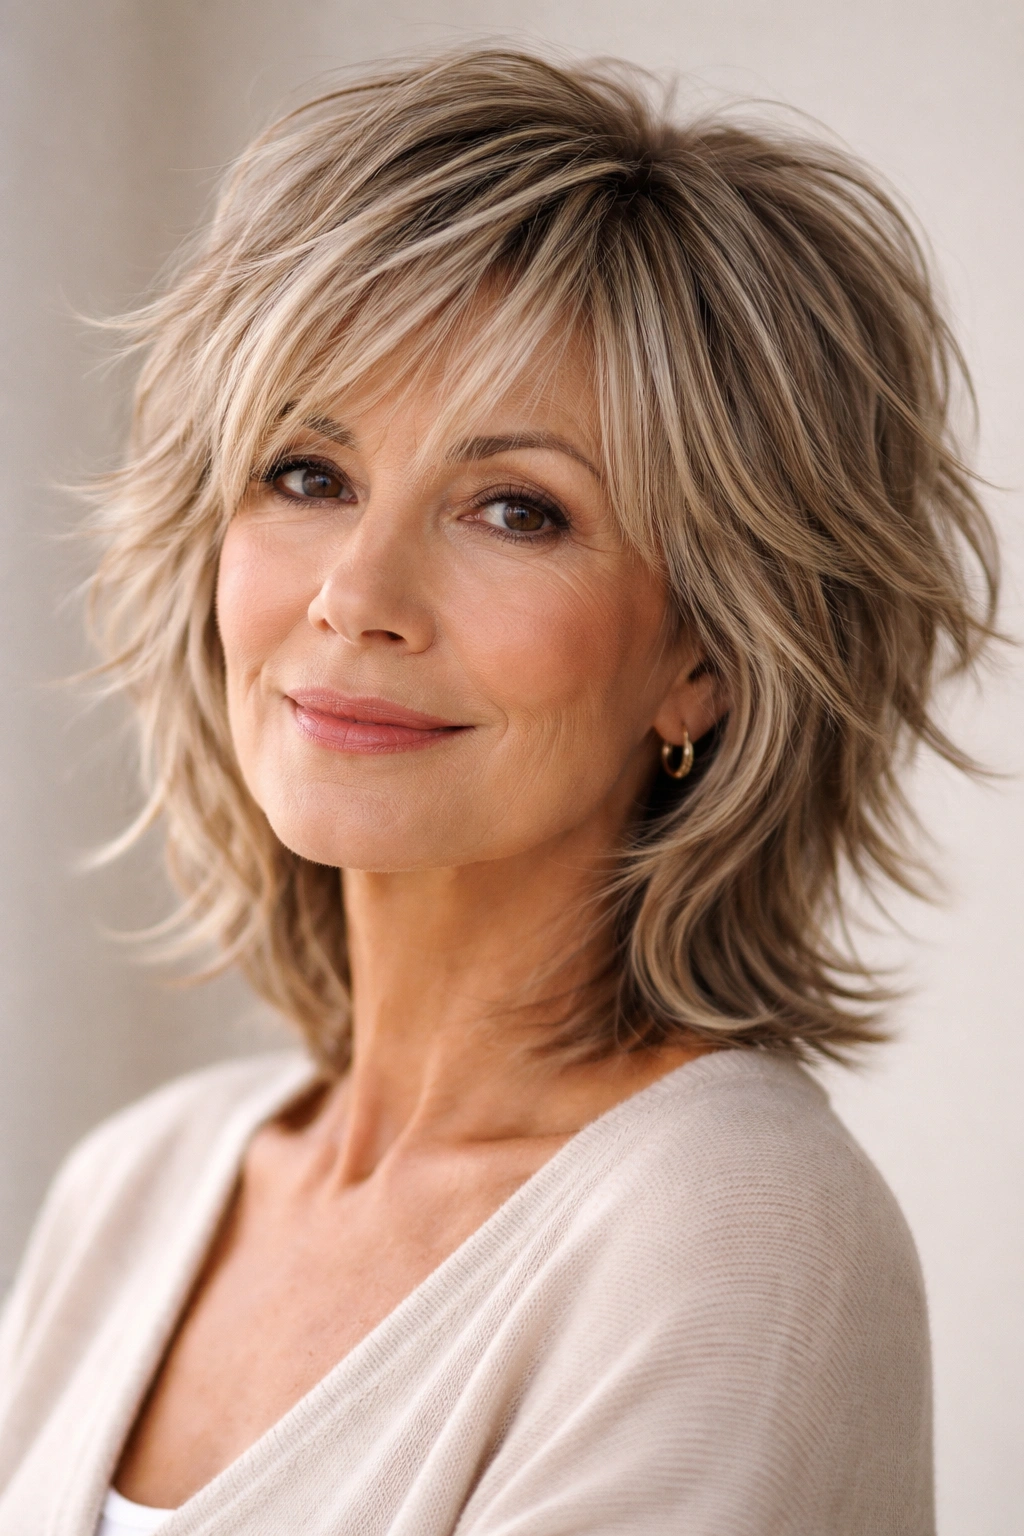
The shag has made a major comeback, and there’s a reason: it’s perfect for thin hair. A shag is essentially layers on top of layers, where the crown is cut extremely short and choppy, and the longest pieces — usually hitting somewhere between ear and shoulder — create movement and shape. The beauty is that the choppy texture means thin hair reads as intentionally piece-y rather than sparse.
Why the Shag Suits Aging, Thinning Hair
A shag works with the texture of thin hair instead of against it. Thin hair often has natural wave or texture, and choppy layers enhance that rather than trying to make it something it’s not. The short, choppy crown creates volume exactly where people over 60 need it most — and because the pieces are so short, even very fine, thinning hair at the crown looks full and textured. The longer layers underneath create shape and movement without weight.
How to Get This Right
- Make sure your stylist understands you want choppy, piece-y layers, not just one overall length with a few longer pieces
- The crown should be cut quite short — three-quarters of an inch to one and a half inches — with choppy texture throughout
- Ask for layers to gradually increase in length as you move toward the face, creating a flattering frame
- Discuss how much texture and choppiness you want; you can go rock-and-roll edgy or softer and more romantic
Styling approach: A shag looks best with texture, so plan to blow-dry it with a round brush and light product, or embrace the tousled, piece-y look that requires almost no styling.
4. The Wispy Bob
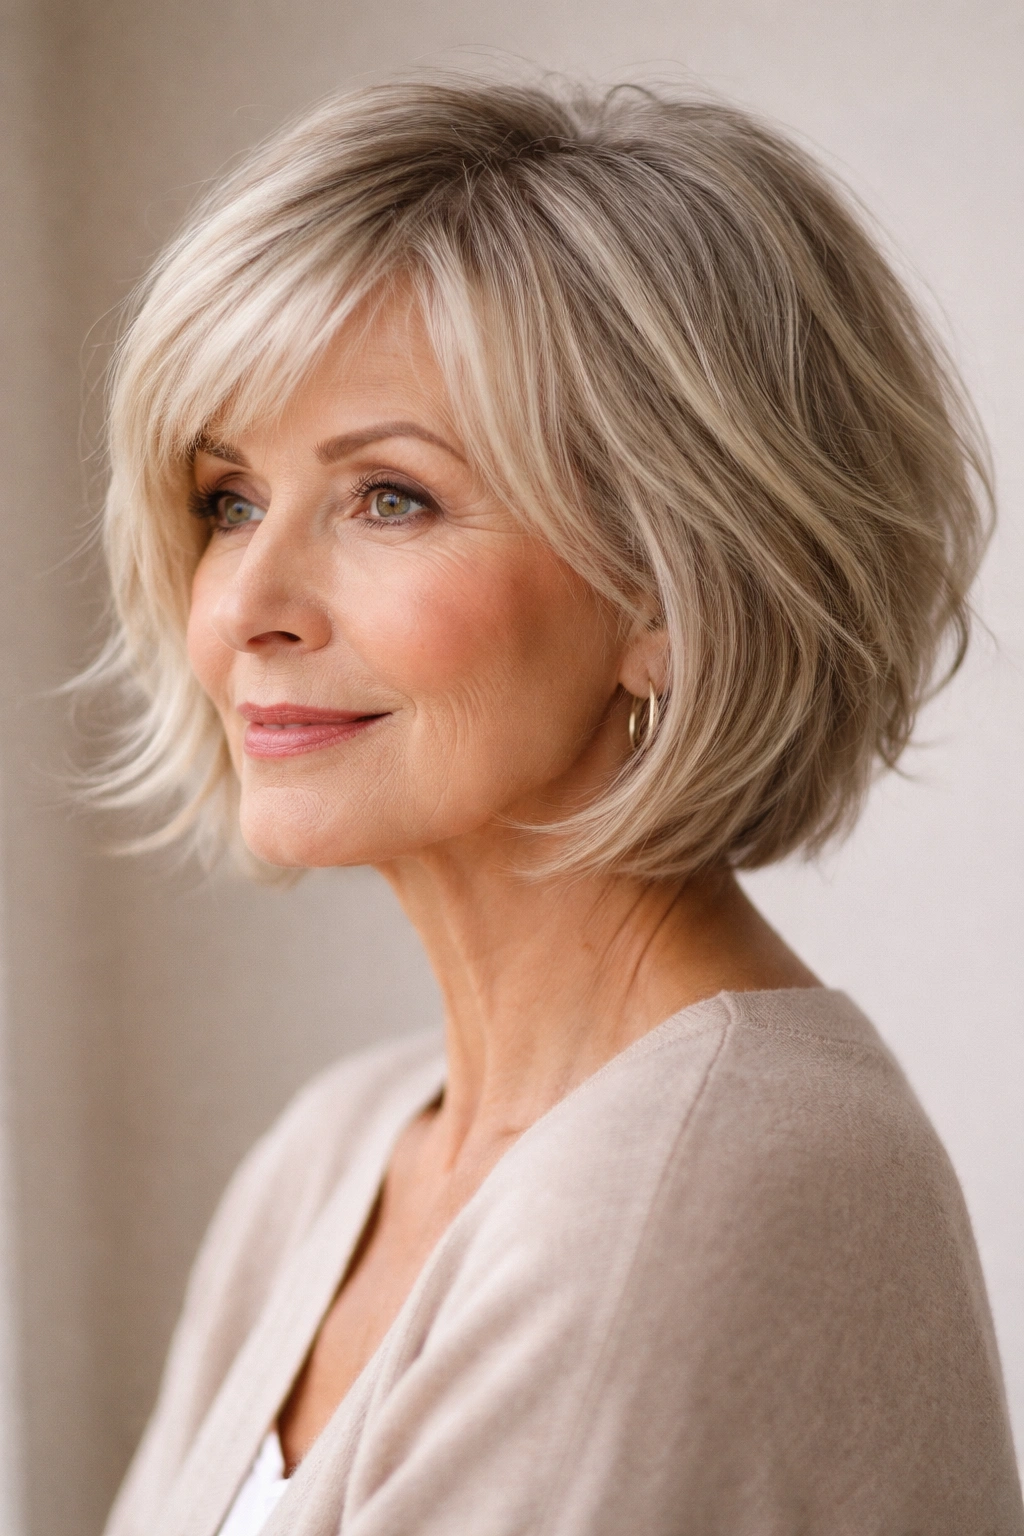
A wispy bob takes the classic bob shape and softens it with layers and feathering so it doesn’t cling to thin hair. This is a shorter bob — usually hitting right at the jawline — cut with layers throughout rather than blunt. The “wispy” part matters: these are soft, feathered edges that create movement and texture, not severe geometric lines.
The Science of Wispy Layering
Wispy layers work because they remove weight strategically while maintaining shape. Your stylist uses razor or point-cutting to create feathered ends that taper rather than blunt ends that stack. This means the hair naturally falls away from your scalp slightly, creating space that makes thin hair appear fuller. The layers also make styling exponential easier — you can blow dry for volume, or let it air-dry and still look polished.
Customizing the Wispy Bob for Your Face
- Consider whether you want the back to be blunt with the sides wispy, or wispy throughout
- Discuss whether you prefer a side part or center part; a side part tends to create more volume on one side
- Ask for longer pieces around your face that can frame and soften; some people want these longer pieces integrated throughout, others want them more defined
- Specify the exact length where the shortest pieces should hit
Confidence factor: Because a wispy bob reads as intentionally styled and modern, it automatically photographs better and feels more polished than a straight-across cut.
5. The Feathered Crop
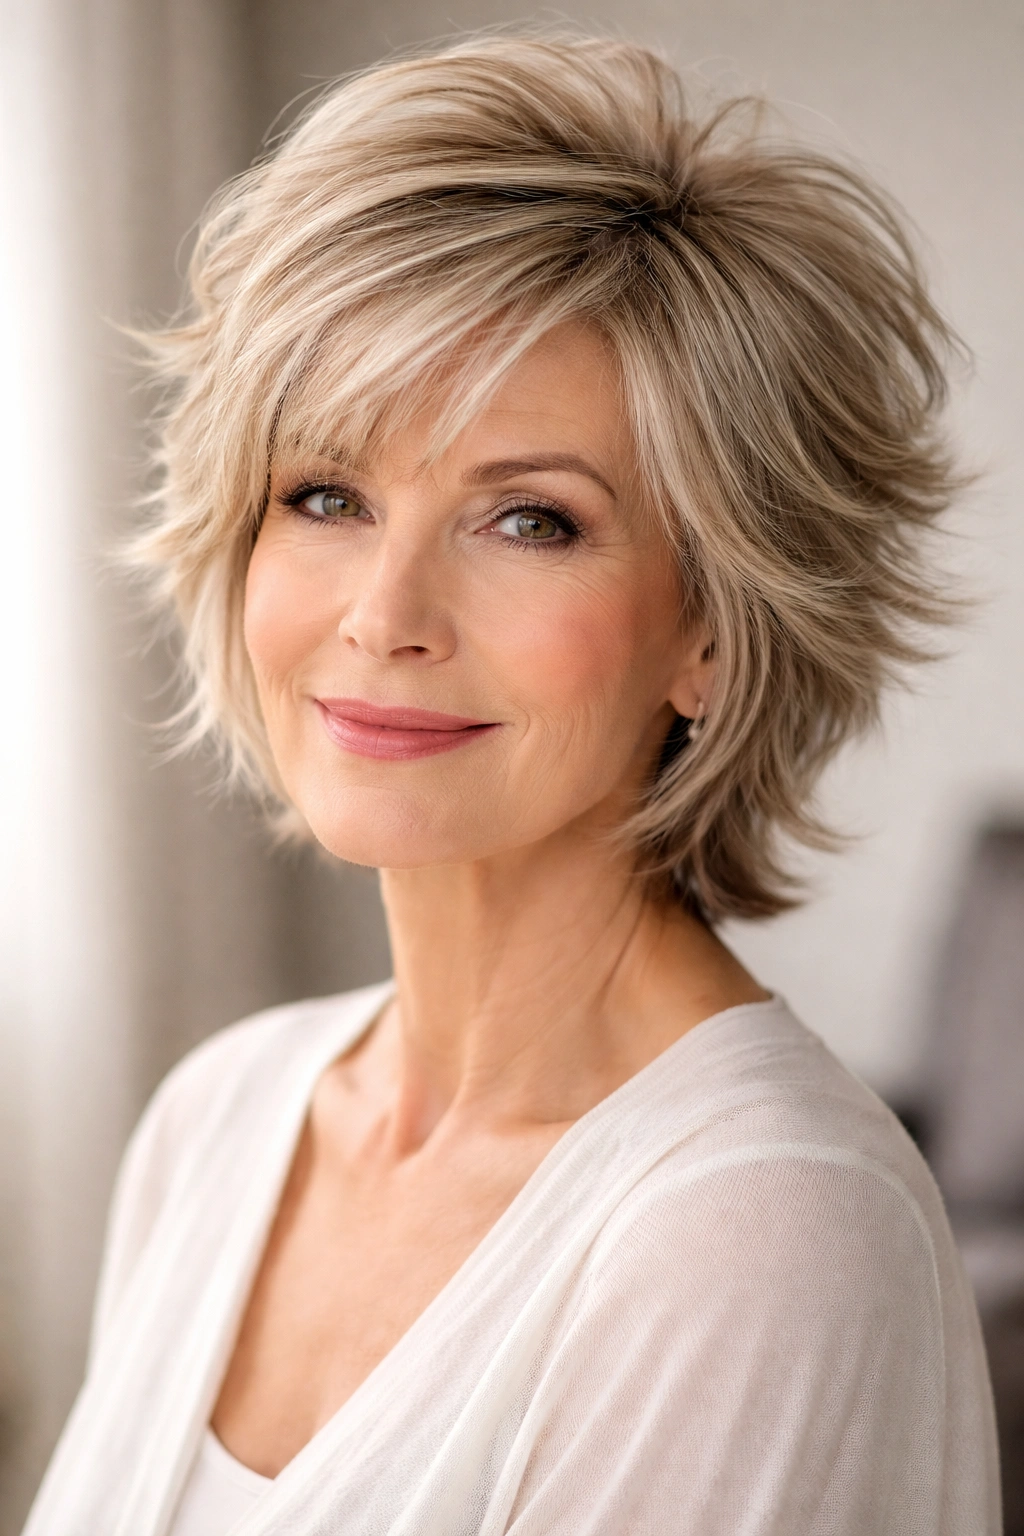
A feathered crop is somewhere between a pixie and a longer style — the crown is short and heavily layered, creating standing texture and volume, while longer feathered pieces frame the face. This cut is feminine, youthful-looking, and incredibly practical for thin hair. The cropped crown means weight is completely eliminated where thinning is most visible, and the feathered face-framing pieces add length and shape.
Why “Feathered” Makes a Difference
Feathering means creating soft, tapered layers that flip slightly outward and don’t sit flat. This is different from chunky layers that create visible sections. Feathered layers are subtle enough that they enhance texture without looking like they’re trying too hard. On thin hair, feathering is magic because it creates the illusion of movement and fullness without requiring thick, heavy hair to work.
Styling a Feathered Crop
- Discuss with your stylist whether you want the crop to be more tapered at the nape (shorter and more defined) or slightly longer for a softer look
- Ask for feathering throughout the crown that encourages hair to lift away from the scalp
- The longer face-framing pieces should be feathered so they flip outward slightly, creating a soft halo rather than hanging limp
- Plan to blow-dry this cut with a round brush and maybe light texture spray for best results
Real talk: This cut requires maintenance every four to six weeks to keep the feathering sharp and the crown from growing too long, but the effort is worth it for the volume and lift it creates.
6. The Tousled Waves
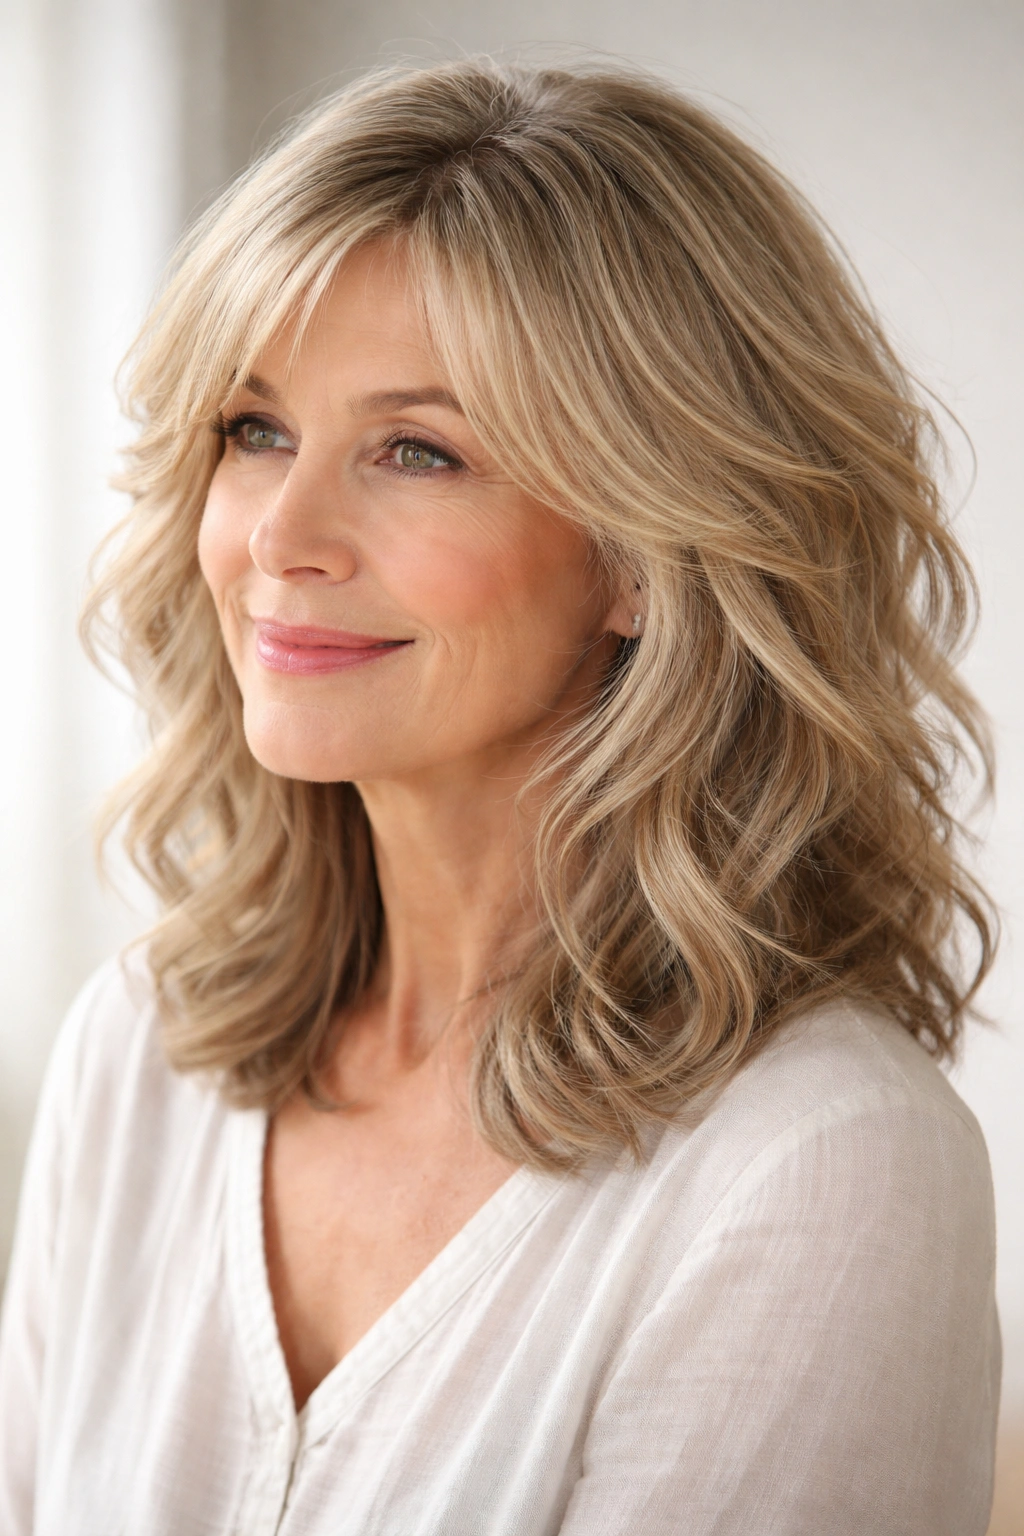
If you love length but struggle with the flat, limp appearance that thin long hair can have, tousled waves with strategic layers offer the best of both worlds. This style keeps length down to mid-shoulder or collarbone, incorporates layers throughout (especially in the crown), and relies on texture and waves to create fullness. The waves are created through styling — blow-drying with a round brush and light product, or using a curling iron — rather than permanent waves.
How Layers Create the Illusion of Density
When you have thin, long hair, individual strands can become very visible. Layers break the hair into sections of different lengths, which means light can bounce through gaps and create perceived density. A tousled wave pattern makes these gaps more obvious, so the overall effect is fuller, thicker-looking hair. The texture also means your styling actually enhances the cut rather than fighting it.
Getting Tousled Waves Right
- Ask your stylist for layers starting at ear-length that increase in density toward the crown
- The longest pieces should hit at or slightly below your collarbone; anything longer will weigh down thin hair
- Request that layers be cut to encourage wave pattern, meaning the length of each layer complements how waves sit naturally
- Discuss your natural wave pattern or lack thereof; if you’re straight-haired, you’ll need to style these waves daily
Daily routine: You’ll typically blow-dry these waves with a round brush while they’re damp, or refresh them with a curling iron. The good news is that tousled waves are forgiving — slightly messy actually looks better than overly polished.
7. The Short Layers with Crown Texture
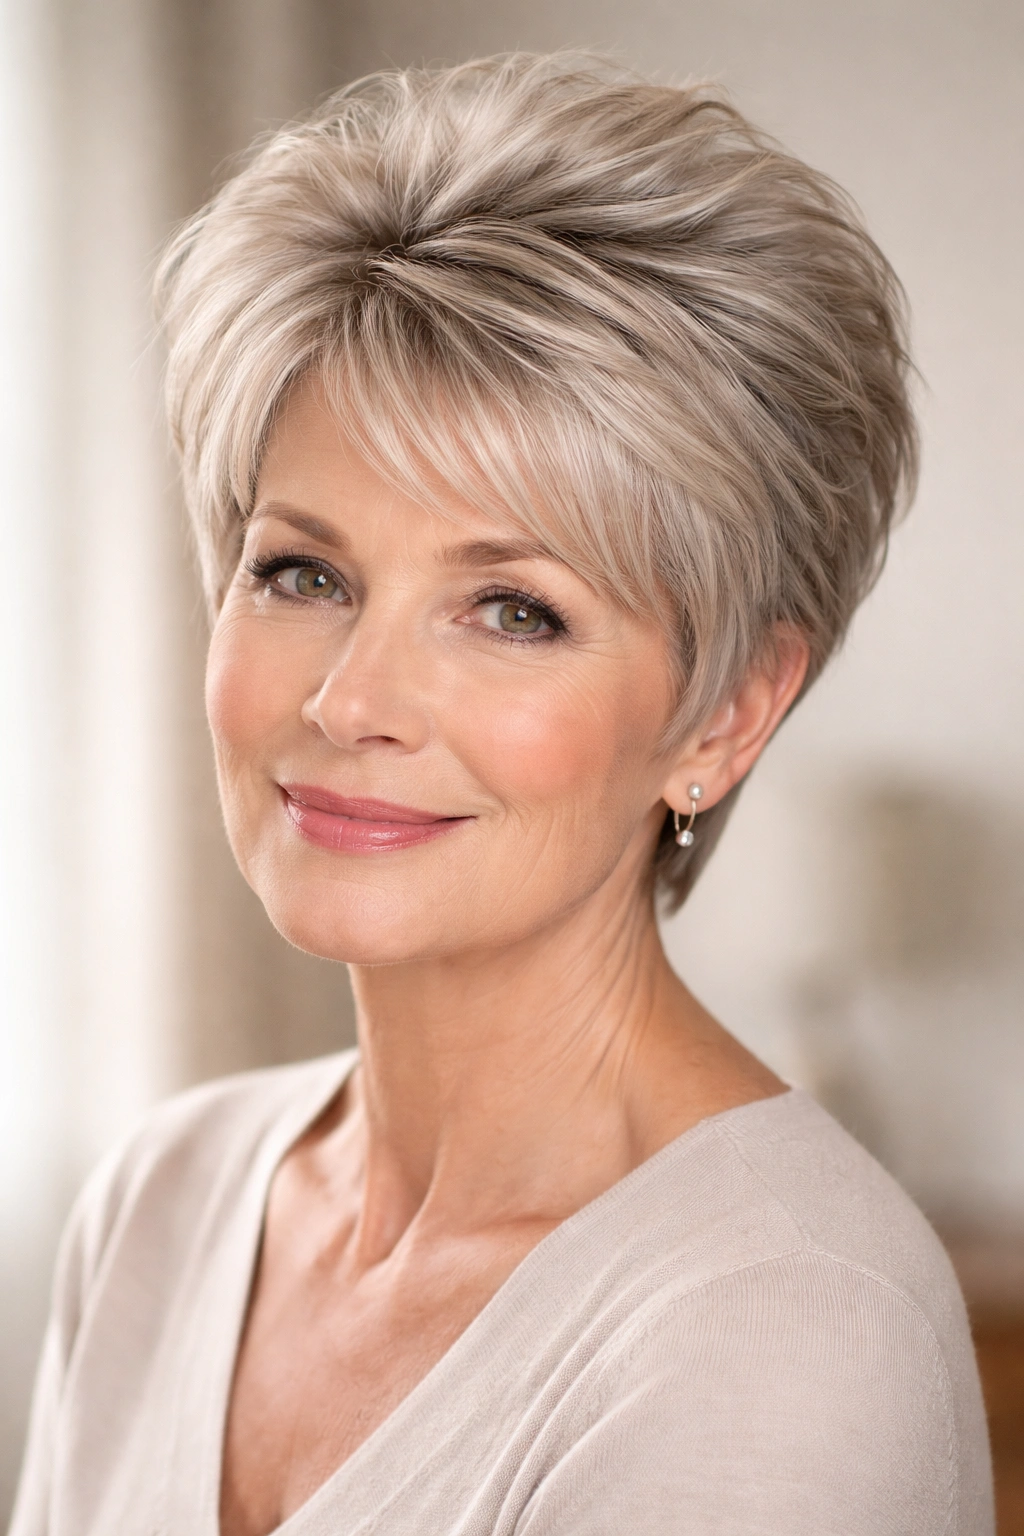
This is the essentials cut — short throughout, heavily layered, with specific attention to creating maximum texture and lift at the crown where thinning is most noticeable. It’s similar to a pixie or crop but can be slightly longer (two to three inches on top) if you want a bit more length to work with while still keeping things light and textured.
Crown Texture as the Game-Changer
The crown is where most people experience thinning after 60, and this cut addresses it directly. Your stylist uses texturizing techniques — point-cutting, razoring, or even thinning shears in strategic spots — to create individual texture throughout the crown. This isn’t about thinning your hair more; it’s about creating visual texture and lift so existing hair looks fuller. The shorter length means thin strands don’t have weight pulling them down.
The Technical Details Matter
- Ask your stylist to focus texturizing on the crown, not the sides; the sides should be relatively smooth so they frame your face cleanly
- Discuss how tapered you want the back and sides; some people prefer very clean lines, others want softness throughout
- Request longer pieces around your face if you want a more feminine frame, or ask for even length throughout if you prefer a bolder look
- Specify whether you want your natural gray to blend with textured layers or whether you prefer solid color
Styling ease: This cut dries into texture and shape naturally if you blow-dry with a round brush, and even air-drying looks intentional because the layers create natural texture.
8. The Side-Swept Layers
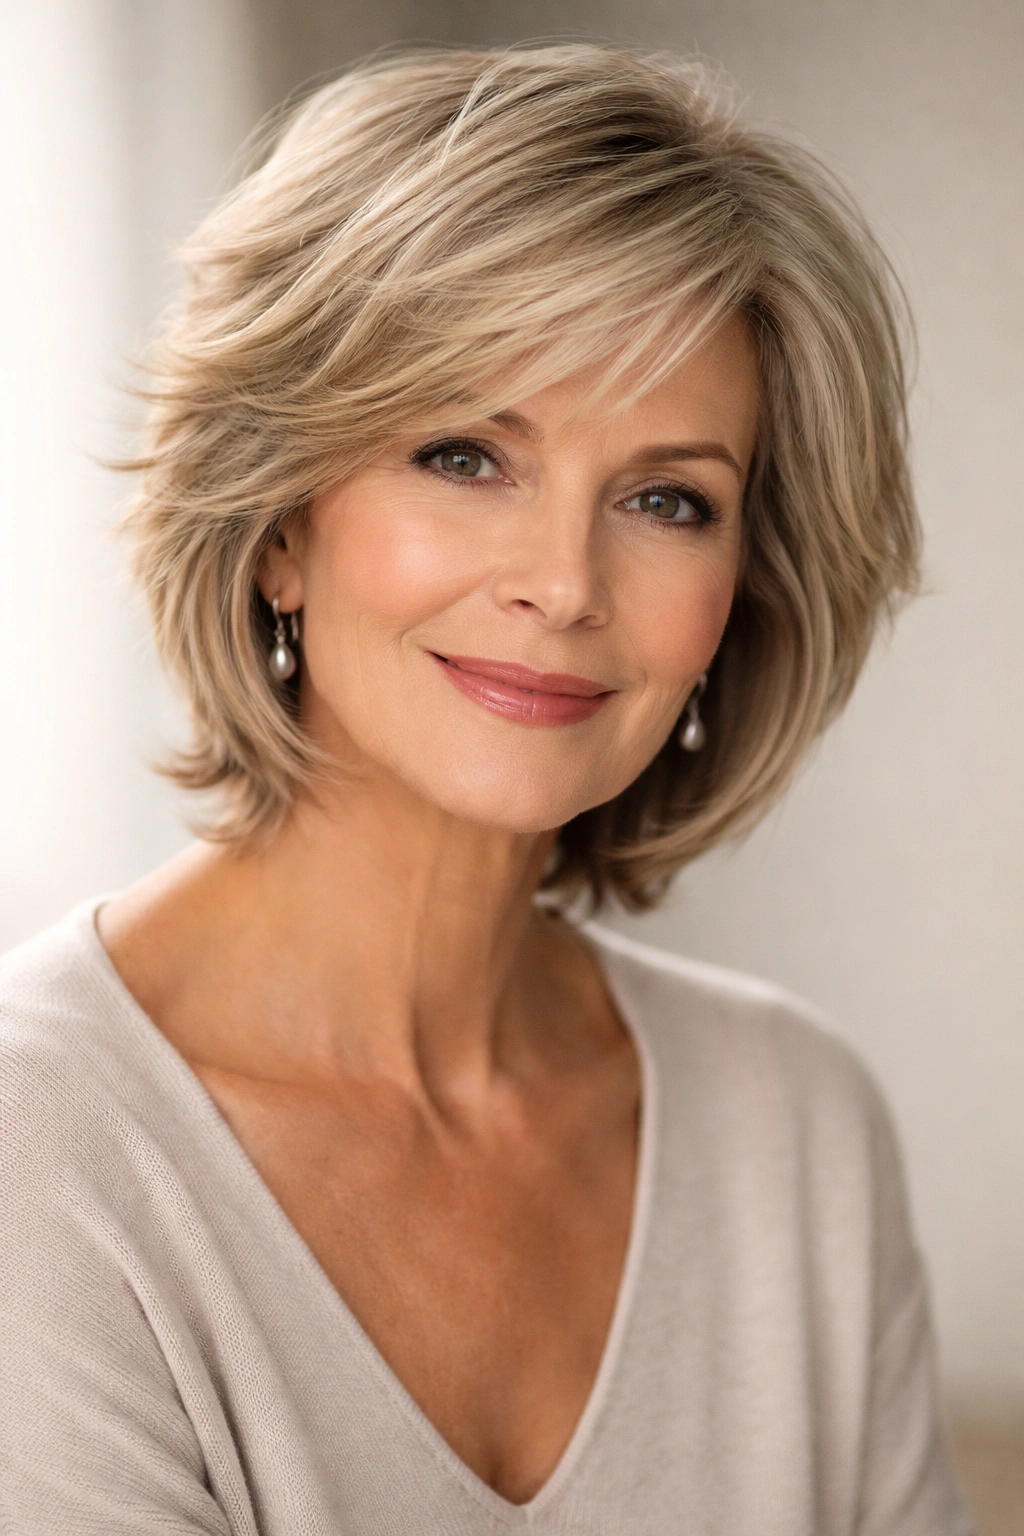
A side-swept layered cut uses length and positioning to create the illusion of volume and fullness. By concentrating shorter layers on one side and longer pieces on the other (typically swept to one side), you create visual depth and dimension. This technique is especially clever for thin hair because it plays with perspective — the longer side looks fuller because of the added length, and the shorter, highly layered side looks fuller because of the texture.
The Psychology of Side-Sweep for Thinning Hair
When thin hair is cut evenly all around, any thinness is obvious from every angle. But a side-swept cut with shorter, heavily layered sides and longer, side-swept pieces creates visual complexity that reads as fullness. Your eye moves around the cut and sees layers, texture, and movement rather than scalp. This is sophisticated styling that works beautifully for mature women.
Asking for Side-Sweep in Your Consultation
- Explain that you want shorter, textured layers on one side and longer pieces swept to the other side
- Discuss which side you want longer; typically, sweeping toward your face-flatter side is more flattering
- Ask for layers throughout the shorter side that create movement and texture
- Decide whether you want the back to follow the side-sweep pattern or be more blended
Styling note: You’ll need to blow-dry this cut toward the side-sweep direction to maintain the shape; it won’t naturally fall into place on its own.
9. The Piece-y Undercut
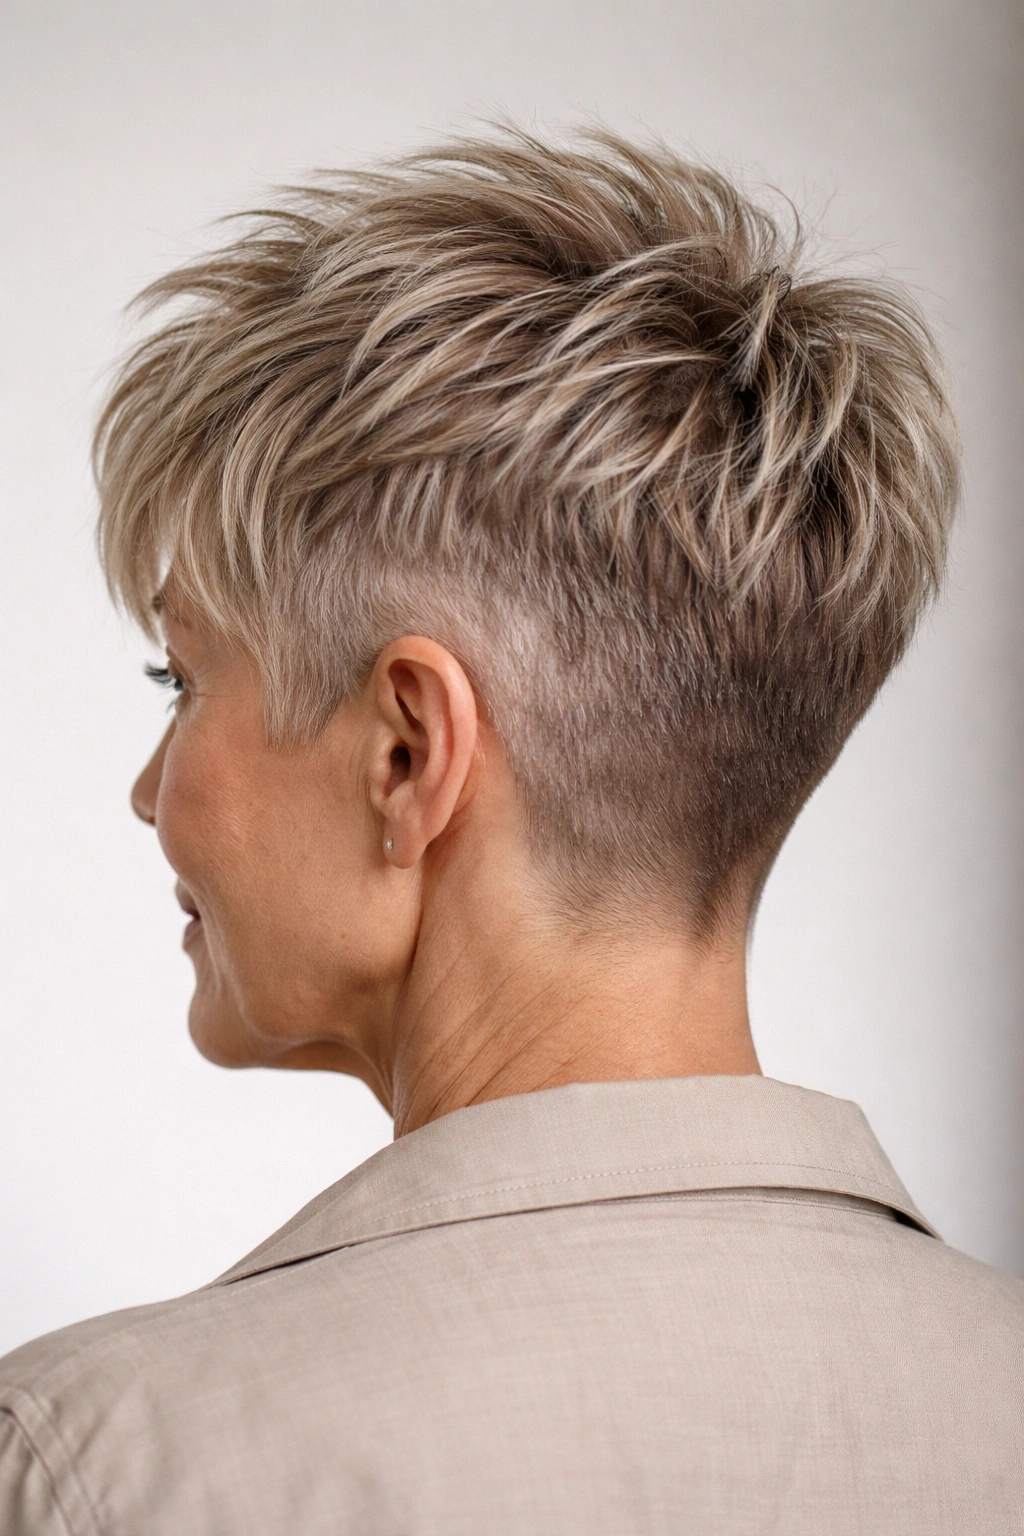
An undercut style keeps length on top but cuts very short or fades underneath (often at the nape and around the ears). The top is heavily layered and piece-y, creating a disconnected, modern look. For thin hair over 60, this works because the short undercut removes all weight where thin hair becomes visible, while the piece-y top layers create texture and movement.
Why Undercuts Work for Mature Women
An undercut feels edgy and contemporary without looking like you’re trying too hard to be young. The piece-y top doesn’t require thick hair to look intentional; in fact, thin hair’s natural tendency to separate into pieces becomes the entire design. You can wear the top down for a softer everyday look, or style it up to show the clean lines of the undercut for something bolder.
Getting an Undercut Right
- Decide how high you want the fade (how far up the back of your head the short section extends)
- Ask for heavy layering on top to create piece-y texture, not just one length with some choppy bits
- Discuss how blended you want the transition between the short undercut and longer top; blended is more romantic, disconnected is more modern
- Consider whether you want the sides to fade as well, or stay longer around your face for framing
Maintenance reality: You’ll need a trim every three to four weeks to keep the undercut clean and sharp, and the top will need regular maintenance to keep the layers distinct.
10. The Soft Layers with Volume at Crown
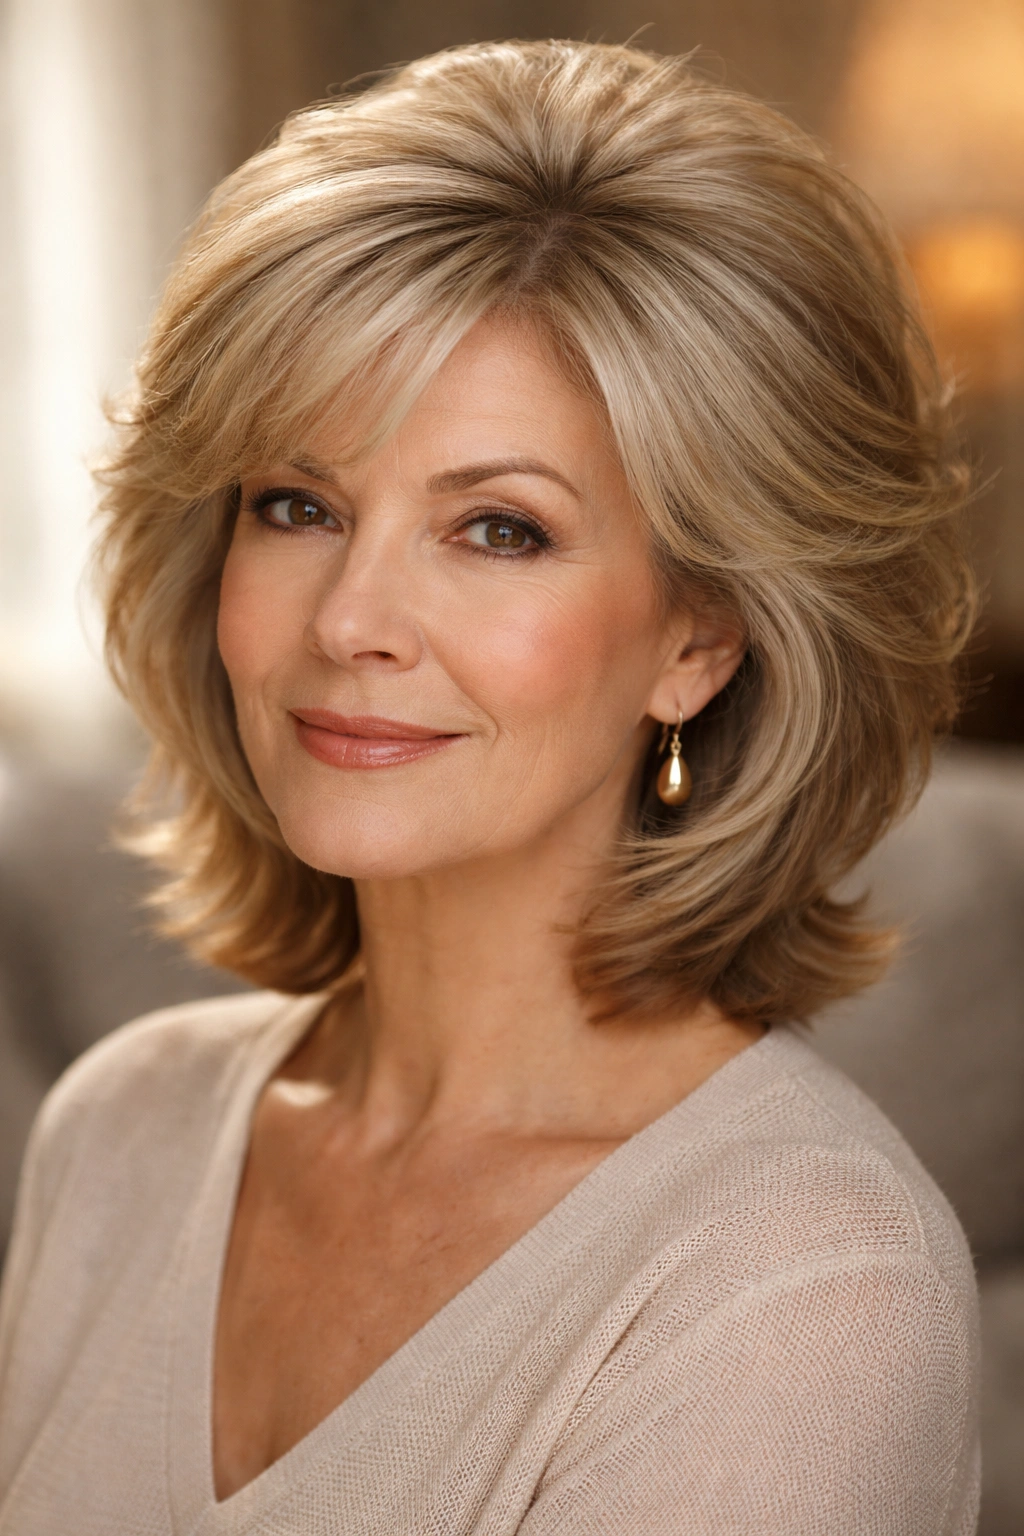
This cut prioritizes creating visible volume at the crown through strategic layering, while keeping the overall length flattering. It’s typically a shorter style — hitting around ear-length or slightly shorter — with the crown cut short and heavily layered while the sides and front are slightly longer. The effect is a fuller-looking head shape that works beautifully for aging faces.
The Head Shape Strategy
Layering is partially about texture, but it’s also about creating the right head shape. A fuller crown with tapered sides creates a balanced silhouette that’s flattering for most face shapes over 60. The crown layers create visible height, which lifts the face and makes you look more awake. Meanwhile, layers that taper toward the face create softness without weight.
Discussing Head Shape with Your Stylist
- Mention that you want your crown to have maximum volume and lift
- Ask your stylist whether they’d recommend keeping your sides slightly longer or cutting them short for a rounder silhouette
- Discuss your face shape; if you have a round face, you might want a slightly tapered crown, while an angular face might benefit from more roundness
- Request that layers be placed specifically to create height, not just randomly choppy texture
Blow-dry technique: Blow-dry the crown upside-down first to create maximum volume, then flip your head upright to finish. This technique works beautifully with this cut’s structure.
11. The Textured Fringe Cut
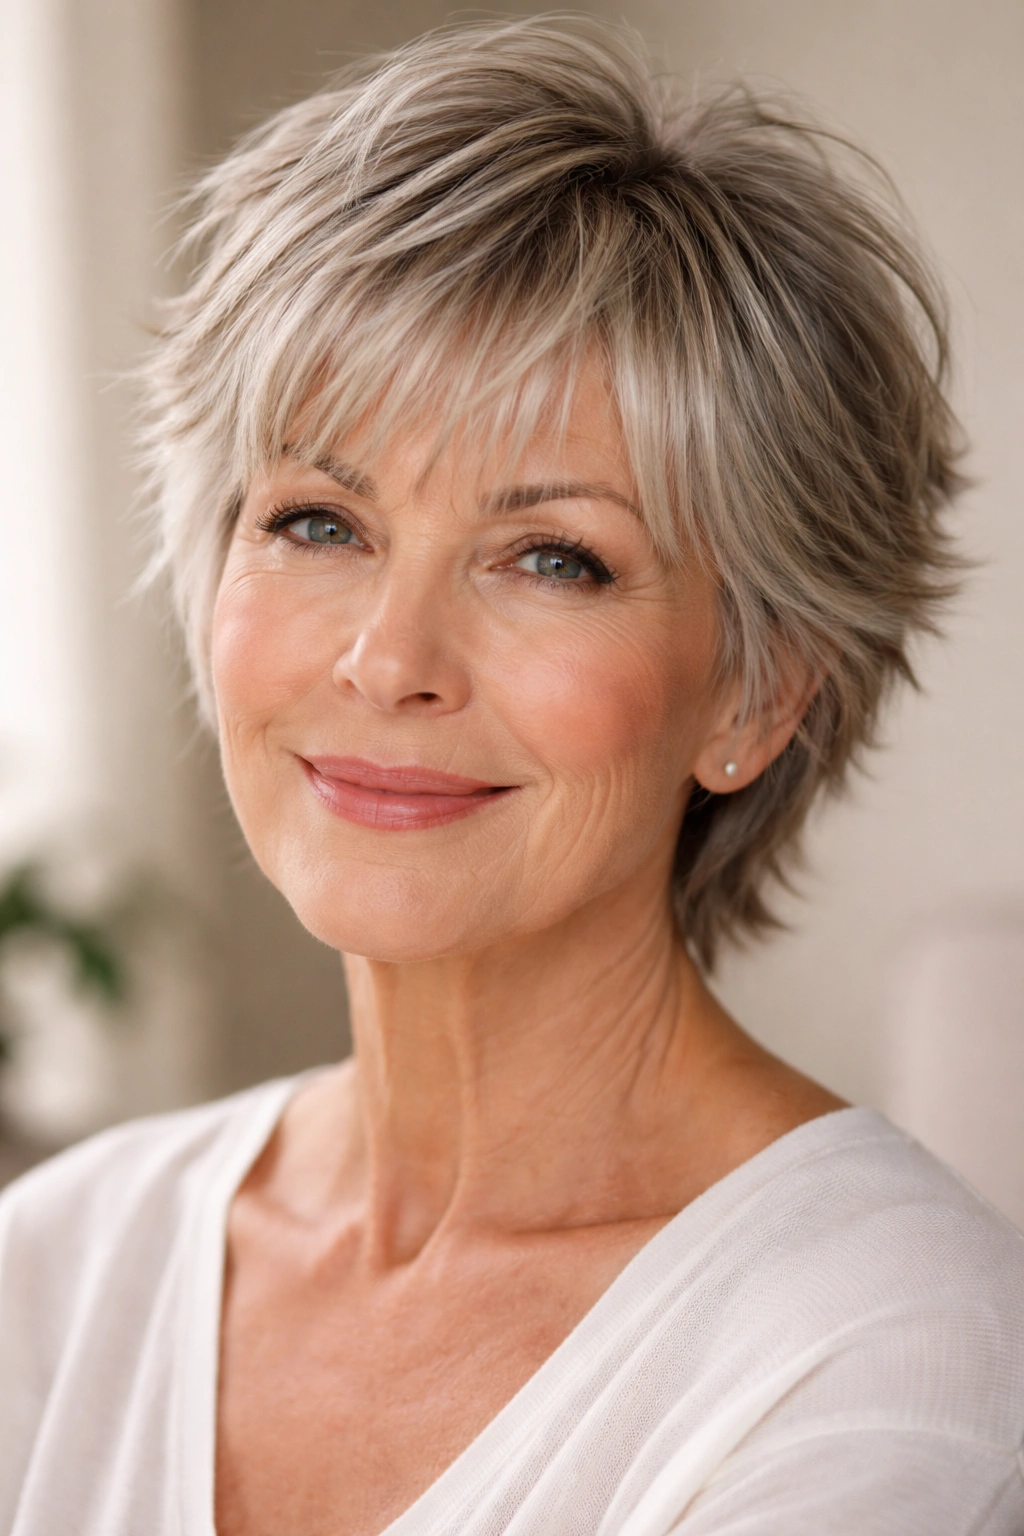
A textured fringe (or micro-fringe, depending on how short) paired with layered hair creates a youthful, sophisticated look that works well for thin hair over 60. The fringe is cut short and textured rather than blunt, and the hair underneath is layered throughout. The fringe draws attention upward to your eyes and away from areas where thinning might be visible, while the layered back creates texture and movement.
Why Texture in the Fringe Matters
A blunt fringe can read as severe, especially paired with thinning hair. But a textured, piece-y fringe feels modern, intentional, and lighter. It requires less precision in styling because the texture is built into the cut. You can blow-dry it straight for a clean look, or let it be slightly piece-y and tousled for something more relaxed.
Working With a Fringe
- Ask for a short, textured fringe that hits around mid-eyebrow or just above
- Discuss how much texture you want in the fringe; some prefer very choppy and piece-y, others want something softer
- Make clear that the fringe should be textured/layered, not blunt
- Specify the length of the hair underneath the fringe so it frames your face properly
- Decide whether you want the fringe to blend with the longer lengths or be more distinctly separate
Styling reality: A textured fringe is more forgiving than a blunt one, but you’ll still want to blow-dry it most days to keep it looking intentional.
12. The Tapered Layers with Length
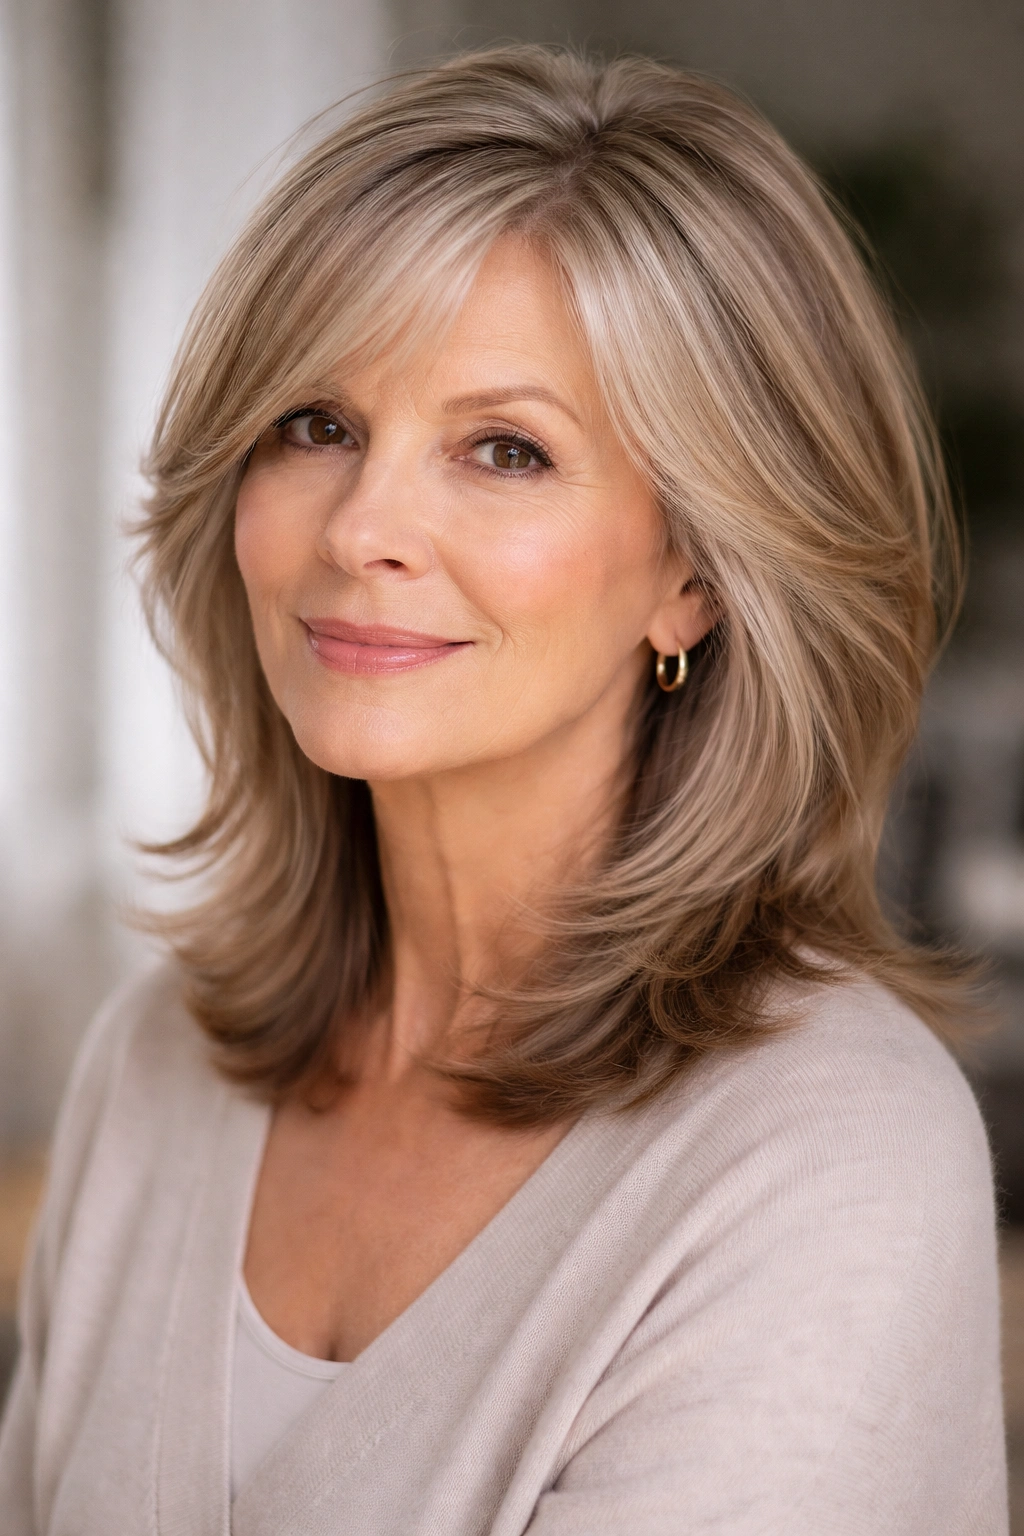
If you really want to keep length but struggle with how thin hair looks when it’s long, tapered layers offer a solution. This cut features layers throughout but specifically tapers toward the face and nape, so longer pieces frame the face softly while shorter layers underneath create texture and weight-distribution. It’s longer than most styles on this list — hitting mid-shoulder or slightly below — but the strategic tapering and layering mean it doesn’t look flat or sparse.
How Tapering Creates the Illusion of Fullness
Tapering means gradually increasing the length as you move inward, so the hair gets longer as you go toward the center of the head rather than being one even length. This creates a rounded, fuller-looking head shape. Combined with layers throughout, tapering means light can pass through the hair in multiple ways, creating depth and perceived density that one-length hair never achieves.
Getting Tapered Layers Right
- Ask for layers throughout, not just around your face
- Specify that you want the cut to taper, so it’s shorter at the nape and around the ears, and gradually longer as you move toward the center
- Request longer face-framing pieces that can be styled softly
- Discuss the overall length goal and make sure your stylist understands you want it layered enough that it doesn’t look limp
Styling approach: This cut works beautifully with waves or gentle texture created through blow-drying. Straight styling can sometimes make the thinner areas more visible, so texture is your friend here.
Final Thoughts
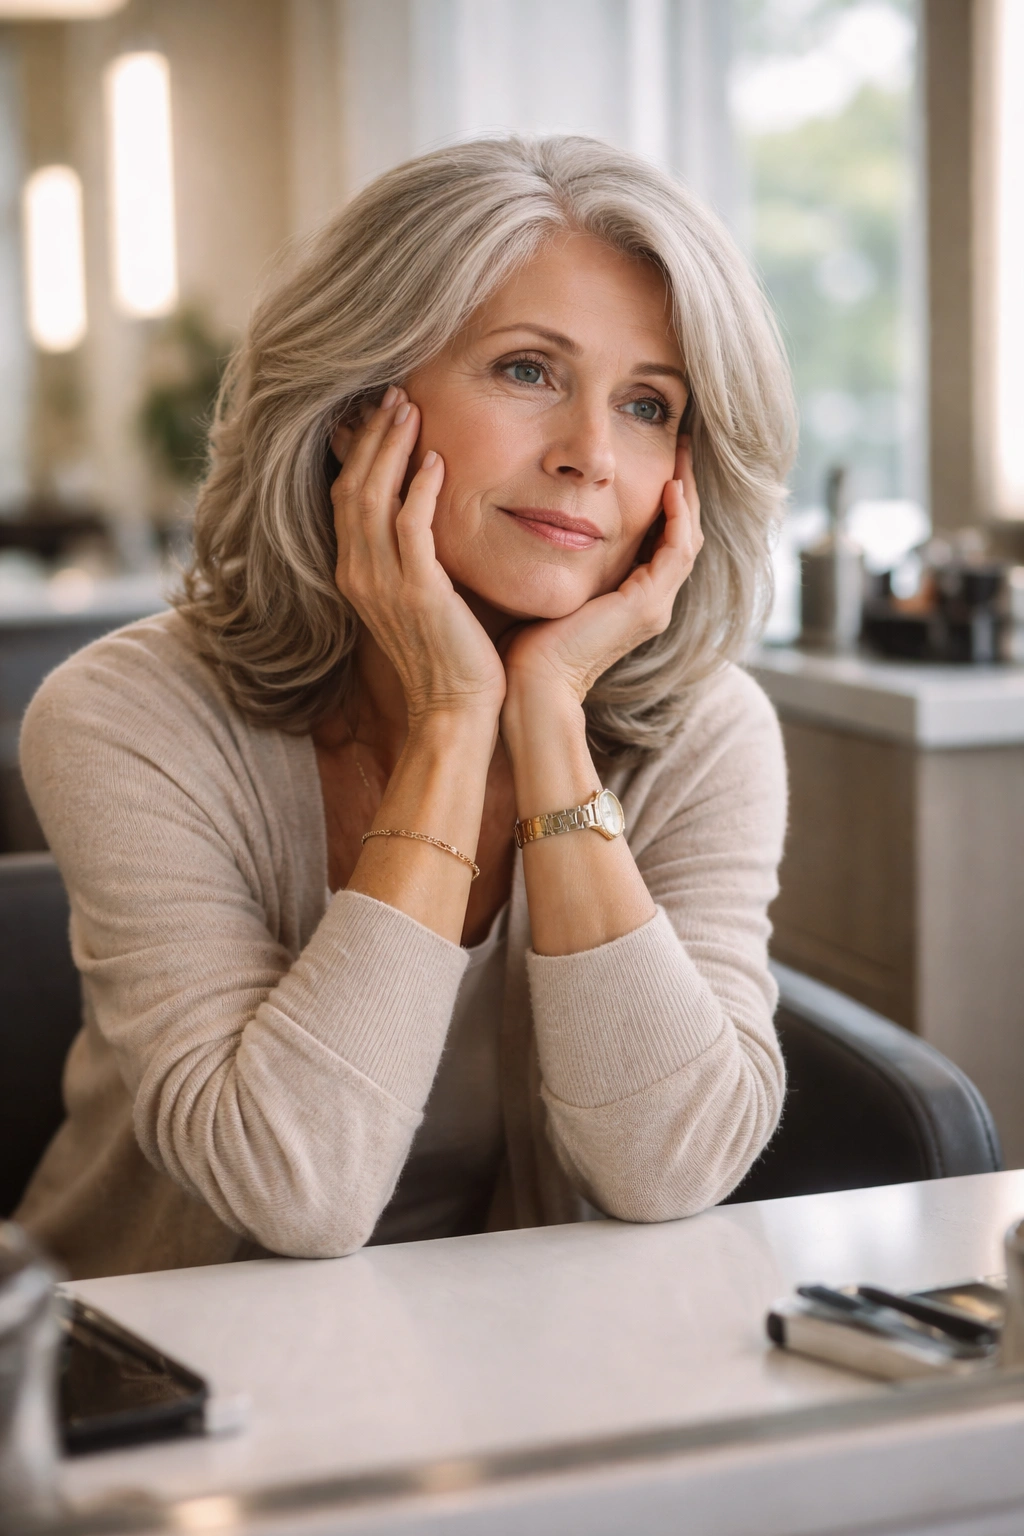
Choosing the right layered haircut is one of the most powerful things you can do for thin hair over 60. The right cut works with your hair’s reality rather than demanding something it can’t deliver. Every style on this list prioritizes removing weight where it makes thin hair look worse, and creating texture where it makes thin hair look fuller. The key is finding a stylist who genuinely understands how thin hair behaves — someone who can explain why they’re making specific choices, not just someone who’s good with thick, full hair.
Before your appointment, bring pictures of the specific cuts you’re considering. Not just random pictures that look pretty, but close-ups that show the texture, layer placement, and how the cut interacts with hair that’s visibly fine. Talk honestly with your stylist about your daily routine and how much styling effort you’re willing to invest. Some of these cuts require blow-drying and daily styling, while others look intentional with minimal effort. There’s no wrong answer, just different tradeoffs.
Remember that how your hair looks isn’t just about the cut — it’s about the combination of the cut, your color, your texture, how it’s styled, and what products you use. But a brilliant cut is the foundation that makes everything else possible. Once you have the right structure and texture, styling becomes easier, your hair looks fuller, and you’ll probably feel noticeably more confident every time you catch your reflection.
