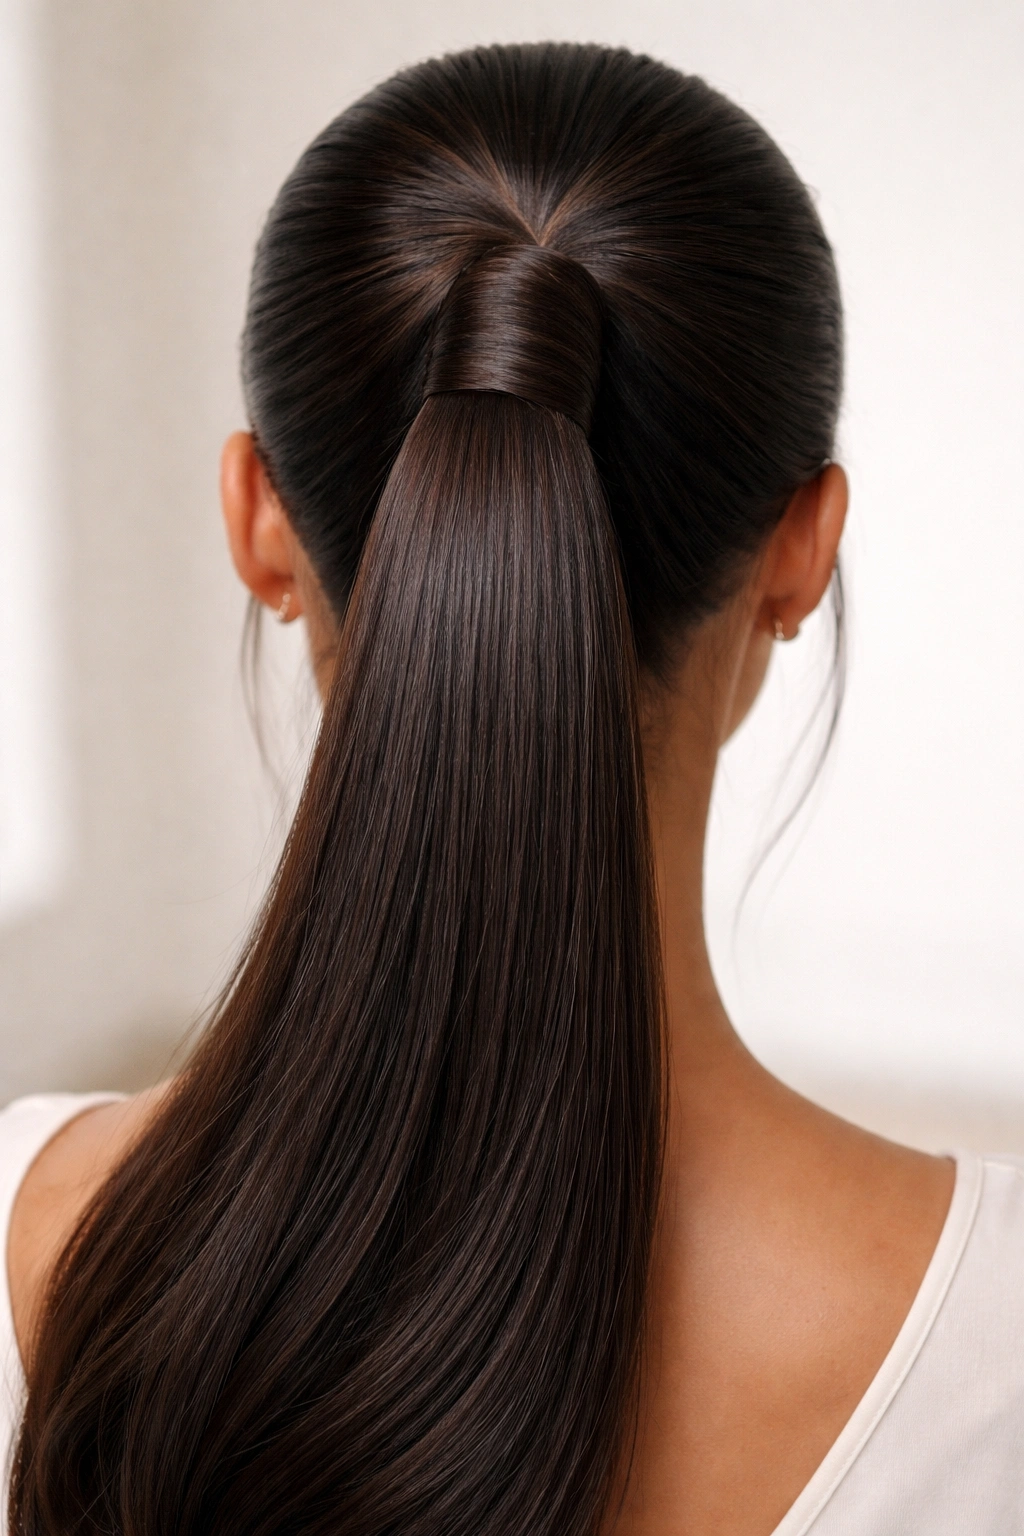
The V-part is having a major moment in hairstyling—and for good reason. Unlike traditional center or side parts, this technique creates a deliberate, geometric division at the crown that frames your face while drawing the eye upward, making your hair look fuller, your features more sculpted, and your whole look instantly more intentional. Whether you’re reaching for a sleek ponytail for work, a night out, or just a polished everyday style, the V-part adds a level of sophistication that makes even a basic ponytail feel editorial and current.
The beauty of V-part ponytails is their versatility. They work with nearly every hair texture, length, and face shape—you just need to understand how to position that V strategically for maximum flattery. A V-part that’s tight and geometric reads almost minimalist and modern, while one that’s slightly softer and less defined feels more effortless and approachable. You can wear them sleek and mirror-smooth, textured and lived-in, high and dramatic, or low and understated. The real magic happens when you match the style to your face shape, hair type, and the occasion, which is exactly what we’re breaking down here.
Here’s what makes a V-part ponytail truly effective: the precision of the part itself, the tension and placement of the ponytail, and how you finish the look. Get those three elements right, and you’ve got a hairstyle that looks intentional, expensive, and authentically polished. This is the kind of style that photographs beautifully, holds up throughout the day, and works equally well for a corporate meeting or a weekend brunch.
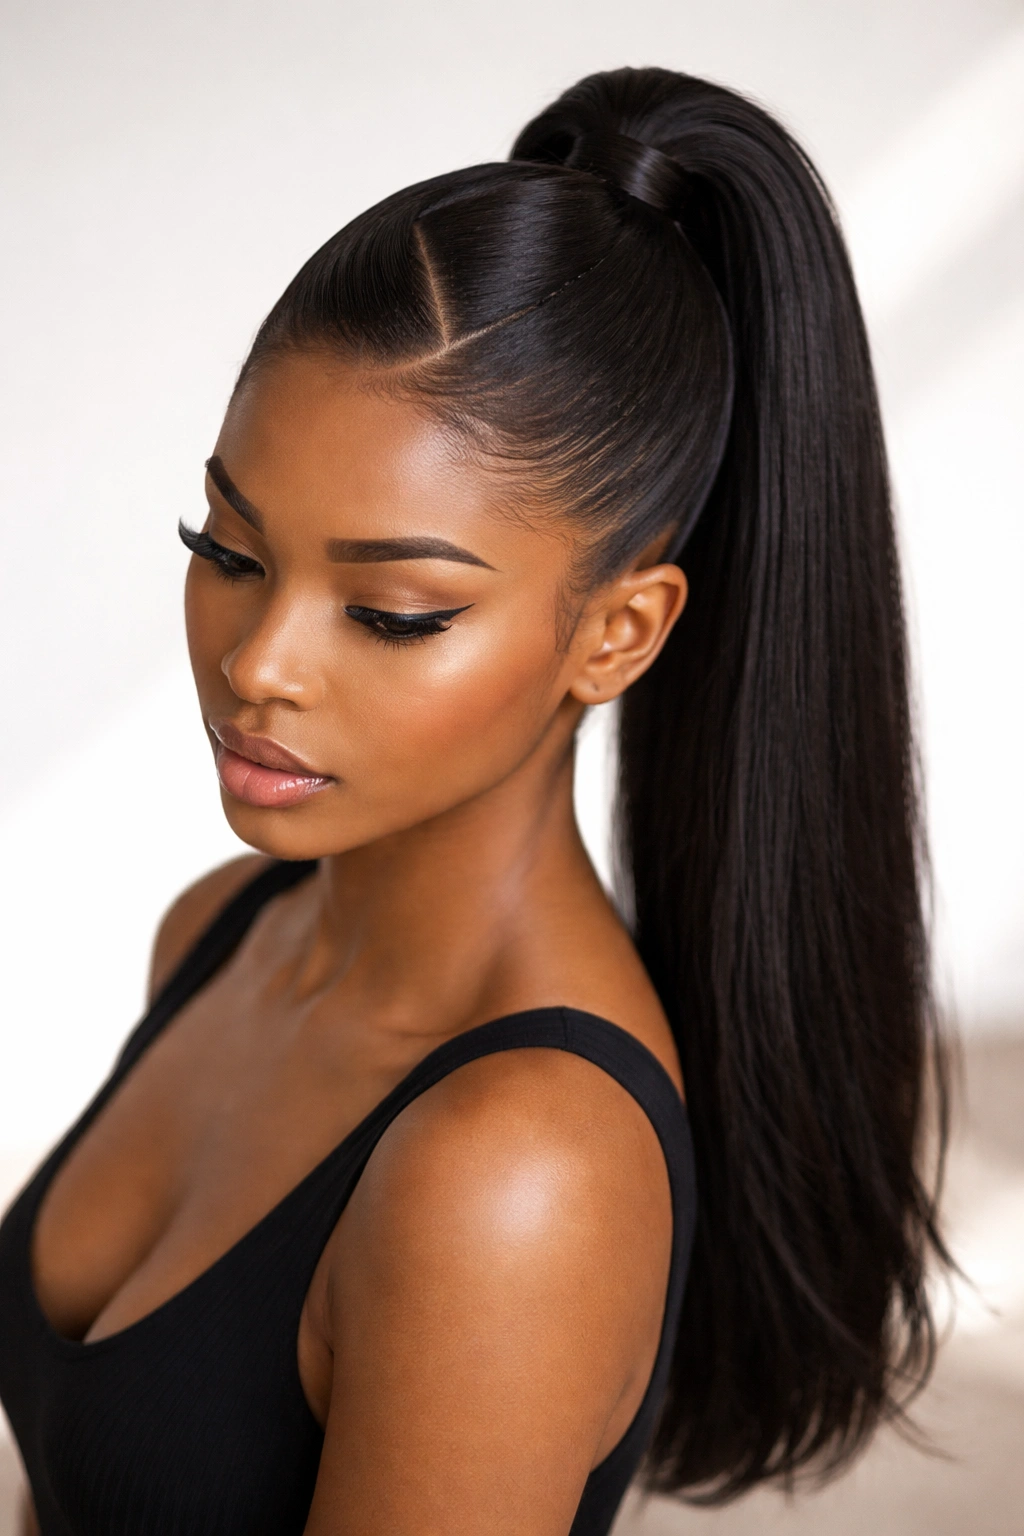
1. The Graphic High V-Part Ponytail
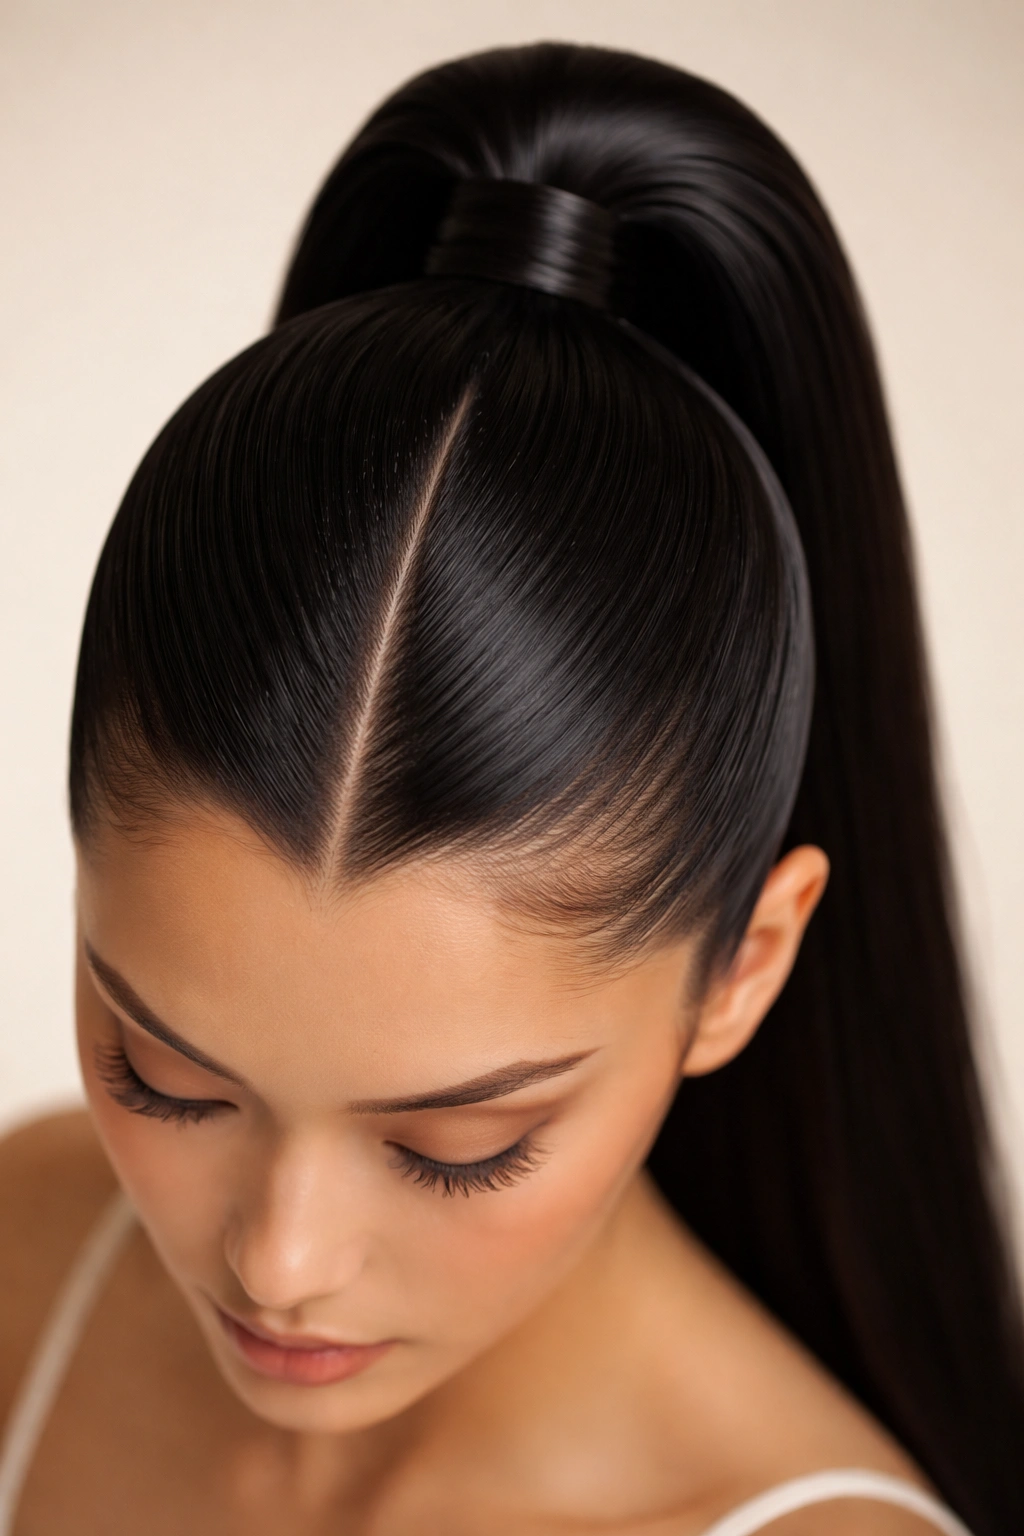
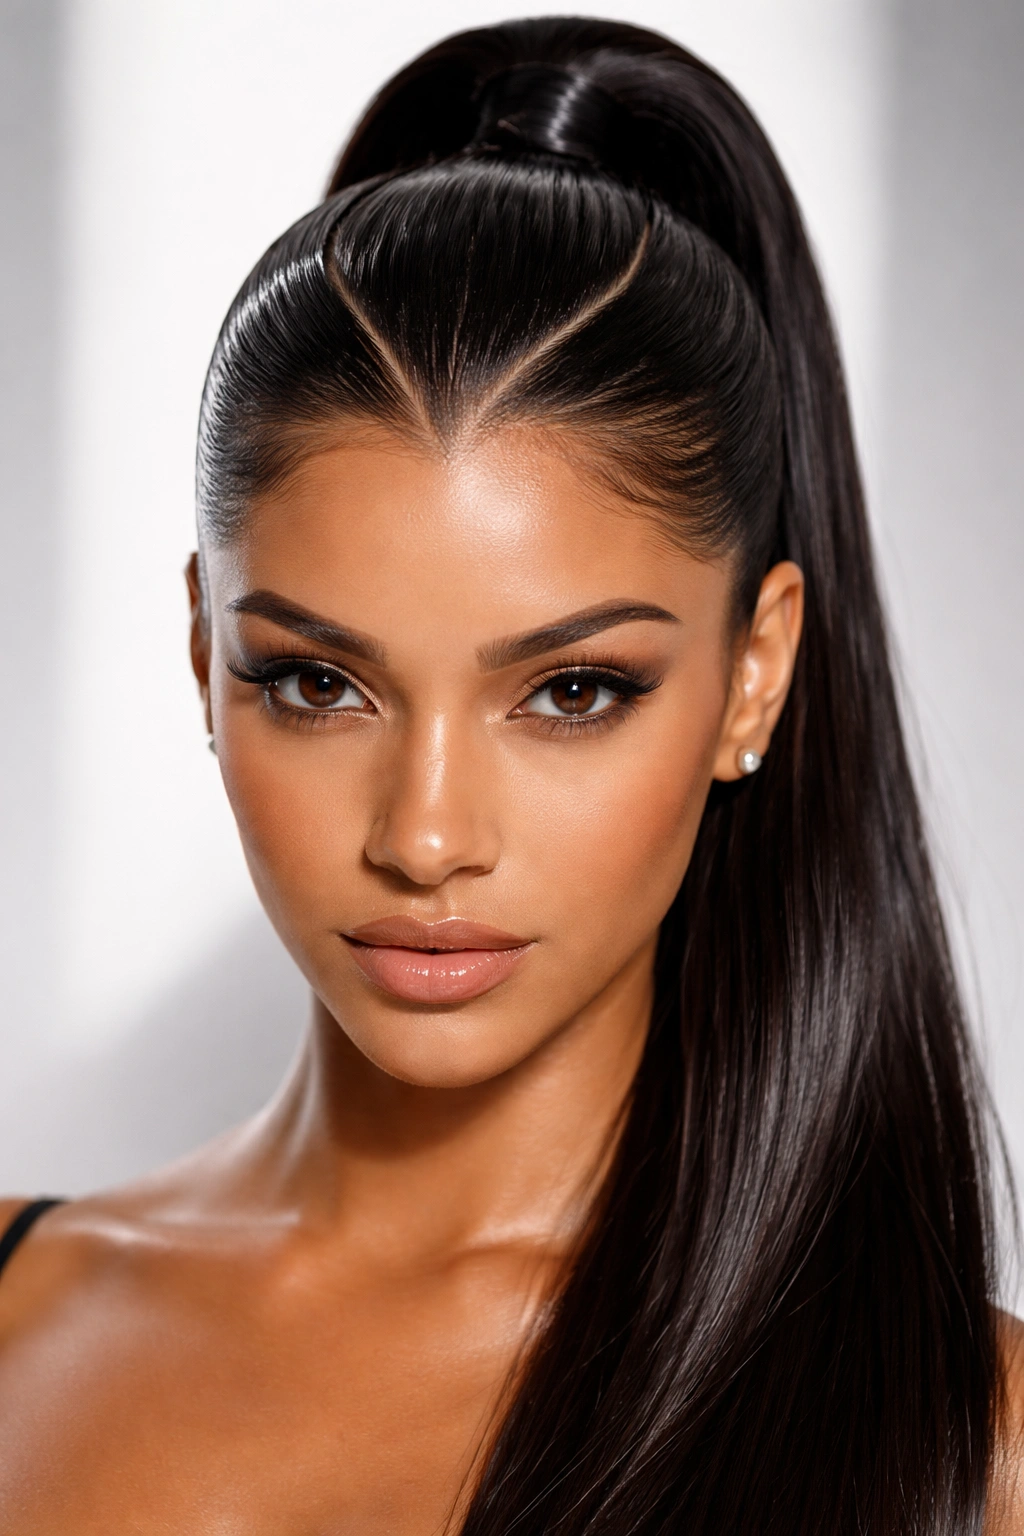
This is the version that makes a statement. A true graphic high V-part means an extremely defined, sharp V created at the crown with clean, controlled sections on either side. The ponytail sits at the very top of your head, pulled up tight enough that you can see the full geometry of that V from above, and the front hairline is completely smooth with zero flyaways.
Why This Style Stands Out
The graphic high V-part reads modern and intentional in a way that softer hairstyles simply don’t. It lifts the face, elongates the neck, and creates an almost architectural quality that feels incredibly polished. This style works exceptionally well for people with longer, finer hair or those who naturally have volume at the crown—the high placement shows off that V beautifully without fighting gravity.
How to Execute It Perfectly
- Create the V using the pointed end of a rat-tail comb, starting at the center of your hairline and drawing straight back
- Divide the hair on either side of that line into clean sections all the way to the back of your crown
- Use pomade or a smoothing gel on the front sections to eliminate any texture or frizz
- Pull the top section into a very tight, high ponytail—think the crown of your head, not just your upper back
- Smooth any baby hairs with a fine-tooth comb and edge control product
- Finish with hairspray for hold and shine
Pro tip: This style actually benefits from a day or two of second-day hair rather than freshly washed strands, which tend to slip and lose that crisp V definition.
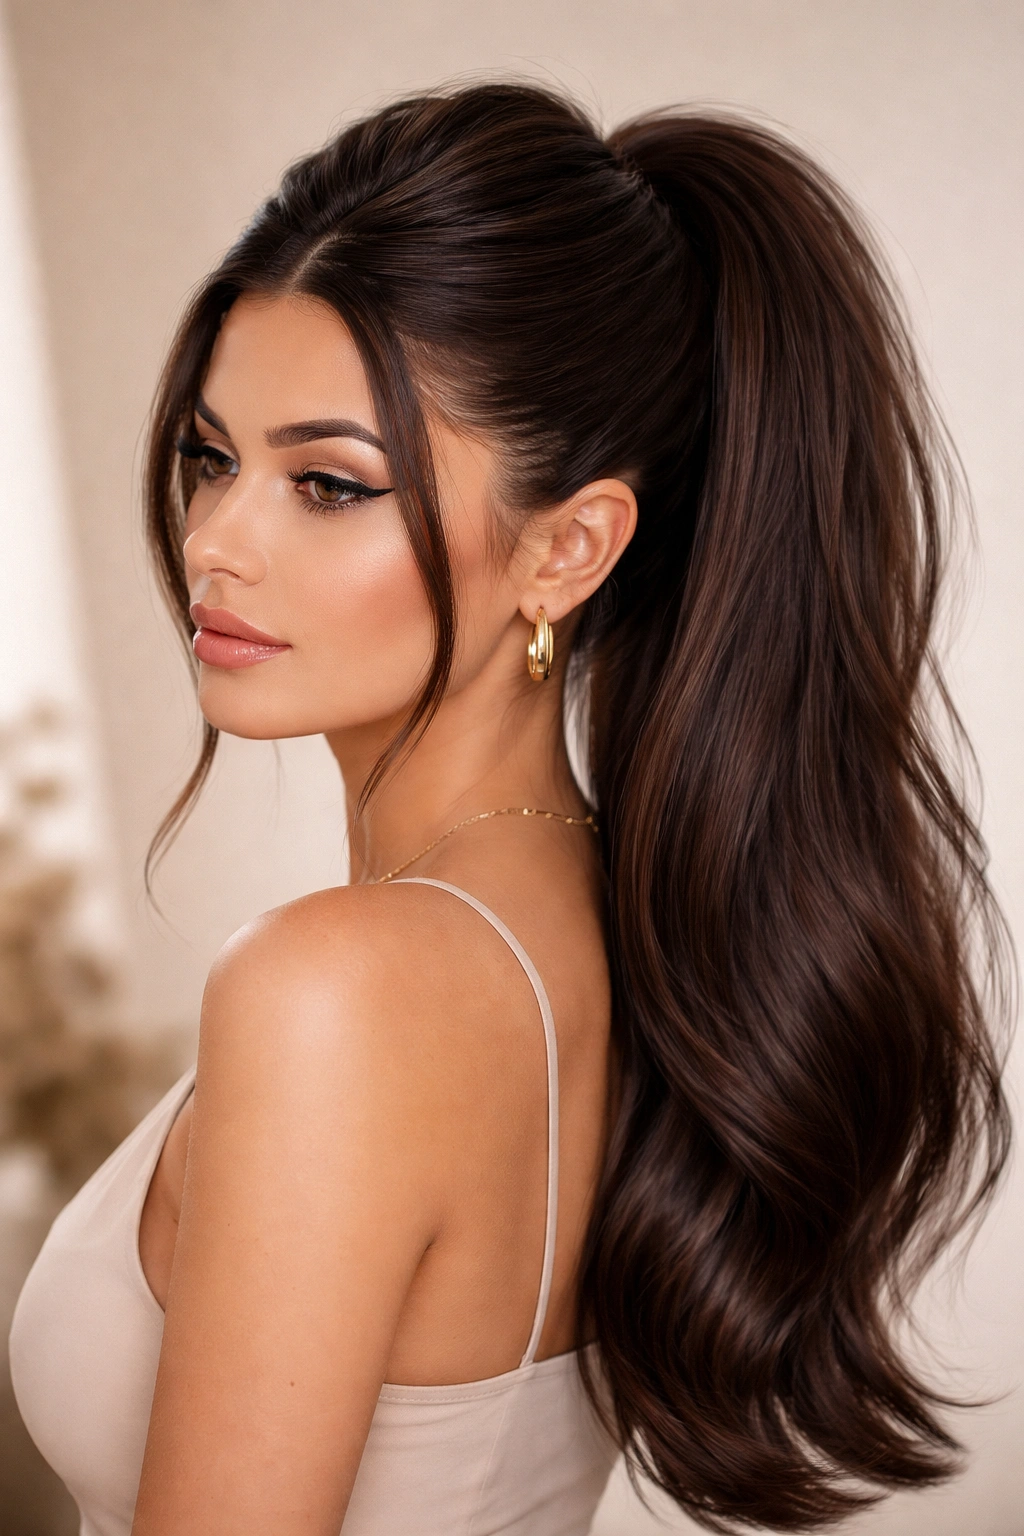
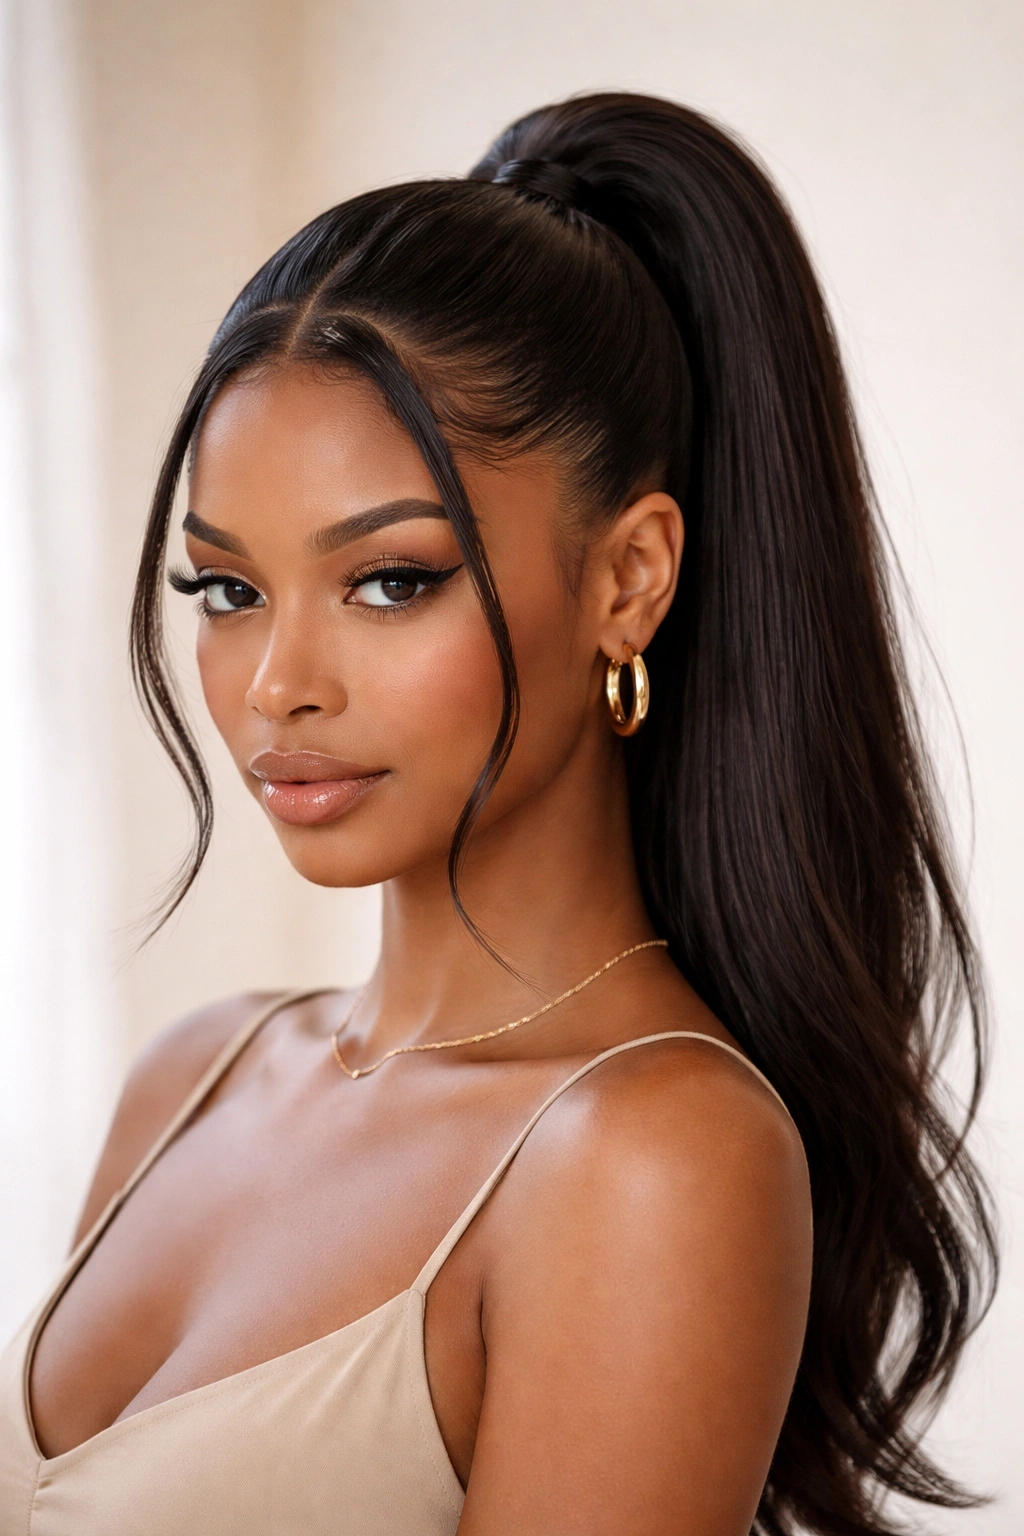
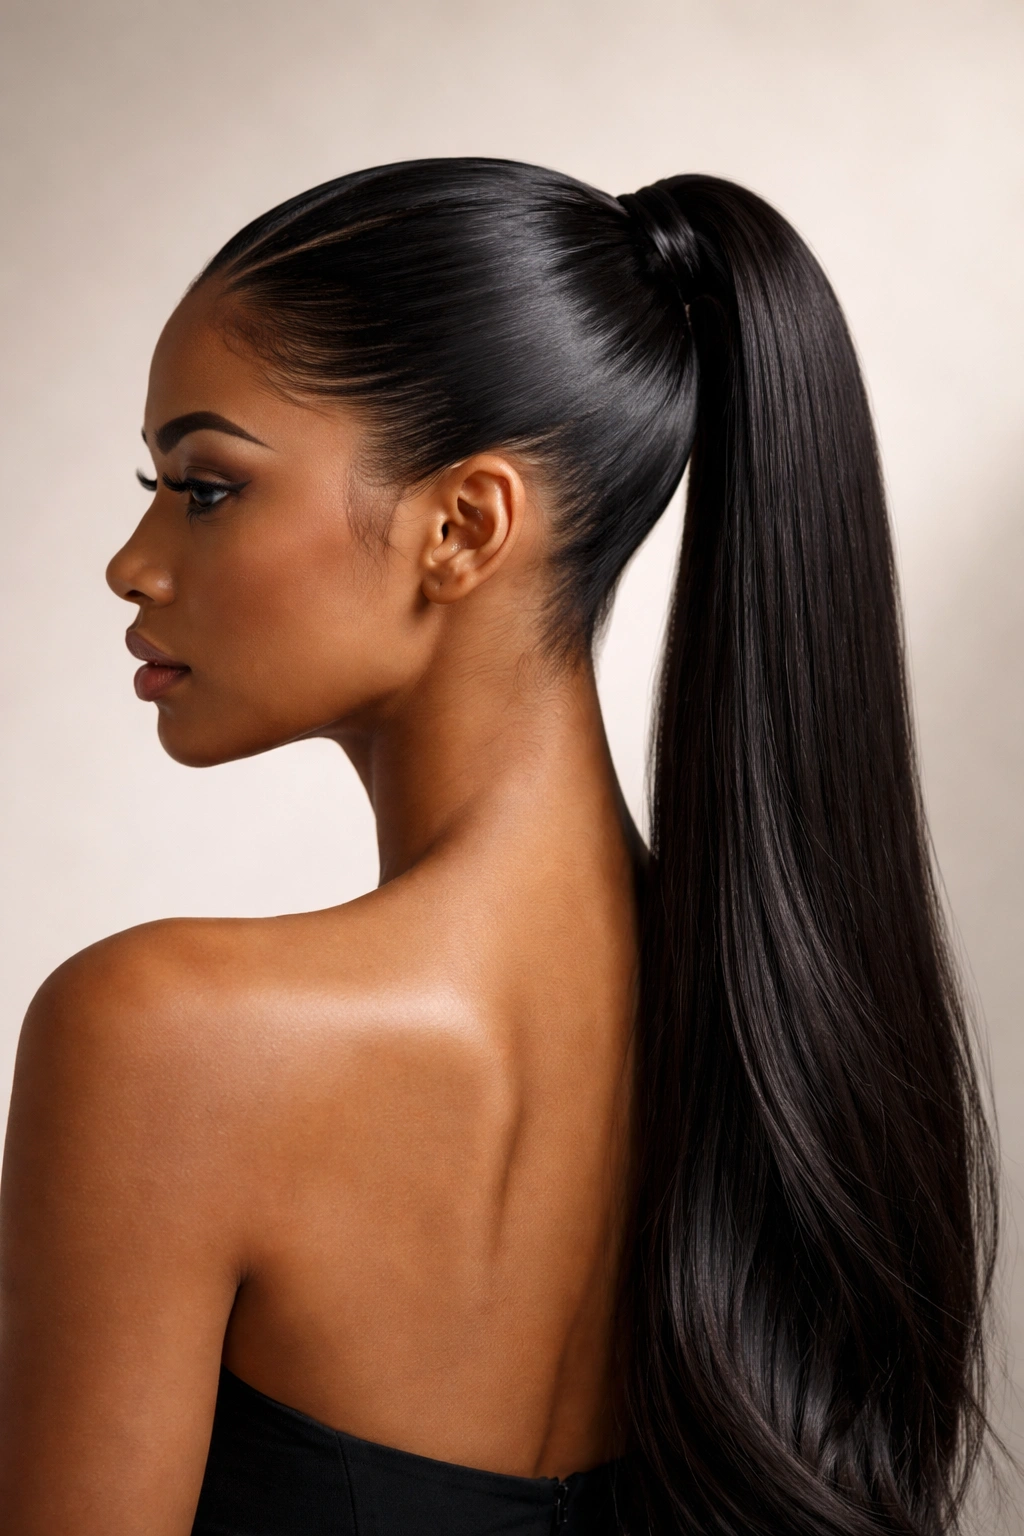
2. The Sleek Low V-Part Ponytail
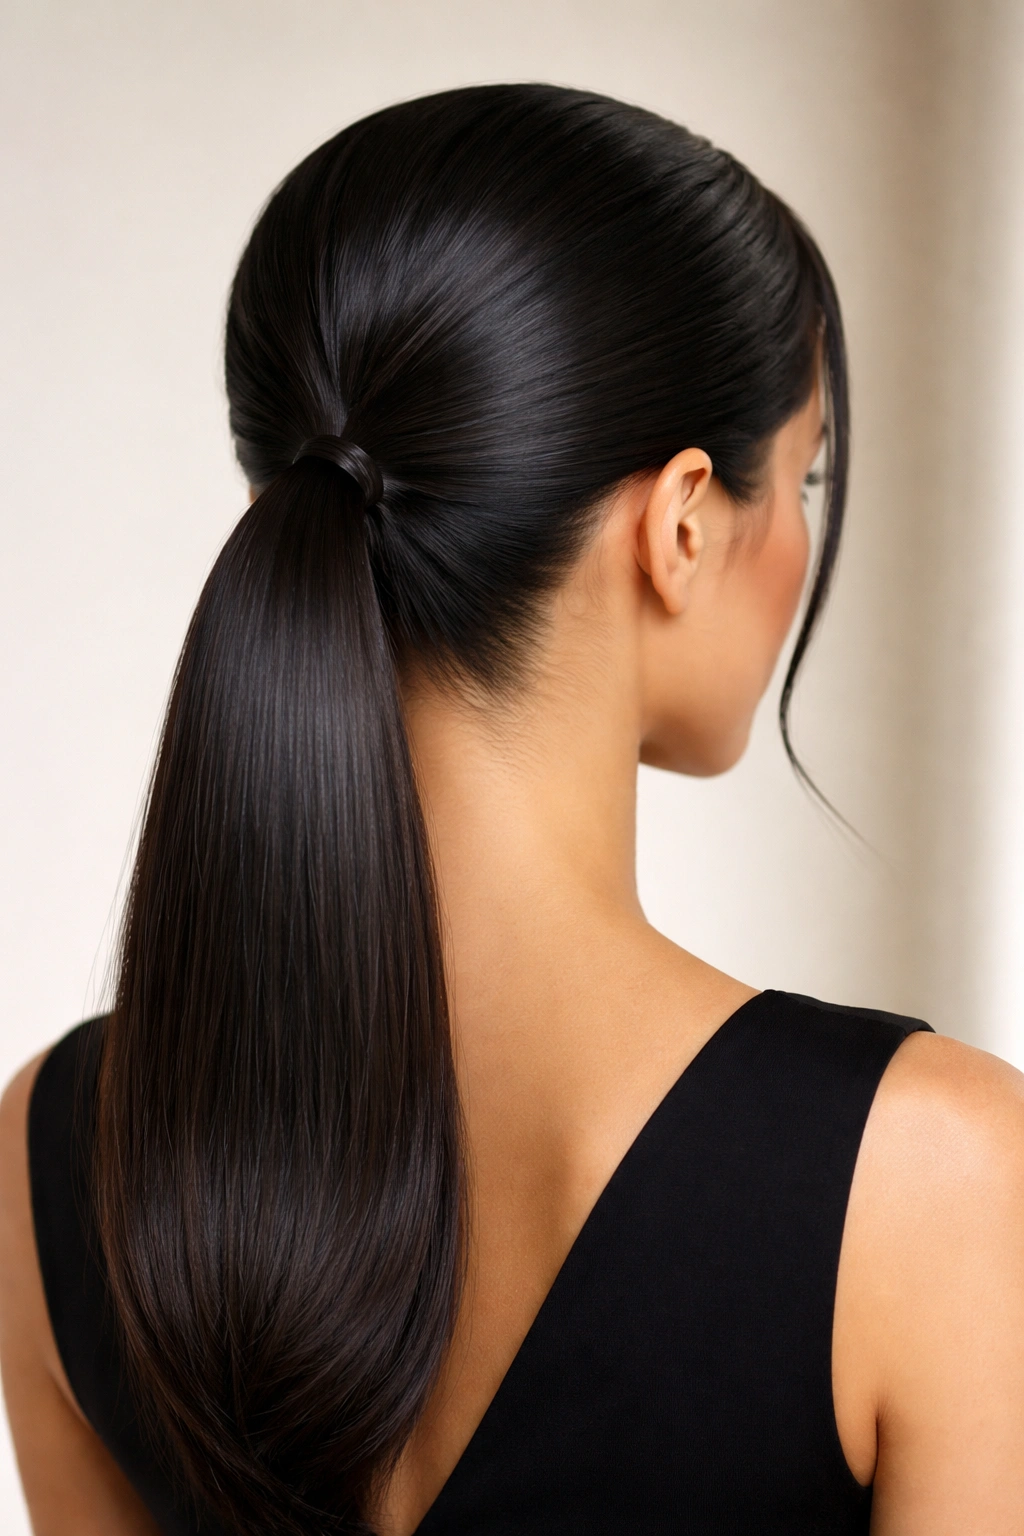
Everything about this version whispers sophistication. The V-part is still clearly defined and intentional, but the ponytail sits lower—at the base of your neck or even between your shoulder blades—creating a completely different energy. This is the V-part ponytail that works for nearly every occasion and every hair type.
What Makes It Universally Flattering
A low V-part ponytail feels refined without being severe. The lower placement elongates your neck and face more softly than a high ponytail, and it actually hides the fullness of longer hair better if you have a lot of volume. This is the style that translates well from the office to dinner because it feels professional but never overdone.
Step-by-Step to Get the Look
- Section your hair using that same rat-tail comb technique, creating a clear V from your hairline to the nape of your neck
- Smooth the front sections with pomade and a fine-tooth comb
- Gather all of your hair into a low, centered ponytail at the base of your neck—the key is making sure that V is still visible from above
- Use a soft elastic or a hair tie that matches your hair color to minimize visibility
- Smooth your ponytail with a smoothing serum or oil for shine and to tame any texture
- Pin down any stray hairs with bobby pins that match your hair color
Worth knowing: The lower the ponytail, the more important it is that your V-part is perfectly centered, or the whole look will feel off-balance.
3. The Textured V-Part Ponytail with Braided Detail
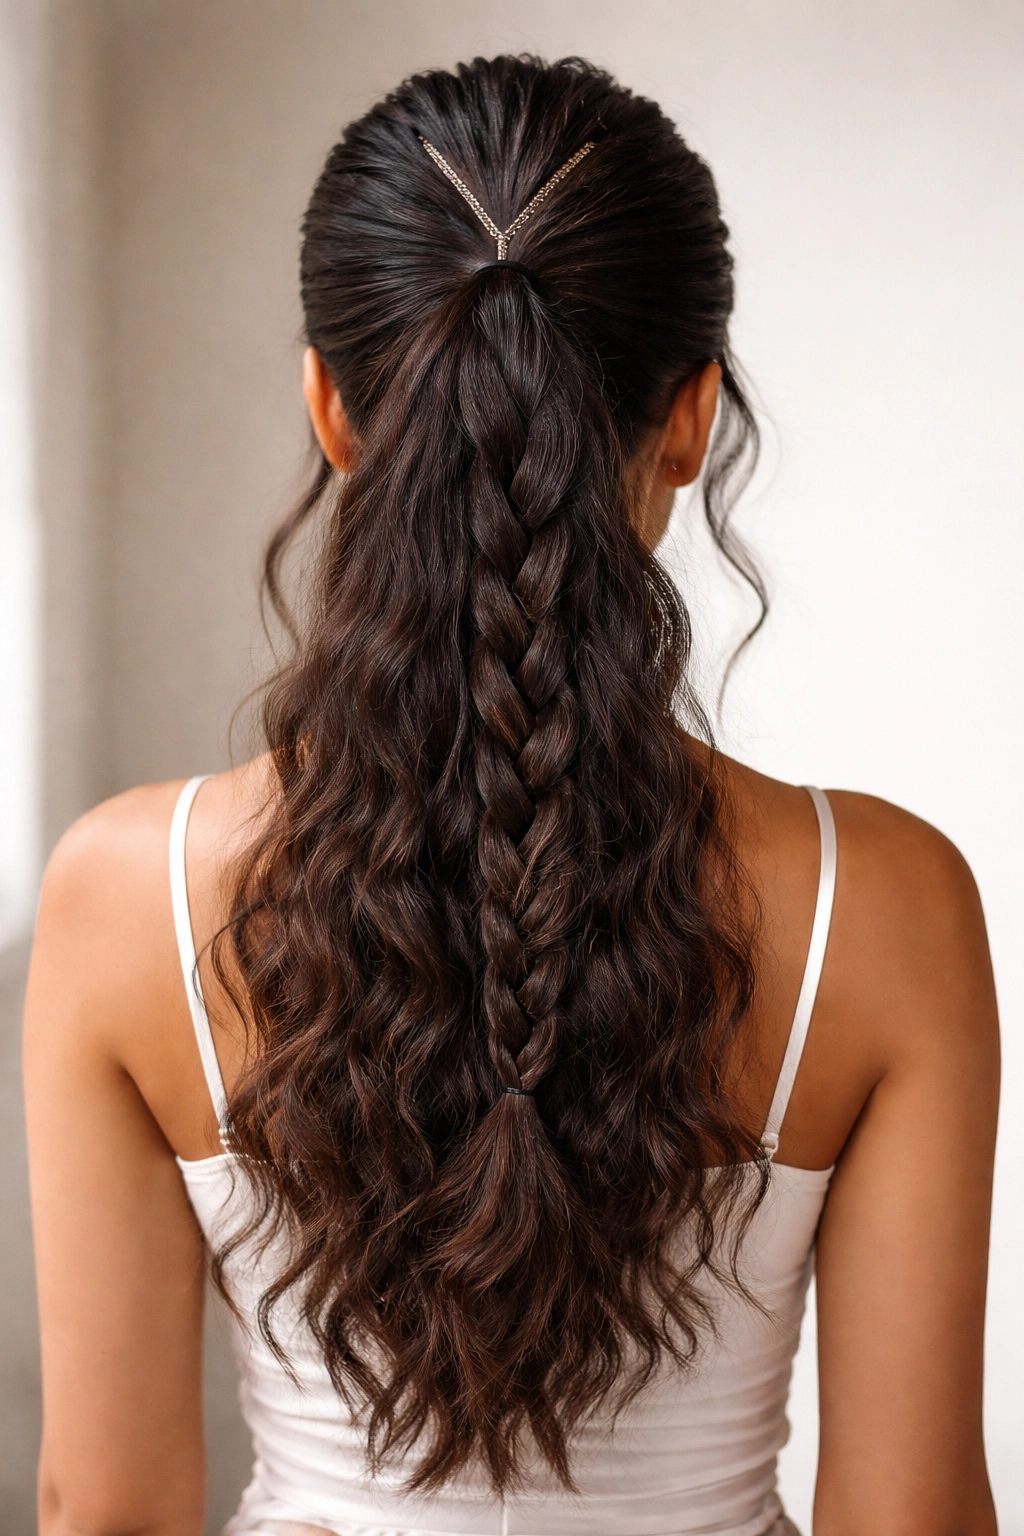
This version keeps that signature V-part clarity while introducing movement and dimension through texture. Instead of a completely slicked-back ponytail, you’re creating intentional texture in the ponytail itself—either through braiding, twisting, or a deliberately tousled finish—which makes the look feel more modern and less corporate.
Why Texture Changes Everything
Adding texture to a V-part ponytail makes it instantly feel more contemporary and creative. The contrast between the sharp, defined V and the soft, textured ponytail is genuinely compelling visually. This works beautifully for people with naturally wavy or curly hair, and it’s far more forgiving than a completely sleek version if you don’t have stick-straight strands.
Building Texture Into Your V-Part
- Start with your V-part divided and smoothed as usual
- Rather than smoothing your entire ponytail, use a texturizing spray on the length before gathering it
- Create a loose three-strand braid down the length of the ponytail, or twist two sections around each other
- Use your fingers to gently pull apart the braid or twist, creating a softer, wider texture
- Finish with a light hairspray to hold the texture without making it feel stiff
- Consider leaving a few face-framing pieces loose around your temples for added softness
Insider note: This style actually looks better on day-two hair when your natural oils have added texture and grip to each strand.
4. The V-Part Sleek Pony with Wrap-Around Detail
This one elevates a basic V-part ponytail by wrapping a section of hair around the base of the ponytail, covering the elastic and adding a finished, boutique-salon quality to the style. That wrap-around section can be a thin braid, a twisted section, or simply a smooth piece of hair pinned underneath.
What the Wrap-Around Actually Does
Beyond the obvious aesthetic of covering your elastic, this technique creates visual interest and makes your ponytail look polished without being fussy. The wrap draws the eye to the nape of your neck and can actually make your ponytail appear fuller and more voluminous because you’re covering the elastic entirely.
Creating That Finished Wrap Look
- Create your V-part and smooth it as usual
- Gather your hair into a ponytail at your desired height
- Take a thin section from the bottom side of your ponytail (about one inch wide) and separate it out
- Wrap that section around the base of the ponytail, covering the elastic completely
- Pin the end of that wrapped section underneath where it won’t be visible
- Optionally, you can braid that wrapping section before wrapping it for added detail and texture
- Use a tiny clear elastic or bobby pins to secure everything invisibly
Pro tip: If you braid your wrap-around section, pull it slightly apart with your fingers to make the braid look thicker and more textured before wrapping it around the base.
5. The Voluminous V-Part Pony with Teasing
For anyone who feels like their ponytail lacks dimension or fullness, teasing strategically under your V-part and throughout your ponytail creates incredible volume without looking obviously backcombed. The V-part frames all that volume beautifully, and the contrast between the sleek front sections and the voluminous ponytail is visually striking.
How Teasing Creates Impact
Teasing at the crown under your V-part section creates actual lift and height, which changes how the V-part itself reads. Instead of lying flat against your scalp, it has dimension and movement. This technique works particularly well for people with fine or thin hair who want their V-part ponytail to look fuller.
Teasing the Right Way for a Polished Look
- After you’ve created your V-part and smoothed the front sections, gently tease the hair at the base of that V using a fine-tooth teasing brush
- Use short, upward strokes in the back sections of your crown, not the front where it will be visible
- Smooth the surface layer with a comb to keep everything looking intentional, not messy
- Gather all your hair into your ponytail, and lightly tease the length of the ponytail as well for overall fullness
- Use a smoothing serum on the surface to tame any texture while keeping that volume intact
- Finish with hairspray for hold and longevity
Worth knowing: The key with teasing is subtlety—you want the volume without the appearance of having obviously backcombed your hair.
6. The Sharp-Cornered V-Part with Gel-Slicked Sides
This is an extremely graphic, almost architectural take on the V-part ponytail. Everything is severely slicked back with gel, the V-part itself has sharp, almost right-angle corners, and every single strand is locked in place. This style reads bold, intentional, and fashion-forward in a way that feels almost editorial.
The Statement Quality of Total Control
When every piece of hair is slicked and gelled, including the sections on either side of your V, the overall effect is clean and controlled in a way that feels very current. The sharpness of that V becomes the focal point, and the geometric quality is genuinely striking. This works especially well for people with longer hair or those who can handle a very sleek aesthetic.
Executing the Ultra-Controlled Look
- Use a strong-hold gel on your entire head before you part and style
- Create your V-part using the gel-covered rat-tail comb
- Apply additional gel to the sections on either side of your V, smoothing them back against your head
- Make sure those side sections are literally painted backward—they should look shiny and controlled
- Gather your hair into a ponytail and smooth the entire length with gel as well
- Use the edge of the gel to create a perfectly smooth hairline around your face
- Finish with a firm-hold hairspray to ensure longevity throughout the day
Pro tip: This style requires a genuinely strong-hold gel—lightweight products won’t cut it for that extreme sleekness.
7. The V-Part Bubble Ponytail
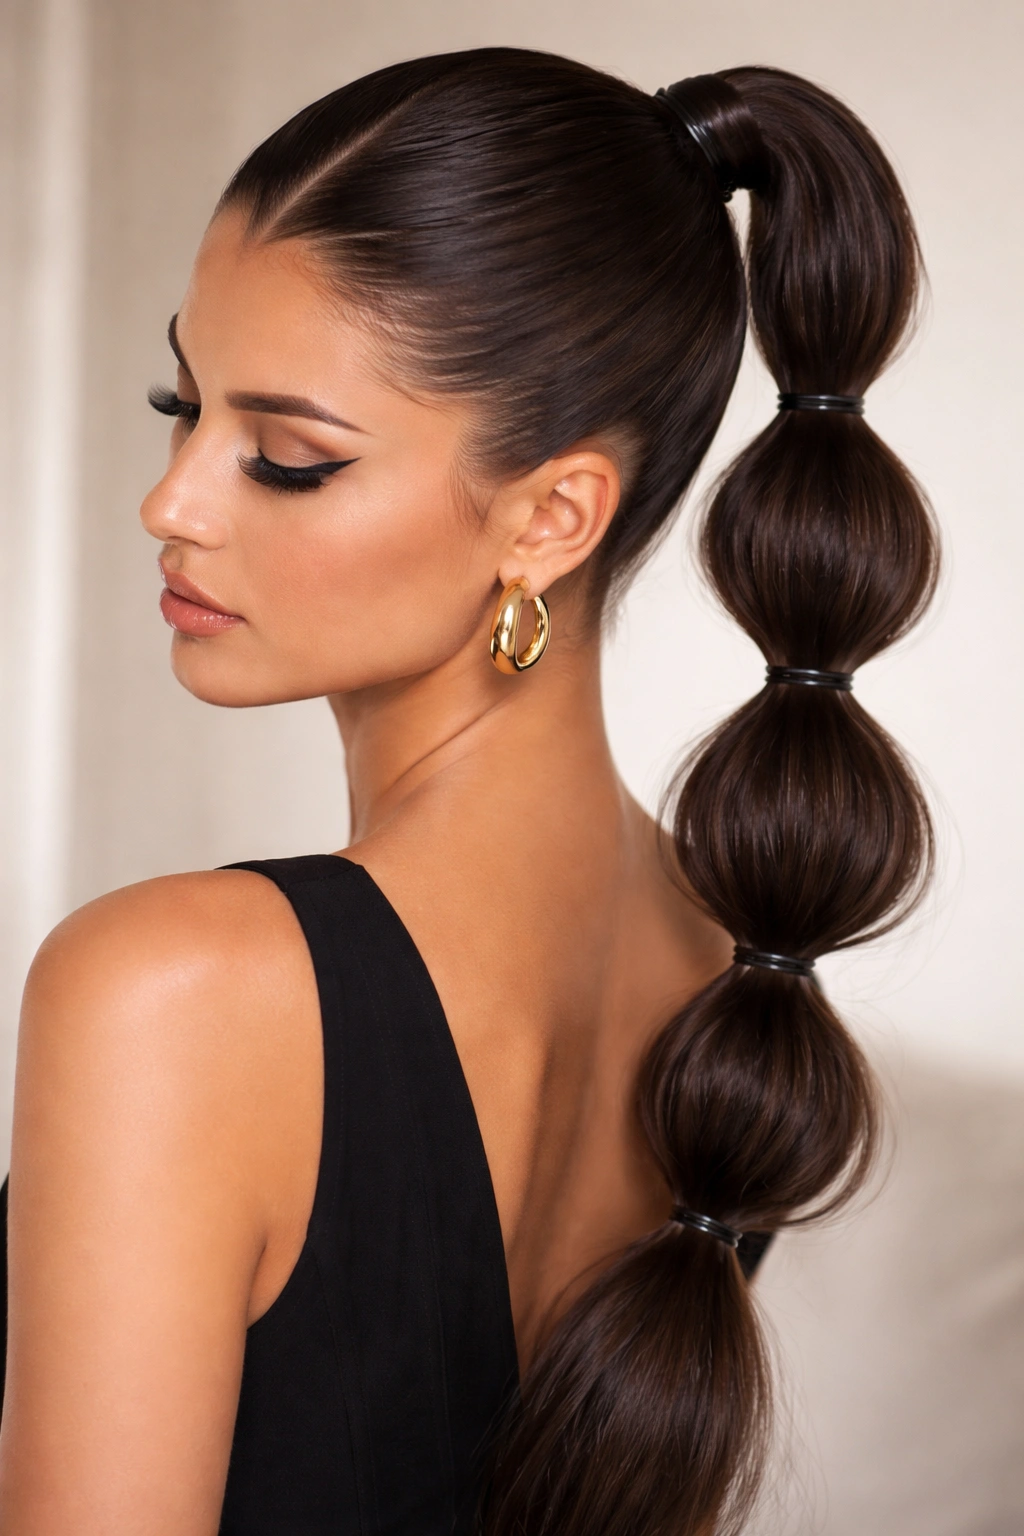
A bubble ponytail is a high-fashion style where you create multiple distinct “bubbles” down the length of your ponytail by tightening elastic bands at intervals, creating a segmented, sculptural look. Adding a V-part to this style elevates it from trendy to truly intentional, framing that bubble detail beautifully.
Why Bubbles Add Visual Drama
The bubble ponytail is inherently playful and modern, and combining it with a V-part gives the overall look more structure and sophistication. The bubbles catch light and create dimension, making the ponytail itself feel like the focal point of the style rather than just an afterthought.
Building Your Bubble Ponytail with V-Part
- Create your V-part as usual and smooth the front sections
- Gather your hair into a ponytail at your desired height
- Secure with an elastic band, then add a second elastic band about two inches below the first one
- Gently pull out the hair between those two bands, creating the first “bubble”
- Continue this pattern down the length of your ponytail, creating bubbles that are evenly spaced
- Use your fingers to gently fluff and shape each bubble so they feel intentional rather than just pinched
- Optional: curl the ends of your ponytail if you want additional dimension, or leave them straight for a more modern look
Worth knowing: The more bubbles you create, the shorter your final ponytail will appear, so plan your bubble placement accordingly.
8. The V-Part Ponytail with Face-Framing Pieces
Sometimes the sleekest V-part ponytail benefits from a few intentional pieces left out around the face—thin pieces at the temples or slightly thicker pieces along the cheekbones that soften the overall geometry and add movement. This bridges the gap between a severe style and something more approachable.
How Face-Framing Pieces Change the Dynamic
Leaving out face-framing pieces from a V-part ponytail makes the style feel less corporate and more romantic, while still maintaining that sharp V-part focus at the crown. These pieces catch light and add movement, and they can actually balance out certain face shapes better than pulling everything back completely.
Incorporating Face-Framing Strategically
- Before you create your V-part, identify where you want your face-framing pieces—usually at the temples or along the cheekbones
- Leave those sections unstyled initially
- Create your V-part and style the rest of your hair into your ponytail
- Take those face-framing pieces and either curl them, braid them, or leave them straight depending on the vibe you’re going for
- Use a light styling product or hairspray to keep them in place without making them feel stiff
- Tuck them slightly behind your ears if you want them more subtle, or let them fall more freely for added movement
Pro tip: If you’re using face-framing pieces, skip the ultra-slicked gel look and go for a slightly softer, more textured ponytail overall for balance.
9. The Asymmetrical V-Part Ponytail
Instead of centering your V-part directly down the middle, shift it slightly to one side. The V itself is still sharp and defined, but it’s positioned asymmetrically, creating a modern, avant-garde quality that’s less expected than a traditional centered V.
The Unexpected Appeal of Off-Center Geometry
An asymmetrical V-part reads as more fashion-forward and intentional than a centered version. It’s subtle enough that not everyone will immediately understand what makes the style feel different, but they’ll absolutely notice that it’s striking and unique. This works beautifully for people who want their V-part ponytail to feel special and personal.
Creating an Asymmetrical V-Part
- Rather than starting your V from the exact center of your hairline, shift the starting point slightly to one side (about half an inch to one inch, depending on how dramatic you want the asymmetry)
- Use your rat-tail comb to create that V, maintaining the same pointed shape but with the offset starting point
- Smooth both sections and gather your hair into a ponytail
- The asymmetry should be visible from above and from the front—that’s what makes it read intentionally
- Use the same sleek techniques you’d use for a traditional V-part, just with this offset positioning
- Finish with hairspray for hold
Worth knowing: An asymmetrical V-part pairs beautifully with a deep side part along the hairline, which enhances the off-center vibe.
10. The V-Part Ponytail with Statement Accessories
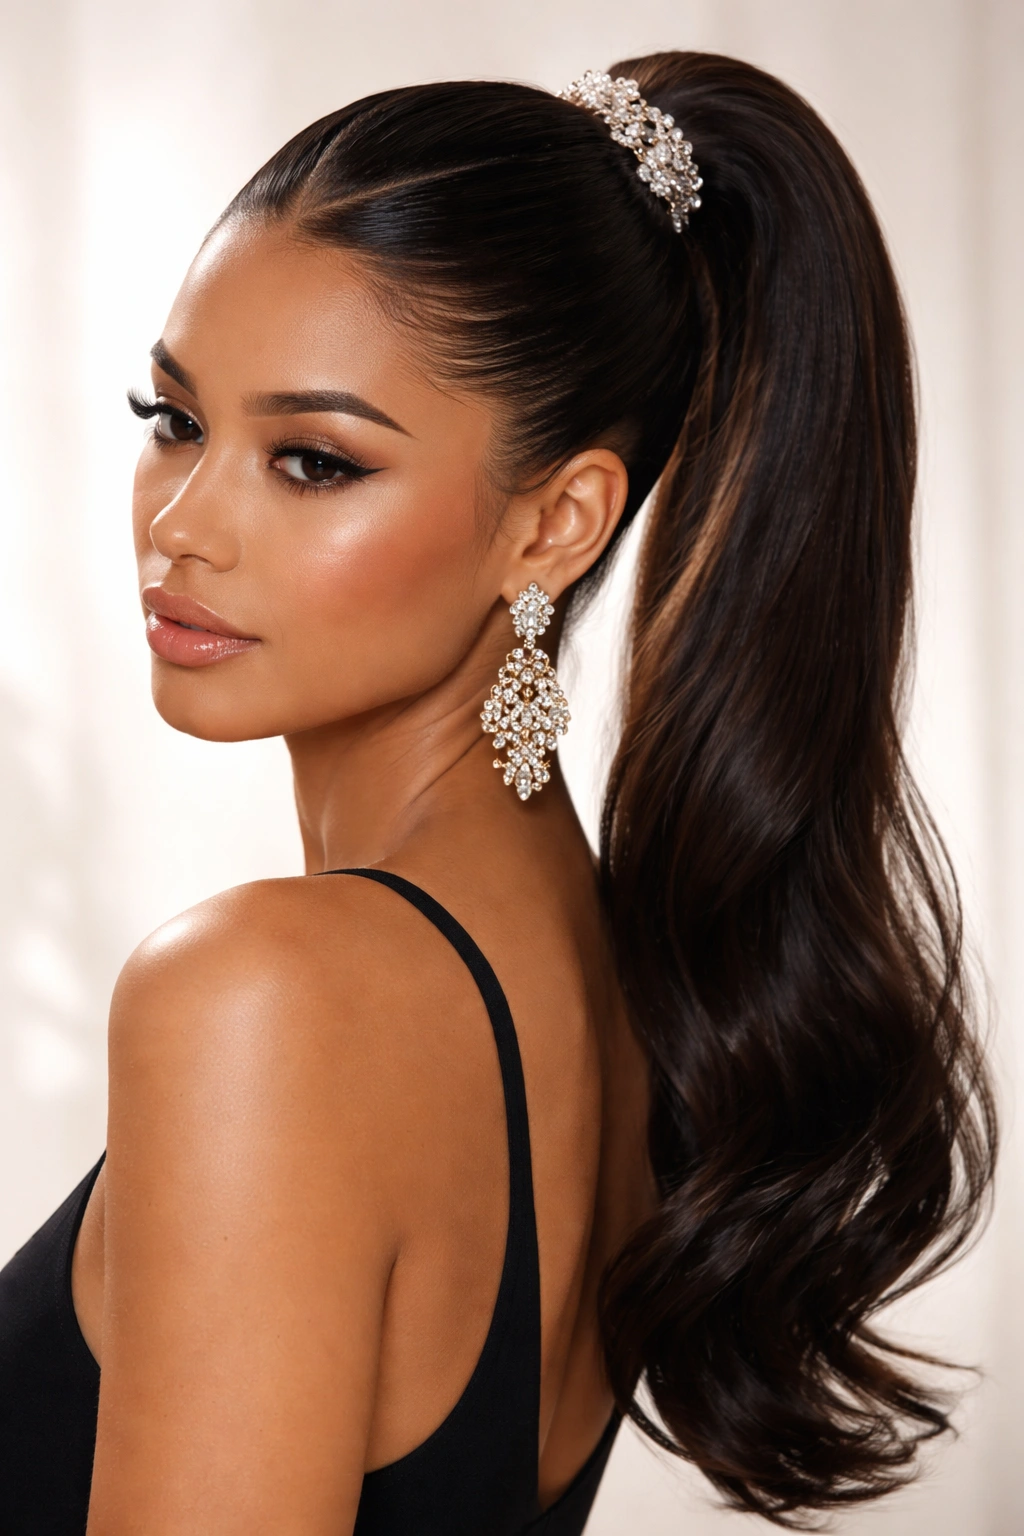
The final style is really about taking a classic V-part ponytail and elevating it with unexpected accessories—a jeweled hair clip, a luxury hair tie, decorative bobby pins, or a silk scarf wrapped around the base. The V-part itself remains clean and sleek, but the accessory is where the personality comes through.
How Accessories Transform the Baseline
Adding an unexpected accessory to a V-part ponytail makes it feel intentional and curated rather than just practical. A simple clip or luxury hair tie transforms a basic style into something that looks thought-through and purposeful. This approach gives you maximum versatility—you can change the mood of the exact same hairstyle just by switching out your accessory.
Styling with Accessories as the Focus
- Create your V-part and style your ponytail using any of the techniques mentioned in the previous styles
- Rather than finishing with an invisible elastic, choose an accessory that actually draws attention—a tortoiseshell clip, a pearl-studded hair stick, or a metallic hair tie
- Position it where it will be visible and prominent
- If you’re using a decorative scarf or wrap-around, style it to be part of the visual design rather than trying to hide it
- Keep the rest of your ponytail clean and sleek so the accessory is truly the focal point
- Make sure the accessory color or material complements your hair color and skin tone
Pro tip: Luxe accessories work best when the rest of your ponytail is completely polished and sleek—they deserve clean backgrounds to shine against.
Final Thoughts
The V-part ponytail is genuinely versatile because the core technique remains consistent while the execution possibilities are endless. Whether you’re going for graphic and sharp, soft and textured, voluminous and dramatic, or accessorized and personal, the V-part gives you a framework that reads intentional and polished immediately.
The real key to making any V-part ponytail work beautifully is respecting the geometry of that V itself. When your part line is clean, your front sections are smooth, and you’ve thought through where that ponytail sits on your head, everything else falls into place. The V-part does the heavy lifting—it makes even a basic, simple ponytail feel editorial and intentional, which is exactly why this technique has earned its moment as a hairstyling essential.
Pick a version that resonates with your hair type, your lifestyle, and the vibe you’re going for, then practice it a few times until the V-part becomes second nature. Once you nail the technique, you’ll find yourself reaching for this style constantly—it’s that perfect combination of polished, manageable, and genuinely flattering.