A sleek braided ponytail hits a sweet spot between effortless-looking and utterly polished. Whether you’re prepping for a wedding, heading to work, or just want to elevate your everyday look, braided ponytails deliver sophistication without needing an appointment at the salon. The best part? Once you understand a few core techniques, you can adapt them to match practically any occasion or your current mood.
The truth is that braided ponytails often get lumped together as though one style fits all contexts. But a tight Dutch braid pulled into a sleek pony reads completely different from a flowing fishtail braid that cascades down your back, or a crown braid that frames your face like a halo. Each variation carries its own vibe—some feel edgy and modern, others feel romantic and effortless, and some project unmistakable authority and polish. Knowing which braid to reach for at any given moment, and understanding exactly how to execute it so it stays sleek and refined all day, separates a good hairstyle from a truly great one.
This guide walks through ten distinct braided ponytail styles, each with detailed instructions on how to create them and exactly when to wear them. You’ll learn the prep work that makes the difference between a hairstyle that falls flat by noon and one that looks as polished at 8 p.m. as it did when you first styled it. Real talk—braiding takes practice, but these styles are absolutely achievable, and the confidence boost when someone compliments your hair is absolutely worth the learning curve.
The Foundation: What Makes a Braided Ponytail Truly Sleek
The difference between a sloppy braided ponytail and a sleek, intentional one comes down to tension, preparation, and the right products. A sleek braid requires consistent, even tension throughout—not so tight that it gives you a headache by mid-afternoon, but firm enough that the braid holds shape and doesn’t look fuzzy or textured. This is where most people stumble. They either braid loosely because they’re worried about comfort, which creates a soft, unfocused look, or they pull so hard they end up with a visible crease and uncomfortable pulling at the roots.
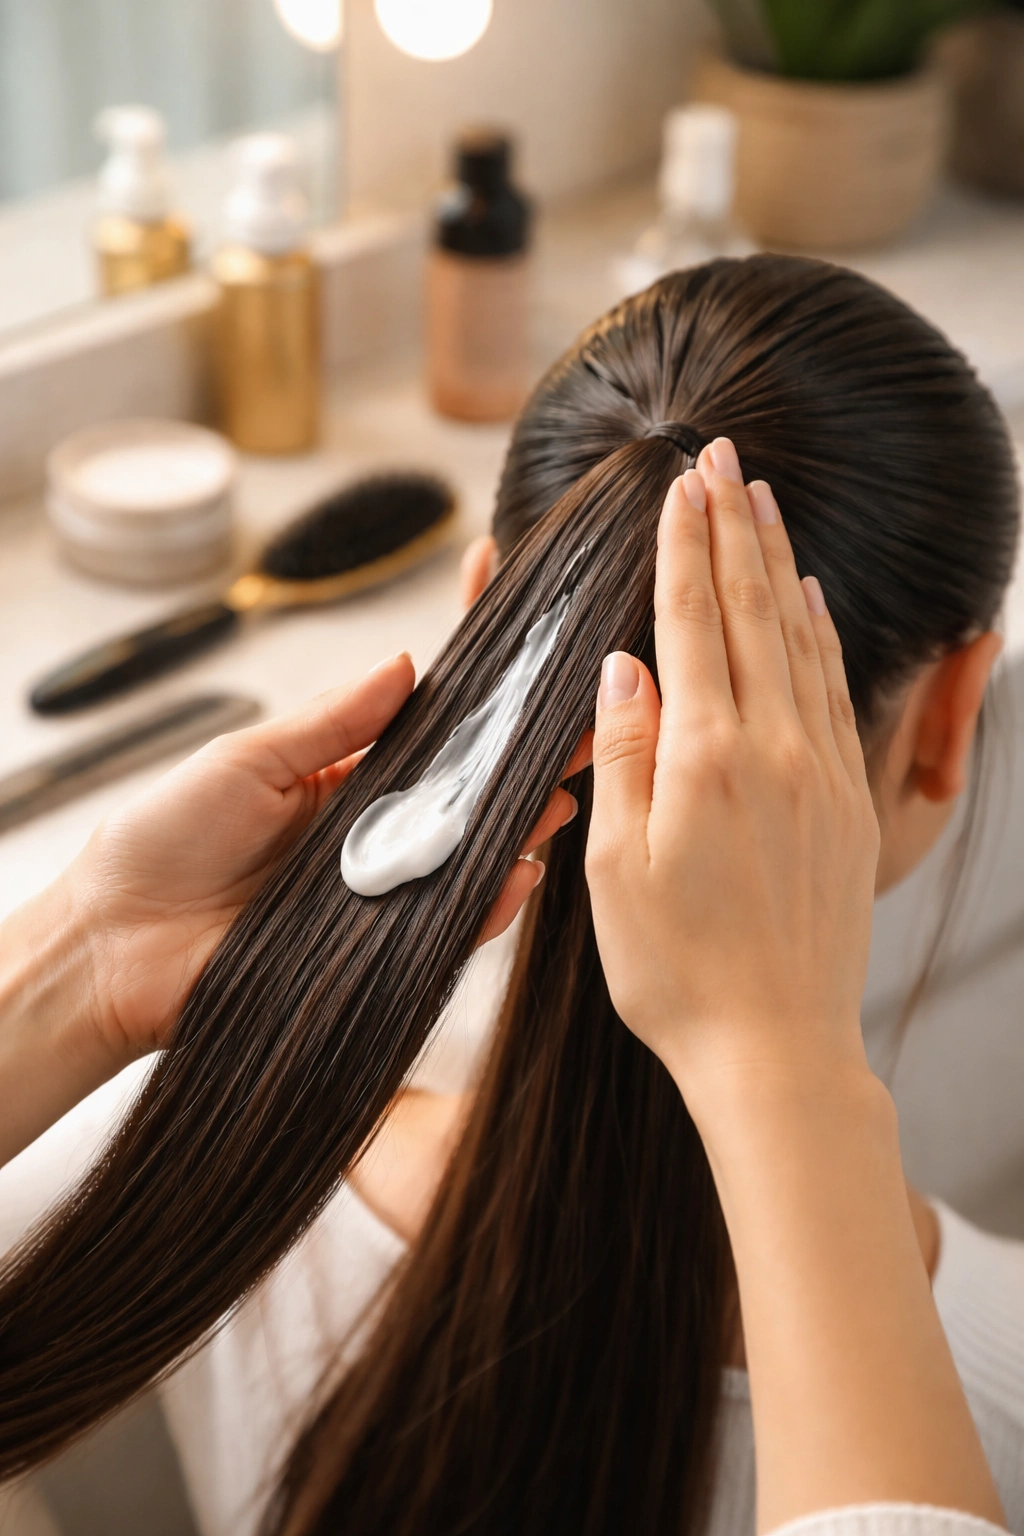
The prep work matters just as much as the actual braiding technique. Starting with hair that’s either completely dry or damp (never soaking wet) gives you better grip and control. Braiding dry hair produces crisper definition; damp hair holds a tighter braid because the moisture adds grip. Adding a lightweight texturizing product—not sticky gel, but something that provides subtle texture and hold—transforms your braiding experience. Without it, slippery hair is nearly impossible to braid neatly.
Sleekness also depends on addressing flyaways and frizz before you even begin. A light smoothing serum or anti-frizz cream applied to damp hair before blow-drying creates a smooth foundation that braids beautifully. This isn’t about fighting your natural texture; it’s about controlling it so your braids have clean lines and a polished finish. The difference between “I braided my hair” and “my hair was professionally styled” often comes down to these invisible prep steps that take less than two minutes but completely transform the result.
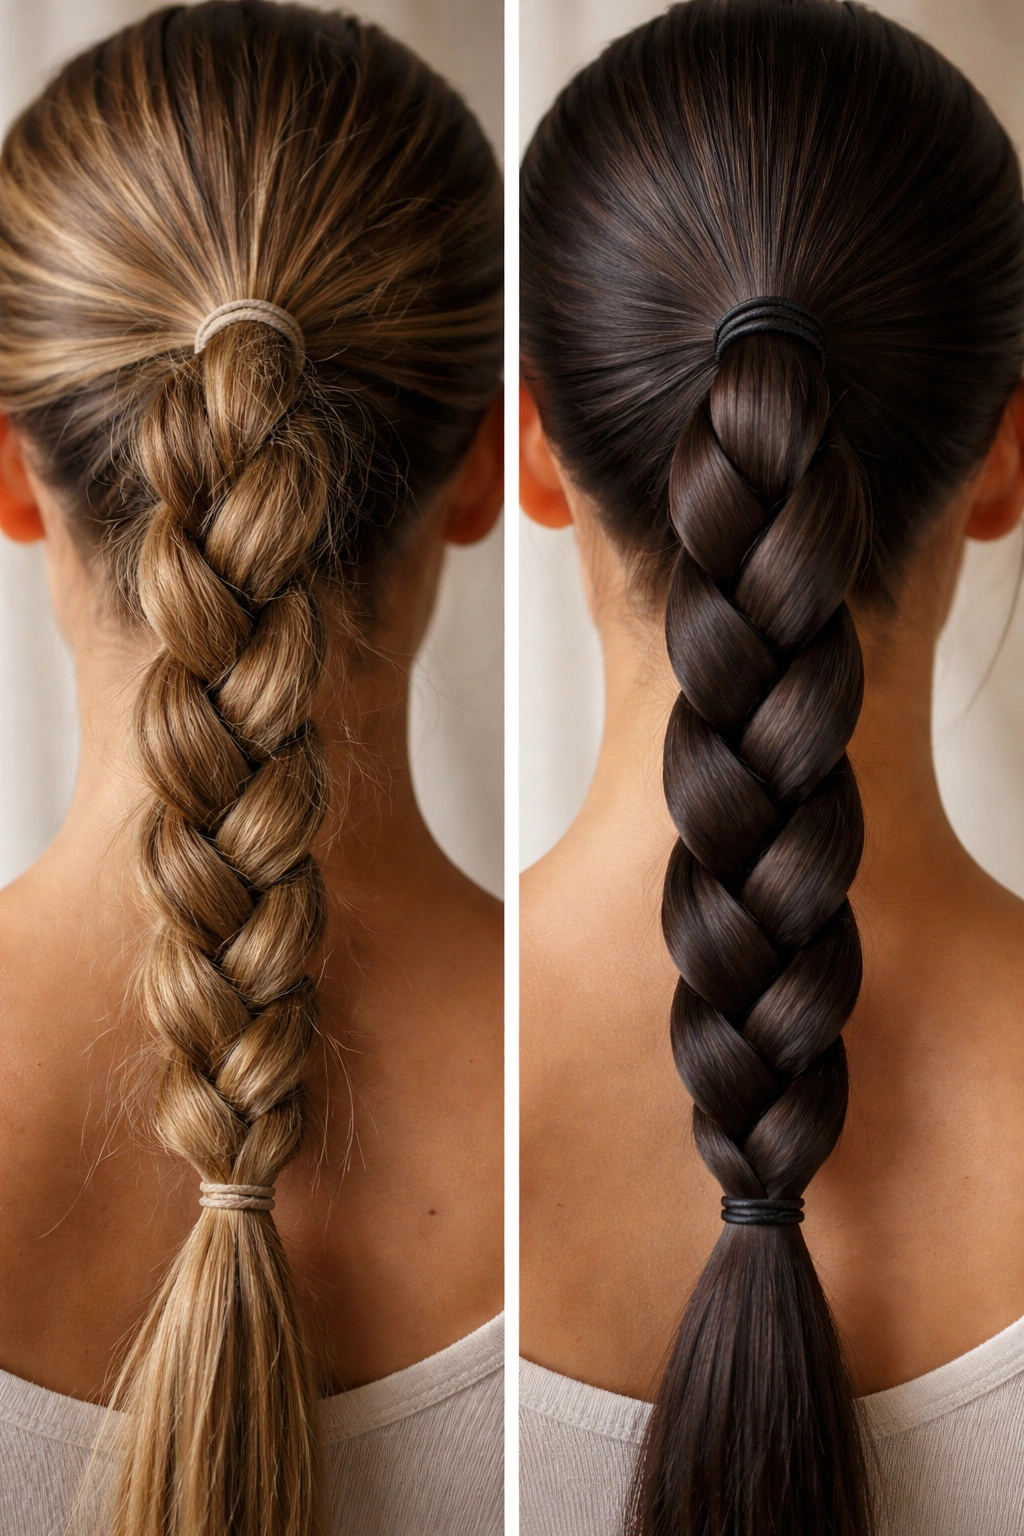
1. Classic Three-Strand Dutch Braid Ponytail
The Dutch braid is the bold, modern cousin of the traditional French braid—instead of weaving the braid under itself, you weave it over, which creates a raised, sculptural effect that photographs beautifully and reads as intentional and polished. When you pull a Dutch braid straight back into a sleek ponytail, you get a style that works equally well for a high-powered business meeting or an upscale dinner party.
Start by blow-drying your hair straight with a smoothing product applied to the roots and midshaft. Section off a clean triangle of hair at the crown—about two inches wide—and divide it into three equal strands. Begin your Dutch braid at this crown section, crossing the right strand over (not under) the center strand, then the left strand over the new center. Keep moving this way, and notice how the braid sits raised on top of your head rather than nestled into your scalp. This raised effect is what makes a Dutch braid look intentional and architectural.
Why It Works for Professional Settings
The raised, structured quality of a Dutch braid signals confidence and attention to detail. It’s the hairstyle equivalent of a perfectly tailored blazer—it says you’ve taken time to prepare without looking like you’re trying too hard. This style holds strong throughout long workdays, maintains its shape even in humidity, and photographs cleanly from multiple angles.
How to Achieve Maximum Sleekness
- Section hair cleanly before you begin braiding—fuzzy, undefined sections create a messy overall look
- Braid slowly and deliberately rather than quickly; rushed braiding inevitably creates loose, uneven sections
- Tug gently on each completed section to tighten it slightly as you move down
- Once you’ve reached the nape of your neck, secure the three strands with a clear elastic, then gather the rest of your hair into a sleek, low ponytail just below where the braid ended
- Use a fine-tooth comb to smooth the ponytail itself and eliminate any bumps or flyaways
Pro tip: The sleekest Dutch braids happen when you start at least two inches behind your actual hairline. This gives you room to braid down several inches before you’re at the crown point where hair naturally gets finer and shorter.
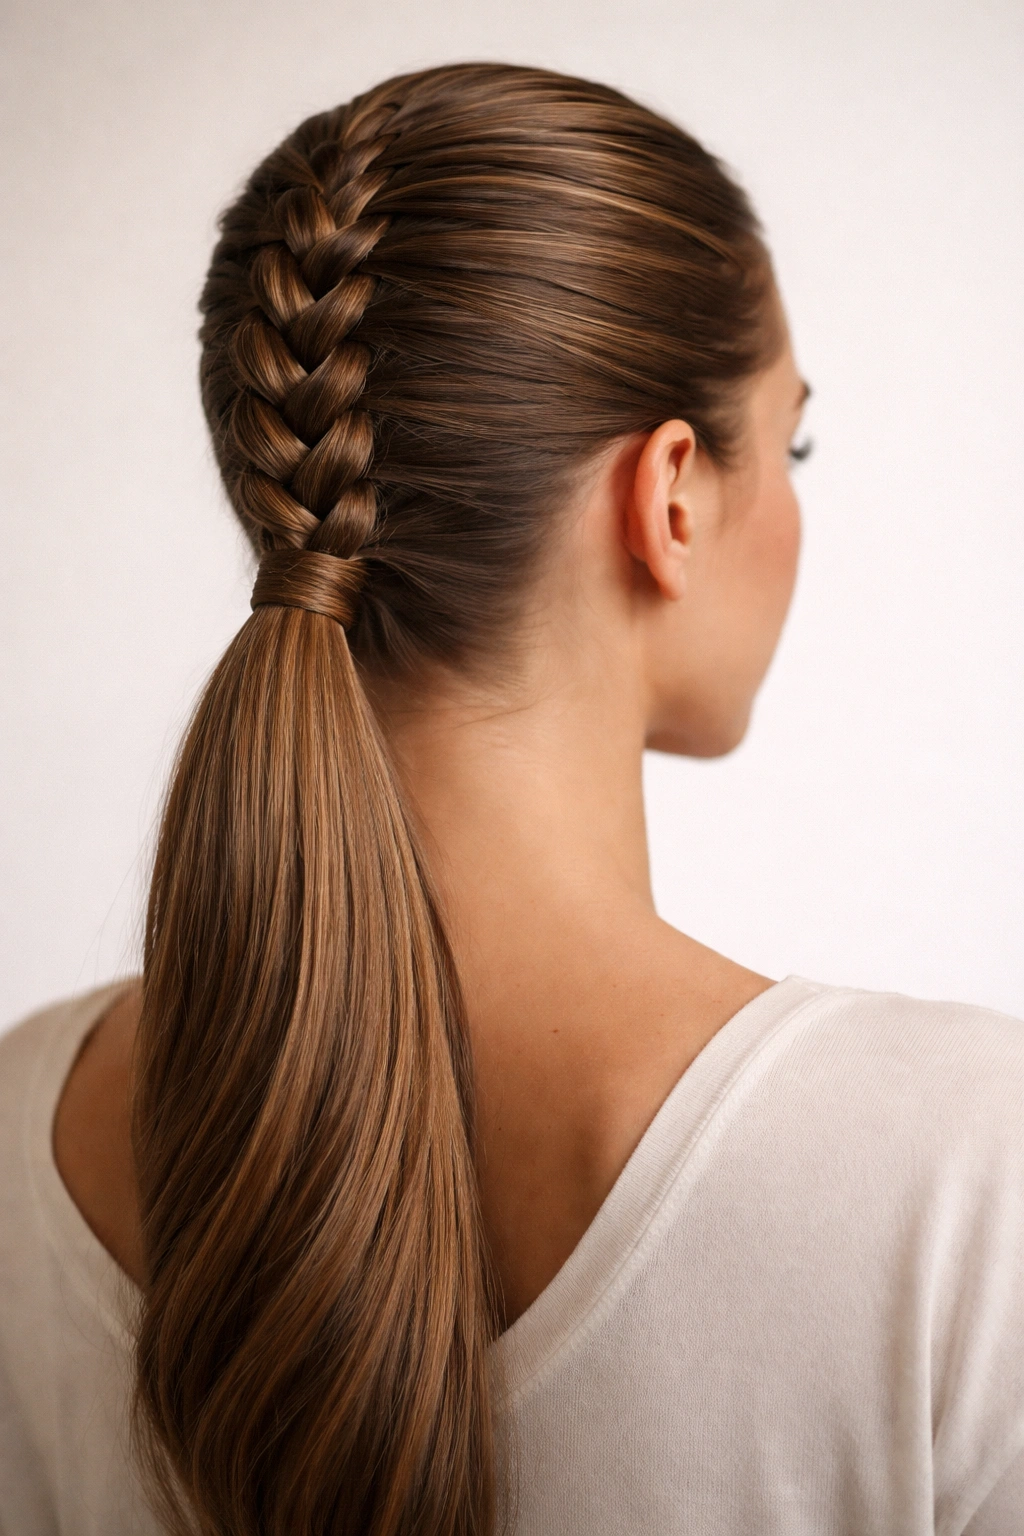
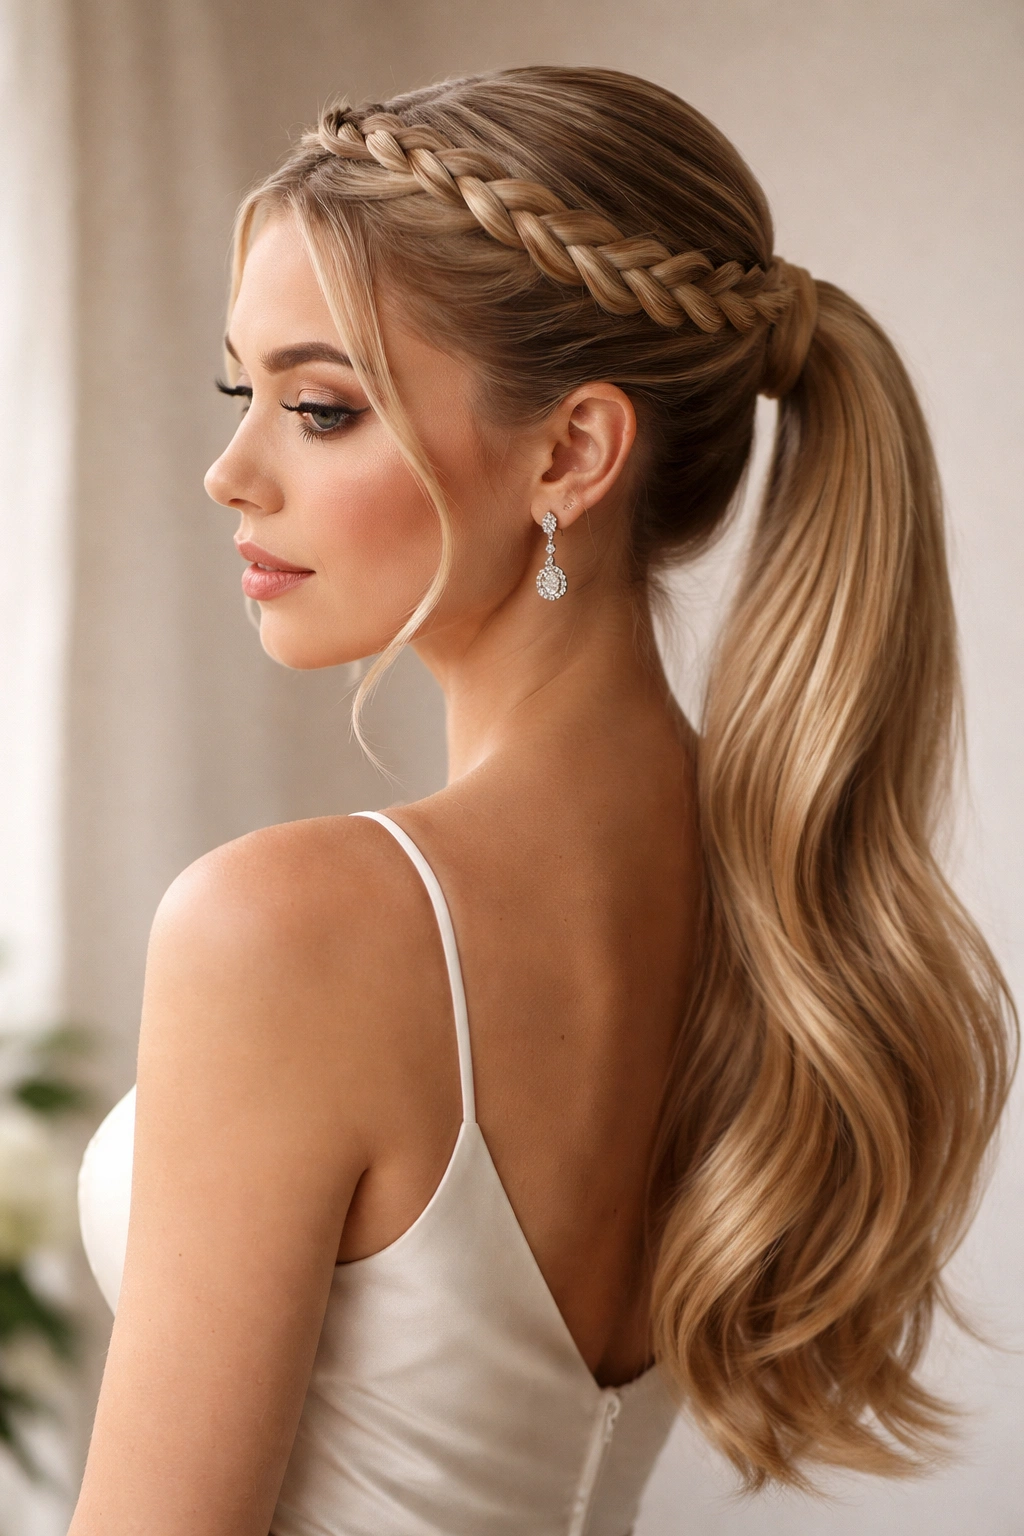
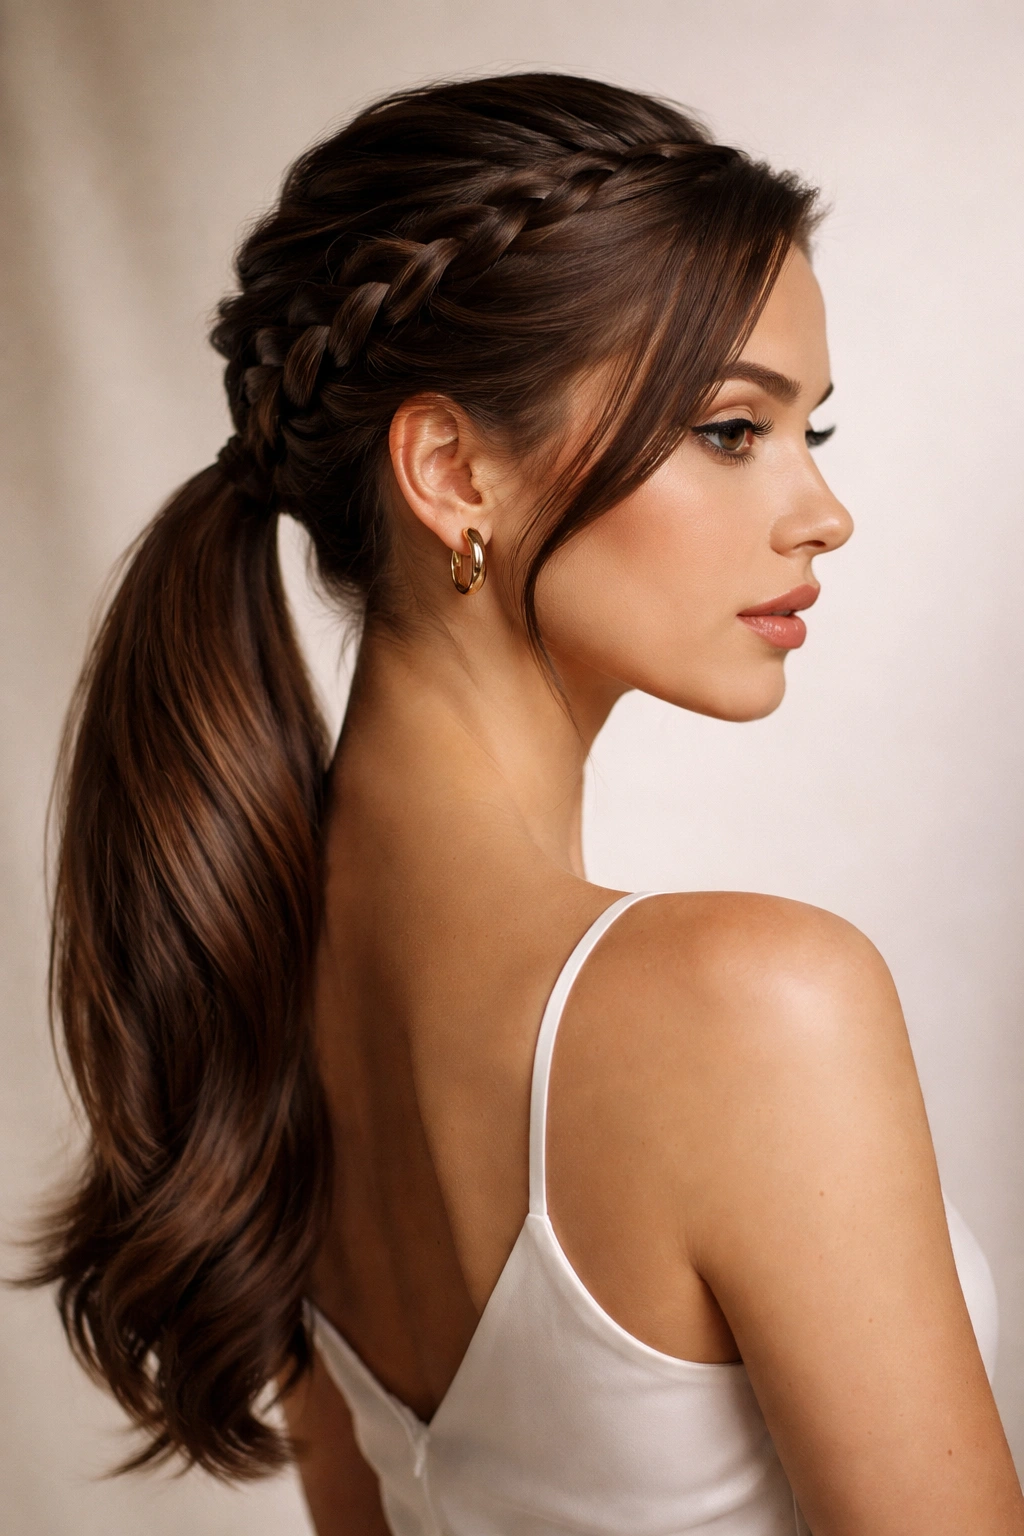
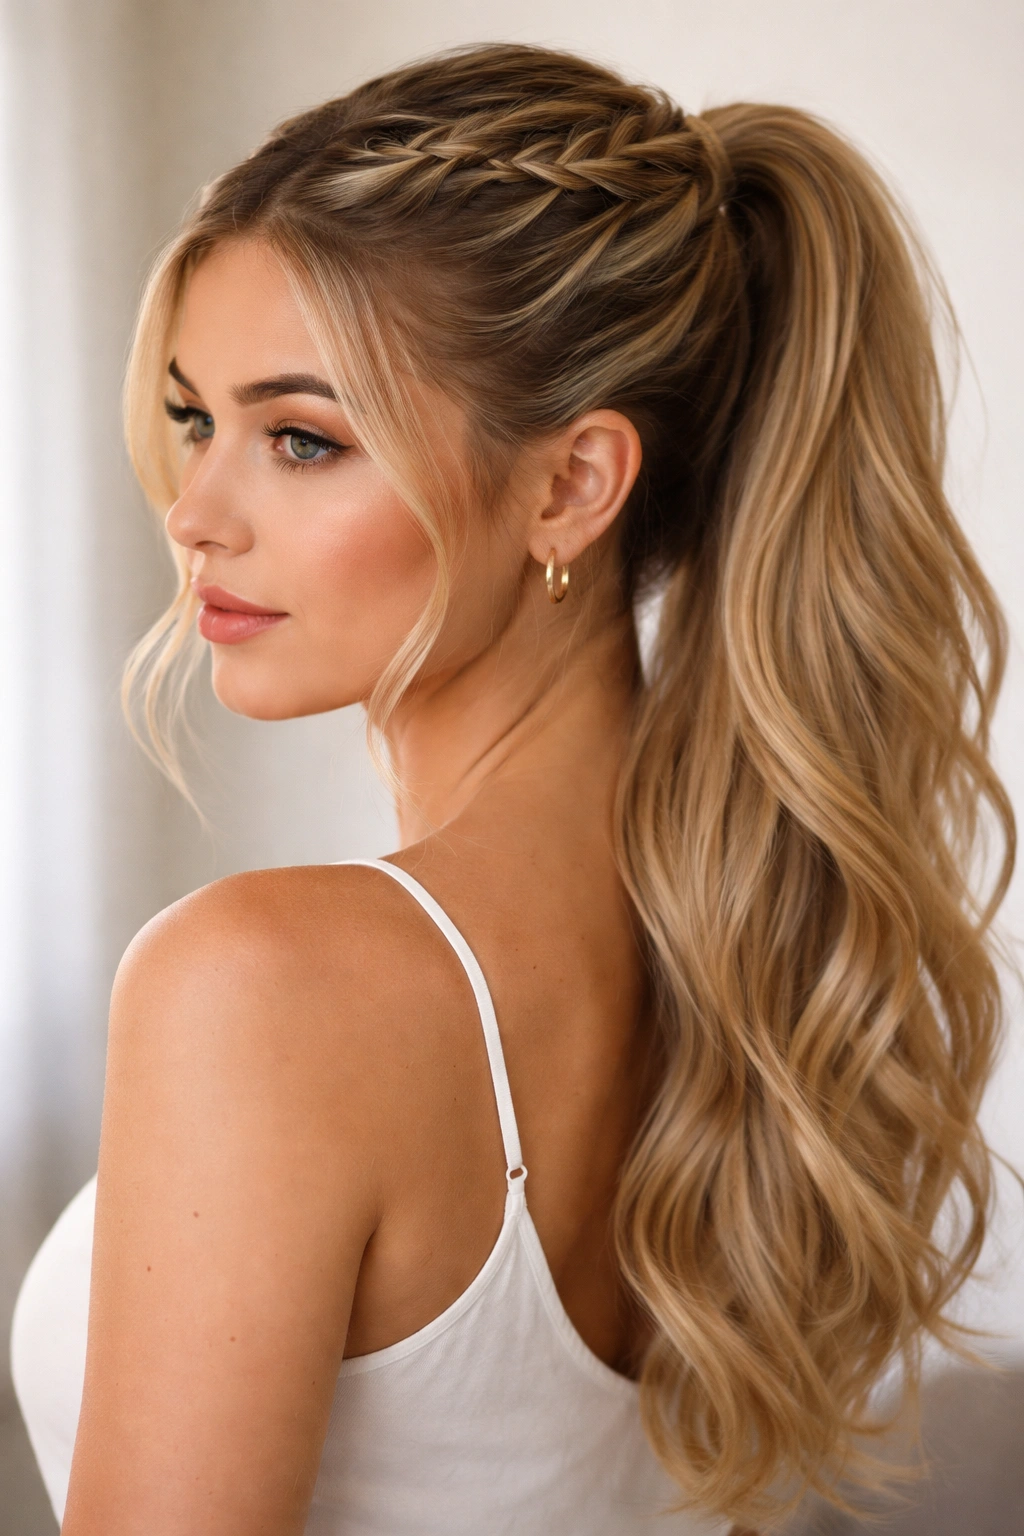
2. French Braid into Sleek Ponytail
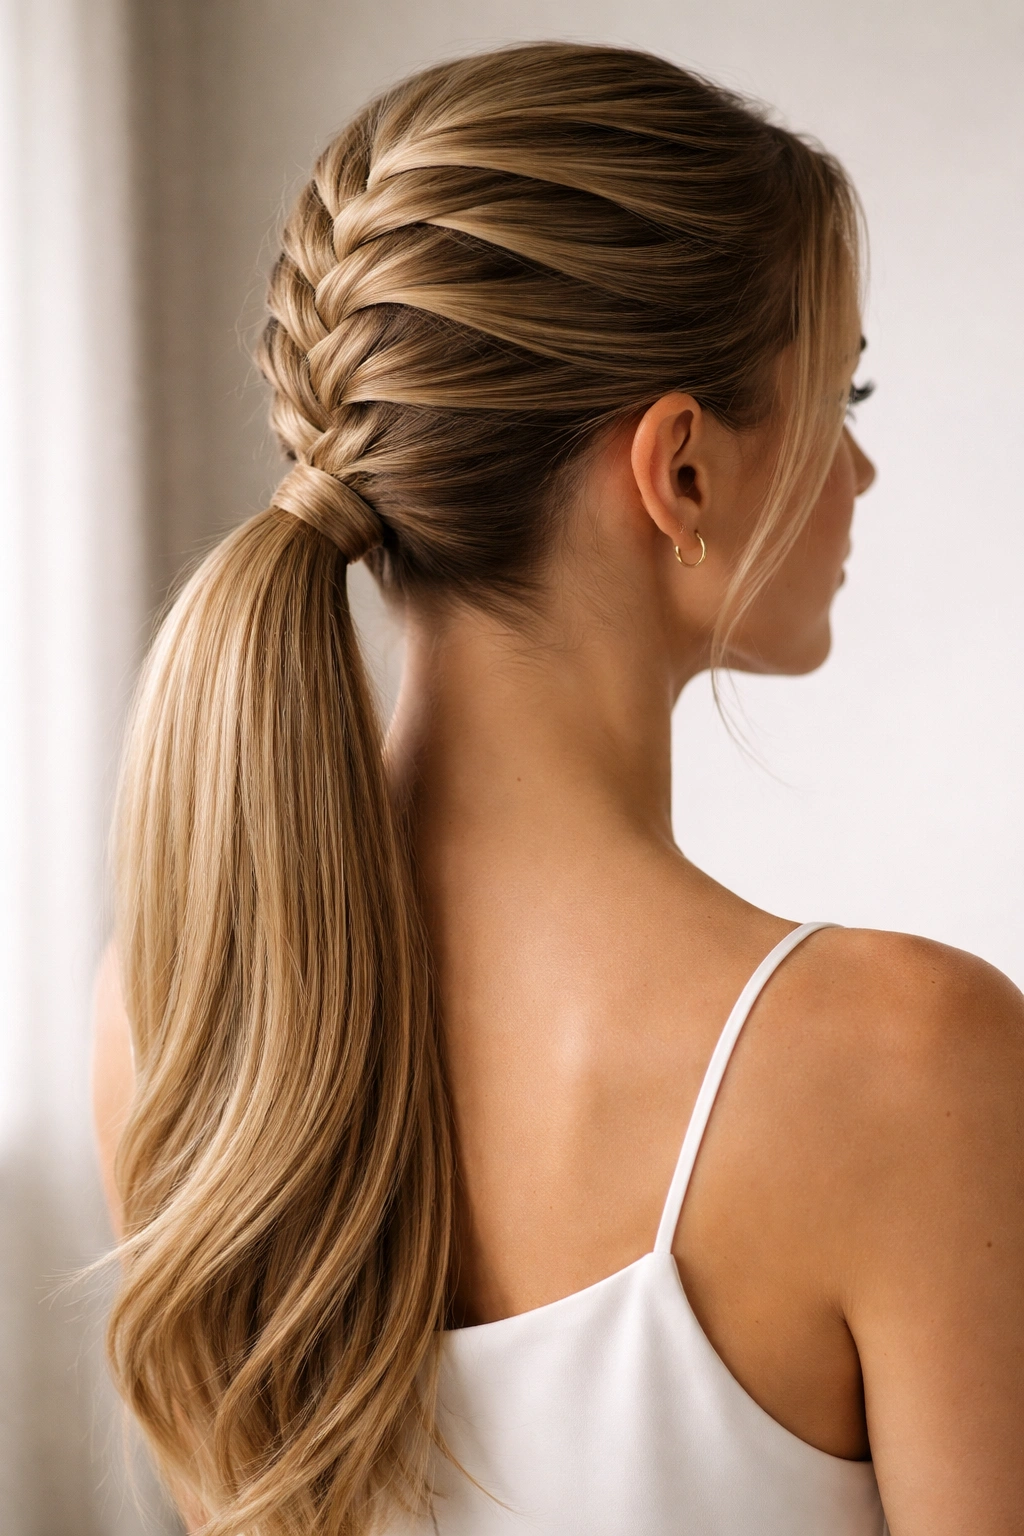
A French braid is the softer, more romantic counterpart to the Dutch braid. Where a Dutch braid sits raised and sculptural on top of your head, a French braid nestles elegantly into the scalp, creating a soft, integrated line that flows down the back of your head. This version reads less “power meeting” and more “I’ve got my life together,” which makes it ideal for dates, casual weddings, or any time you want polish without drama.
The French braid actually uses the same under weaving motion that most people learned as kids, which makes it a great starting point if Dutch braids feel intimidating. Begin with a triangle section at your crown, just as you would with a Dutch braid, but this time cross the right strand under the center, then the left under the new center. As you braid down, gradually pick up new hair from the sides, incorporating them into your three strands as you work. The key to achieving a sleek, refined look is to incorporate hair from small, even sections—not grabbing thick hunks that create an unbalanced braid.
Why Sleekness Matters for This Style
A French braid that’s too loose looks sloppy and falls apart by mid-day. One that’s braided too tightly creates an uncomfortable pulling sensation and can show visible white space between the braided sections. The sweet spot is a braid that feels secure but not strangling—imagine you’re gently holding someone’s hand, not gripping it. This moderate tension creates a beautiful, defined braid that lasts all day.
Step-by-Step Execution
- Begin with damp hair that’s been blow-dried smooth with a volumizing mousse applied to the roots
- Part your hair off-center (an off-center part automatically looks more intentional and flattering than a center part)
- Start your braid from the highest point on the side with more hair and work diagonally down toward the opposite ear
- Each time you add new hair, make sure the section is the same thickness as the strands you’re already working with
- Braid all the way to the nape of your neck, then secure with an elastic
- Gather remaining hair into a low ponytail and smooth with a fine-tooth comb
Insider note: The French braid in this particular direction—from one side toward the opposite ear—naturally guides the eye across your face in a flattering way and looks more intentional than a simple center-parted braid.
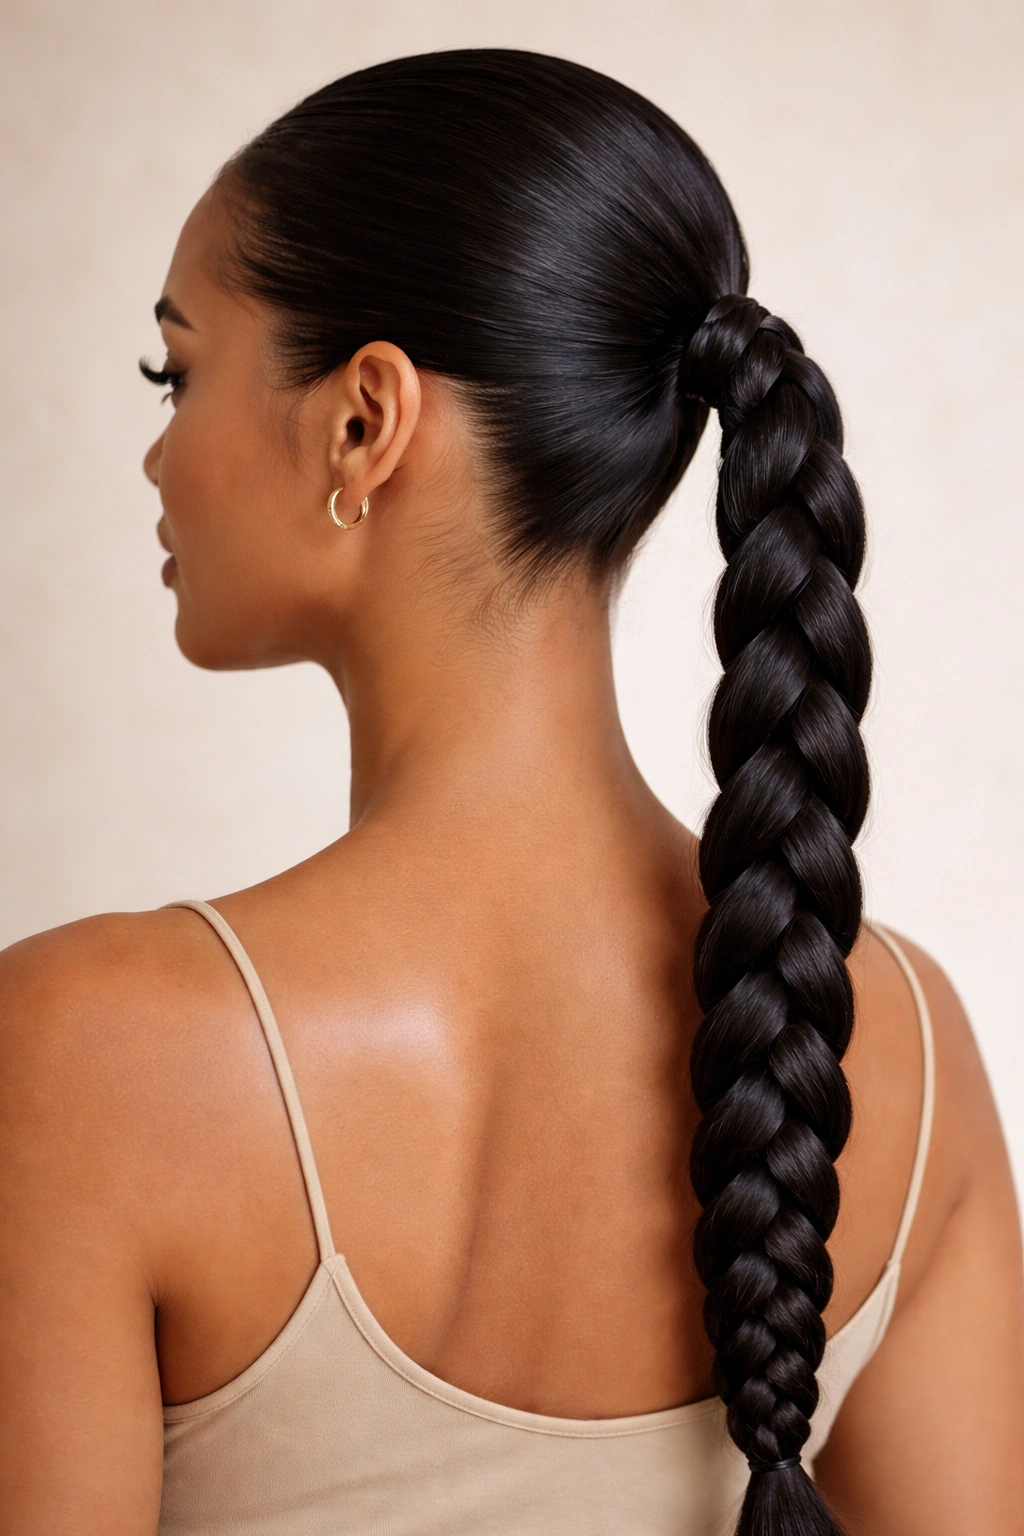
3. Double Braided Ponytail

Two braids are inherently more interesting than one, and a double braided ponytail creates visual impact and a sense of deliberate styling that reads as elevated and fashion-forward. This style works beautifully for events where you want to stand out—think gallery openings, creative industry events, or dinner parties where the vibe is more artistic than formal. The symmetry of two matching braids feels graphic and modern, while the ponytail at the end softens the effect so it doesn’t read as too edgy.
The key to pulling off a double braided ponytail is creating two identical braids, which requires dividing your hair into two perfectly even sections. Start by drawing an imaginary line straight down the center back of your head from the crown to the nape. Using that center line as your guide, create a clean side part, then braid each section in the same style (either two Dutch braids or two French braids—whatever you prefer). The braids should be equally tight, use sections of equal size, and end at the same point on your neck.
Creating Visual Balance
Symmetry creates balance, but you can play with where that balance sits. A center part with two braids down the middle of your head reads as intentional and formal. Braiding from each side and pulling the braids back to meet at a low ponytail reads as more playful and casual. Side-parted double braids create an asymmetrical, slightly edgier feel. The styling choice you make here determines whether the overall effect feels elegant, artistic, or casual-chic.
Pro Tips for Flawless Execution
- Use a rat-tail comb to create a perfectly straight center part—a crooked part instantly makes everything look less intentional
- Braid each section to the same depth and tension, checking your progress in the mirror frequently
- Secure each braid with the same style of elastic (they should look identical) in a shade that matches your hair color
- Pull both braids back and secure them together into a single low ponytail for a cohesive, unified finish
- Use a finishing spray to lock everything in place and control any texture or frizz
4. Fishtail Braid Ponytail
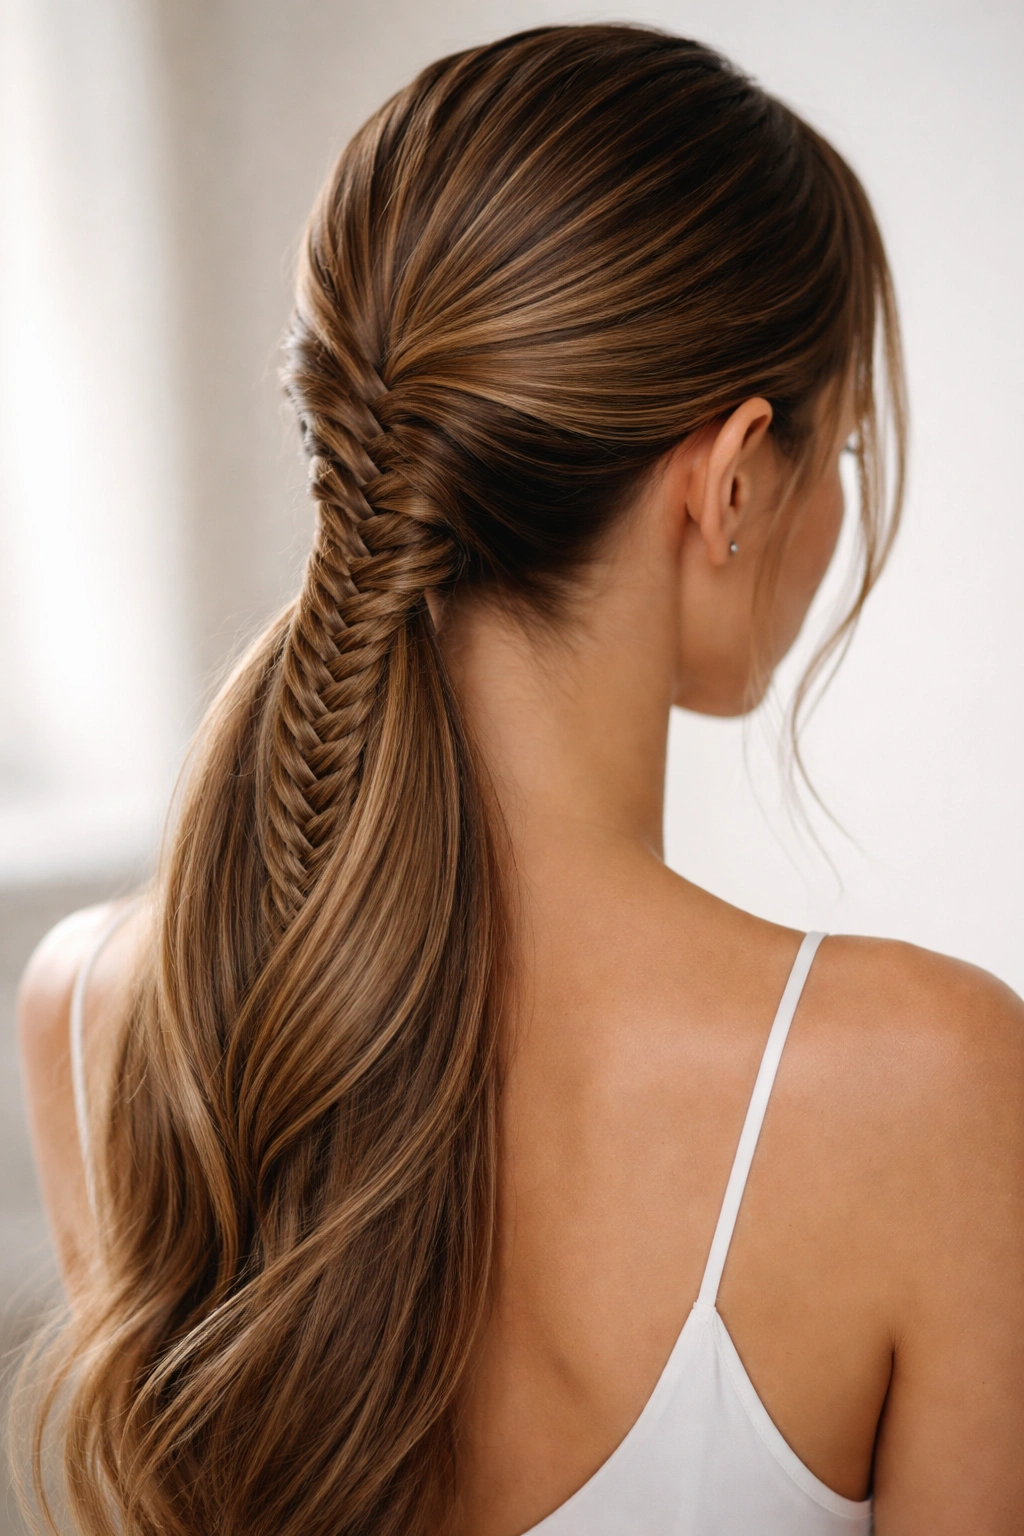
A fishtail braid might look complicated, but it’s actually deceptively simple once you understand the technique—and the result is dramatically more interesting than a standard three-strand braid. Instead of three sections, you’re working with just two, taking a small piece of hair from the outside of one section and crossing it over to join the other section. The result is a delicate, interwoven braid that resembles the skeleton of a fish, hence the name. When you pull a fishtail braid back into a ponytail, you get an incredibly feminine, slightly romantic look that photographs like you spent an hour getting ready.
Start with damp hair and a light texturizing spray—fishtail braids actually look better with a tiny bit of texture rather than super-sleek hair. Divide your hair into two equal sections. Take a thin piece of hair from the outside of the right section and cross it over to join the left section. Then take a thin piece from the outside of the left section and cross it over to join the right. Keep alternating, always taking from the outside and crossing over, working your way down the back of your head. The thinner you make each piece, the more intricate and detailed your braid will look.
Why This Style Creates Instant Impact
The fishtail braid reads as more sophisticated than a standard braid because it’s visibly more complex—even though it’s not actually harder to create. There’s something about the irregular pattern and delicate interwoven appearance that makes people assume you spent a lot of time and effort, which means you score major points for minimal extra work. Bonus: it’s incredibly forgiving because any minor unevenness in the pattern just adds to the organic, handmade aesthetic.
Styling for Maximum Effect
- Apply texturizing spray to damp hair and let it air-dry slightly so you have some grip for braiding
- Fishtail braids look best when slightly undone, so don’t aim for surgical precision—aim for pretty and organic
- Braid to the nape of your neck, then secure with a small clear elastic
- Pull back into a low ponytail and gently pull a few pieces from the fishtail braid to loosen it slightly
- Use a light texturizing spray on the finished braid to enhance the intricate appearance and add hold
Worth knowing: Fishtail braids work beautifully even with slightly shorter layers because the interwoven pattern creates the illusion of length and fullness. If your hair is layered or you’re dealing with some shorter pieces, a fishtail is a forgiving choice.
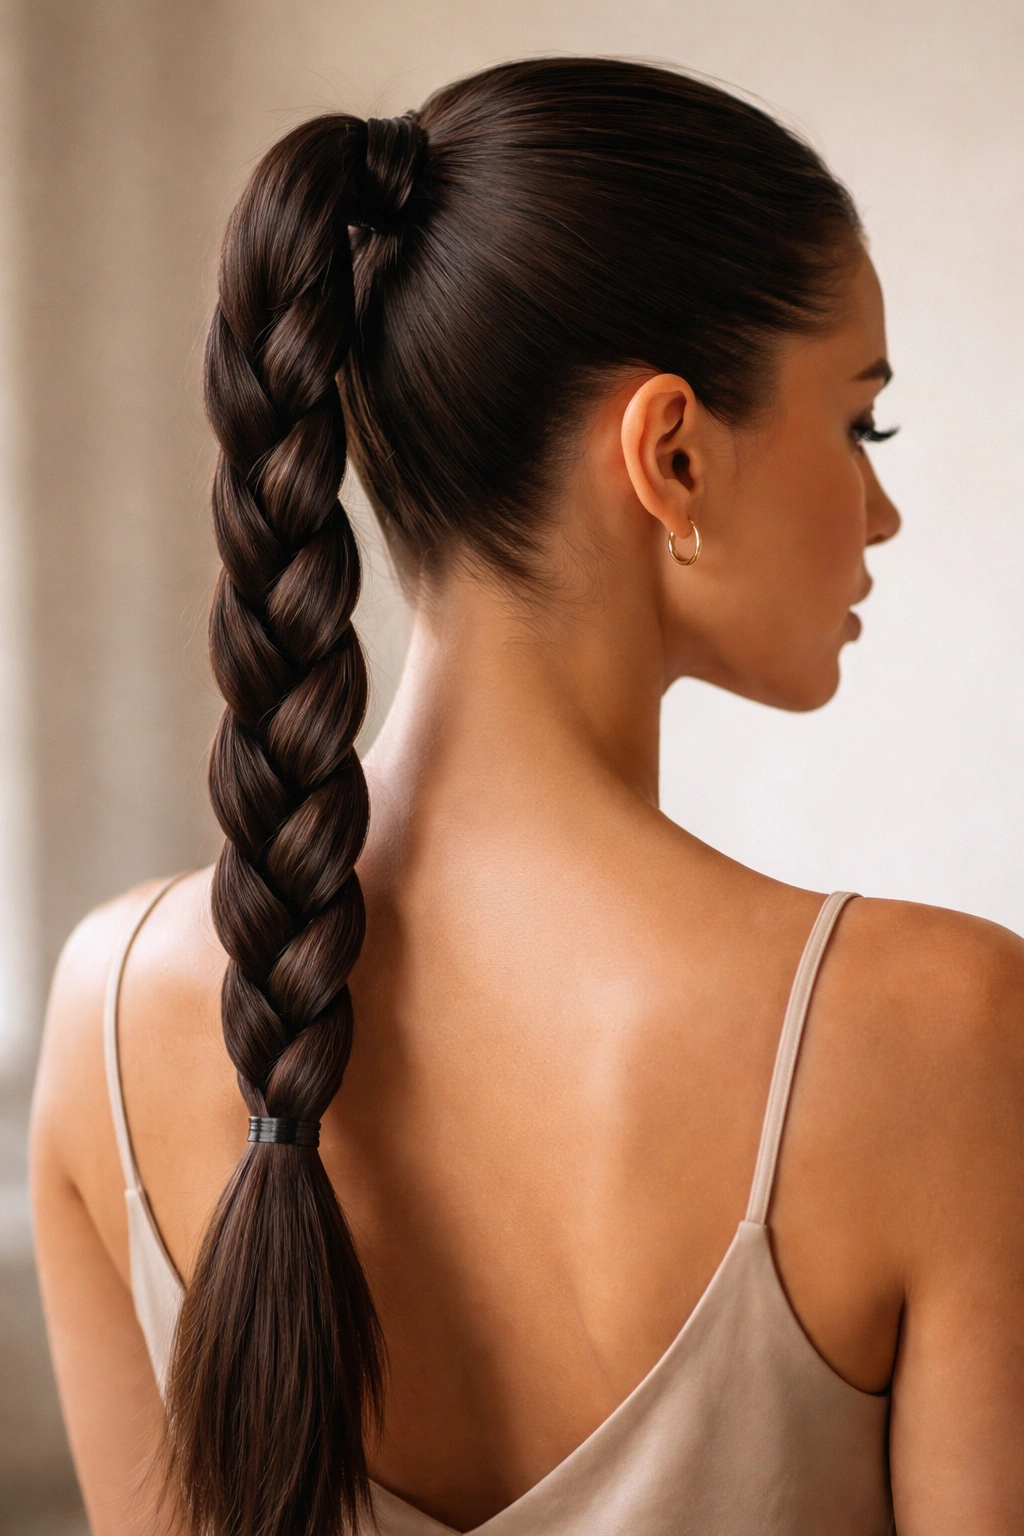
5. Rope Braid Sleek Ponytail
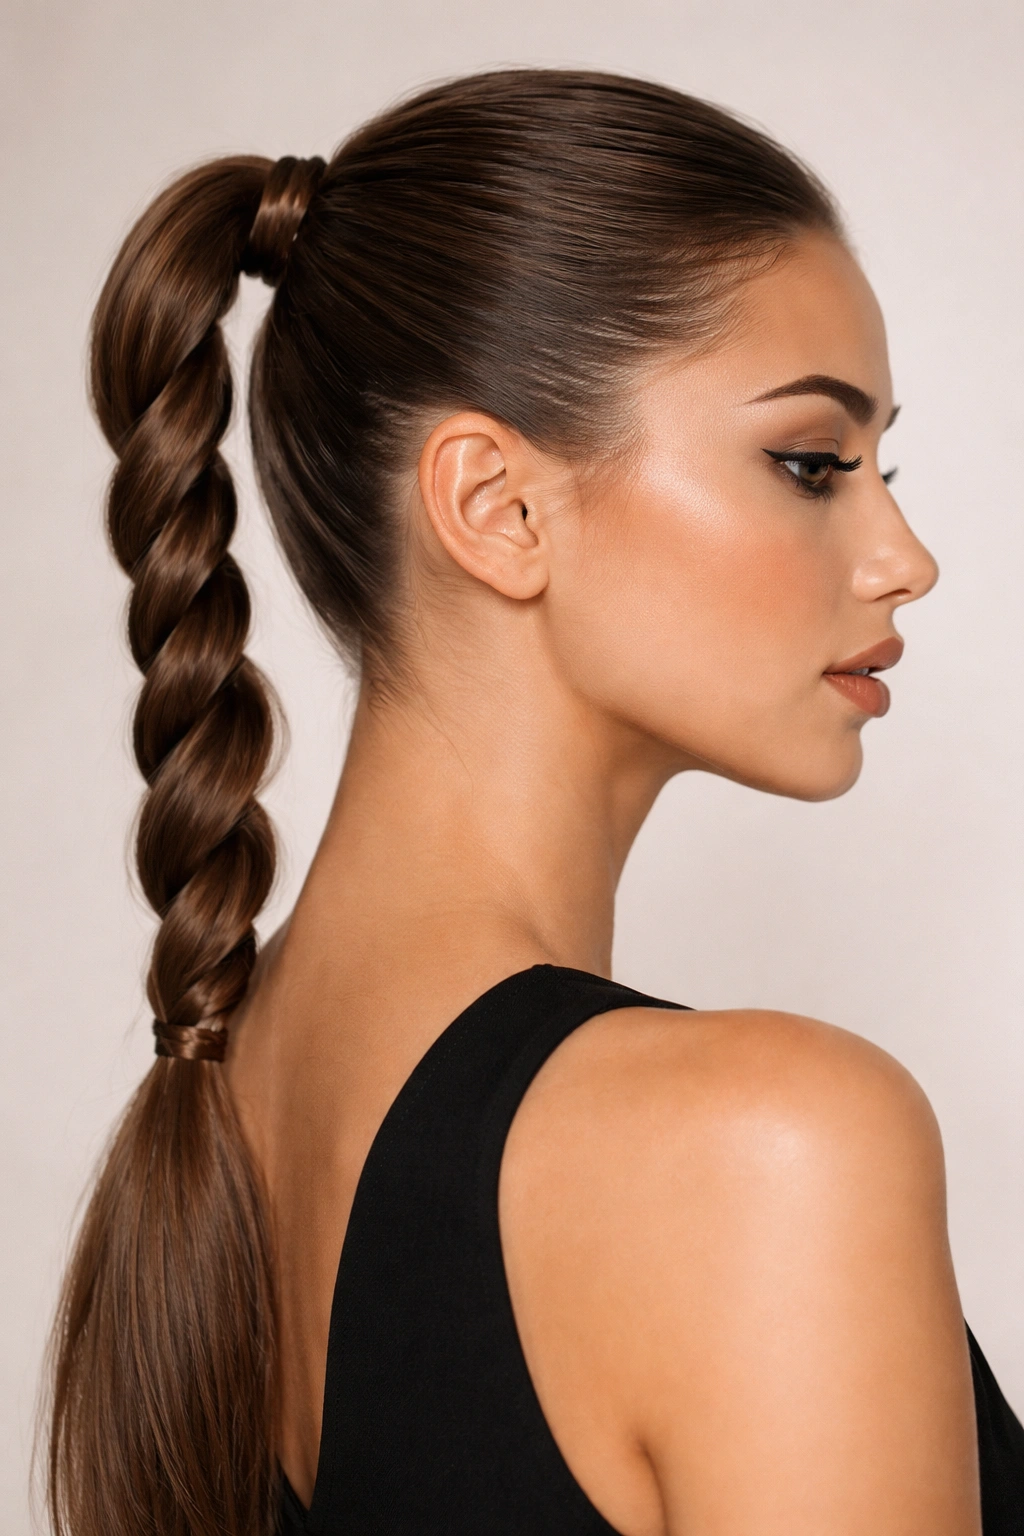
A rope braid is hands-down the easiest of all the braiding techniques and creates a surprisingly polished, coiled effect that looks fantastic pulled back into a ponytail. If you’ve ever struggled with three-strand braiding or found your braids falling apart, a rope braid is about to become your new best friend. You’re literally just twisting two sections of hair around each other, which means you can create the sleekest, tightest braid in your repertoire because the tension is easier to control.
Begin with cleanly sectioned hair at the crown. Divide a triangle section into just two strands instead of three. Twist the right strand away from you (clockwise), then twist the left strand away from you (clockwise), keeping both strands at the same tension. Now wrap the right twisted strand over the left twisted strand—you’re essentially wrapping them around each other as you move down. Continue this rhythm: twist right, twist left, wrap right over left. The result is a beautiful, rope-like braid that sits sleek against your head and photographs like you’ve mastered advanced braiding techniques.
Why Rope Braids Deliver Sleekness
The twisting motion naturally creates tighter hold than three-strand braiding, which means your rope braid will stay crisp and polished all day without requiring excessive tension that creates discomfort. The coiled appearance of a rope braid is inherently more structured-looking than a three-strand braid, so it automatically reads as more refined and intentional. This is the braid of choice if you’re pressed for time but need to look absolutely put-together.
Technique Essentials
- Keep both strands at even tension—if one is looser than the other, the finished rope will look lopsided
- The wrapping motion should be firm but not frantic; smooth, controlled wrapping creates a smoother finished product
- Work from one side of your head diagonally toward the opposite ear for a flattering frame-the-face effect
- Once you’ve reached the nape, secure the braid and pull your remaining hair into a tight, smooth ponytail
- Use a smoothing serum to polish any minor texture and create shine
6. Crown Braid into Ponytail
A crown braid is exactly what it sounds like—a braid that wraps around the crown of your head like a tiara, and when you anchor the remaining hair into a ponytail at the base, you create an elegant, romantic, slightly bohemian look that works beautifully for weddings, engagement parties, or any occasion where you want to feel like the best version of yourself. The crown braid creates a halo effect that flatters almost every face shape because it draws attention upward and frames your face softly.
Start by sectioning off hair from one ear, working around to the opposite ear, creating a horseshoe-shaped section around the crown. Begin braiding at one ear using a Dutch braid or French braid (your choice), and work your way across the crown toward the opposite ear, creating the effect of a braid wrapping around your head. As you braid, you’re gradually adding hair from the top section while leaving the hair underneath untouched. Once you’ve reached the opposite ear, secure the braid with a hidden elastic and tuck the tail of the braid under to conceal it.
Achieving the Romantic Crown Effect
The magic of this style is that it looks elaborate and special, but it’s actually just one braid wrapped around your head. The key to making it look intentional and polished is keeping the braid tight enough that it doesn’t slide down throughout the day, but loose enough that it doesn’t distort your head shape. You’re aiming for elegant and ethereal, not constrictive or helmet-like.
Styling Steps for Success
- Blow-dry hair smooth with a volumizing mousse applied to the roots—you want some height at the crown
- Create the crown braid using a Dutch or French braid technique, working from temple to temple across the back of your head
- Keep the braid pulled snugly against the crown so it doesn’t slip down as the day goes on
- Gather all remaining hair at the base of the crown into a low ponytail
- Pull a few soft pieces out around your face to frame it gently
- Finish with a light hairspray that holds without feeling sticky or stiff
Pro tip: If you have finer hair or worry about this style feeling too heavy, try a lighter rope braid for the crown instead of a full three-strand braid. It creates the same elegant effect with less weight.
7. Braided Wrap-Around Ponytail
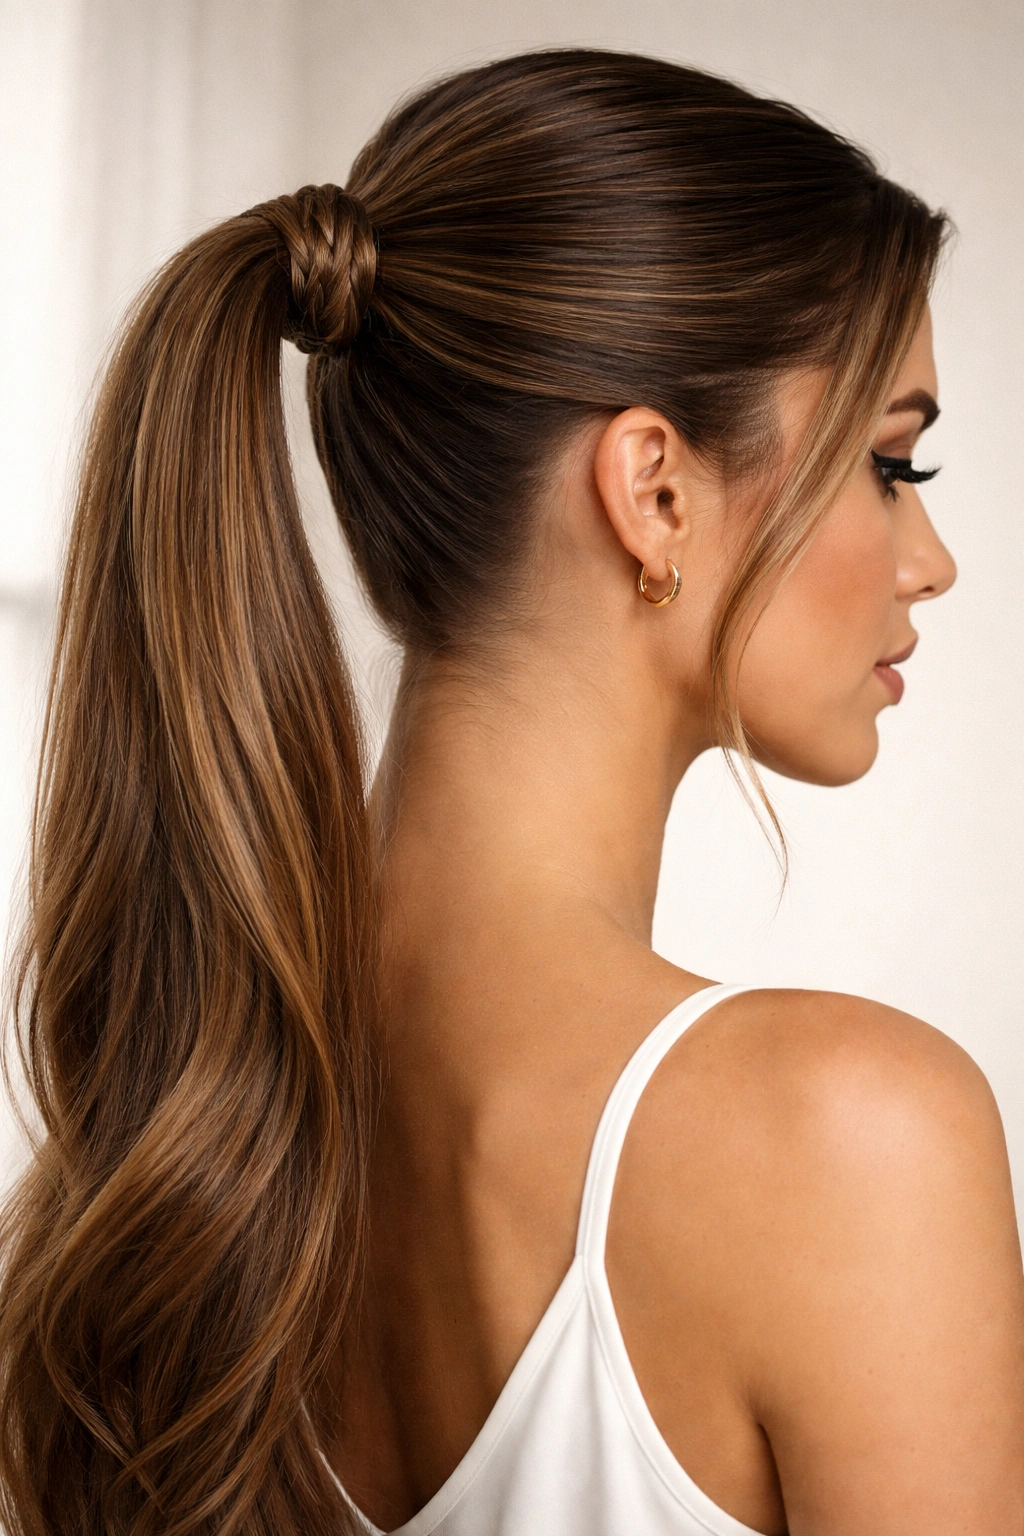
This style is subtle genius—you create a regular ponytail, then wrap a thin braid around the base of it to conceal the elastic and add a polished, finished touch that looks like you spent hours perfecting your hair. It’s the hairstyle equivalent of finishing a room with the perfect throw pillow; that small detail changes everything. This works beautifully for situations where you want your hair pulled back and out of the way (work, workouts, running errands) but you still want it to look intentional and put-together rather than utilitarian.
First, create a sleek, smooth ponytail at whatever height feels right for your occasion—higher for a more energetic, youthful feel, lower for a more sophisticated, elegant impression. Secure it with an elastic that matches your hair color. Then take a thin section of hair from underneath the ponytail and create a two-strand twist or a thin three-strand braid. Wrap this braid around the base of the ponytail, covering the elastic completely, and secure the end of the braid with a bobby pin tucked underneath so it’s hidden from view.
Why This Detail Transforms the Overall Look
A ponytail with a visible elastic looks casual and unfinished. The exact same ponytail with a braided wrap looks intentional, polished, and professionally styled. It’s one of those subtle styling tricks that signals you understand the difference between wearing a hairstyle and styling a hairstyle. The wrap also serves a practical purpose—it holds the elastic securely in place and prevents it from slipping down as you move throughout the day.
Execution Tips
- Create your base ponytail first and ensure it’s positioned where you want it to stay all day
- The wrap-around braid should be thin enough that it’s proportional to your ponytail—a thick, chunky braid wrapped around a sleek ponytail looks disjointed
- A two-strand twist is often easier to control than a thin three-strand braid, and it looks equally elegant
- Secure the wrap so the end is completely hidden—the point is to create a finished, seamless look
- You can incorporate a small ribbon or decorative element into the wrap for added polish at formal events
8. Side-Swept Braided Ponytail
Instead of pulling your braid straight back, you sweep it to the side and gather it into a low, asymmetrical ponytail. This creates a dramatically different vibe than a centered ponytail—it feels more dramatic, more fashion-forward, and somehow more flattering. The side-swept styling naturally frames one side of your face while creating beautiful, flowing lines that elongate your silhouette. This style is perfect when you want to look polished but not overly formal, and it’s genuinely flattering for most face shapes because you can adjust which side you sweep based on your features.
Begin by creating a French or Dutch braid starting from one side of your head and working diagonally down and across toward the opposite side. If you’re naturally left-handed, you might find it easier to start your braid on the right side of your head and work diagonally toward the left. As you braid, you’re aiming to create a diagonal line that sweeps across the back of your head. Once you’ve reached the base of the opposite side, secure your braid and gather all remaining hair into a ponytail positioned low and slightly to the back, rather than centered.
Creating Flattering Asymmetry
Asymmetrical styling is inherently more interesting than symmetrical styling because your eye has to follow a line rather than taking in a balanced image all at once. A side-swept braided ponytail draws attention up and across your face, then down one side, which is exceptionally flattering. The angle of the braid also creates the visual illusion of making your face appear slightly more sculpted and defined.
Styling for Impact
- Part your hair off-center on the side where you want less volume
- Create your braid on the opposite side so it sweeps across the back
- Make sure your braid is tight enough to hold its diagonal line throughout the day
- Pull your ponytail low and slightly off-center at the base of the skull
- Leave a few soft pieces loose around your face for a romantic, intentional softness
- This style is particularly beautiful with loose waves through the ponytail portion
9. Layered Braided Ponytail
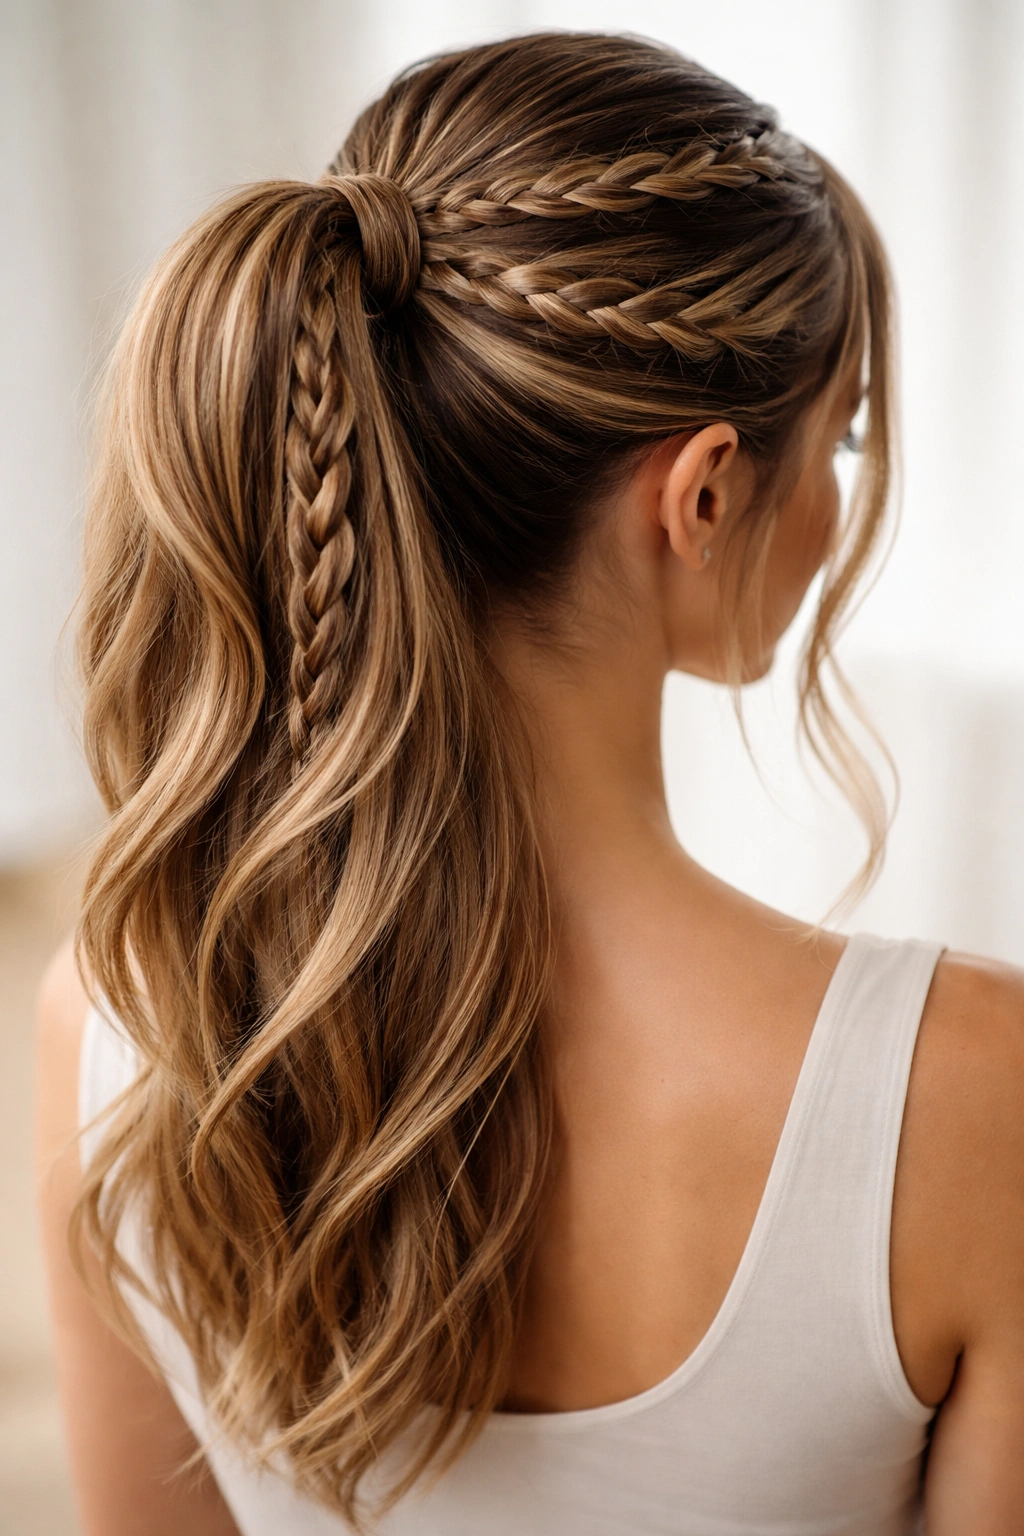
A layered braided ponytail creates incredible visual depth and texture by braiding sections of your hair and then incorporating them into a larger ponytail. Instead of one braid, you’re creating multiple smaller elements that all work together to create a polished, multi-dimensional look. This is the hairstyle equivalent of wearing a textured sweater—it has visual interest and presence in a way that a smooth, solid style doesn’t. It’s perfect for occasions where you want to feel special and put-together without the style reading as overly formal.
The technique involves creating two or three smaller braids on different levels of your head, then gathering all of your hair (braided and non-braided) into one ponytail. For example, you might create one braid starting at your crown and working straight back, another Dutch braid starting slightly lower on the left side, and another starting lower on the right side. You braid each of these down several inches, then gather all the braided and unbraided hair together into one low ponytail. The result is a ponytail where you can see multiple braid sections running through it, creating incredible texture and dimension.
Building Visual Complexity
Layered braids work because they create the appearance of a more complex, intricate style without actually requiring advanced technique—you’re just creating multiple simple braids and pulling them together. This is a style that photographs beautifully from behind and reads as intentional and artistic. It’s particularly striking with hair that has natural color variation or highlights, because the braids emphasize the color dimension.
Technique Breakdown
- Plan your braid placement before you begin—sketch out where you want each braid to start
- Create your first braid (typically straight back from the crown), braid it down several inches, then secure with a clear elastic
- Create your second braid starting slightly to the left and lower, following the same process
- Create a third braid mirroring the placement on the right side
- Once all braids are secured individually, gather all of your hair—both braided and non-braided sections—into a low ponytail
- The individual braid elastics will be hidden within the final ponytail elastic, creating the effect of multiple layers
Worth knowing: This style takes longer to create than a single braid, so it’s perfect for weekend styling when you have a few extra minutes, but less ideal for rushed weekday mornings.
10. Half-Up Braided Ponytail
A half-up braided ponytail strikes the perfect balance between having your hair down and having it pulled back—you get the softness and movement of loose hair while keeping it off your face and neck. It’s the Goldilocks of ponytails: not too formal, not too casual, not too heavy on the crown, not too vulnerable to wind or humidity. This is genuinely one of the most versatile styles in existence, working for everything from casual workdays to romantic dinners to garden parties.
Create your half-up by sectioning off hair from temple to temple across the crown of your head, following your natural hairline. Braid this top section using your favorite braiding technique, then pull the remaining bottom section of hair up and secure it with the braid using a single elastic. The result is a hybrid style where half your hair is contained in a braided, pulled-back section, while the other half flows freely down your back. You can tighten the braid close to your scalp for a more polished look, or leave it slightly loose and undone for a softer, more romantic aesthetic.
Why This Style Offers Maximum Flexibility
A half-up ponytail works in virtually every context because it reads as intentionally styled (you clearly took time to braid) while remaining undone and relaxed (you still have hair down). It’s dressy enough for professional settings but casual enough for weekend wear. It works on good hair days and bad hair days because the braided top section commands visual attention while softly framing your face.
Creating the Perfect Half-Up
- Section your hair cleanly from temple to temple, using your natural hairline as a guide
- Braid this top section down to where the ponytail will sit (typically at ear level)
- Gather the braided section and all remaining loose hair together
- Secure with an elastic that matches your hair color
- You can add volume to the crown with a light backcombing under the braid
- Pull a few face-framing pieces loose around your face for softness
- The ponytail portion looks beautiful with loose waves or curls
Prep and Styling Tips for Sleek Braids That Last
The difference between a braided ponytail that falls apart by lunchtime and one that looks just as polished at 8 p.m. comes down to preparation and product choice. Starting with the right foundation makes every braid easier to execute and longer-lasting.
Blow-dry your hair smooth before braiding. Wet hair loses its shape and doesn’t hold braids well. Blow-dried hair has structure and grip. If you have naturally straight hair, blow-dry straight with a smoothing serum. If you have texture, blow-dry with a volumizing mousse to add grip without creating frizz. The goal is hair that’s smooth enough to braid cleanly but textured enough that the braid doesn’t slip.
Apply a lightweight texturizing product to your hair before you braid. This might be a light mousse, a dry texture spray, or a light sea salt spray. Avoid heavy gels or thick styling creams that make hair sticky and difficult to work with. What you’re looking for is something that gives your hair enough grip that your braid stays tight and defined, without adding weight or creating that “wet” appearance. A light texture spray on dry hair is perfect—it adds grip without any visible product buildup.
Braid slowly and deliberately. Rushed braiding inevitably creates loose, uneven sections that fall apart. When you’re moving through the braiding process, take your time. Check your work frequently in the mirror. If you notice one section is looser than the others, stop and tighten it. This process might take a few extra minutes, but you’re essentially quality-checking as you go rather than discovering problems at the end.
Use bobby pins strategically. A ponytail held together with a standard elastic often feels like it could slip at any moment, especially as your hair stretches throughout the day. Use two elastics stacked on top of each other, or secure your ponytail with an elastic and then use bobby pins underneath to anchor it to your actual hair. This distributes the tension and prevents that slipping sensation.
Finish with a flexible-hold spray, not a stiff one. Soft-hold sprays keep your braids in place while still allowing natural movement and flexibility. Stiff sprays create the appearance of shellacked, unnatural hair that actually feels worse than it looks.
Products and Tools You’ll Actually Need
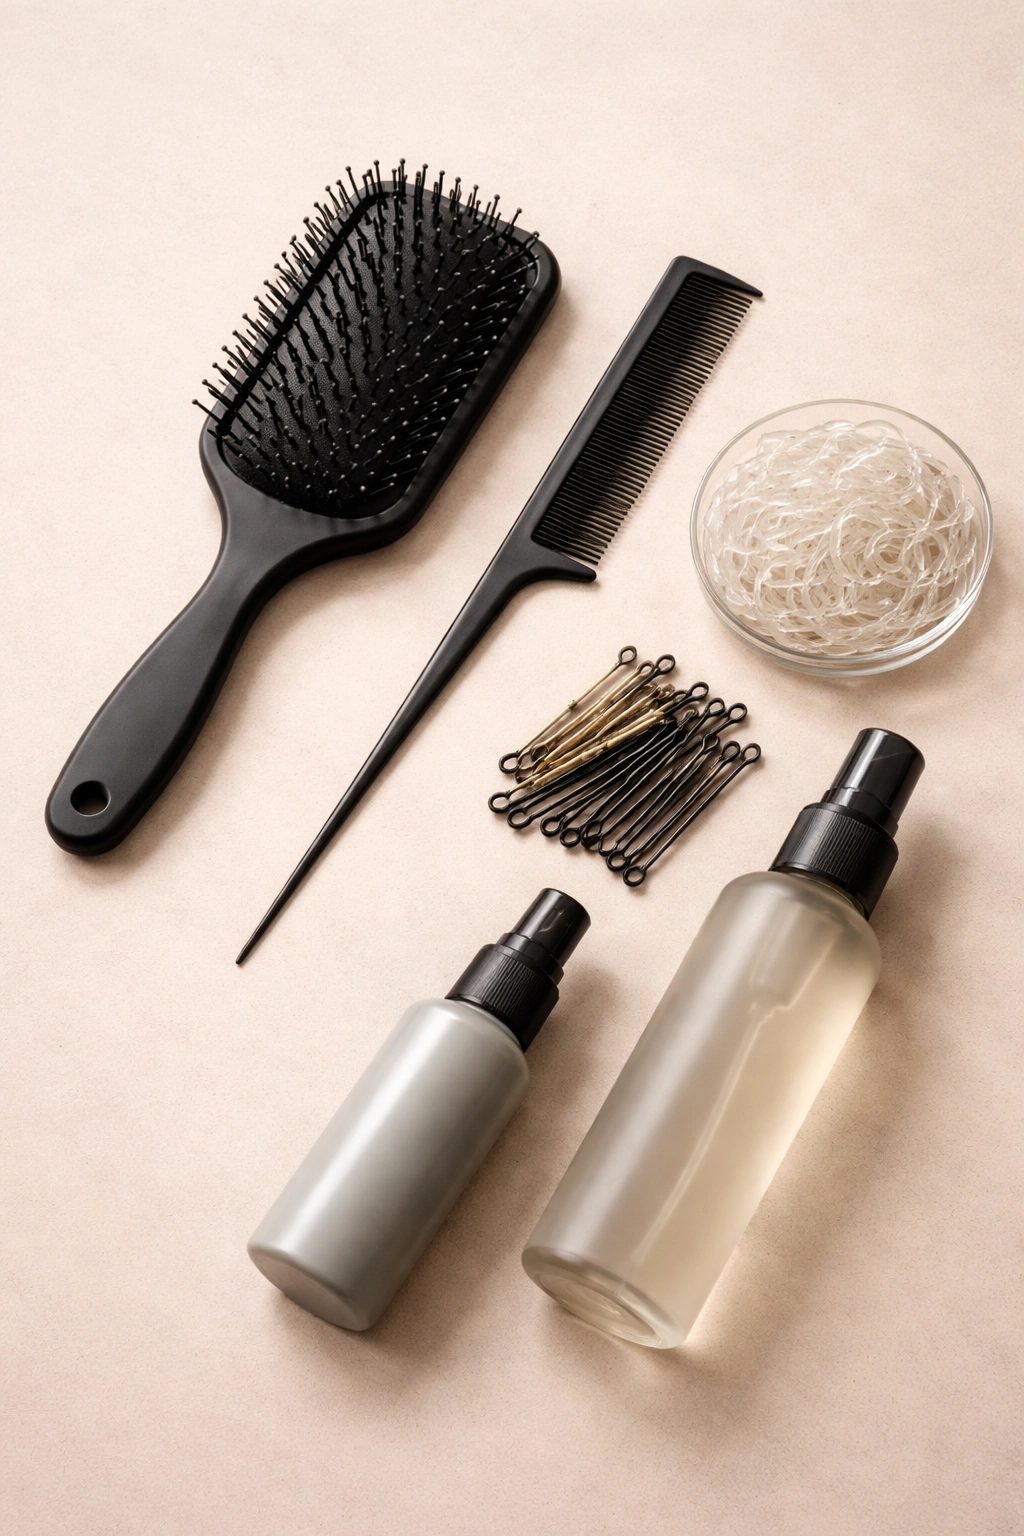
You don’t need an extensive collection of products to create professional-looking braided ponytails, but the right few make an enormous difference.
A good brush or comb. Invest in a paddle brush for general brushing and a fine-tooth comb for creating clean sections and smoothing ponytails. Cheap brushes create frizz and break hair; good brushes create sleekness.
Clear elastics in various sizes. These are invisible against any hair color and create a polished look because you don’t see them. Stock up on small, medium, and large sizes. Small elastics are perfect for securing individual braids. Medium elastics work for ponytails. Large elastics are useful for thick, full hair.
Bobby pins that match your hair color. Visible bobby pins immediately make a style look less polished. Match your pins to your hair shade—it’s a small detail that makes a big difference.
A lightweight texturizing spray or mousse. This is genuinely non-negotiable for creating clean, defined braids. Without it, slippery hair refuses to braid tightly. With it, even fine hair braids beautifully.
A smoothing serum or anti-frizz cream. Apply this to damp hair before blow-drying to create a smooth foundation. It doesn’t need to be expensive—drugstore options work perfectly.
A flexible-hold hairspray. This is your finishing touch. Flexible-hold spray keeps everything in place without creating that stiff, unnatural appearance that stiff-hold sprays create.
Common Mistakes That Ruin the Sleek Look
Most people make the same few errors repeatedly when braiding, and addressing these mistakes transforms your results.
Braiding too loosely. Loose braids read as sloppy and fall apart within hours. The solution isn’t necessarily pulling tighter—it’s understanding that you want firm, even tension throughout. If braiding feels uncomfortable, you’re probably pulling too hard on the hair itself rather than maintaining consistent tension on the braid sections.
Starting your braid too close to your hairline. If you begin your braid right at your hairline, by the time you reach the back of your head, you’ve only incorporated a small amount of hair and the braid looks thin and fragile. Start further back—at least two inches behind your hairline—so you have more hair to work with and create a more substantial braid.
Not smoothing flyaways and frizz before you braid. One or two flyaways instantly make a braid look less polished. Take thirty seconds to smooth these down before you secure your ponytail. Keep a small smoothing stick or anti-frizz cream nearby for touch-ups throughout the day.
Using elastics that don’t match your hair color. This is such a small thing, but it completely changes how finished your style looks. An elastic that contrasts with your hair immediately draws the eye there, which is exactly where you don’t want attention if you’re going for sleek and polished.
Skipping the prep work. Attempting to braid unwashed, textured, or product-free hair is genuinely harder and produces inferior results. Spending two minutes on prep work—blow-drying smooth and applying a light texturizing product—saves you ten minutes of frustration while creating better results.
Matching Braided Ponytails to Different Events
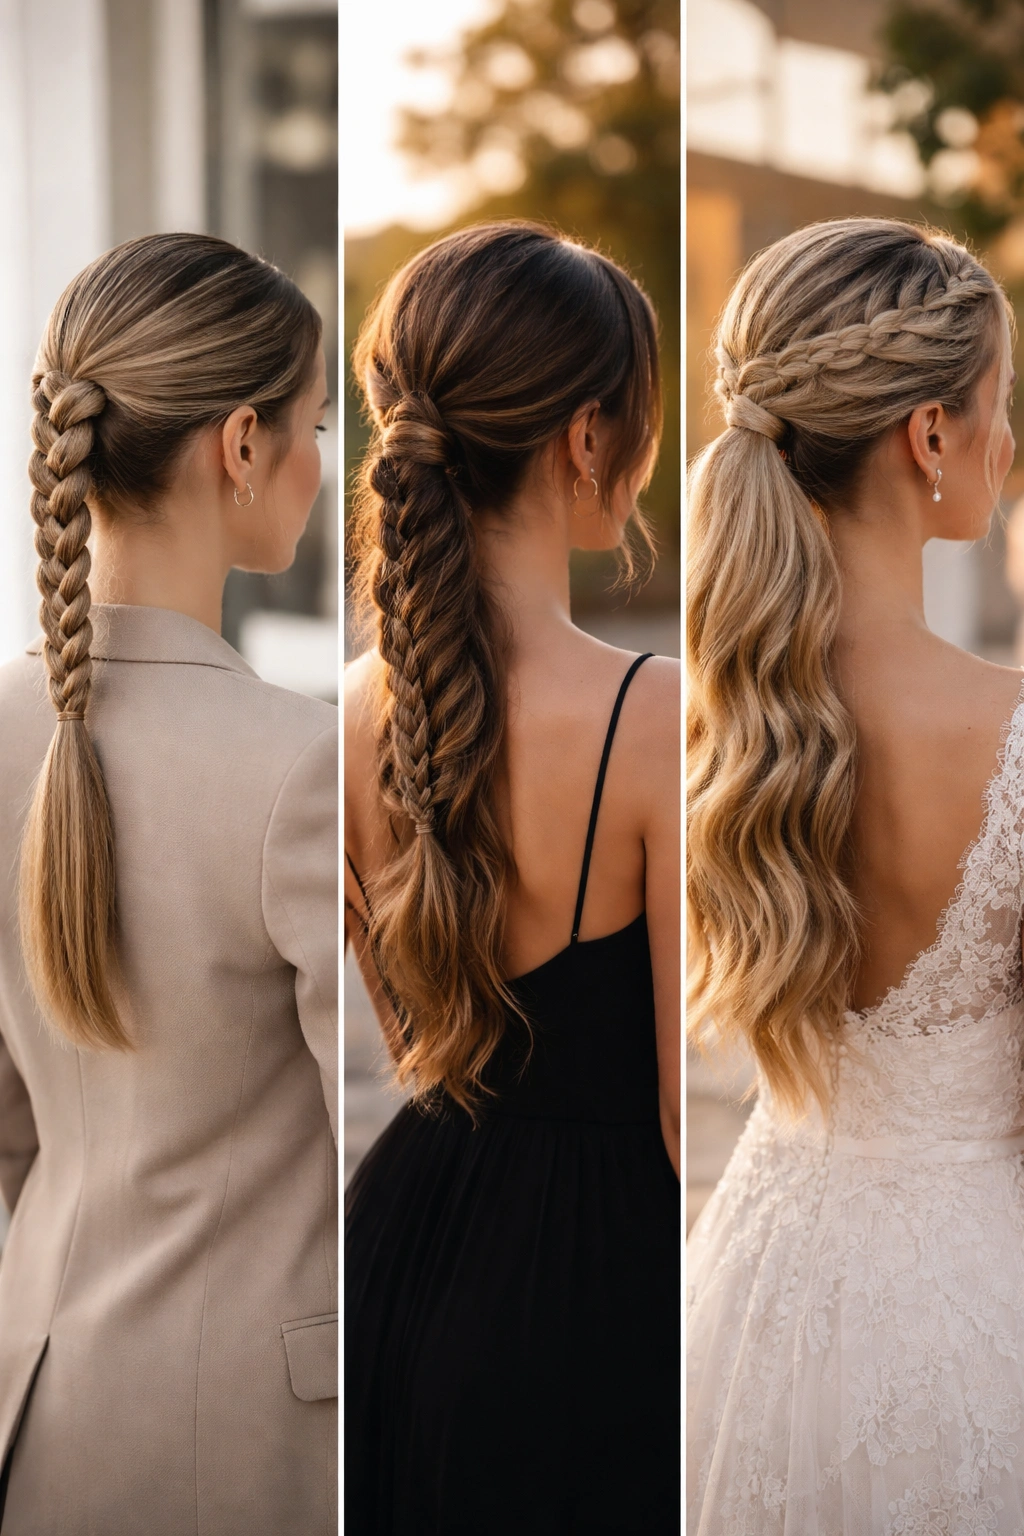
The specific braided ponytail style you choose should match the vibe and formality of your event.
For work and professional settings: Choose the classic Dutch braid into a sleek, low ponytail or the rope braid ponytail. These styles signal polish and professionalism without being so formal that they stand out. Keep the braid tight and the ponytail smooth. Avoid elaborate styles like crown braids or double braids—save those for after-hours.
For dates and casual events: The fishtail braid ponytail or the half-up braided ponytail work beautifully. These styles feel effortless and romantic without looking like you tried too hard. Let the braid be slightly undone and leave a few pieces loose around your face.
For weddings and formal events: A crown braid or a layered braided ponytail reads as elevated and special-occasion appropriate. These styles communicate that you’ve thought about your appearance for this specific event. Pull everything back cleanly and use a smooth, polished finish.
For creative and artistic events: Double braided ponytails or side-swept braided ponytails feel fashion-forward and intentional. These styles work beautifully for gallery openings, creative industry events, or anywhere the vibe is more artistic than traditional.
For everyday and weekend wear: Half-up braided ponytails, fishtail braids, or braided wrap-around ponytails are perfect. These styles look intentional without requiring the perfect conditions. They forgive slightly undone hair and uneven sections because the aesthetic is organic and effortless.
Final Thoughts
A sleek braided ponytail is one of the most versatile hairstyles you can master—it looks polished enough for professional settings, romantic enough for dates, and put-together enough for special occasions. The key isn’t finding the most complicated or elaborate braiding technique; it’s understanding the fundamentals of tension, preparation, and choosing the right style for your specific context.
Start with whichever style resonates with you most, and practice that one until it feels natural. Once you’ve got one braid down, you’ll find that the others come much more easily because you understand the core mechanics. The first time you braid takes fifteen minutes; the tenth time takes five. Be patient with the learning curve because the confidence and daily options that come with knowing how to create beautiful, polished braided ponytails genuinely pay dividends.
The beautiful truth about braided hairstyles is that they’re significantly more forgiving than they appear. A slightly uneven braid just adds organic texture. A few flyaways add softness. A braid that isn’t perfectly symmetrical reads as intentionally handmade rather than sloppy. You don’t need flawless execution to create a hairstyle that makes you feel polished, put-together, and ready to take on whatever your day brings.