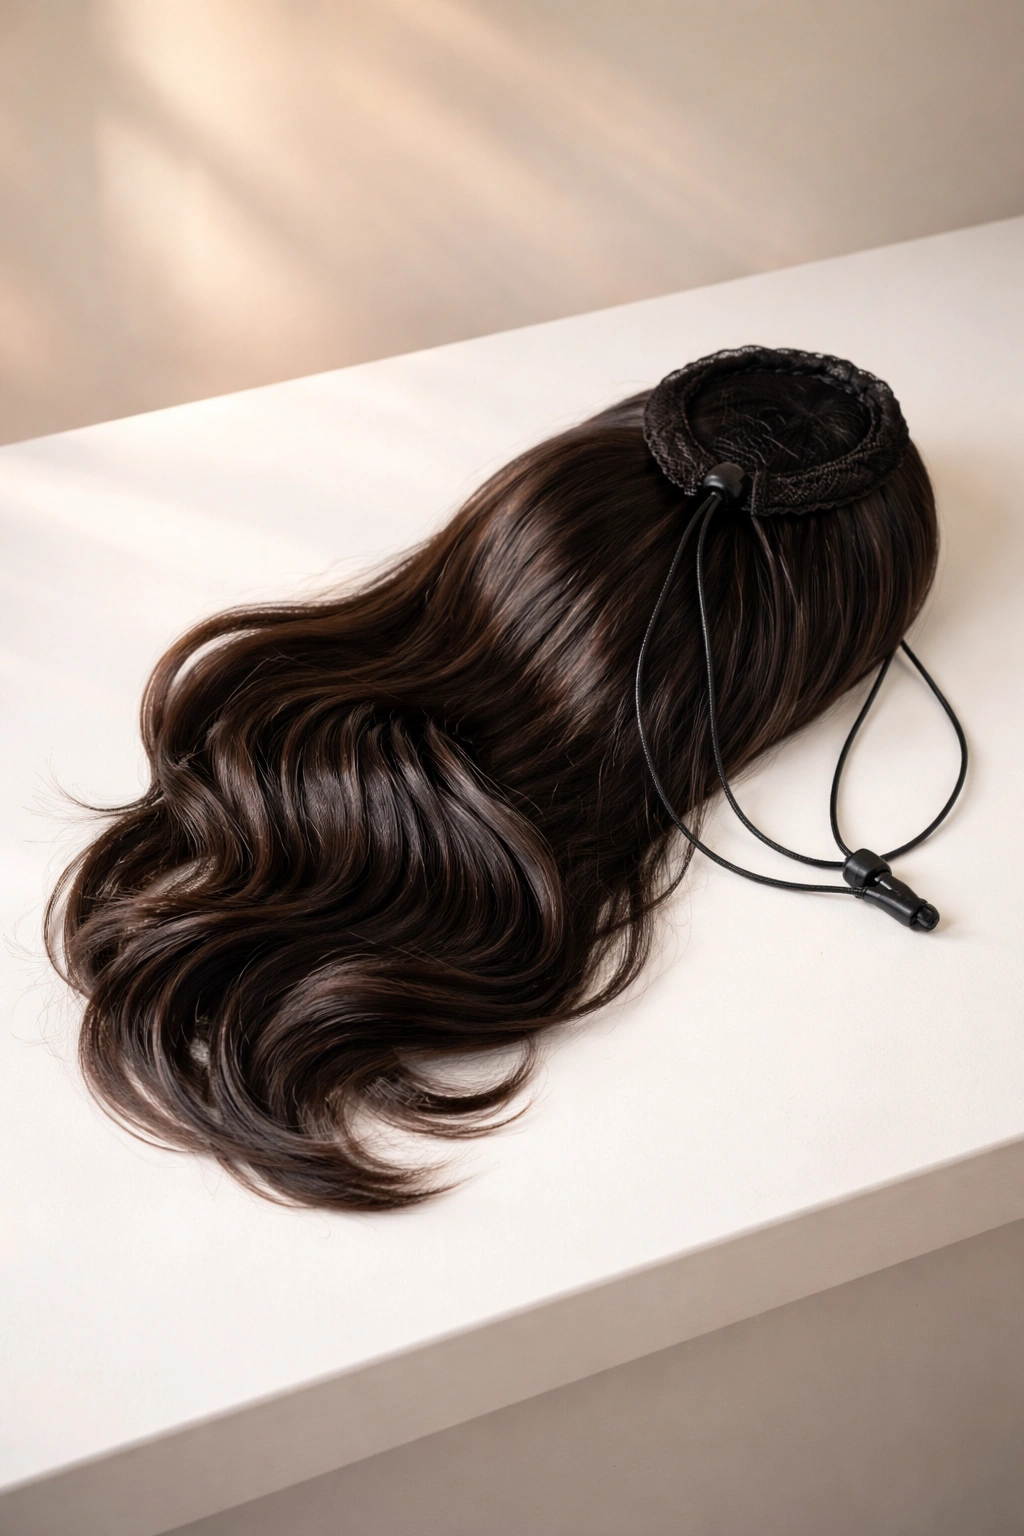
The drawstring ponytail has become a styling staple for anyone who wants polished results without the fuss. Unlike traditional elastic ponytails that can damage hair or require precise tension adjustments, drawstring ponytails use an adjustable cord mechanism built into the hair tie itself—giving you complete control over how tight or loose you want the hold. The best part? You can transform your entire look in under five minutes, even if you’re rushing out the door. Whether you’re dealing with fine, textured, curly, or thick hair, drawstring ponytails offer flexibility that regular bands simply can’t match.
What makes drawstring ponytails stand out from other quick-style options is their versatility across hair types and occasions. You can wear them sleek and professional for work, tousled and casual for weekends, or elevated and polished for evening events. The drawstring mechanism also means you’re not fighting with your hair or re-doing your style halfway through the day—it stays exactly where you put it. The adjustment feature lets you loosen the ponytail if your scalp feels tender by late afternoon, something that traditional elastics can’t do without completely redoing your hair.
The real game-changer with drawstring ponytails is how they combine speed with style. Most of these looks take less than five minutes to execute, even if you’re new to the technique. You don’t need advanced styling skills or expensive products to pull off these styles convincingly. A basic drawstring hair tie, a few bobby pins, and maybe some texturizing spray or curl cream—that’s genuinely all you need to create a range of different looks that feel intentional and put-together.
1. The Sleek Drawstring Ponytail for Everyday Wear
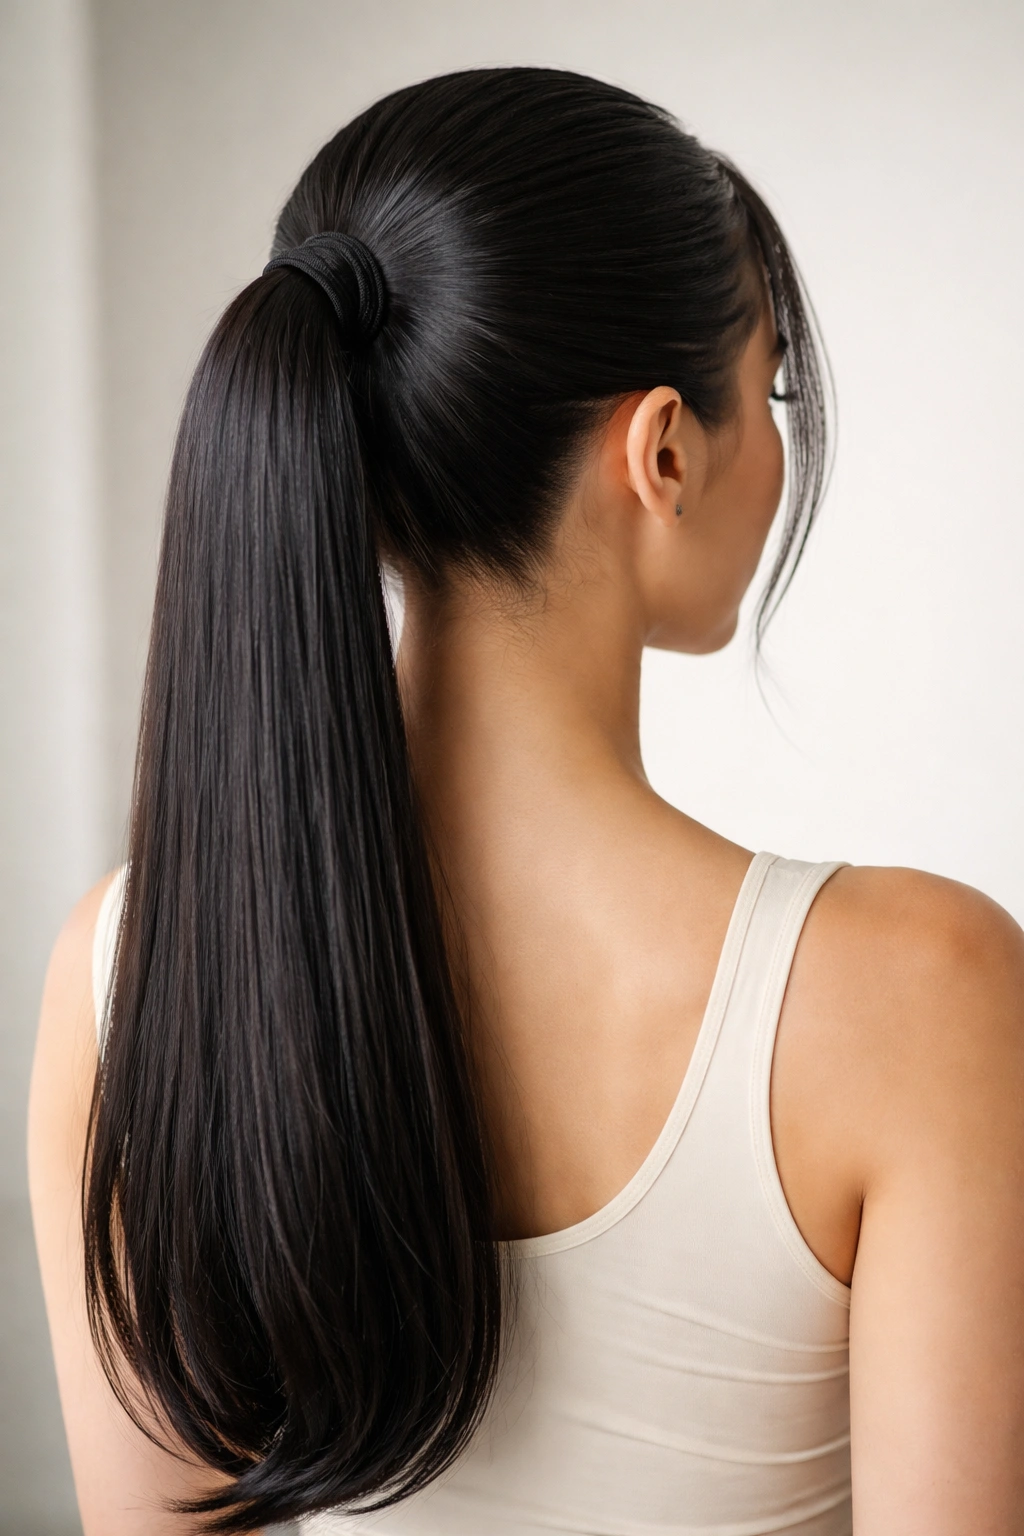
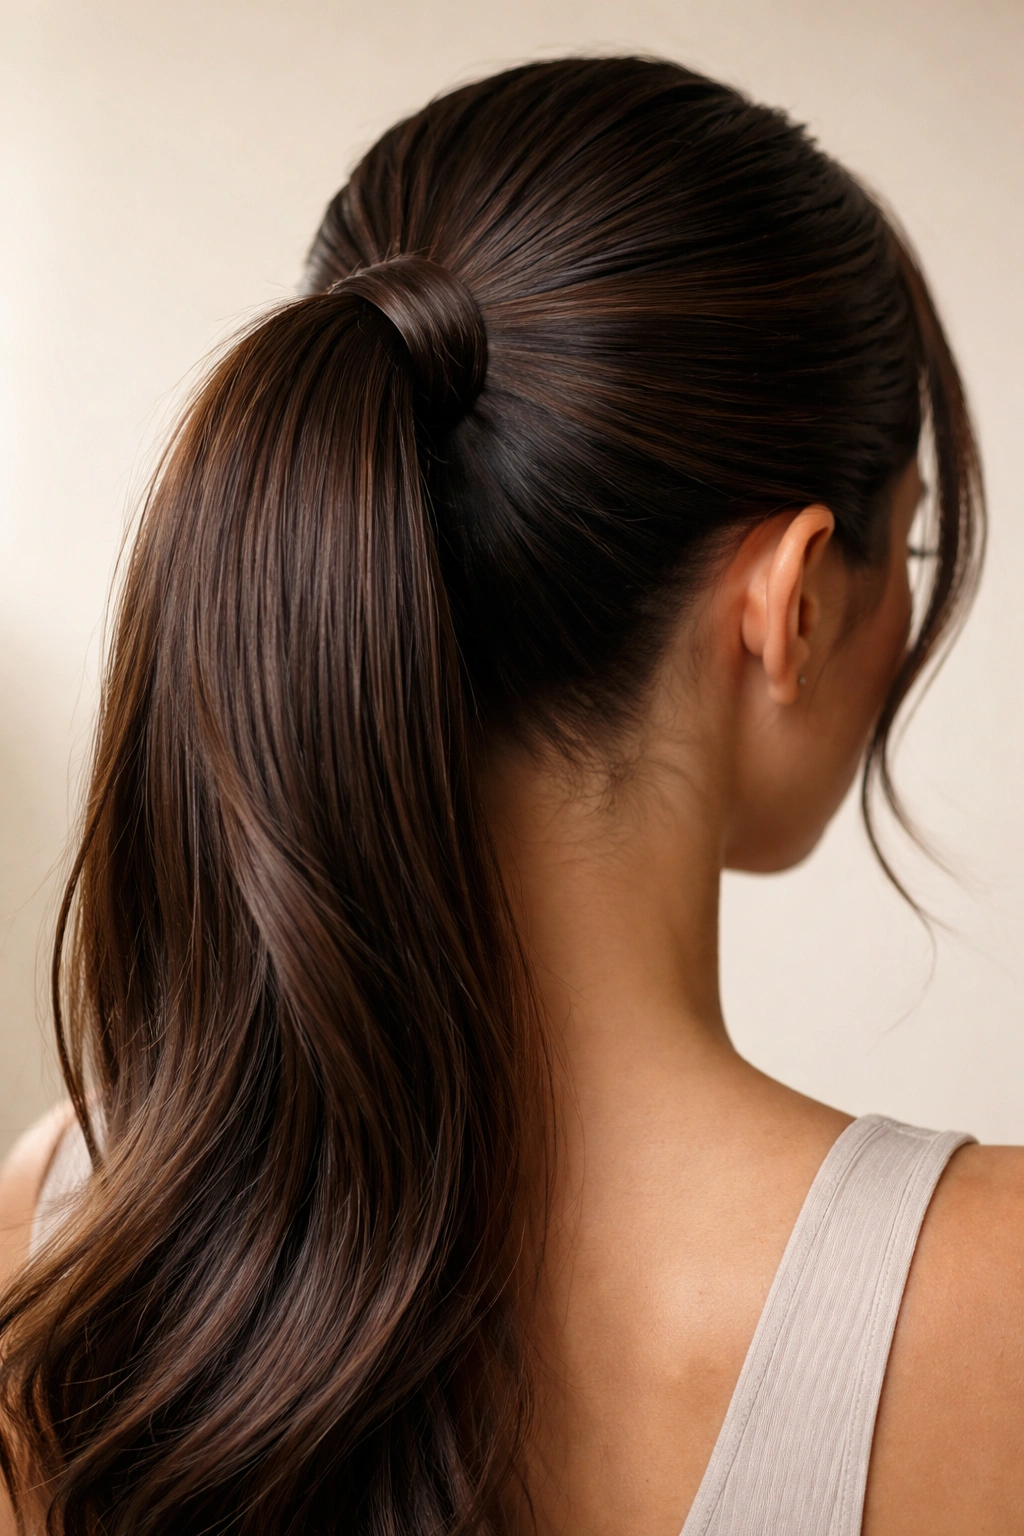
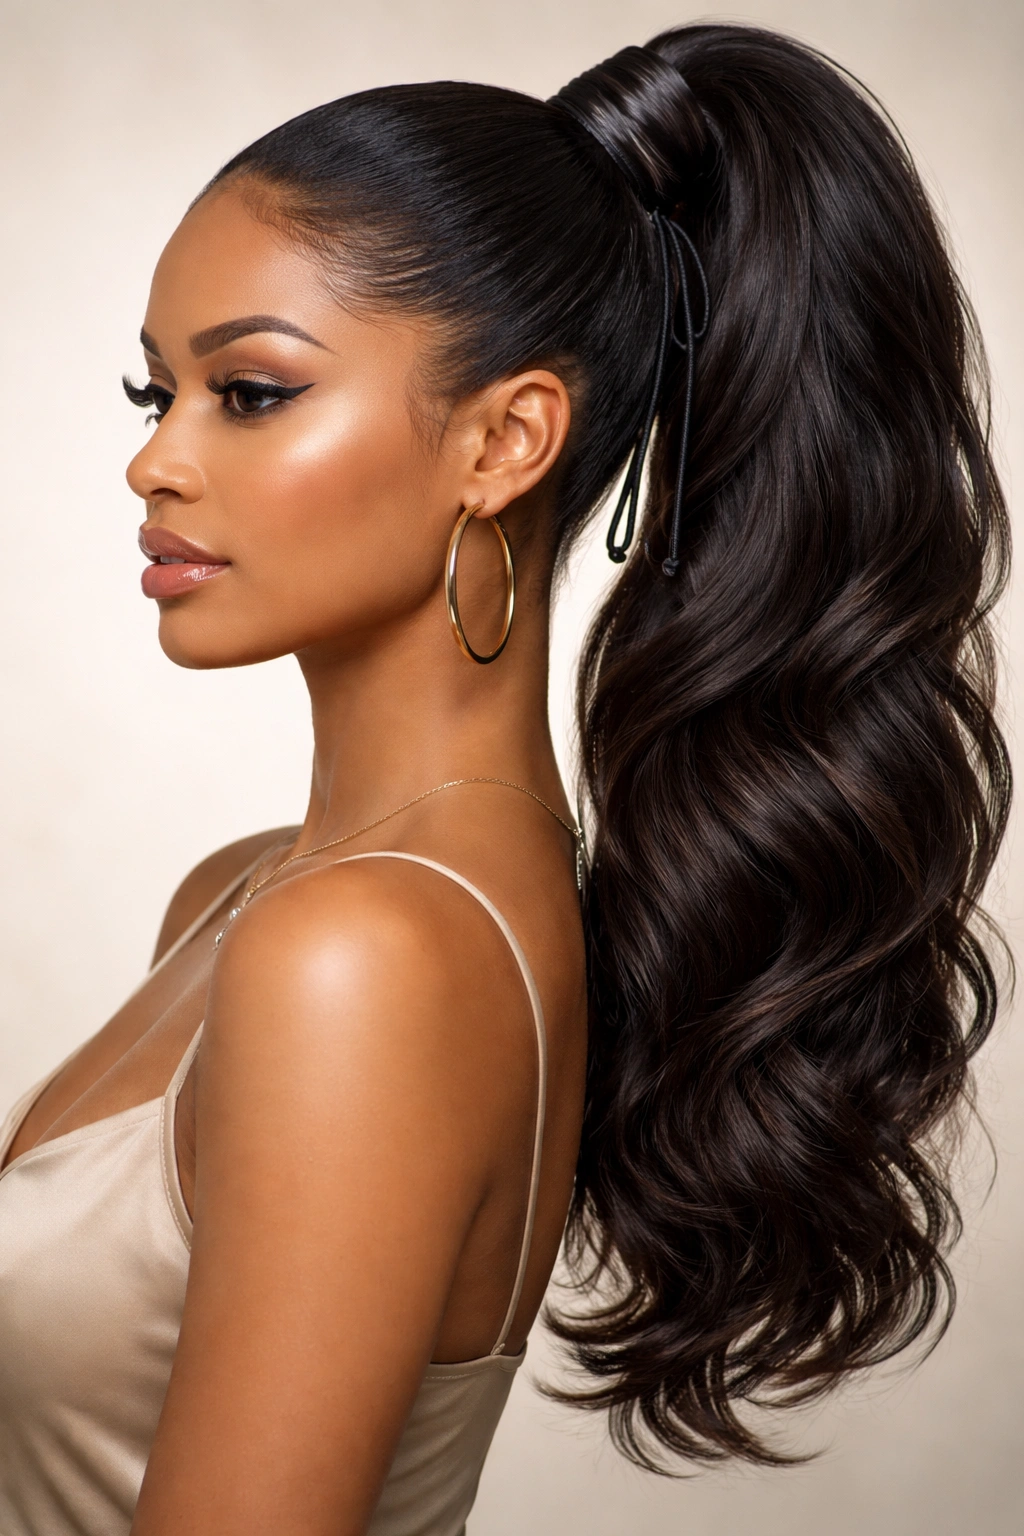
This is the foundational drawstring style that works on literally any hair type and any occasion. The sleek version prioritizes a smooth, polished finish from root to tip—think office presentations, client meetings, or any scenario where you want to look intentionally groomed. Start with dry or slightly damp hair, use a fine-tooth comb to smooth everything back into a sleek base, then secure your drawstring ponytail at whatever height feels comfortable. The magic happens when you pull the drawstring snug enough to hold everything in place all day, but not so tight that you get a headache or create tension breakage along your hairline.
How to Execute the Perfect Sleek Finish
The slickness comes from two things: preparation and the right products. First, apply a smoothing serum or lightweight oil to damp hair before blow-drying—this creates a gloss that catches light and makes everything look more refined. As you brush your hair back toward the ponytail placement, use small, controlled strokes with a fine-tooth comb rather than a paddle brush. Any flyaways become immediately visible against a sleek base, so this is where precision matters. Once your ponytail is secured with the drawstring, you can use a tiny dab of edge control on your hairline to smooth any remaining baby hairs, or leave them au naturel if that’s your style.
Styling Tips for Maximum Impact
- Keep the placement either at the crown (high ponytail) or at the nape of your neck (low ponytail)—avoid the middle ground, which reads less intentional
- Use a clear drawstring hair tie if you want maximum invisibility, or choose a matching color to blend with your hair shade
- The ponytail itself should feel smooth and cylinder-shaped, not kinked or bent where the tie sits
- A lightweight smoothing spray holds everything in place without creating that crunchy, overproduct look
- If you have baby hairs or texture around your face, consider a sleek ponytail that pulls everything back uniformly for that “ballet dancer” aesthetic
- This style holds beautifully for 8-12 hours without needing adjustments, making it perfect for long workdays
This version of the drawstring ponytail reads instantly professional because sleekness signals intention and control. It’s the style you wear when you want your appearance to reinforce credibility, whether that’s at a job interview, a client dinner, or a presentation where you want people focused on what you’re saying rather than your hair.
2. The Textured Drawstring High Pony
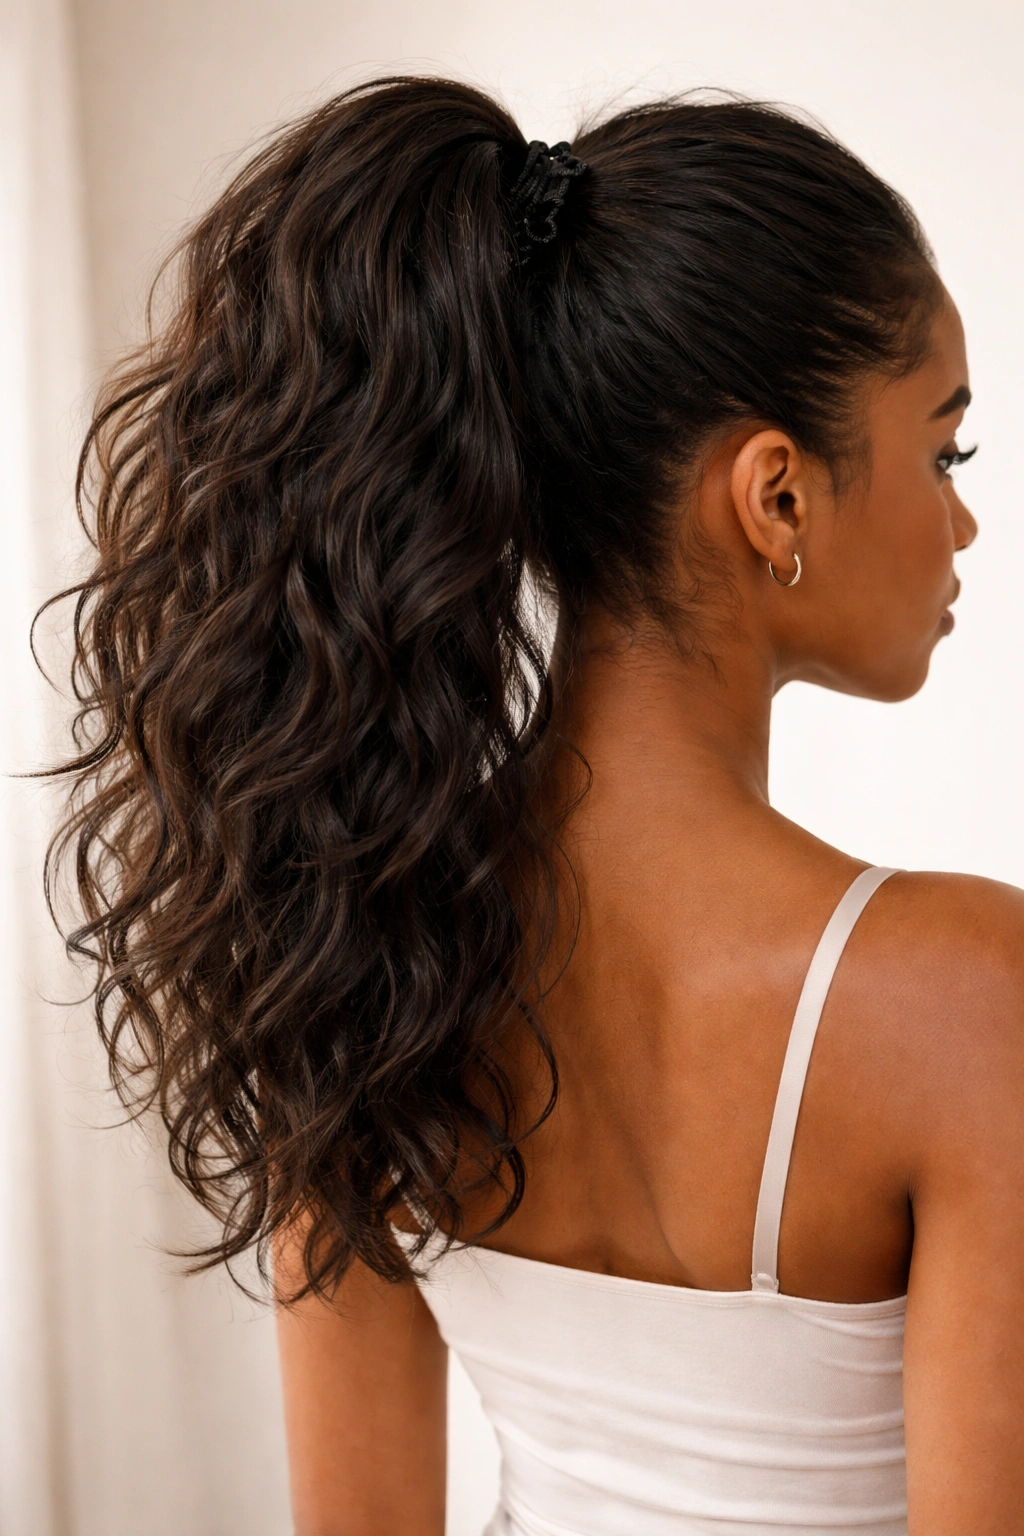
Everything changes when you add texture to your ponytail. A textured drawstring high pony sits at the crown or slightly above it and uses movement, dimension, and a slightly undone quality to look effortlessly put-together. This works beautifully on wavy, curly, or naturally textured hair, but it’s equally stunning on straight hair once you add some intentional texture through styling techniques. The drawstring tie holds everything securely while the ponytail itself has visible waves, bends, or curl definition that makes it feel alive rather than stiff.
Building Texture Into Your Base
You don’t need to use heat tools or complicated teasing techniques to get texture—you have several faster options. If your hair naturally waves or curls, simply scrunch it while damp with a curling cream or mousse, let it air-dry or diffuse-dry, and you’ve got built-in texture ready to go. For straight hair, a salt spray applied to damp hair and then scrunched while air-drying creates beachy waves in 20-30 minutes. Alternatively, you can quickly braid damp hair overnight and unravel it in the morning for instant texture. The texture should feel organic and intentional—not frizzy or fried-looking, but definitely not surgically straight.
Securing Your High Pony With Definition
Once your textured base is ready, gather everything into a high ponytail and secure with your drawstring tie. Pull the drawstring snug but not uncomfortably tight—textured ponytails actually look better when they have a tiny bit of movement at the base. You can gently release 2-3 small sections from the base of the ponytail before securing it, creating a face-framing effect that adds dimension. Some people love leaving a small piece unincorporated at the nape to create visual interest. The texture should be visible throughout the ponytail itself, not just at the base—if you’re seeing a smooth section at the tip, that texture is being pulled tight and losing its impact.
Textured High Pony Essentials
- Texture product choice matters: Mousse gives the lightest hold and bounciest texture; creams give more definition on curls; salt spray gives the beachy, undone effect
- Textured ponytails photograph beautifully and feel casual enough for the gym but polished enough for coffee with friends
- If your texture dropped by midday, a quick mist of water and 30 seconds scrunching brings it right back
- Avoid over-brushing textured ponytails—use your fingers or a wide-tooth comb to maintain the wave or curl pattern
- This style looks intentional worn high (at the crown or above), but the same ponytail placement at mid-back height reads as unfinished
- You can add a small hair clip or tiny claw where the drawstring sits to add visual interest and hide any rubber showing through
The textured drawstring high pony walks that perfect line between “I woke up like this” and “I’m put-together.” It’s the hairstyle that reads as both effortless and intentional simultaneously.
3. The Braided Drawstring Ponytail
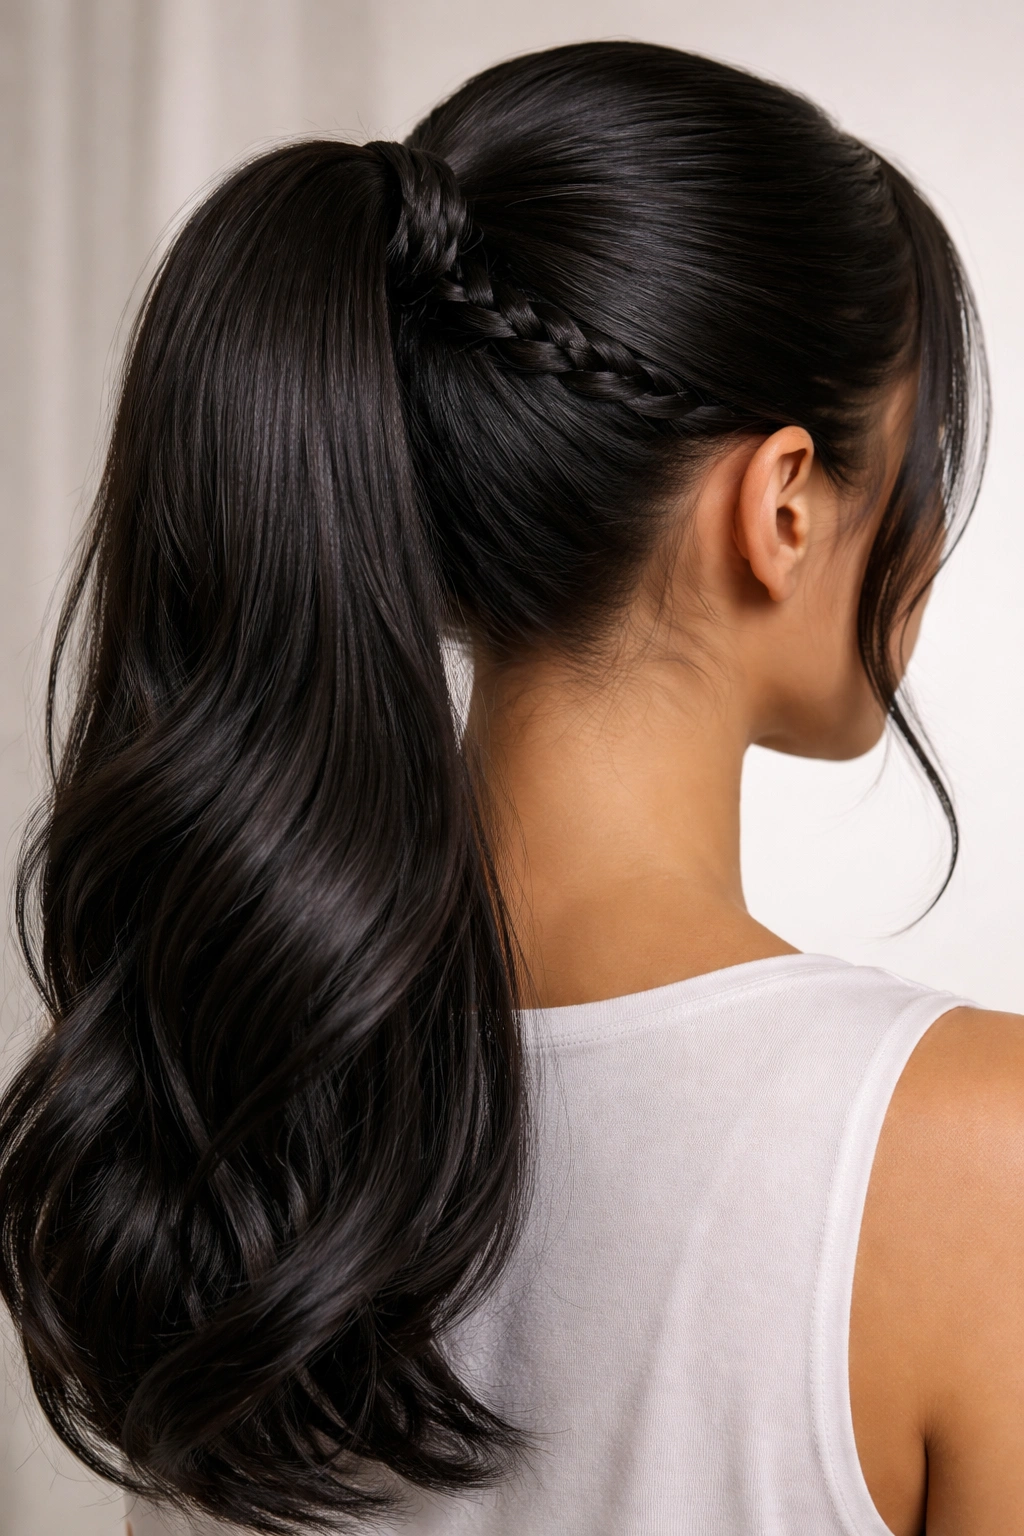
Incorporating a braid into your drawstring ponytail adds instant polish and visual interest while still maintaining the speed advantage of a drawstring tie. The braid sits either in the ponytail itself or wraps around the base where the drawstring tie sits, creating dimension and complexity that looks like you spent way more time styling than you actually did. This works on every hair type—straight hair shows the braid definition most clearly, textured hair creates a softer, more romantic version, and thick hair makes the braid look especially lush.
The Wrapped-Base Braid Method
This is the fastest version and requires zero braiding skill in your actual hair. Create a standard drawstring ponytail at whatever height you prefer—crown, mid-back, or nape. Then take a small section of hair from the bottom of the ponytail (about the thickness of a marker) and braid it loosely, creating a three-strand braid that’s 3-4 inches long. Once you’ve created your short braid, wrap it around the base of the ponytail, covering where the drawstring tie sits, and secure the braid’s end with a bobby pin tucked under the ponytail. The braided wrap instantly elevates your look and hides the mechanics of the drawstring tie. You’ve just gone from “quick ponytail” to “I took time with my appearance” in about 45 seconds.
The Incorporated-Braid Method
This version takes slightly longer but creates a more cohesive look. Section your hair into three parts before gathering it into the ponytail base—left, center, right, or however feels natural to you. Loosely braid these three sections together as you gather your hair back, then secure everything with the drawstring tie at your desired height. The braid flows through your ponytail and creates visual movement from root to tip. This version works especially well with textured hair because the braid and texture play beautifully together, creating dimension that reads as intentional styling.
Braid-and-Drawstring Ponytail Specifics
- Loose braids photograph better and feel more modern than tight, structured braids—aim for a relaxed three-strand that has visible space between the strands
- If you’re uncomfortable braiding in the back of your head (completely understandable), stick with the wrapped-base method, which you can do looking in a mirror
- A drawstring ponytail with a braid wrapping the base is sophisticated enough for weddings, events, and professional settings
- For textured hair, a braid integrated into a textured ponytail creates a romantic, bohemian aesthetic without feeling costume-like
- Straight-haired folks can create more definition in their braid by roughing it up slightly once complete—gently tug on the braid edges to create a fuller, less structured appearance
- This style looks intentional worn loose and flowing, not yanked tight against your head
The braided drawstring ponytail instantly reads as more intentional than a plain ponytail, even though your actual time investment is minimal.
4. The Sleek-to-Tousled Contrast Pony
This style deliberately creates contrast—a smooth, sleek base and gathered ponytail, but then the ponytail itself gets tousled, textured, or voluminous, creating visual interest and dimension. The drawstring tie sits right at the transition point between sleek and undone, which is exactly what makes this style work. It reads as intentionally styled rather than accidentally messy, because the intentionality is visible in that crisp transition line.
Creating the Contrast Effect
Start by smoothing your hair completely back into a sleek base using the same techniques as the sleek ponytail—smoothing serum, fine-tooth comb, edge control if needed. Gather everything into your drawstring ponytail at your preferred height (usually mid-back or crown works best for this style). Now here’s where the contrast happens: you’re going to deliberately add texture, volume, or movement to the actual ponytail portion while leaving the base sleek.
Use your fingers to gently scrunch the ponytail section with a texturizing spray, salt spray, or light mousse. You can also roughly backcomb the ponytail slightly to create volume, or twist sections and allow them to cool for soft waves. The goal is to make the ponytail look intentionally undone while the gathered base stays precisely smooth. This contrast is what creates the polished-yet-effortless aesthetic that reads as intentional styling, not like your hair just… escaped from the ponytail.
The Visual Impact of Strategic Contrast
The sleek-to-tousled contrast works because it gives your eye something interesting to land on. A completely sleek ponytail from root to tip reads as formal or corporate. A completely tousled ponytail reads as undone. But the contrast between them reads as creative and intentional. This is the style that gets compliments because people can see the styling choices you made.
- You can adjust how dramatic the contrast is: subtle tousling for everyday wear, heavy texture for evening occasions
- This style pairs beautifully with a sleek makeup look because the hair has visual interest but doesn’t compete with your face
- The sleek base should genuinely shine—this is where smoothing serum and a light mist of shine spray pay off visually
- Textured or curly hair naturally has some tousling happening, so emphasize the sleek base to create stronger contrast
- This works on all hair lengths, but looks especially striking on mid-back length or longer hair where the contrast is really visible
5. The Half-Up Drawstring Style
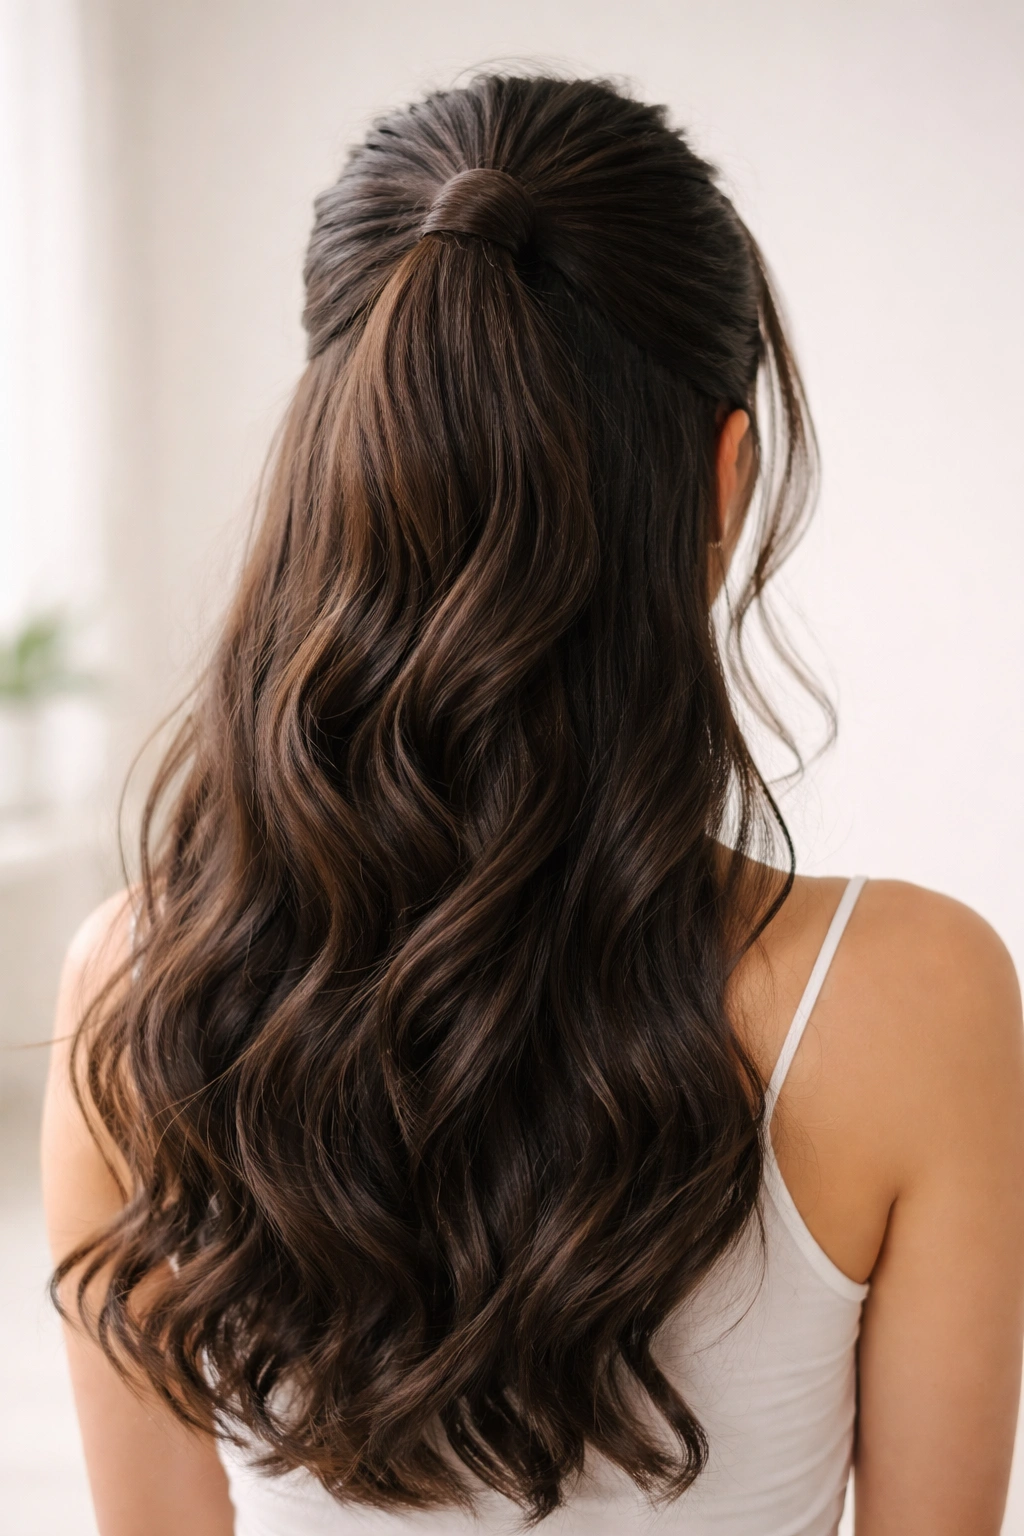
A half-up ponytail offers a middle ground between “my hair is fully down” and “my hair is entirely up,” and the drawstring mechanism makes it infinitely easier to execute. You’re gathering roughly the top half or two-thirds of your hair while leaving some length flowing free, creating a style that’s practical (hair off your face and neck) without being as severe as a full ponytail. This works beautifully when you want to look put-together but maintain the softness of down hair.
The Half-Up Mechanics With Drawstring Ties
The basic technique is simple: section your hair horizontally from temple to temple across the back of your head at roughly ear level, or gather hair from the crown area if you prefer a higher half-up. Secure this section with your drawstring ponytail tie, leaving the bottom section of hair completely down and loose. The magic of the drawstring is that you can adjust the tightness to make it feel either more refined or more casual—tighter for a polished, intentional look, slightly looser for an effortless vibe.
Many people make a mistake here: they use the wrong tie. A drawstring ponytail tie is perfect for a half-up because it’s less visible than an elastic and holds securely without creating that tight, uncomfortable feeling. If you use a traditional elastic on only half your hair, it can look sloppy or unfinished. The drawstring’s sleek profile reads as more intentional.
Half-Up Styling Variations
You can create endless variations by changing what you do with the hair below the drawstring tie. Leave it completely straight and sleek for a sophisticated look. Braid the bottom section and wrap it around the back of your head for a bohemian vibe. Curl just the bottom section for dimensional waves. Tease the bottom section for volume. You’re essentially creating a canvas—the half-up creates structure, and you can style the rest of your hair however matches your mood or the occasion.
- A half-up drawstring works beautifully on every hair length from shoulder-length to very long hair
- This style is practical for keeping hair off your face without the commitment of an actual ponytail
- You can easily convert a half-up to a full ponytail in 10 seconds by gathering the remaining hair and adding it to your existing drawstring tie
- Add a second small drawstring tie at the very bottom of your hair (where it naturally ends) to create a “double ponytail” or “pigtail” effect that’s surprisingly chic
- Textured or curly hair looks especially beautiful in a half-up because you get the polished top and the natural texture cascading down
The half-up drawstring ponytail is perfect when you want the benefits of an updo (practical, polished, off-your-face) without the formal commitment of a full ponytail.
6. The Curved Drawstring Ponytail
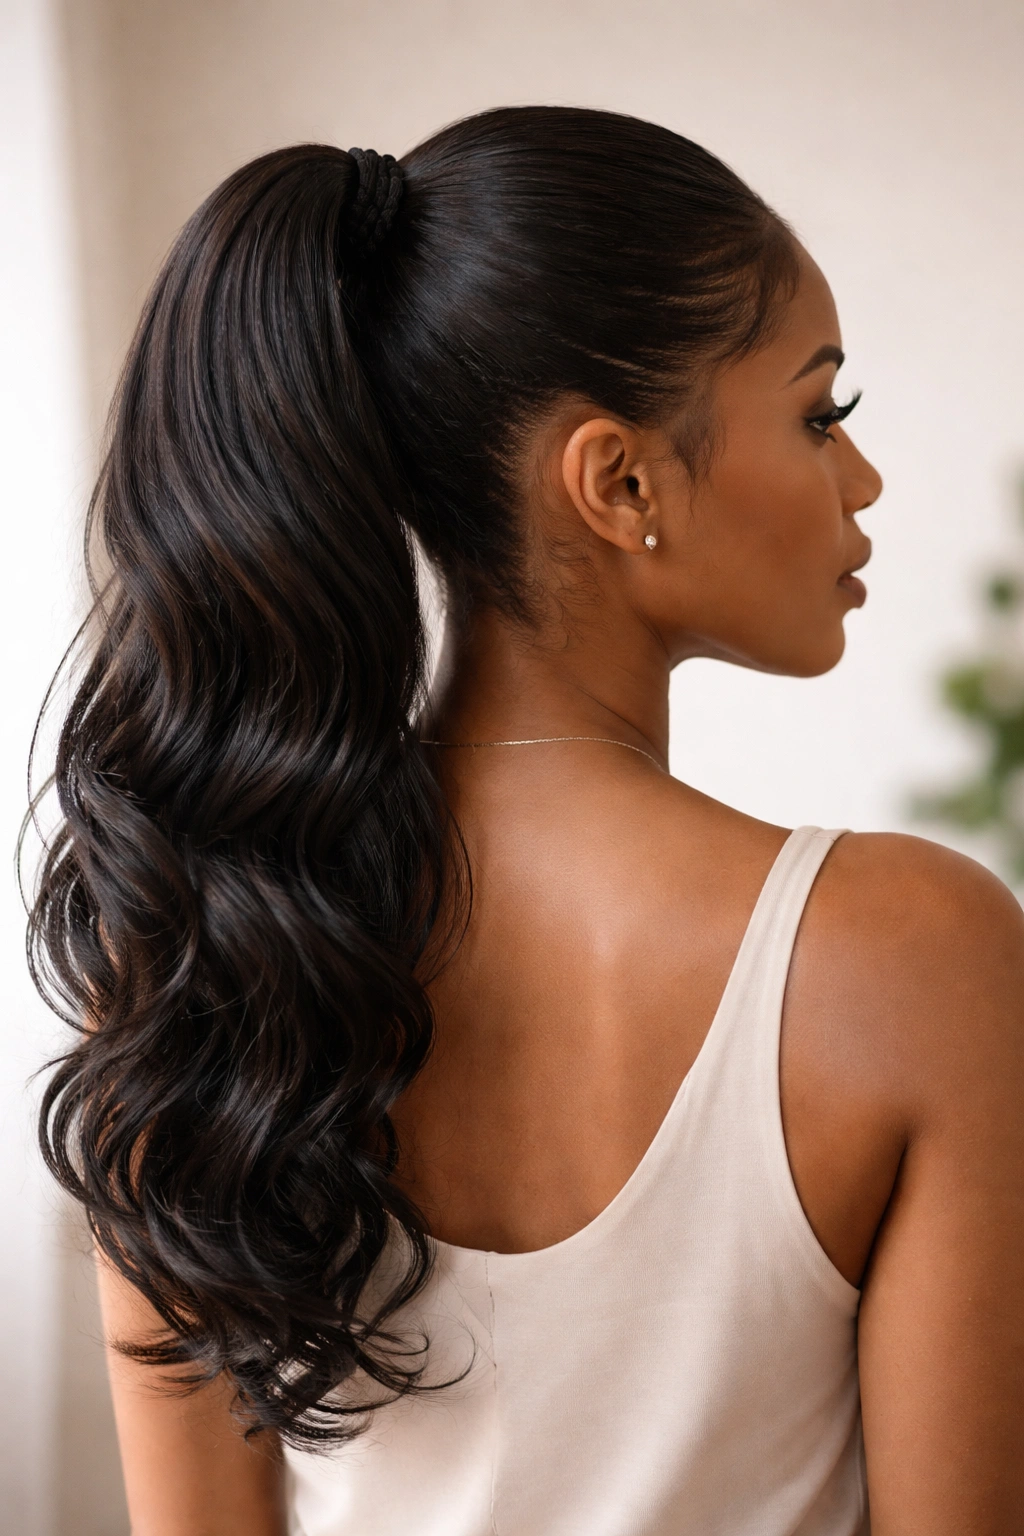
Instead of gathering hair straight back from your hairline, a curved drawstring ponytail curves slightly to one side or follows the natural curve of your head shape, creating a more flattering, less severe look than a centered ponytail. This subtle variation works on every face shape and hair type, and it changes the entire energy of the style from “practical” to “intentional.” The curve can be subtle (barely noticeable) or more dramatic (pulling clearly to one side), depending on your mood and the occasion.
Creating the Curved Silhouette
Start by brushing your hair back, but as you gather it toward the ponytail point, angle slightly to one side. If you’re creating a curve to the right, your ponytail placement will be slightly right of center; to the left, slightly left of center. Some people naturally create this curve simply by brushing from their usual side part. Others deliberately angle their brush strokes as they gather the hair back. The ponytail point itself—where you secure the drawstring tie—sits slightly off-center rather than directly at the crown or nape.
The curved ponytail is surprisingly flattering because it softens the face and creates visual balance. A curved line is inherently more flattering than a straight line in styling, which is why this simple variation makes such an impact on how the overall style photographs and reads.
Curved Ponytail Applications
This works beautifully with every other technique mentioned in this article. You can create a curved sleek ponytail, curved textured ponytail, curved braided ponytail, curved half-up—anything becomes more flattering when you introduce that subtle curve. The curve also gives your ponytail visual direction and movement, making it feel dynamic rather than static.
- A curved ponytail to the side you naturally favor (if you have a side part) reads as effortless and intentional
- This is an especially flattering choice if you have a rounder or wider face shape, because the angle of the curve creates visual slimming
- You can increase or decrease the curve throughout the day—tighter curve for evening, more subtle curve for daytime
- Curved ponytails photograph beautifully from certain angles, which is why you’ll see them frequently in fashion and beauty content
- The curve doesn’t need to be dramatic; even a half-inch offset from center creates noticeable improvement in how flattering the style reads
7. The Wrap-Around Drawstring Pony
This technique takes a standard drawstring ponytail and wraps a section of your own hair around the base multiple times, creating a style that looks finished and intentional rather than utilitarian. The wrap covers the drawstring tie entirely and adds visual complexity, making a quick ponytail look like something you actually spent effort on. It’s one of the easiest ways to elevate your ponytail from “I’m just putting my hair up” to “I styled this deliberately.”
The Wrapping Technique Explained
Secure your drawstring ponytail at your preferred height. Take a thin section of hair from the underside of your ponytail (the hair touching your scalp)—about the thickness of a pencil—and gently pull it free. Now wrap this section around the base of the ponytail, covering where the drawstring tie sits. Wrap it once, twice, or three times around, depending on how much coverage you want and how long your wrap section is. Secure the end of the wrap with a bobby pin tucked underneath the ponytail where nobody can see it.
This technique works because it looks intentional and custom—like you took time to finish your style properly. A plain drawstring ponytail reads functional. A wrapped ponytail reads polished.
Wrap Variations and Styling Choices
You can create different effects depending on how you wrap. Wrap tightly for a structured, precise look. Wrap loosely for a softer, more romantic effect. Use a straight wrap section for sleek styling. Use a slightly textured or crimped wrap section for added dimension. You can even braid your wrap section for extra visual interest, though this does take a few extra seconds.
The wrap works on all hair types and can be applied to absolutely any ponytail style mentioned in this article. Wrapped sleek ponytail, wrapped textured ponytail, wrapped curved ponytail—every variation benefits from this finishing touch.
- The wrap looks especially striking when your wrap section is slightly textured or wavy, creating contrast against the wrapped-around base
- You can use a transparent or hair-matched bobby pin to keep the wrap completely invisible, or use a decorative clip that coordinates with your style
- If your ponytail feels loose by midday, gently tightening the wrap usually solves the problem without needing to redo the entire ponytail
- A wrap that’s too tight around the base can create discomfort as the day goes on—secure it snugly but not aggressively
- This is an excellent technique for disguising when you’ve gone 2-3 days without washing your hair; the wrap hides any texture or flatness at the base
The wrap-around detail transforms a basic ponytail into something that reads as genuinely styled.
8. The Layered Drawstring Ponytail
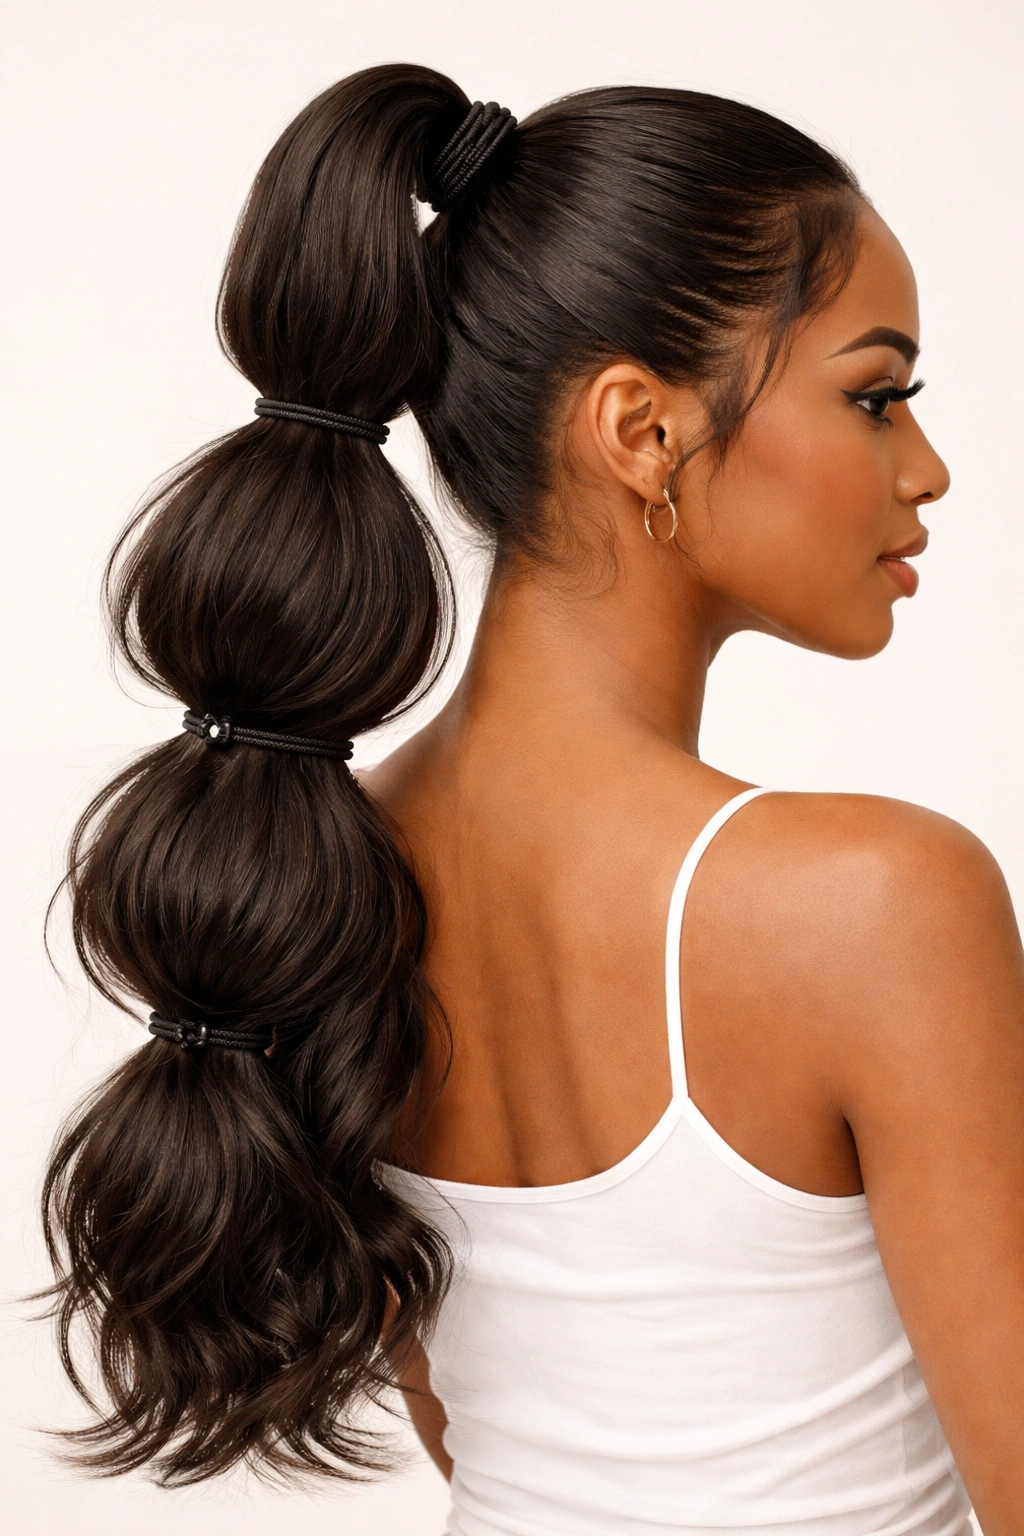
A layered ponytail uses multiple drawstring hair ties placed at different heights along your ponytail, creating segmented sections that add visual interest and dimension. This works beautifully on thick hair, where the layers actually add to the fullness, and on thin hair, where the layers create an illusion of thickness through separation and shadow. Layering can be subtle (drawstring ties just 1-2 inches apart creating a gentle segmented effect) or dramatic (drawstring ties 3-4 inches apart creating very obvious sections).
Creating Multiple Layers Effectively
Secure your first drawstring ponytail at your preferred height—crown, mid-back, or nape. Then, approximately 2-4 inches down the length of that ponytail, secure a second drawstring tie. You can stop there for a subtle two-layer effect, or continue adding ties down the length of your ponytail. Between each tie, you can very gently tease or fluff the ponytail section to create volume and separation between layers.
The visual effect is striking: instead of a single cylinder of hair, you have distinct segments that catch light differently and create shadow and dimension. On camera, this creates incredible visual texture. In real life, it reads as intentional styling.
Layered Ponytail Styling Considerations
The placement of your layers matters. For a flattering, intentional look, keep layers somewhat evenly spaced rather than randomly placed. You can vary the spacing slightly for visual interest, but completely random placement reads accidental. The tightness of each tie should be consistent—either all snug or all slightly loose—rather than alternating between tight and loose, which reads chaotic.
Layered ponytails work especially well with textured or wavy hair, where the texture naturally creates depth between the layers. On straight hair, the layers are more visible and geometric, which reads modern and intentional. You can add texture or waves between the layers even on naturally straight hair, creating what’s essentially a textured layered ponytail.
- Each layer should be visible from the back and sides—if they’re not visible, your ties are either too close together or too tight
- Layers work beautifully with color; if you have highlights or multiple tones, layering creates separation that shows off your color depth
- This style is more formal than a single ponytail, making it excellent for events where you want to look noticeably intentional
- You can combine layering with other techniques—layered braided ponytail, layered curved ponytail, layered wrapped ponytail
- Layered ponytails hold incredibly well throughout the day because each tie acts as an independent anchor point
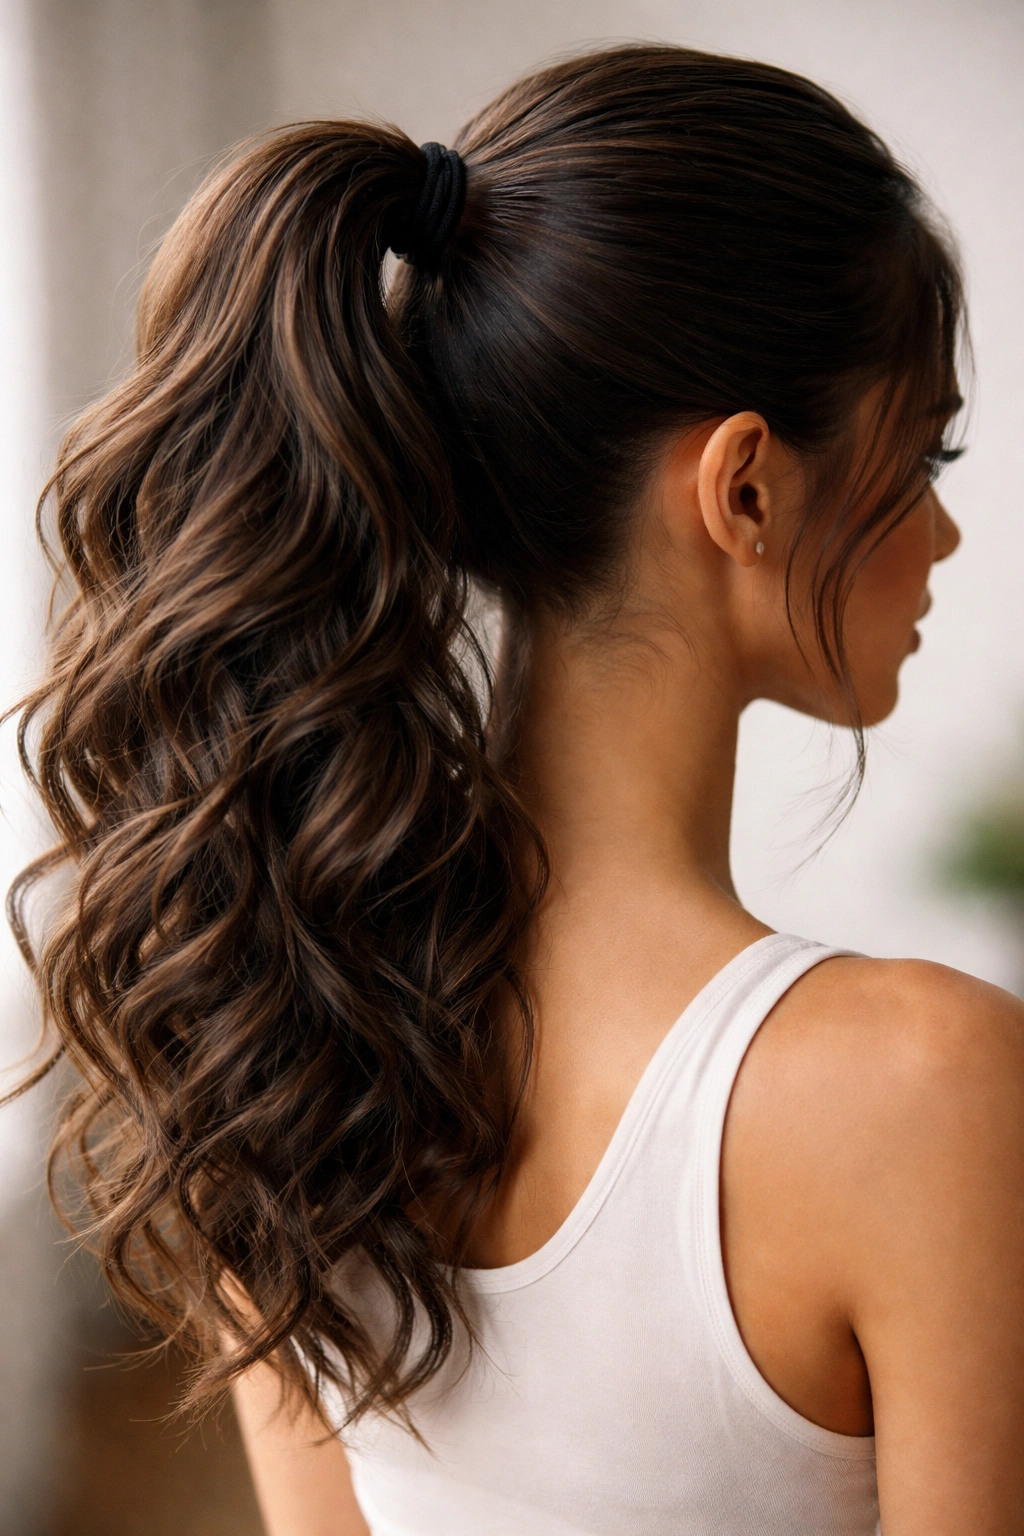
9. The Curly Drawstring Pony
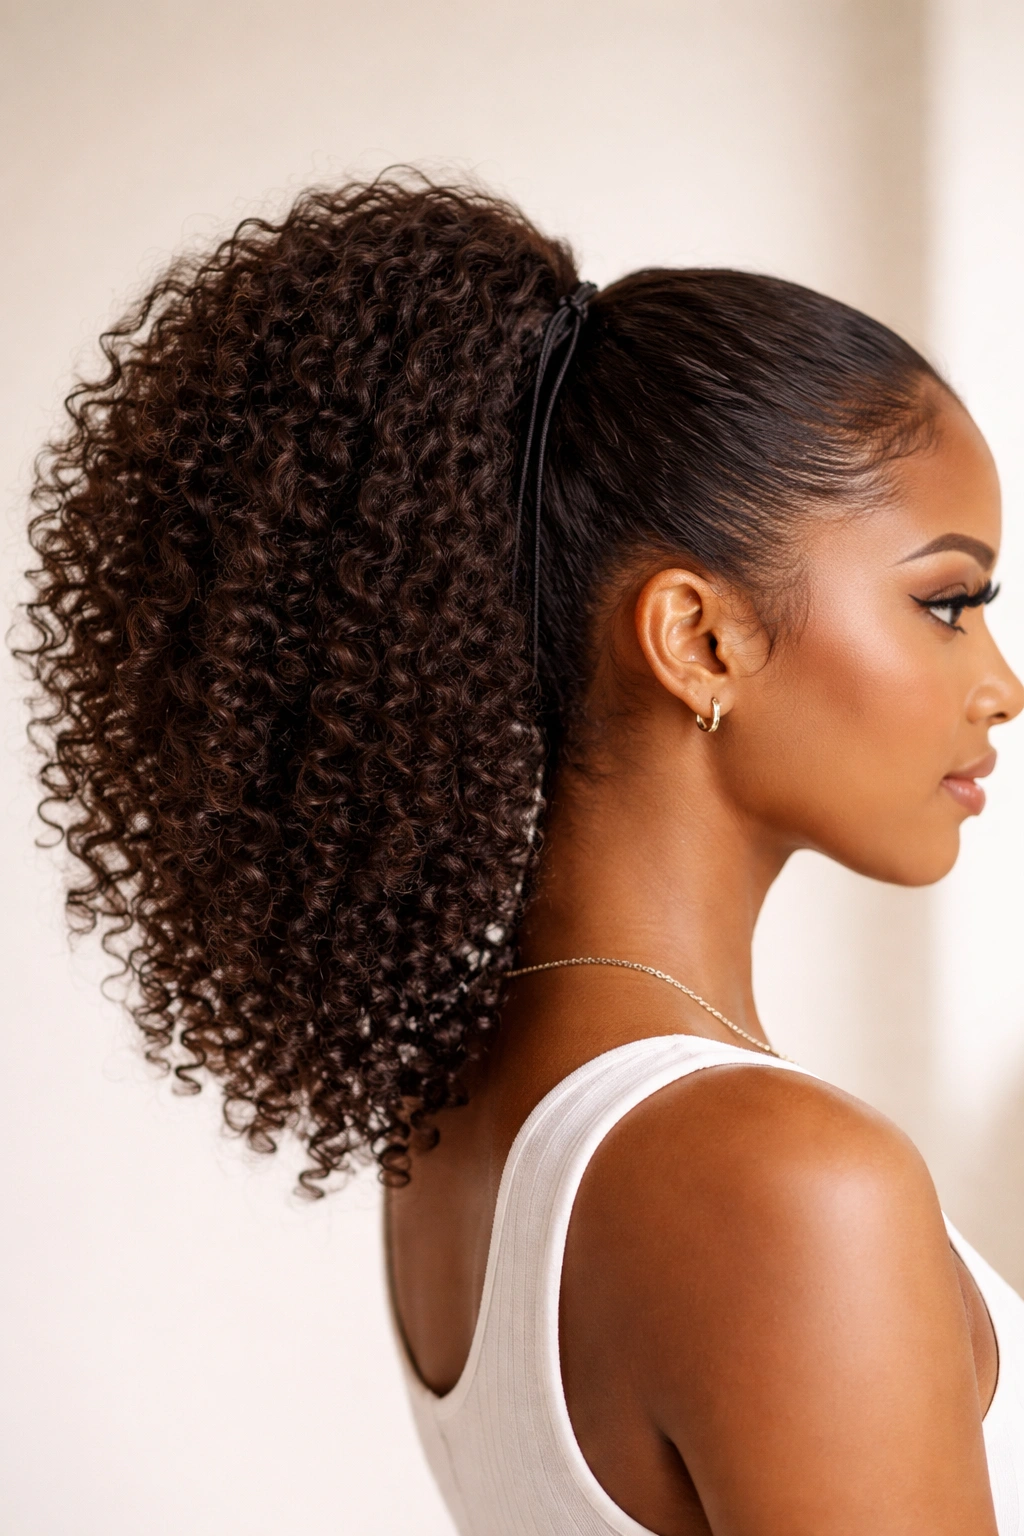
If you have naturally curly or coily hair, or if you’ve created curls or waves, a drawstring ponytail that celebrates and emphasizes that texture is absolutely stunning. Rather than flattening your curls into a smooth ponytail, you’re gathering them loosely and allowing them to maintain their natural pattern and volume. The drawstring tie holds everything at the base while the curls cascade down freely, creating a full, dimensional, glamorous look that celebrates your hair’s natural texture.
Preparing Curls for a Drawstring Ponytail
The key to a beautiful curly drawstring ponytail is preparation. If you’re working with naturally curly hair, you want to enhance your curl pattern before gathering. Use a curl-defining cream, gel, or mousse applied to damp hair. Scrunch your curls as they dry (air-dry or diffuse-dry) to enhance definition and encourage springiness. Once your curls are set and dry, they’ll maintain their pattern even when gathered into a ponytail.
When you gather your curls into the ponytail, use your fingers rather than a fine-tooth comb, which can disrupt your curl pattern and create frizz. Gently corral your curls back without smoothing them flat. The drawstring tie should hold them at the base while allowing the full body of your curls to shine below.
Curly Ponytail Styling Options
You have so much flexibility here. A high curly ponytail at the crown creates a voluminous, statement-making look. A mid-back curly ponytail feels slightly more casual. You can leave your curls completely loose and bouncy, or you can smooth the base into a sleek curved section with your curls exploding below—that contrast again, but this time celebrating texture rather than creating an undone effect.
Some people love adding a wrap around the base of a curly ponytail—the sleek wrap against the voluminous curls creates a beautiful contrast. Others add a small clip or decorative element at the drawstring tie point to add visual interest. You can even incorporate a braid wrapped around the base for additional dimension.
- Curly ponytails hold incredibly well because curly hair naturally grips itself—your drawstring tie barely needs to be snug
- This is the perfect style when you want to show off length and curl definition without spending 20 minutes styling
- Curly ponytails photograph beautifully and read as confident and intentional
- Refresh-sprays or curl-revival sprays help maintain your curl definition throughout the day
- The fuller and more voluminous your curls, the more striking a high curly ponytail becomes
A curly drawstring ponytail is the hairstyle that celebrates your hair rather than fighting with it.
10. The Side Drawstring Ponytail
A side ponytail sits completely off to one side rather than at the center back, creating a dramatic, intentional look that reads as genuinely styled. The ponytail can be placed at the ear level, lower on the side of the neck, or even over the shoulder, depending on how dramatic you want the effect and your hair length. A side ponytail instantly changes the geometry of your face and reads as more formal or statement-making than a center ponytail.
Positioning Your Side Ponytail Correctly
The key to a flattering side ponytail is keeping it far enough to the side that it’s clearly intentional, not just “off-center.” Gather your hair to one side—let’s say the right—as if you’re creating a curved ponytail that curves dramatically to the right. Your drawstring tie placement should be over your right shoulder or at the side of your neck, depending on length and preference. If your hair is very long, you can pull the ponytail all the way around to the front, creating a side ponytail that sits over your shoulder in front of your body.
The side ponytail works beautifully on all hair types and lengths. Shorter hair (shoulder-length or slightly longer) creates a cute, youthful effect. Longer hair creates a more dramatic, glamorous effect. Thick hair fills out the side ponytail beautifully. Fine hair can be teased or textured at the base to create the illusion of fullness in the side ponytail.
Side Ponytail Variations and Occasions
A side ponytail reads differently depending on execution. A sleek, smooth side ponytail is elegant and refined—perfect for events and occasions where you want to look noticeably styled. A textured or curly side ponytail is fun and casual—perfect for weekend gatherings. A braided side ponytail is romantic and intentional. You can combine your side ponytail with literally any other technique in this article: wrap the base, layer it, add texture, create a curved effect.
Side ponytails also work beautifully for showing off your neck and side profile. If you have a pretty neckline or are wearing a dress or top that exposes your neck and shoulders, a side ponytail is the perfect choice. It draws attention to your silhouette rather than centering everything on your face.
- A side ponytail is the ultimate choice when you want your hairstyle to read as intentional and dramatic
- This works for evening events, dates, parties, and any occasion where you want to look noticeably styled
- You can adjust the exact placement of your side ponytail to flatter your face shape—higher placement if you want to elongate, lower placement if you want to soften angularity
- Side ponytails feel less corporate and more creative than center ponytails, making them perfect when you want personality in your style
- If you typically wear your hair down, a side ponytail reads as a noticeable departure—it’s the kind of change that gets compliments
Final Thoughts
The beautiful truth about drawstring ponytails is that they democratize polished hairstyling. You don’t need expensive salon visits, professional styling skills, or hours spent perfecting your technique. You need a decent drawstring hair tie and five minutes. That’s genuinely sufficient to create a style that reads as intentional, flattering, and put-together.
Every single style in this article can be done in the mirror looking at your own face, which means you’re never guessing whether it looks good—you can see exactly what you’re creating as you create it. The drawstring mechanism itself adds security and adjustability that regular elastics can’t touch. Your ponytail won’t slip halfway through the day, and if your scalp gets tender, you can loosen it instantly without completely redoing your hair.
The real power of these ten styles is that you can rotate through them across your week. Monday’s sleek ponytail, Tuesday’s textured high pony, Wednesday’s braided version, Thursday’s half-up, and Friday’s curly side ponytail—you’re hitting variety without needing to master complicated techniques or own special equipment. Mix and match elements from different styles: add a wrap to your curved ponytail, layer your textured high pony, braid your side ponytail. The combinations are genuinely endless, and each one takes roughly the same amount of time as a basic ponytail.