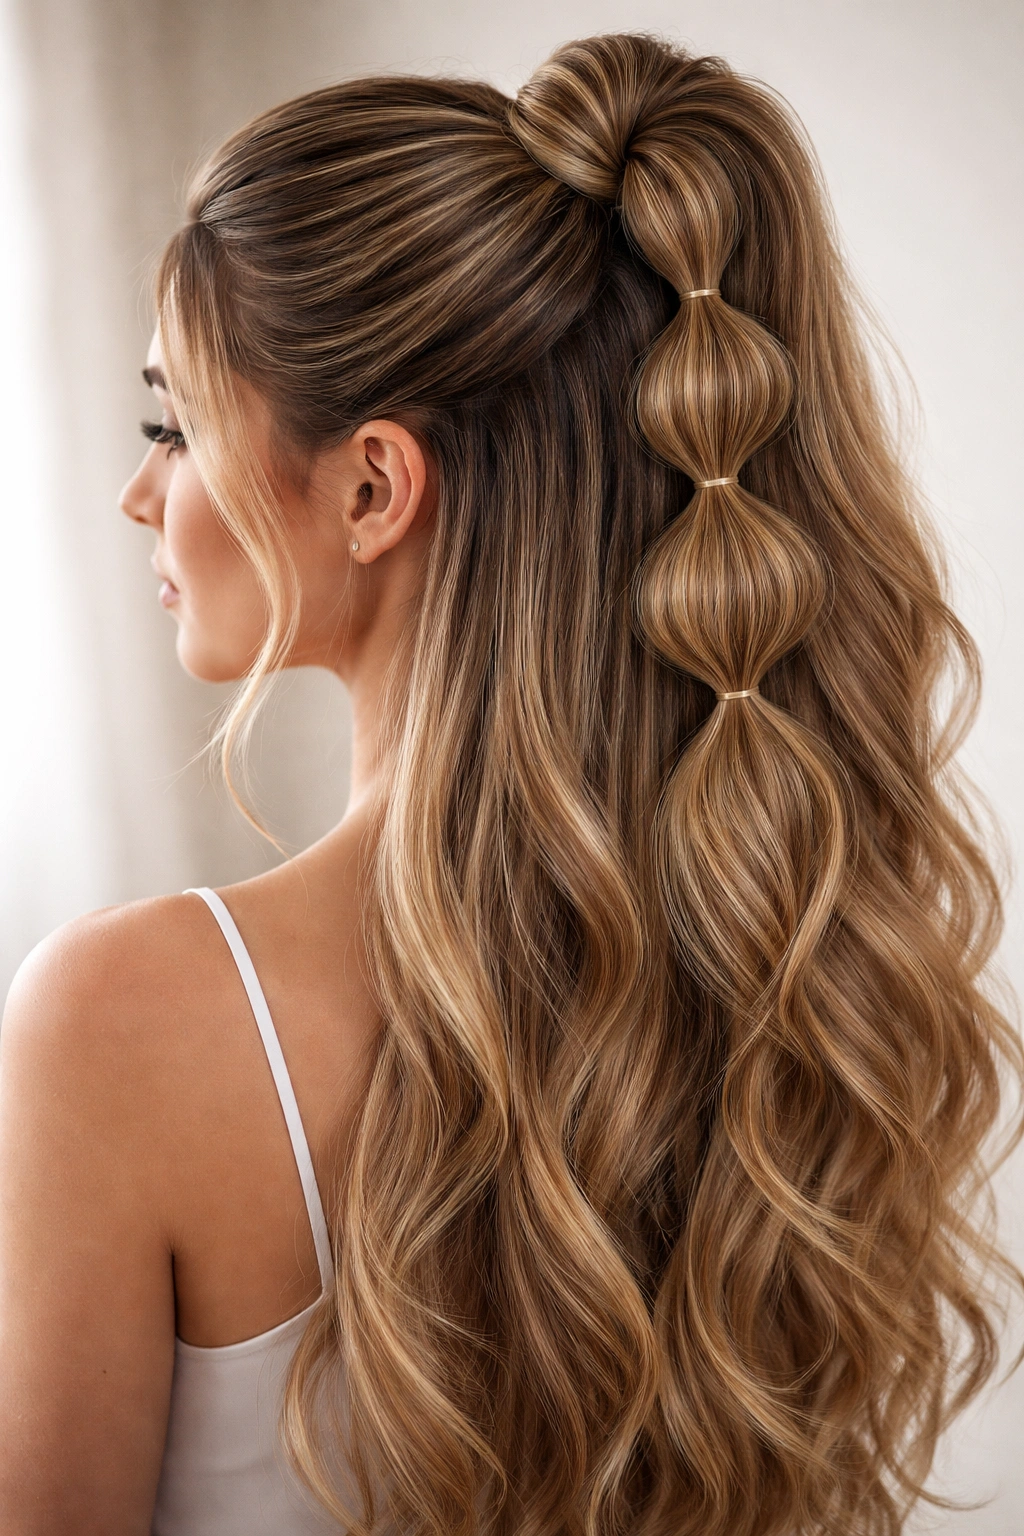
Bubble braid ponytails have become one of the most versatile and visually striking hairstyles for long hair. The beauty of this style lies in its elegant simplicity — elastic bands create uniform, puffy sections along a ponytail or braid, giving the illusion of volume and movement while actually being surprisingly easy to execute. Whether you’re heading to a casual weekend outing, a formal event, or just want to refresh your everyday look, a bubble braid ponytail offers endless possibilities for customization and styling variations.
What makes bubble braids particularly appealing is how they transform the way your hair sits and moves. The strategic placement of elastics creates texture and dimension that make even fine hair look fuller, while the lifted sections add a playful, intentional quality that reads as more polished than a standard ponytail. Once you understand the fundamental technique, you can adapt it in countless ways — changing the height, tightness, number of bubbles, and finishing touches to suit your hair type, face shape, personal style, and the occasion.
The style has genuine staying power too. Unlike some trends that fade quickly, bubble braid ponytails work across age groups, hair textures, and styling preferences. They hold up well throughout the day, transition smoothly from casual to dressed-up depending on how you style them, and most importantly, they actually feel comfortable to wear for extended periods. Over the following sections, you’ll discover ten distinct interpretations of the bubble braid ponytail — each with its own character, difficulty level, and ideal wear scenario.
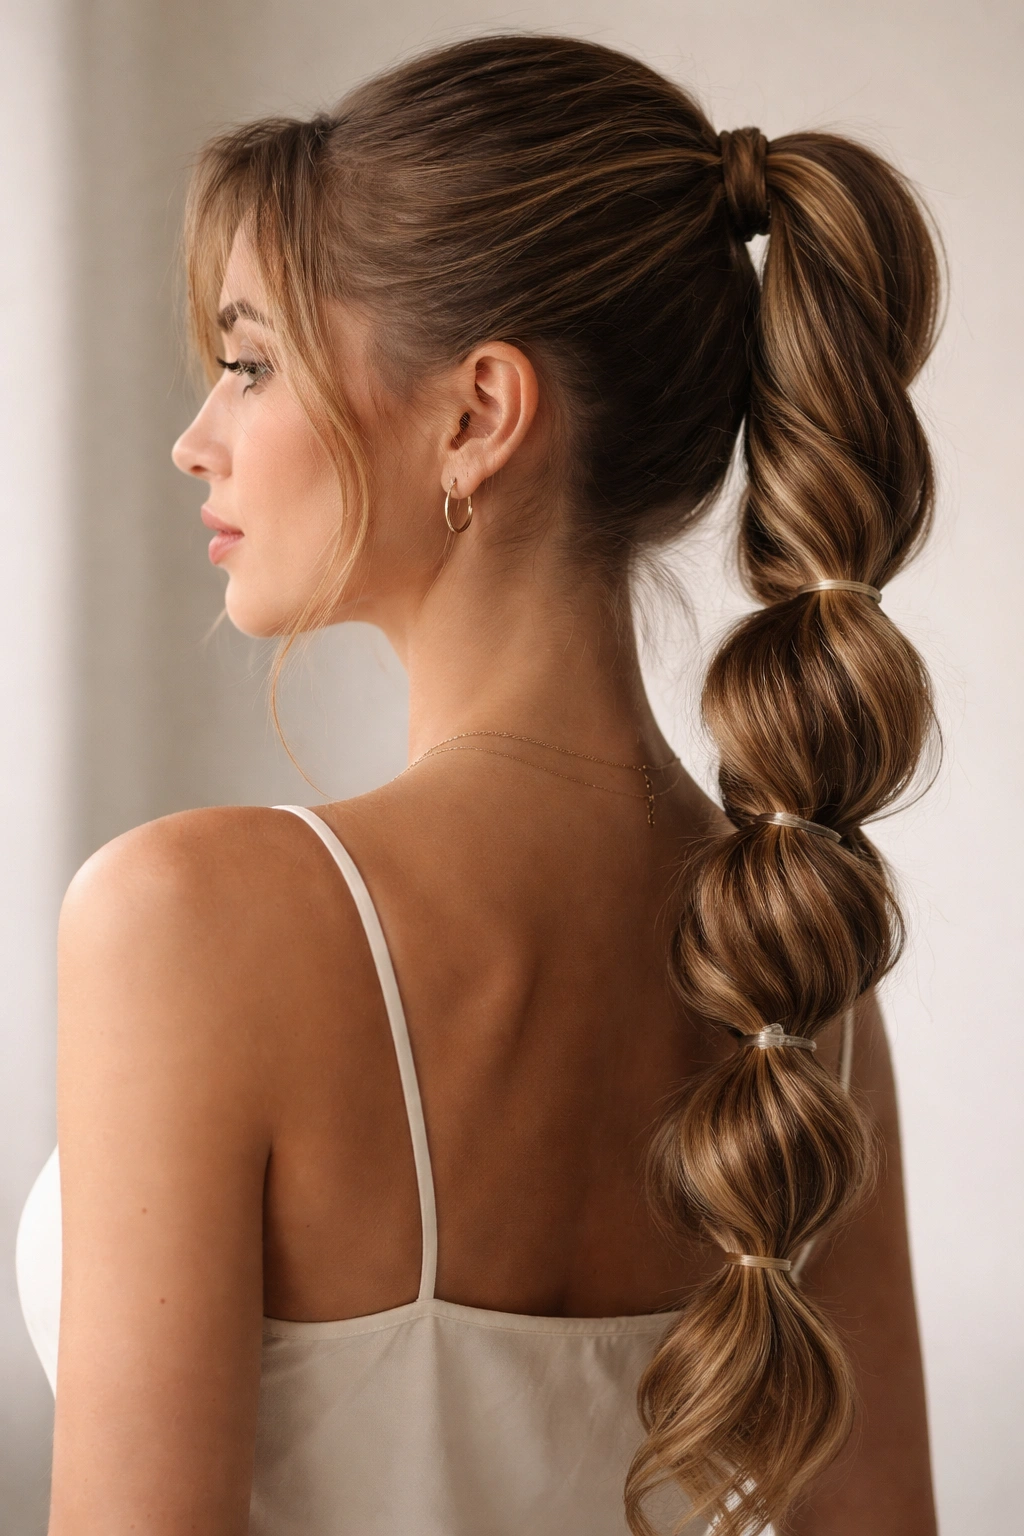
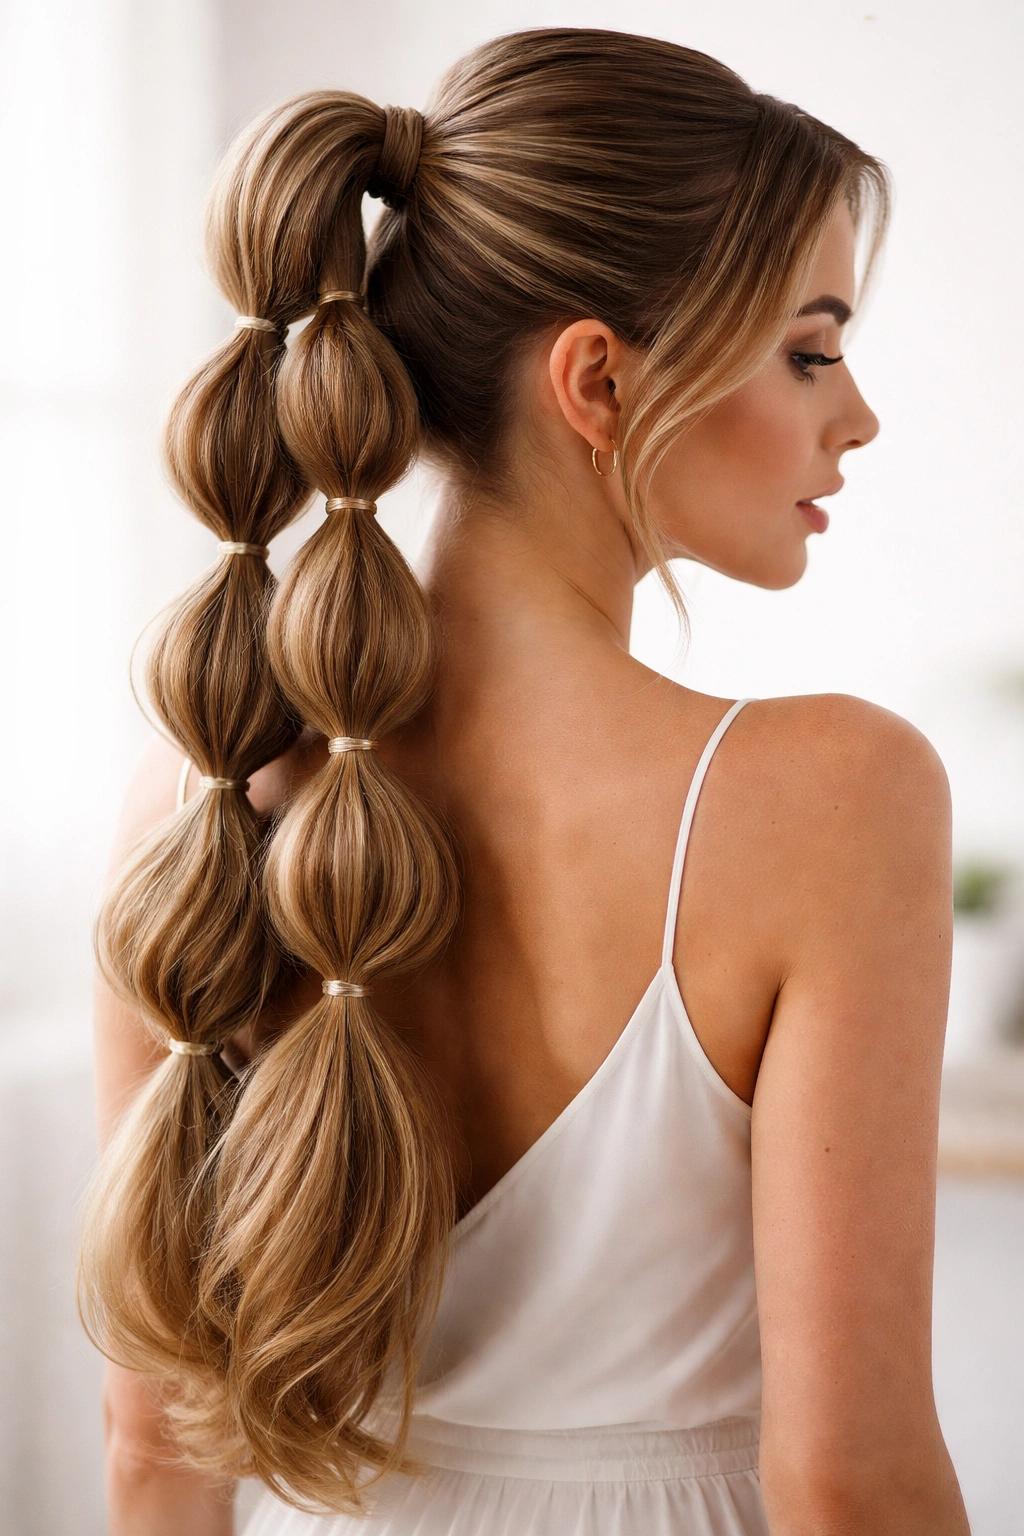
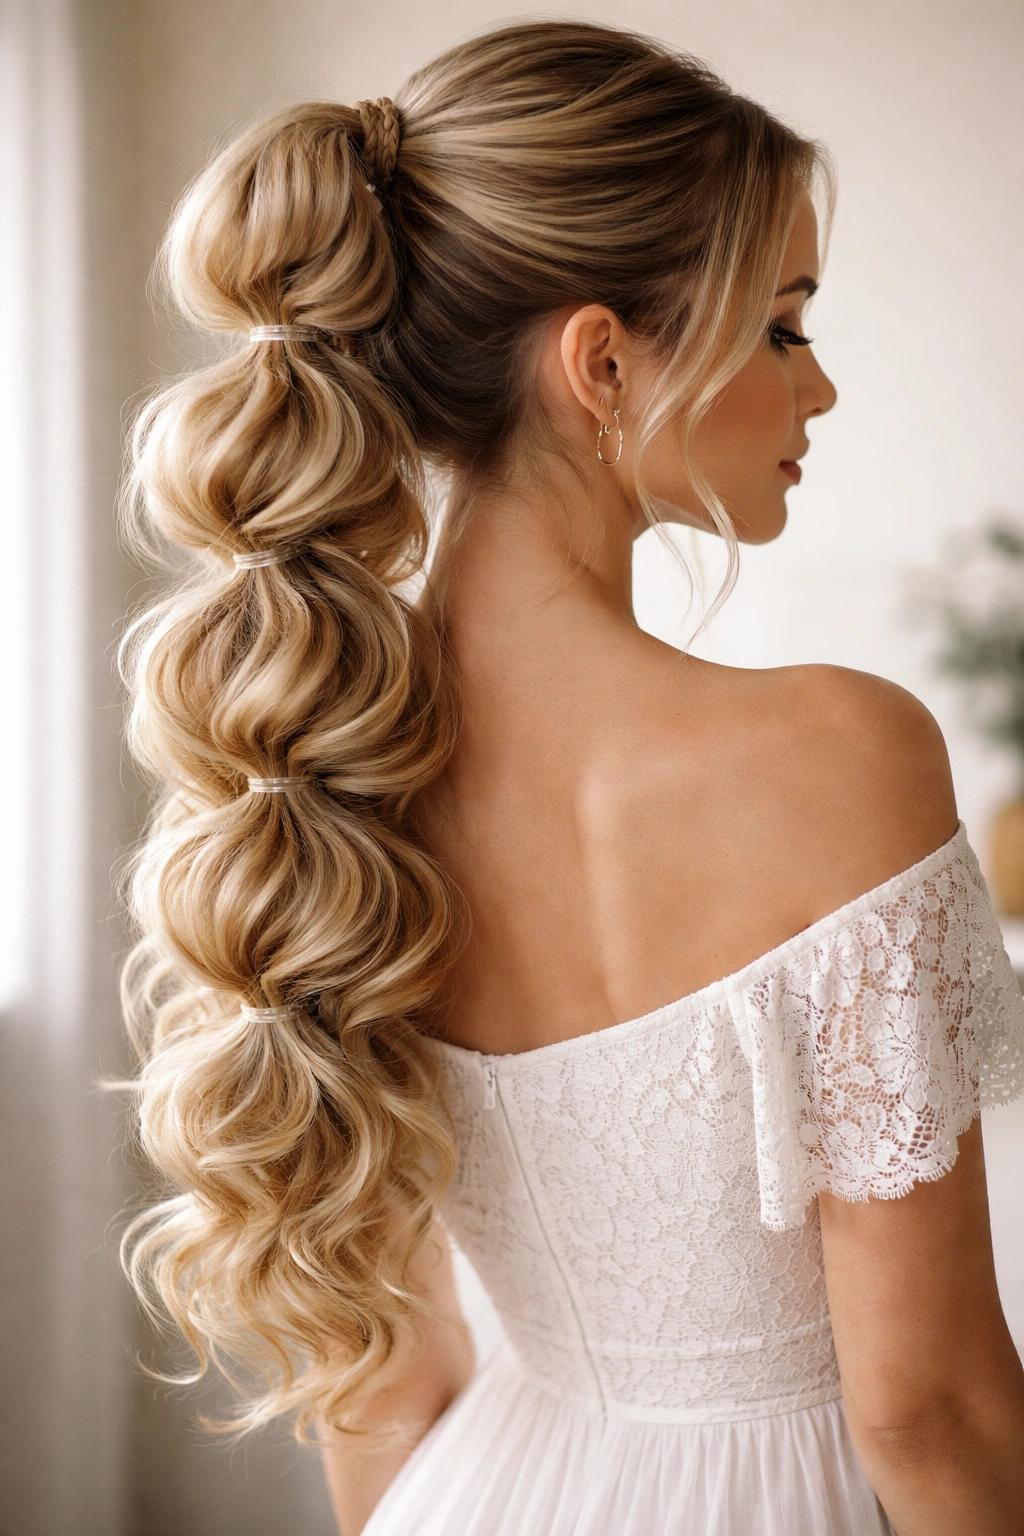
1. Classic High Bubble Braid Ponytail

The classic high bubble braid ponytail sits at the crown of your head, creating instant lift and a youthful, energetic vibe. This is the foundational style that most people think of when they picture a bubble braid, and it remains the most versatile option in your styling arsenal. The high placement makes it ideal for showing off your face and neck, which is why it works so beautifully for both casual and polished occasions.
Why It’s the Perfect Starting Point
The high position naturally draws attention upward, making it flattering for most face shapes and particularly helpful if you want to emphasize your eyes or showcase a bold lip color. The bubbles catch light beautifully because they sit at a height where they’re highly visible, creating dimension that photographs well and looks intentional from every angle. The style also keeps hair completely off your shoulders and face, making it functional for workouts, warm weather, or any situation where you need hair fully contained.
How to Create the Look
- Gather your hair into a high ponytail at the crown using one elastic band (position it about 2-3 inches above where a typical ponytail would sit)
- Take another elastic band and secure it roughly 2 inches down the length of your ponytail
- Gently pull up the section of hair between the two elastics, creating your first bubble
- Continue placing elastics down the ponytail, spacing them about 2 inches apart
- After each new elastic, carefully tease and pull up the section above it
- For a fuller bubble appearance, gently backcomb or tease each section slightly before pulling it up
- Finish with your preferred styling product (hairspray adds hold; serum adds shine)
Styling Tips for Success
If your hair is particularly thick or long, use smaller sections between elastics to maintain proportion — typically 1.5 to 2 inches works best. Softer hair benefits from a light texturizing spray applied before you start, as this gives the elastics something to grip and makes the bubbles look more intentional. To make the bubbles even more pronounced, you can gently loosen each one slightly after you’ve created all of them — this actually creates a fuller, more glamorous effect than keeping them tight.
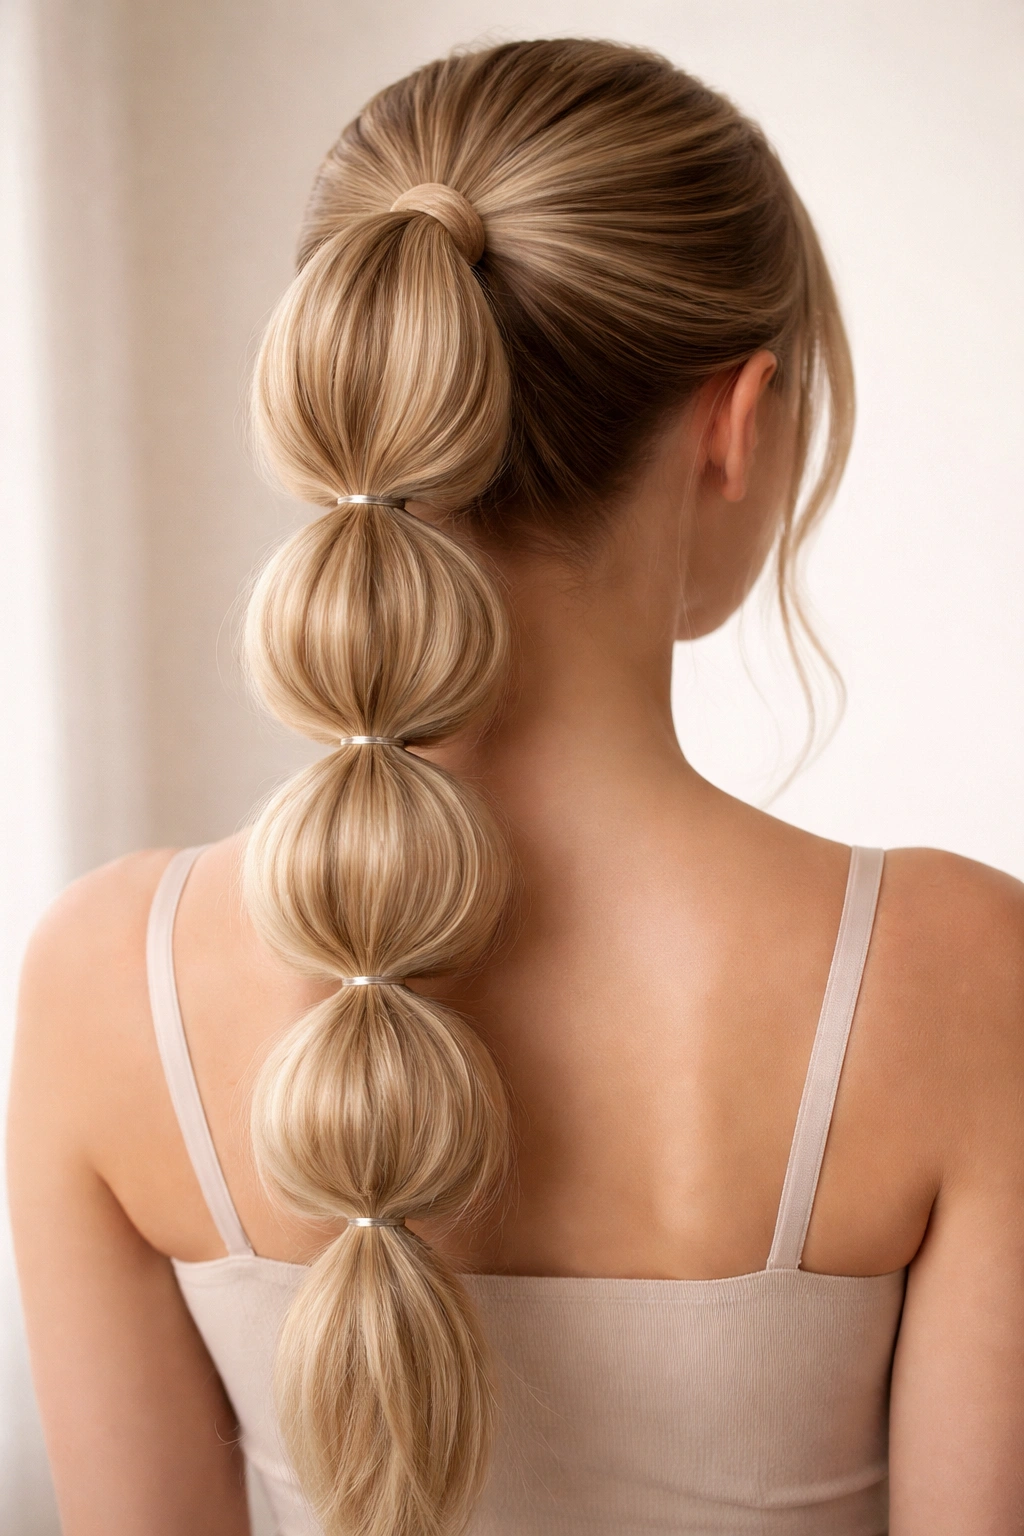
2. Low Bubble Braid Ponytail
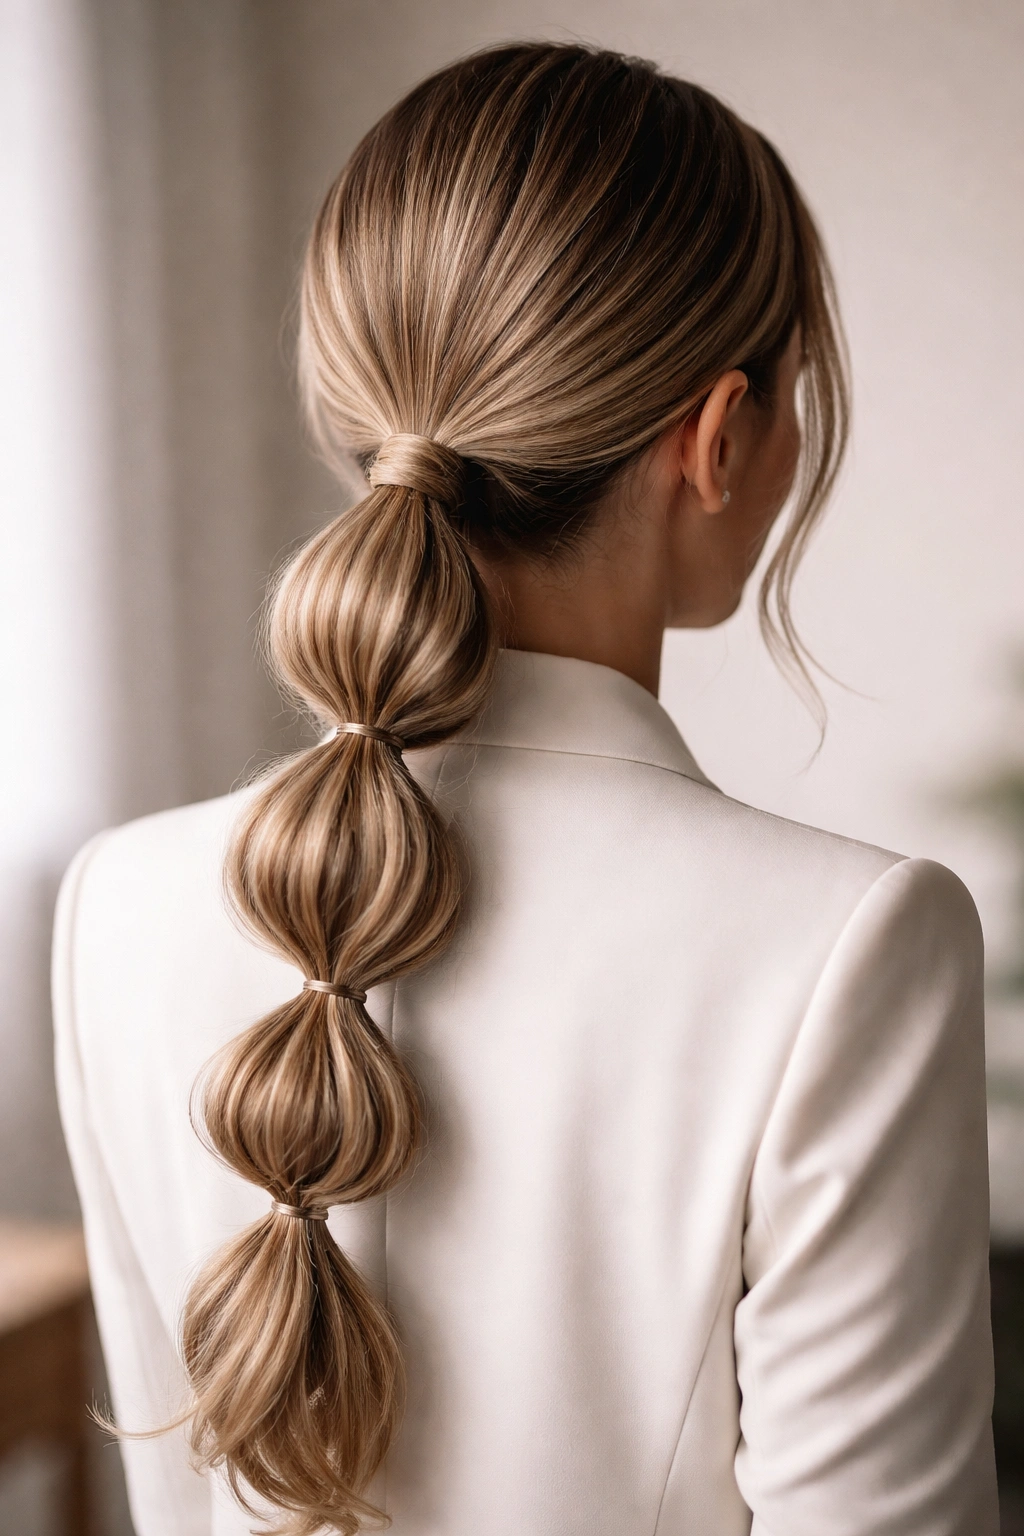
The low bubble braid ponytail shifts the entire aesthetic from energetic and youthful to sophisticated and refined. This version sits at the nape of your neck or just below, creating a more subtle, elegant interpretation of the style that works beautifully in professional settings or when you want something less dramatic than the high version. The lower placement creates softer, more elongated bubbles that feel especially polished.
The Elegance of Lower Placement
When you position your bubbles lower on the head, they create an elongated silhouette that actually lengthens your face and neck. The style feels inherently more grown-up and intentional — there’s something about the lower placement that reads as more deliberate than a casual ponytail. This version photographs beautifully from behind, making it a favorite choice for events where you’ll be photographed from multiple angles, like weddings or formal dinners.
Building Your Low Bubble Braid
- Create a low ponytail at the nape of your neck, positioning it where a classic low ponytail would naturally sit
- Secure with an elastic, but don’t pull it too tight — you want some give so the bubbles can expand
- Place your second elastic about 2.5 inches down from the first one (spacing can be slightly larger with low ponytails because they’re more visible from behind)
- Pull up and secure the bubble, being gentle with the motion to keep it smooth rather than kinky
- Continue down the length of your ponytail with even spacing
- For added polish, smooth any flyaways with a fine-tooth comb and a small amount of edge control product
Making It Work for Different Hair Lengths
If you have very long hair, creating 6-8 bubbles spaced further apart creates a more balanced proportion than cramming many small bubbles together. Shorter long hair (shoulder-length to mid-back) usually looks best with 4-5 larger bubbles that feel intentional rather than fussy. The key is stepping back and looking at the overall proportions — your bubbles should feel like they belong in the space they occupy, not like an afterthought.
3. Twisted Bubble Braid Ponytail
The twisted bubble braid ponytail adds a fascinating textural dimension by incorporating a gentle twist throughout the ponytail before creating your bubbles. This variation creates movement that reads as intentional and more intricate than a straight bubble braid, while actually being just as simple to execute. The twist catches light differently, creating visual interest that makes the style feel more elevated than the basic version.
Creating Dimension With a Twist
The twist fundamentally changes how your bubbles sit and catch light. Instead of creating vertical lines down your ponytail, the twist creates a spiral pattern that moves the eye around the style rather than straight down. This is particularly effective if you have very straight hair naturally — the twist adds the kind of movement and dimension that you might otherwise need to create with styling tools. It’s also significantly more forgiving of hair that’s not freshly washed, because the twist naturally disguises certain texture inconsistencies.
The Step-by-Step Technique
- Create a ponytail at your desired height (high, mid, or low — this technique works with all positions)
- Divide the ponytail into two equal sections from base to end
- Gently twist one section around the other, moving down the length of the ponytail (think of it like creating a rope twist)
- Once you’ve twisted all the way to the end, secure the twist with an elastic so it doesn’t unravel
- Now place your first bubble elastic about 2 inches down from the base
- Pull up the twisted section above this elastic, creating your first bubble
- Continue placing elastics and creating bubbles down the length of the twisted ponytail
- The twist will naturally create ridges and texture within each bubble that look deliberate and polished
Pro Tips for Flawless Twisted Bubbles
The tightness of your twist impacts how the final style looks — a loose, relaxed twist creates softer, more romantic bubbles, while a tighter twist creates more defined, geometric bubbles. For longer hair, a loose twist tends to read as more elegant. When you’re placing your elastics, the twist might rotate, so rotate it gently back to where you want it before securing each elastic. If your twist starts to loosen as you work down the ponytail, you can respray and re-twist that section without starting completely over.
4. Doubled-Up Bubble Braids Ponytail
The doubled-up bubble braids ponytail uses two parallel braids instead of a single ponytail, creating double the visual interest and an effect that’s significantly more dramatic and eye-catching. This style requires a bit more time and attention than single-ponytail versions, but the payoff is a look that reads as carefully crafted and polished. It’s an excellent choice when you want to make a clear styling statement.
Why Double Means More Impact
Using two bubble braids instead of one creates a symmetrical, balanced effect that feels inherently more intentional and formal than a single ponytail. The doubling also solves the problem of bubble braids on very thick hair — rather than trying to create one massive bubble braid, you distribute the hair volume across two more manageable braids. This version photographs beautifully because the symmetry creates a clean, architectural quality that reads well from every angle.
Creating Two Perfect Bubble Braids
- Part your hair down the center from your crown to the nape of your neck
- On one side, gather hair into a ponytail at your desired height (using only that side of your hair)
- Secure with an elastic and create bubbles down the length exactly as you would for a single bubble braid
- Repeat on the other side with the remaining hair, matching the height and spacing of the first side as closely as possible
- Use a mirror to check that both braids sit symmetrically
- At the bottom, you can either leave them as two separate braids or gather them together into a combined tail
Styling Variations Within Double Braids
You can curve each braid slightly inward (toward the center back) or outward (toward the ears) to create different silhouettes. Curved inward creates a more formal, pulled-back effect, while curved outward creates a softer, more romantic interpretation. If you have very long hair, you might want to curve the braids toward each other and secure them together at the bottom with a decorative hairpin or jeweled elastic for extra polish.
5. Side-Swept Bubble Braid Ponytail
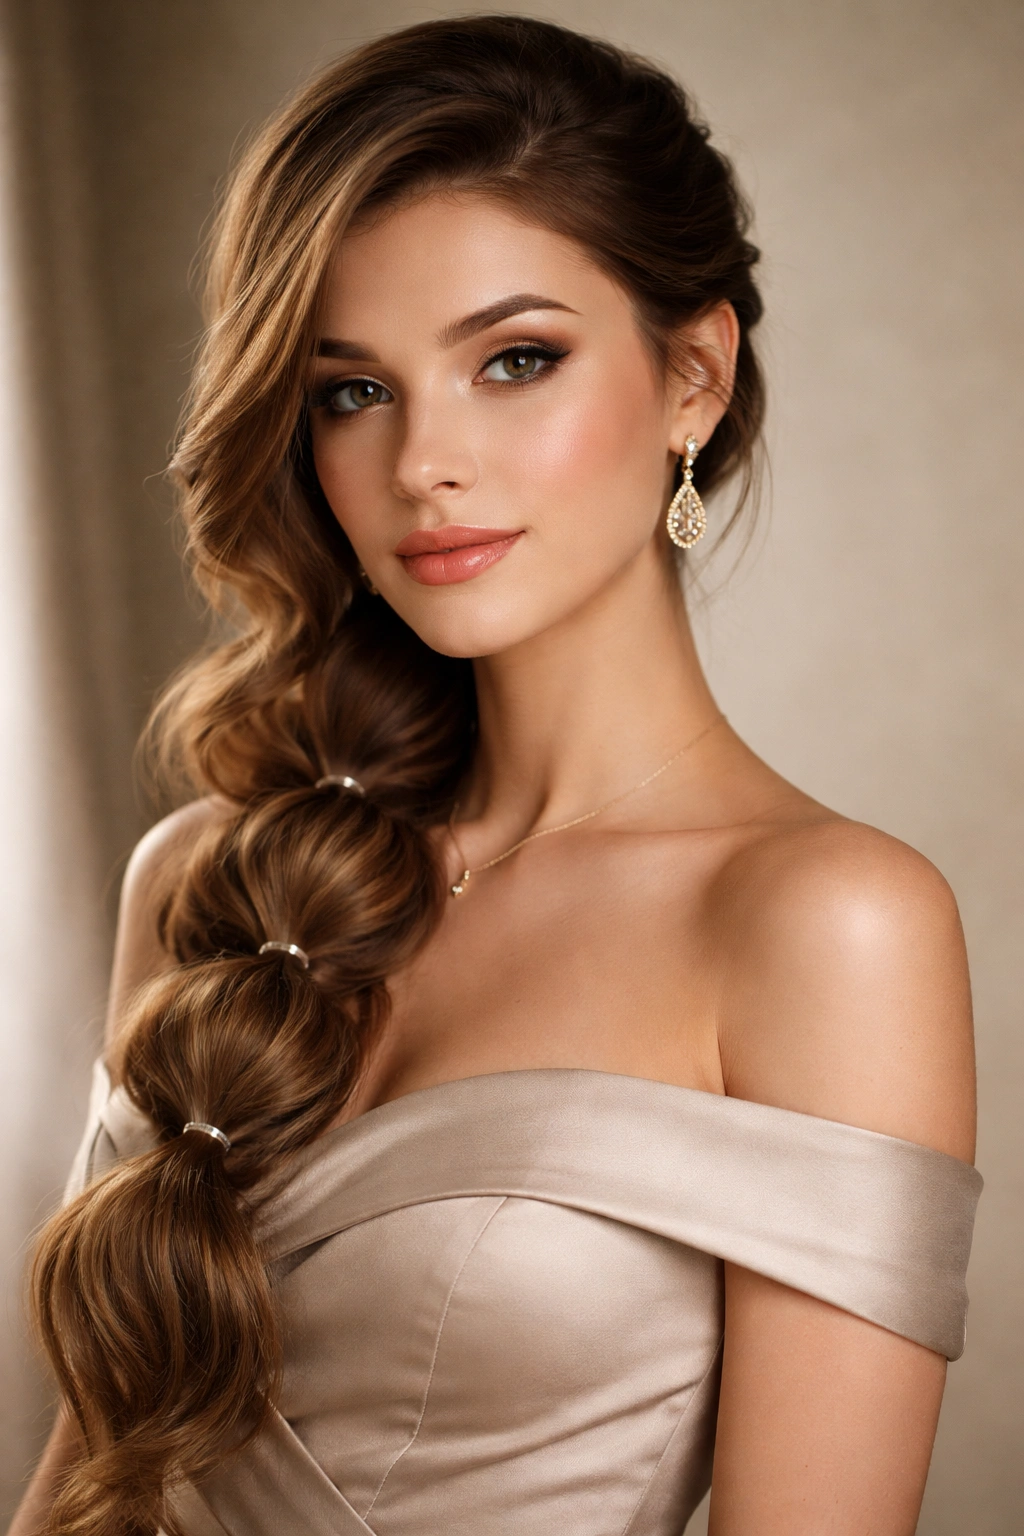
The side-swept bubble braid ponytail positions your entire ponytail off to one side of your head, creating an asymmetrical, romantic aesthetic that’s particularly flattering for showing off your face and neck. This version works beautifully for date nights, special occasions, or anytime you want to add a touch of glamour without looking overdone. The side positioning creates movement and creates a softer silhouette than a centered ponytail.
The Flattering Magic of Side-Swept Positioning
Shifting your ponytail to one side fundamentally changes how the style frames your face. The asymmetry is inherently more interesting visually, and it creates the impression of movement and intentionality. This positioning also reveals more of your neck and shoulder line, which can be particularly flattering if you want to emphasize those features or if you’re wearing a special neckline. The side placement naturally creates a cascading effect as the ponytail falls, making even straight hair appear to have more movement.
Building a Side-Swept Bubble Braid
- Brush your hair smoothly to one side
- Gather your hair into a ponytail positioned to one side of your head (typically just behind your ear or slightly lower)
- The exact position depends on your hair length and face shape — experiment to see what feels balanced
- Create bubbles down the length of your side-swept ponytail using the same technique as a traditional bubble braid
- The side placement means people view this style from angles where it catches light differently, so the bubbles tend to look extra dimensional
- You can brush some hair from your opposite side across to conceal the base of the ponytail for a softer look
Creating Flattering Asymmetry
The lower you position your side-swept ponytail on your head, the more romantic and soft the effect becomes. Positioning it higher creates more energy and movement. If your face is round, positioning the ponytail slightly higher and further back tends to be most flattering. If your face is long or angular, positioning the ponytail lower and further forward can help balance your proportions. The side-swept positioning makes this style particularly versatile for different face shapes.
6. Curled Bubble Braid Ponytail
The curled bubble braid ponytail adds bouncy, soft waves throughout the length of your ponytail, combining the architectural interest of bubbles with the romantic texture of curls. This version works beautifully on long hair because the curls have space to develop and move naturally. The combination of structure and softness creates a look that’s simultaneously polished and effortlessly beautiful.
Why Curls Elevate Bubble Braids
Straight bubble braids create clean, geometric lines, while curled bubble braids create organic, flowing movement. The curls soften the structure of the bubbles, making the overall style feel less rigid and more romantic. The curls also create additional texture and dimension within each bubble, making the bubbles themselves appear fuller and more voluminous. This is particularly effective on fine or thin hair, where the curls add optical fullness without actually requiring more hair density.
Creating Perfect Curls Before Bubbling
- Blow-dry your hair smooth and straight first — this gives you a clean base
- Apply a heat protectant spray to your damp hair before blow-drying
- Create your bubble braid ponytail (at whatever height and style you prefer)
- Divide the ponytail into 3-4 inch sections
- Using a 1-1.5 inch curling iron, wrap each section around the barrel, holding for 8-10 seconds
- Release the curl and let it cool for a moment before moving to the next section
- Once all sections are curled, gently run your fingers through the curls to loosen them slightly
- Finish with a light hold hairspray to keep the curls defined without stiffening them
Styling Tips for Lasting Curls
If you have naturally straight hair, allowing the curls to cool completely before touching them ensures they last longer — this is why letting them cool for even just a few seconds makes a real difference. Using a finer barrel on your curling iron creates tighter, longer-lasting curls, while a larger barrel creates softer, more romantic waves. If you want the curls to last all day, consider using a texturizing spray before creating your bubble braid — this gives the elastics something to grip more securely, and it helps the curls hold better throughout the day.
7. Half-Up Bubble Braid Ponytail
The half-up bubble braid ponytail leaves some hair down while creating a bubble braid from just the top section. This style offers a middle ground between fully up and fully down, creating dimension and polish without the completely contained effect of a full ponytail. It’s an excellent choice when you want to show off the length and texture of your hair while still keeping some of it away from your face.
The Best-of-Both-Worlds Appeal
The half-up style gives you the practical benefits of having hair secured away from your face while maintaining the soft, flowing quality of wearing your hair down. The bubble braid sits higher and more prominently than it would in a full ponytail, creating a nice focal point at the crown of your head. This positioning is particularly flattering because it adds lift right where you want it, and the contrast between the secured bubbles and the flowing hair below creates visual interest and movement.
Executing a Perfect Half-Up Bubble Braid
- Brush your hair smoothly and decide how much you want to secure — typically about half of your hair goes into the braid
- Gather the top section into a ponytail at the crown, positioning it high enough that the secured section is clearly visible
- Secure with an elastic, and create bubbles down this top section
- The bottom section (the hair you’re leaving down) can be left straight, curled, or textured — whatever matches your overall style
- The contrast between the structured bubbles above and the free-flowing hair below naturally creates visual balance
- You can curl or wave the bottom section after you’ve completed the bubble braid
Customizing the Half-Up Look
The amount of hair you secure in the bubble braid dramatically changes how the style reads. Securing less hair (maybe just the top third) creates a more romantic, subtle look, while securing more (closer to half your hair) creates a more dramatic effect. You can also experiment with how tight or loose you make the bubbles — looser bubbles in a half-up style feel more relaxed and casual, while tighter bubbles feel more intentional and polished.
8. Zigzag Bubble Braid Ponytail

The zigzag bubble braid ponytail incorporates directional changes by alternating which side of the ponytail you pull the bubbles from, creating a zigzag or S-curve pattern down the length of your hair. This version is visually striking and adds a sophisticated complexity that makes the style feel especially intentional and carefully crafted. It requires a bit more attention than straight bubble braids, but the visual payoff is substantial.
Creating Visual Interest Through Movement
A straight bubble braid creates vertical lines, but a zigzag pattern creates movement and dynamism that’s significantly more eye-catching. The zigzag technique is particularly effective in photographs and when viewed from behind, where the alternating pattern creates a flowing, almost architectural effect. This version works beautifully on very long hair where there’s space for the pattern to develop and be clearly visible.
The Technique for Perfect Zigzags
- Create a standard ponytail at your desired height
- Place your first elastic about 2 inches down the ponytail
- When you create your first bubble, pull it up toward one side (let’s say the right side)
- Place your second elastic about 2 inches below the first
- When you create your second bubble, pull it toward the opposite side (the left side)
- Continue alternating sides as you move down the ponytail
- The key is making sure your pulls are directional — really pull right, then really pull left — so the zigzag pattern is clearly visible
- After you’ve completed all your bubbles, you can gently loosen each one to create a fuller effect while maintaining the directional pulls
Making Your Zigzag Pattern Clear
The more pronounced your directional pulls, the more obvious your zigzag pattern becomes. If you’re finding it subtle, really exaggerate the pulls — pull right with more force, then left with more force. This creates definition in the pattern that reads as intentional rather than accidental. Using slightly tighter elastics can also help maintain the pattern better throughout the day, since the pulls won’t loosen as easily.
9. Textured and Crimped Bubble Braid Ponytail

The textured and crimped bubble braid ponytail starts with textured or crimped hair before creating your bubbles, adding layers of texture that create a dramatically fuller, more voluminous effect. This version works beautifully on fine or thin hair because the texture creates optical fullness, and it’s excellent if you want maximum impact and visual drama. The crimped texture moves the eye around each bubble, making them appear larger and more defined.
How Texture Changes Everything
Applying texture or crimping before creating your bubbles fundamentally changes how full and impressive your bubbles look. Straight hair creates sleek, clean bubbles, but textured hair creates bubbles that appear thicker, fuller, and more intentional. The texture also helps the elastics grip more securely, which means your bubbles hold their shape better throughout the day. For fine hair especially, this technique is transformative — you get the visual effect of much thicker hair without actually needing more density.
Creating Texture Before Bubbling
- Start with clean, dry hair (or lightly dampened hair that you’ve blow-dried)
- Apply a texturizing spray throughout your hair, paying special attention to where you’ll be creating your ponytail
- Allow the spray to dry completely (usually 2-3 minutes)
- Using a crimping tool, work through your hair in sections, crimping from roots to ends
- Focus the crimping on the sections where your ponytail will be, as this is where the texture will be most visible
- You can crimp your entire head for maximum effect, or just focus on the ponytail section if you prefer a softer overall look
- Once crimped, create your bubble braid ponytail normally — the texture will already be doing the work of making your bubbles look fuller
Maintaining Texture Throughout the Day
Textured hair tends to hold elastics more securely, which is a real advantage for bubble braids. However, texture can relax throughout the day, so a light texturizing spray or dry shampoo applied mid-day can refresh your look. If you’re using a crimping tool, use a heat protectant spray first, and consider applying a smoothing serum to your ponytail area after crimping to add shine and prevent frizz while maintaining the texture.
10. Braided Crown With Bubble Ponytail Tail
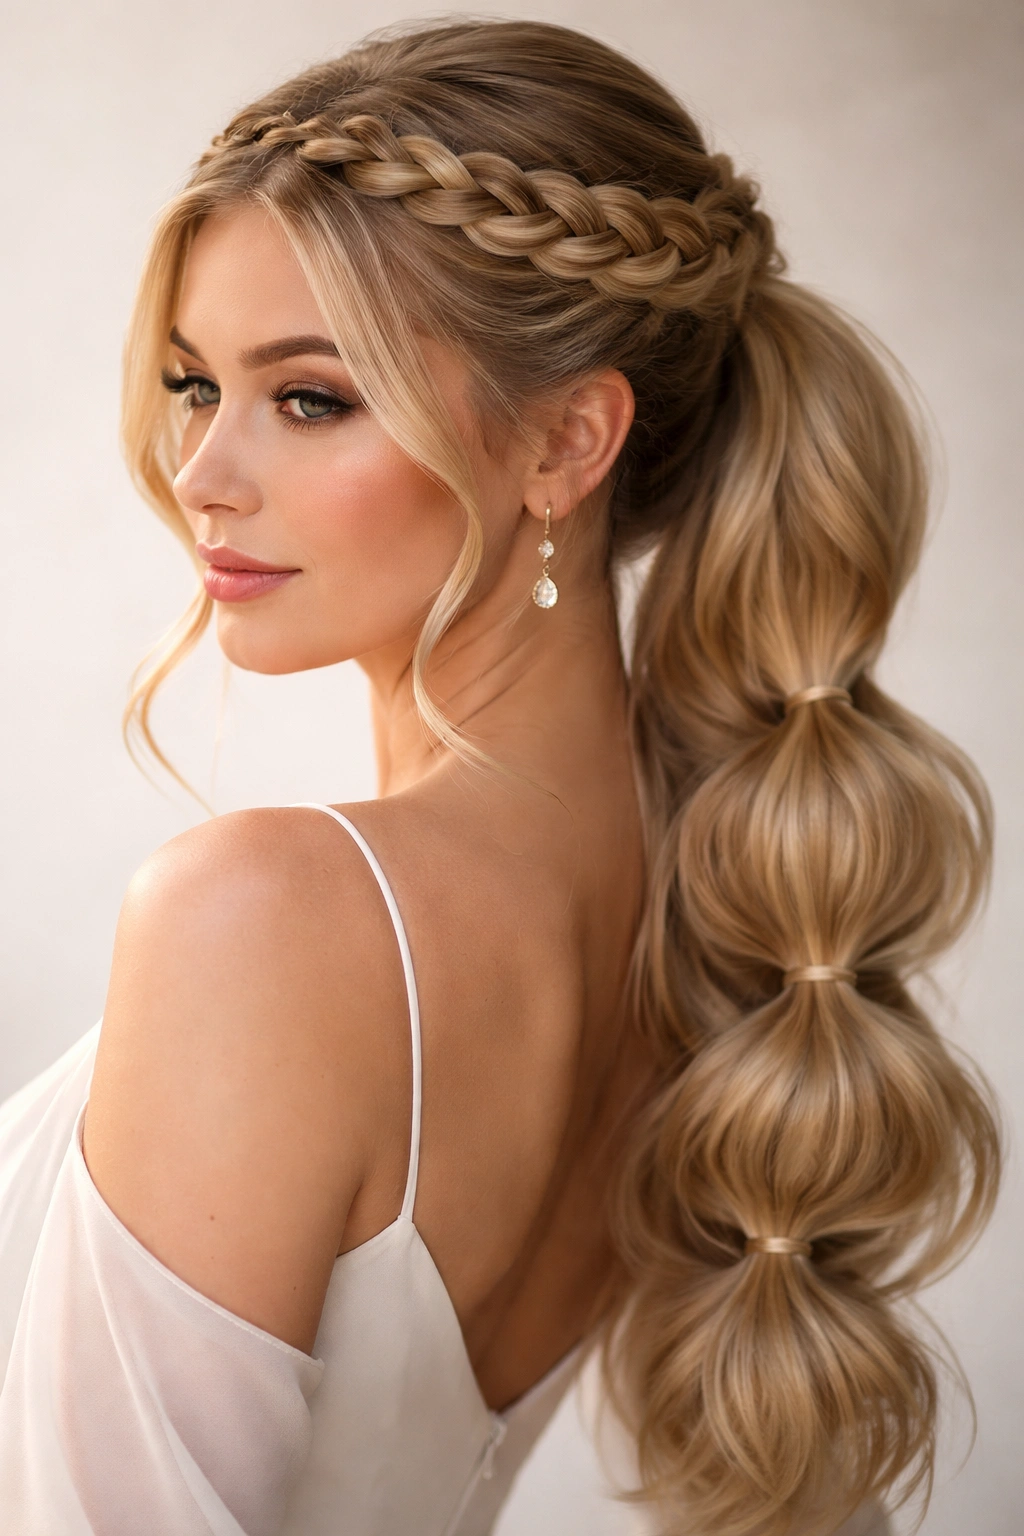
The braided crown with bubble ponytail tail combines a crown braid with a bubble braid ponytail, creating an extremely polished, romantic style that feels particularly special for formal occasions or events. This version incorporates two different braiding techniques into one cohesive look, making it feel more intricate and intentional than either technique alone. It’s a beautiful choice when you want to look truly put-together.
Combining Two Elegant Techniques
This style merges the sophistication of a crown braid (which wraps around the head) with the modern, playful quality of a bubble braid ponytail. The crown braid adds elegance and dimension to the top of your head, while the bubble ponytail adds contemporary interest below. Together, they create a style that’s both romantic and current — timeless elegance meets modern interpretation.
Building Your Crown-to-Bubble Style
- Create a crown braid starting at one side of your head and wrapping around toward the opposite side (you can find detailed crown braid tutorials for the technique if you’re unfamiliar with it)
- Your crown braid shouldn’t go all the way around; it should stop when you reach the opposite side of your head
- Gather all your hair (including the crown braid and the remaining loose hair) into a ponytail where the crown braid ends
- From this point, create your bubble braid ponytail as you normally would
- The crown braid becomes a decorative element that frames the top of your head, while the bubble braid ponytail extends from where the crown braid ends
- The effect is a style that appears extremely intricate but is actually just two techniques layered together
Making the Transition Seamless
The key to making this style look polished is ensuring that your crown braid flows naturally into your bubble braid ponytail. Make sure the gathering point for your ponytail is positioned where your crown braid ends, so there’s no awkward gap or disconnect. You can secure a small elastic right where the crown braid ends, then gather all hair into your main ponytail elastic — this creates a smoother transition. If any little pieces escape from the crown braid where it meets the ponytail, you can smooth them back with a fine-tooth comb and a small amount of edge control for a polished finish.
Final Thoughts
Bubble braid ponytails are genuinely one of the most forgiving and versatile styles in your long-hair arsenal. Whether you’re drawn to the youthful energy of a high bubble braid, the sophisticated polish of a low version, or the creative complexity of twisted, zigzag, or crown variations, you can execute any of these styles with just a few elastics and a little practice. The beauty of bubble braids is that they’re nearly impossible to get truly wrong — even an imperfectly spaced or slightly uneven bubble braid still reads as intentional and cute rather than messy or careless.
What makes these styles so valuable is their incredible range of appropriateness. You can style a casual bubble braid ponytail for a workout or grocery run, and you can style a more polished version with curls and careful spacing for a date night or formal event. The same fundamental technique works across contexts, which means once you master the basic skill, you’ve essentially unlocked ten different styles to rotate through.
The most important thing to remember is that practice makes perfect — your first bubble braids might have slightly uneven spacing or bubbles of inconsistent size, and that’s completely normal. By the time you’ve styled your second or third bubble braid, your hands understand the spacing and your eyes calibrate to what looks balanced. Keep a few spare elastics on hand, don’t stress about absolute perfection, and embrace the soft, intentional vibe that bubble braids naturally create. You’ve got this.