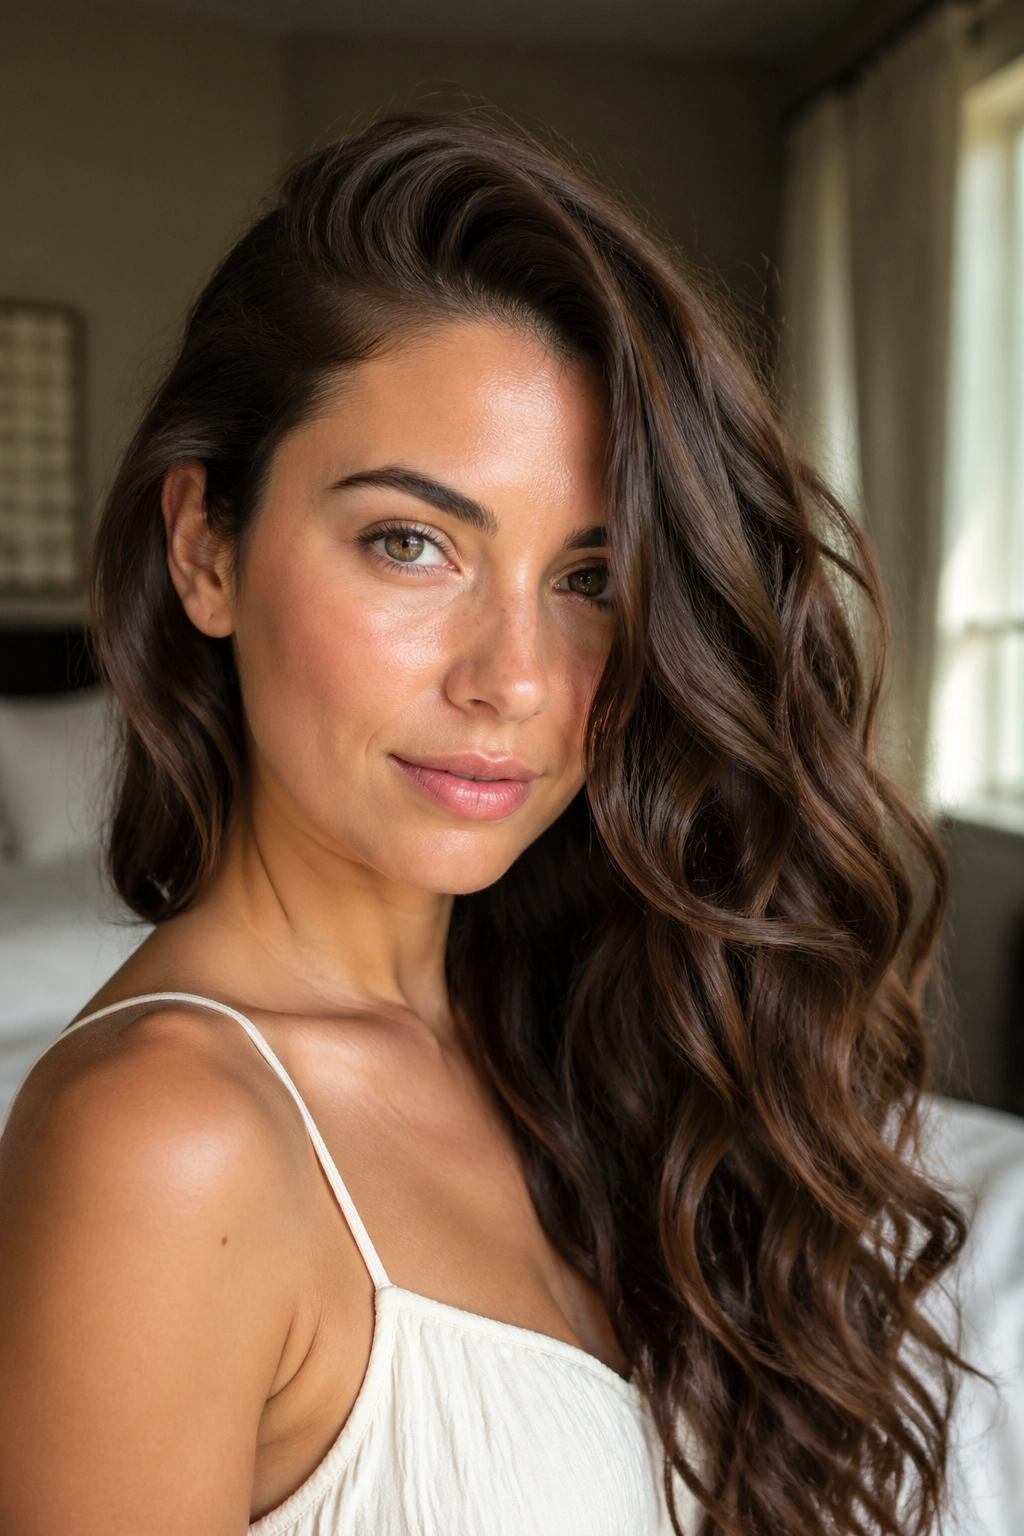
Thick wavy hair can look expensive in one mirror and rebellious in the next. That’s half the charm, and half the headache. The right cut or style doesn’t try to flatten that texture into submission; it gives the wave room to move while keeping the bulk where you want it.
The bad haircut trap is usually the same one: too much weight at the bottom, too much puff at the sides, or bangs that were cut with straight hair in mind. Thick wavy hair has memory. It holds shape, but it also swells, bends, and changes depending on how it’s dried, pinned, or brushed. That means the most flattering styles are the ones that make peace with the hair’s own personality instead of fighting it.
A good style on this texture should do at least two jobs at once. It should show off the wave, and it should stop the triangle effect that thick hair can fall into when the ends spread out and the crown goes flat. That’s why layers, strategic parting, and half-up styling matter so much here. They’re not just decoration. They’re the difference between “big hair” and good big hair.
Some of these looks are cut-based, some are pure styling tricks, and a few are the sort of low-effort ideas you can do with a clip and five minutes in front of a mirror. All of them work with thick wavy hair instead of pretending it’s something else.
1. Long Layers That Let the Wave Move
Long layers are the safest place to start when you want shape without losing the drama of length. On thick wavy hair, they take weight out of the lower half so the wave can spring instead of drooping into a heavy curtain. The trick is asking for layers that begin below the chin, not around the cheeks, unless you want a lot of movement near the face.
This cut works because it changes how the hair falls. Instead of one dense block, the layers let each bend show up a little more clearly, which keeps the whole style from looking bulky. It also gives you a cleaner silhouette when the hair dries naturally. If your ends tend to flip out or puff, long layers can calm that down fast.
What to ask for
- Layers that start around the collarbone or just below it
- Soft face-framing pieces that blend, not chop
- Slightly removed weight at the ends, not aggressive thinning
- A dry-cut finish if your wave pattern changes a lot when wet
How to wear it A light mousse on damp hair and a quick scrunch are usually enough. If you diffuse, stop when the hair is about 80 percent dry and let the rest air-dry. That keeps the shape from getting frizzy at the crown.
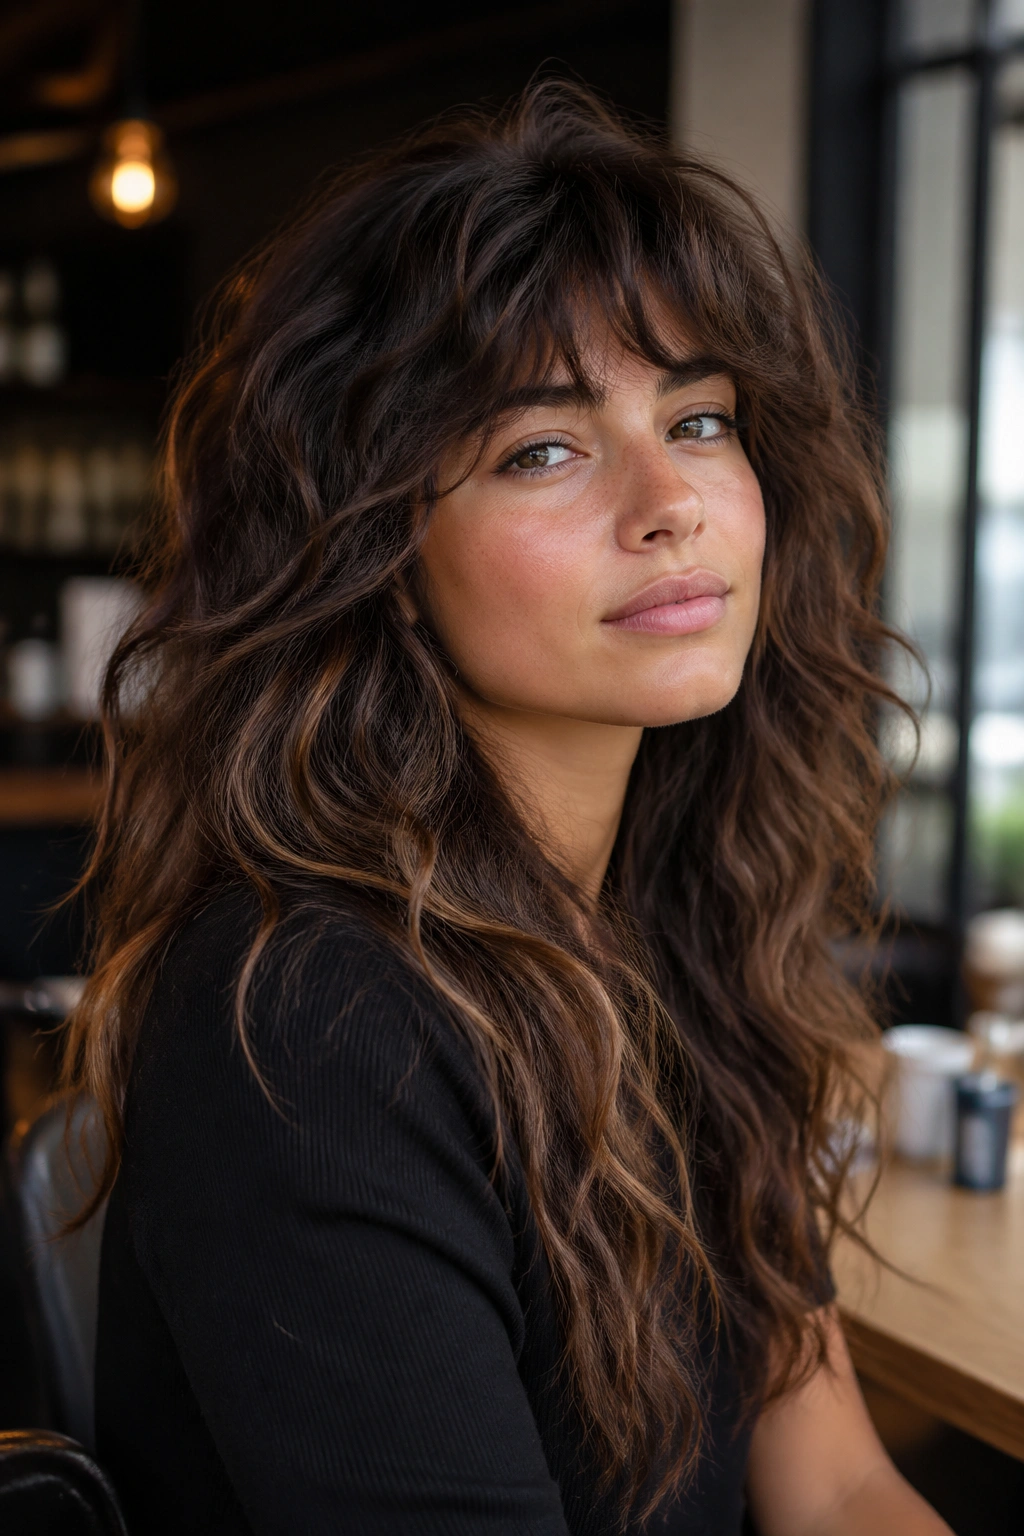
2. The Curly Shag With Soft Fringe
The shag is not for the timid. Good. Thick wavy hair can handle it, and often looks better with it than finer hair ever could. The layered top and softer fringe make the texture look deliberate instead of accidental, which is the whole point.
Why It Works on Dense Waves
A shag removes bulk from the interior of the cut, not just the bottom edge. That matters. When the weight comes out of the middle, the wave lifts and separates, and the whole style feels lighter without looking thin. The fringe also helps balance the volume around the face, especially if your hair gets puffy through the sides.
Ask for a fringe that’s longer than eyebrow length if your wave is strong. Short bangs on thick wavy hair can spring up faster than you expect. That’s not a disaster, but it does mean a style change you should choose on purpose, not by surprise.
- Best on hair that’s dense from root to tip
- Looks strong with a slightly undone finish
- Needs regular dusting to keep the shape crisp
- Works well with mousse, curl cream, or a light foam
A small warning: do not let anyone over-thin the ends. A shag should move. It should not look chopped to bits.
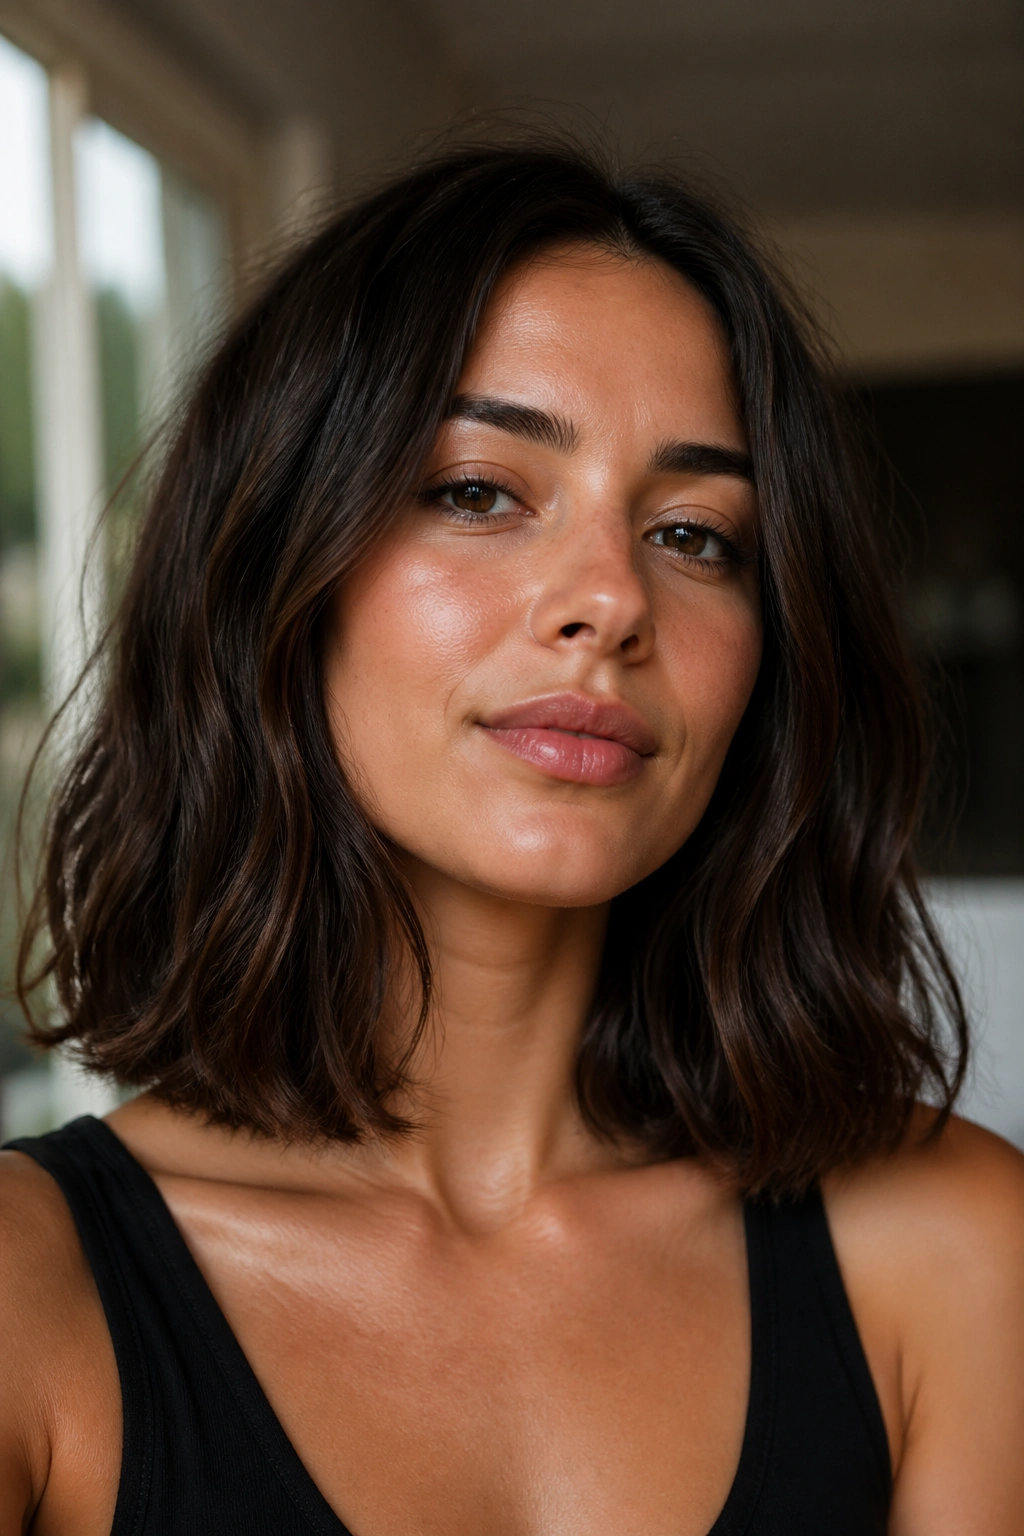
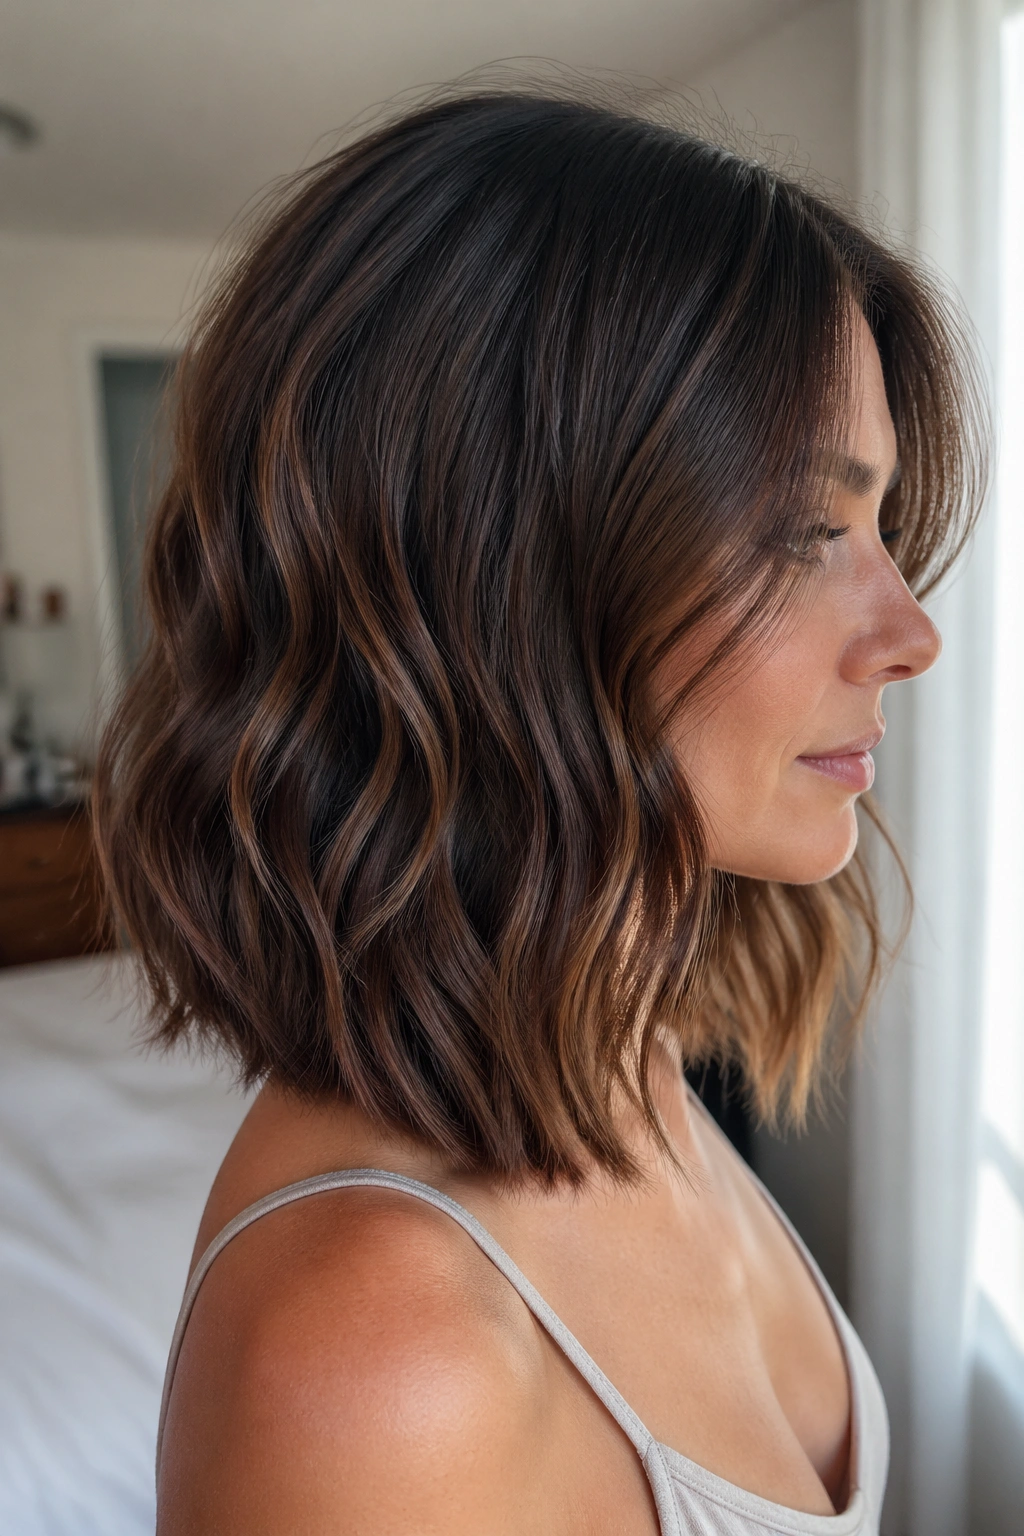
3. The Collarbone Lob With Invisible Layers
What if you want thick wavy hair to look cleaner, not bigger? The collarbone lob is the answer I keep coming back to. It sits in that sweet spot where the hair is long enough to show off the wave, but short enough to keep the weight from pulling everything flat.
Invisible layers are what make this cut worth wearing. They sit under the top layer, so the shape gets lighter without looking shaggy or overdone. That’s especially useful if your waves are broad and loose rather than tight and springy. The outer line still looks smooth, but the inside has enough give to stop the helmet effect.
This cut is a good one for people who like easy mornings. A bit of leave-in conditioner, a diffuse-dry, and you’re done. If you blow-dry it straight, it still has a nice bend at the ends, which means the haircut keeps working even when you’re not in the mood to style it.
One thing I like here: it looks polished with a side tuck. Very little effort. Very decent payoff.
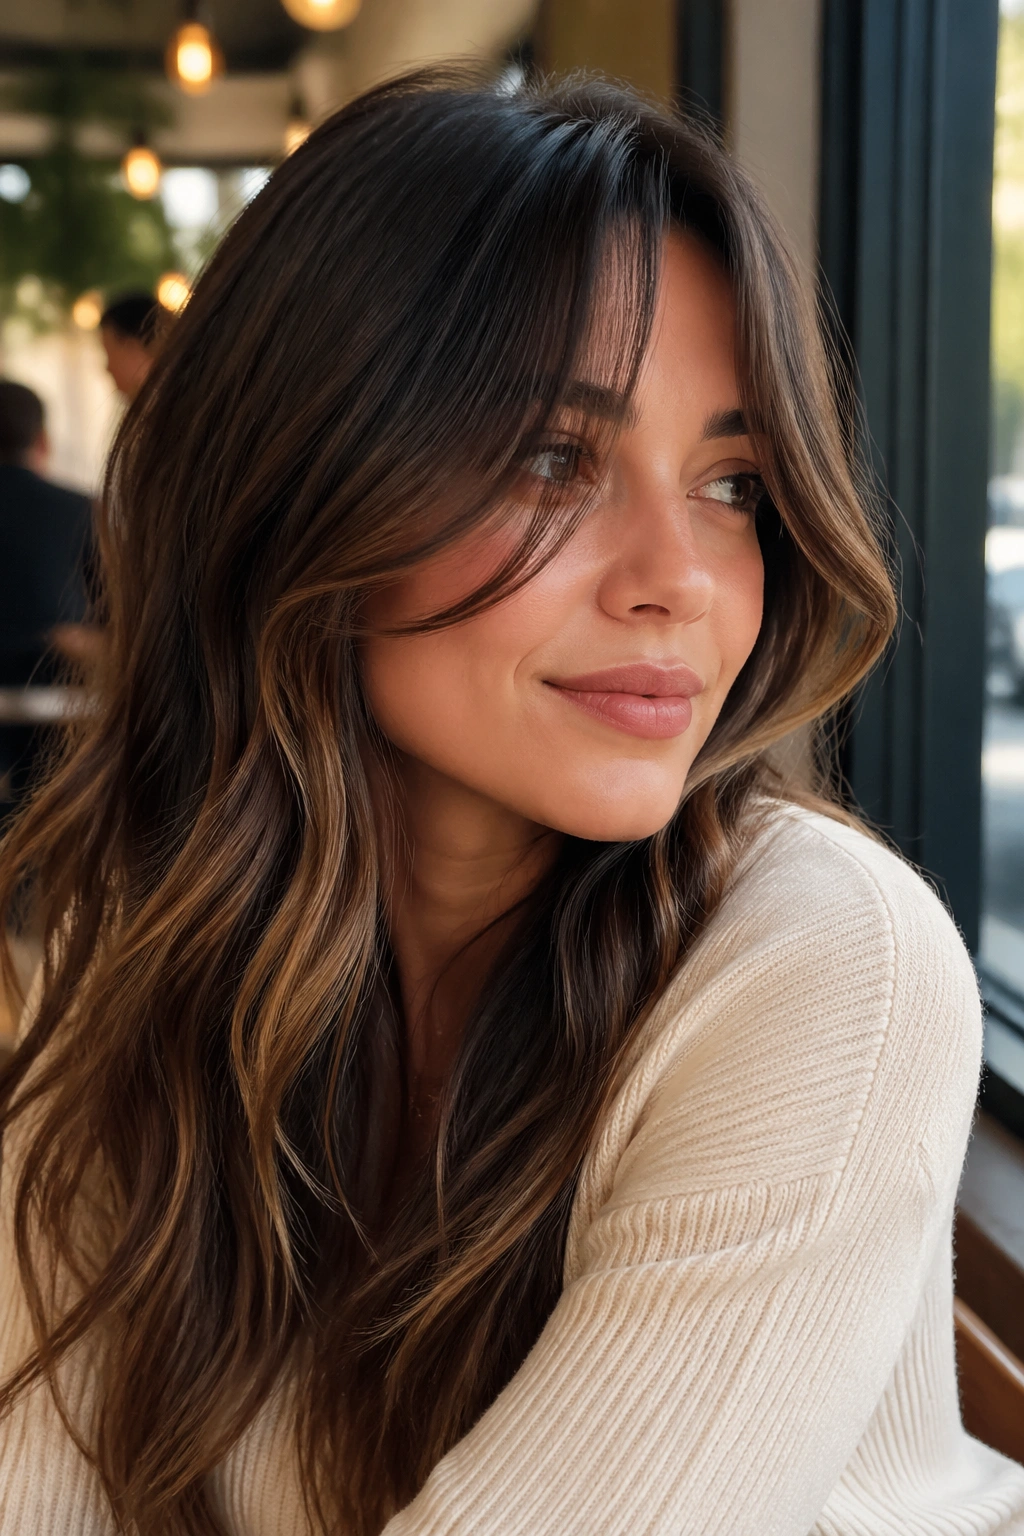
4. Curtain Bangs With Face-Framing Pieces
Curtain bangs can be a gift on thick wavy hair, but only if they’re cut with a little restraint. Too short, and they balloon. Too blunt, and they fight the rest of the hair. The better version lands around the cheekbones, sweeps open near the brows, and blends into longer face-framing pieces around the jaw.
The reason they work is simple. Thick wavy hair needs a front section that softens the face without adding a block of extra mass right across the forehead. Curtain bangs do that. They create movement around the eyes and cheekbones, and they grow out more gracefully than a straight fringe.
How to Keep Them From Splitting Weirdly
Blow-dry them right after washing, even if the rest of the hair air-dries. Use a round brush or a large roller and push the bangs away from the face, then let them cool in that shape. A pea-sized amount of styling cream is enough; anything heavier turns them stringy.
If your waves are strong, ask for the center of the fringe to stay a little longer. That one detail keeps the bangs from bouncing up too high and gives you more room to play.
5. The Half-Up Knot That Keeps the Crown Lifted
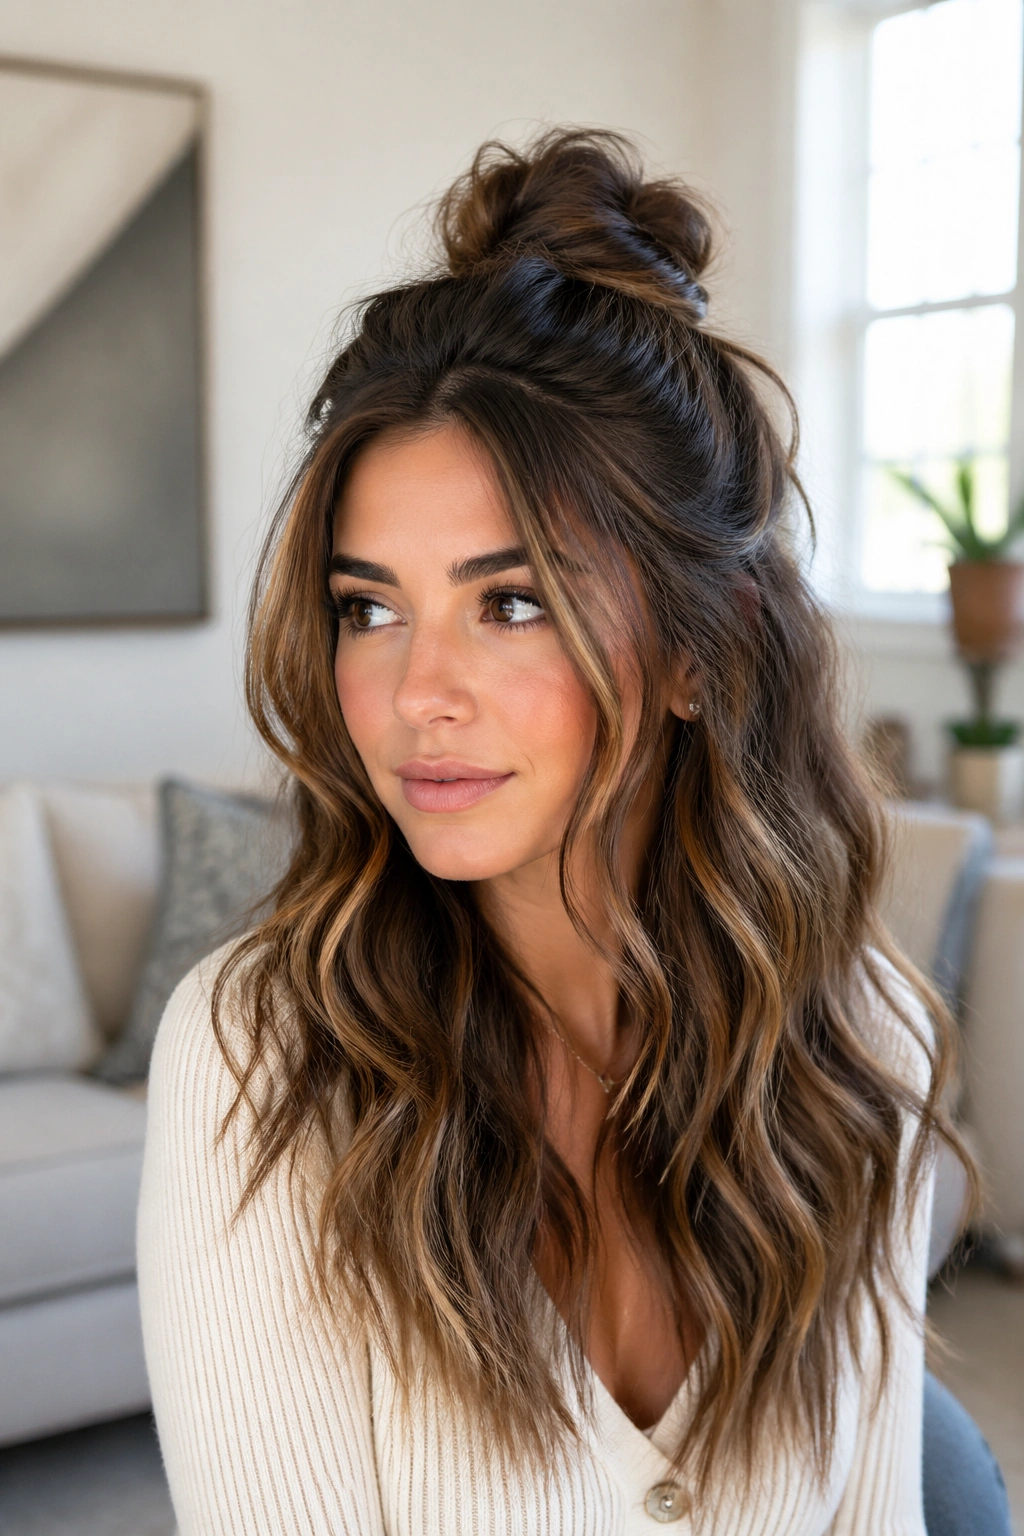
A flat crown can make thick wavy hair look heavier than it is. A half-up knot fixes that without taking away the length you probably want to show off. It’s one of those styles that feels casual but still looks like you meant it.
Take the top third of the hair, from temple to temple, and gather it loosely at the crown. Twist once, maybe twice, then pin or tie it into a knot that sits slightly high rather than low. The point is lift. If the knot is pulled too tight, the wave loses its softness. If it sits too low, the whole style collapses into the back of the head.
This is a good move when your ends still look decent but the roots have gone a little sleepy. Day-two hair? Perfect. Day-three? Still workable if you mist the lengths with water and a little leave-in first.
A few face pieces help. Not wisps. Real pieces. Leave them out, bend them once with a flat iron if they need help, and the whole thing looks less school-photo and more relaxed.
6. The Low Messy Bun With a Loose Wave Halo
The bun should feel soft, not shellacked. That’s the whole appeal here. Thick wavy hair makes a low bun look fuller than fine hair ever could, so you don’t need padding or a donut unless you want a very formal shape.
Gather the hair at the nape, but do not brush it into a smooth sheet. Keep the wave texture visible. Twist the length into a loose coil, then pin it in a loose circle or tuck it through itself once and secure it with two or three pins. The ends can hide or peek out a little. Either is fine.
A few face-framing pieces keep it from looking too severe. I like a gentle bend around the cheekbone and a softer one near the jaw. That’s enough. Anything more starts to feel fussy.
This style is also forgiving. If one side sits lower, good. If a little texture spray makes the top piece rough, also good. The charm is in the looseness, not in precision.
7. The Claw-Clip Twist That Works on Day-Two Hair
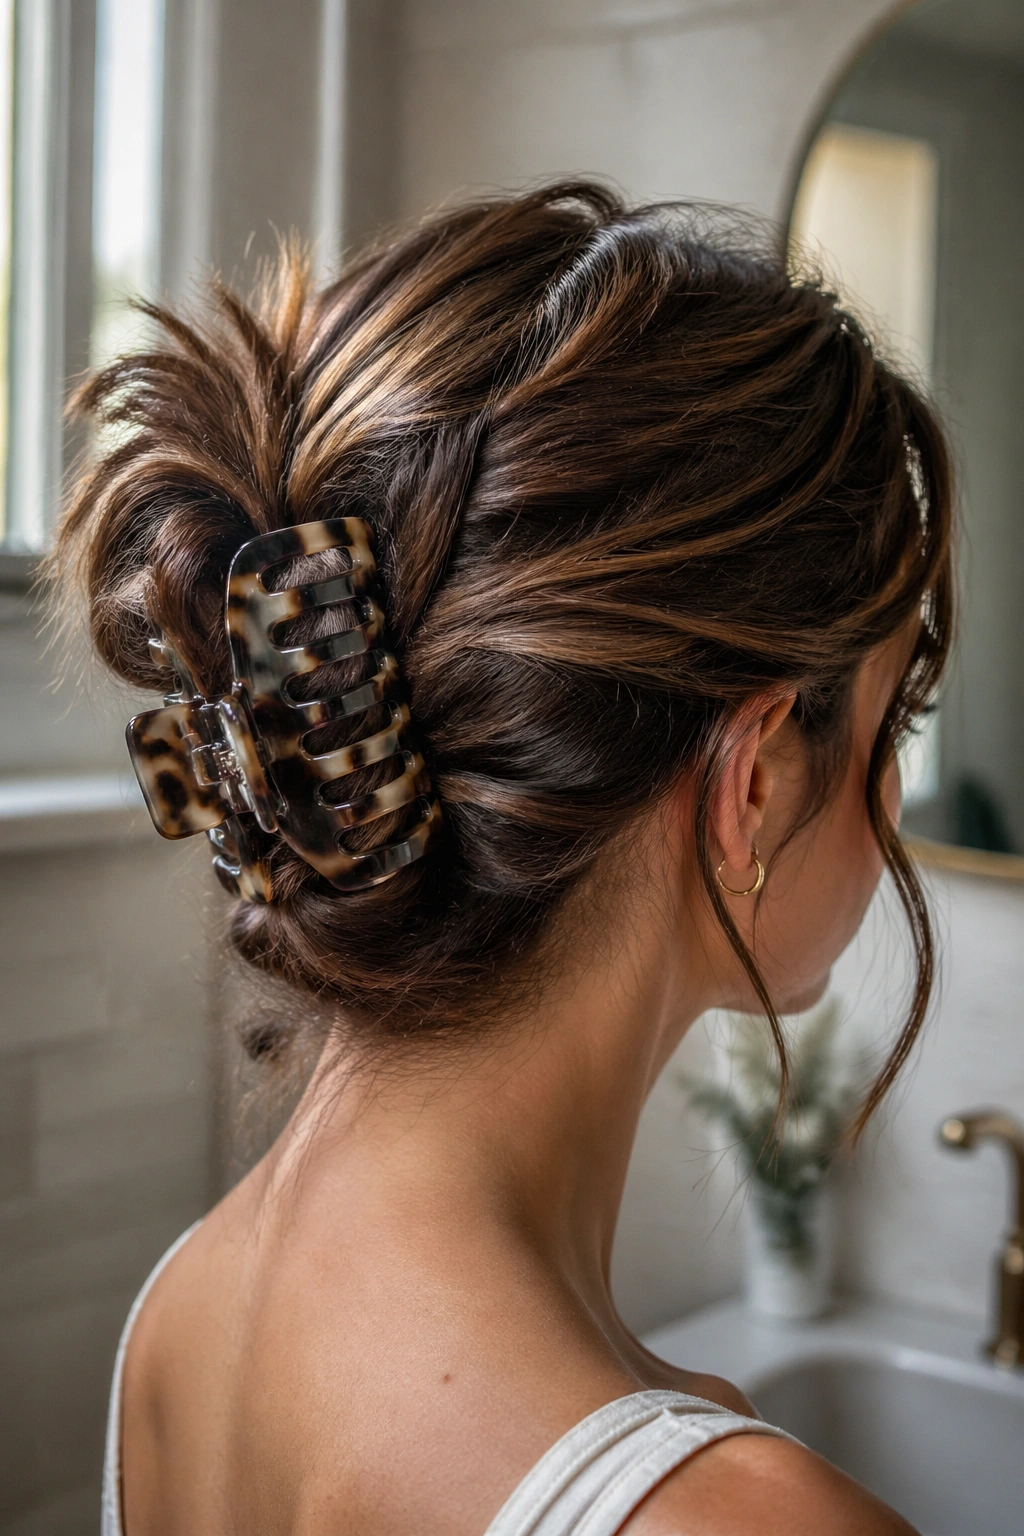
Thick wavy hair was made for a big claw clip. Small clips snap, slide, or leave a red line in the middle of the afternoon. A wider clip with strong teeth can hold a serious amount of hair, which means you can get the style up fast and still have it stay put.
What to Look For in the Clip
Choose a clip with teeth that are spaced far enough apart to grab a lot of hair at once. Matte plastic tends to grip better than slick, shiny material. A curved shape helps because it follows the shape of the head instead of sitting awkwardly on top like a toy.
To style it, twist the hair upward from the nape, fold the length once, and clip it so the ends either fan out slightly or tuck under. The twist should feel secure without being painful. If you need to yank the clip shut, it’s too small.
This is the style I reach for when the hair is too textured to go fully sleek but too messy to leave down. It looks casual in a good way. Like you have other things to do. Which, frankly, is the point.
8. The Side Braid With Pulled-Out Texture
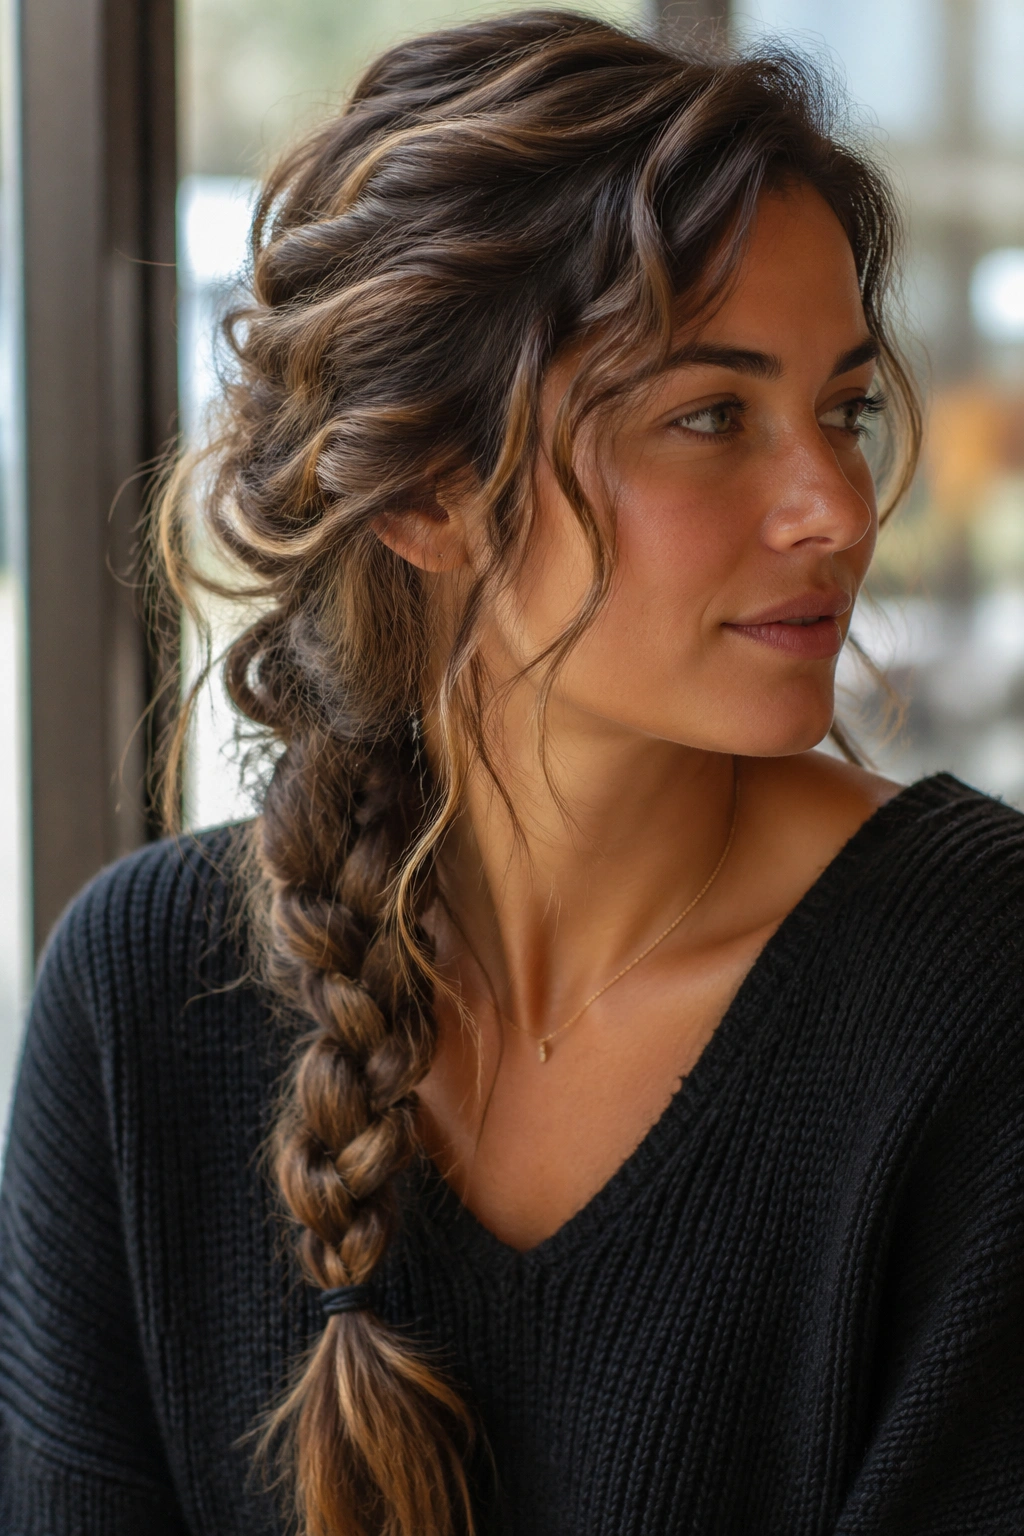
Why does a side braid look better on thick wavy hair than on fine hair? Because the braid actually has something to work with. The density fills it out, and the natural wave keeps the braid from looking too neat or too flat. That little bit of roughness is what makes it feel modern.
Start the braid low, near one temple or just behind the ear. A loose three-strand braid is fine, but a fishtail gives more detail if your hair is long enough. Keep the braid soft as you go. Then go back and gently pull at the edges of each section to widen it. Not too much. You want texture, not unraveling.
How to Keep It Soft
Use a little dry shampoo or texture spray at the roots before braiding if the hair is slippery. If the lengths are freshly washed, a touch of mousse helps the braid hold shape better. A clear elastic at the end works, or a tiny wrapped strand if you want a cleaner finish.
This is one of those styles that can go from errands to dinner without much change. Tighten it a little and it gets neater. Pull it apart and it gets softer. That’s a useful range.
9. The Braided Crown for Full, Romantic Volume
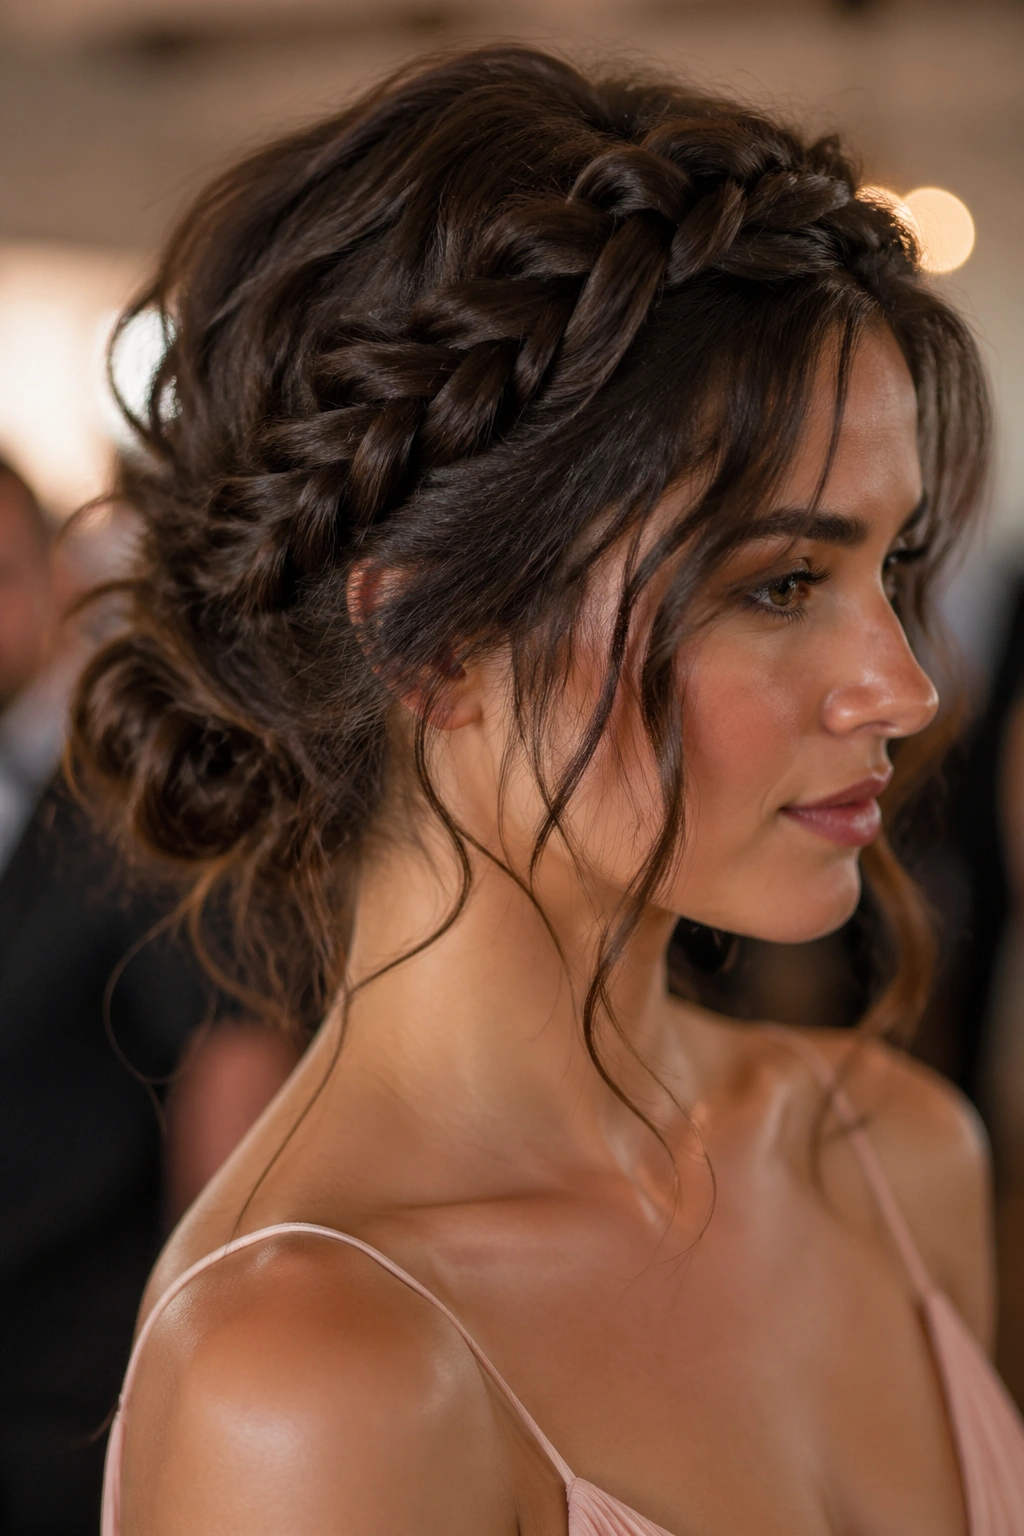
If you have ever thought your hair was too thick for a delicate braid, try a braided crown. The volume actually helps. It gives the braid enough body to sit around the head without disappearing into the rest of the hair.
A braided crown usually works best as two braids that meet in back, though one wraparound braid can also do the job. The shape matters more than the exact method. You want the braid to sit like a frame, not a helmet. That means keeping the braid slightly loose at the edges and pinning it in a way that lets the wave underneath stay visible.
It’s a good style for events, but I like it just as much on regular days when the hair feels too loose and unruly to leave down. It makes the whole head feel controlled without sacrificing texture.
A few hidden pins are your friend here. One at each meeting point. Maybe two if your hair is heavy. Use pins that match your hair color and press them in flat so they disappear.
10. The High Ponytail With a Wrapped Base
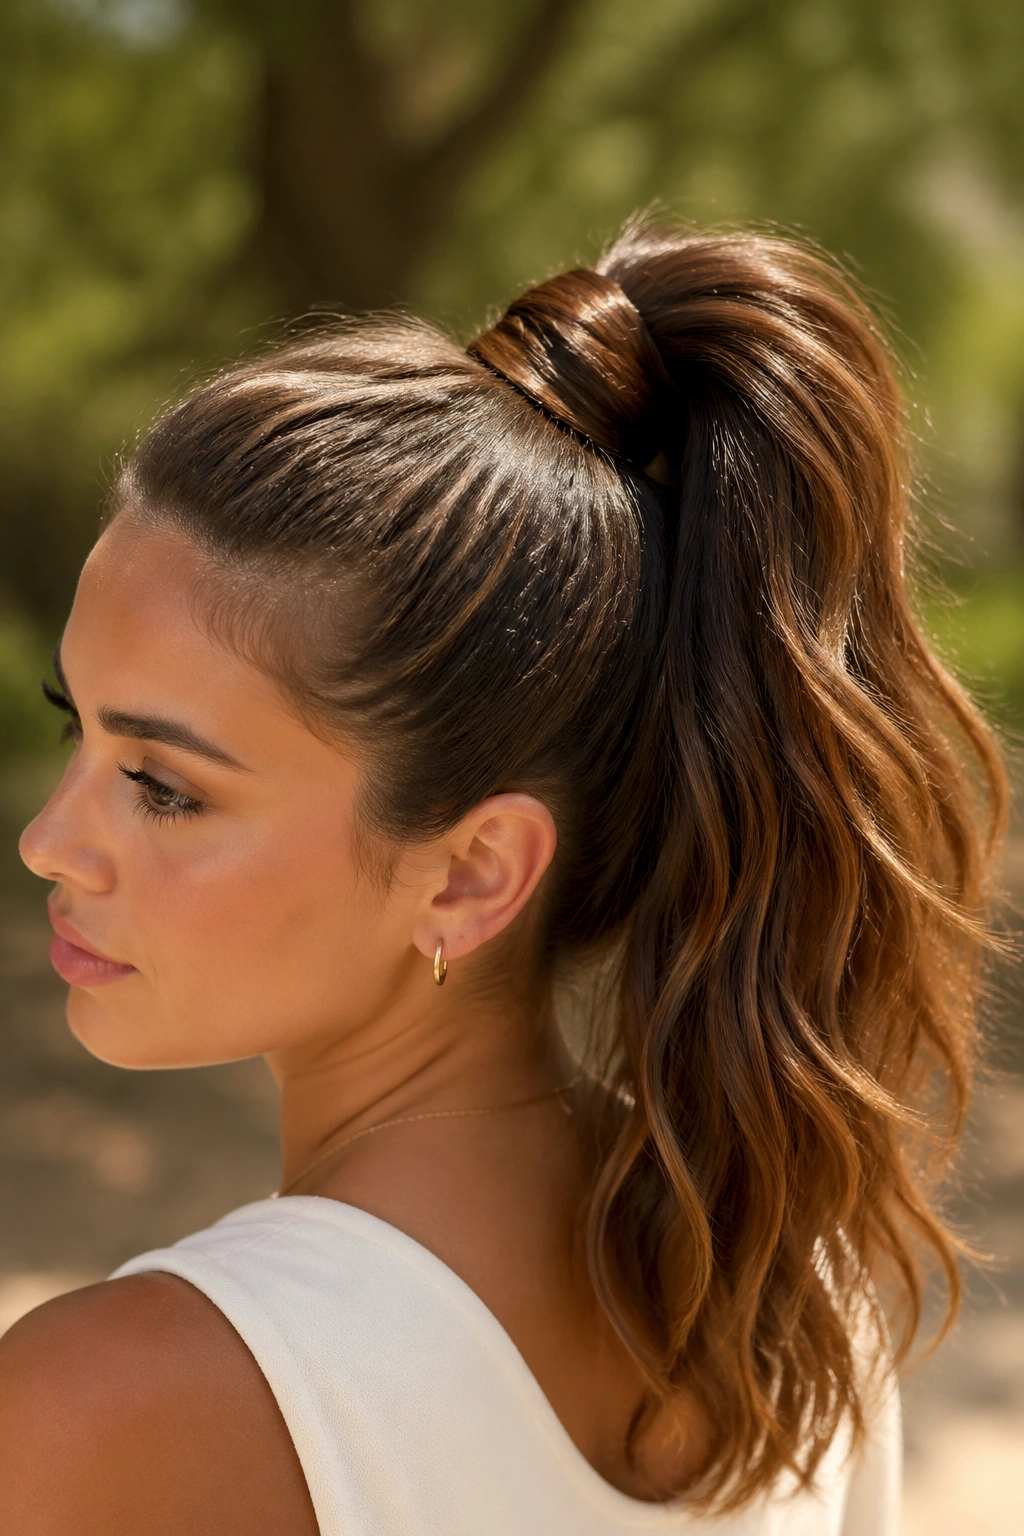
A high ponytail on thick wavy hair has a lot of presence. It lifts the face, shows off the wave in the tail, and keeps the silhouette clean at the neckline. The one thing you need to watch is weight. Thick hair can drag a ponytail down if you don’t anchor it well.
Split the ponytail into two ties if your hair is dense. One elastic at the base, another one an inch below it, and suddenly the style stays higher and feels much more secure. Wrap a small strand around the elastic at the top for a finished look. It takes twenty seconds and changes the whole thing.
This style works because the texture in the ponytail does the visual work for you. You do not need to curl every inch. Often the natural wave is enough. If the ends are a little flat, bend just the bottom six inches with a curling iron and stop there.
The front can stay soft. You don’t need the slicked-back pageant version unless that’s your taste. A brushed crown and a few loose pieces at the temples keep it from looking severe.
11. The Wolf Cut for Thick Wavy Hair
The wolf cut is the one people ask about when they want something with edge but don’t want to lose their hair’s natural bounce. It’s a mix of short crown layers and a longer perimeter, and on thick wavy hair that contrast can look sharp in a good way.
Who It Suits
It suits dense waves that need shape around the top and sides. It also suits people who don’t want to spend a lot of time forcing the hair into a polished finish. The cut already carries some attitude. You’re not supposed to smooth it into submission.
Ask for soft texture, not extreme thinning. That part matters. A wolf cut should remove bulk through layering, not leave the ends wispy and weak. The top layers should lift the crown, while the lower sections stay long enough to keep the outline solid.
- Good if your hair swells at the sides
- Good if you like an undone finish
- Less good if you want a neat, classic shape
- Needs a stylist who understands wavy density, not just straight hair
A diffuser helps, but air-drying with a bit of foam can work too. The cut does a lot of the work. That’s the appeal.
12. The Butterfly Cut for Shape Without Losing Length
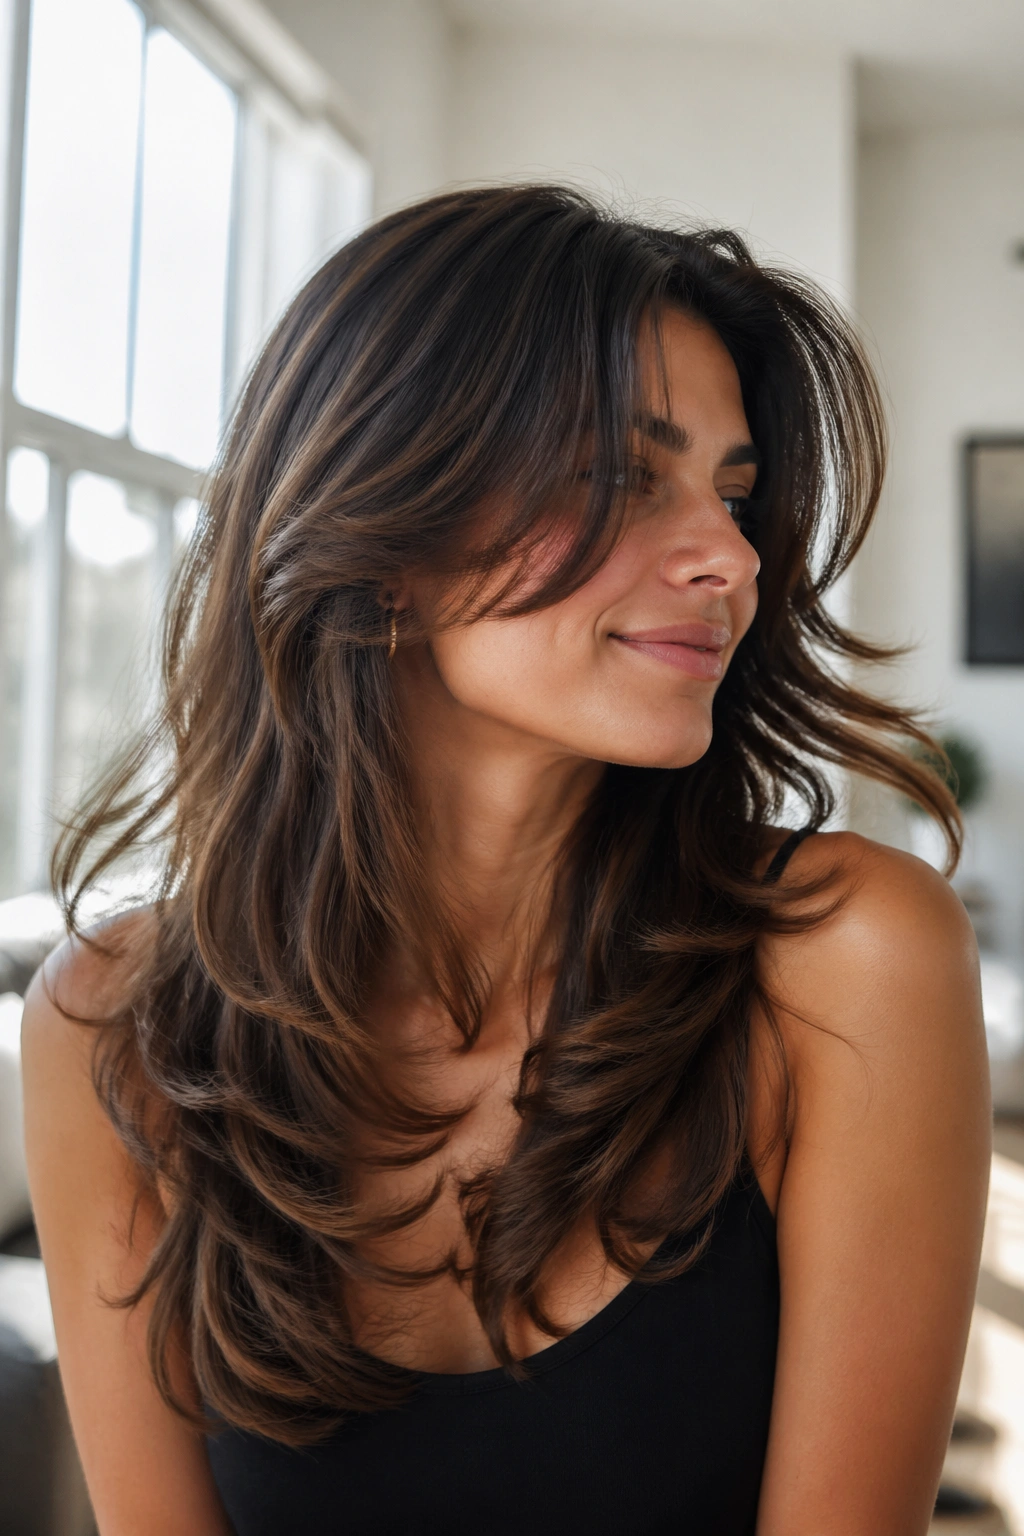
The butterfly cut is the friendliest way to get movement without giving up the long line. On thick wavy hair, that matters. You get face-framing layers that lift around the cheekbones and shoulders, while the rest of the length stays intact and usable for ponytails, braids, or half-up styles.
The difference between this and a more obvious layered cut is where the lift happens. The shortest layers sit near the front and top, creating that floating effect. The lower length stays long, so the hair still looks full from the back. It’s a smart cut if you’re attached to your length but tired of it feeling heavy.
Styling Trick
Round-brush only the top layer and the front pieces. Leave the lower lengths alone or loosely wave them with a 1.25-inch iron. That gives you bounce without making the whole head look overstyled. The top layers should move when you turn your head. That’s the sweet spot.
This cut is also kinder to grow-out. The shape stays readable for months without needing constant cleanup.
13. The Deep Side Part With Glossy Waves
A deep side part can change the whole mood of thick wavy hair in under a minute. It shifts the volume, creates lift at the root, and makes the hair fall in a way that feels more dressed up than a center part. Sometimes that’s all a style needs.
Use a tail comb to move the part about two to three inches from where you normally wear it. Then smooth the top with a small amount of cream or serum, and let the rest of the wave do its own thing. If one side falls over the cheek, tuck it behind the ear and pin it under the hair for a little asymmetry.
This works especially well when the wave pattern is strong enough to hold a soft curve through the lengths. You do not need a tight curl here. A loose, glossy bend is cleaner and usually more flattering on thick texture.
I like this when the hair feels a little too familiar and you want a fast change without a haircut. A part shift is not dramatic in theory, but on the head it can feel like a fresh start. Strange how something so small changes the whole face.
14. The Slicked-Back Top With Soft Ends
You do not need a fully slicked look to get polish. Thick wavy hair actually handles this style well because the length and weight keep the ends from sticking out like they might on finer hair. The trick is to keep the top controlled and let the lower half stay soft.
Apply gel or a strong cream only to the top two inches and around the hairline. Brush the crown back with a soft bristle brush, then stop before the product spreads too far down the length. If you slick everything, the waves lose their shape and the style goes from chic to wet-head fast.
How to Keep It From Looking Greasy
Start on damp hair. Dry hair drinks product in a patchy way, which makes the top look stringy. Use less than you think you need, and smooth in thin layers rather than dumping a big blob at once. A little shine spray on the ends can help balance the matte top.
This one is good when you want strong face shape and clean lines. It is also good on second- or third-day hair. That texture gives the slicked area something to grip.
15. The Waterfall Braid Over Loose Waves
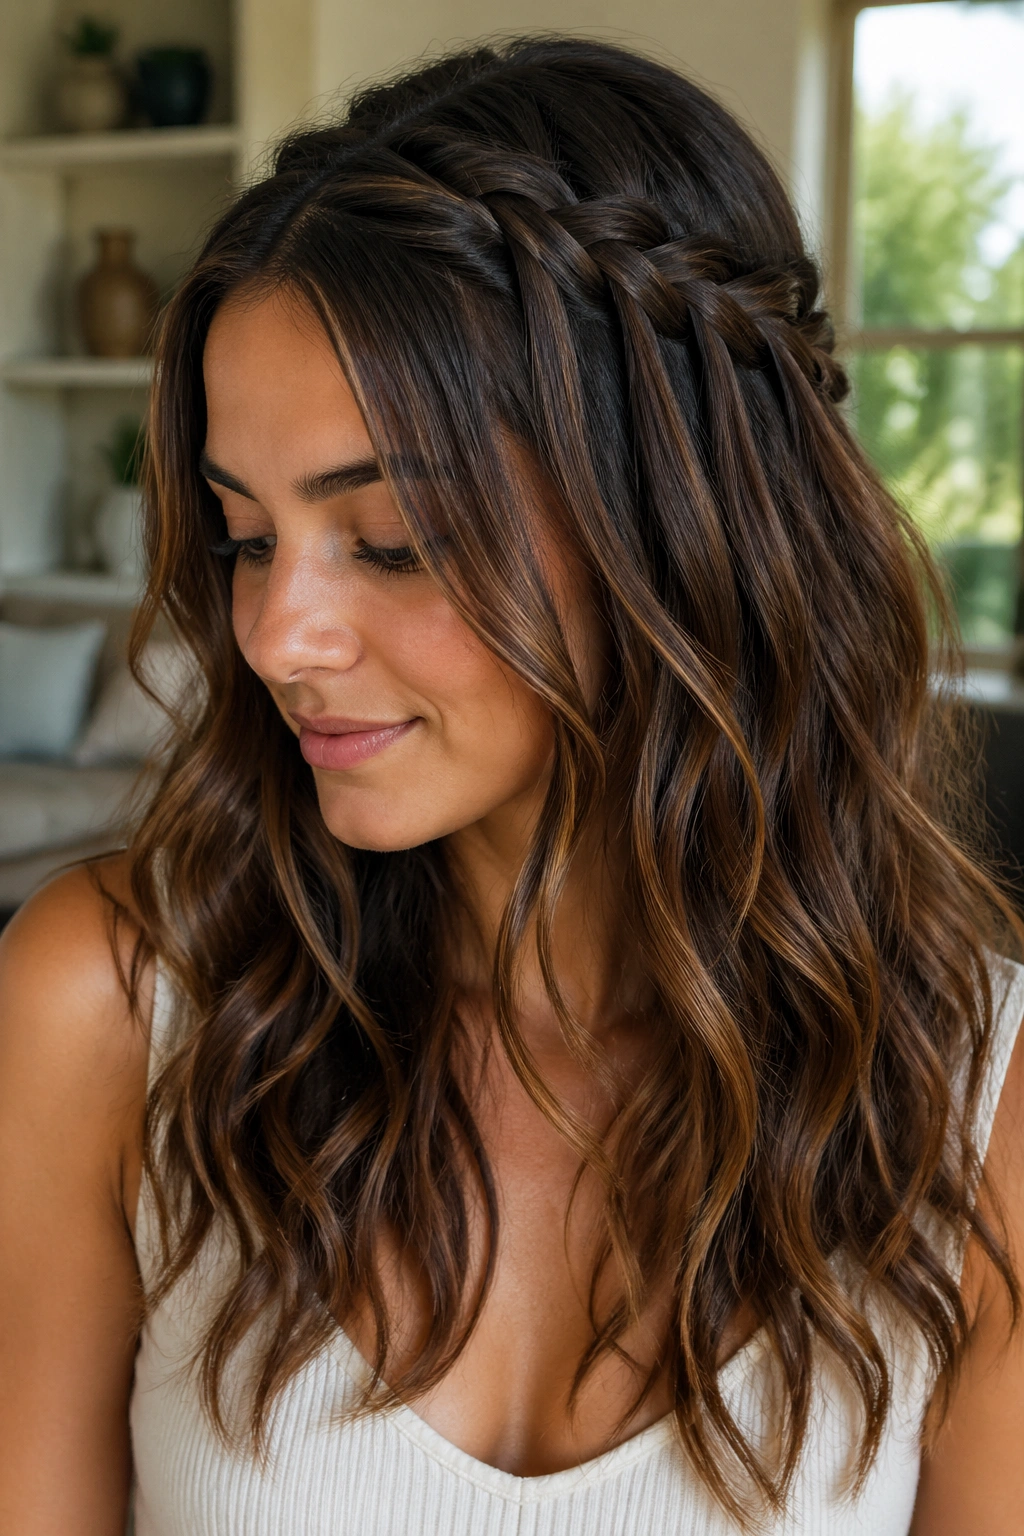
A waterfall braid is the kind of detail that looks much harder than it is. On thick wavy hair, the loose texture underneath gives the braid a place to sit, so the whole thing feels full and romantic instead of tiny and nervous.
Start the braid at one temple and work it across the head, dropping one section each time you cross a strand over. That drop is what creates the waterfall effect. The hanging pieces blend into the rest of the wave, which makes the braid feel built into the style rather than layered on top.
This is a nice choice when you want one side to be interesting and the rest to stay loose. It’s also one of the better braid styles for people with dense hair, because the body of the waves keeps the braid from disappearing.
A small curl at the ends can help if your pattern goes flat near the bottom. But if the natural wave is strong, leave it alone. The braid already gives the hair enough structure.
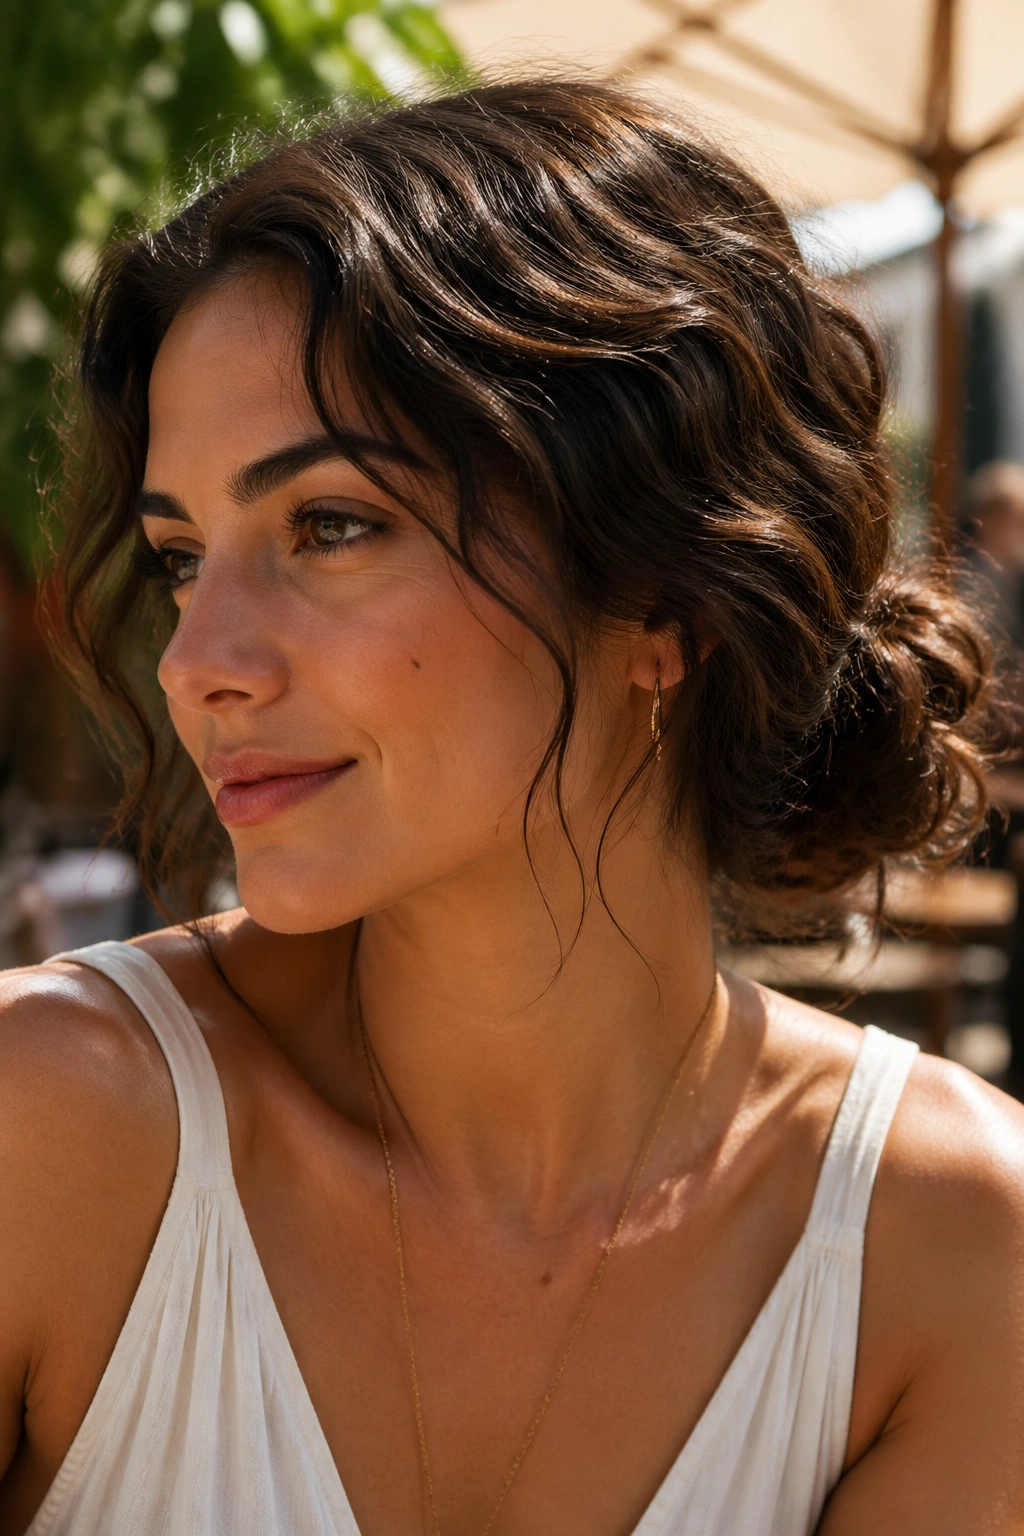
16. The Low Chignon With a Polished Finish
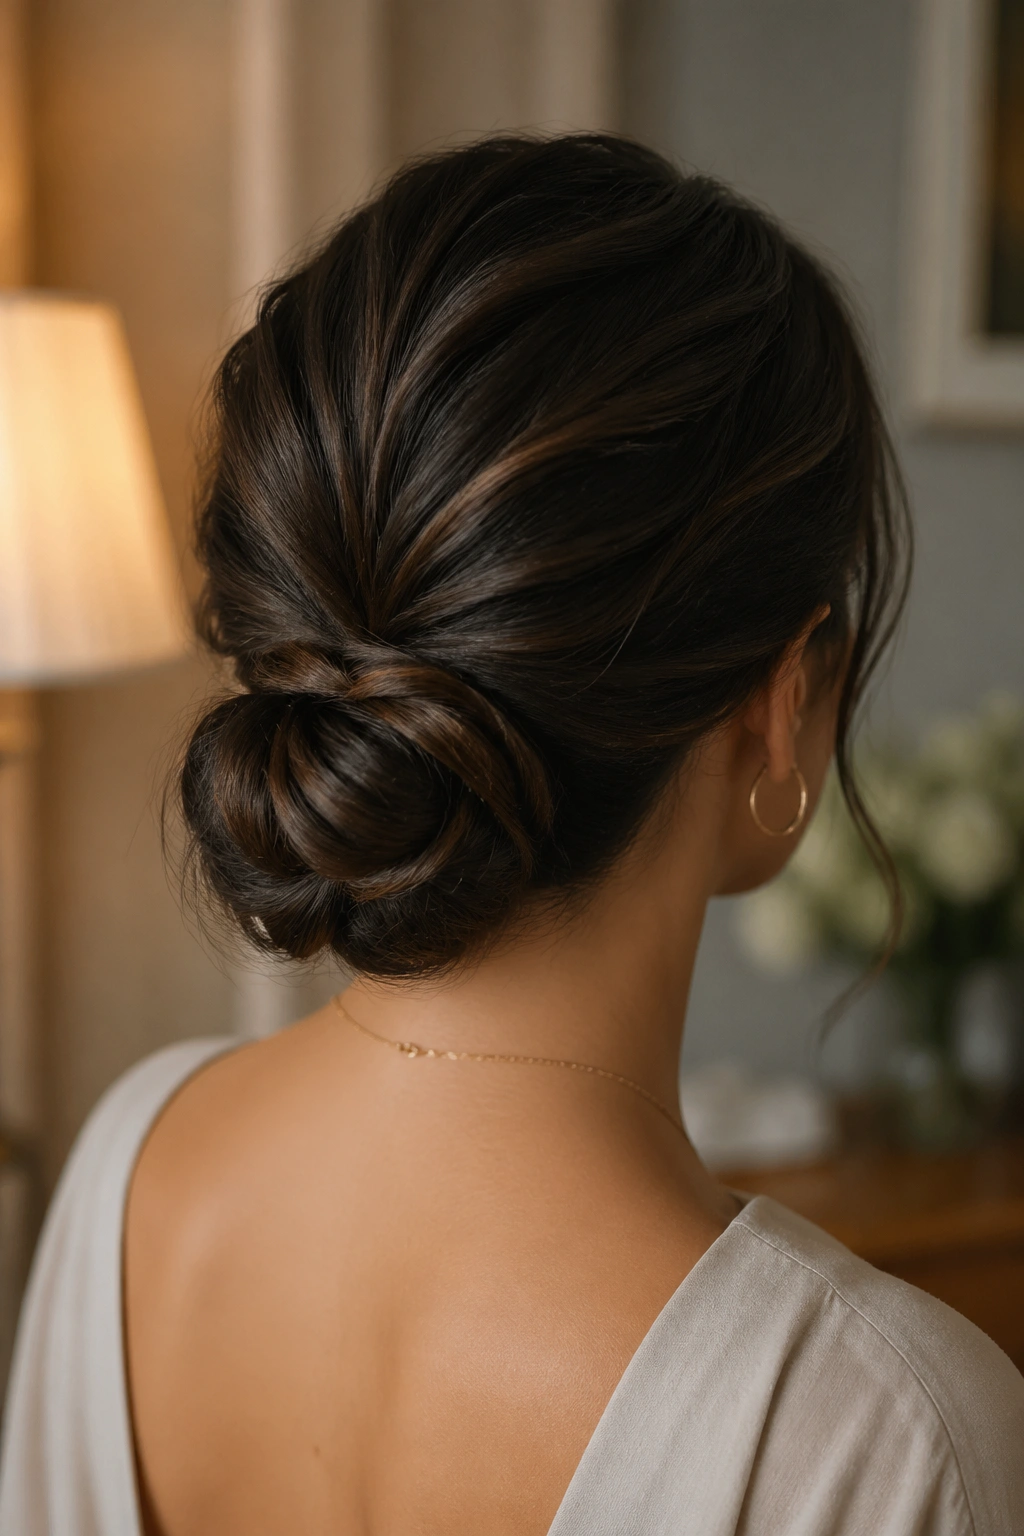
Can thick wavy hair look sleek without turning into a helmet? Yes. A low chignon is the proof. It keeps the shape close to the neck, uses the hair’s natural thickness to build a full knot, and still leaves room for a smooth top if that’s the look you want.
Brush the front and sides back with a little balm or cream. Gather the hair low, twist it into a bun, and fold the length under itself so the shape sits compact. Pin it in a crisscross pattern. That holds heavy hair better than a single pin line, which can slip halfway through the evening.
A chignon does not have to be severe. Leave a tiny bit of softness at the temples if you want the face to look less formal. The bun itself can stay neat while the rest of the head keeps a bit of texture.
This is one of the better styles for events where you want the hair under control but not stiff. It also photographs well from the back because thick wavy hair gives the chignon a fuller shape than fine hair can manage.
17. The Shoulder-Length Blunt Cut With Soft Ends
Lots of people assume thick wavy hair needs layers. Sometimes it does. Sometimes the smarter move is a blunt edge at the shoulders. A strong perimeter keeps the shape clean and stops the sides from exploding outward in that wide, heavy way that can happen with too many layers.
The key is softness at the very ends, not through the whole cut. A tiny bit of point-cutting or internal shaping keeps the line from looking like a block, but the outer shape should still feel solid. That contrast is what gives this cut its polish.
This style is a favorite when you want the hair to look full and expensive without a lot of styling effort. Air-dry it with a small amount of cream, or blow-dry with a paddle brush for a smoother edge. The result is strong either way.
It’s not the right cut if you crave a lot of top movement. But if you want the wave to sit in a neat, shoulder-length frame, it’s hard to beat.
18. The Long Mermaid Waves With Barely There Layers
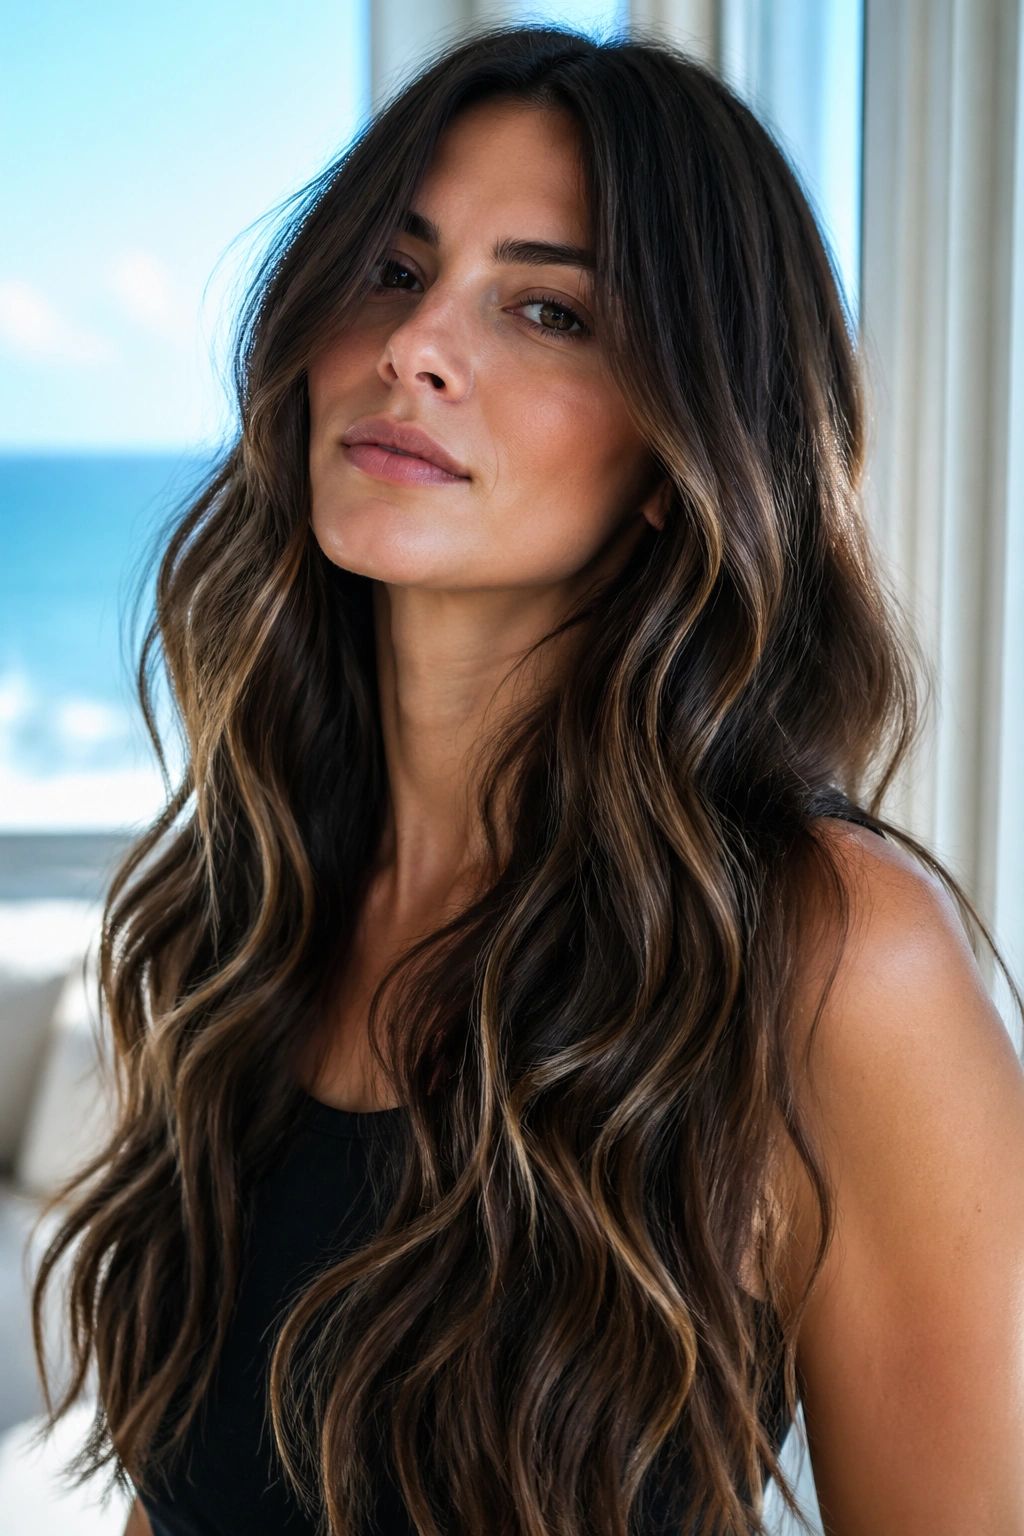
Think glossy bends, not crunchy curls. Long mermaid waves work well on thick wavy hair because the fullness supports the length instead of dragging it down. The style looks especially good when the layers are nearly invisible and the wave pattern stays loose and flowing.
Use a 1.25-inch or 1.5-inch iron if you’re curling, and switch direction every few sections so the waves don’t all fold the same way. If you prefer heatless styling, twist damp hair into loose ropes and let it dry fully before undoing them. Either route gives you that long, fluid shape without chopping away the density.
How to Get the Bend to Last
Let each section cool in your hand or against a clip before brushing it out. That small pause matters more than people think. Warm hair forgets shape fast. Cool hair holds it.
A drop of serum on the very ends helps the wave look smooth. Keep it away from the roots unless your hair loves weight. A heavy hand here can turn the whole look limp by lunchtime, which would be a shame.
This style is gorgeous when you want hair that moves on its own. Not stiff. Not overworked. Just long, shiny, and full of bend.
19. The Pinned-Back Front Sections With Open Length

Sometimes the smartest move is to leave most of the hair alone and deal only with the front. Pinned-back sections clear the face, add a tiny lift at the temples, and let thick wavy hair keep doing its own thing through the lengths. Simple. Useful. Better than messing with the whole head when you don’t have to.
Take a section from each temple, twist it once, and pin it behind the ear or just above it. You can use decorative clips if you want the pins to show, or plain bobby pins if you want the hair to do all the talking. Cross the pins if the hair is heavy; that stops the twist from slipping out.
- Pull the section from just above the eyebrow arch
- Keep the twist loose so the wave stays visible
- Pin into hair, not just the outer surface
- Use two pins per side if the hair is thick
This is a nice style for days when your hair is good but your face wants more space. That’s a real thing, by the way. Not every style needs to be a full production.
20. The Bubble Ponytail for Extra Thickness

What if you want a ponytail that looks intentional, not rushed? The bubble ponytail handles thick wavy hair better than people expect. Each section has enough volume to puff out into a clean round shape, and the wave texture gives the bubbles a little movement instead of a stiff, plastic look.
Gather the hair into a ponytail and secure it tightly at the base. Then add small elastics every two to three inches down the length, gently tugging each section outward to create the bubble. The gaps between the elastics should stay even, or the shape starts to wobble. That detail matters more than it sounds like it should.
A wrap of hair around the base cleans it up fast. I’d do that almost every time unless you’re after a sporty look. It takes the style from practical to finished with almost no effort.
This one is especially useful when the ends are a little rough but the length still looks good. The bubbles hide a lot. Handy.
21. The Twisted Half-Up Style With Volume at the Crown
This is the kind of style that makes thick wavy hair look soft without losing its shape. Two sections twist back from the temples, meet near the crown, and pin in place so the rest of the hair falls free. It gives you lift where you want it and leaves the wave in full view below.
A little volume at the roots helps. Tease the crown with a fine comb or push the section upward with your fingers before pinning. Don’t overdo it. You want shape, not a bump that looks borrowed from a costume box.
The twist itself should stay loose enough to show movement. If you pull it too tight, the top goes flat and the style loses the softness that makes it work. That’s the whole balancing act here.
This style is good when you want something more polished than leaving the hair down, but less formal than a full updo. It sits right in the middle, which is often where real life lives anyway.
22. The Tucked-Behind-Ears Lob With Airy Ends
Sometimes the chicest move is barely a move. A lob that lands around the collarbone or shoulder, tucked behind both ears, can look cleaner and sharper than a dozen more dramatic styles. On thick wavy hair, the tuck reveals the face, shows the wave line, and keeps the length from swallowing your features.
The ends should stay airy, not puffed out. A light cream, a quick bend at the bottom with a flat iron if needed, and a clean tuck behind the ears are enough. If the front wants to fall forward, use a tiny clip or a discreet pin just behind the ear to keep it in place.
I like this look because it works in real life. It’s tidy for work, easy for dinner, and not precious enough to feel fussy. Thick wavy hair can carry that kind of understated shape better than most textures, because the volume gives the lob presence even when the styling is minimal.
And honestly, that’s the charm of these hairstyles in general. The best ones do not fight the wave. They give it a better frame, a cleaner shape, or a smarter place to land. If your hair already has body, texture, and a bit of attitude, the right style just steers it a little.