There’s nothing quite like a bridesmaid who looks effortlessly polished from ceremony to reception, and a well-executed high ponytail can deliver exactly that. Whether your bridesmaids have sleek, straight hair or gorgeous waves, whether they’re rocking a minimalist aesthetic or going full drama, a high ponytail offers the perfect canvas for wedding-day elegance. The beauty of this style lies in its versatility—it keeps hair off the face (crucial for photos and dancing), shows off jewelry and dress necklines, and works across every hair type and length. Plus, it photographs beautifully, creating flattering lines that complement the face while maintaining that polished, unified bridesmaid look.
The challenge isn’t finding a high ponytail—it’s choosing the right one. A too-basic pony can feel underwhelming against a formal dress. A style that’s too trendy might feel dated in wedding photos five years down the line. What you really need is a high ponytail that’s elegant without being boring, on-trend without being gimmicky, and manageable enough that your bridesmaids can maintain it through a full day of celebrations. The styles below range from sleek and minimalist to romantic and textured, each designed to work beautifully in a wedding context. Many can be achieved by a professional stylist in under 20 minutes, and several can be adapted for varying hair lengths and textures. You’ll find options that work whether your bridesmaids are wearing their hair naturally, with extensions, or with added volume.
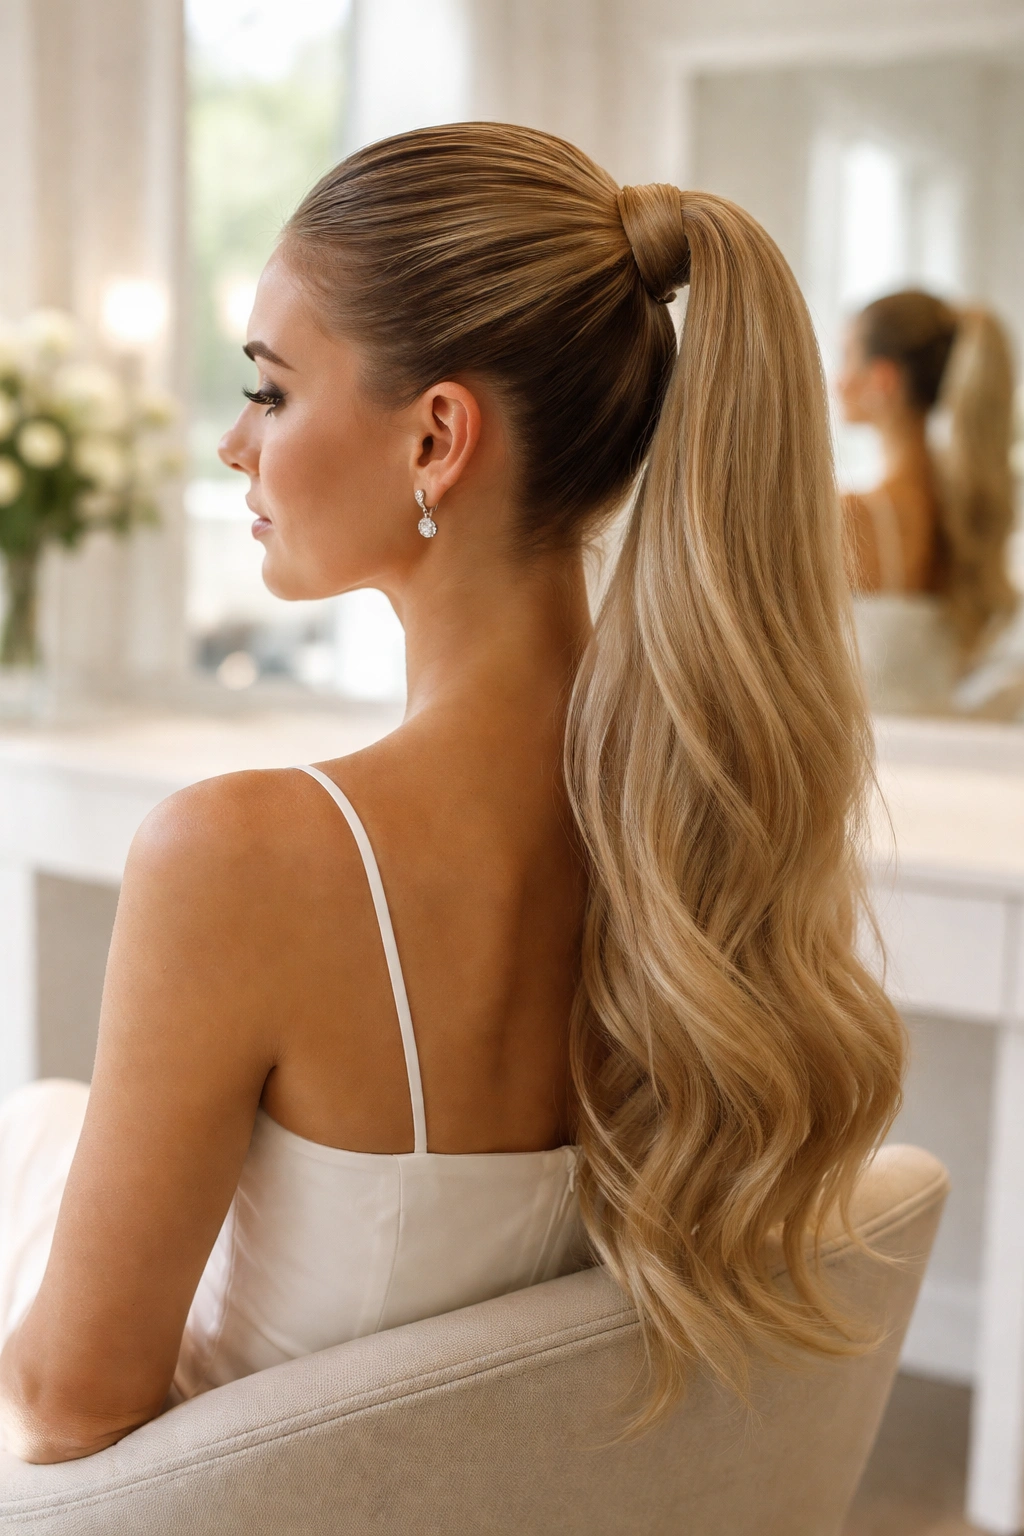
1. The Classic Sleek High Ponytail
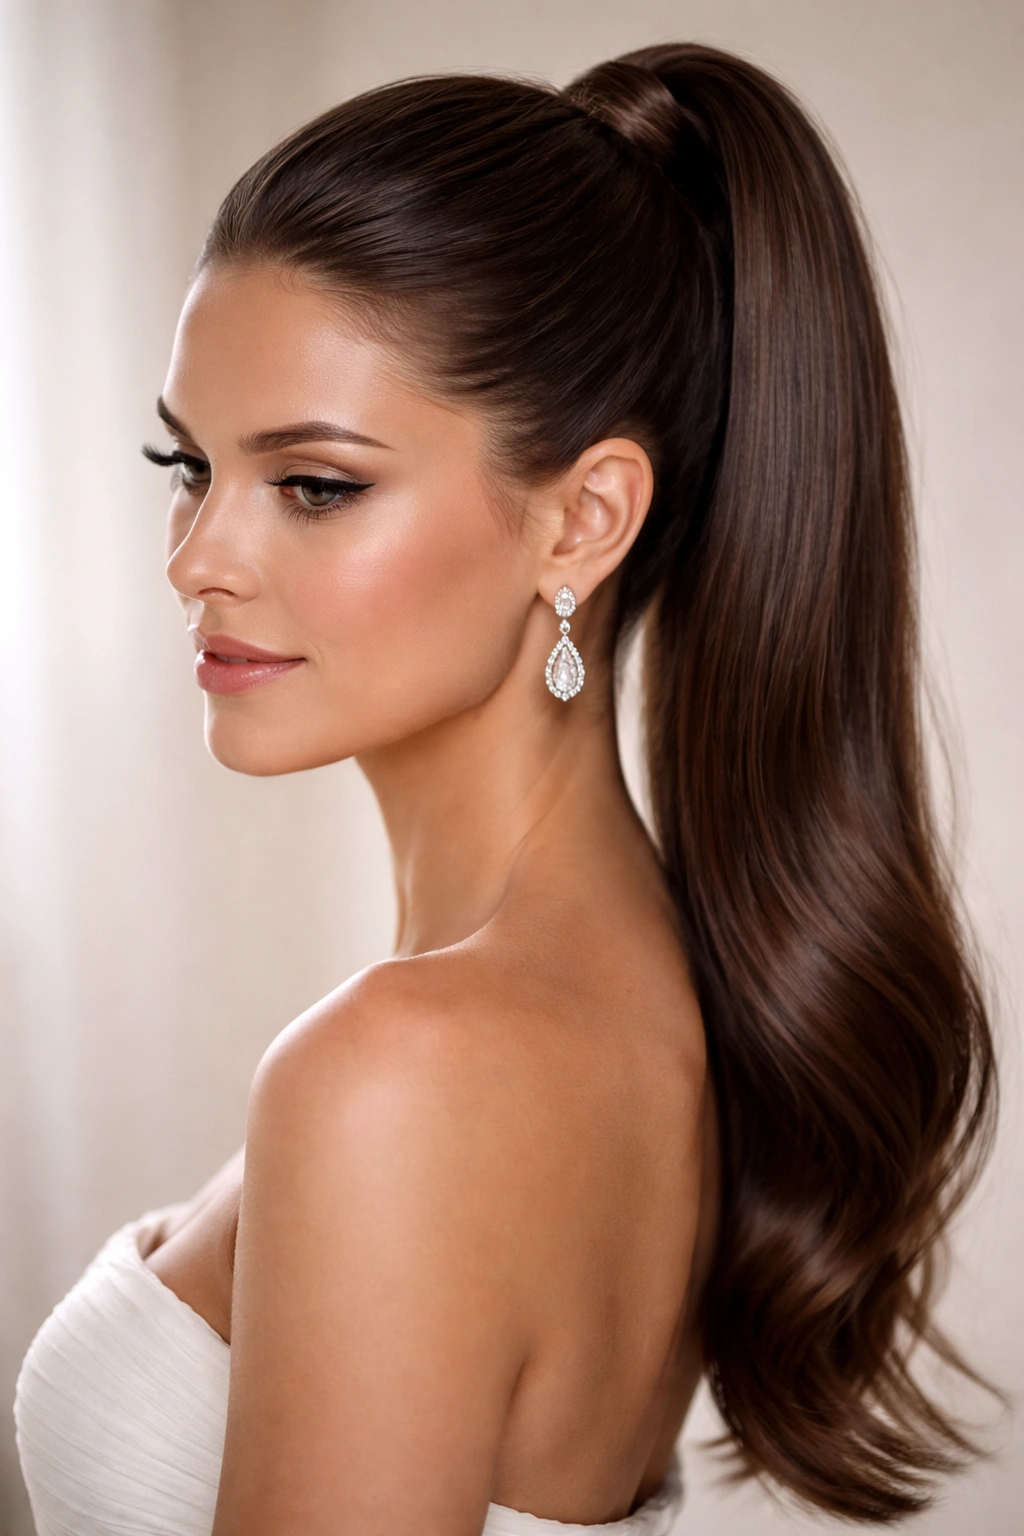
This is the foundation of bridesmaid elegance—a flawlessly smooth ponytail gathered high on the crown, with every hair in place and a mirror-finish polish. It’s the style that photographs like a dream, looks professional from every angle, and works across hair types when styled correctly. The key is creating a truly smooth base without bumps, flyaways, or texture inconsistencies that catch the light in unflattering ways.
Why It Works for Weddings
The sleek high ponytail is timeless precisely because it’s uncompromising about polish. It demands precision styling and a healthy dose of smoothing products, but that effort translates into photos where each bridesmaid looks intentional and coordinated. There’s no distraction—just clean lines and a focus on the face, jewelry, and dress. This style also keeps hair completely off the face, which is non-negotiable when you’re standing in formal photos and dancing close to other people all evening.
How to Perfect the Look
- Use a lightweight smoothing cream or serum on damp hair before blow-drying to create a gloss-like finish
- Blow-dry hair completely straight using a paddle brush, working section by section for maximum smoothness
- Apply a small amount of gel or smoothing balm to the hairline and top of the head to tame flyaways
- Gather hair high on the crown using a fine elastic (silk or coated elastics prevent breakage)
- Use a fine-tooth comb to smooth any remaining texture at the base of the ponytail
- Finish with a light hairspray that holds without creating a stiff, helmet-like effect
Pro tip: Have your stylist blow-dry each bridesmaid’s hair using the same technique and products the night before the wedding, if possible. This ensures consistency across the wedding party and gives everyone confidence that their hair will look exactly as intended on the day.
2. The Wrapped High Ponytail with Hidden Elastic
This is the sleek high ponytail’s more refined cousin—same smooth, polished base, but with a clever design detail that elevates it from simple to special. A small section of hair is wrapped around the elastic at the base of the ponytail, completely hiding the band and creating the illusion of hair cascading directly from the crown.
Why It Feels More Intentional
Hiding the elastic is a small detail that signals professional styling. It removes that visual break where the elastic sits, creating uninterrupted lines from the crown down the length of the ponytail. In photos, this reads as more refined and less casual, which is exactly the vibe for a formal wedding. The wrapped detail also frames the nape of the neck beautifully, which matters if your bridesmaids’ dresses have open backs or interesting neckline details.
How to Create the Wrapped Effect
- Gather the base ponytail as you would for a sleek style, using a clear or matching elastic
- Take a thin section of hair from the underside of the ponytail (about the width of a pencil)
- Wrap this section tightly around the elastic at the base, pinning as you go with bobby pins that match the hair color
- Smooth the wrapped section and secure the end with a tiny bobby pin tucked behind the ponytail
- Apply smoothing serum to catch the light and create a polished finish
- Set the entire style with a flexible-hold hairspray that prevents the wrapped section from loosening
Worth knowing: This detail requires a bit of practice, but any hairstylist can execute it in under two minutes once they understand the technique. Have them show your bridesmaids how to do a basic version themselves in case any touch-ups are needed throughout the day.
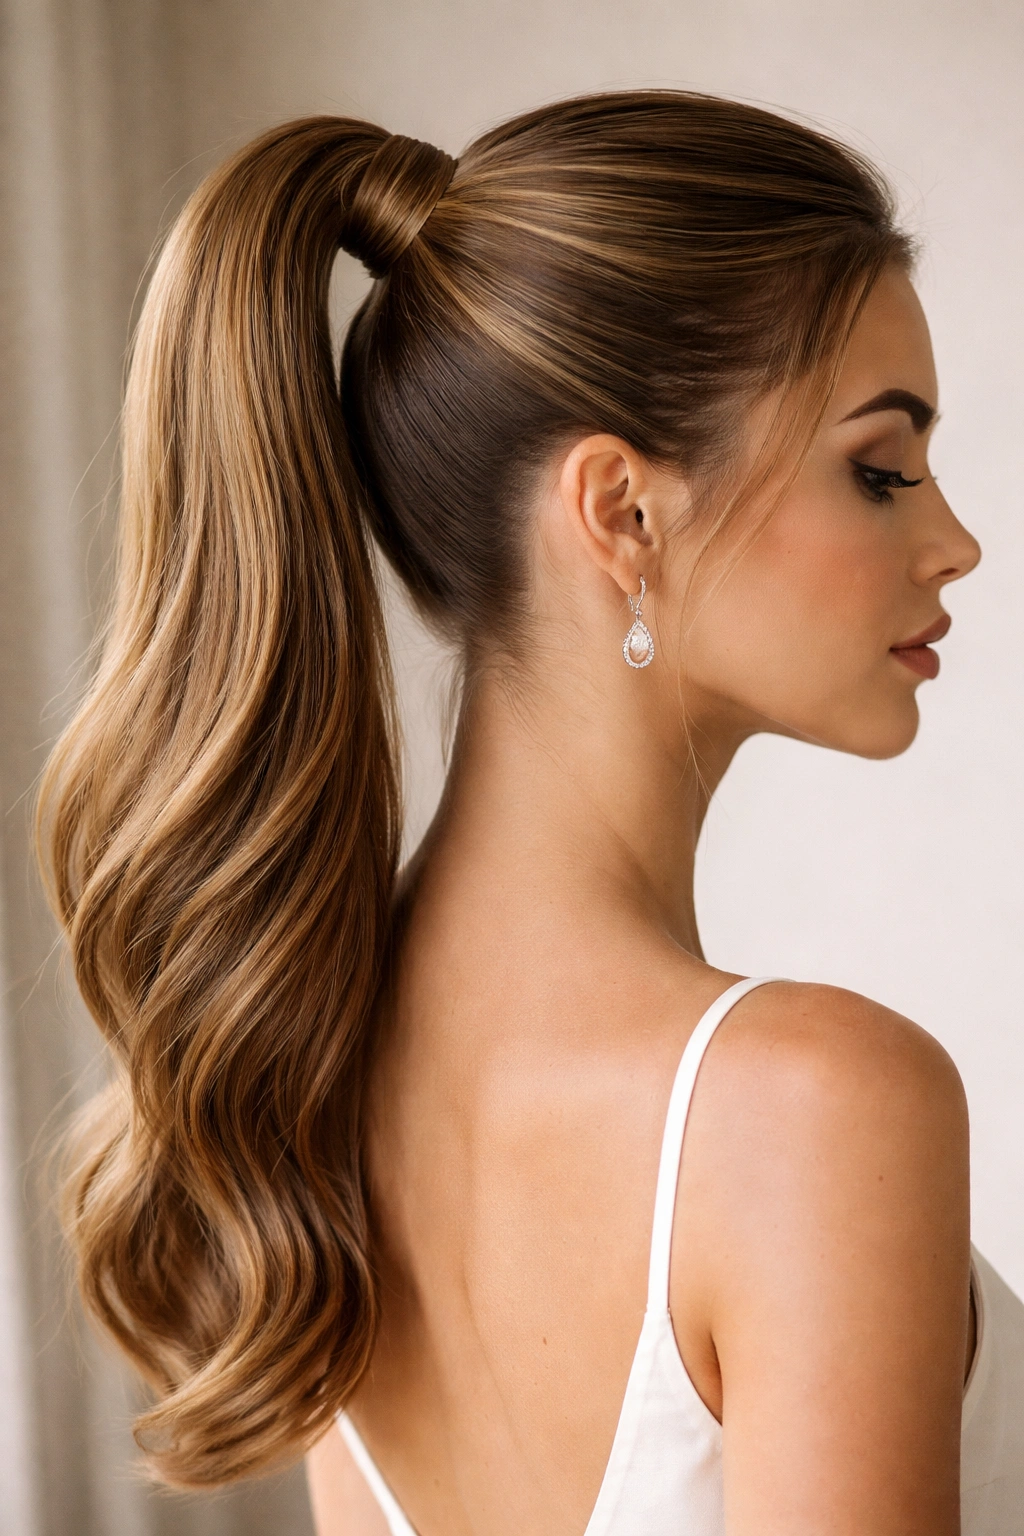
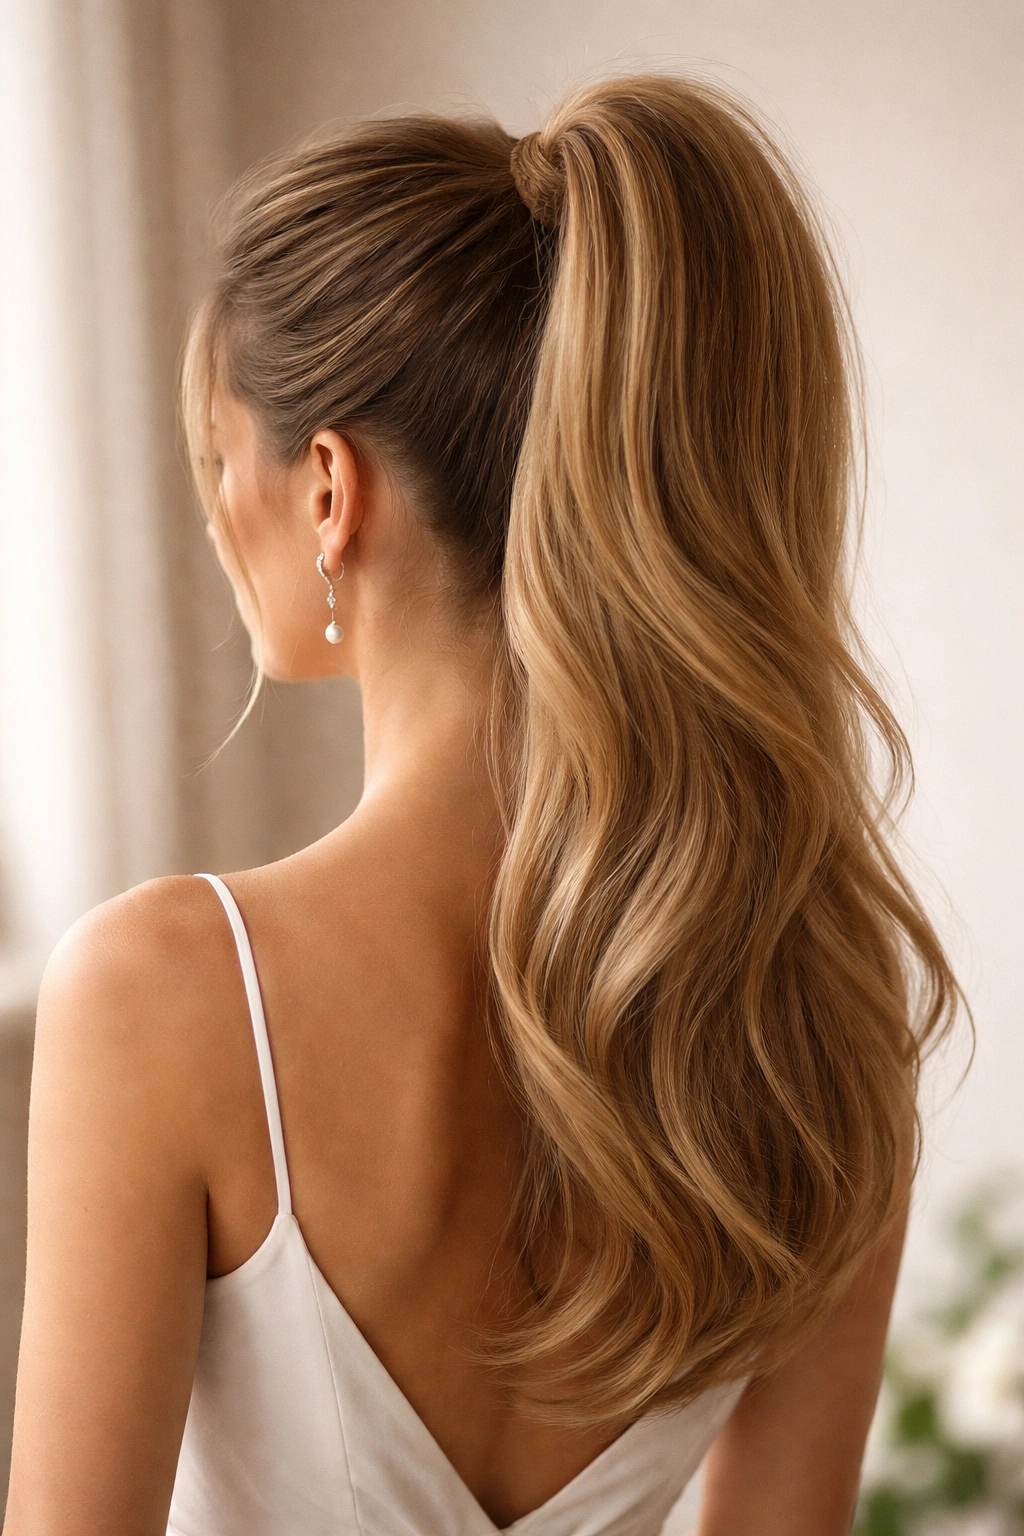
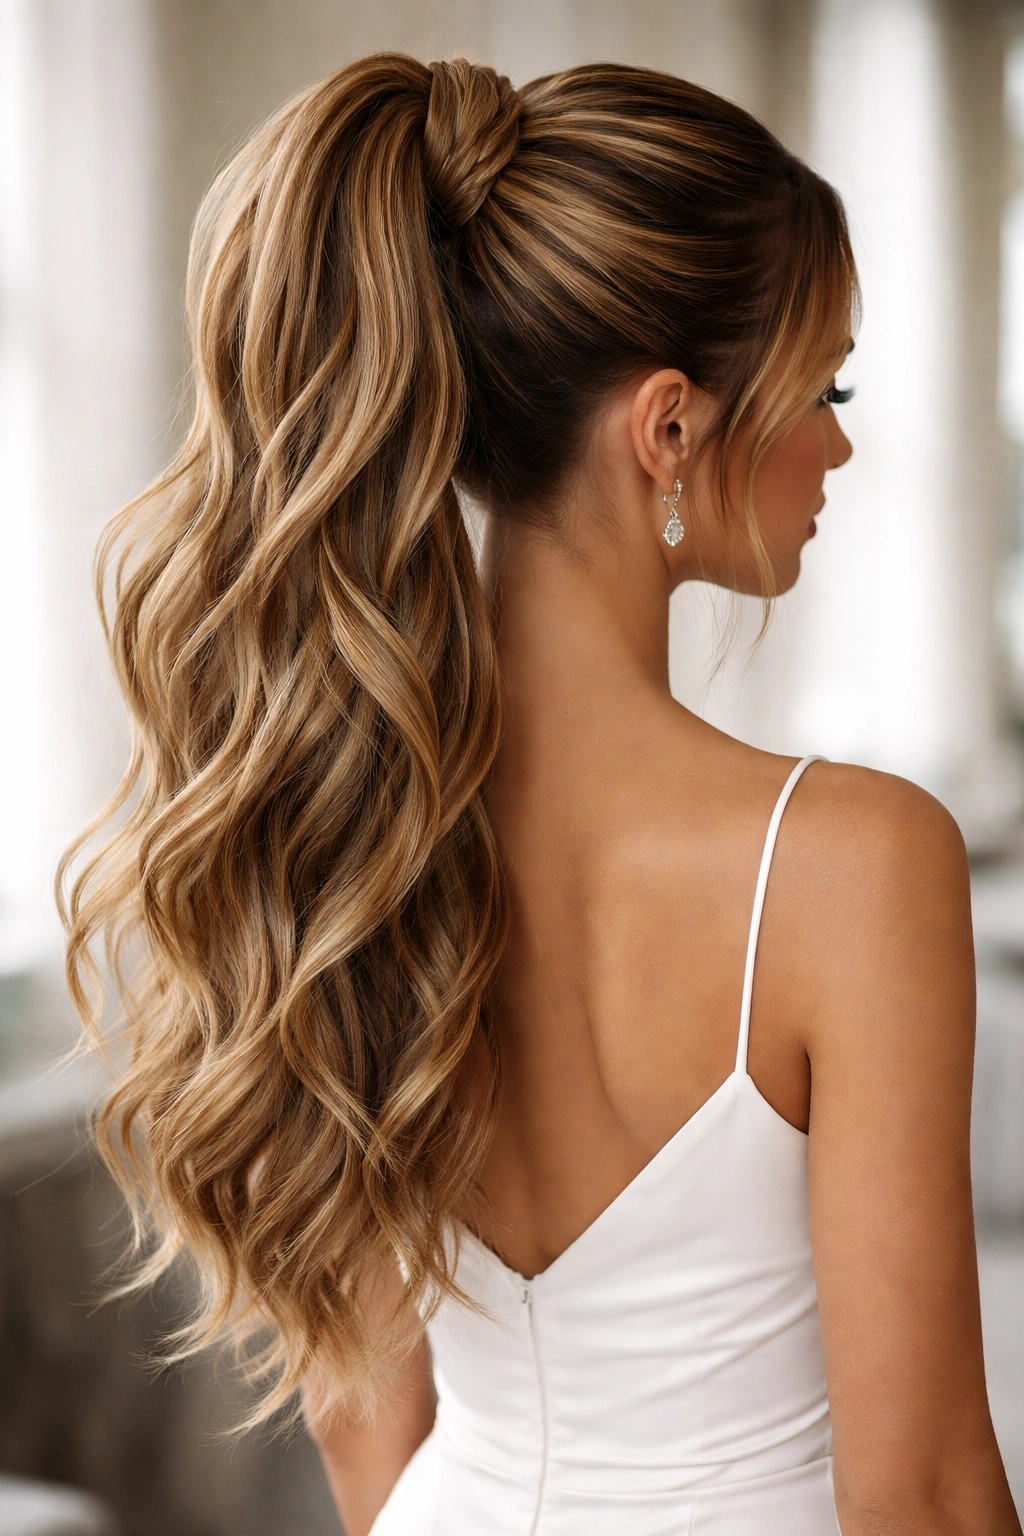
3. The High Ponytail with Textured Length
This style keeps the polished high positioning but adds romantic movement and texture to the length, making it feel less corporate and more bride-adjacent. Instead of a stick-straight pony, the hair below the elastic gets soft waves, gentle curls, or modern texture that catches light beautifully and moves naturally as your bridesmaids walk and dance.
Why Texture Changes Everything
A sleek high ponytail with stick-straight ends can sometimes feel harsh or too minimal. Adding texture to the length softens the entire look while maintaining the formal, pulled-together vibe that a high ponytail provides. The contrast between the smooth, refined crown and the textured, moving length creates visual interest without looking undone. This approach also photographs exceptionally well—texture catches light in a way that flat, straight hair simply doesn’t.
Achieving Gorgeous Textured Length
- Style the top portion of the head smooth and sleek, gathering the ponytail high on the crown
- Before tightening the elastic completely, blow-dry the length of the ponytail using a round brush or by hand for added volume
- Create soft waves or curls using a 1.5-inch curling iron, working through the ponytail in sections and leaving ends out for a modern finish
- Alternatively, use a waving iron for a more effortless, undone texture
- Gently separate the waves or curls with your fingers rather than running a brush through them
- Finish with a medium-hold hairspray that allows movement without looking frizzy
Pro tip: Texture lasts longer when you work with slightly textured (not freshly washed) hair. Have bridesmaids skip their usual morning shampoo and style their hair the evening before if possible, then refresh the style lightly on the morning of the wedding using a texturizing spray.
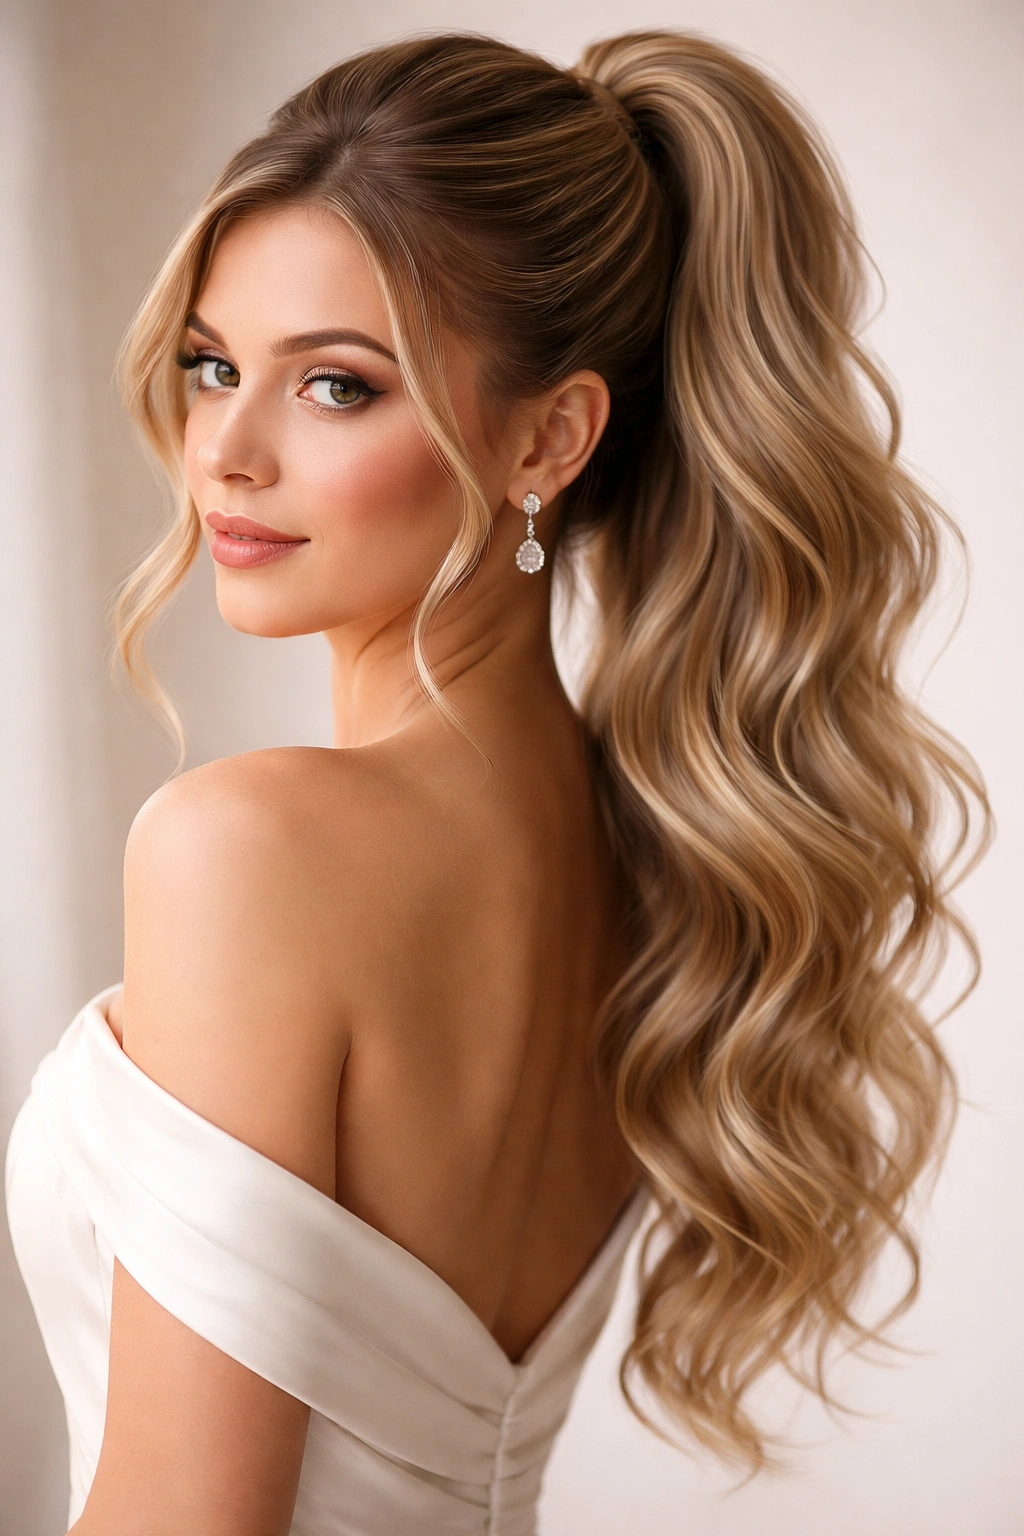
4. The High Ponytail with Face-Framing Pieces
This style pulls hair back into a high ponytail while deliberately leaving two to three soft pieces of hair loose at the face, creating a romantic, slightly undone aesthetic that softens the formality of a high pony. The framing pieces are typically longer than the rest of the ponytail so they can be styled into waves or tendrils.
Why This Works for Bridesmaids
A completely pulled-back look can sometimes feel severe, especially on certain face shapes or if your bridesmaids have delicate features. Soft face-framing pieces create a romantic balance—they’re still polished and intentional, but they feel a touch less architectural. This style is also forgiving if someone has loose baby hairs or a less-than-perfect hairline, as the framing pieces can gently disguise those areas while looking intentional.
Styling Face-Framing Sections
- Before gathering the ponytail, identify which sections you want to leave loose at the face (typically from the temples or front hairline)
- Clip these pieces back temporarily using small, discreet clips
- Gather the remaining hair into a high ponytail and secure with an elastic
- Release the clipped pieces and curl them gently using a 1.5-inch curling iron, wrapping the hair around the barrel and holding for 8-10 seconds
- Let the curls cool before gently separating them with your fingers
- Pin the curled pieces loosely behind the ear or let them frame the face naturally
- Smooth the face-framing pieces with a small amount of smoothing serum for polish
Worth knowing: Face-framing pieces work beautifully with both sleek and textured ponytails. The framing pieces don’t have to match the texture of the main ponytail—you could have a sleek ponytail with loose, romantic tendrils at the face, or vice versa.
5. The High Bubble Ponytail

This modern, playful style stacks multiple elastics along the length of a high ponytail, creating distinct sections or “bubbles” that give the illusion of a much fuller, bouffant-style pony. Each bubble is created by gently teasing the hair between elastics and smoothing the outer layer for a polished finish.
Why It Works in a Wedding Context
The bubble ponytail feels contemporary without being trendy—it’s been popular for several years and shows no signs of dating soon. It’s also incredibly photogenic, creating height and volume that reads beautifully in formal photos. The structured bubbles convey that real effort went into the styling, which elevates the overall bridesmaid aesthetic. Plus, it works across hair lengths, making it a great choice if your bridesmaid squad has varying lengths.
Creating Perfect Bubbles
- Blow-dry hair straight or with a slight wave for texture and volume
- Gather the hair into a high ponytail at the crown and secure with a clear elastic
- Using a fine-tooth comb, gently backcomb the hair just below the first elastic to create volume
- Smooth the outer layer using the comb and a light smoothing serum, keeping the teased volume inside
- Place a second elastic about 2-3 inches below the first, enclosing the teased section
- Repeat this process (backcomb, smooth, secure) for 2-3 additional bubbles down the length of the ponytail
- Finish with a flexible-hold hairspray to maintain the shape without stiffness
Pro tip: The size and number of bubbles should be proportional to the length and thickness of the hair. Finer hair typically looks better with fewer, larger bubbles, while thicker hair can handle more, smaller bubbles.
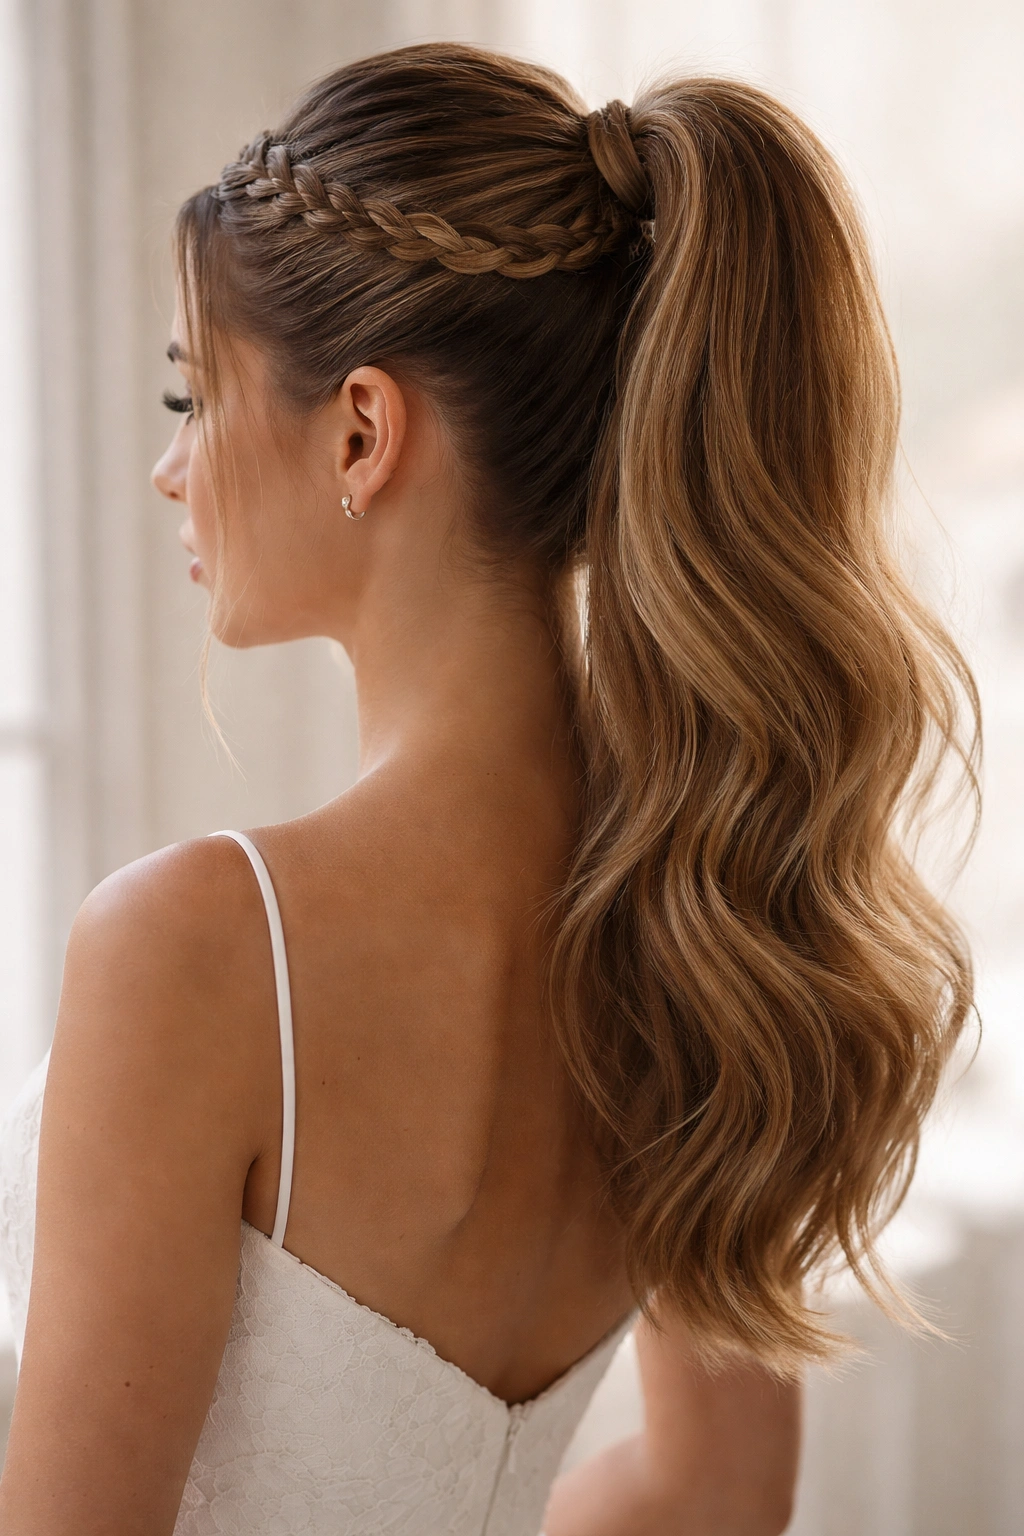
6. The High Ponytail with Braided Detail
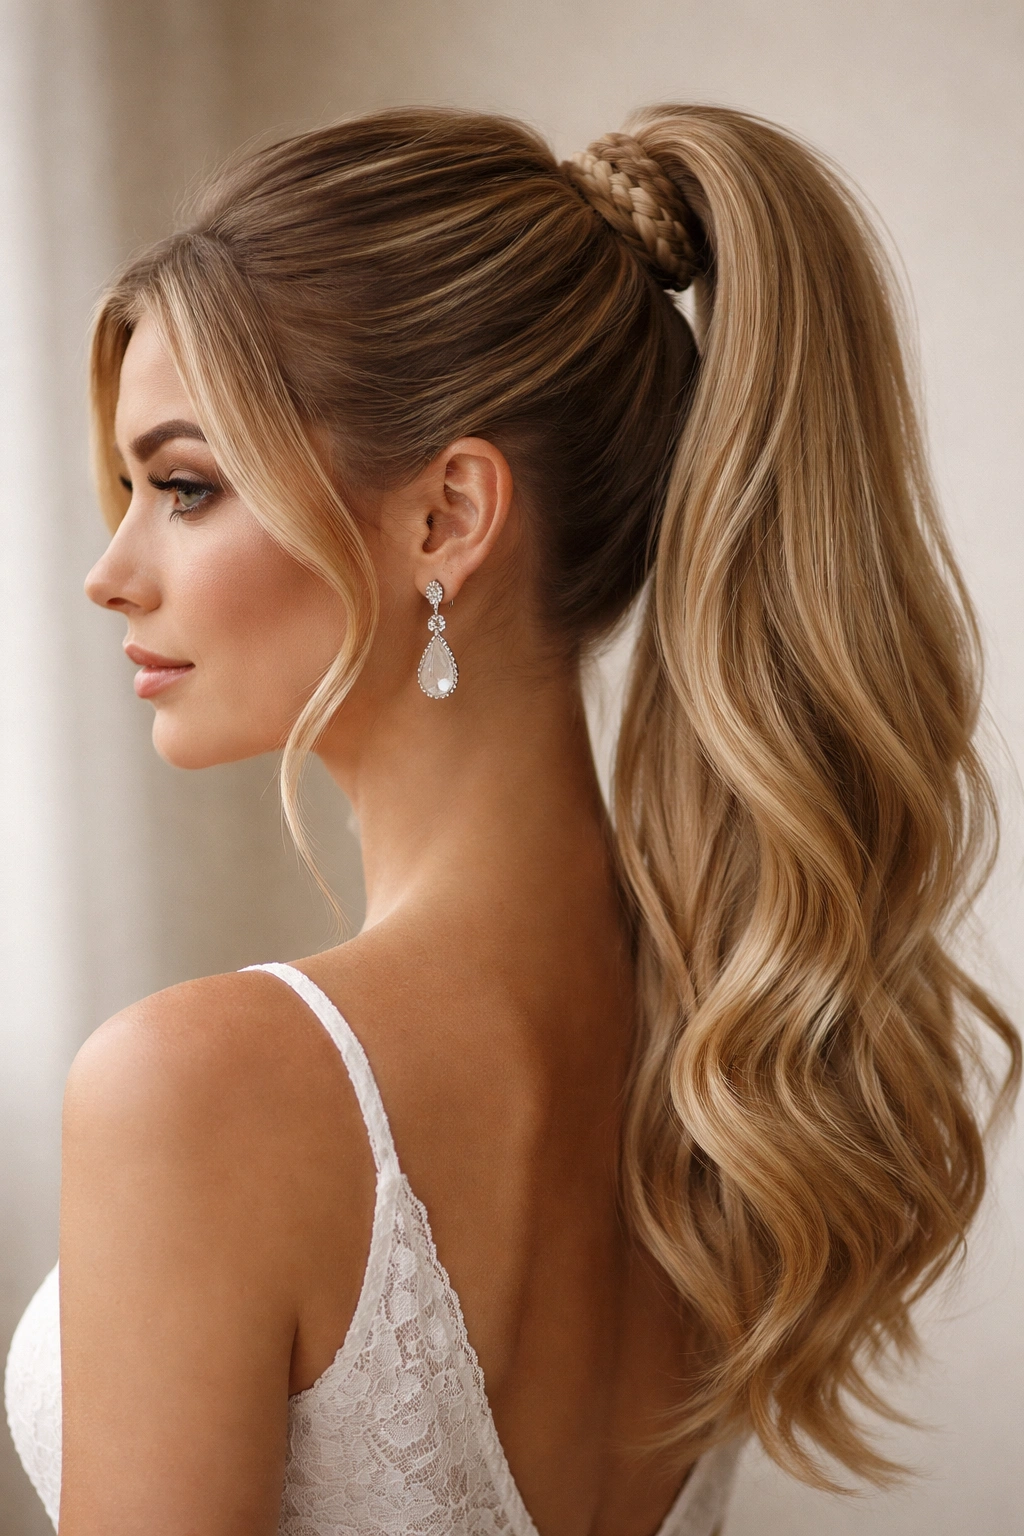
This style incorporates a small braid into a high ponytail, either by braiding a section of hair and then gathering it into the ponytail, or by using the elastic wrap technique and braiding that wrapped section instead of simply smoothing it. The result is a classic but distinctive look that reads as intentional and special.
Why Braids Elevate a Ponytail
A thin braid woven into the base of a ponytail adds visual interest and a handcrafted quality that pure smoothness can’t quite achieve. It signals that this isn’t a rushed style—it’s been thoughtfully constructed. Braids also catch light beautifully in formal photos and add romantic texture without the casualness of loose waves.
Two Approaches to Braided Ponytails
Approach 1: Braid First, Then Gather
- Take a thin section of hair from one side of the head (starting near the temple)
- Braid this section loosely but neatly, working toward the back of the head
- Gather all hair, including the braid, into a high ponytail and secure with an elastic
- Pin the braid in place so it sits against the side of the ponytail, creating a visual accent
Approach 2: Wrapped Braid
- Gather the high ponytail as usual
- Take a thin section from the underside and braid it instead of simply wrapping it
- Wrap the braid around the elastic at the base, securing with bobby pins that match the hair color
- This creates a more intricate, refined detail at the base of the ponytail
Worth knowing: Even a three-strand braid works beautifully—it doesn’t need to be complex. A simple, loose three-strand braid actually reads as more romantic and less overtly styled than a complicated French or Dutch braid.
7. The High Ponytail with Pearlescent Accessories
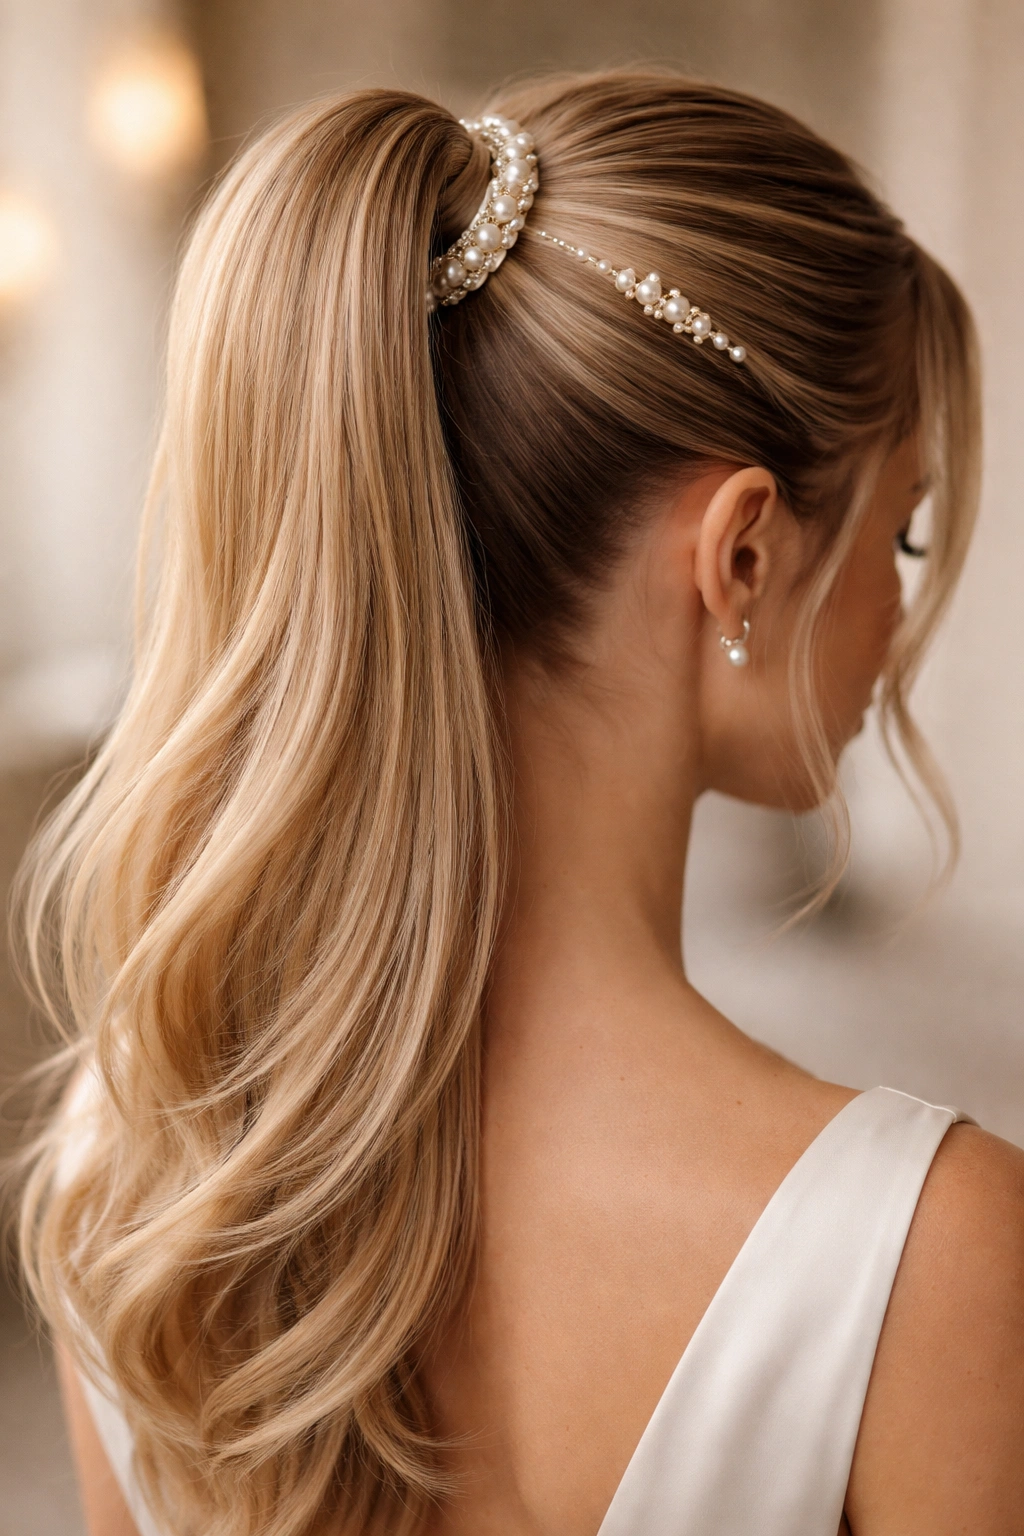
This style takes a classic high ponytail and amplifies its elegance through carefully chosen hair accessories—pearl-adorned clips, delicate hairpins, or a decorative comb worked into the base or wrapped section. The accessories echo the formality of the occasion and the jewelry bridesmaids will be wearing.
Why Accessories Matter
The right hair accessory transforms a simple ponytail into a statement. Pearls and crystals catch light beautifully in photos and add a touch of luxury that feels wedding-appropriate. Accessories also help unify the bridesmaid look—having every bridesmaid wear the same pearl clip or comb signals coordinated intentionality. This approach is also practical; if someone’s ponytail loosens slightly throughout the day, a decorative clip can anchor it back into place.
Styling with Accessories
- Create a sleek or textured high ponytail as desired
- If using an elastic wrap, secure your decorative element (a pearl-adorned clip, hairpin, or comb) over the wrapped section
- Position the accessory so it’s visible but not visually competing with the face or dress
- If using multiple smaller pins, space them slightly apart rather than clustered together
- Ensure the accessory is secure enough to withstand dancing and movement—test it gently before the bride walks down the aisle
- Choose finishes that complement both hair color and skin tone: gold works beautifully with warm undertones, while silver or platinum suits cooler tones
Pro tip: Vintage or antique-looking accessories often feel more timeless than shiny, new-looking ones. Search for pearl combs or clips with a slightly aged finish—they photograph beautifully and feel elevated.
8. The High Ponytail with Volume at the Crown
This style prioritizes strategic height and fullness at the crown, achieved through teasing, mousse, or a hair topper (a small, matched hairpiece that clips in for added volume). The rest of the ponytail remains sleek or lightly textured, creating a silhouette that’s both grand and wearable.
Why Crown Volume Commands Attention
A voluminous high ponytail creates a flattering silhouette—it elongates the neck, creates visual interest in photos, and draws eyes upward. The height also helps your bridesmaids’ heads and faces remain visible in group photos when they’re standing next to seated guests. This approach works beautifully across face shapes, though it’s particularly flattering for longer faces or those with delicate features.
Creating Crown Height
Teasing Method:
- Blow-dry hair smooth first
- Take a 2-3 inch section from the crown area
- Using a fine-tooth teasing brush, gently backcomb this section to create volume and hold
- Smooth the outer layer using the brush and a light smoothing product
- Gather all hair into a high ponytail, starting at the crown and working back
Mousse Method:
- Apply volumizing mousse to damp roots and crown area before blow-drying
- Blow-dry the crown using an upside-down technique (bending forward while drying) to build height
- Smooth the roots once dry, then style the ponytail as usual
Hair Topper Method:
- Tease the crown area lightly to create a gripping surface
- Clip a small matched hairpiece into the teased area
- Gather all hair, including the topper, into the high ponytail
Worth knowing: The amount of teasing or added volume should be proportional to face size and dress scale. A smaller face might be overwhelmed by excessive crown volume, while a larger frame with a more dramatic dress can handle fuller styling.
9. The High Ponytail with Ribbon or Velvet Weave
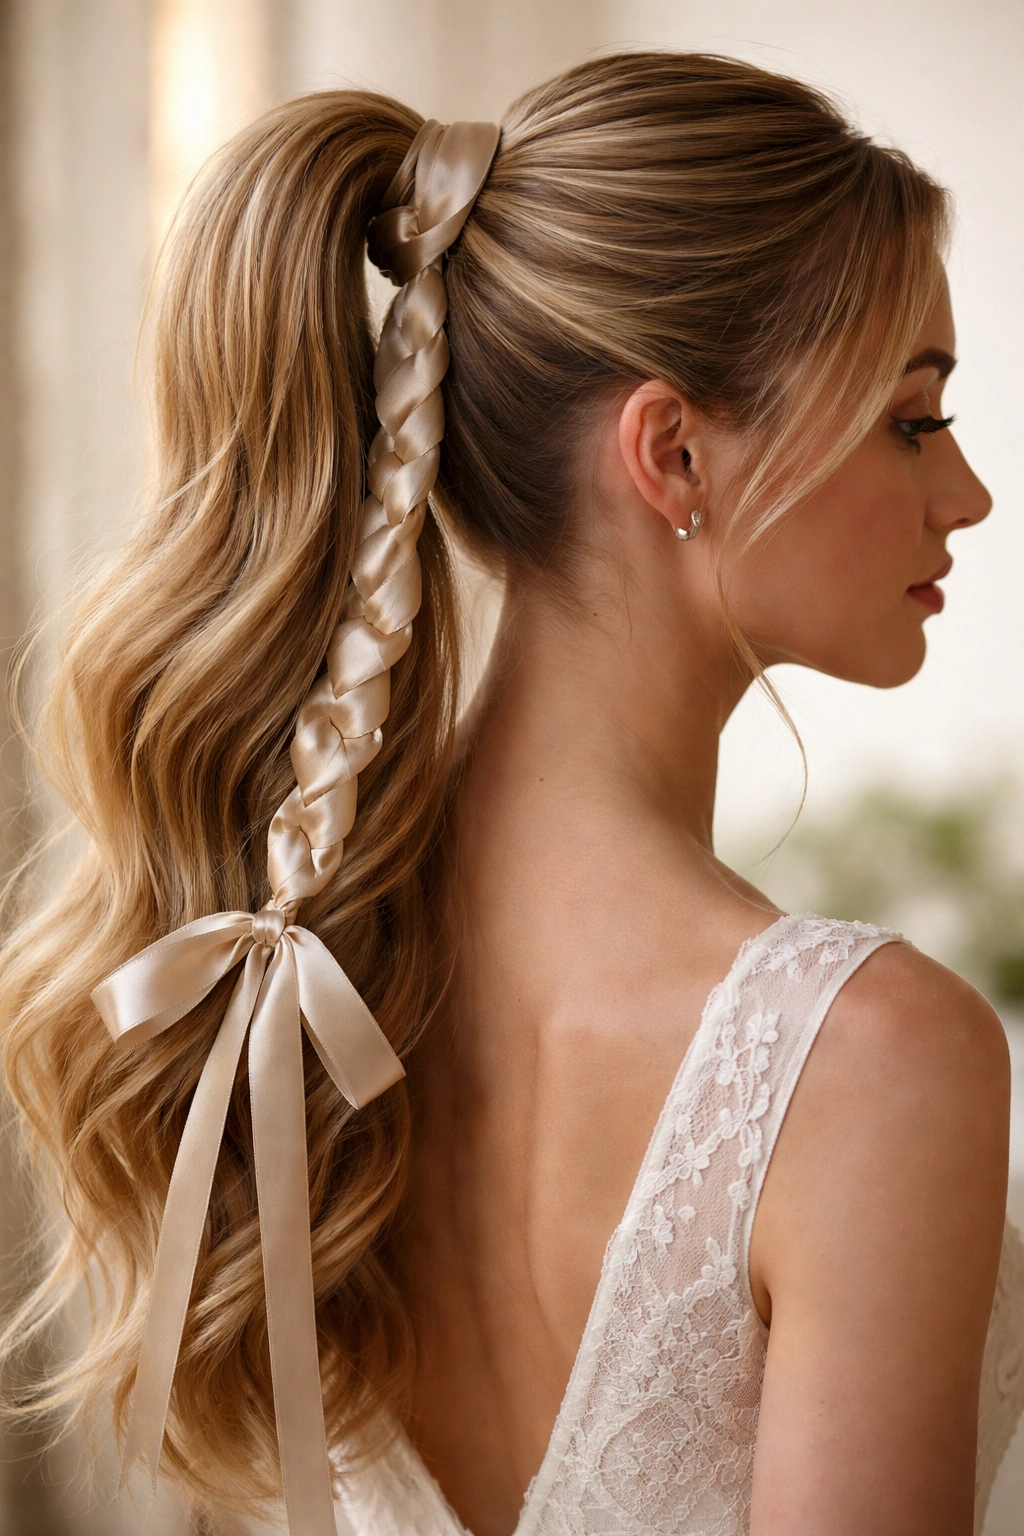
This romantic, elegant style threads a thin ribbon, velvet cord, or delicate trim through the length of the ponytail, creating a linear accent that’s both decorative and functional. The ribbon can wrap around the elastic at the base or weave through the entire length, depending on the desired effect.
Why Ribbon Details Feel Special
A woven ribbon adds a bespoke quality that feels entirely intentional and wedding-appropriate. It’s a design choice that most of your guests wouldn’t think to do themselves, which signals professional styling. Ribbons also introduce color options—you could coordinate ribbon colors with your bridesmaid dresses, flowers, or wedding palette. The texture of ribbon or velvet also catches light differently than hair alone, creating visual depth.
Incorporating Ribbon into a Ponytail
- Gather the high ponytail and secure with an elastic
- Cut a length of ribbon (silk, grosgrain, or velvet all work beautifully) to approximately 1.5 times the length of the ponytail
- Starting at the base, wrap the ribbon around the elastic, securing one end with a bobby pin
- You can either wrap the ribbon tightly around the elastic like an elegant candy cane stripe, or weave it loosely through the length of the ponytail, securing the free end at the bottom with a small bobby pin
- For a more intricate look, use a thin needle to thread the ribbon directly through small sections of the ponytail
- Smooth any flyaways with a light hairspray
Pro tip: Silk ribbon won’t damage hair the way some elastics can, and it provides a luxe feel. Choose ribbon in colors that complement the overall wedding palette—blush, champagne, or soft metallics work with nearly any bridesmaid dress color.
10. The High Ponytail with Braided Extensions
This style incorporates hair extensions or added hairpieces to create thickness, length, or color variation within the high ponytail. Extensions can be subtle (adding depth to fine hair) or dramatic (creating a much fuller, bouffant-style pony). They’re particularly useful if your bridesmaids have varying hair lengths or densities.
Why Extensions Make a Difference
Extensions are a secret weapon for bridesmaid styling. They ensure that every bridesmaid can achieve the exact same volume and length in her ponytail, creating visual unity across the wedding party. They’re also transformative for bridesmaids with fine or shorter hair who might otherwise feel self-conscious about their styling compared to those with naturally thick, long hair.
Applying Extensions into a Ponytail
- Prep the hair with a light volumizing product at the roots for gripping power
- Gather the base ponytail and secure with an elastic
- Using bonded or clip-in extensions, attach them to the bases of the ponytail, working your way around the elastic
- Match the extension color to the natural hair as closely as possible—even one shade off will be visible, especially in photos
- Once extensions are applied, treat them as you would the natural hair: you can curl them, add a braid, wrap them, or leave them sleek
- Gently blend where the extensions meet the natural hair by curling both together or using a smoothing serum
Worth knowing: Human hair extensions blend far more seamlessly than synthetic, and they accept curl or texture more naturally. For a one-day wedding event, clip-in extensions (which take 5-10 minutes to apply) are easier to manage than semi-permanent bonded extensions.
11. The High Ponytail with Halo Braid Accent
This romantic, editorial-style look incorporates a thin halo braid that sits above the high ponytail, creating the visual effect of a delicate crown. The braid typically starts at one side of the head, sweeps across the back, and ends on the opposite side, with the high ponytail gathered inside or just below this braided halo.
Why This Style Reads as Bridal
Halo braids feel inherently romantic and special—they’re the kind of detail you see in editorial wedding photography. Even when worn by bridesmaids, this style feels elevated and intentional. The braid creates a flattering frame around the face without pulling hair completely back, and it photographs beautifully from every angle, making it a photographer’s dream.
Creating a Halo Braid
- Start with smooth or lightly wavy hair as a base
- Create a small three-strand braid that begins at the temple on one side of the head
- Gradually add sections of hair to this braid as you work toward the back of the head, creating a Dutch or French braid effect
- The braid should sweep across the back of the head and end at the opposite temple
- Gather all remaining hair into a high ponytail, securing it just below where the halo braid ends
- Pin the end of the braid into place at the opposite temple using bobby pins that match the hair color
- Gently loosen the braid sections slightly for a softer, more romantic appearance
Pro tip: A halo braid works beautifully with a textured ponytail—the softness of the waves in the ponytail balances the intricate detail of the braid. Practice this style at least once before the wedding day so you’re confident executing it under time pressure.
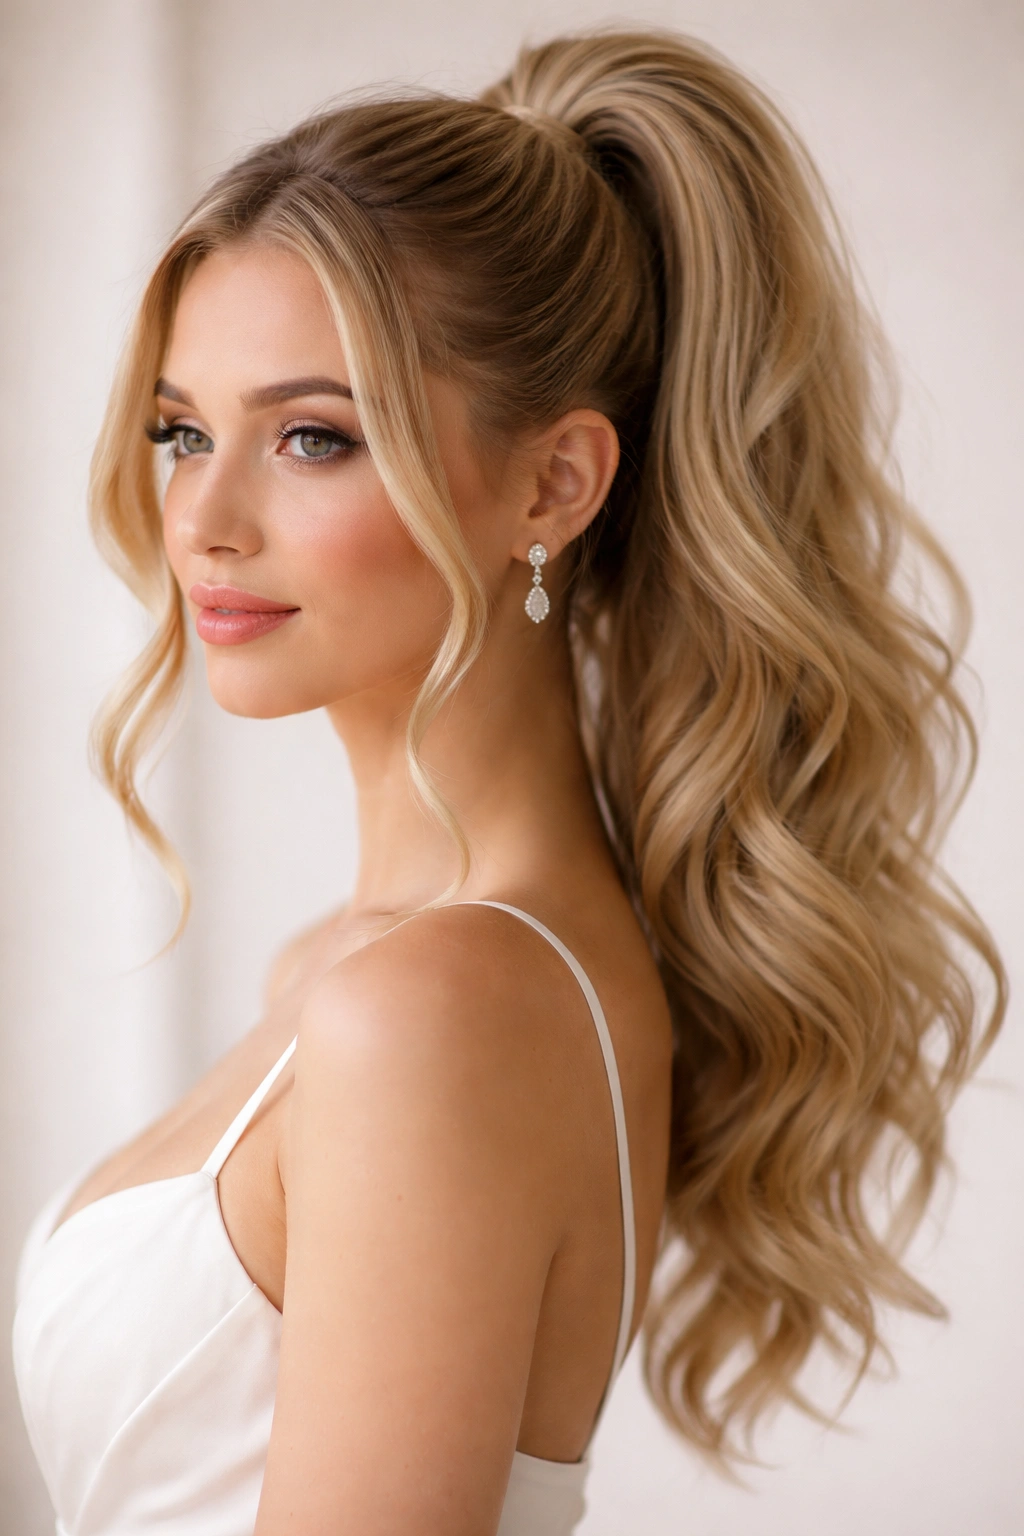
12. The High Ponytail with Subtle Dimension and Gloss

This final style focuses on creating visual depth through color dimension and a luminous finish, rather than texture or accessory details. It’s particularly stunning on bridesmaids with longer hair or those who prefer a more minimalist, modern aesthetic. The styling is essentially a perfectly executed sleek or lightly textured high ponytail, but the dimensional color and reflective finish elevate it significantly.
Why Color Dimension Matters
Even without visible texture, subtle color variation (like balayage highlights, hidden layers of color, or money pieces framing the face) creates movement and visual interest. A luminous shine or gloss finish makes the entire style photograph beautifully, catching light and creating a premium, polished appearance. This approach is also timeless—it’s not reliant on a specific trendy technique, just on the fundamentals of color and light.
Achieving Dimensional Shine
- Have bridesmaids get dimension work (highlights, balayage, or color melting) done at least a week before the wedding to let the color settle
- Use a purple or blue-toning shampoo if hair is light or blonde, to maintain brightness and cool tones
- On the morning of the wedding, apply a luminizing gloss or shine spray to damp hair before blow-drying
- Blow-dry the hair smooth or with a light wave, being mindful not to flatten any intentional dimension
- Gather into a high ponytail and smooth the base meticulously
- Apply a light shine-enhancing hairspray at the very end to create a gloss-like finish that photographs beautifully
Worth knowing: The right lighting in a venue can make or break a glossy finish. Warm lighting tends to emphasize golden or warm-toned dimension, while cool lighting showcases cooler, ashier tones. If possible, scout your wedding venue’s lighting ahead of time and adjust the dimension approach accordingly.
Final Thoughts
The high ponytail offers bridesmaids a polished, elegant, and endlessly adaptable way to wear their hair on your wedding day. Whether you choose a sleek, refined look or something with more personality through texture, ribbons, or braids, the key is selecting a style that your bridesmaids feel confident wearing and that complements both your wedding aesthetic and their individual features.
Whichever style (or combination of styles) you choose, schedule a trial run with your stylist well in advance. This allows you to test the look under different lighting, see how it photographs, and make adjustments before the actual wedding day. Ask your stylist how long each style takes to execute and whether it requires any special products or techniques—some styles are quicker and easier to maintain than others, which matters when you’re coordinating multiple bridesmaids on a tight morning timeline.
Remember that the best bridesmaid hairstyle is one that makes the wearer feel beautiful and confident. Give your bridesmaids input and options rather than dictating a single non-negotiable style. Most of these approaches work across hair types and lengths, which means your entire wedding party can look coordinated without anyone feeling uncomfortable or misrepresented. A bridesmaid who loves her hairstyle radiates that confidence in every photo, which is the ultimate win for your wedding day documentation.