



Afro wedding hairstyles are having a powerful moment, and for good reason. When you show up to your wedding with hair that celebrates your natural texture and heritage, you’re making a statement that goes far beyond aesthetics — you’re declaring that your wedding day is about honoring who you actually are. The beauty of styling an afro for a wedding lies in the endless possibilities: your hair becomes the canvas for everything from subtle elegance to bold, unapologetic drama. Whether you’re drawn to the romance of intricately braided crowns, the modern edge of shaved-side designs, or the pure magnificence of a perfectly shaped high-top afro, there’s a wedding hairstyle that matches your vision and celebrates your texture.
The best wedding hairstyles for afro hair don’t rely on trying to make your hair “behave” in an unnatural way — they work with your natural curl pattern and volume, amplifying what makes your hair stunning in the first place. That means you get to feel 100% like yourself on your wedding day, which honestly matters more than following some arbitrary bridal rulebook. Styling afro hair for a wedding requires a different approach than straight-hair bridal standards typically cover: you’re thinking about texture enhancement, strategic moisture retention, creative use of length and volume, and style longevity for a full day of celebration.
Let’s walk through twelve stunning afro wedding hairstyles that range from timeless classic to contemporary bold — each one detailed enough that you and your stylist can nail the vision together.
1. Classic High-Top Afro with Gold Cuff
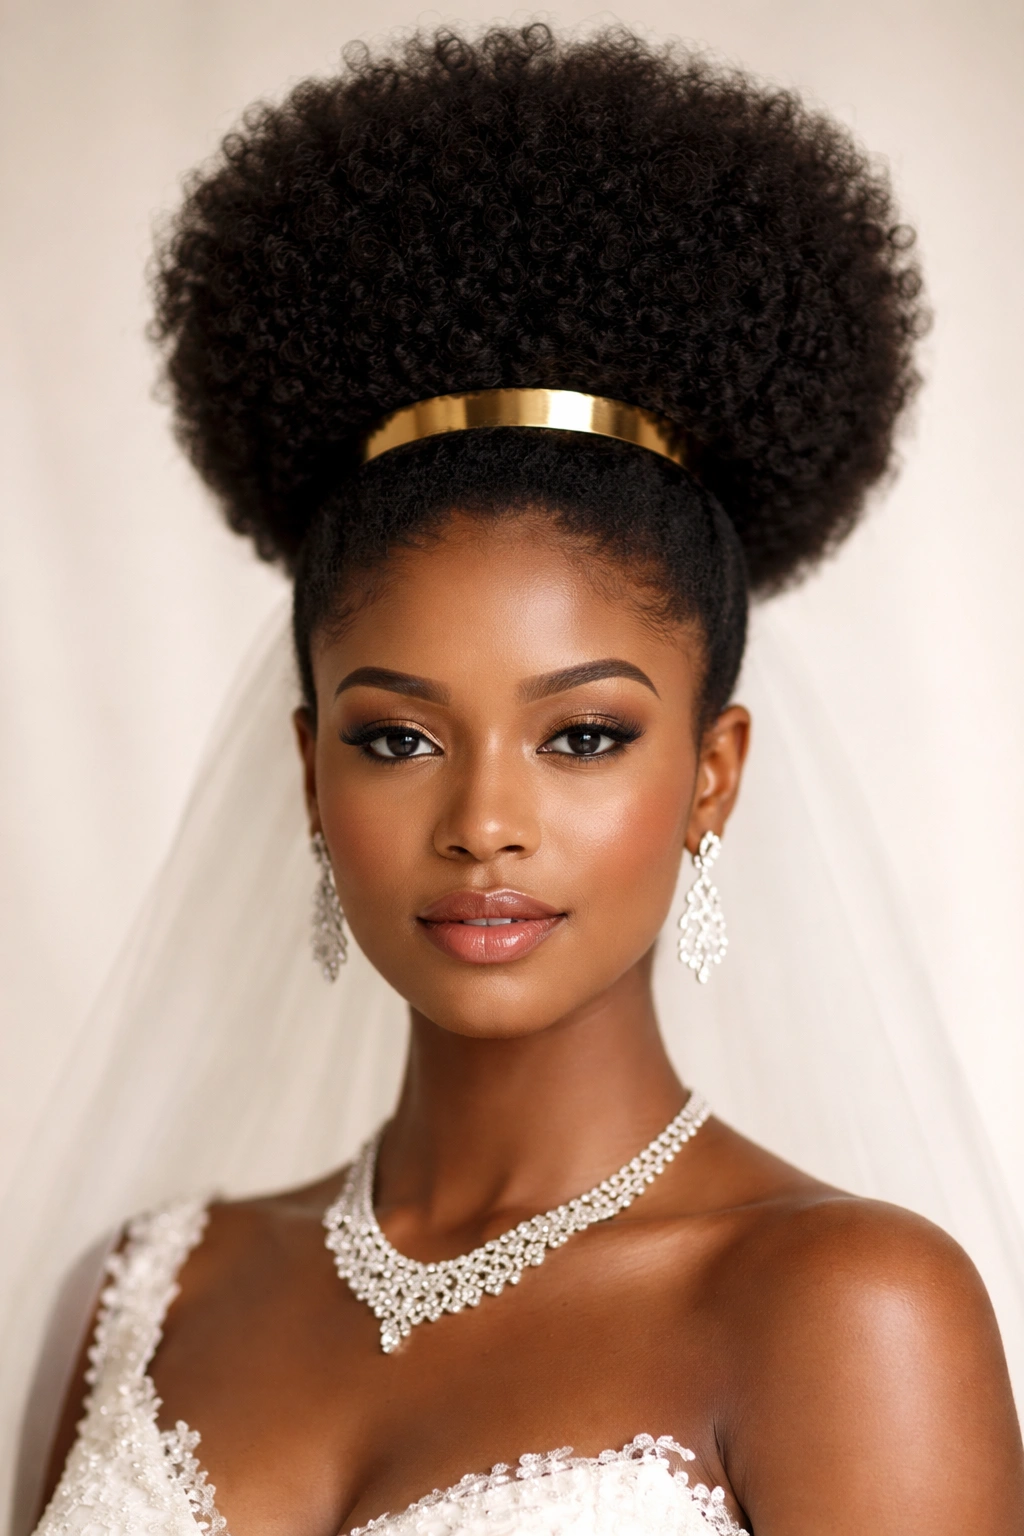
This is the unapologetic power move: a perfectly shaped, full-volume afro that crowns your head like the queen you are. Picture a symmetrical sphere of texture with intentional volume that extends several inches above your head, paired with a sleek gold cuff or delicate wrap at the crown. The simplicity is what makes it work — there’s no competing for attention, just pure confidence in your natural hair’s beauty. This style works beautifully when you want your face, skin, and bridal jewelry to be the focal points, letting your hair serve as the stunning frame.
Why This Works for Modern Brides
A high-top afro makes an unmistakable statement that you’re honoring your natural hair texture on the most important day. It photographs beautifully from every angle, and the volume reads as elegance rather than casualness. The style feels celebratory — like your hair is literally lifting with joy.
How to Achieve This Look
- Schedule a fresh cut 2-3 weeks before your wedding to establish clean lines and shape
- Start with deeply moisturized hair; use a leave-in conditioner and curl cream the morning of to define and boost volume
- Blow-dry with a diffuser attachment while cupping sections upward to maximize lift and shape
- Use a round brush to smooth and define the outer edge into a clean silhouette
- Add a gold cuff, wrap, or delicate crown piece at the base for bridal polish
2. Braided Crown with Flowing Curls
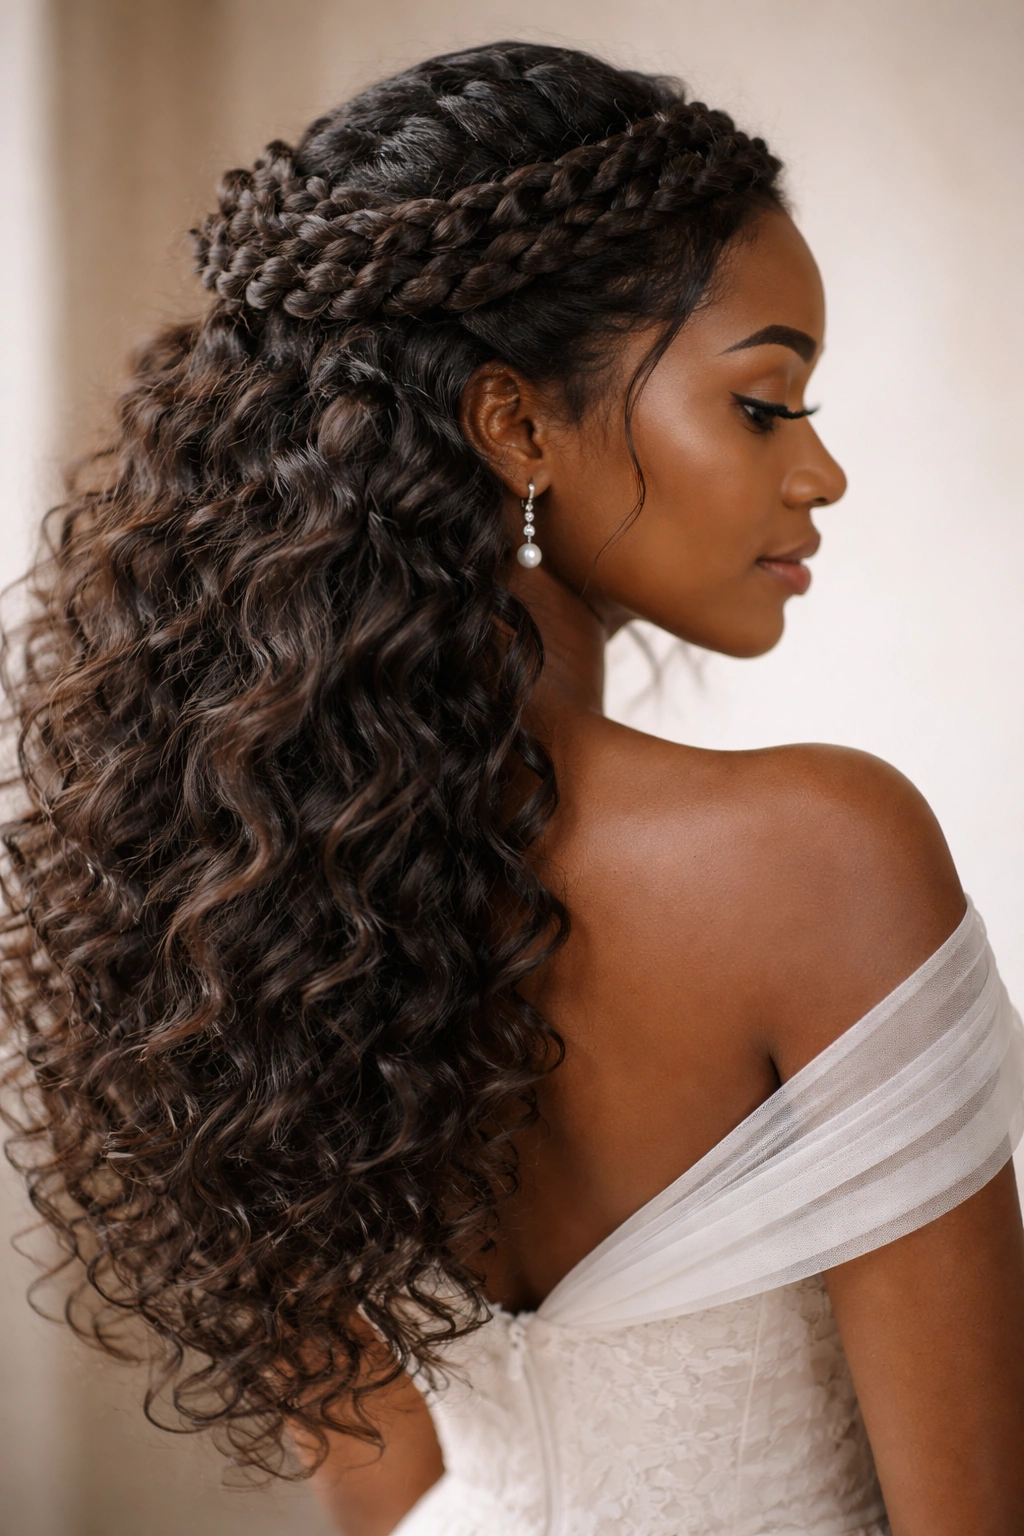
Imagine a halo of intricate braids woven around the perimeter of your head, with your natural curls left loose and flowing down your back and shoulders. The braids — whether they’re Dutch braids, fishtails, or a mix of thicknesses — frame your face while your curls provide movement and softness. This style strikes an elegant balance between put-together and romantic, and the braids catch the light beautifully. Your curls can be defined coils or a softer curl pattern depending on your natural texture; the key is that your hair flows past your shoulders for that whimsical bridal movement.
The Romance Factor
Braided crowns feel inherently wedding-appropriate because they’re traditional without being restrictive or inauthentic. You get the elegance of an updo without sacrificing the beauty of your natural curl pattern. The contrast between the precise braiding and the loose curls below creates visual interest that photographs beautifully.
Making This Style Last All Day
- Pre-braid your hair 1-2 days before your wedding for better hold and definition in the braids
- Use a light gel or mousse on your curls the morning of, but skip heavy oils that can weigh them down
- Mist the braids lightly with hairspray, targeting just the edges to keep them crisp without affecting the curl definition
- Secure the braids with small, discreet bobby pins that match your hair color so they disappear into the design
- Bring a small spray bottle and curl cream in your wedding day emergency kit for any curls that need refreshing between the ceremony and reception
3. Twisted Bun with Shaved Sides
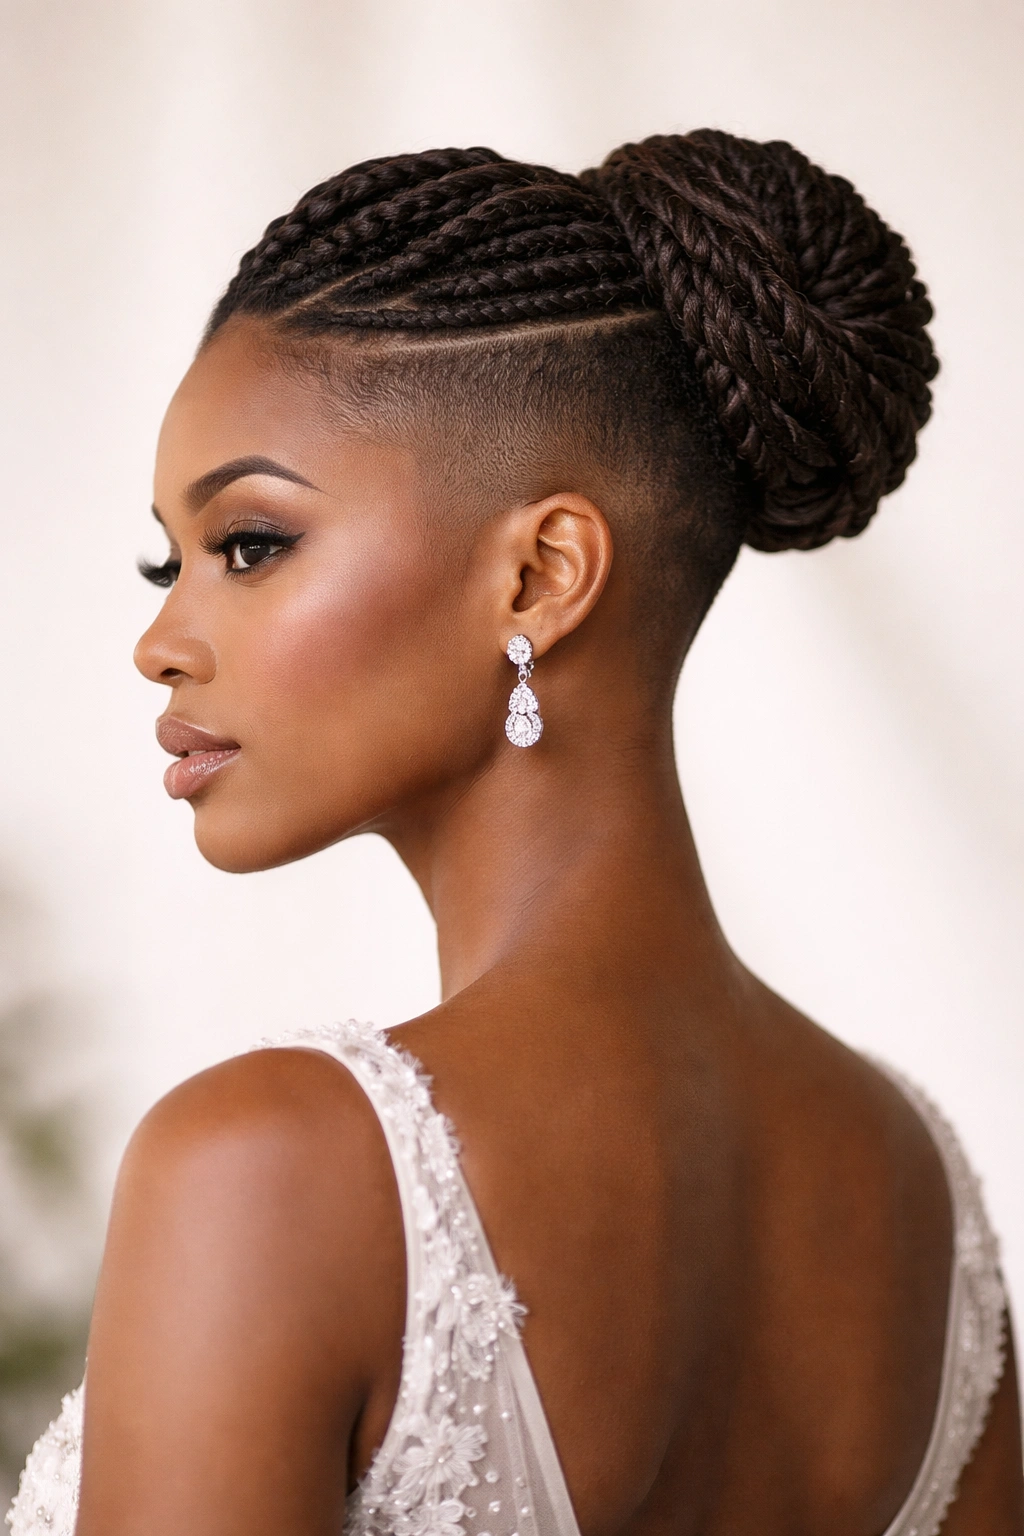
This is modern bridal elegance with an edge: sculpted twisted sections gathered into a sophisticated updo, paired with cleanly shaved or faded sides that reveal your head shape and the nape of your neck. The contrast is everything — the texture and dimension of the twists command attention, while the shaved portions add contemporary polish and show intentional design thinking. This style works especially well if you have longer hair (at least shoulder-length stretched) and want something that feels upscale and fashion-forward without looking casual.
Why This Combination Works
The shaved sides make the updo feel intentional and high-fashion rather than just a practical style. You’re demonstrating total control over your aesthetic — nothing accidental about this look. The twists create texture and visual interest that a smooth bun wouldn’t offer, and the shaved undercut is undeniably bridal-modern.
Styling the Twisted Bun
- Start with hair that’s been moisturized but not saturated; slightly damp hair twists more cleanly
- Create 4-8 twists depending on the thickness you want, twisting sections from the temple or crown area downward
- Gather these twists into a low or mid-height bun at the nape, securing with bobby pins and a small elastic
- Use a lightweight smoothing serum on the twists to enhance shine without making them greasy
- The shaved sides should be freshly faded 3-5 days before your wedding so they look clean and intentional
- Secure loose pieces with edge control applied with a clean brush for a polished finish
4. Locs with Pearl Wrapping
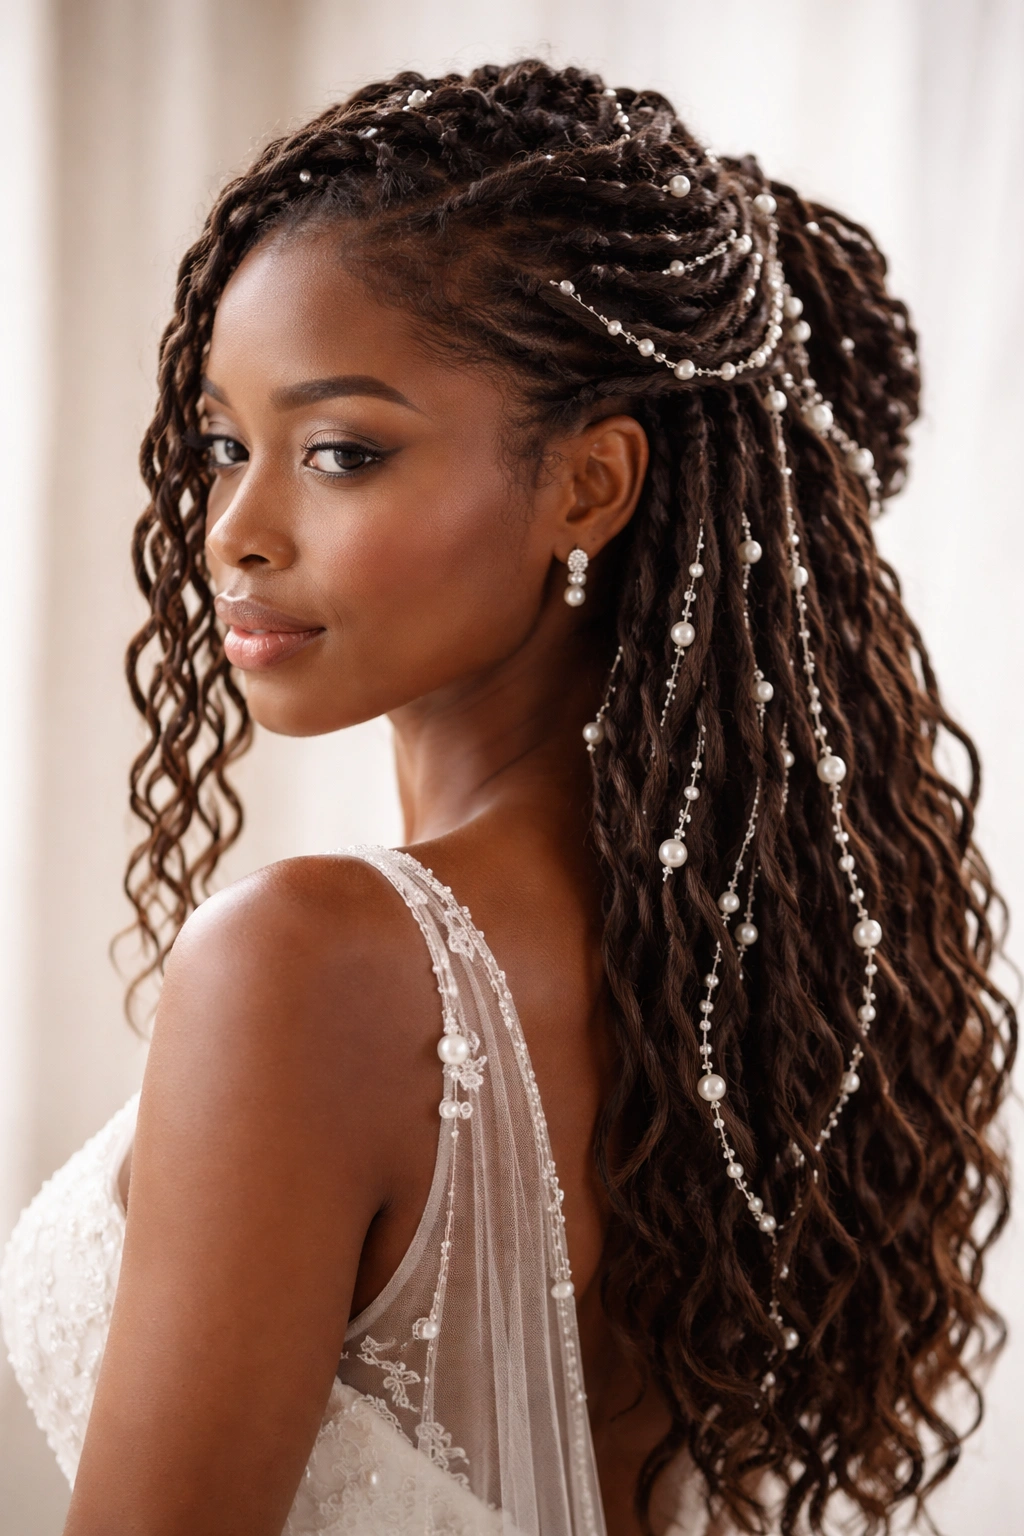
If you wear locs, your wedding day is the perfect moment to celebrate them as your bridal hairstyle. This style involves wrapping sections of your locs with pearl thread, thin gold wire, or delicate metallic strands, creating an almost ethereal quality that feels ceremonial and elegant. You might wrap your locs completely, or strategically wrap certain sections while leaving others bare for contrast. The wrapped locs can cascade down your back, be swept to one side, or gathered into an updo — the wrapping itself becomes the bridal detail.
The Significance of Wearing Your Natural Hair
Locs are a significant part of your identity and heritage, and incorporating them into your bridal look is a powerful statement of authenticity. The wrapping adds embellishment and intentionality, signaling that your locs are absolutely wedding-appropriate and beautiful. This style requires no major alteration to your hair and actually showcases years of healthy hair care and commitment to your natural texture.
Wrapping and Adorning Your Locs
- If you’re wrapping with thread or wire, plan this at least one week before your wedding so you can practice placement
- Wrap tightly enough that the threads won’t slip, but not so tight that you’re putting tension on your scalp
- Consider wrapping only select locs (perhaps every other one, or just the front-facing sections) rather than your entire head for a more refined look
- Pair pearl or metallic wrapping with minimal other jewelry to let the locs be the statement
- If you’re wearing your locs down, add a delicate crown, headpiece, or tiara to frame your face and add bridal polish
- For an updo with wrapped locs, secure them into a bun or gather style using bobby pins and a small amount of edge control
5. Puff with Bridal Veil
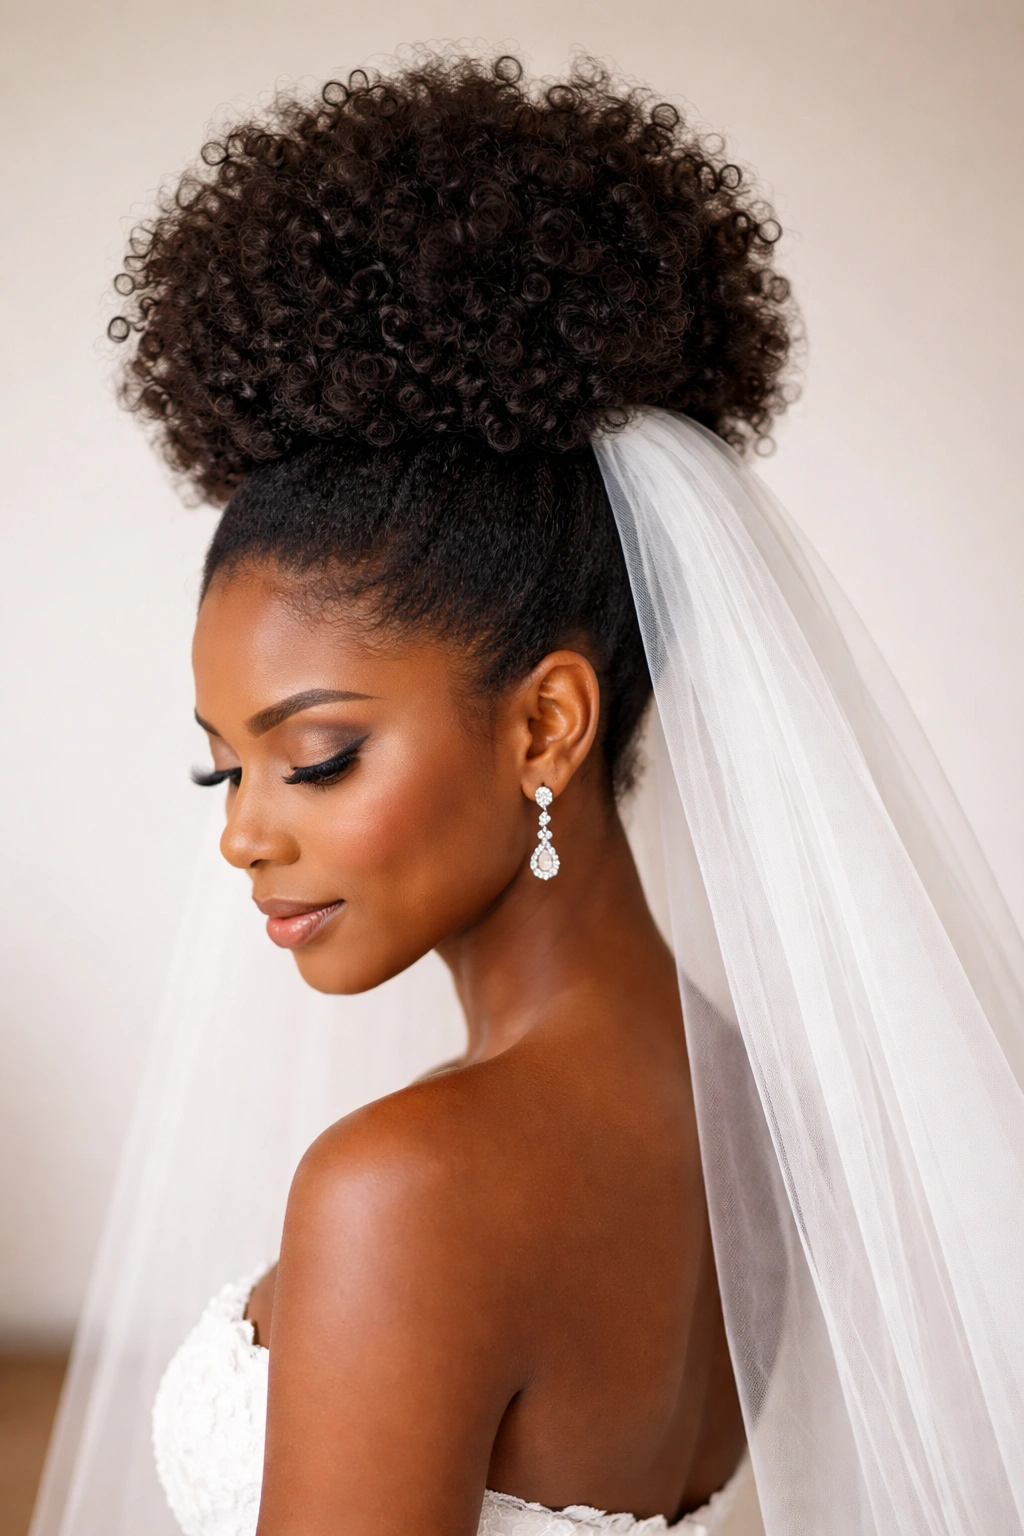
A high, voluminous puff — technically a gathered topknot made from coiled or very curly hair — is a stunning bridal choice, especially when paired with a delicate veil attached at the base of the puff. The puff creates height and drama at the crown of your head, and the veil flows from that anchor point, creating a gorgeous silhouette. This style works beautifully if you’re trying to achieve that classic bridal look while staying true to your natural hair. The veil adds the traditional bridal element without requiring you to alter your hair.
Creating the Perfect Puff
A puff isn’t just hair thrown into a ponytail — it’s a sculpted, intentionally voluminous style that requires the right foundation and technique. Your hair needs to be moisturized and defined so the curls or coils read as one cohesive shape rather than looking messy. The puff should be positioned high enough on your crown that it feels balanced with your face and body.
From Puff to Veil Integration
- Create your puff by sectioning hair at the crown and gathering it into an elastic band positioned at the exact spot where your veil will be anchored
- Arrange the gathered hair into a full, rounded shape, picking out curls gently so they spread outward and create volume
- Secure the veil with bobby pins so it connects seamlessly to the base of the puff
- Use lightweight edge control around your hairline and where the puff sits to ensure everything looks polished
- If you have additional length below the puff, you can leave those curls flowing or pin them into the puff as well, depending on the silhouette you want
- Test the puff a few days before your wedding to make sure the positioning feels balanced and the volume is what you envisioned
6. Half-Up Style with Decorative Sticks
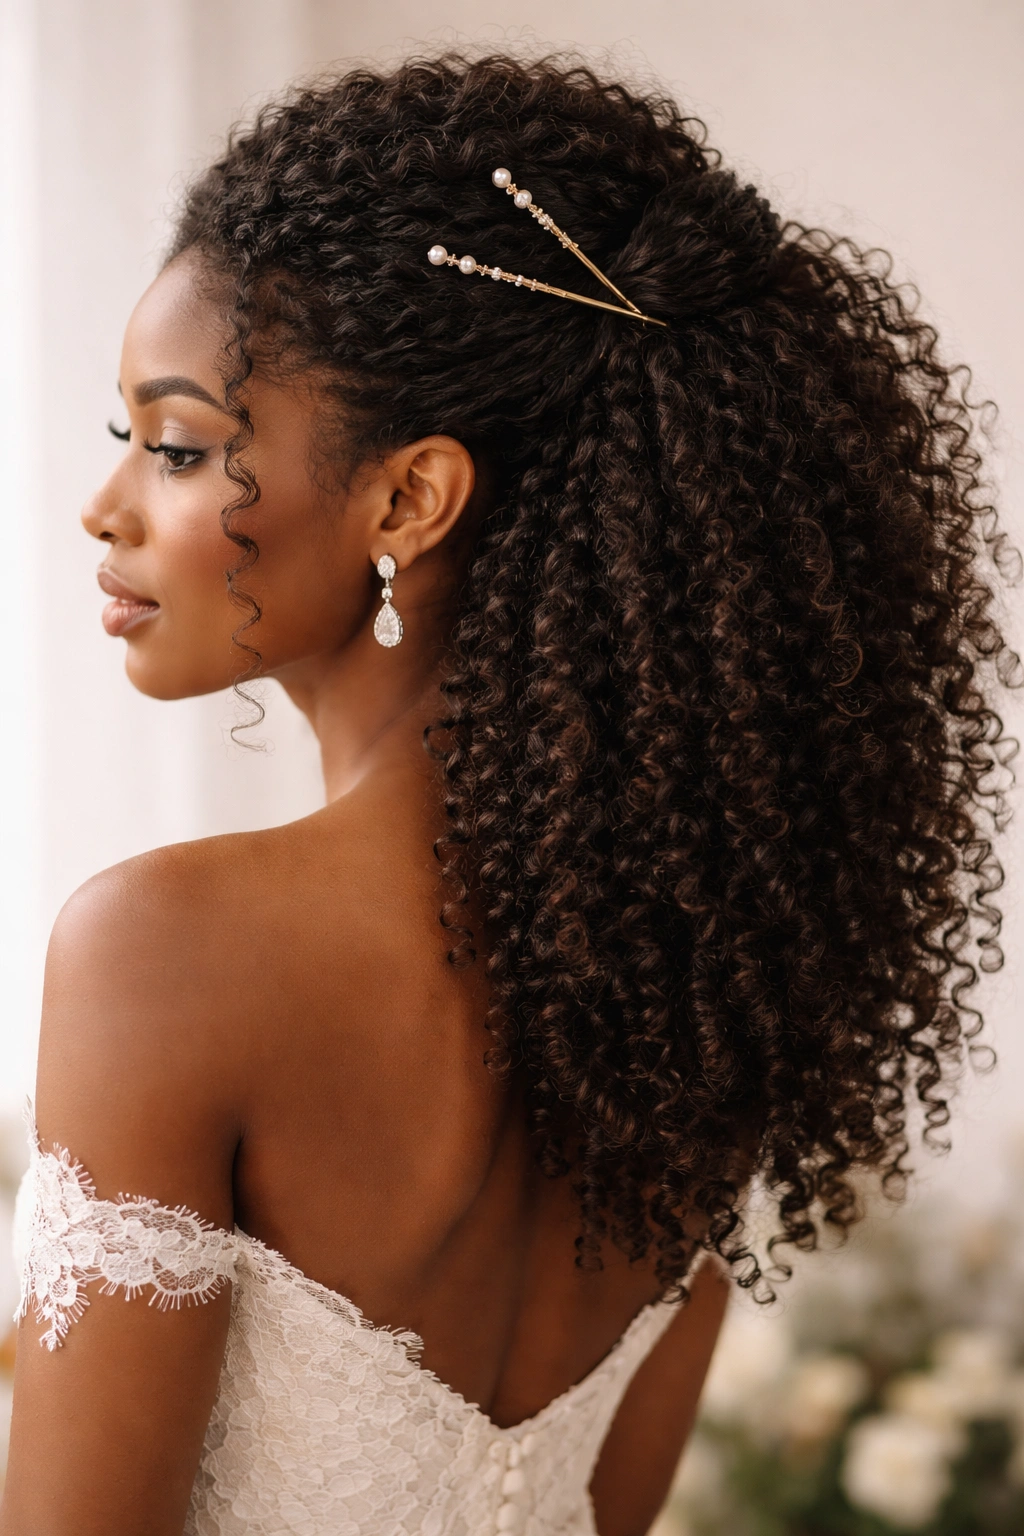
This effortlessly elegant style gathers the top half of your hair up and back, securing it with decorative sticks, metal cuffs, or hairforks in place of traditional bobby pins. Your bottom half remains down, creating movement and flow while keeping your hair off your face. The sticks become an intentional design element — they can be simple and minimalist or ornate and jewelry-like depending on your aesthetic. This style feels both romantic and modern, and it’s ideal if you want your natural curls visible but also want structure and definition.
Why Sticks Work Better Than Expected
Using decorative sticks instead of hiding your hair tools actually elevates the entire look, making it feel more intentional and curated. The sticks catch light and move slightly with your head, adding subtle animation to your hair. This is an especially smart choice if you’re doing a destination wedding or outdoor celebration because the sticks keep hair in place without relying on heavy products.
Perfecting the Half-Up Technique
- Section your top half (from temple to temple, and back to the crown area) and gather it into your preferred height — mid-back of head works well
- Use two decorative sticks inserted through the gathered section in an X or parallel pattern for security
- You can wrap the gathered section lightly with thread or leave it smooth, depending on the look you want
- Leave your bottom curls loose and defined; use a curl cream on these sections to enhance definition without weighing them down
- Your face should be fully framed, with no stray pieces; use edge control around your hairline for polish
- Accessorize minimally since the sticks are already making a statement — a simple earring and necklace are all you need
7. Cornrows with Beads and Gems
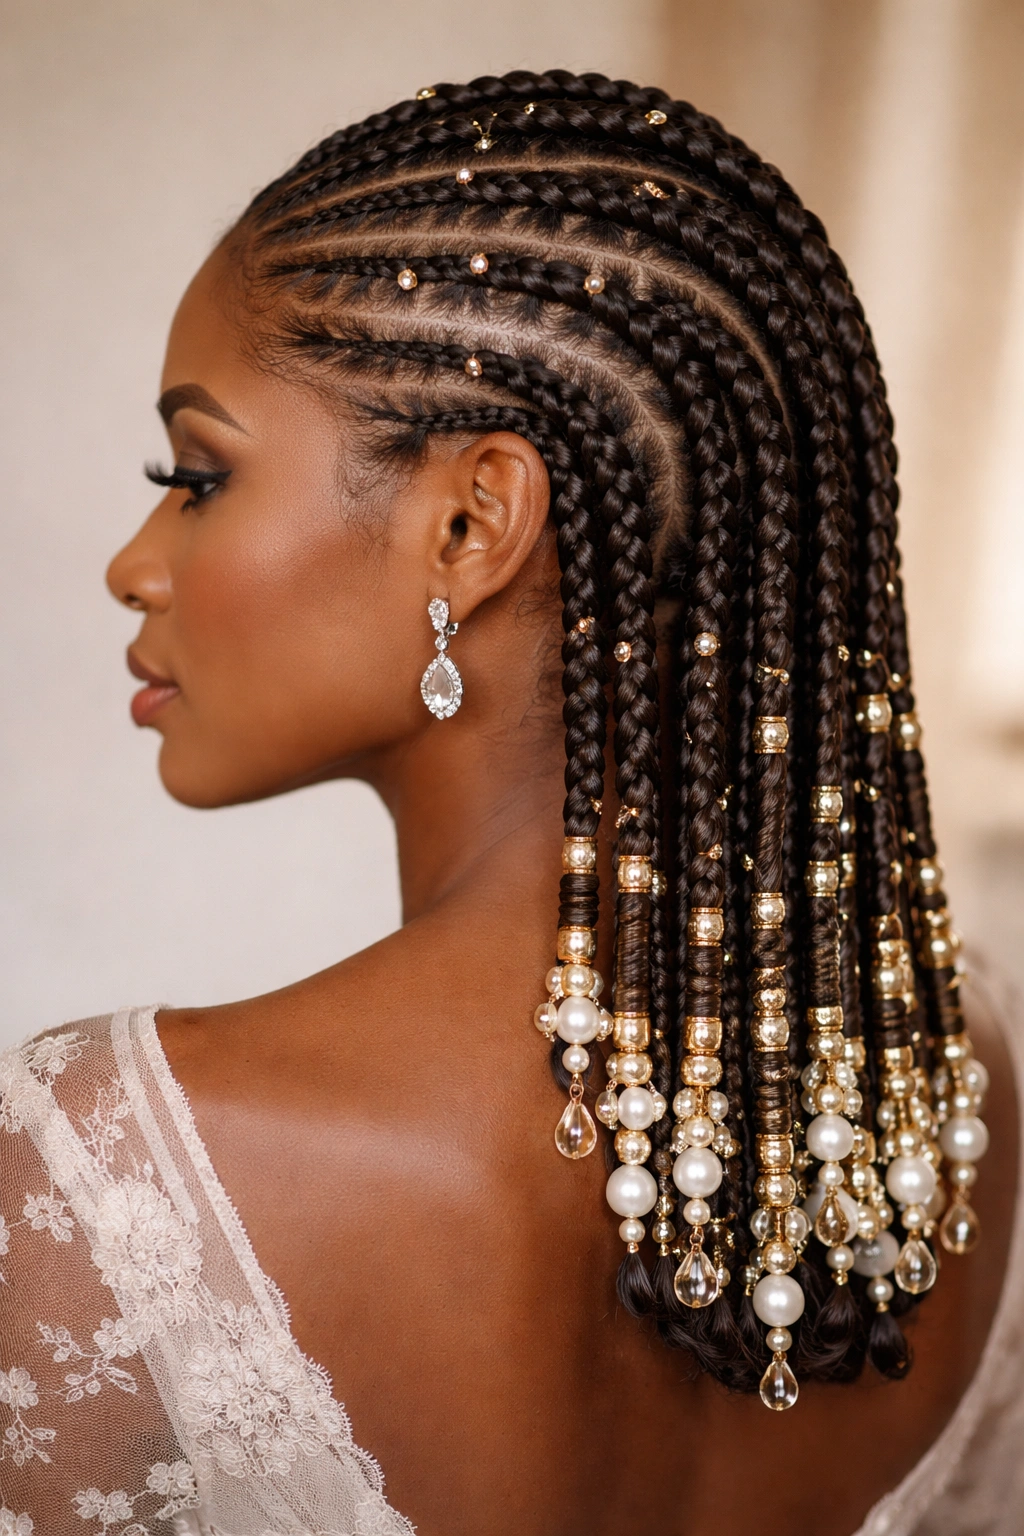
Cornrows are a stunning bridal choice, especially when adorned with gold beads, pearls, or small gems at the ends of each braid. You can create an intricate pattern of cornrows that cover your entire head, or create strategic cornrows framing your face with your natural curls underneath. The cornrows can be swept back into a low bun, gathered to one side, or left loose with the braids flowing down your back. Each bead or gem catches light throughout your wedding day, creating sparkle without requiring additional jewelry.
The Versatility of Cornrow Bridal Styles
Cornrows are simultaneously elegant, cultural, and totally customizable. You can do thick cornrows for a bold statement, thin cornrows for delicate intricacy, or a mix of both for visual interest. The beauty is that cornrows are both a protective style and a showstopper — your hair is actually staying healthy while you’re looking stunning. The beading transforms cornrows from everyday to ceremonial.
Planning Your Cornrow Design
- Book your braider at least 2-3 weeks ahead of your wedding; a complete cornrow style takes 3-5 hours depending on complexity
- Bring reference photos showing the exact pattern, density, and bead placement you want
- Discuss whether you want the cornrows to go all the way to the scalp (zero invisible tracks) or if you’re okay with some natural hair showing underneath
- Plan for beading at the ends if you want that detail; glass beads, gold beads, and pearls all work beautifully
- If you’re gathering your cornrows into a bun or side gather, secure them with bobby pins that match your hair color
- Cornrows can last 2-3 weeks, so you can get them done several days before your wedding without worrying about them loosening
- Protect your cornrows the night before your wedding with a silk or satin bonnet to prevent frizz and preserve the pristine look
8. Natural Coils with Tiara or Crown
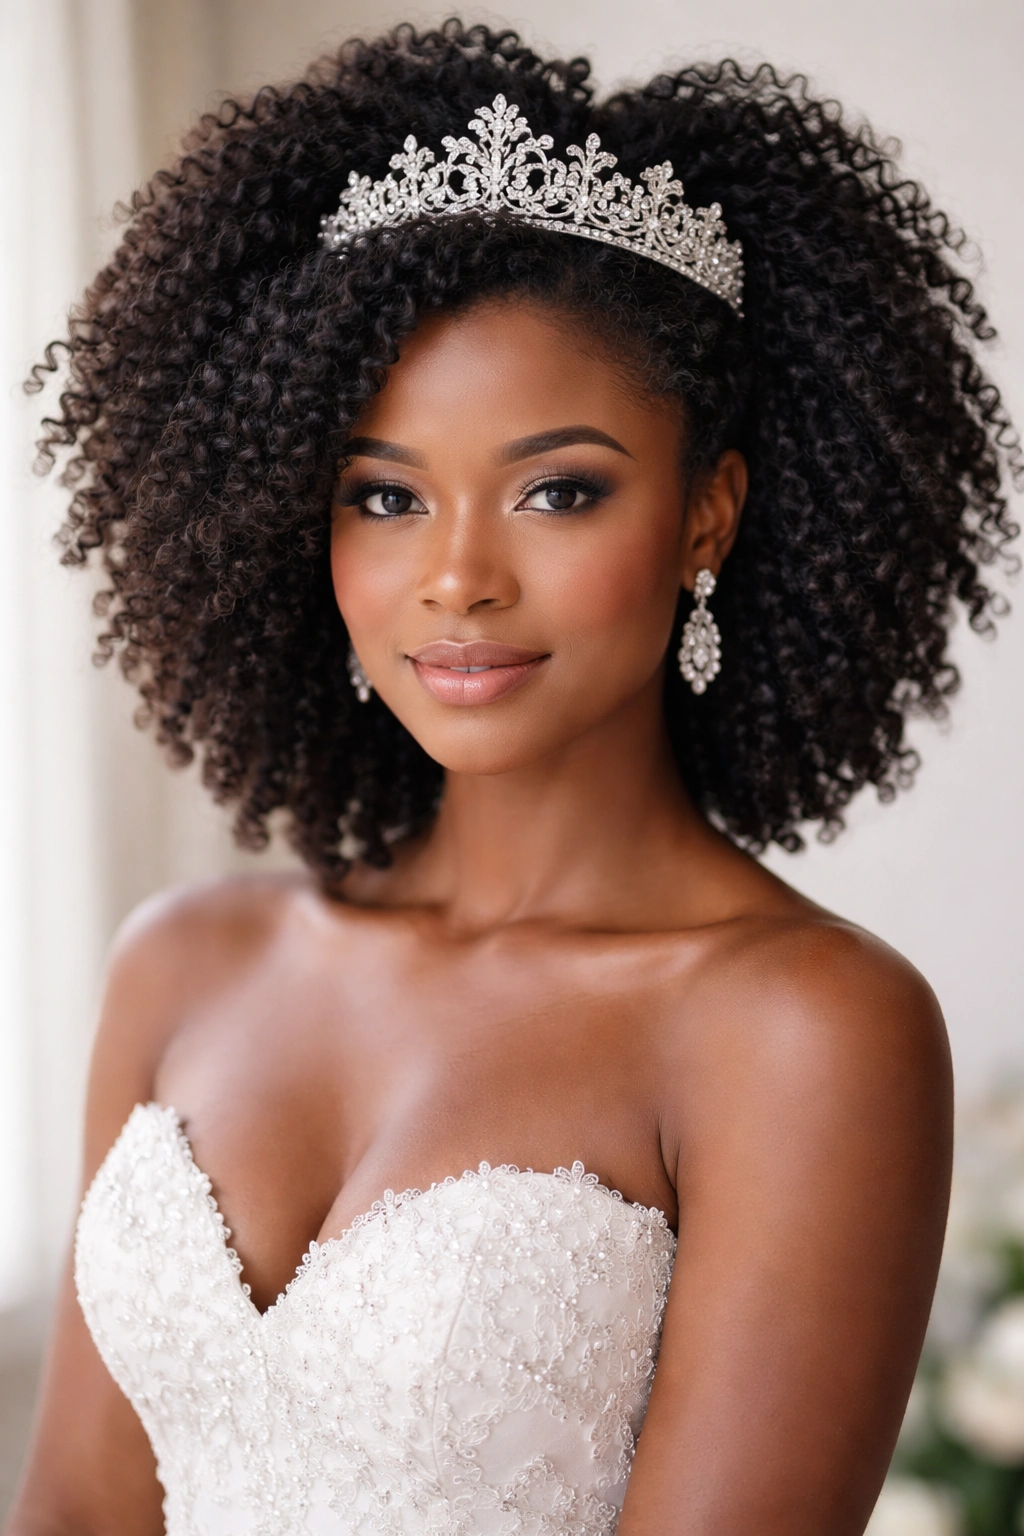
This style celebrates your natural coil pattern in its fullest, most defined form, paired with a bridal tiara, crown, or headpiece that sits beautifully against and above your coils. Your hair is blown out and fluffed for maximum volume, or you’re working with your natural coil definition enhanced with leave-in product and curl cream. The tiara becomes the bridal embellishment while your hair remains the star. This works whether your natural texture is loose waves or tight coils — the key is definition and intentional styling.
Defining Your Coils for Maximum Impact
Beautiful defined coils don’t happen accidentally on your wedding day — they’re the result of proper moisture, the right products, and strategic styling technique. You want each coil or curl to be distinct and shiny, not matted together or frizzy. This takes planning in the weeks leading up to your wedding through deep conditioning and moisture-retention strategies.
Styling Defined Coils
- Use a deep conditioning treatment 1-2 times per week in the month before your wedding to build moisture in your coils
- The morning of your wedding, lightly dampen your hair and apply a leave-in conditioner and curl-defining cream
- Use a blow dryer with a diffuser attachment, cupping coils upward as you dry to enhance volume and definition
- Avoid touching your hair too much once it’s dry; excess manipulation causes frizz
- Position your tiara or crown at the front-center of your head, securing it with bobby pins that blend into your hair
- A simple tiara works better with defined coils than an ornate one; you want to showcase your hair, not compete with excessive headpiece details
- Use a light hairspray designed for curls (not a heavy hold) to lock in the style without creating crunch or frizz
9. Faux Hawk for Bold Brides
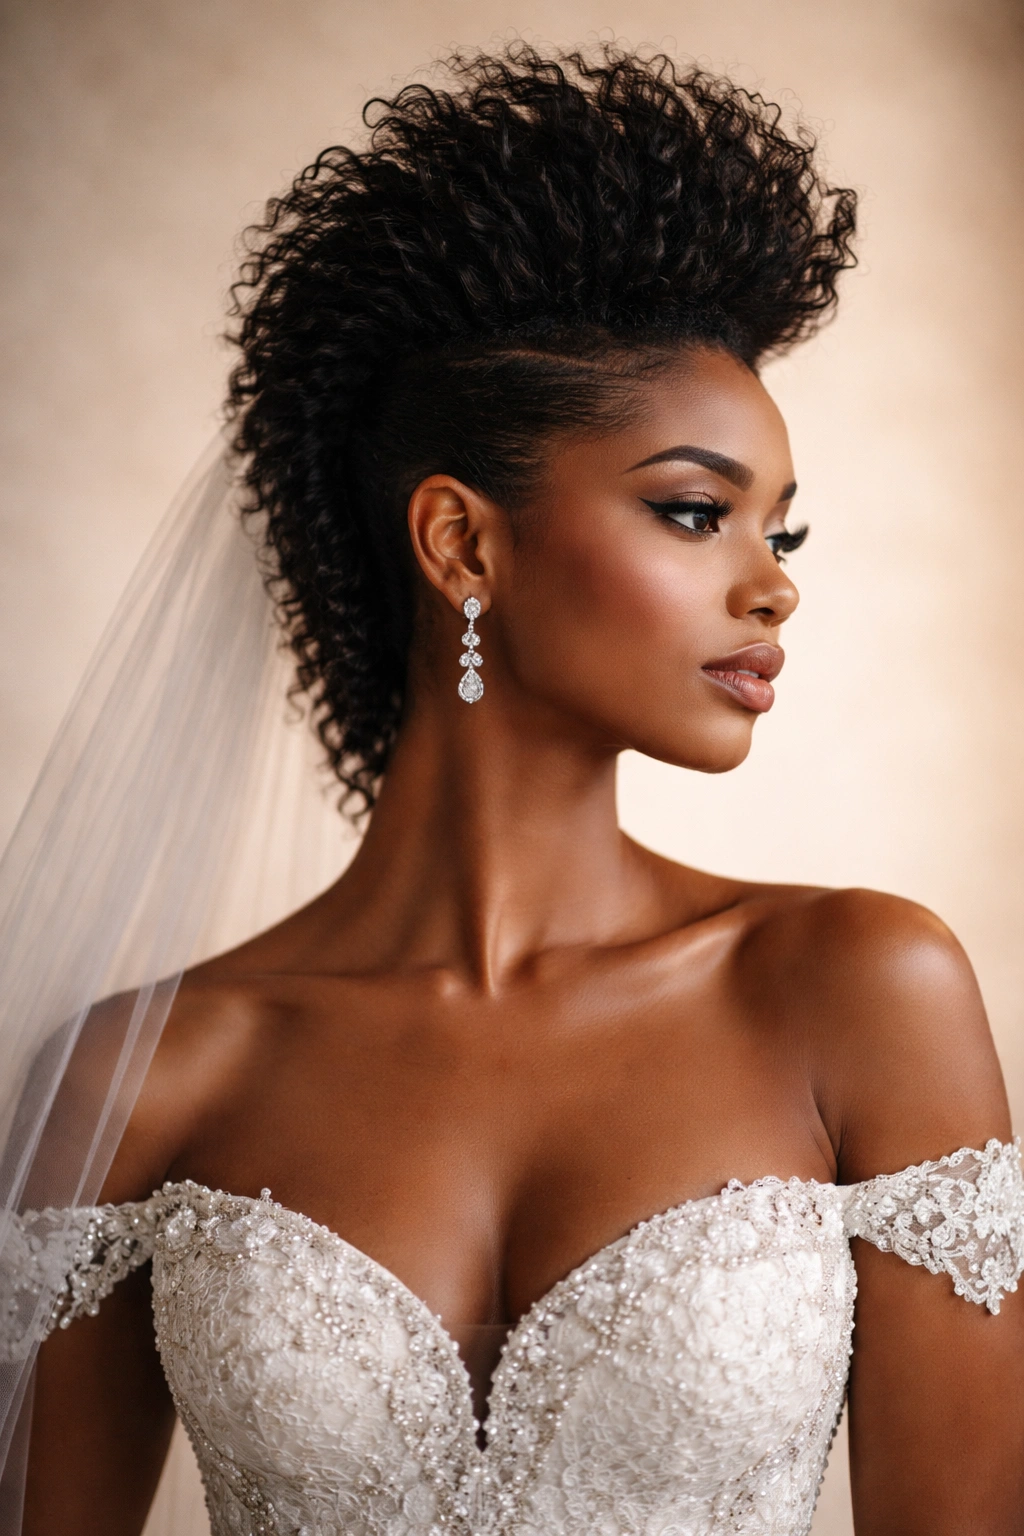
If you want to make a statement that says “I’m not following the rulebook,” a faux hawk might be your hairstyle. This dramatic style creates a raised centerline of voluminous hair from your crown to your nape, with the sides smoothed back or faded. The faux hawk is bold, modern, and undeniably bridal when executed intentionally — it says you know exactly who you are and you’re celebrating it. This works especially well if you’re doing a smaller, more intimate wedding or if your overall aesthetic skews contemporary.
The Confidence Factor
A faux hawk isn’t for everyone, and that’s exactly the point. If you’re drawn to this style, it’s because you want your wedding to reflect your personality and style rather than adhering to traditional bridal expectations. This is a statement hairstyle, and it pairs best with a bride who’s ready to own her moment completely. The faux hawk photographs beautifully and is absolutely memorable.
Building Your Faux Hawk
- You’ll need significant length on top (at least 6 inches stretched) and short faded or shaved sides for the full effect
- Style the centerline with a blow dryer and round brush to create maximum height and definition
- Use a lightweight smoothing serum on the sides to enhance the sleekness of the faded portions
- Secure the raised center section loosely with bobby pins positioned underneath so they’re invisible
- Consider the proportions of your face and body; a faux hawk should feel balanced, not overwhelming
- A minimal headpiece (maybe a small crown positioned at the peak of the hawk) can add bridal polish, or go without for pure edge
- Keep jewelry minimal; your hair is making a statement that doesn’t need competition
10. Twist-Out Updo
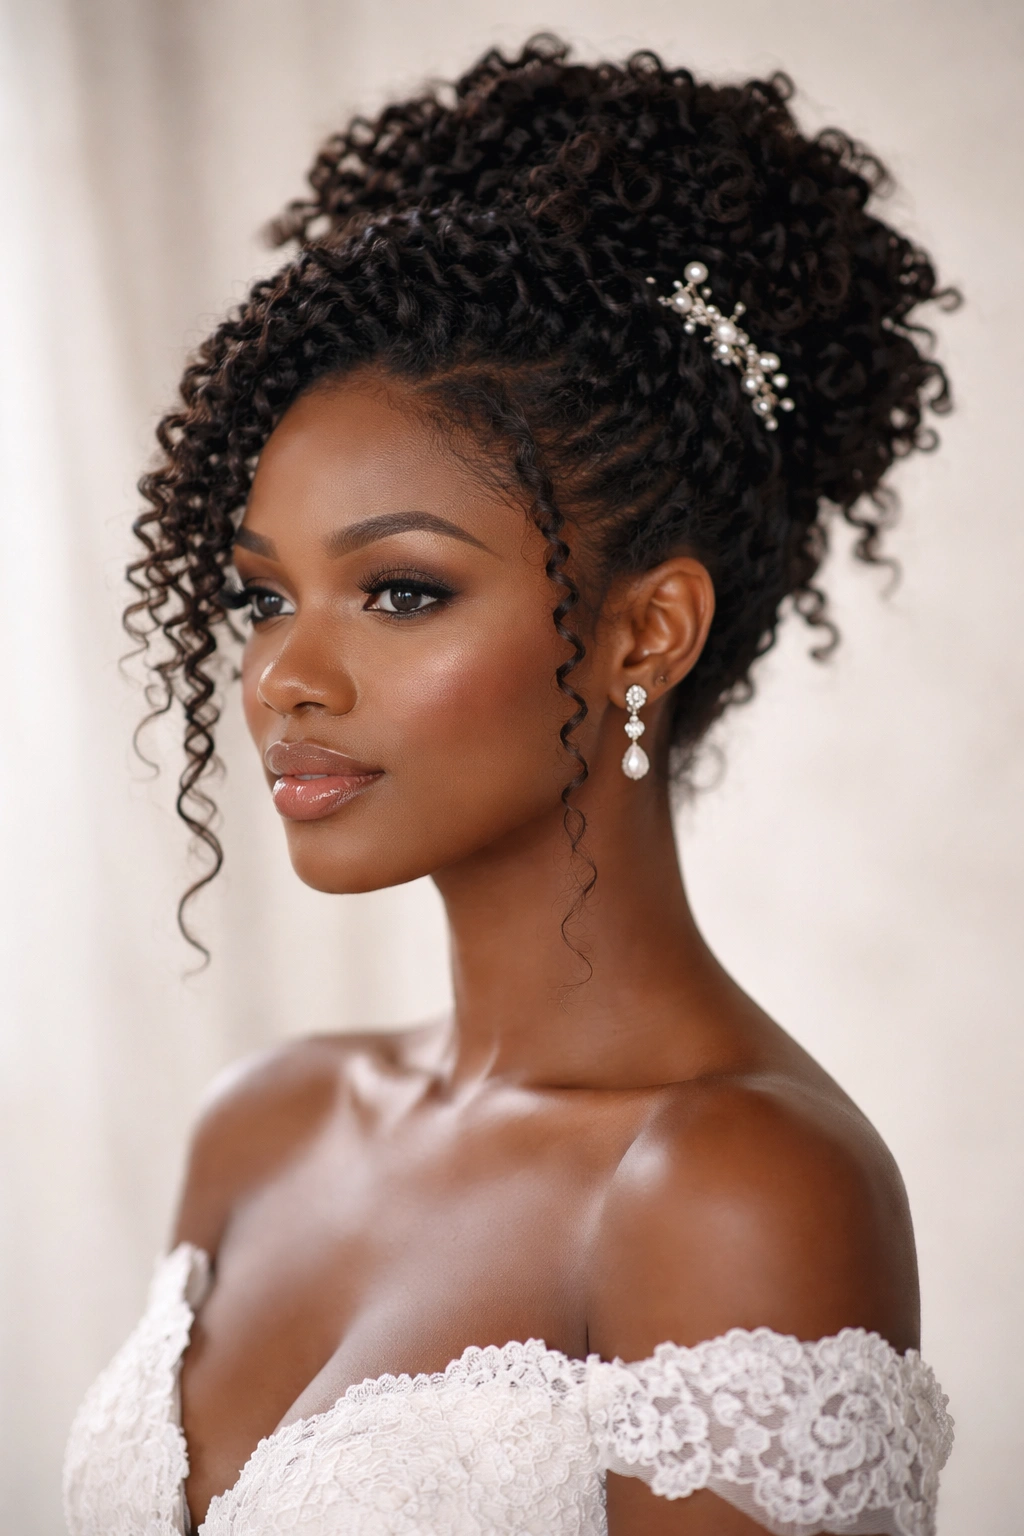
A twist-out creates soft, defined texture that’s perfect for an updo style. This involves twisting damp hair, allowing the twists to set and dry overnight, then untwisting them to reveal a beautiful wave or curl pattern. Those twists are then gathered and pinned into an updo — either loose and romantic or tight and sculptural, depending on your preference. The twist-out updo combines texture, definition, and polish all in one style. Your hair remains natural throughout the process, and the resulting texture is stunning and long-lasting.
Why Twist-Out Updos Photograph Beautifully
A twist-out creates individual texture and dimension that reads beautifully in photos from every angle. The pattern of the twists creates visual interest that a smooth updo wouldn’t offer, and the style inherently looks intentional and editorial. This style works whether you have shoulder-length hair or longer.
Creating a Twist-Out Updo Timeline
- 2-3 days before your wedding, wash and deep condition your hair, then create 8-16 twists depending on the thickness and definition you want
- Allow the twists to dry completely — either air dry or blow dry with a diffuser
- The night before your wedding, gently untwist each section, creating soft, defined waves or coils depending on how tightly you twisted and what your natural curl pattern is
- The morning of your wedding, lightly mist the twist-out texture with a spray bottle to refresh it, then gather sections into your preferred updo
- Secure the updo with bobby pins, using edge control around your hairline for polish
- Lightly mist the finished updo with a curl-friendly hairspray to lock it in place without creating crunch
- This style typically lasts beautifully throughout a full wedding day; if pieces shift, they usually look intentional rather than messy
11. Coil-Out with Hair Jewelry
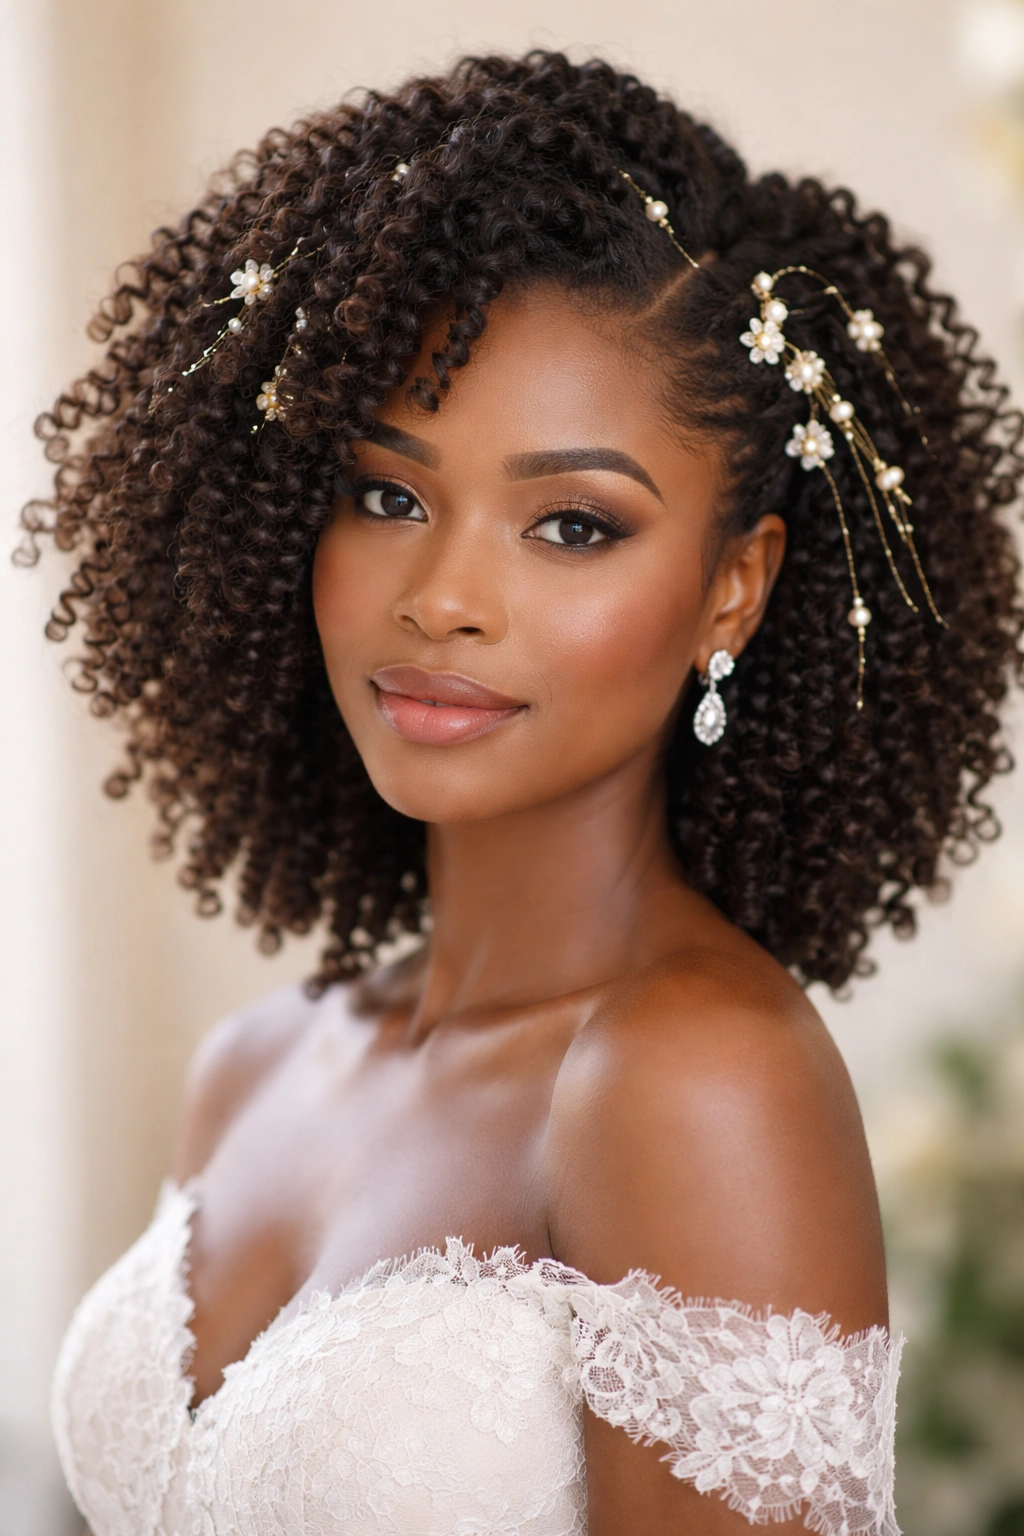
Similar to a twist-out, a coil-out involves sectioning hair into small coils, allowing them to set, then uncoiling them to create voluminous definition. The coil-out style is adorned with hair jewelry — delicate cuffs, rings, or chains that wrap around sections of your hair or clip into your coils. The jewelry becomes the bridal embellishment, catching light and adding sparkle throughout your hair. This style celebrates your curl pattern in its most natural form while adding intentional, decorative elements.
The Modern Appeal of Hair Jewelry
Hair jewelry transforms a natural style into something ceremonial and special without requiring you to chemically alter or straighten your hair. The jewelry is removable, adjustable, and completely customizable to your bridal vision. You might wear delicate gold cuffs, pearl-adorned clips, or statement rings woven through your coils — whatever matches your overall aesthetic.
Installing Hair Jewelry
- Create your coil-out the same way you would a twist-out: section, coil, set, and uncoil
- After uncoiling, use a curl cream or leave-in conditioner to define your coils and add shine
- Position your hair jewelry strategically: perhaps cuffs around coils framing your face, or rings woven through coils at the back of your head
- Make sure any jewelry is secure but not so tight that it’s pulling your hair; you want beauty without damage
- Test wearing the jewelry for at least an hour before your wedding day to make sure it feels comfortable and stays in place
- Bring replacement jewelry in your wedding day kit in case anything shifts or falls out
- Pair jewelry with minimal additional hairpieces so your hair and the jewelry are the focus
12. Bantu Knots Released into Volume
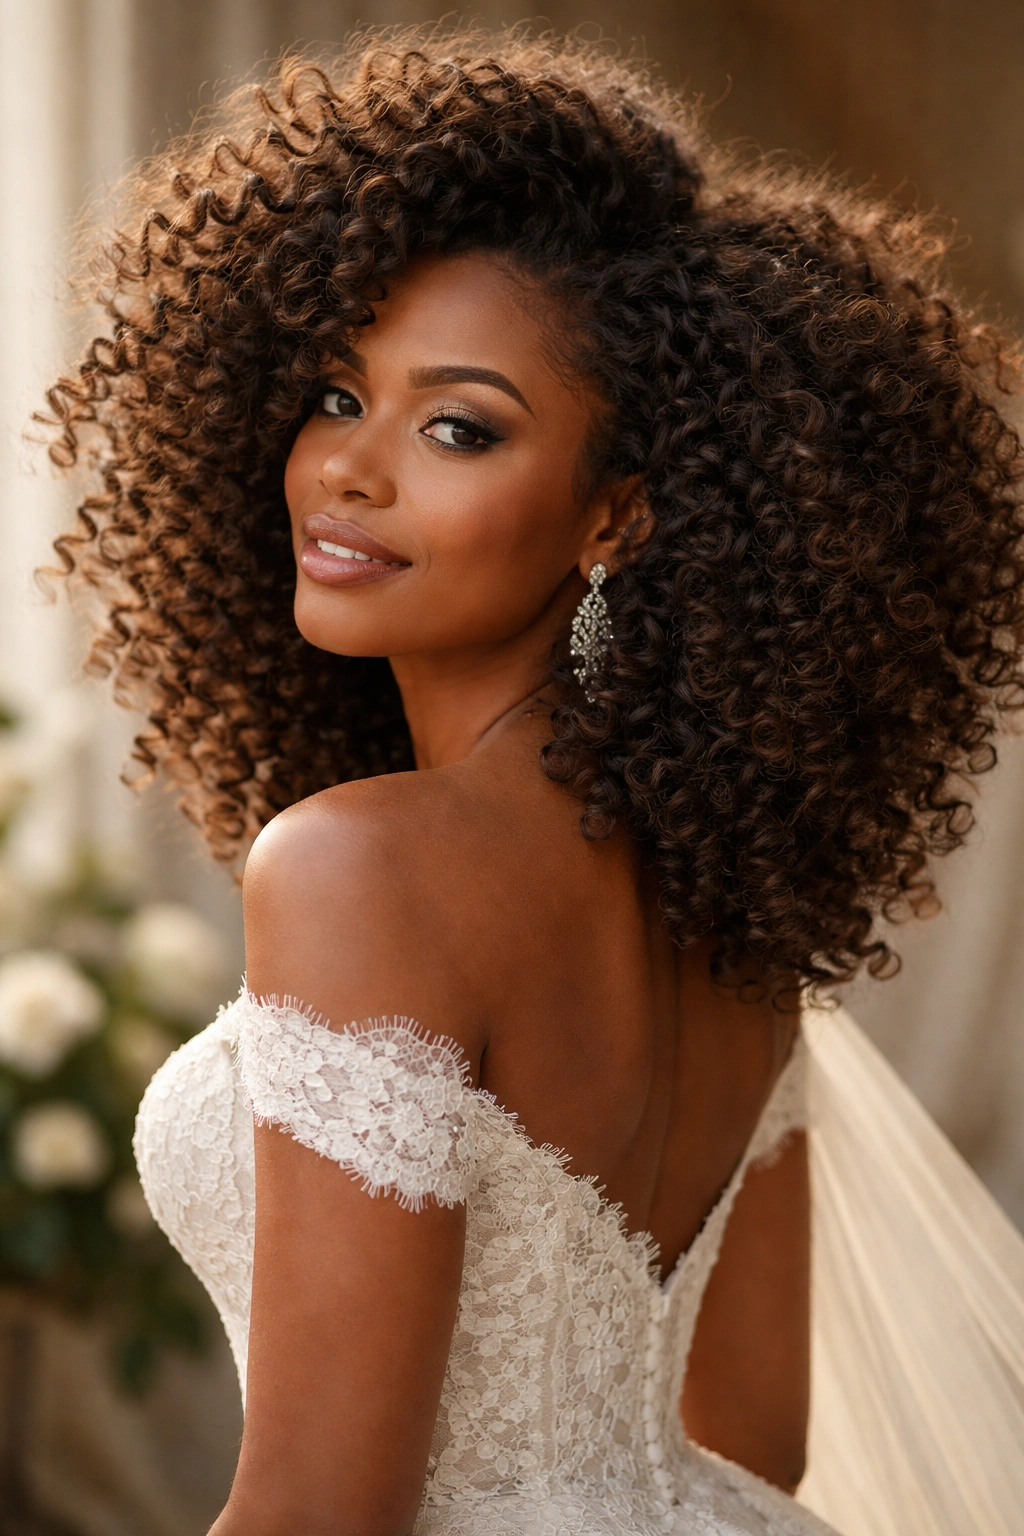
Bantu knots are a traditional protective style where small sections of hair are twisted and coiled tightly against the scalp, creating knot-like bumps. For a wedding, you create the knots a day or two before your event, then release them to reveal incredible volume and texture. When you release the knots, your hair explodes into a magnificent cloud of coils, waves, or curls depending on your hair type and how tightly the knots were coiled. This creates drama, volume, and undeniable presence — you’ll command attention from the moment you walk into the room.
The Impact of Released Bantu Knots
The moment you release bantu knots, your hair transforms from compact knots into pure volume and movement. This style is especially stunning if you’re drawn to drama and visibility; there’s no understating the presence of hair that’s been released from knots. The style photographs remarkably well, and the texture reads as intentional and artistic rather than accidental.
Bantu Knot Timeline and Execution
- 2-3 days before your wedding, section your hair into 12-20 sections (depending on how much volume you want)
- Create each knot by twisting the section and coiling it tightly against the scalp, then securing it with bobby pins
- Leave the knots in place overnight and throughout the following day to allow them to fully set
- The morning of your wedding, gently release each knot by uncoiling and untwisting; don’t brush through your hair, just separate the coils with your fingers
- Use a lightweight curl cream or oil on your fingertips as you’re releasing the knots to prevent frizz and enhance shine
- The result should be incredible volume and dimension; you might have a large natural halo around your head
- Consider pairing this with minimal accessories so the hair is the statement, or add a small crown or headpiece if you want a bridal element
- This style is naturally long-lasting and won’t need much touch-up throughout your wedding day
Final Thoughts
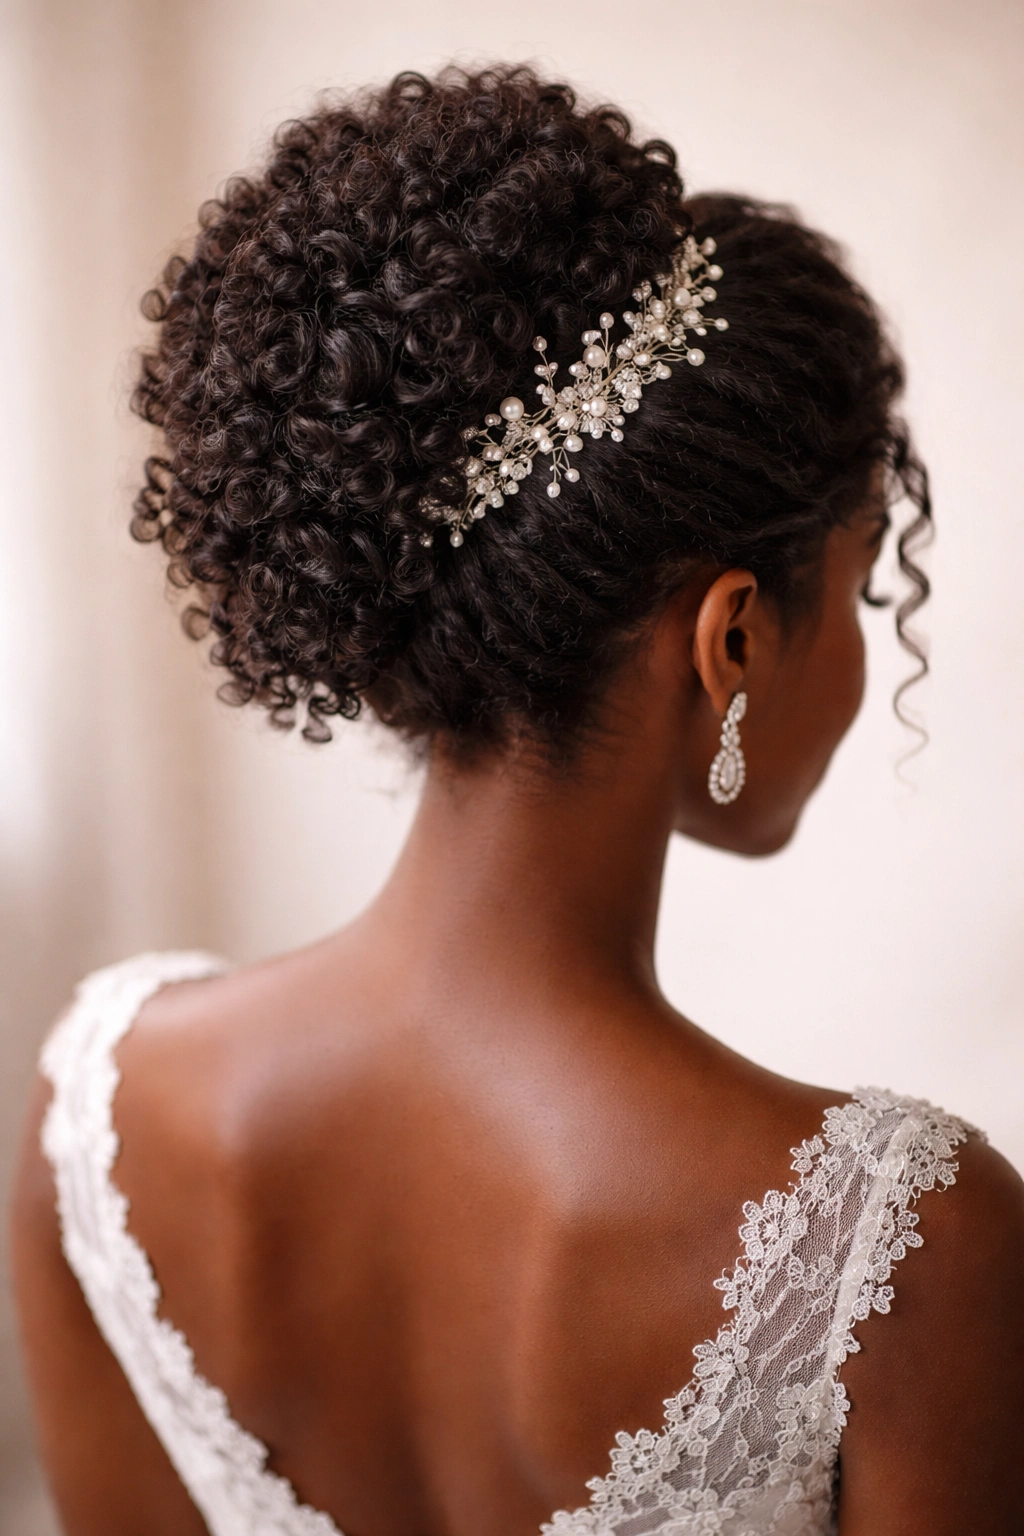
Your wedding hairstyle should feel like you — amplified and celebratory, but authentically you. The beauty of choosing an afro-textured wedding hairstyle is that you’re starting from a place of celebrating your natural hair rather than working against it. Each of these twelve styles works with your hair’s natural qualities instead of fighting them, which means you’ll spend less energy worrying about your hair holding up and more energy enjoying your actual wedding day.
What matters most is finding a stylist who understands afro hair, respects your natural texture, and has the skills to execute the style you’re envisioning. Look through their portfolio specifically for afro wedding hairstyles, not just any wedding hair they’ve done. Schedule a consultation well before your wedding day to discuss products, timing, any protective measures you’re taking, and exactly how the style will be maintained throughout your celebration. Bring reference photos, ask questions about durability and touch-ups, and make sure you feel confident and heard.
On your wedding day, remember that your hair is an extension of your beauty and your heritage. Whether you choose classic elegance or bold modernity, the most important thing is that you feel like the best version of yourself as you walk down the aisle.
