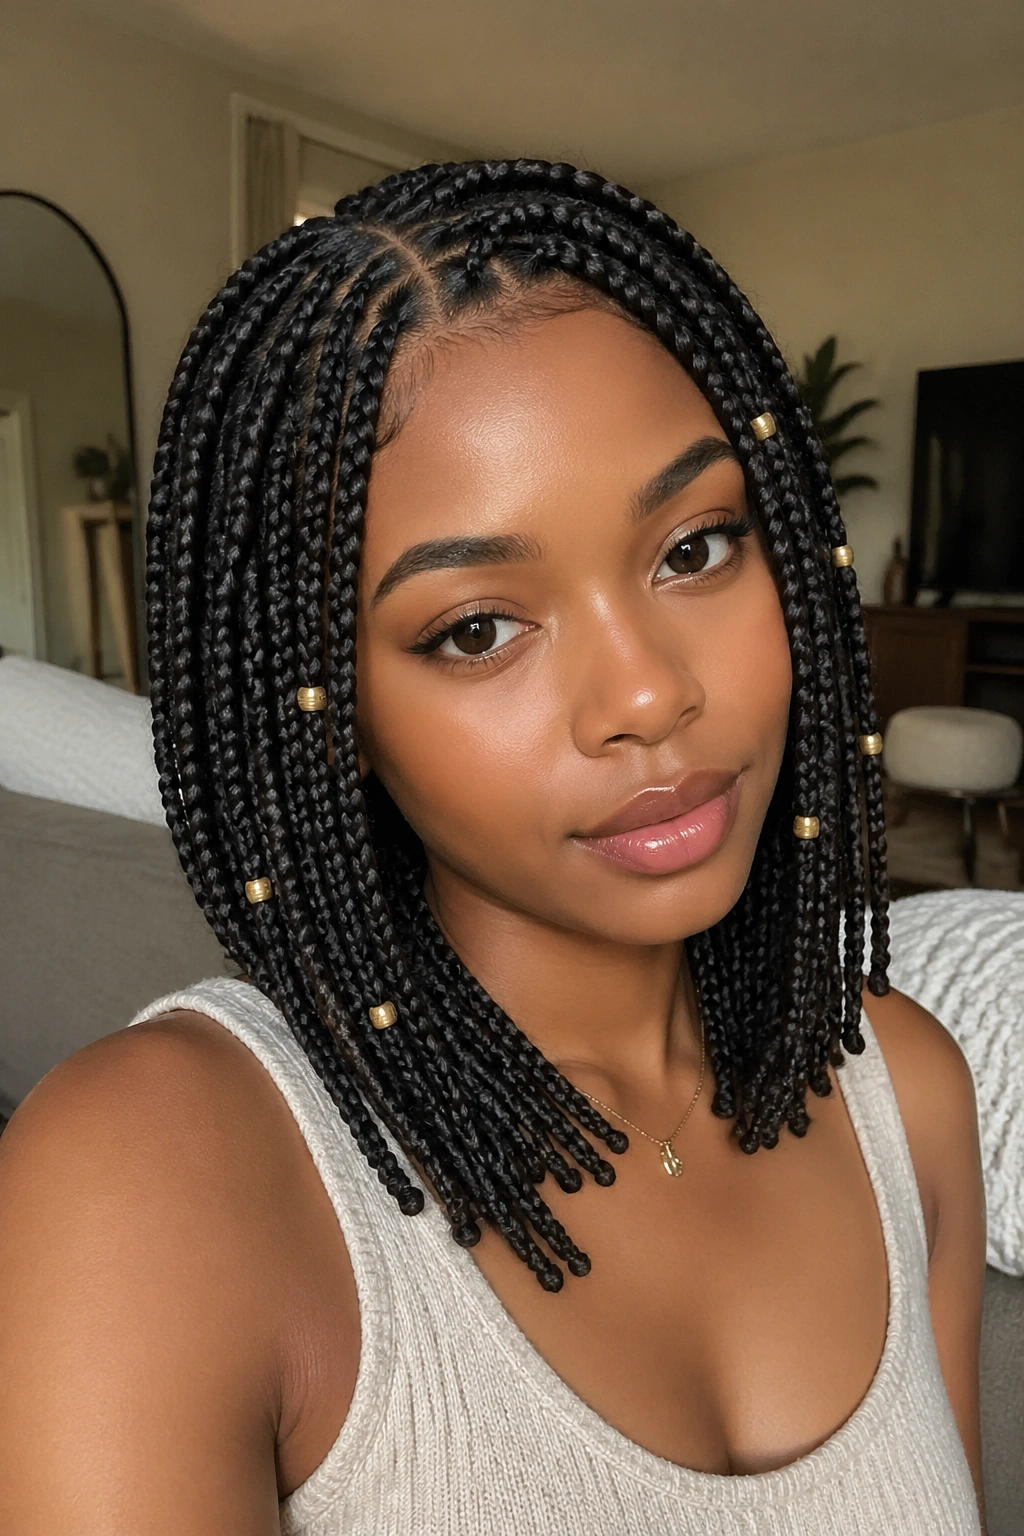
Medium-length knotless box braids with beads sit in a sweet spot that long braid fans and short-braid fans both chase: enough length for swing, not so much weight that your neck feels dragged down by noon. The style looks relaxed in motion and tidy when it’s still, which is a rare thing. Most protective styles lean hard in one direction or the other.
The knotless part matters more than people give it credit for. Because the braid is fed in gradually instead of starting with a bulky knot, the base lies flatter and the scalp usually feels calmer. That makes a real difference once beads enter the picture, because beads add their own little pull and rhythm. You want the braid to carry the look, not the hardware.
Beads are where the personality comes in. A few clear or wooden pieces can make a set feel soft and easy. Stack too many heavy beads near the hairline, and the style starts feeling crowded fast. Heavy ends drag, especially on medium-length braids where the braids already sit close to your shoulders and collarbone.
That’s why medium length works so well here. The beads land in a visible spot, the ends still move, and the whole thing can go into a low ponytail, half-up top knot, or loose side sweep without fighting you. The right parting, bead size, and finish change the whole mood. Small changes. Big difference.
1. Clear Beads on a Clean Center Part
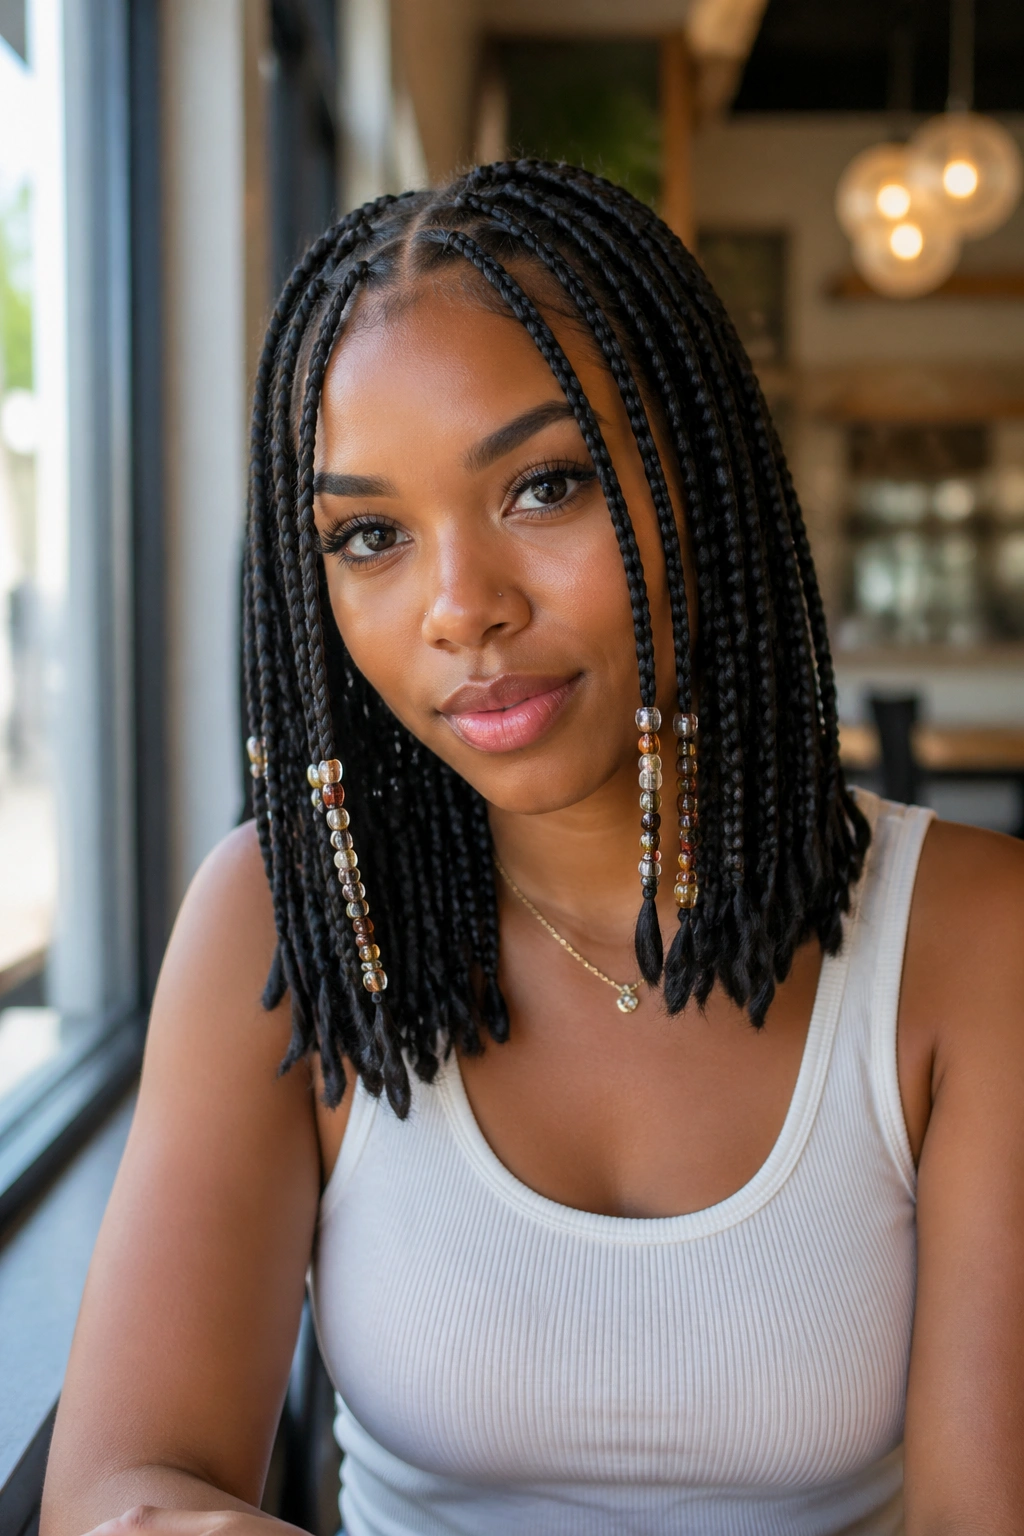
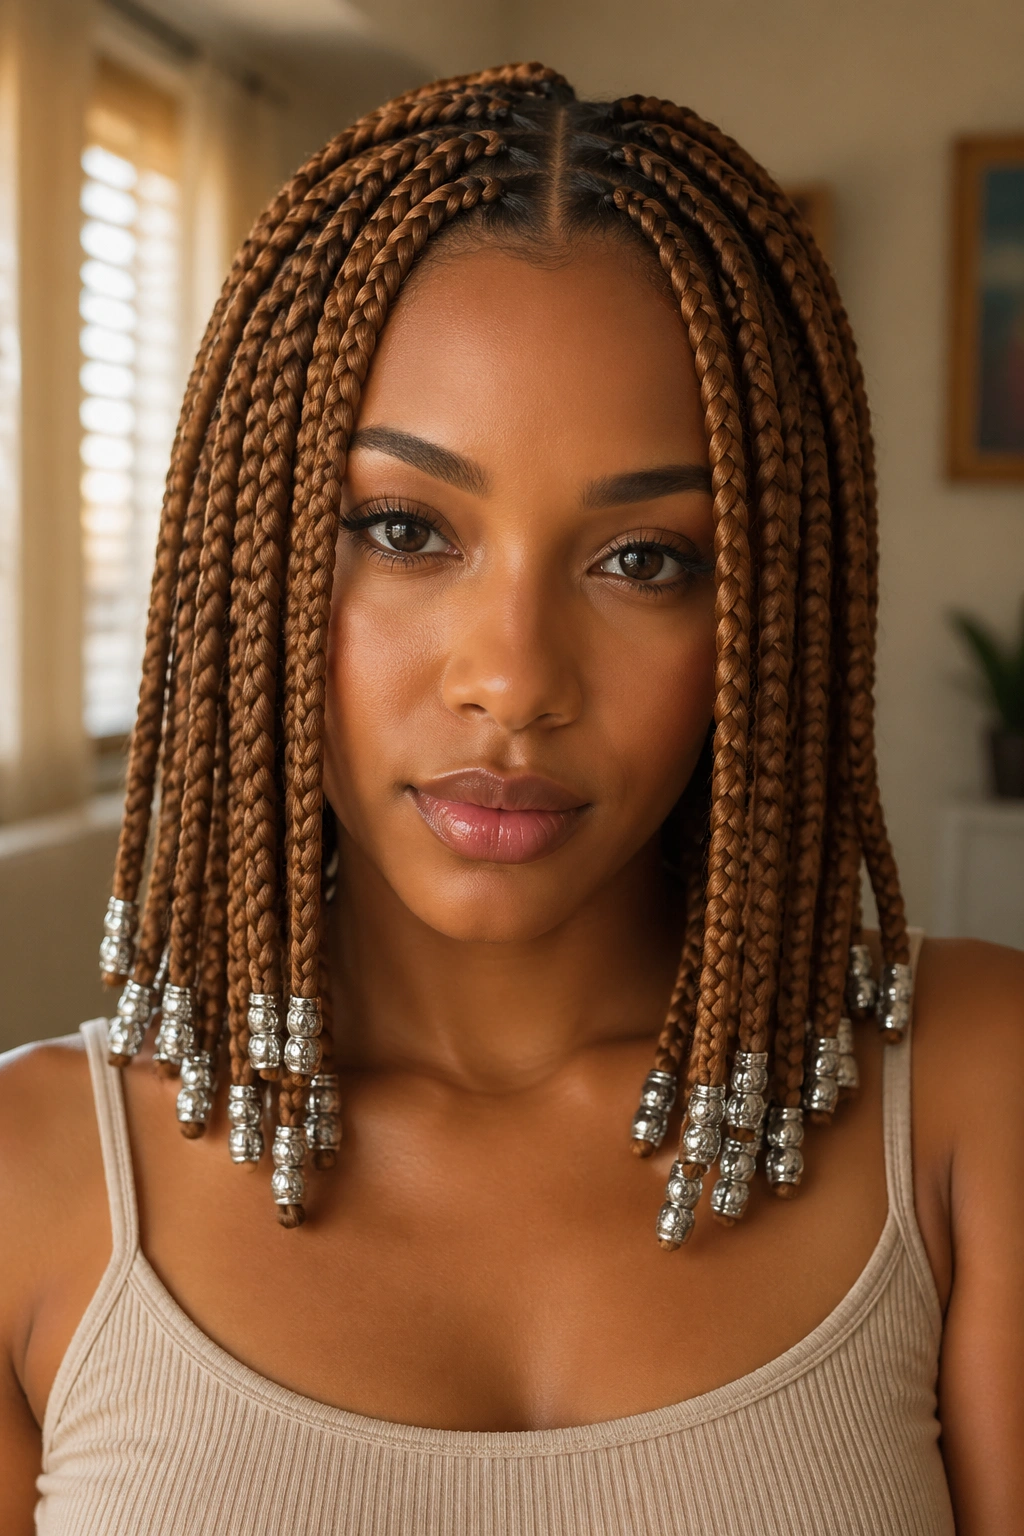
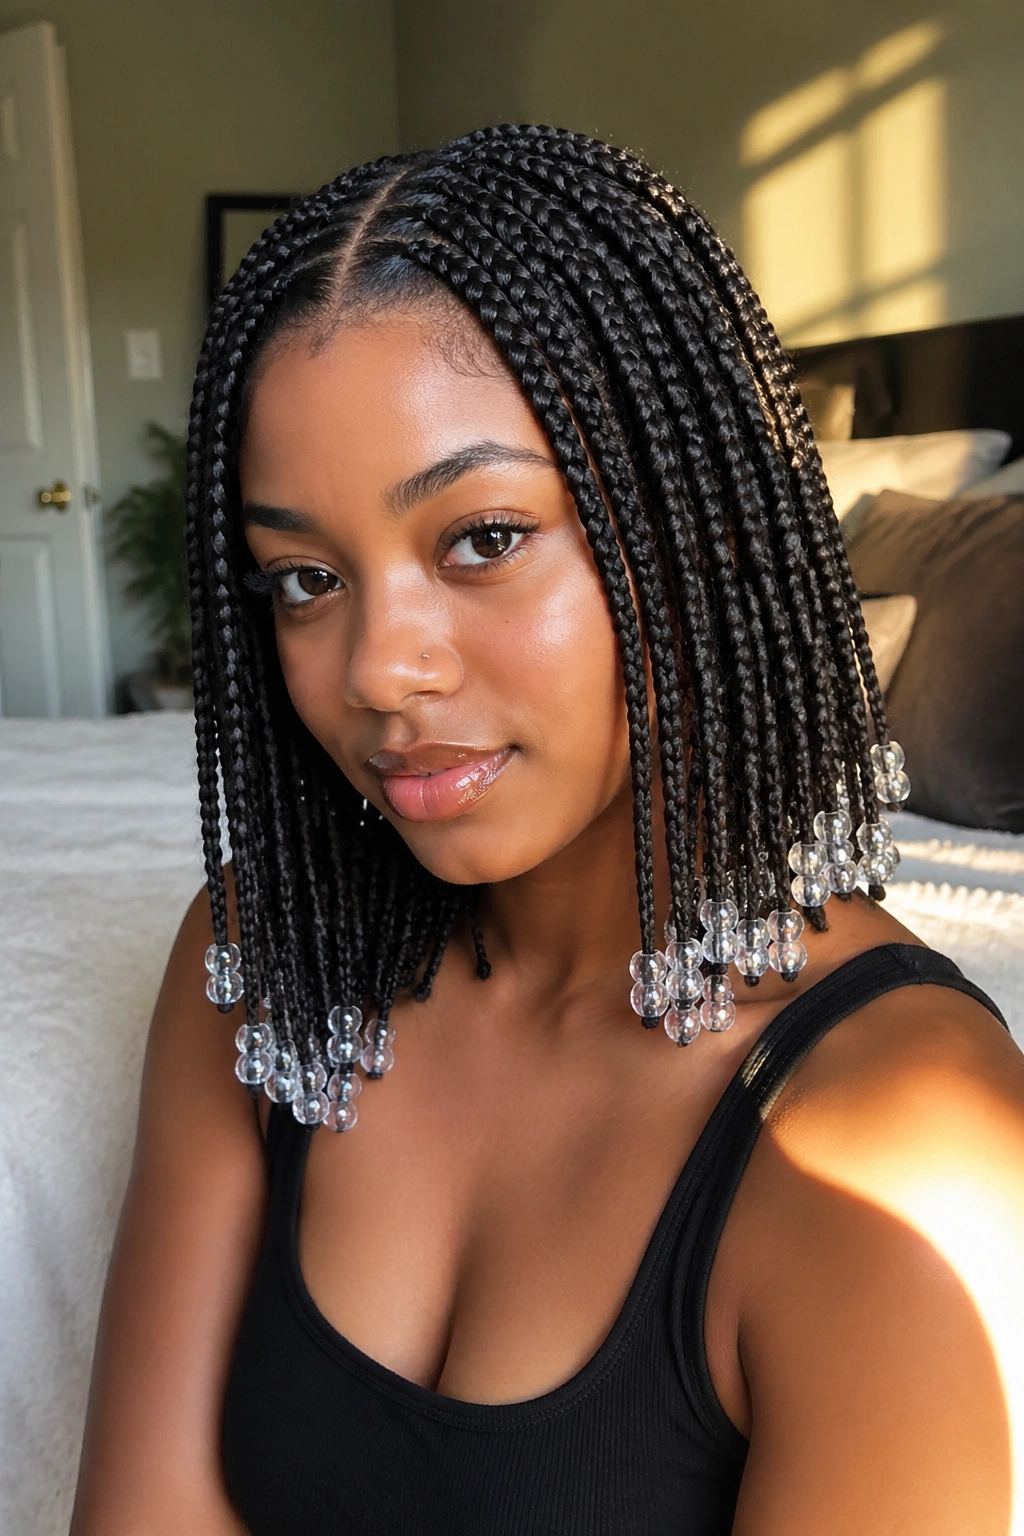
Clear beads are the easiest way to make medium-length knotless box braids with beads feel crisp instead of busy. On black or deep brown braiding hair, transparent beads show off the braid ends without stealing attention from the parts and the neat feed-in at the root.
Why Clear Beads Keep the Look Sharp
They also give you motion without clutter. When the braids tap your shoulders, the sound is soft and light, not heavy or clunky. That matters more than people think. A clear bead reads almost like a lens — you notice the shape inside it more than the bead itself.
If you want the set to look especially clean, ask for 8 mm to 10 mm clear beads and keep the front rows slightly smaller than the back. A center part with even spacing on both sides makes the clear beads feel deliberate instead of random. Too many bead sizes at once can make the ends look fussy.
- Use 1 to 2 beads per braid tail for a neat finish.
- Choose flat, smooth beads if your braids will sit against your collarbone.
- Keep the first braid on each side a touch smaller so the face frame stays soft.
- If the beads slide too freely, add a small spacer bead before the clear one.
My favorite detail here is restraint — clear beads look best when they’re helping the braids, not fighting them.
2. Side-Swept Braids With Gold Cuffs
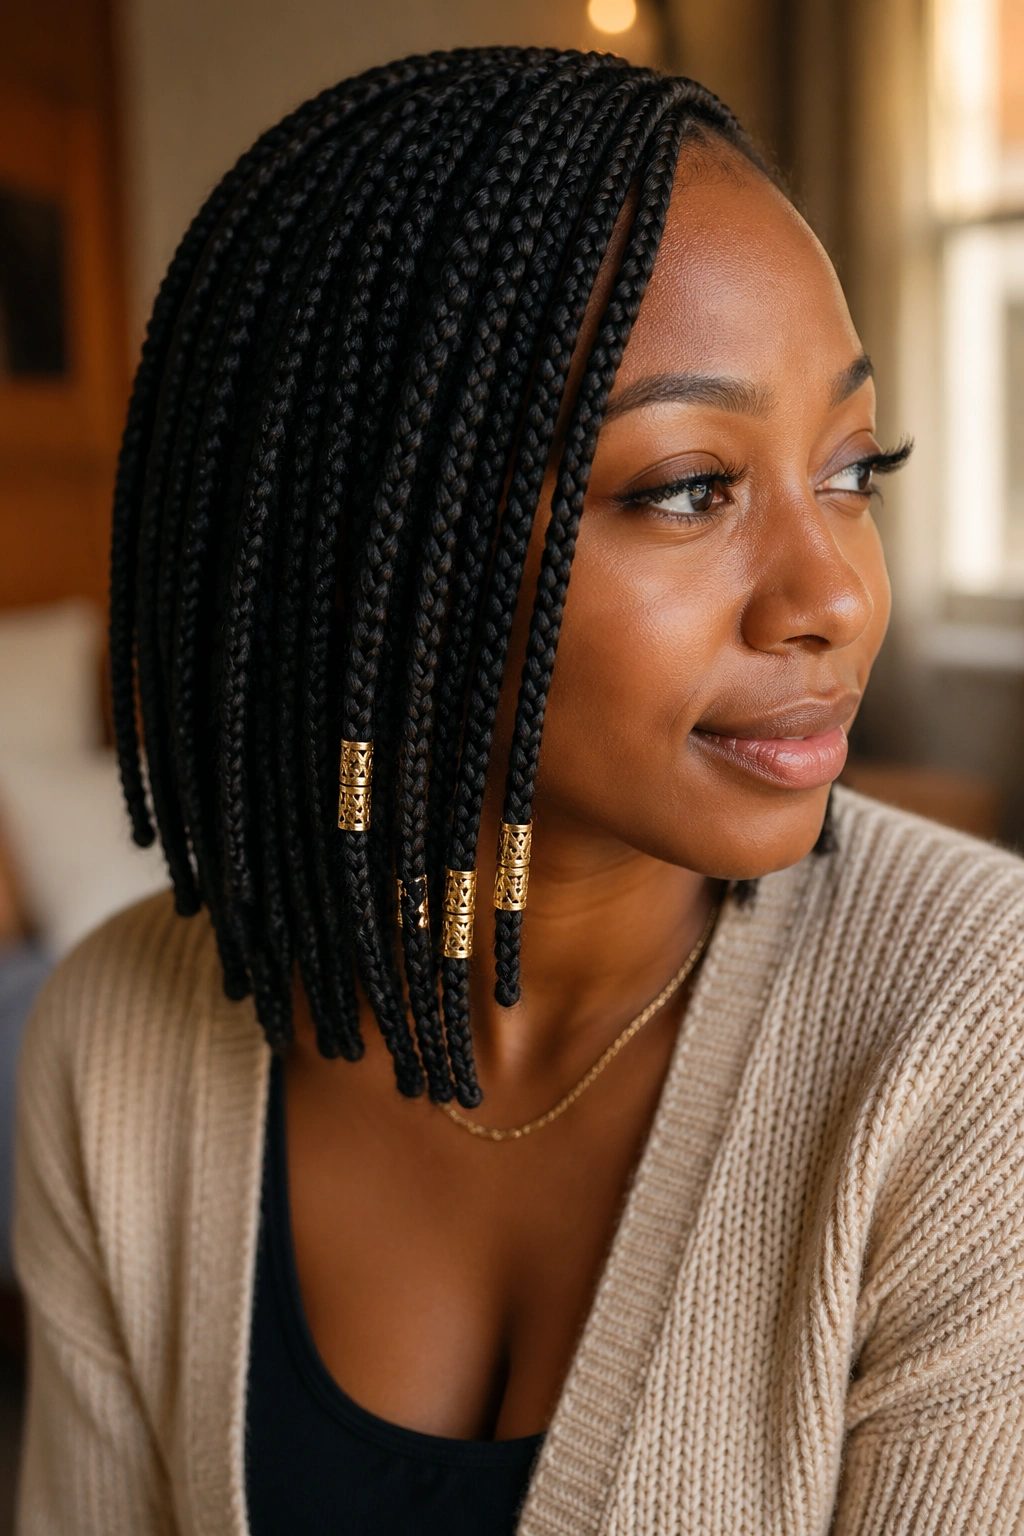
Gold cuffs can turn a plain braid set into something sharper in seconds. A deep side part gives the braids a little slant, and the cuffs catch the eye right where the hair curves across the face. It feels dressed up without turning the whole style into costume territory.
The trick is placement. I like cuffs on the lower half of the braid, not clustered right at the scalp where they can look crowded. A few cuffs on the front and temple braids are enough. Leave the rest of the set plain so the eye has a place to rest.
This style works especially well if your medium-length braids hit around the collarbone or top of the chest. That length gives the cuffs room to move and keeps them from bunching under a jacket collar. A warm gold finish tends to sit better with black braiding hair than a brassy yellow tone.
If you want the style to feel balanced, keep the side with more hair slightly cleaner and let the bead work live on the thinner side. It sounds small. It isn’t. That one choice keeps the look from turning lopsided in a sloppy way.
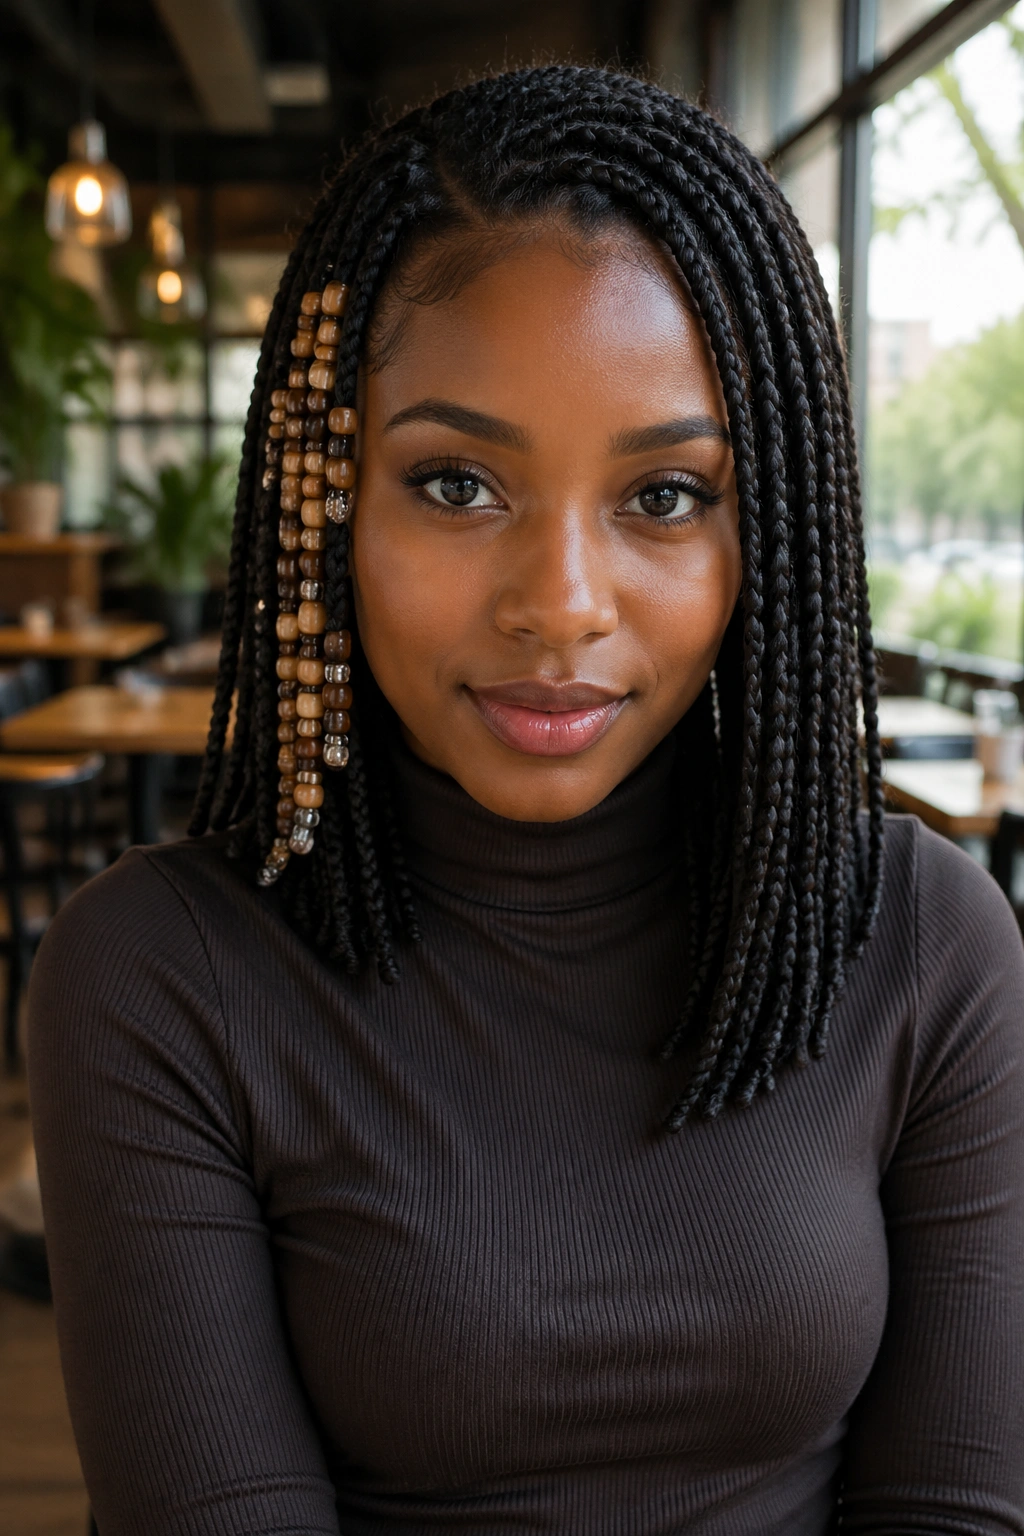
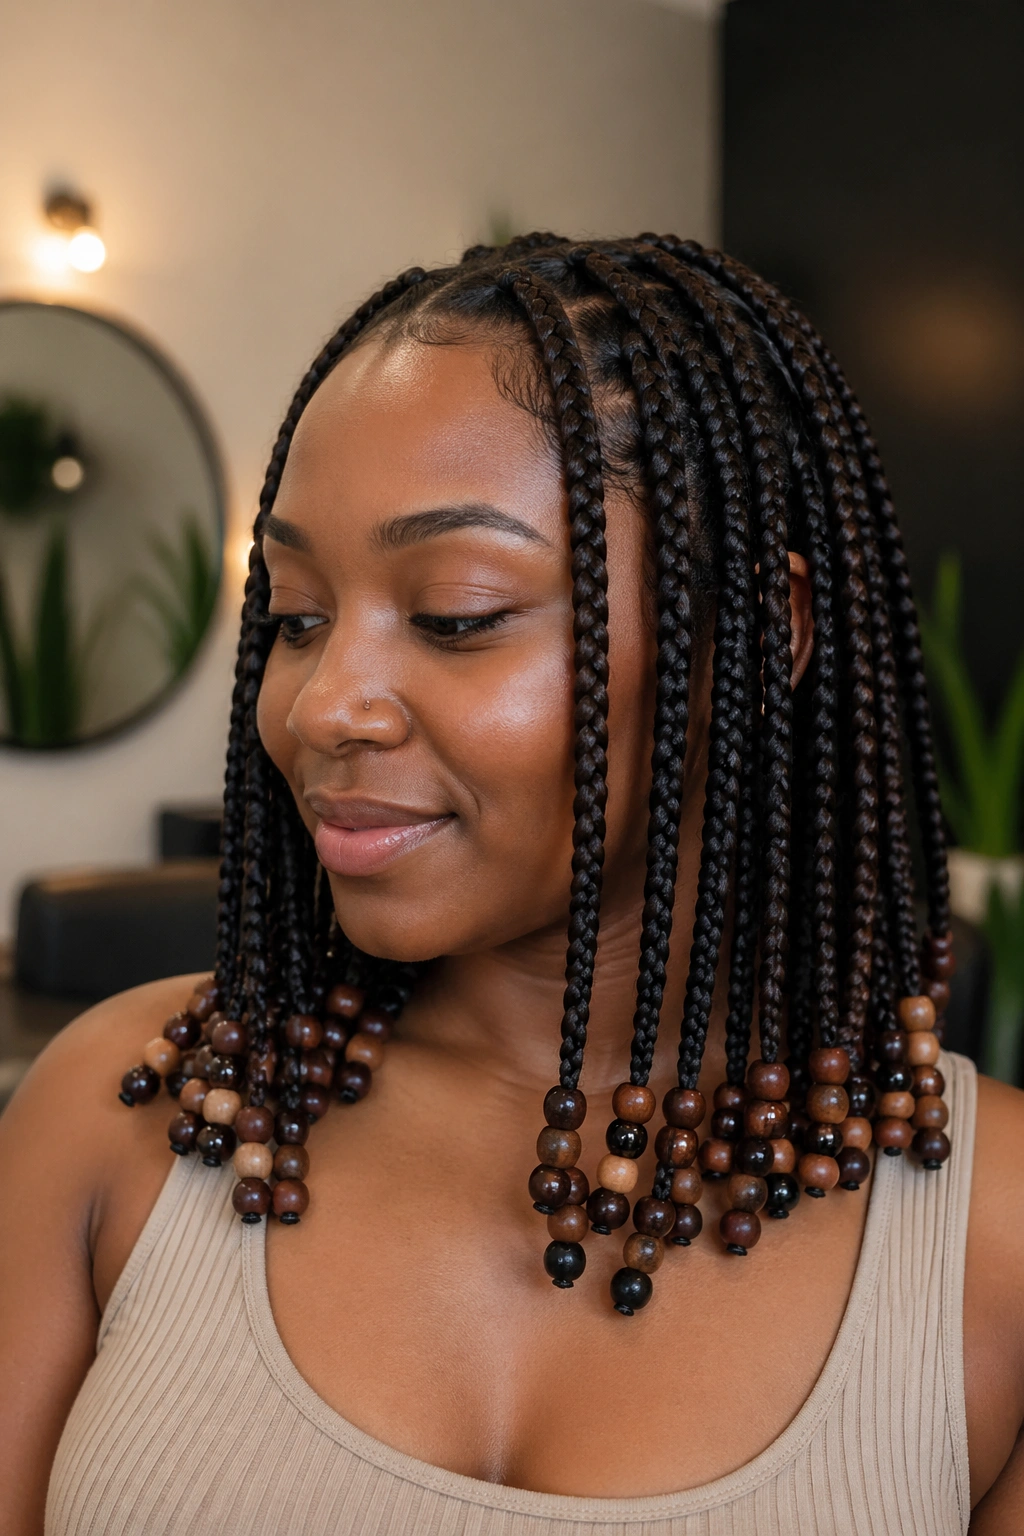
3. Wood Beads and a Soft Middle Part
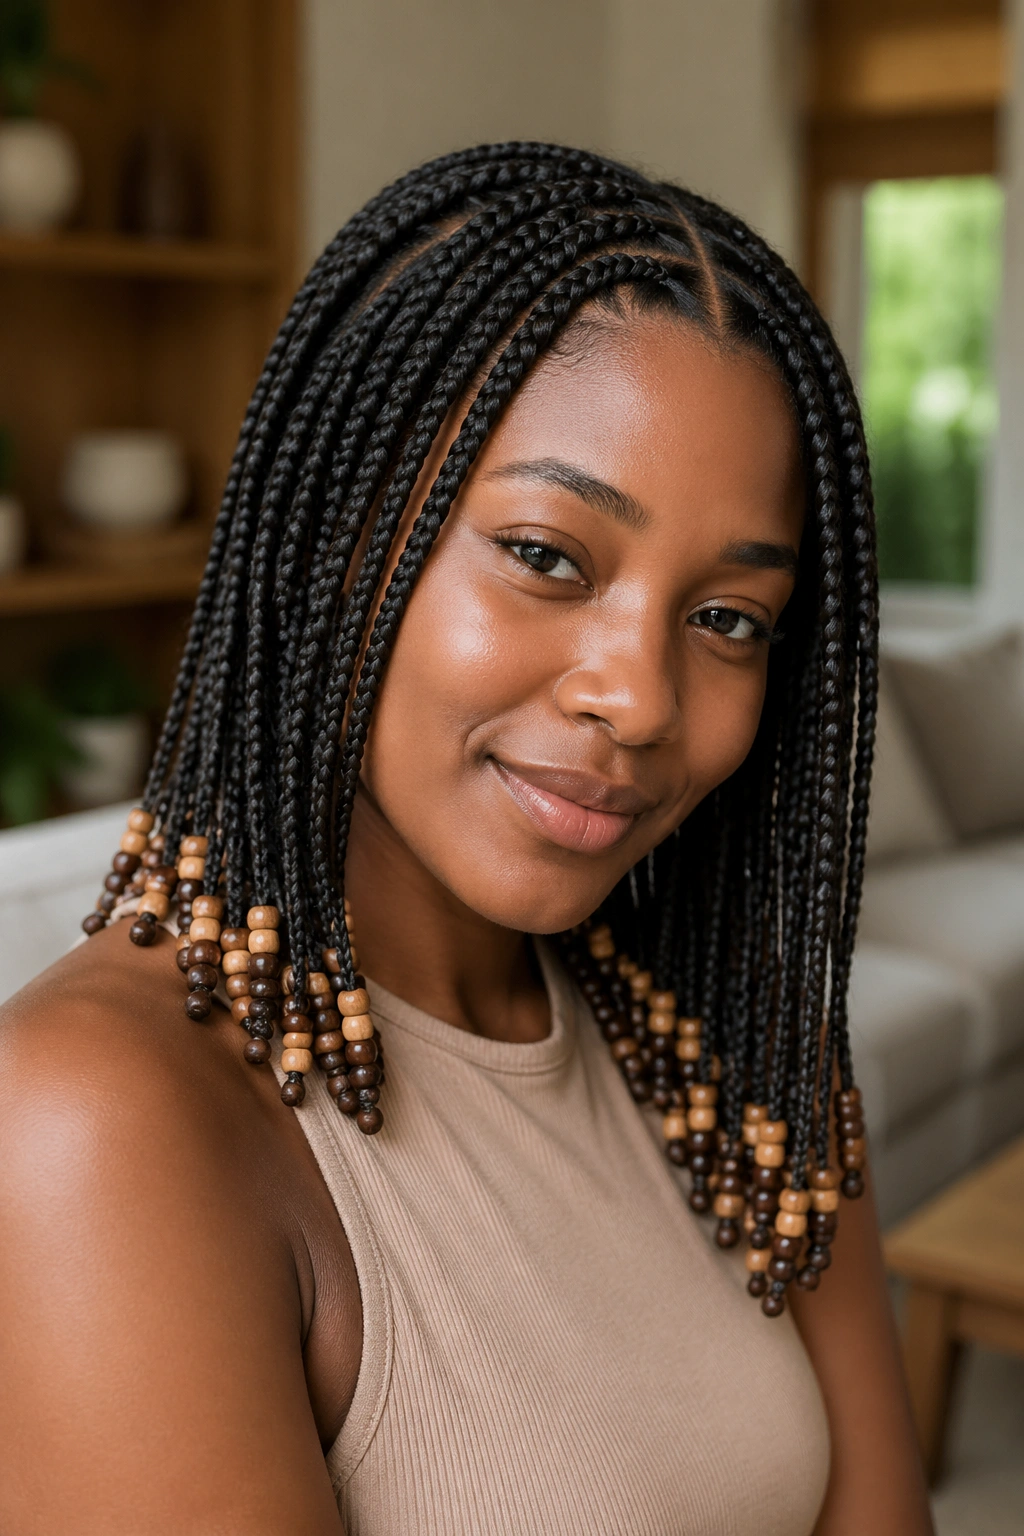
Why do wood beads look so good on knotless braids? Because they take some of the shine out of the ends and make the whole style feel grounded. Clear beads sparkle. Wood beads settle. That’s the difference.
How to Wear It
A soft middle part keeps the set calm and neat, especially on medium-length braids that already sit right in the visual sweet spot. The wood beads add weight in a good way, but they should still feel light enough that the braids swing easily when you turn your head. Go for medium-sized beads, around 10 mm to 12 mm, so the ends don’t look crowded.
I prefer this look on braids with a little texture in the parting, not razor-straight lines. It makes the style feel lived-in instead of overworked. You can leave the front braids a touch thinner if you want the beads to frame the face more softly.
It’s also a smart choice if you wear simple jewelry — small hoops, a plain chain, maybe a watch and nothing else. The wood already gives you enough texture. You do not need to pile on extra noise.
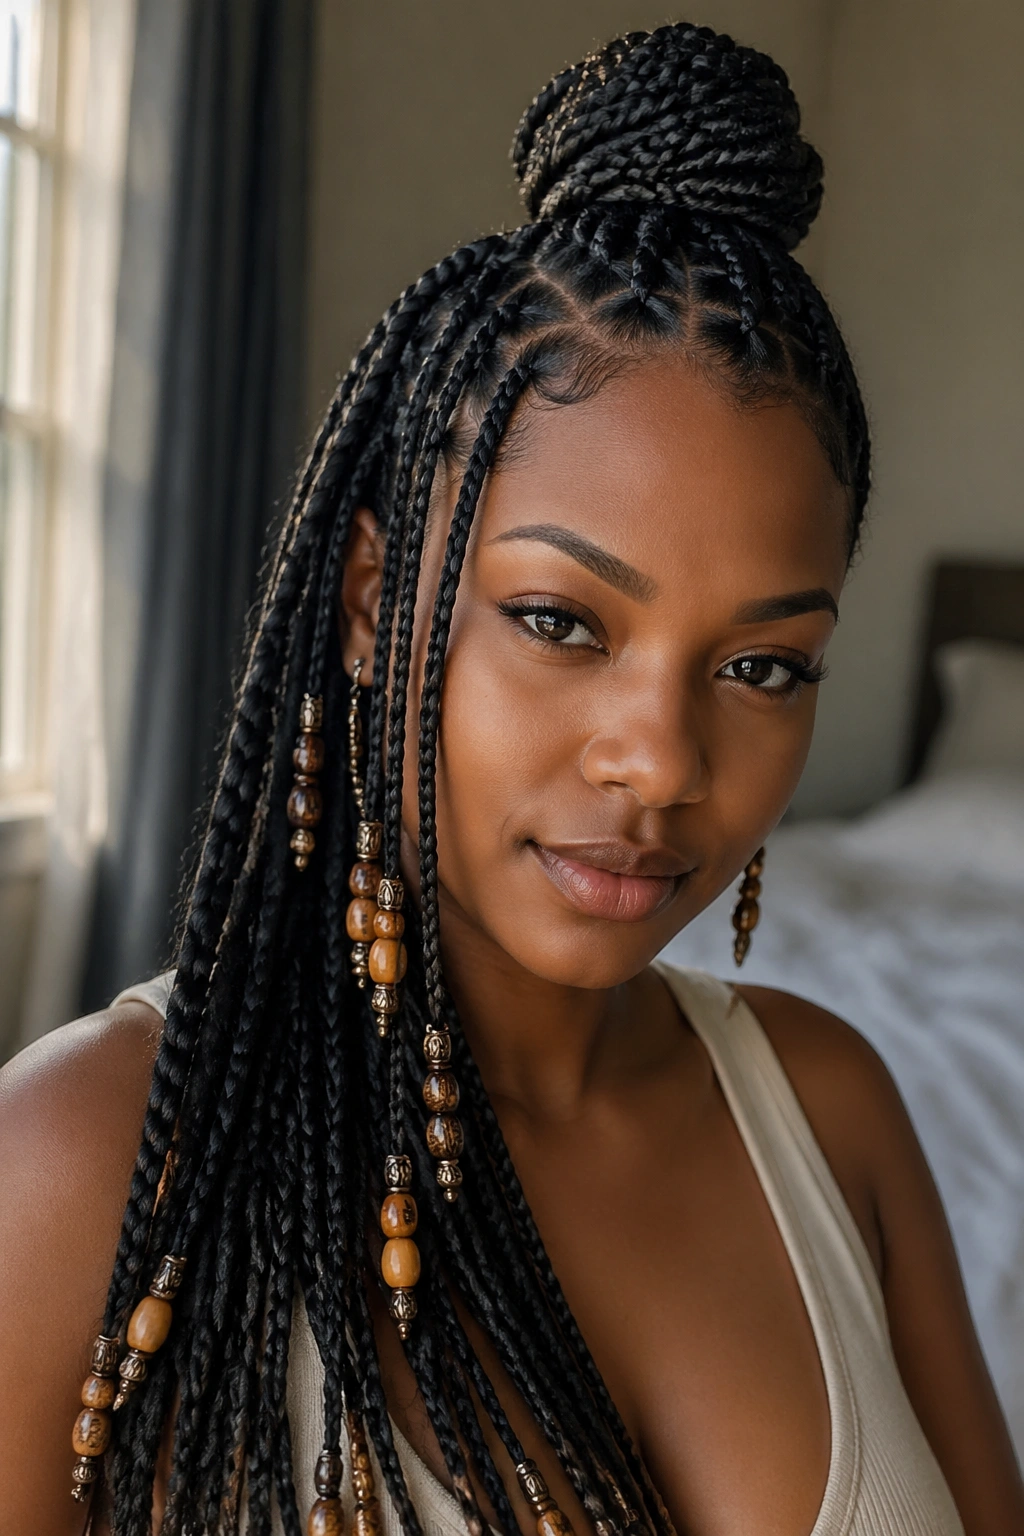
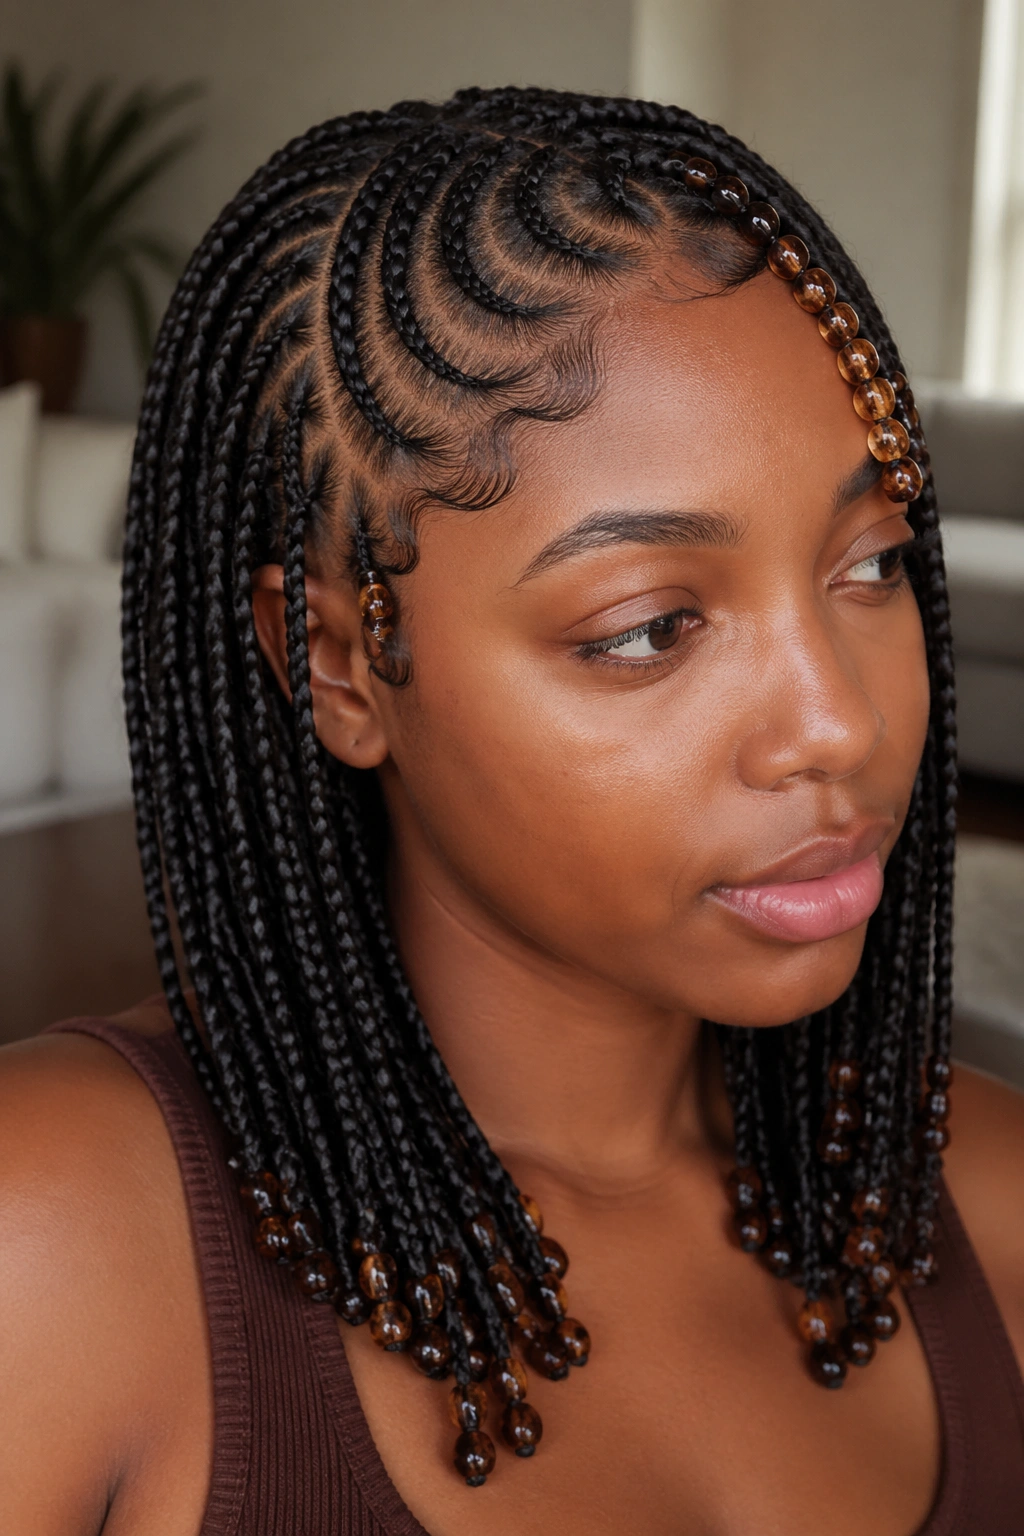
4. Burgundy Knotless Braids With Amber Ends

Burgundy braiding hair and amber beads are a combination that looks richer than it sounds. The hair brings depth first; the beads bring warmth second. Together, they give the ends a glow that shows up best when the braids move.
I’ve always liked this set for people who want color without going neon. Burgundy can feel bold on its own, and amber beads keep it from turning flat. If you choose beads that are too orange, though, the whole thing skews loud fast. A honeyed amber or smoked topaz finish usually looks better.
- Use one bead at the very end if you want the color to stay clean.
- Stack two small beads only on the front braids if you want extra emphasis near the face.
- Keep the parting simple — center or soft side part works best.
- Pair with warm makeup tones if you like the hair to feel pulled together.
The best part is that this set doesn’t need much else. The color does enough on its own. When the light hits the amber against burgundy, the ends look almost polished, but in a way that still feels casual.
5. Face-Framing Braids With Beads Only at the Front
Less is often smarter here. If you bead only the front braids, the whole style feels lighter around the face and less noisy at the back, which is useful when you want your braids to work with glasses, earrings, or a strong lip color. The eye lands where you want it.
The back can stay plain. Honestly, that’s part of the appeal. Medium-length knotless braids already give enough movement on their own, so putting beads only on the front pair or front four braids creates a little frame without making the set feel crowded. I like clear beads or matte black beads here because they do not compete with the rest of the hair.
A face-framing set like this also makes maintenance easier. Fewer beaded braids means fewer tangles when you sleep and fewer little noises rubbing against your pillow. If your scalp gets irritated by weight near the temples, this is one of the cleaner ways to wear the style without giving up the look.
The whole point is focus. You want the braids to point the eye toward your face, not turn the head into a bead display rack.
6. Triangle Parts and Transparent Beads
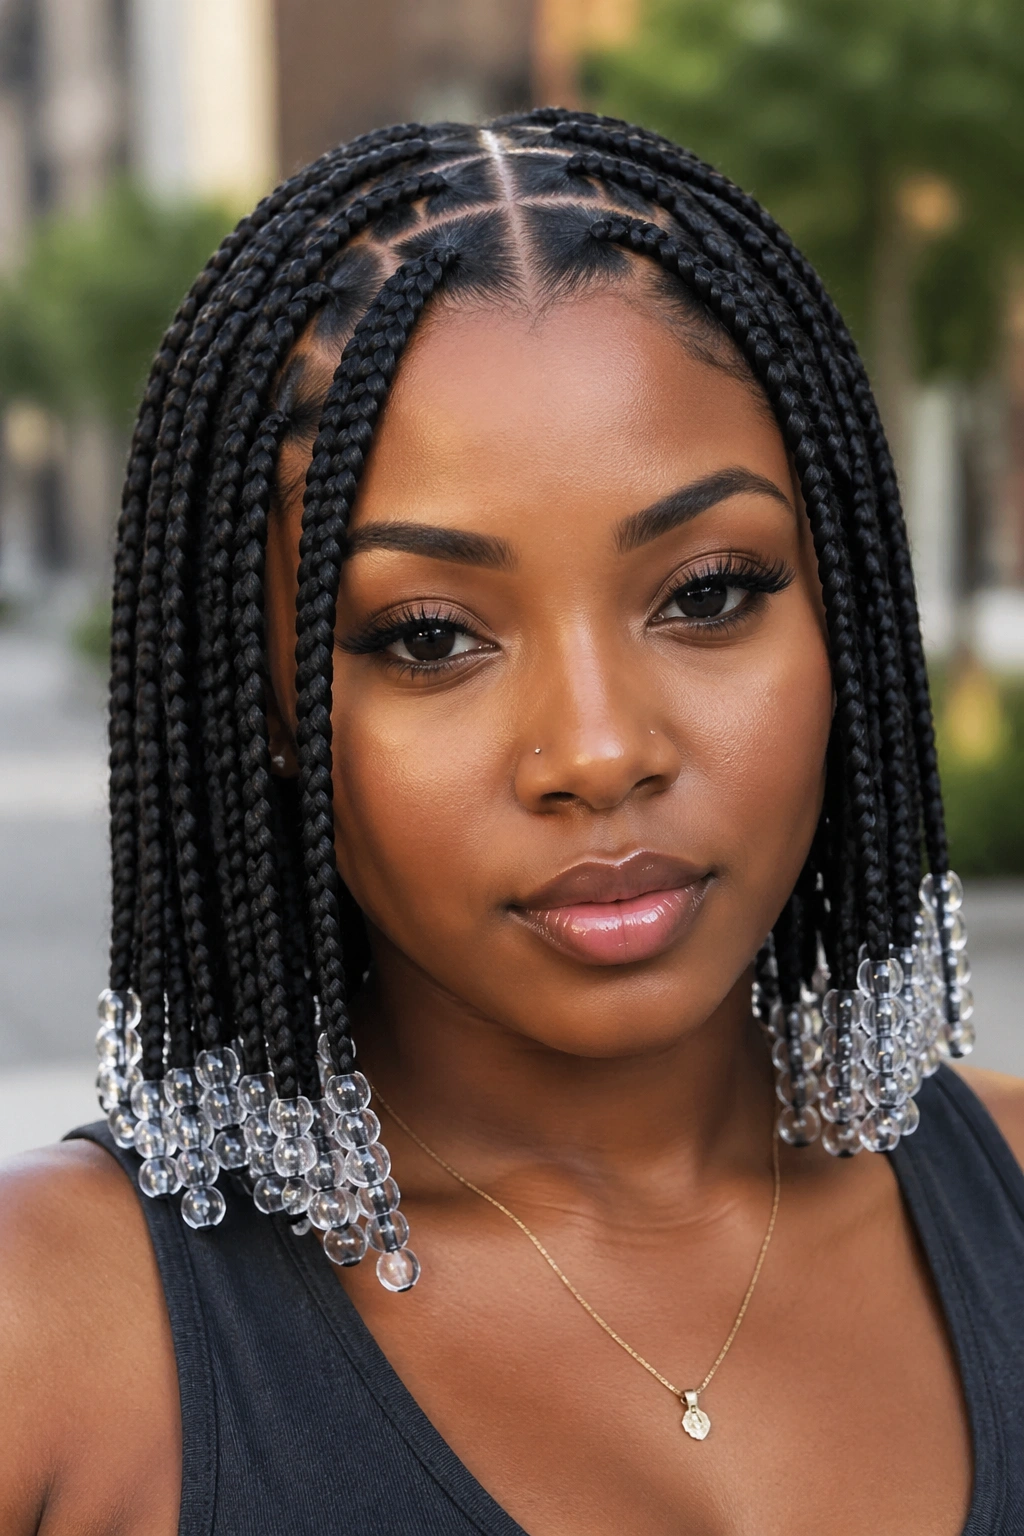
Triangle parts change the mood immediately. Unlike the standard square grid, the angles break up the scalp pattern and make medium-length braids look a little more styled before you even add beads. Transparent beads keep that geometry visible instead of covering it up.
That’s the real appeal. Triangle parts already give the set movement at the root, and clear beads at the ends repeat that feeling without making the style heavy. The result is cleaner than a mixed-color bead set and less stiff than a full row of cuffs.
This is a good choice if you wear a lot of simple clothes and want the hair to do more of the work. The parts create interest up top, while the clear ends keep the finish neat. If you want the braids to feel a little more finished, ask your braider to vary the size of the triangles slightly so the scalp pattern doesn’t look too mechanical.
I’d skip oversized beads here. They can overpower the angled parting. Keep the ends light, keep the lines visible, and let the shape do the talking.
7. Half-Up Top Knot With Dangling Beads
A half-up top knot makes medium-length knotless braids with beads feel casual and practical at the same time. You get hair off your face, but the length still hangs where you can see the beads move. It’s one of those styles that looks like effort and convenience had a decent conversation.
What to Watch For
The base of the knot matters. Pull the top section too tightly and the front row starts fighting back by the end of the day. Gather the braids from ear to ear, twist once, and secure with a snag-free elastic or a covered scrunchie. That keeps the tension soft and the bead ends from digging into the knot.
- Leave 2 to 4 front braids loose so the face frame stays soft.
- Use lighter beads on the loose braids so the front doesn’t feel pulled down.
- Keep the bun high enough to show the bead tails, not so high that the look turns bulky.
- If the ends are long enough to hit your shoulders, check that the beads don’t stab into the knot when you sit back.
This is the kind of style that saves you on busy days. It still looks intentional. It still moves. And when the beads swing under the knot, the whole thing has a little bounce that plain braids don’t get.
8. Bob-Length Braids With Mixed Rainbow Beads
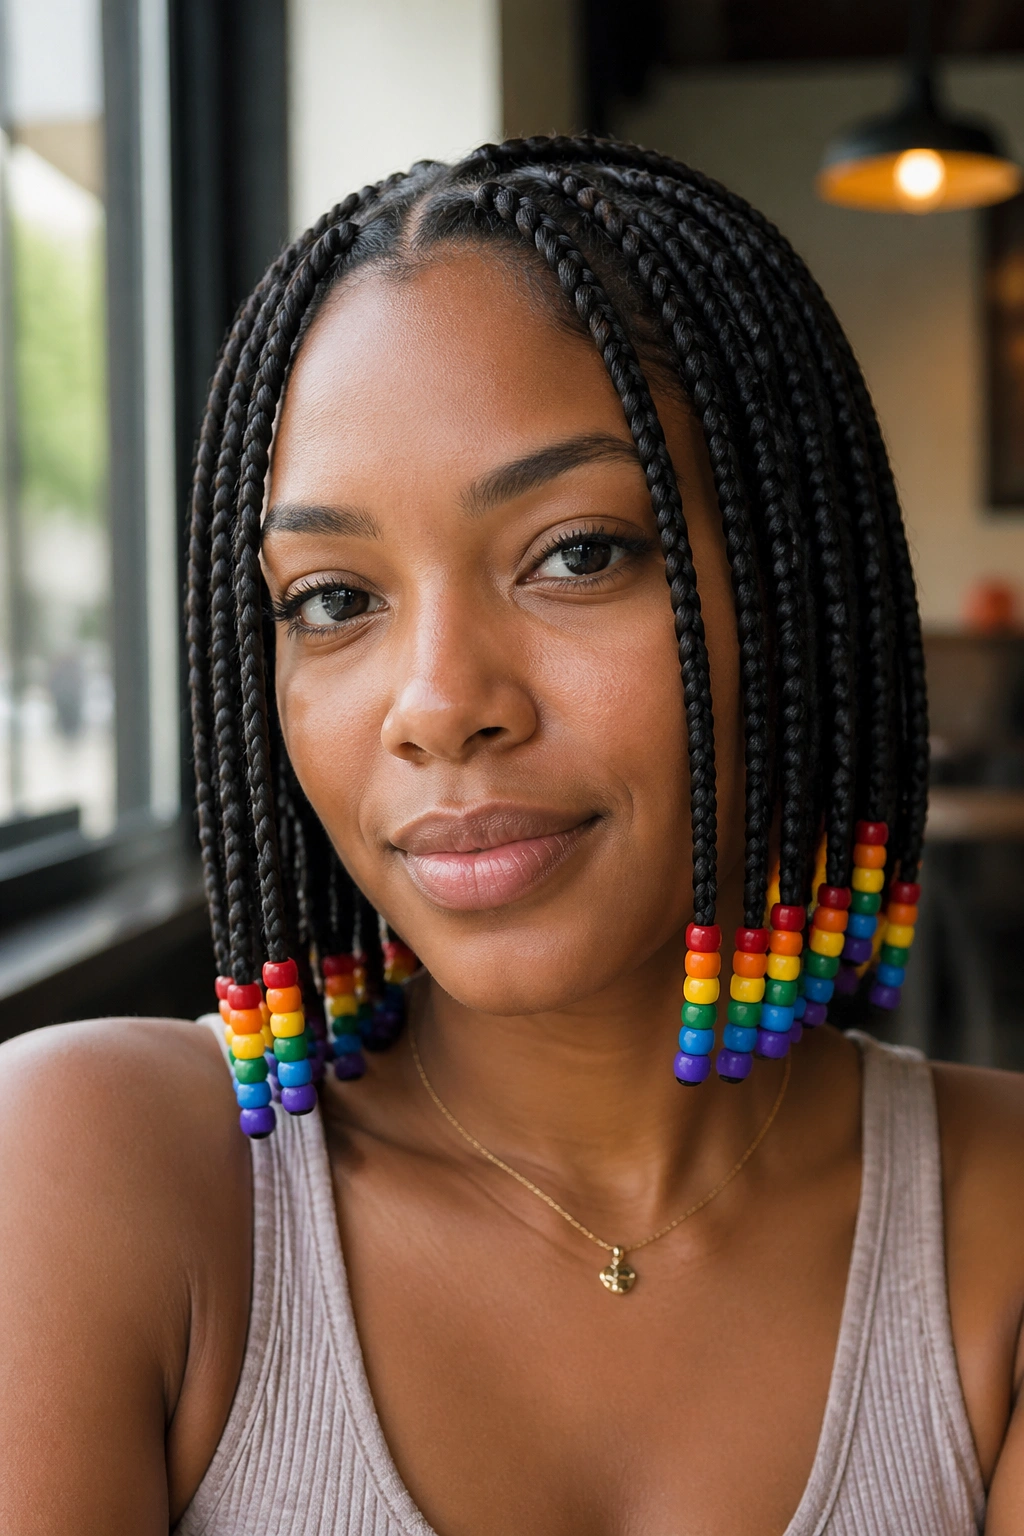
Bob-length medium braids with mixed rainbow beads can be fun without looking childish, but only if the color count stays controlled. Three colors is my limit. More than that, and the ends start competing with each other instead of working as one set.
The shorter medium length helps here because the beads sit higher on the body and feel more like an accent than a weight. You get enough swing to show off color, but not so much length that the mix gets lost. If the braids stop around the jawline or upper neck, the bead colors read quickly and cleanly.
I like pairing one clear or white bead with two accent colors, maybe red and blue or amber and green, depending on the outfit. Keep the bead sizes the same so the color contrast does the work instead of the shape. A tiny mismatch in size can make the whole set look accidental.
This set is strongest when the rest of the look stays simple. A plain top. Small earrings. Maybe a lip color that echoes one bead tone. That’s enough. The braids can carry the rest.
9. Black Beads in Small, Tight Clusters
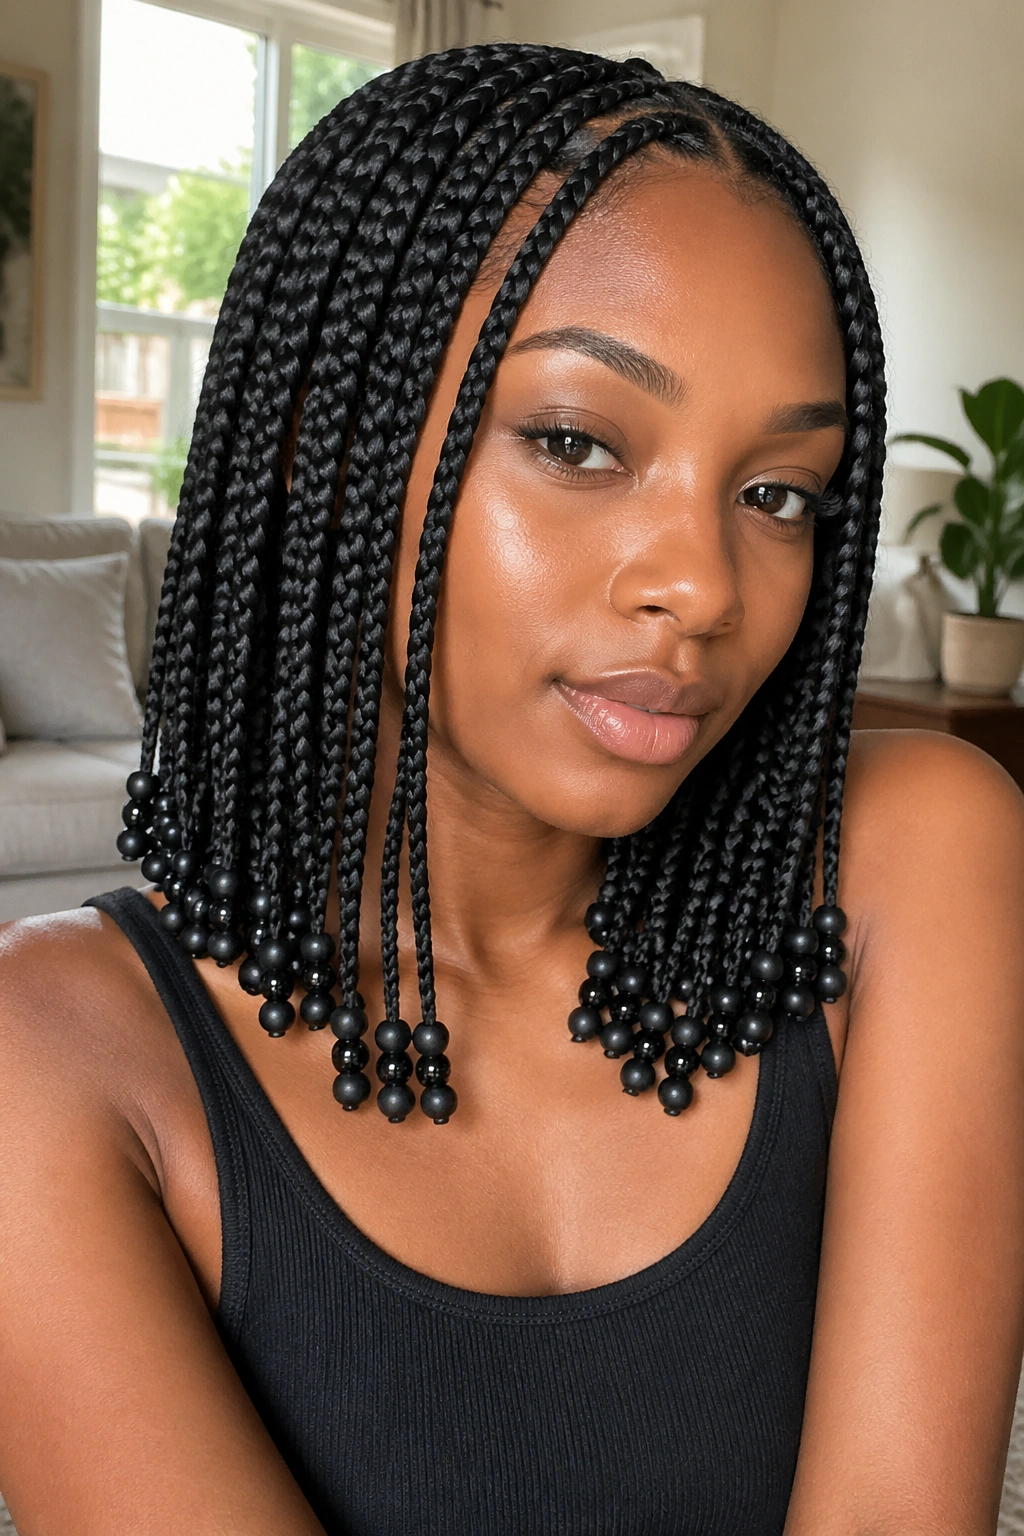
Can black beads make a difference when the braids are already dark? Absolutely. They can, and the reason is contrast inside the silhouette, not contrast against the hair. Small clusters change the way the ends move and give the style a heavier, more grounded finish.
How to Use It
Think in threes, not tens. A tight group of 2 or 3 black beads at the end of a braid makes a neat little drop without turning the ends into a brick. I like a mix of glossy and frosted black so the light catches one bead and disappears into the next.
This works best when the braids themselves are clean and evenly sized. If the base is messy, black beads won’t save it. They’ll just make the mess sit lower. So keep the braid pattern sharp and let the beads act like a finish, not a rescue job.
The style is quiet, but not dull. There’s a nice weight to it. The beads tap softly, the ends settle well, and the whole look feels controlled. If you want a low-key beaded set that still has personality, black clusters are hard to beat.
10. Shell Beads With Thread-Wrapped Accents

Shell beads bring a different kind of texture to medium-length knotless braids. One or two cowrie shells near the face can change the whole mood, especially if you wrap a short section of thread around a few ends first. That tiny mix of shell, fiber, and braid makes the style feel handmade in the best way.
I would not load the whole head with shells. That gets heavy and starts looking forced. Better to place shells on the outer braids — maybe two on each side, or one front braid and one near the temple — and leave the rest clean. The thread wraps should stay short, around 1 inch to 1½ inches, so they add detail without turning into tassels.
- Use natural-colored thread if you want a soft finish.
- Choose small cowrie shells so the weight stays manageable.
- Keep the thread wraps tight and neat; loose thread frays fast.
- Let the shell placement mirror on both sides for balance.
This set has a relaxed, handmade feel without losing structure. If you like details that show up when someone is standing close, this is one of the best places to put your energy.
11. One-Side Bead Placement for an Asymmetrical Look
One-sided bead work feels deliberate. Put the beads on the heavier side of a side part, or cluster them along one temple, and the whole braid set suddenly has direction. It’s a small shift, but it changes how the braids fall when you walk or turn your head.
The cleanest version keeps the opposite side plain. That contrast matters. If both sides have equal bead weight, the asymmetry disappears and the style goes flat again. Medium-length braids are perfect for this because the ends still swing enough to show the offset clearly.
I like this idea for people who wear one earring more often than the other, or who want the braids to support a strong neckline on a shirt or dress. It doesn’t need a lot of bead colors. Clear, black, or smoked brown beads all work. The placement does the heavy lifting.
There’s also a practical upside: fewer beaded strands means less noise and less friction against your shoulders. Good asymmetry should look styled, not random. This one does if you keep the balance on purpose.
12. Silver Beads on Honey-Brown Braids
Silver beads change the tone of honey-brown braids in a way gold can’t quite match. Gold warms the whole style up. Silver sharpens it. On brown braiding hair, that sharper contrast makes the braid pattern easier to see, especially around the face and along the ends.
This is a nice choice if you already wear silver hoops, cool-toned rings, or darker liner. The hair starts matching the rest of your look instead of floating off on its own. Keep the bead finish smooth and reflective, not mirror-bright. A soft metallic surface tends to feel more wearable.
I’d keep the bead sizes consistent, around 10 mm, and avoid mixing too many finishes in the same set. Silver already gives you enough contrast. If you add black or clear beads in the same tail, the end can look busy in a hurry.
The honey-brown base keeps the style from feeling cold. That’s the trick. You get the clean metal edge, but the braid color holds it down. A good braid set should know when to shine and when to stay put.
13. Low Ponytail Braids That Swing at the Nape
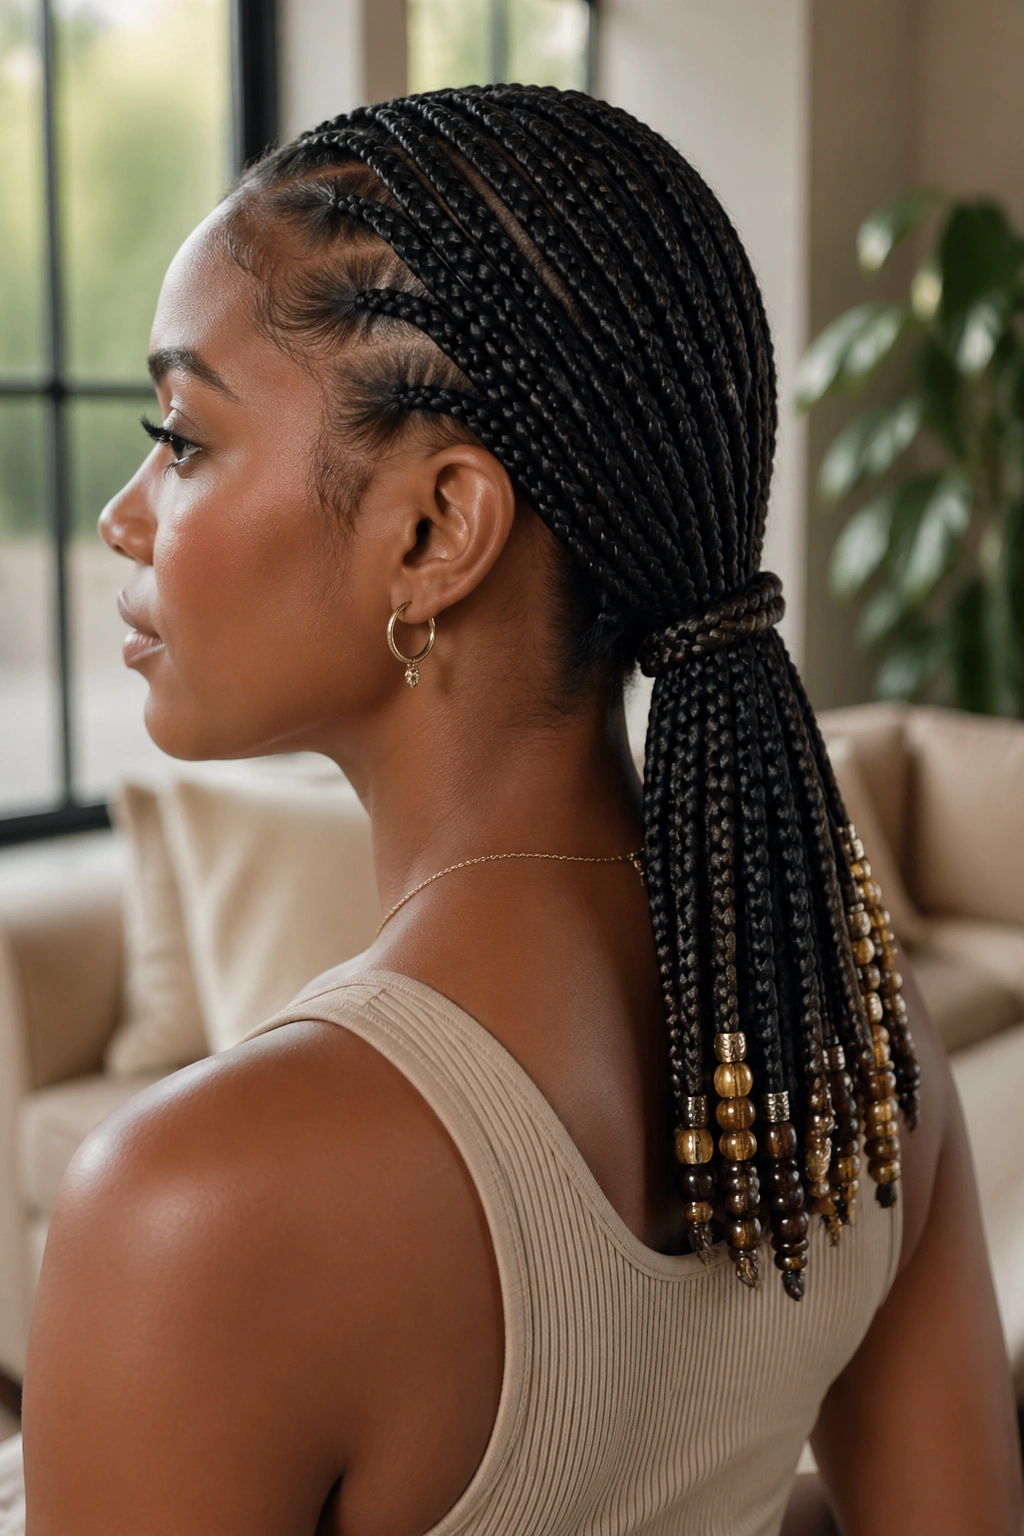
A low ponytail with beaded medium braids solves a lot of everyday problems at once. Hair stays off the face, the beads still show, and the whole style sits in a neat line at the back of the neck instead of collapsing into a high puff of braid ends. It’s practical and still looks considered.
How to Keep It Neat
Start the ponytail at the nape, not halfway up the head. That keeps the braids from fanning out too much and helps the beads fall together in one clean drop. Use a covered elastic or satin scrunchie so the braid finish doesn’t snag on rough hardware.
- Leave a few front braids loose so the hairline still frames the face.
- Keep the ponytail base low and smooth.
- Put the heaviest beads on the lowest tails, not the shorter front pieces.
- If the ends swing too hard against your neck, use lighter beads or fewer of them.
This style is one of my favorites for medium length because it behaves. You can move, lean back, put on a jacket, and not spend the whole day adjusting your hair. That’s worth something.
14. Heart Parts With Soft Pink Bead Details
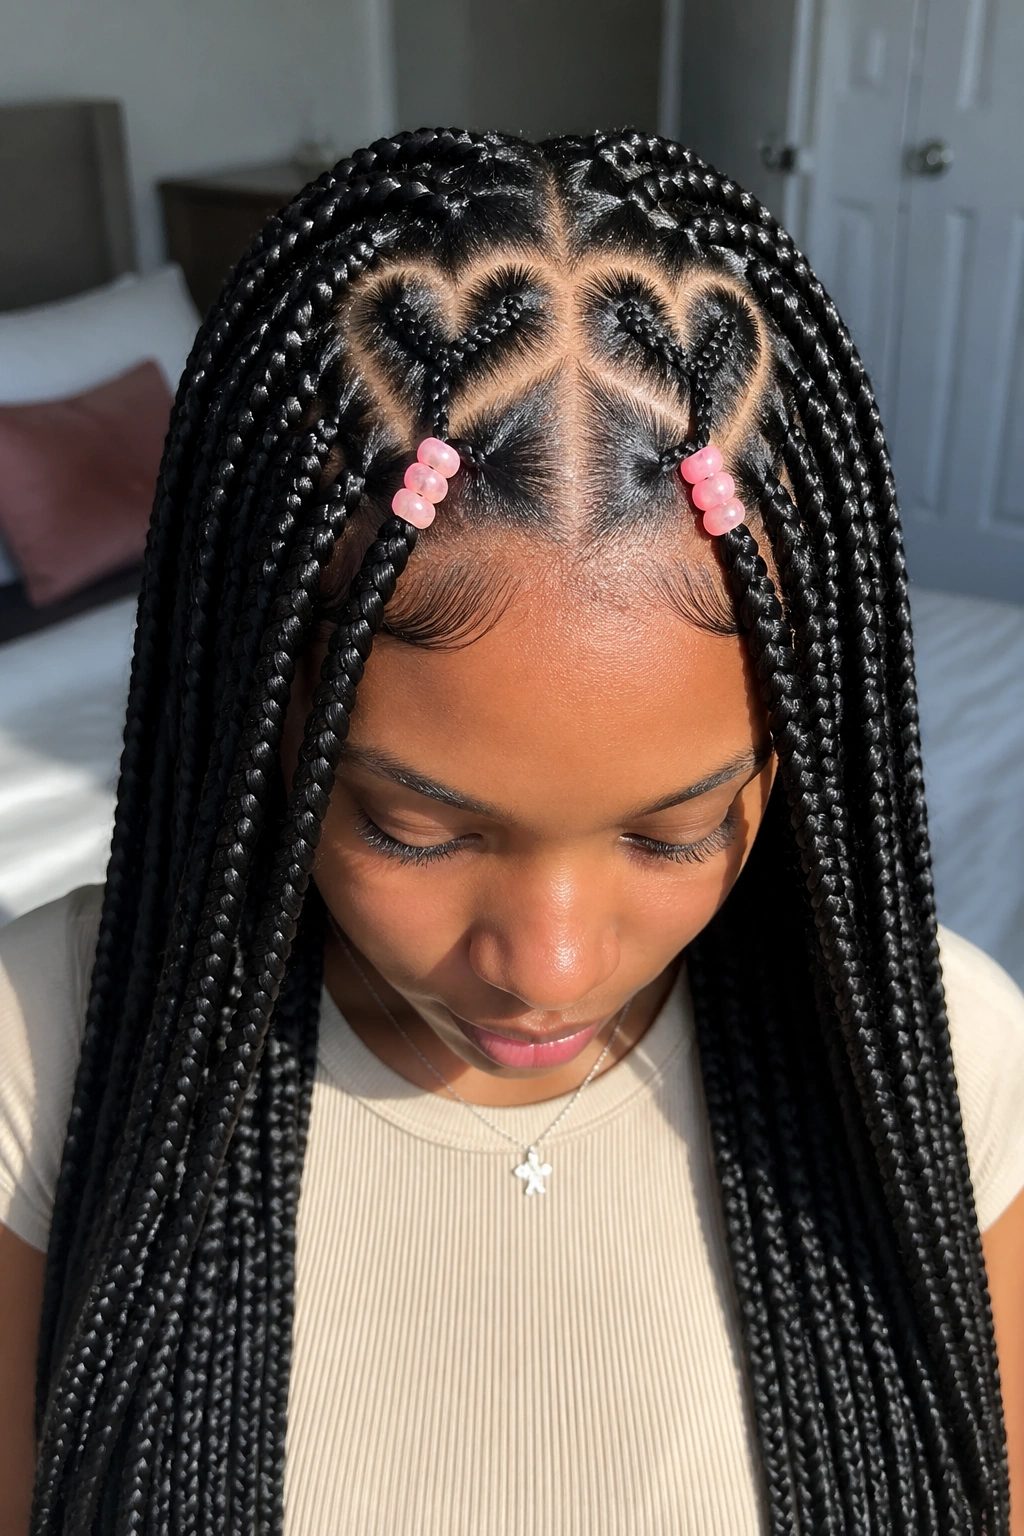
Heart-shaped parts sound playful, and they are, but they do not have to look sugary if the rest of the set stays clean. Medium-length knotless braids give you enough space to show off the parting without drowning it in extra bead work. A few soft pink or blush beads are enough to echo the shape.
The key is keeping the heart parts small and neat, usually just in the front two sections. If every part is shaped like a heart, the style starts feeling busy. One or two heart parts near the hairline are plenty. The rest can stay in standard square or triangle sections so the braid pattern still reads clearly.
I like translucent pink beads here because they soften the look without turning it bubblegum-bright. Matte pink can work too, especially if you want the beads to blend into the hair a little more. The style is strongest when the parting and the bead tone feel related, not identical.
This is for someone who likes details. Not loud ones. Details.
15. Mixed Matte and Glossy Beads for Extra Texture
Why does finish matter so much? Because the eye reads shine and dullness as movement, even when the color stays the same. A braid set with matte and glossy beads can feel more layered than one built from a single bead finish, especially on medium-length ends that sit right around shoulder level.
What to Look For
Stick to one color family and swap the surface texture instead of the color. Matte black, glossy black, frosted black. Clear, smoked clear, pearl clear. That kind of mix feels cleaner than throwing in six unrelated colors and hoping for the best.
I like this on simple box parts because the bead finish becomes the main event. If the parts are already busy, the mixed texture can tip the style into clutter. Keep the braid size even and let the beads do the small, interesting work.
A good mixed-finish set has a little rhythm. Not every tail needs the same end. One glossy bead, one frosted bead, maybe one plain spacer bead. That small variation keeps the hair from looking mass-produced, which is exactly the problem with overly uniform bead sets.
16. Medium Braids With Tiny Beads on Every Third Plait
Putting beads on every third braid is a smart way to get the sound and movement without loading the whole style down. It also lets the braid pattern breathe. The eye catches the rhythm — bead, plain, plain — and that pattern keeps the set from feeling too full.
This works especially well if your braids are on the thicker side of medium length. Tiny beads on every tail can make the ends feel dense fast. But when you space them out, the style stays light and the neck gets a break. Use small beads, around 6 mm to 8 mm, and keep the placement consistent from side to side.
- Bead the front braids first so the frame feels finished.
- Leave the crown plain if you want the parts to stay visible.
- Use the same bead size on all beaded strands.
- If your scalp is tender, this is easier to live with than an all-beaded set.
There’s a lot to be said for a little restraint. Especially with braids. The style still moves, but it doesn’t nag at you all day.
17. Curved Parts and Beads That Follow the Hairline
Straight rows have their place, but curved parts soften medium-length knotless braids in a way that feels less strict. The curve matters because the braid length isn’t long enough to hide the parting the way waist-length braids sometimes can. You see the shape. It has to hold up.
Where the Curve Works Best
Keep the curve near the front and along the temple area, where the hairline naturally bends. Then match the bead placement to that shape by putting the larger or brighter beads on the outer braids. That way the eye follows the curve from scalp to ends without getting stuck at one point.
I like this look when someone wants the braids to frame the face without looking boxed in. It feels a little softer than a strict grid and a little more polished than random parting. Medium length helps because the ends hang in a tidy line that doesn’t interrupt the shape.
Do not overdo the bead size here. The curve is already doing enough work. Keep the ends slim and let the parting show off the hairline instead of burying it under accessories.
18. Everyday Minimal Braids With Brown Beads
If you want one version of medium-length knotless box braids with beads that you can wear again and again, this is the one I’d choose. Brown beads disappear into the braid more than clear or bright beads do, which means the style stays easy to wear with work clothes, denim, or a simple hoodie and still feels finished.
The best thing about brown beads is how little they demand. They do not scream for attention. They sit in the braid, move when you move, and keep the set looking calm. Use a medium brown that’s close to the hair color rather than a reddish brown unless you want a stronger contrast. A gentle match keeps the ends from looking chopped up.
That’s why this set lasts. You can wear it with a middle part, a side part, or swept back into a low ponytail, and it still looks right. The beads never fight the outfit. They just keep the ends from feeling bare.
A braid style this wearable does not need much else. If the parts are clean, the braid size is even, and the bead choice stays close to the hair color, the whole look holds together without asking for extra effort.