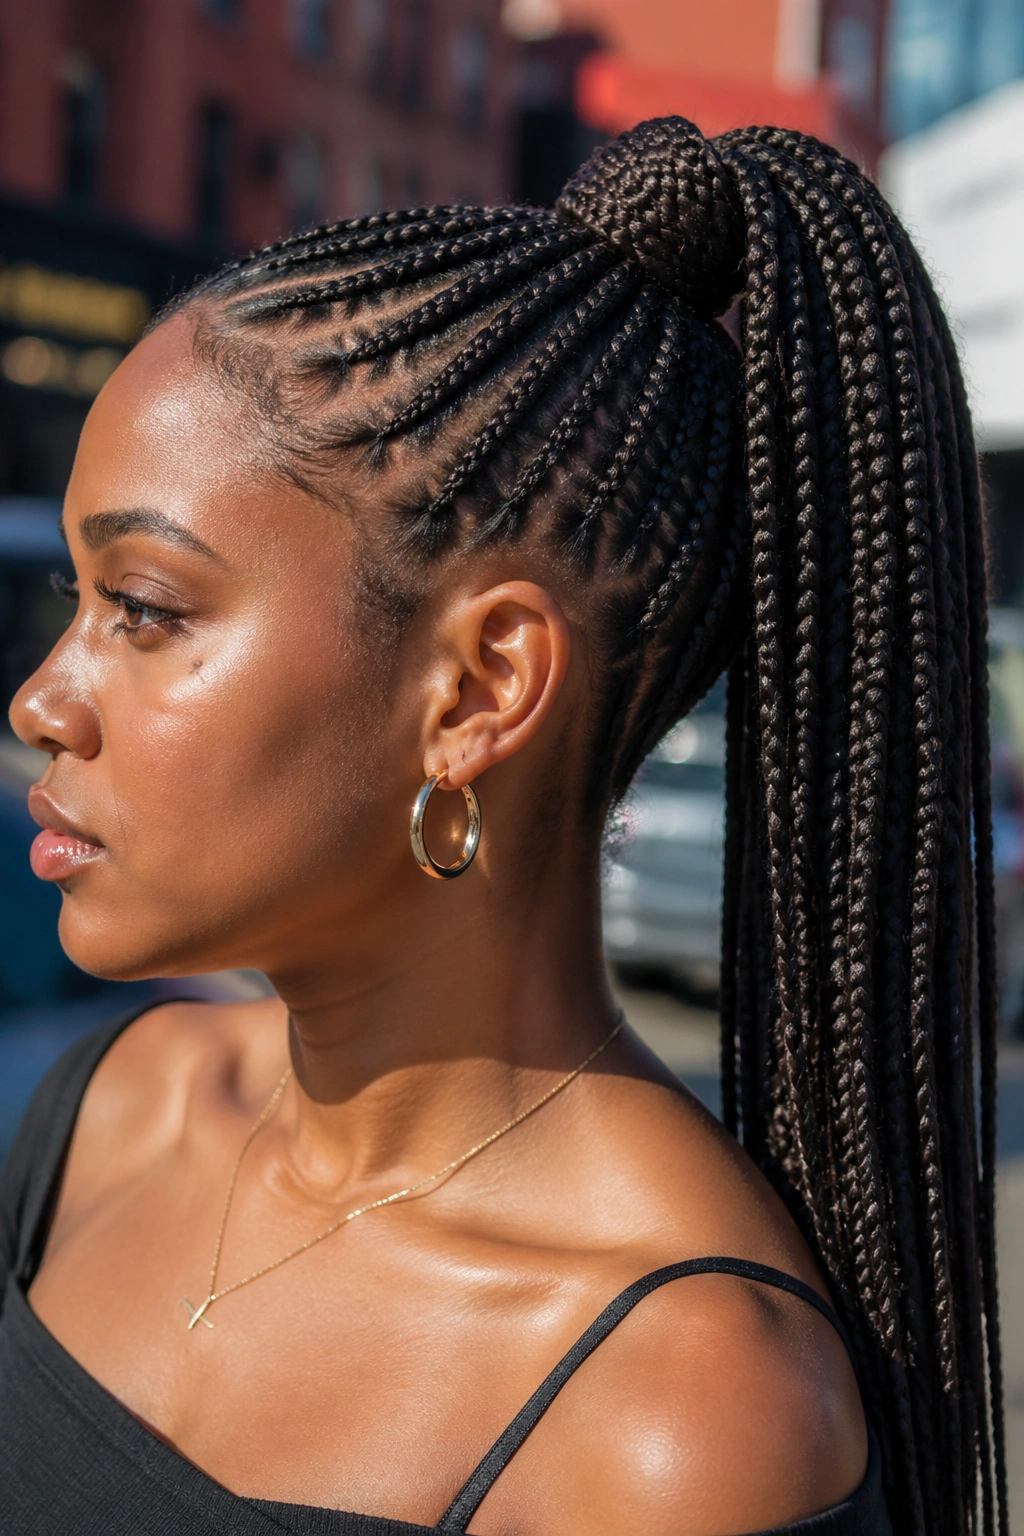
Small knotless box braid updos are the kind of style you reach for when you want your hair off your neck but you still want the braids to look intentional, not crammed into a lopsided pile at the back of your head. The shape matters. So does the tension. And with knotless braids, you get a little extra flexibility at the root, which makes pinning, tucking, and stacking much easier than people expect.
That lighter root is the whole reason these styles work so well. Small knotless braids move more like hair and less like rope, which means they can sit flat, coil cleanly, or sweep into a crown without that hard, bulky look older braid styles sometimes have. You still need a steady hand, though. Tight is not the goal.
A good updo should hold. It should not yank at your edges by lunchtime or leave a tender spot behind your ear by dinner. A few snag-free elastics, a handful of bobby pins, and a little patience go a long way here. That’s the part people skip, and then they wonder why the style falls apart.
Some days you want sleek and serious. Some days you want playful. Some days you want something you can do in five minutes before you run out the door. The styles below cover all three moods, and a few in-between that are honestly the ones I keep coming back to.
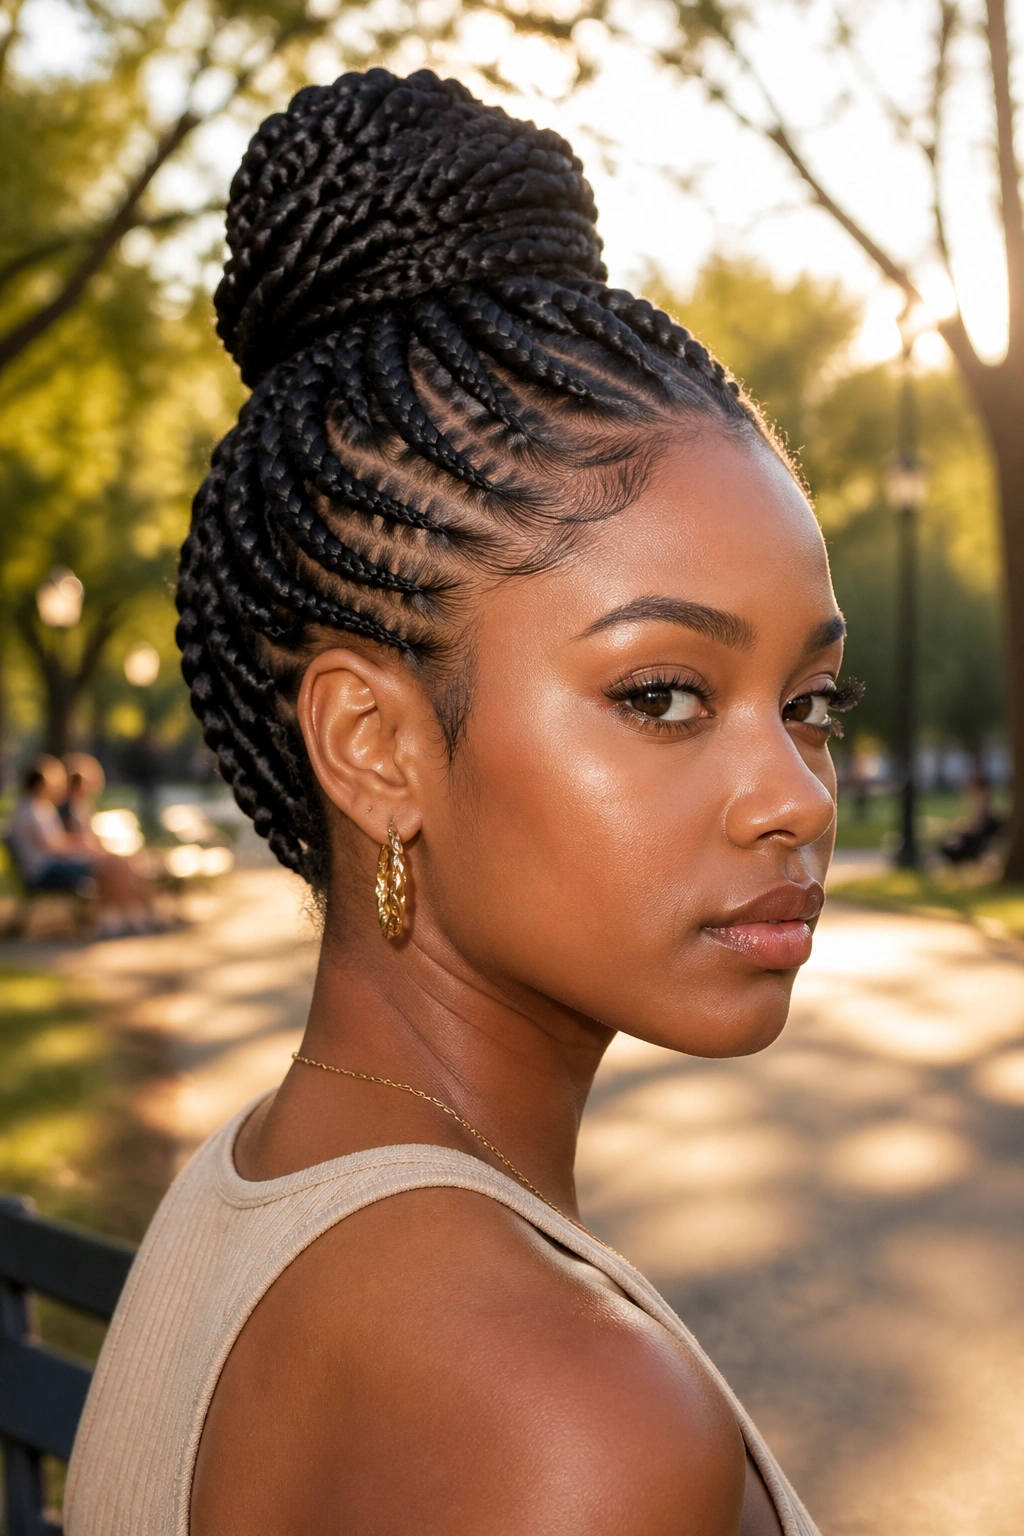
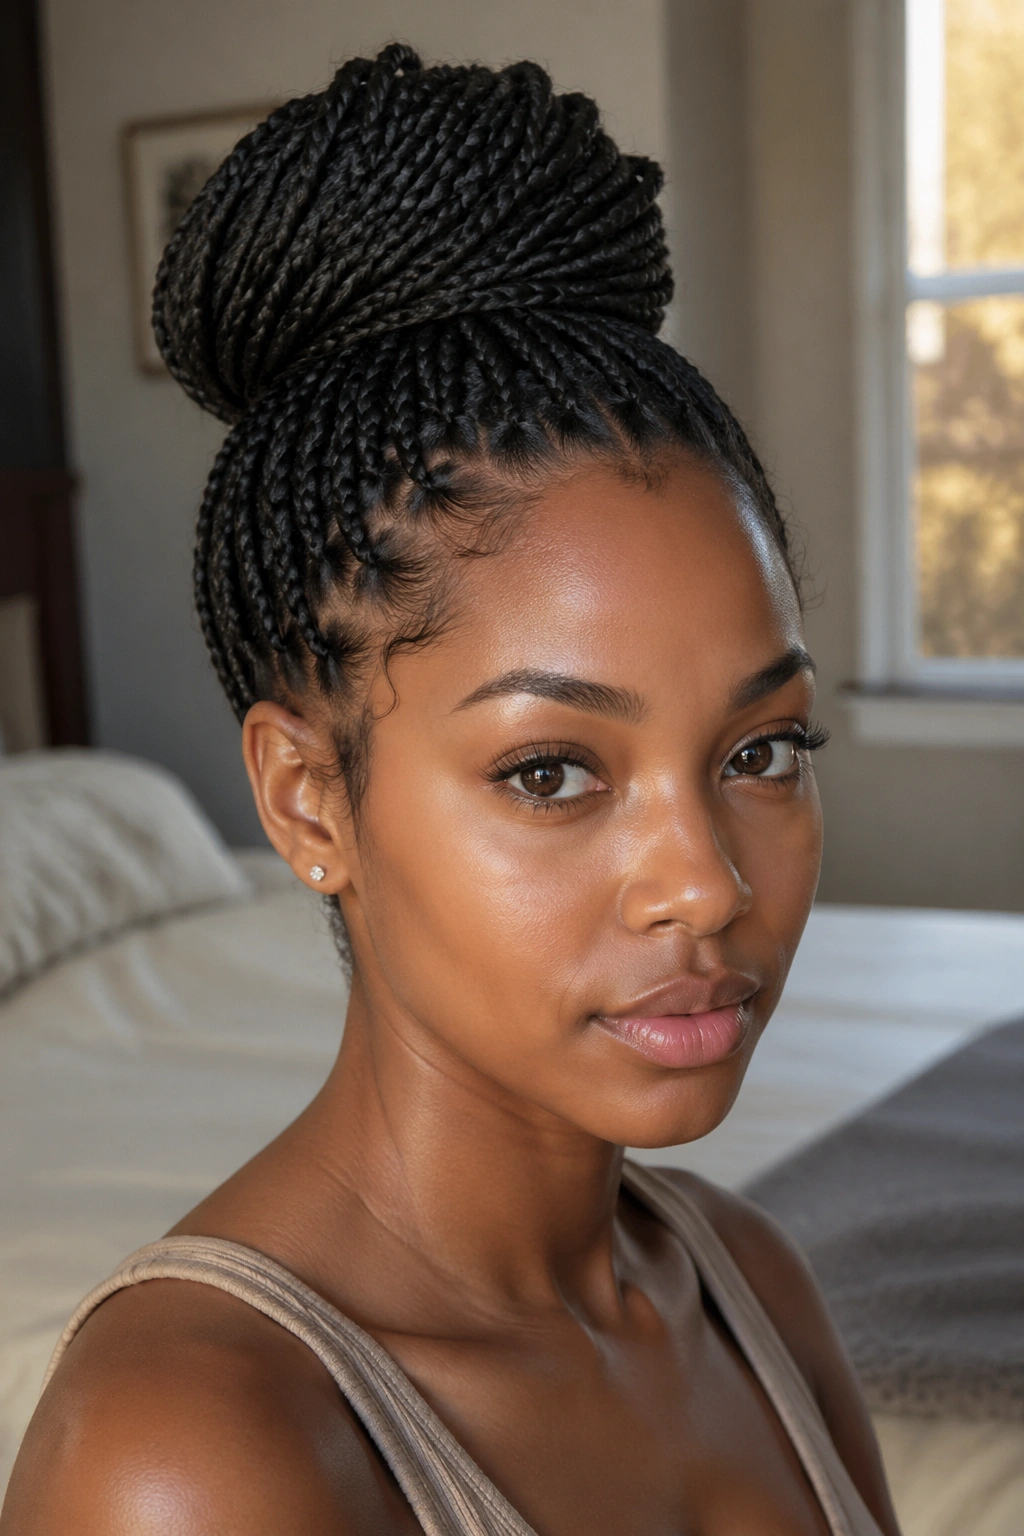
1. High Braided Bun That Sits on the Crown
A high braided bun is one of those styles that makes small knotless box braids look neat without feeling stiff. The bun sits right on the crown, so the whole face opens up, the neck stays clear, and the braids get this lifted shape that reads clean from every angle.
Why It Works With Small Knotless Box Braids
Small braids fold into a crown bun more easily than chunky ones. You can wrap them in tighter circles, hide the ends, and still keep the bun from looking bulky. If your braids are mid-back length or longer, this is one of the fastest ways to make them look dressed up without adding extra hair.
- Use one strong elastic to gather the braids first.
- Twist the lengths in one direction before wrapping.
- Pin the bun from the inside out so the pins stay hidden.
- Leave a few baby braids loose at the hairline if you want a softer finish.
My favorite trick: wrap one braid around the base of the bun before pinning anything else. It hides the elastic and makes the whole style look cleaner in about ten seconds.
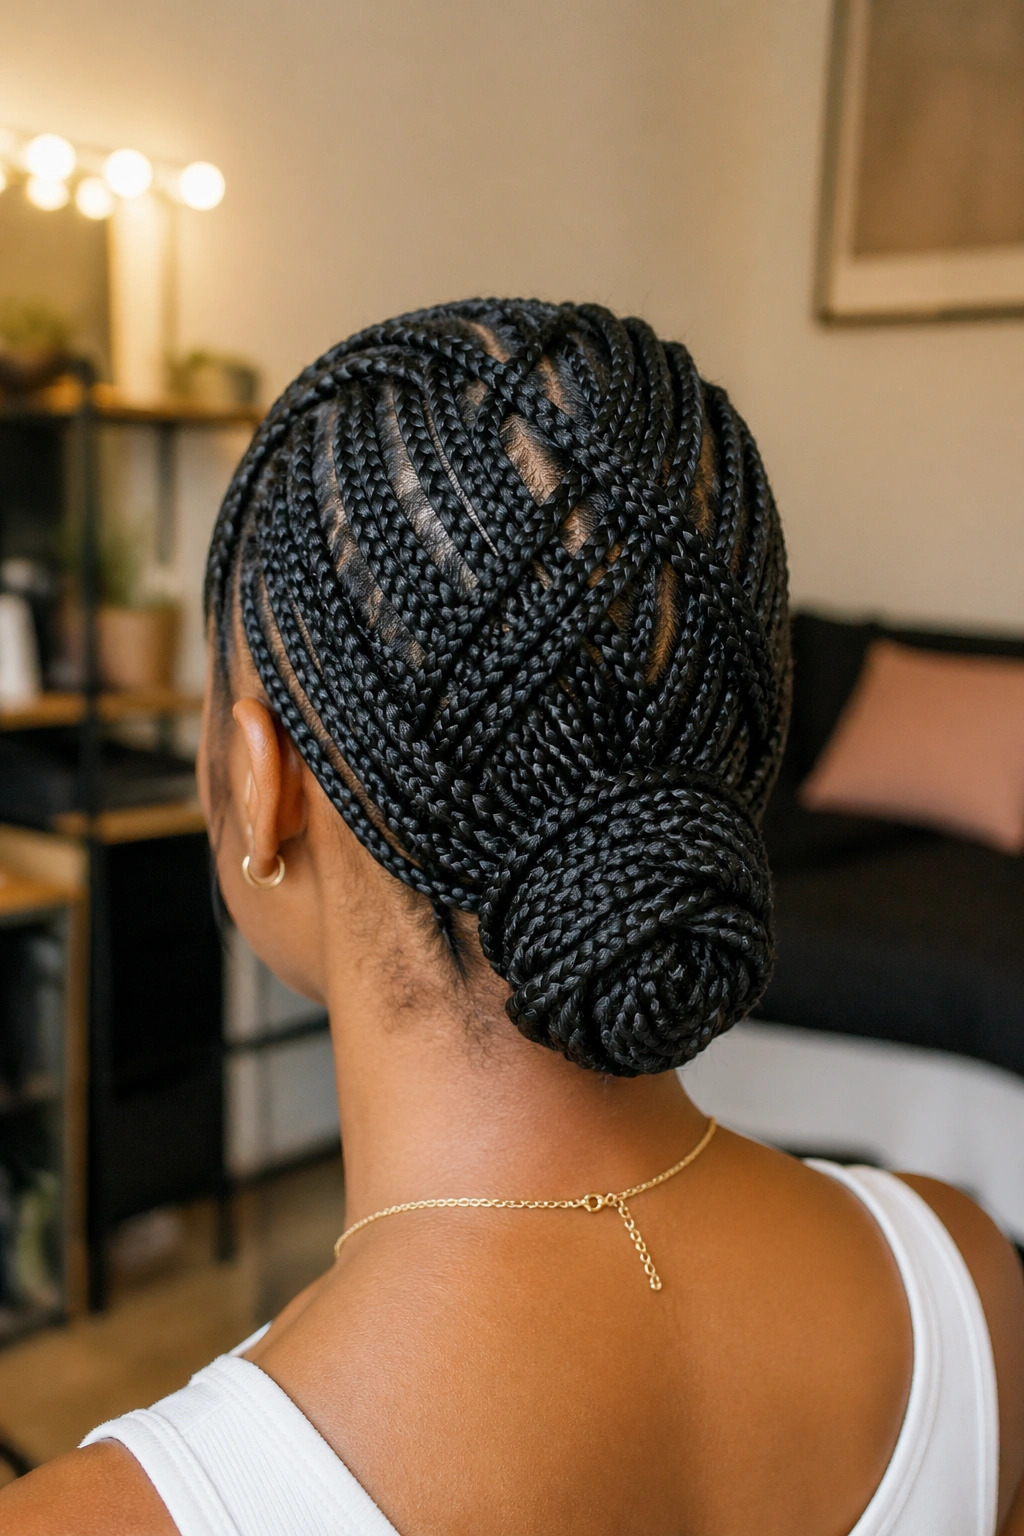
2. Low Nape Bun with Tucked Ends
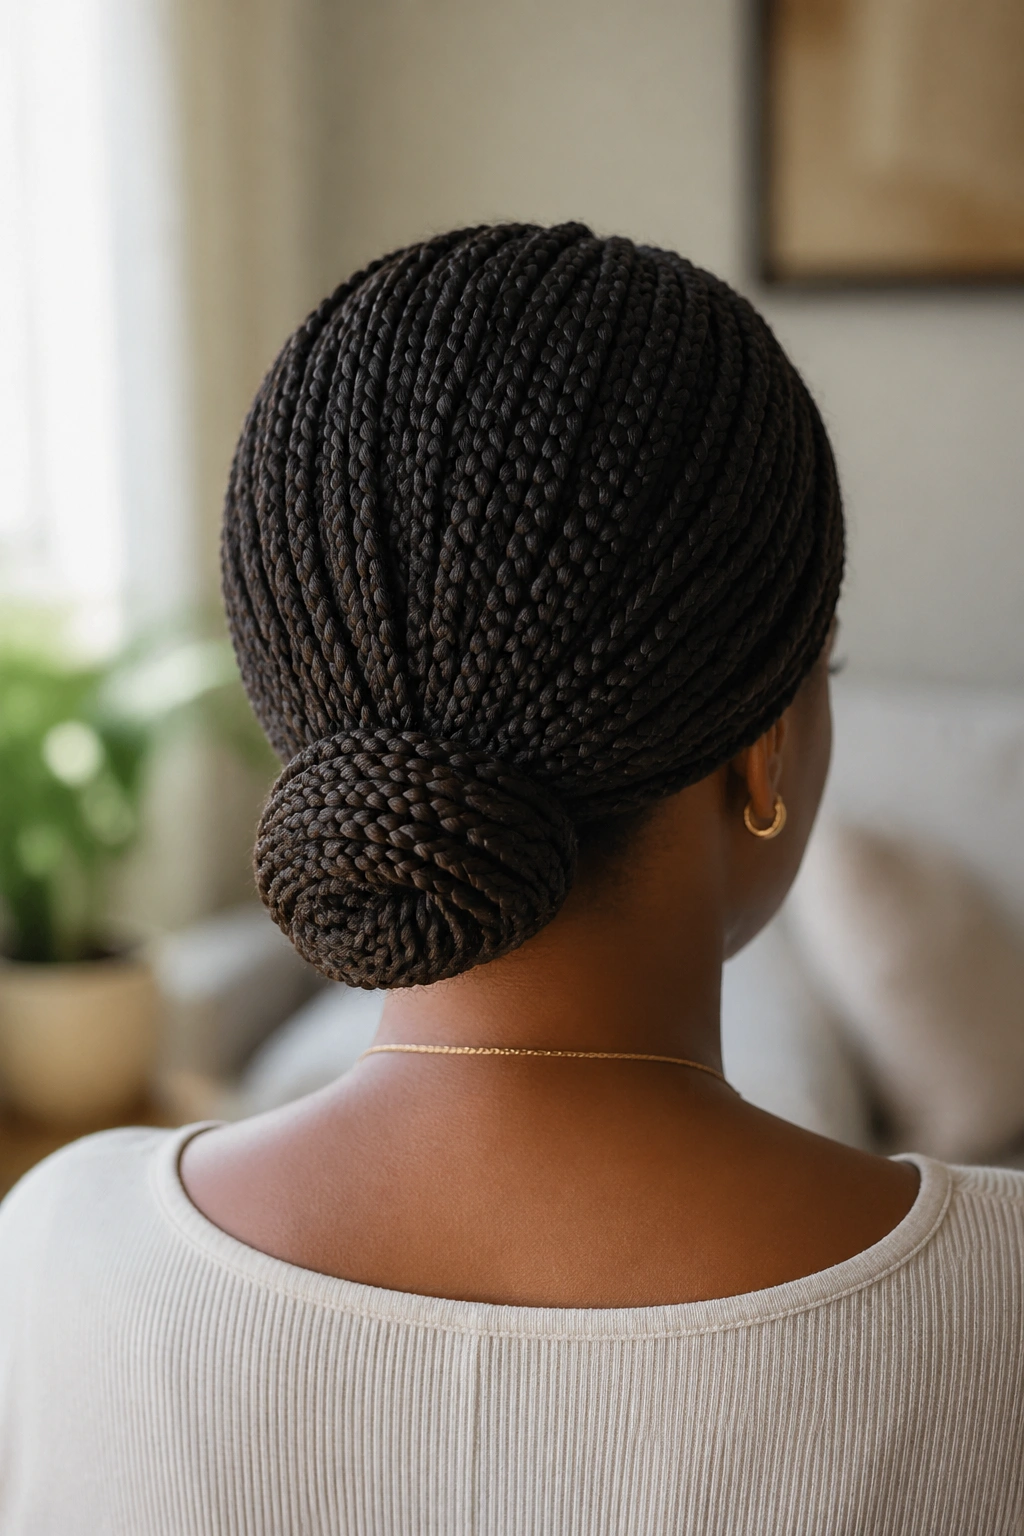
If you want a style that feels calm and stays comfortable, the low nape bun is hard to beat. It sits below the head’s widest point, so the weight feels balanced instead of top-heavy, which matters more with braids than people think.
This is the braid style I’d pick for a long workday, a dinner out, or any time you know you’ll be taking your coat on and off. The bun stays out of the way, and because it’s tucked low, it doesn’t press into chair backs or collars every time you move. The shape is also kinder to edges than a high ponytail, especially if your braids are freshly installed.
Keep the bun compact. That’s the part people miss. A loose, sagging nape bun starts to feel sloppy fast, so twist the braids into a tighter coil and pin across the center, not just the outside.
One clean section near the back. That’s enough.
3. Braided Crown Halo
Why does a halo style look so put together, even when the rest of the outfit is plain? Because it frames the face on purpose. The braids run along the perimeter of the head like a soft border, and that shape does a lot of the styling work for you.
With small knotless box braids, the crown halo can be pinned flat enough to wear with earrings, glasses, or a high neckline. I like this style when the front of the braids are neat but the rest need a little control. The crown effect draws the eye upward, which gives the whole look a finished feel without needing a perfect bun.
How to Wear It Without Letting It Slip
Start at one temple and work across the hairline, pinning the braids in a slow curve around the head. Don’t rush the corners near the ears. That’s where halo styles usually start to loosen.
A few braid cuffs or small gold rings help, but they are optional. The real trick is spacing the pins no more than 1 to 1.5 inches apart in the loose sections. That keeps the halo from tilting during the day.
4. Half-Up Top Knot With Loose Length
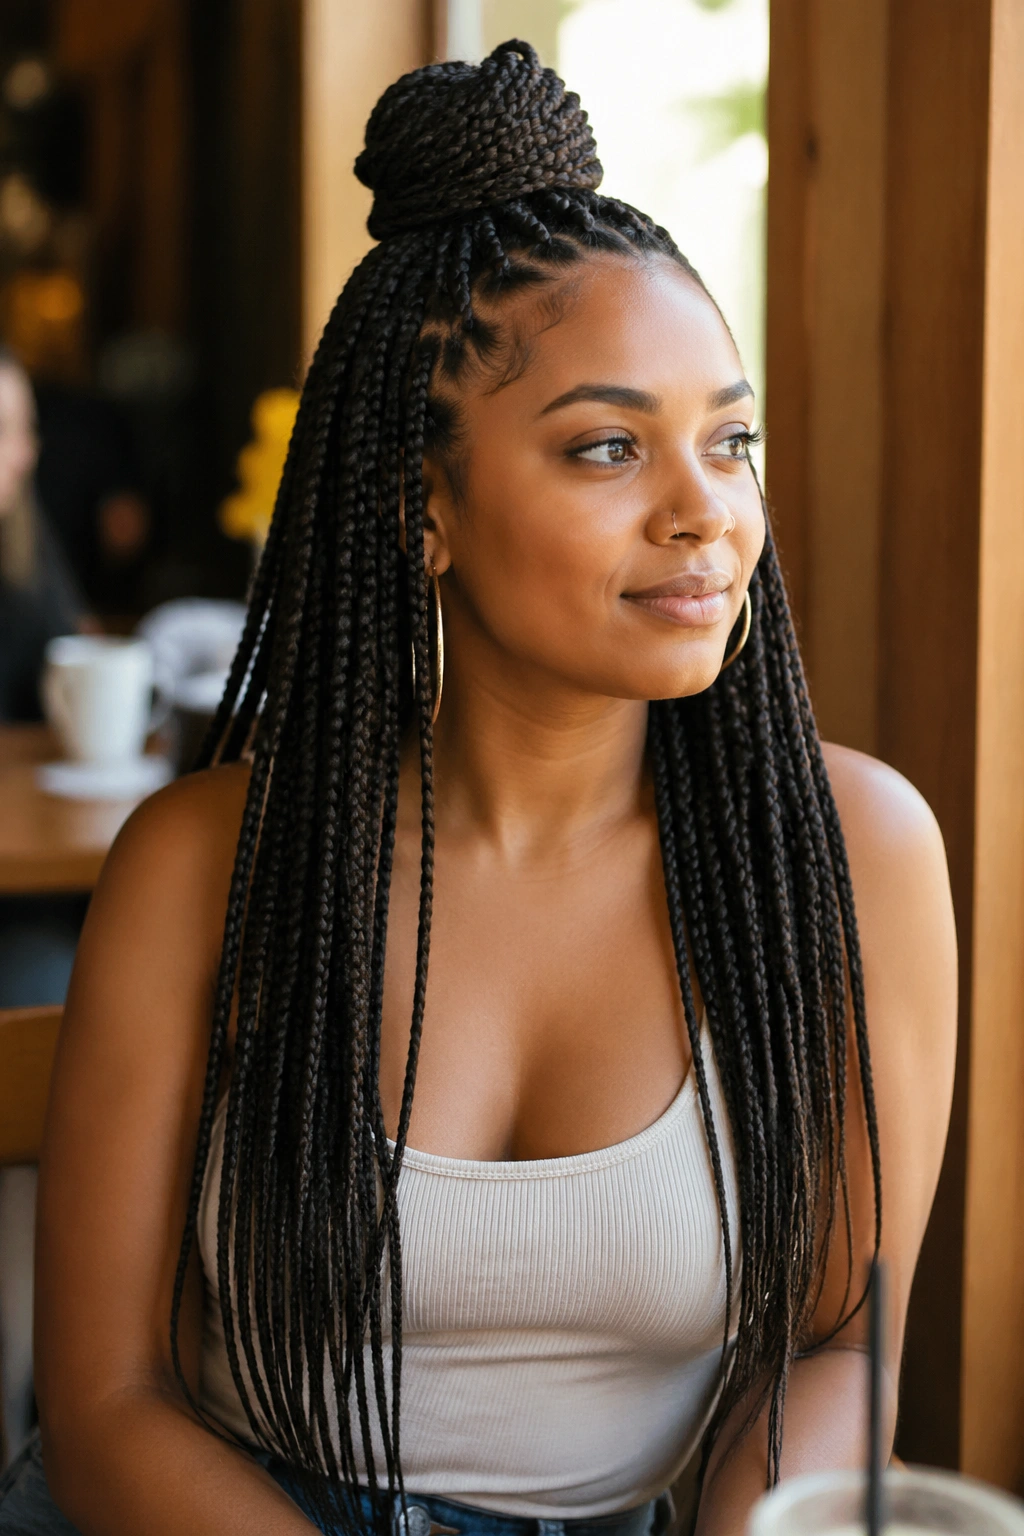
A half-up top knot is the easy answer when you want your face clear but you’re not in the mood to tuck every single braid. Pull the top section into a knot, leave the back hanging, and the style suddenly feels lighter without losing the shape of the braids.
This one works especially well on small knotless box braids because the braid size keeps the knot from getting clunky. You get height at the crown and movement in the back, which is a nice middle ground if a full bun feels too formal. I also like how it shows off length. There’s something about a half-up knot that lets the braids still be the main event.
Keep the top knot slightly messy, not too tight. If you pull it like you’re trying to win a competition, the whole style gets sharp and uncomfortable. A soft wrap, one or two pins, and a satin scarf for five minutes after styling can make the knot sit better.
Some styles behave. This one has a little attitude, and that’s the charm.
5. Double Space Buns With Center Parts
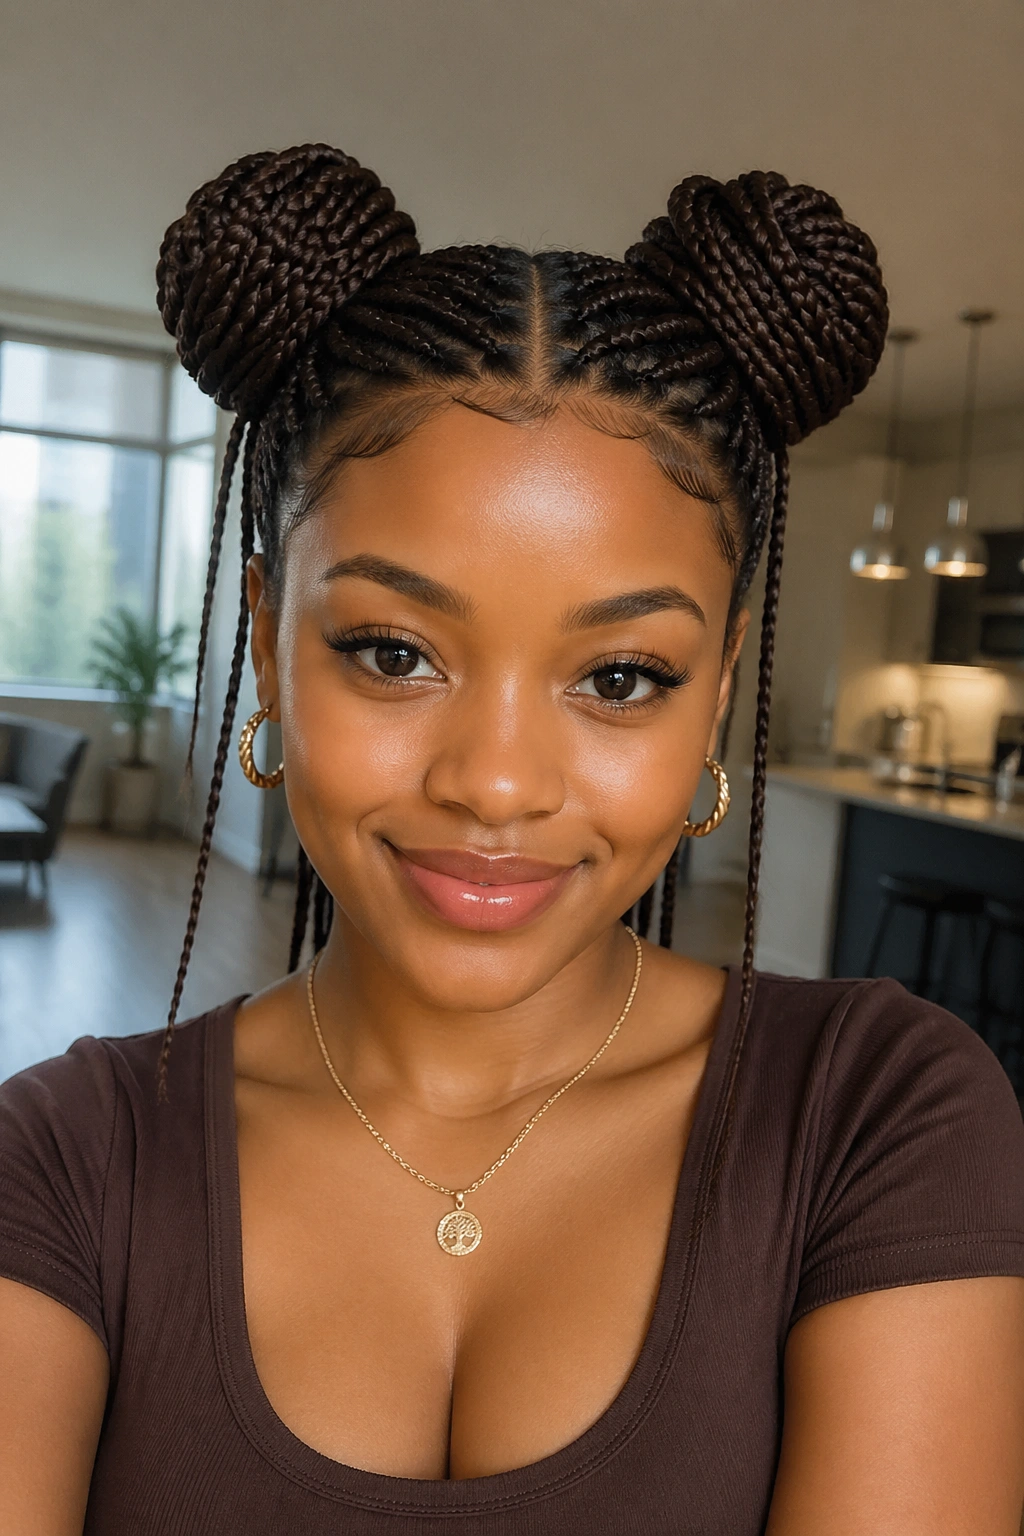
Two buns. That’s the whole idea, and it works because the symmetry takes all the guesswork out of the look. With small knotless box braids, space buns sit nicely without needing a lot of added hair or heavy product.
The vibe is playful, sure, but it’s also practical. The weight spreads across the head instead of pulling in one direction, which can feel better on long braid days. I like this one when I want something that looks deliberate but does not take itself too seriously. It has a bit of fun to it.
What Keeps Them Balanced
- Make your middle part straight before you start.
- Gather each side at the same height.
- Twist each bun in the same direction so they match.
- Secure with two elastics and three or four pins per side if the braids are long.
A lot of people stop after the buns are tied, but the shape looks better when you tug the loops into a rounder finish. Not hard. Just enough to make the buns feel full instead of tight.
6. Wrapped Braided Ponytail Knot
Unlike a loose ponytail that swings everywhere, a wrapped braided ponytail knot keeps the ends controlled and the base neat. It’s a good pick when you want height, but you do not want the whole style dangling down your back.
This works well for errands, heat, or any day you know you’ll be moving a lot. Gather the braids at the crown or slightly above it, wrap one braid around the elastic, then fold the tail into a compact knot. The result is cleaner than a basic ponytail and less formal than a full bun. That middle space is useful.
If your braids are medium length, this style can look especially tidy because the ends disappear faster. Longer braids need a little more pinning, so tuck the loose pieces under the knot instead of forcing them all into one tight wrap. That keeps the shape smooth and prevents one side from sticking out like a handle.
A good wrapped knot should feel secure but not rigid. You want movement at the ends of the braids, not at the base.
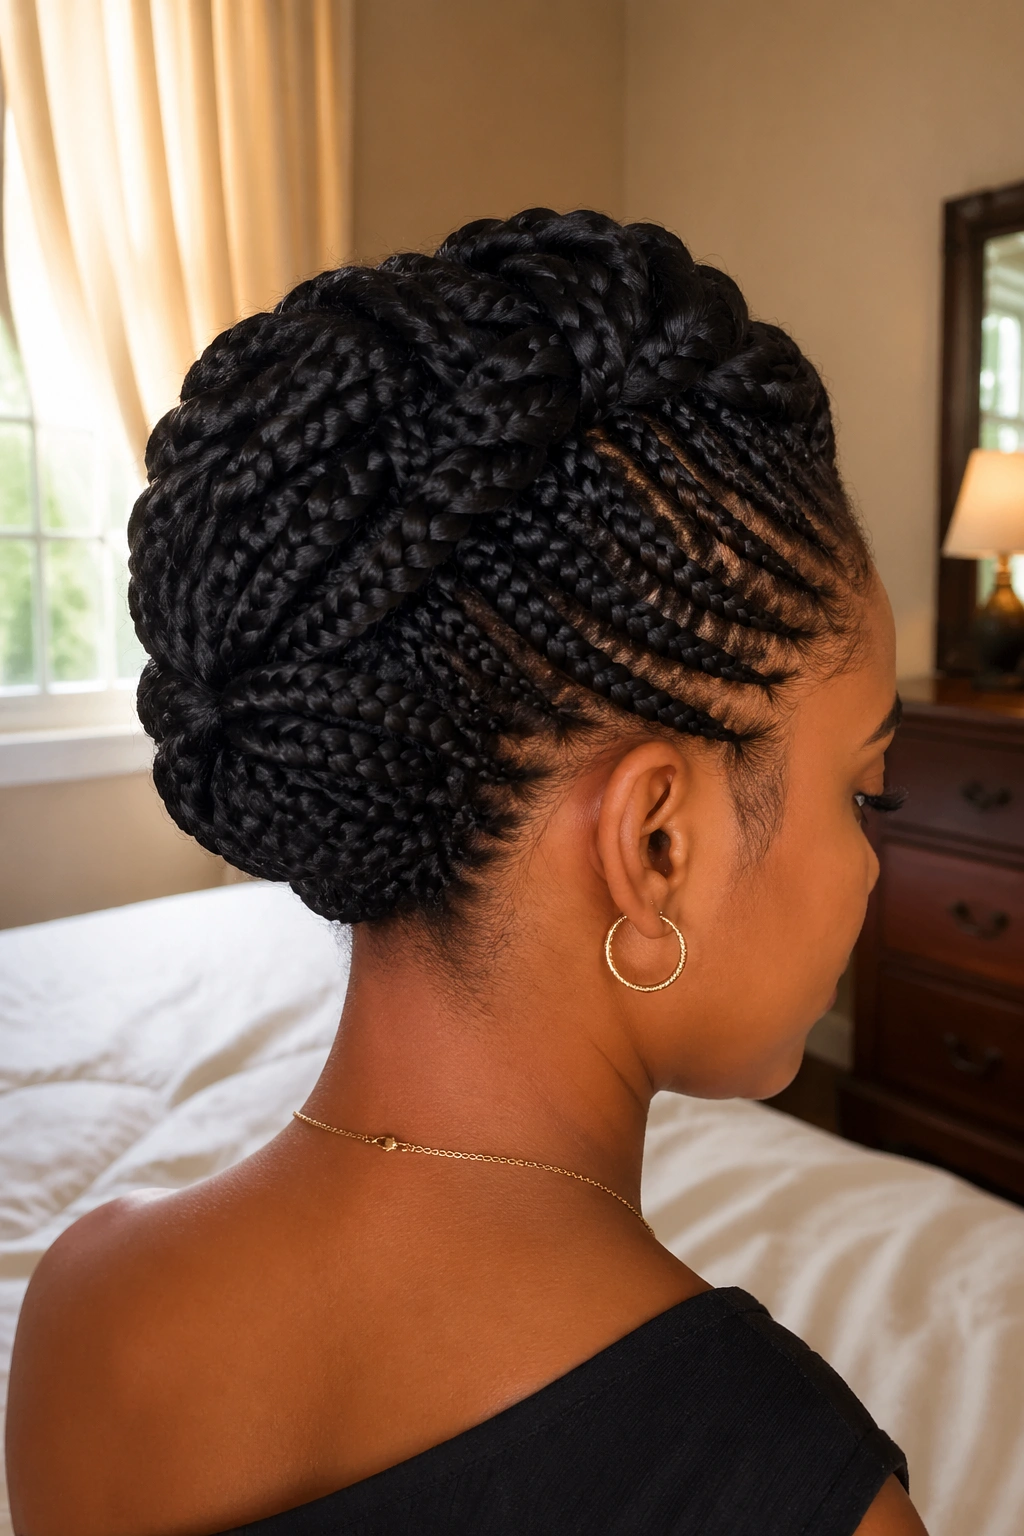
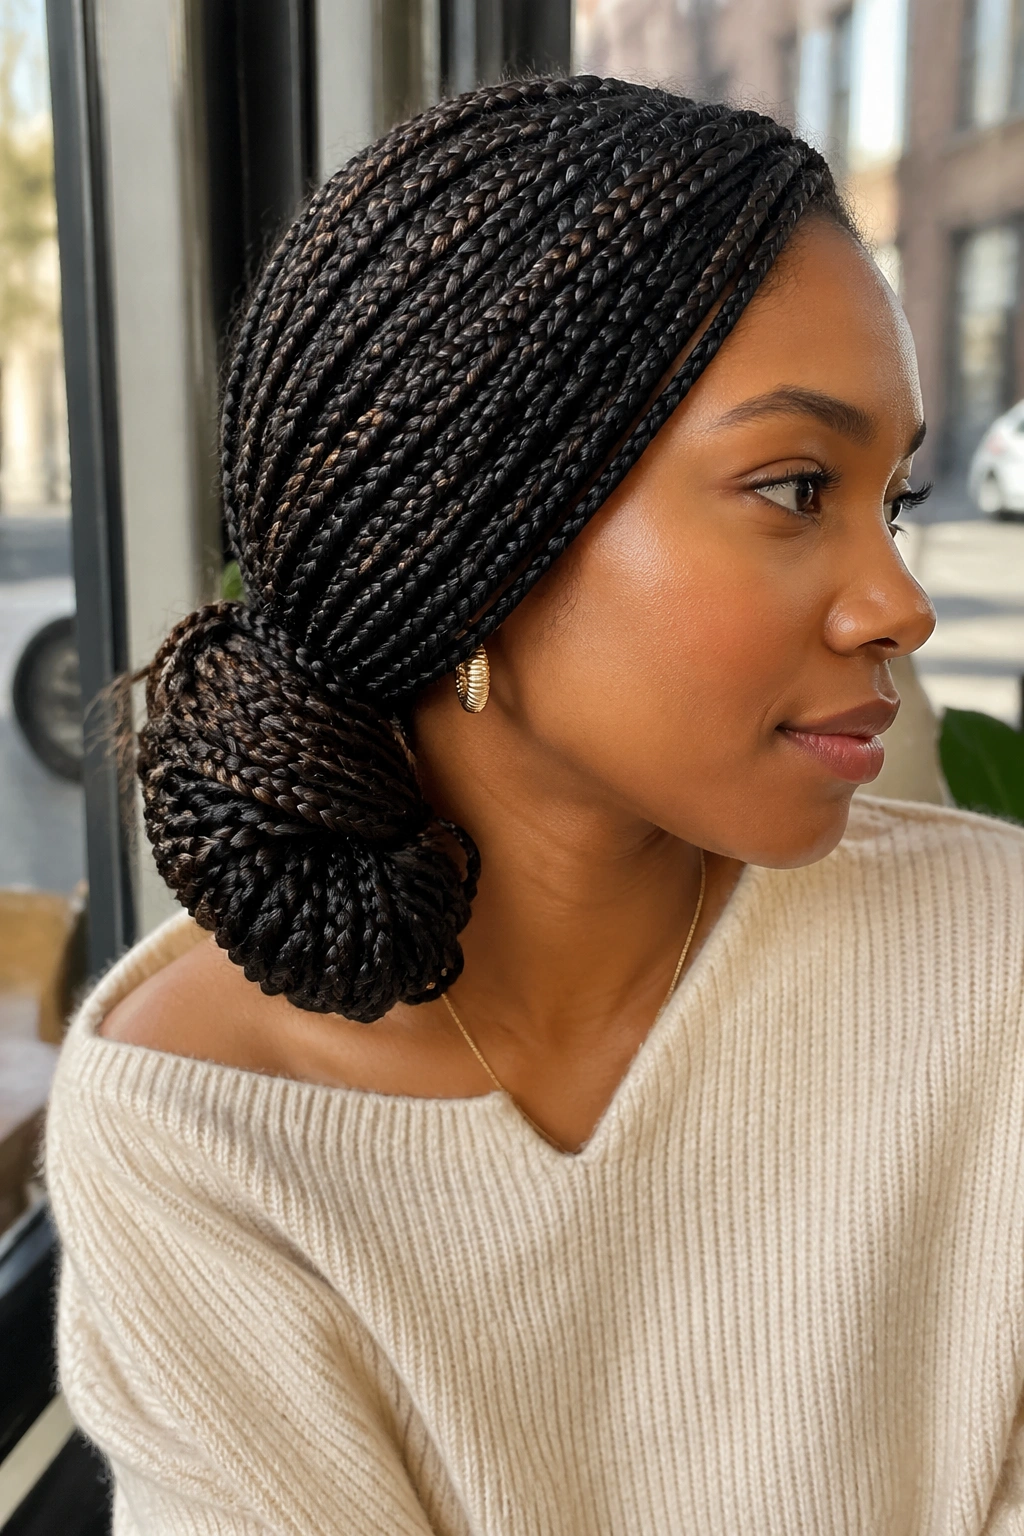
7. Side Chignon With a Deep Part
A deep side part changes the whole mood of small knotless box braid updos. It gives the style more shape before you even start pinning, which is handy if you want something that feels softer than a straight-back bun.
The side chignon sits low and a little off-center, usually near the nape or just behind one ear. That placement lets the braids sweep over one shoulder side first, then fold into the knot. I’m fond of this shape for evenings because it makes earrings stand out without needing a lot of extra work. It also flatters braids that have a little shine on them — the sweep shows that off.
Keep one side flatter than the other. The asymmetry is the point. If both sides are pulled equally tight, the style loses its charm and starts looking like a standard low bun with a part.
A satin scarf helps here. Wrap it around the top while the pins cool off into place, and the chignon tends to sit more smoothly the next time you wear it.
8. Faux Hawk Updo With Pinned Sides
A faux hawk with small knotless box braids has edge, but not the messy kind. The sides are pinned close to the head, and the center section rises into a ridge of buns, twists, or stacked coils. It’s dramatic in a clean way.
What to Keep Slick and What to Leave Loose
The sides should stay flat. That’s non-negotiable. Use a little edge control or a light gel around the temples if that’s your thing, then brush or smooth the braids back before pinning them. The center section can hold more shape, so you can get creative there.
- Build the center ridge in 3 sections for a fuller look.
- Pin from the back forward if the braids are long.
- Use braid cuffs on the center pieces if you want extra detail.
- Keep the base snug, not tight.
This style works when you want the braids to look bold without covering your face. It’s also one of the best choices if your hairline is sensitive, because the pull stays mostly at the sides and can be adjusted more easily than a high ponytail.
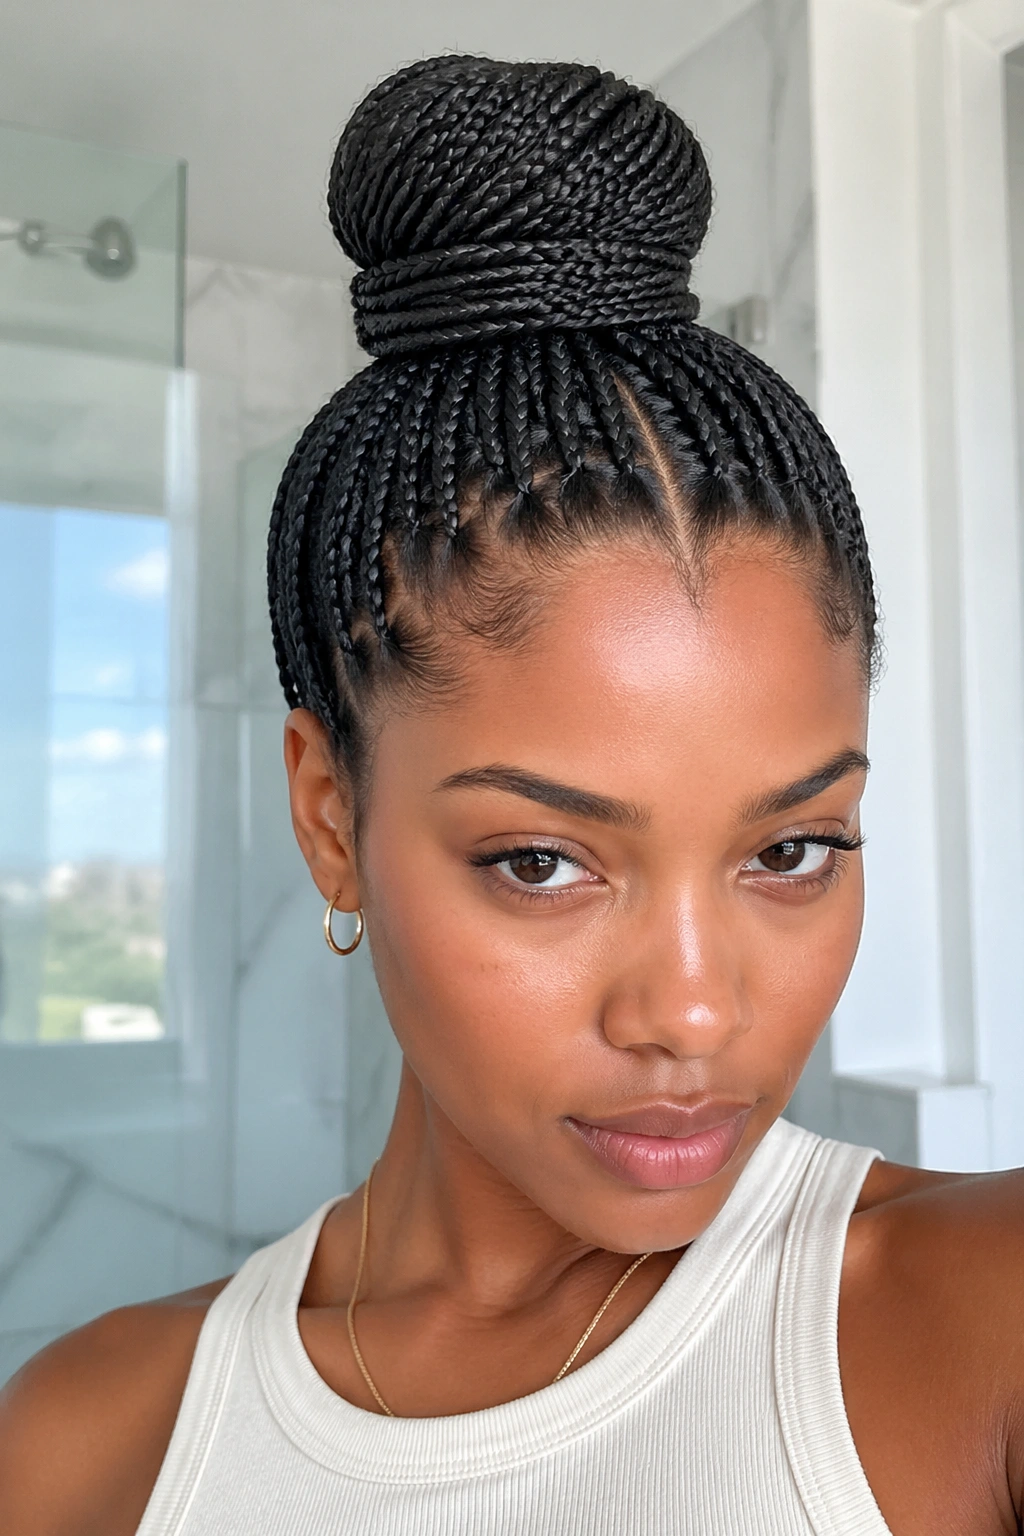
9. Twisted Donut Bun
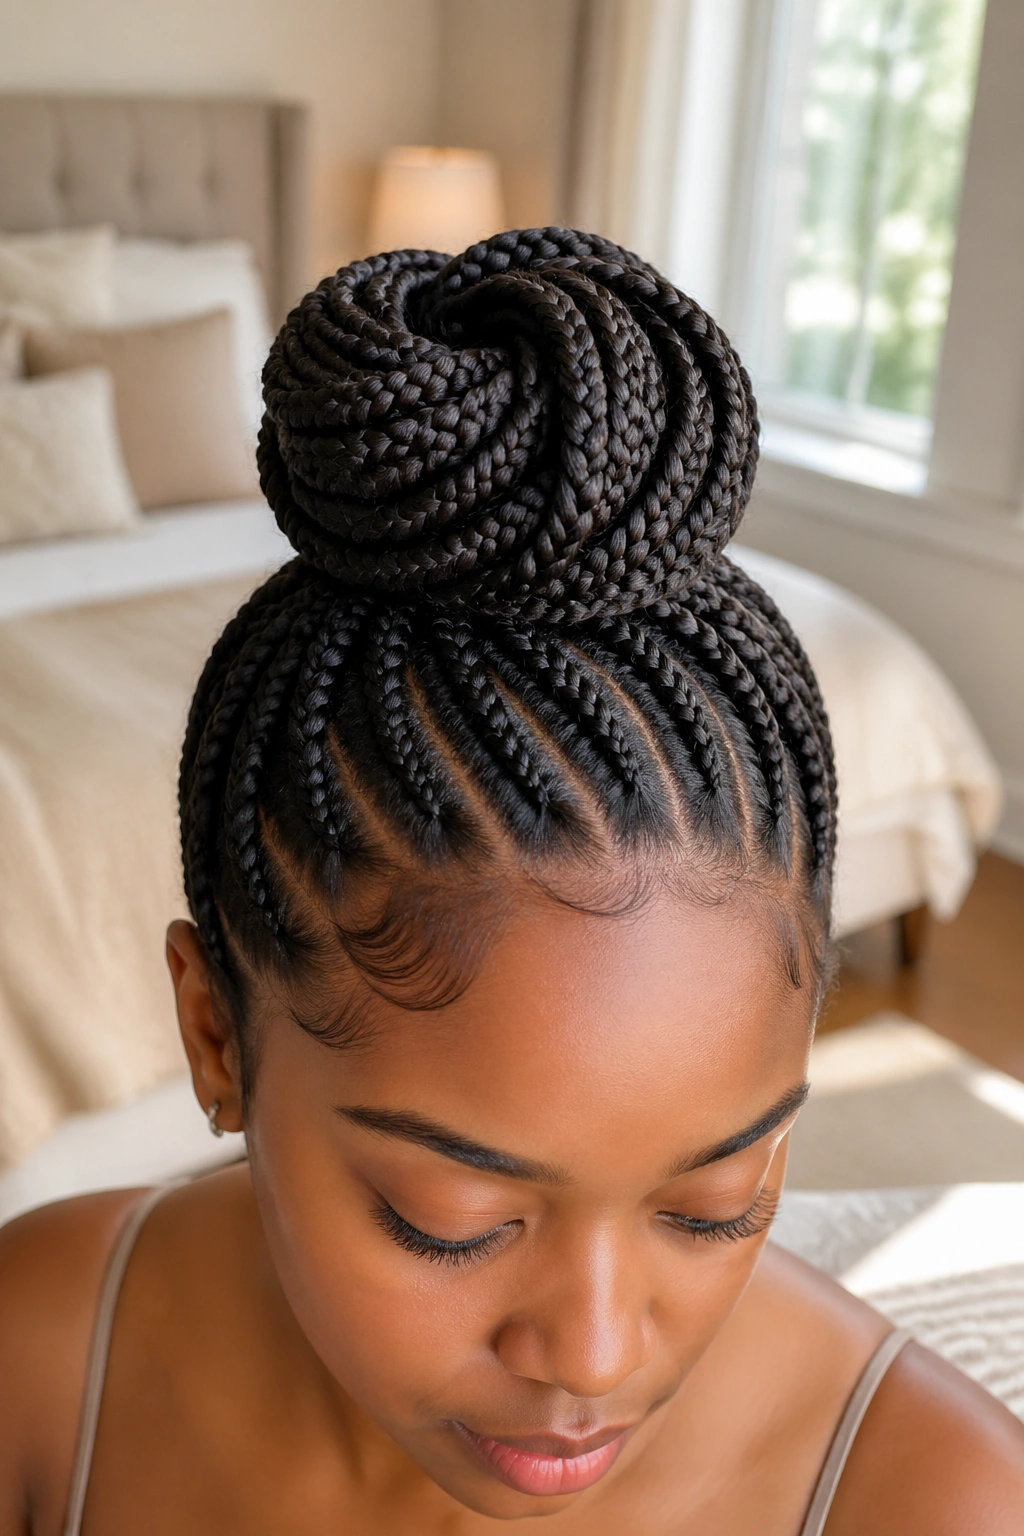
What if you want a bun that looks rounded and full instead of flat? Go for a twisted donut shape. It gives small knotless box braids a softer, more sculpted outline than a plain coil, and the roundness reads well from the side.
The trick is splitting the braids into two sections, twisting both sections, then wrapping them around each other in a circle. Think of it as a rope twist that folds back on itself. The bun sits best at the crown or just above the nape, depending on how formal you want it to feel.
I like this style because it has shape without looking fussy. That’s rare. A lot of braid buns end up either too tight or too puffy, but the donut form keeps a neat edge around the outside while the center stays full. Use a few hidden pins under the widest part of the bun so the roundness holds.
If one side looks bigger, don’t panic. Shift the twist a little before pinning the last piece. Small changes make a big difference here.
10. Basket-Weave Pin-Up
A basket-weave pin-up takes a bit more patience, but the payoff is worth it when you want your small knotless box braids to look textured and intentional. The crossed sections create a pattern at the back of the head, almost like woven lines leading into the bun.
The Parting Pattern Matters
Start with clean sections. That part matters more than fancy pins. If the braids are just thrown across one another, the style loses the woven effect and starts looking random. A rat-tail comb helps, but your fingers will do most of the real work.
The best way to build this one is to cross small groups of braids over one another in a loose grid, then tuck the remaining ends into a low or mid bun. It sounds complicated. It’s not, once you do it once or twice.
- Use small sections, not whole handfuls.
- Keep the weave flat against the head.
- Hide the ends under the final fold.
- Finish with one or two decorative pins if you want a cleaner back view.
This is a good style when you want something people notice from behind. And they will.
11. Bow Bun
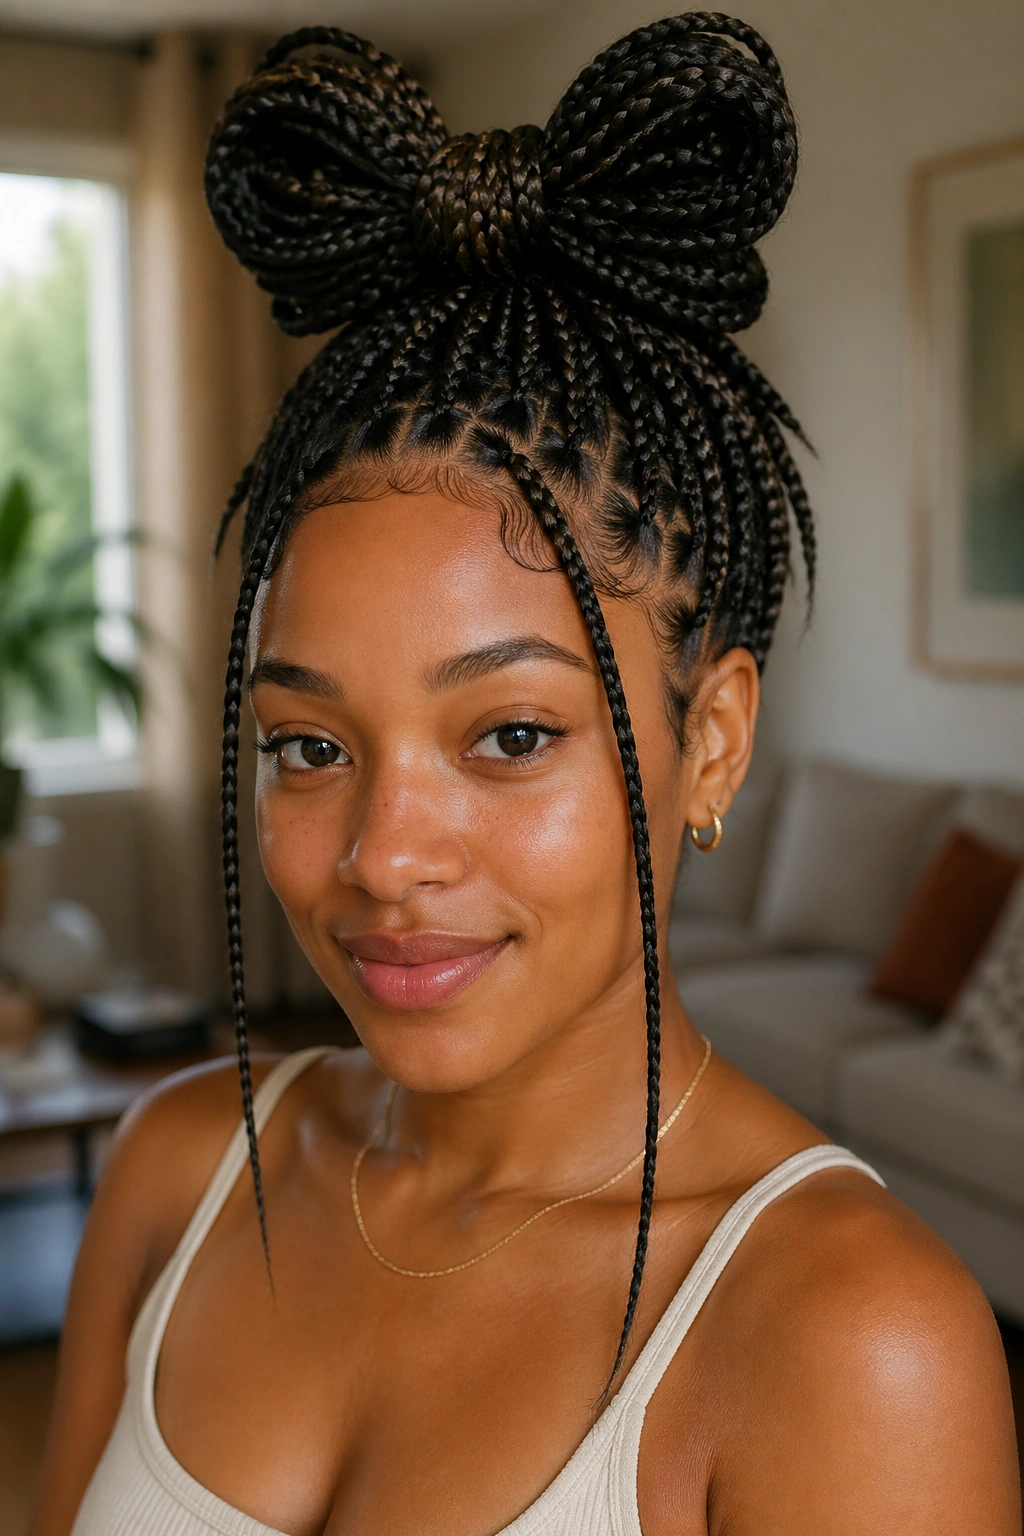
A bow bun is one of those styles that looks playful but still polished enough to wear somewhere nice. With small knotless box braids, the loops hold their shape better than you might expect, which makes the bow form possible without a lot of extra filler.
The key is building two even loops and leaving one braided section through the center to mimic the knot of a bow. If the loops are uneven, the style starts looking accidental. If they match, it feels crisp and deliberate. I prefer this one on braids that are medium length, because the ends fold more neatly and don’t have to be hidden under too much weight.
There’s a sweet spot here. Too small, and the bow disappears. Too big, and it starts to feel costume-like. Keep the loops medium-sized and pin them from the inside so the structure stays snug.
A bow bun is not the style I’d wear every week. But for a birthday dinner, a photo shoot, or a day when you want your braids to look a little more playful, it’s a fun option that still feels grown.
12. Pineapple Bun Up High
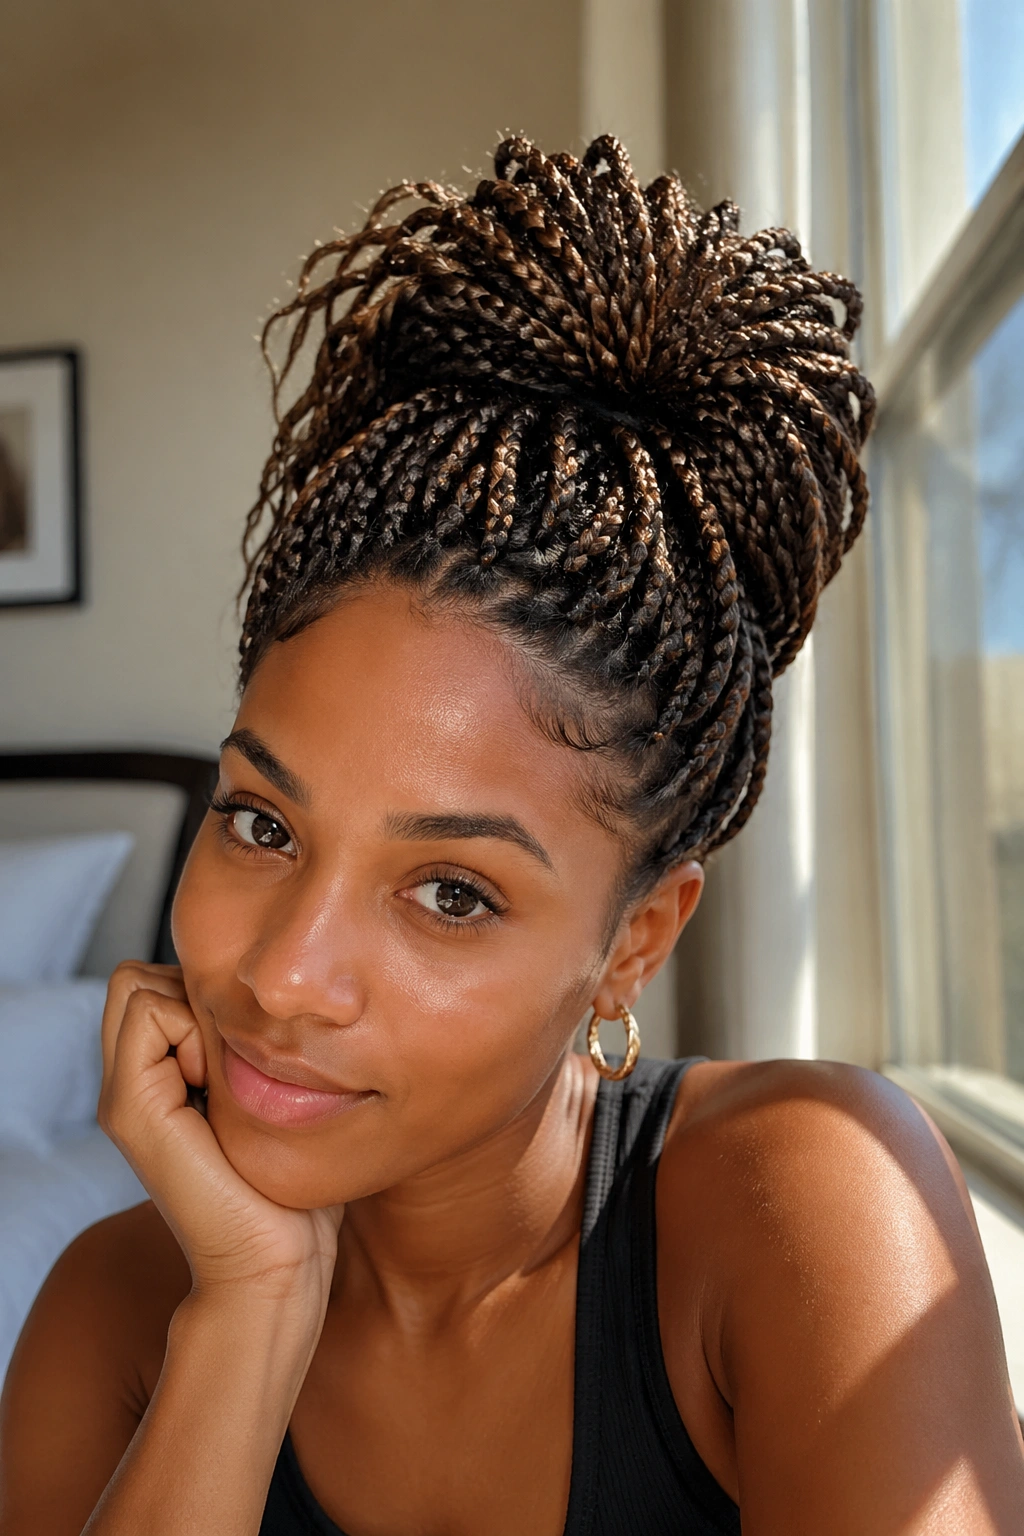
A pineapple bun is what I reach for when I want the braids off my shoulders fast and I’m not trying to make it complicated. It sits high, gathers the lengths loosely, and keeps the top shape soft instead of rigid.
That looseness is the point. Small knotless box braids can feel a little heavy when they’re pulled into a sharp knot, so a pineapple bun gives the braids room to puff out a bit while still staying contained. It works especially well on days when you plan to take the style down again that night. Or maybe you just want something quick before the gym, the store, or a long drive.
Quick Shape Notes
- Use a soft scrunchie or stretch band.
- Don’t force all the ends into the center.
- Let the outer braids fan upward a little.
- Pin only the braids that threaten to fall.
I like this style because it feels easy, but not lazy. There’s a difference.
13. Rolled French Pin-Up
A rolled French pin-up gives small knotless box braids a smoother back profile than a standard bun. Instead of stacking the braids in one round knot, you roll them upward against the head and pin them in place as you go. The shape ends up flatter, cleaner, and a little more old-school.
This is a smart pick if you hate bulky buns pressing into headrests. The roll hugs the back of the head, so it sits close and stays out of the way. It also works well under collars, which is more useful than it sounds. Not every braid updo plays nicely with a jacket.
The roll takes more pins than people expect. Use them across the length of the roll, not just at the top and bottom. If one section feels loose, stop and pin it before moving on. Do not keep rolling and hope it fixes itself later. It won’t.
I’d wear this one when I want the braids to look tidy from every side, especially the back. It has a clean line to it that I always find appealing.
14. Heart-Shaped Braided Bun
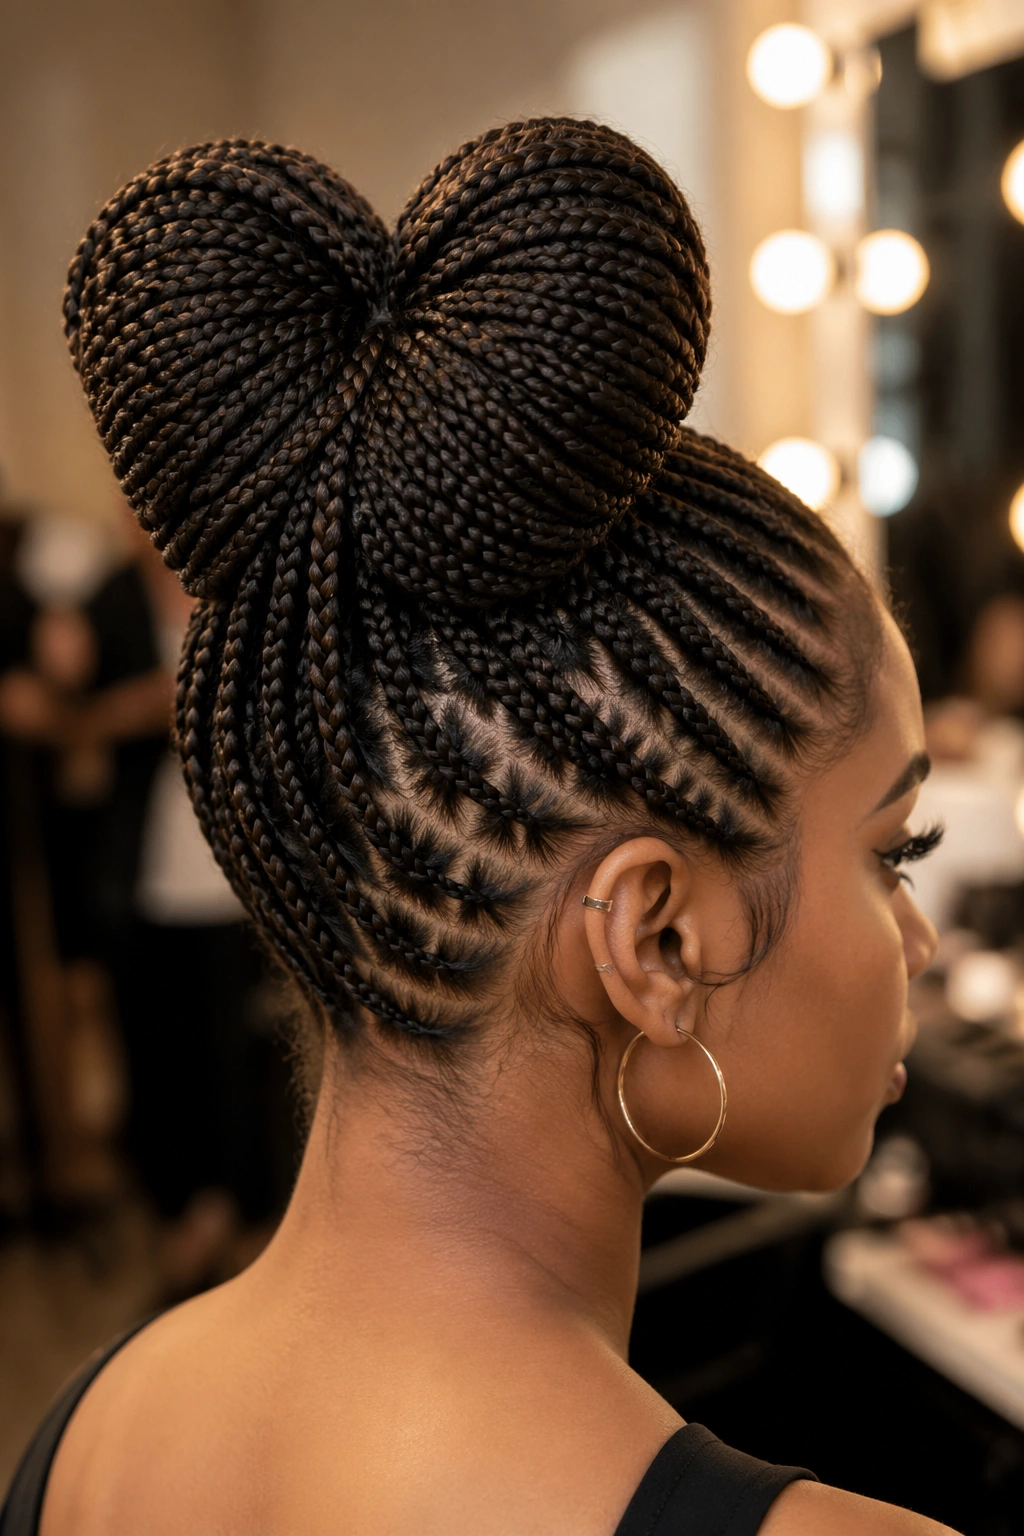
A heart-shaped bun is a little extra, and that’s exactly why it works. The shape is visible, distinct, and a nice change from the usual round bun or plain knot. Small knotless box braids make it easier to form the two curved loops without the style looking too heavy.
The trick is splitting the braids into two rounded sections that mirror each other, then bringing the tails together at the center so the bottom point of the heart has a clear finish. If the loops sit too far apart, the shape gets lost. If they sit too close, the bun starts looking like a doubled-up knot.
I like this style for events where you want something memorable but not loud. It has enough personality to stand out in pictures, and the braid texture gives the shape a bit of grit so it doesn’t feel sugary.
When to Wear It
This one works for birthdays, date nights, or any dressy setting where you want your hair to say a little more. Keep the edges neat and the loops even, and the whole thing reads as intentional rather than cute-for-cute’s-sake.
15. Side-Swept Low Knot
Why do side-swept styles feel more flattering than straight-back ones sometimes? Because they create a line across the face and neck that feels softer. A side-swept low knot does that without losing the neatness of a braid updo.
Sweep all the braids toward one shoulder first, then anchor the knot just below the opposite side of the nape. That off-center placement shows off earrings and keeps one side of the face open. It’s a simple shift, but it changes the mood a lot. I like it for days when I want the style to feel a little romantic without turning into a full formal look.
How to Keep the Weight Balanced
The bigger side should not drag. Use pins underneath the fold so the knot stays lifted, then tuck the loose ends back toward the center. If the braids are long, split them into two bundles before wrapping; one giant bundle tends to sag.
A little shine spray on the finished braid lengths makes the side sweep stand out, but keep it light. Too much product makes the whole knot feel greasy by the end of the day.
16. Center-Part Top Knot With a Wrapped Base
A clean middle part does a lot of work here. It gives the style symmetry before the braids even reach the top knot, which makes the whole look feel neat without needing a complicated shape.
This updo starts with the braids pulled straight back from the part, then gathered into a high knot with one braid wrapped around the base. That wrapped base matters more than people think. It hides the band, smooths the transition from part to knot, and makes the style look finished instead of improvised.
I prefer this on braids that are medium to long because the knot gets a little more height. Shorter braids can still work, but the top knot needs more pinning to stay lifted. If the knot leans forward, it can look heavy, so keep the base tight and the crown smooth.
There’s a tidy confidence to this style. Not fussy. Just clean.
17. Curved Mohawk Bun
A curved mohawk bun is for the days when you want the braids to look strong and a little dramatic without losing control of the shape. The sides are slicked back or pinned flat, while the center section rises in a curved line from front to back.
The curve is what makes it interesting. Instead of one static bun sitting in the middle of the head, the braids create motion along the scalp first, then gather into a raised finish near the crown. It gives the eye somewhere to travel. That sounds small, but it makes the style feel more deliberate.
I’d keep this one fairly smooth at the sides and fuller in the middle. If everything is equally big, the mohawk effect gets muddy. The center should lead. The edges should support it.
This is one of the better options when you want your knotless box braids to look bold without needing extra hair or wild accessories. A few pins, a bit of patience, and the right curve are enough.
18. Tuck-and-Pin Everyday Updo
The tuck-and-pin updo is the style I’d hand to anyone who wants a braid look they can repeat without stress. No special shape. No tricky loops. Just gather, tuck, and pin until the braids sit where you want them.
It’s the quiet workhorse of small knotless box braid updos. You can wear it high, low, or somewhere in the middle depending on your mood and how much time you have. The finished look is simple, but that’s the point — it keeps the braids controlled while still looking like you actually styled them.
I like this one for busy mornings because it forgives little mistakes. A braid that slips? Pin it back. A section that feels too flat? Tug it once and move on. You do not need a mirror for every second of it.
If I had to narrow all of this down, I’d say the best updos are the ones that fit your day instead of fighting it. Some will feel dressy, some playful, some barely-there. The good ones keep your braids comfortable, your edges calm, and your neck free. The rest is mood.