Goddess box braids with beads have a funny way of changing an entire look with just a few small decisions. Swap clear beads for wood, and the style feels calmer. Go with gold or pearl beads, and the whole thing moves toward dressy. Keep the beads sparse and the curls soft, and suddenly the braids read as airy instead of heavy. That’s the part people often miss: the bead choice is not decoration at the end. It is part of the shape.
The braids themselves matter, of course. So do the loose curly pieces that give goddess braids their softer edge. But beads change the rhythm. They change the sound, the weight, the swing, even the way the style sits against a collar or frames the cheekbone. Too many beads can turn a lovely style into a clunky one. Too few, and the look can feel unfinished.
I’ve always liked beaded box braids when the details are doing distinct jobs instead of all shouting at once. A neat parting pattern. A braid length that suits your day-to-day life. Beads that look like they were chosen on purpose, not grabbed from the nearest container. That’s the difference between a style that just exists and a style that feels thought through.
Some looks below lean polished. Some are playful. A few are the kind of thing you wear when you want your braids to do the talking before you do. The common thread is simple: the bead placement, braid length, and curl pattern all have to work together.
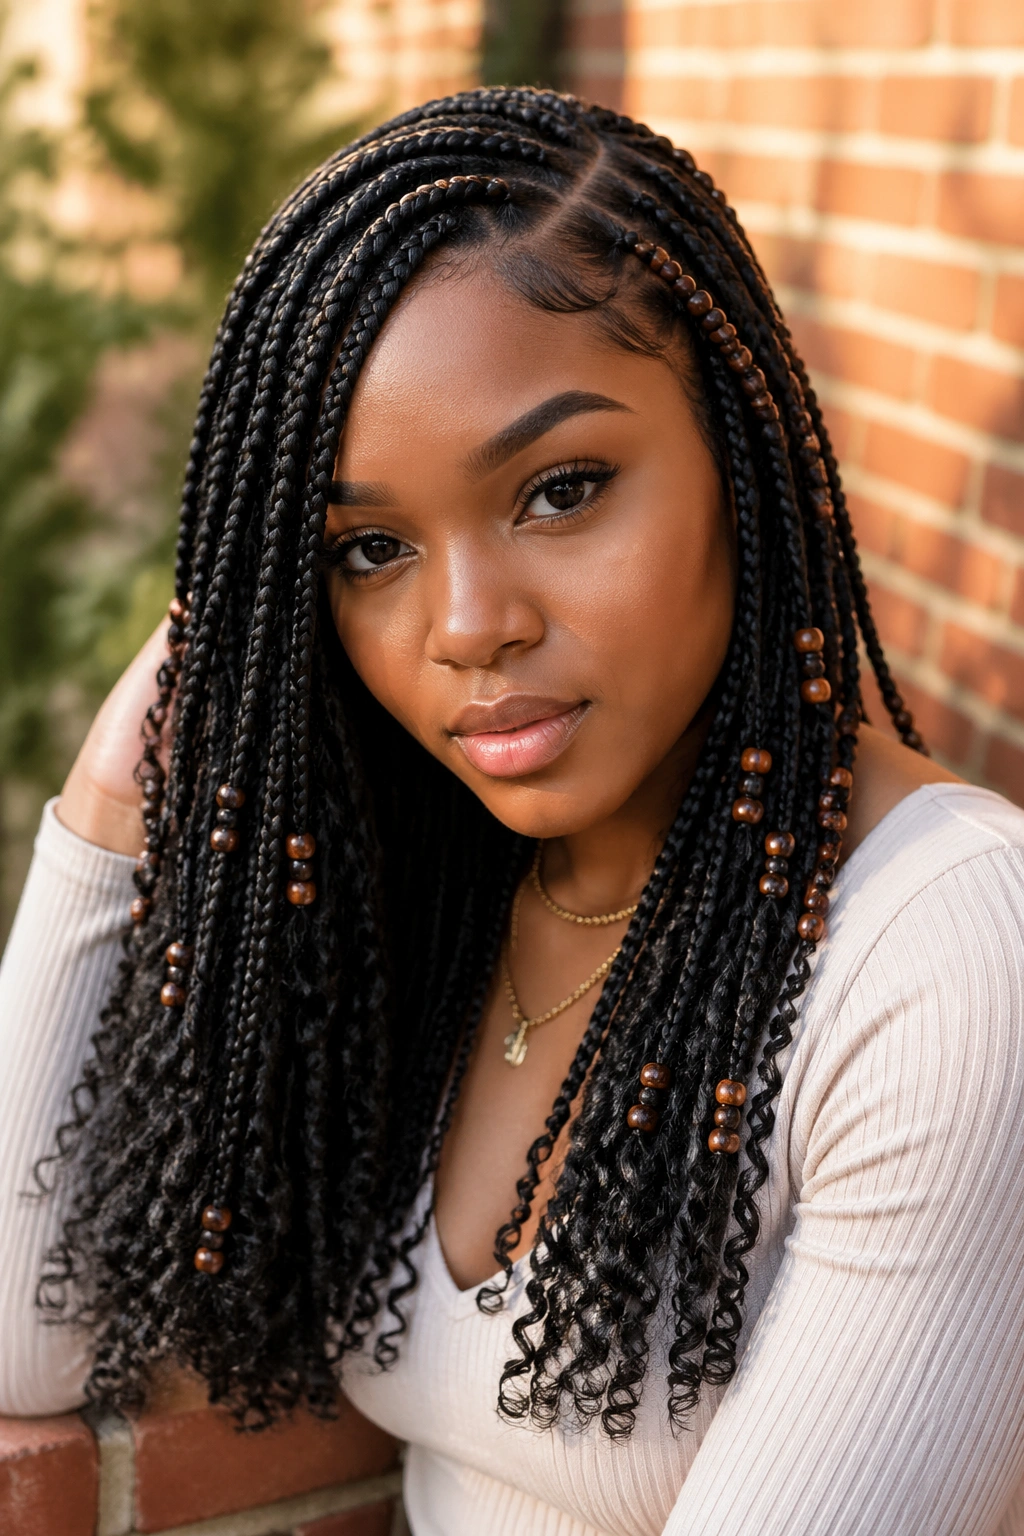
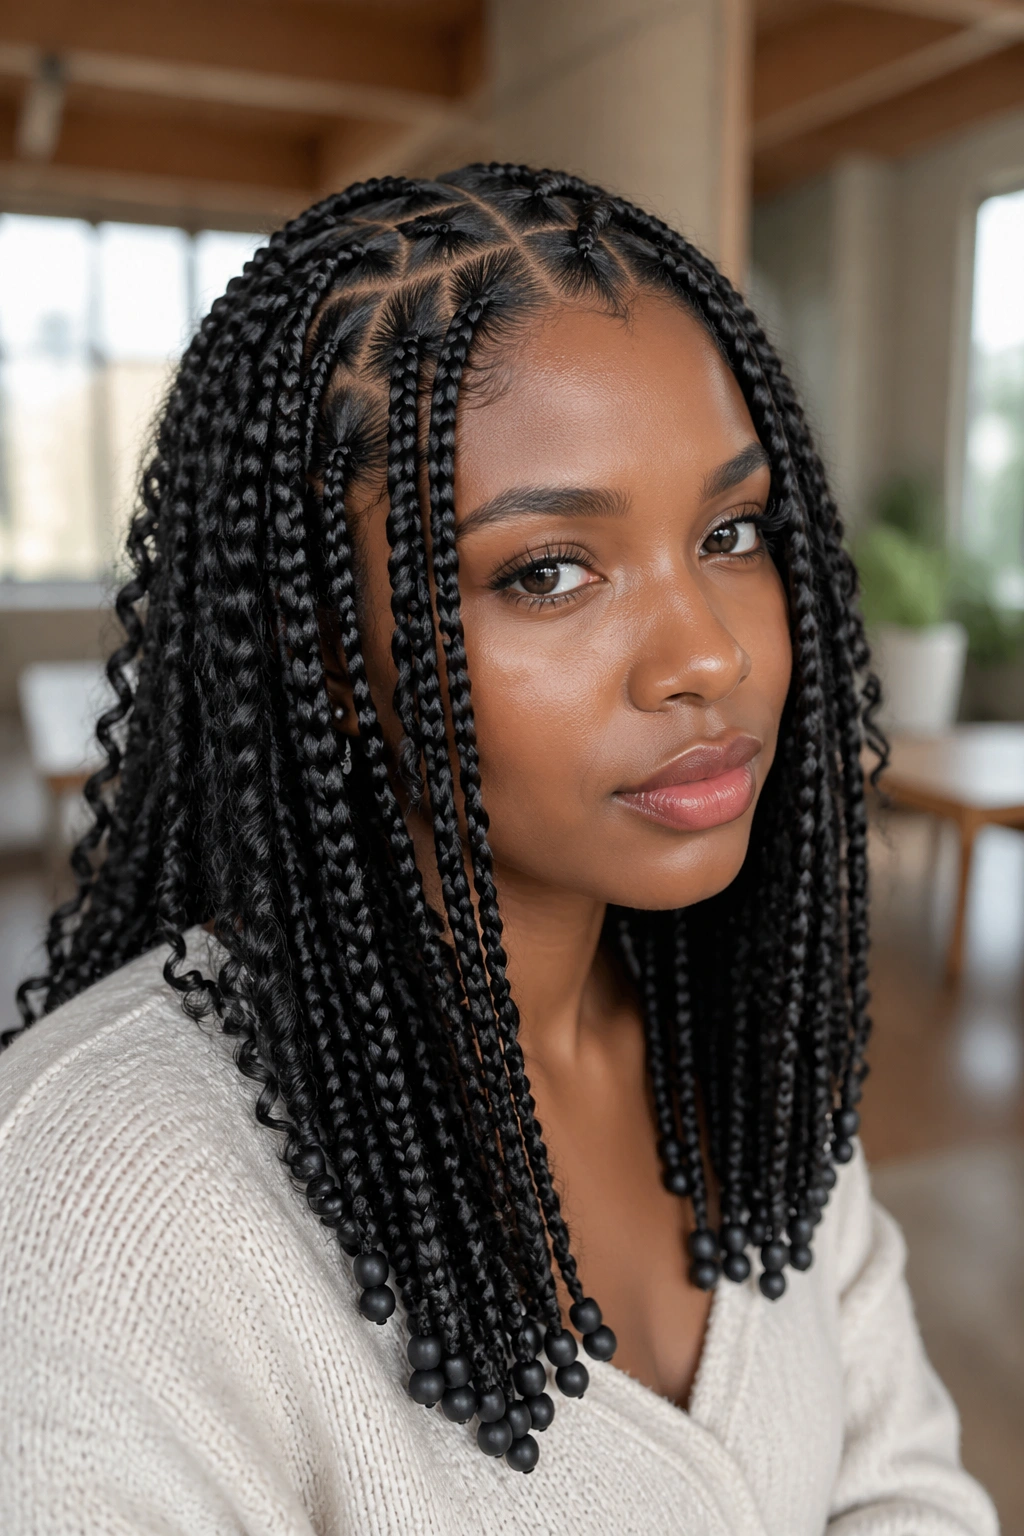
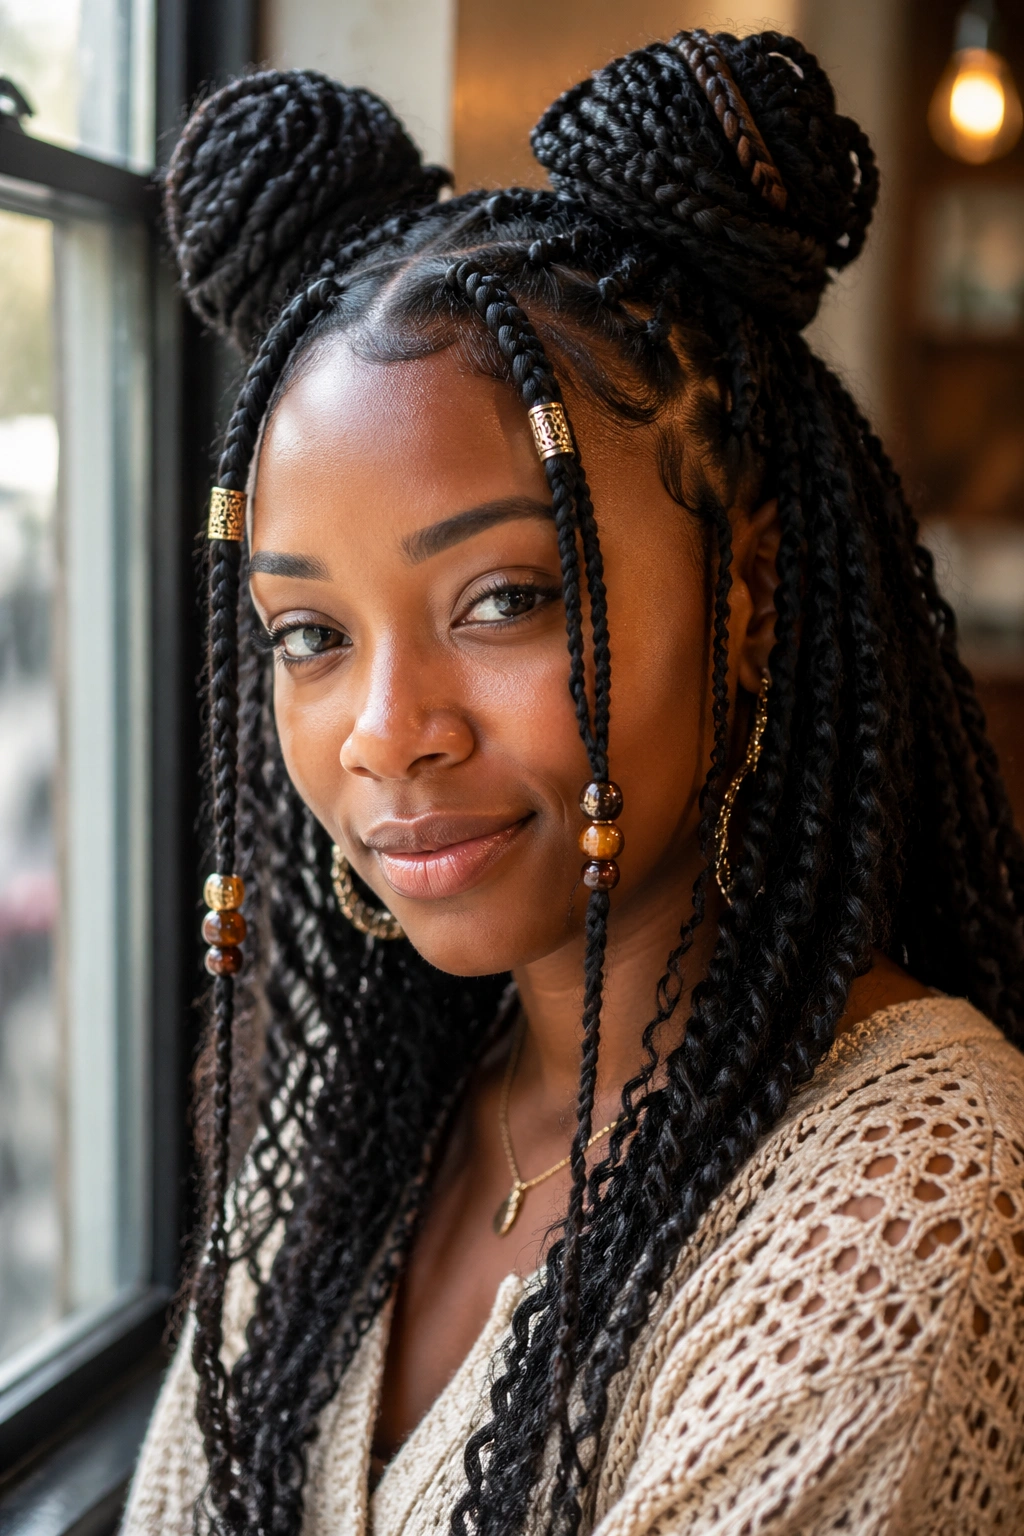
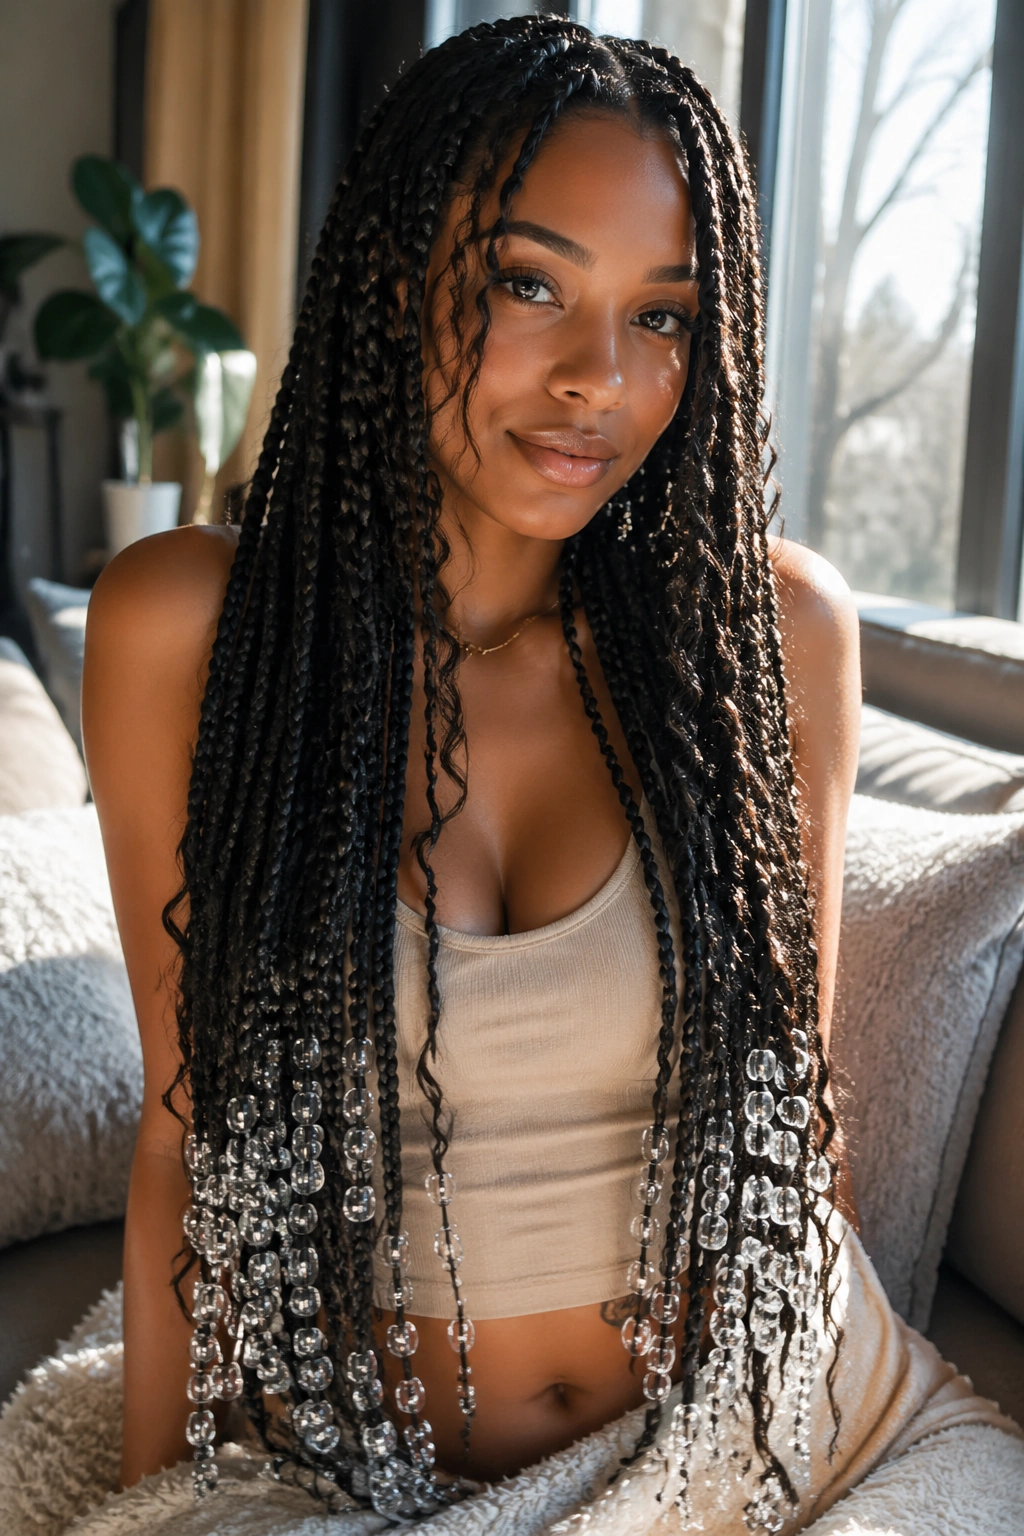
1. Waist-Length Goddess Box Braids With Clear Beads
Clear beads are the easiest way to let the braids themselves stay in charge. They don’t fight the curl pattern or the parting lines, and that’s exactly why they work so well on waist-length goddess box braids. The style feels clean, but not plain. There’s still movement, still texture, still a little sparkle when the light hits the ends.
Why Clear Beads Keep the Look Airy
The best thing about clear beads is that they act like punctuation instead of a headline. If your braids are long and the loose curls are already doing a lot visually, clear beads give the eye a place to land without cluttering the finish. I like them most when they sit only on the lower third of the braid, because that keeps the roots light.
A waist-length braid also gives the beads room to breathe. Shorter braids can make clear beads feel crowded. Longer braids let them dangle and move without looking busy.
- Best on medium-size braids with soft curly pieces left out near the face
- Works well when the beads sit mostly near the ends, not all the way up the shaft
- Good choice if you wear a lot of black, denim, white, or silver jewelry
- Feels neat for everyday wear and still reads polished for dressier outfits
Pro tip: If the beads start clacking together like a wind chime, there are too many.
2. Side-Part Goddess Box Braids With Wooden Beads
Wooden beads calm the whole style down. That’s the short version. They add warmth, a little texture, and a grounded feel that works beautifully with a deep side part because the braid line already has movement built into it.
A side part softens the forehead area and gives the curls a nice sweep across the face, which is why wooden beads make sense here. They do not compete with the parting. They echo it. When the beads are a shade deeper than the hair—think honey, walnut, or dark coffee—they pull the style into something earthy and intentional without making it feel costume-like.
I also like wooden beads on styles that use medium-thick braids rather than tiny ones. The grain of the wood shows better that way, and the beads don’t get lost. If you want a little contrast, keep the curls loose and fluffy around the temples, then let the beads sit lower toward the ends.
One-sentence truth: wooden beads look best when the rest of the style stays soft.
3. Half-Up Goddess Box Braids With Gold Beads
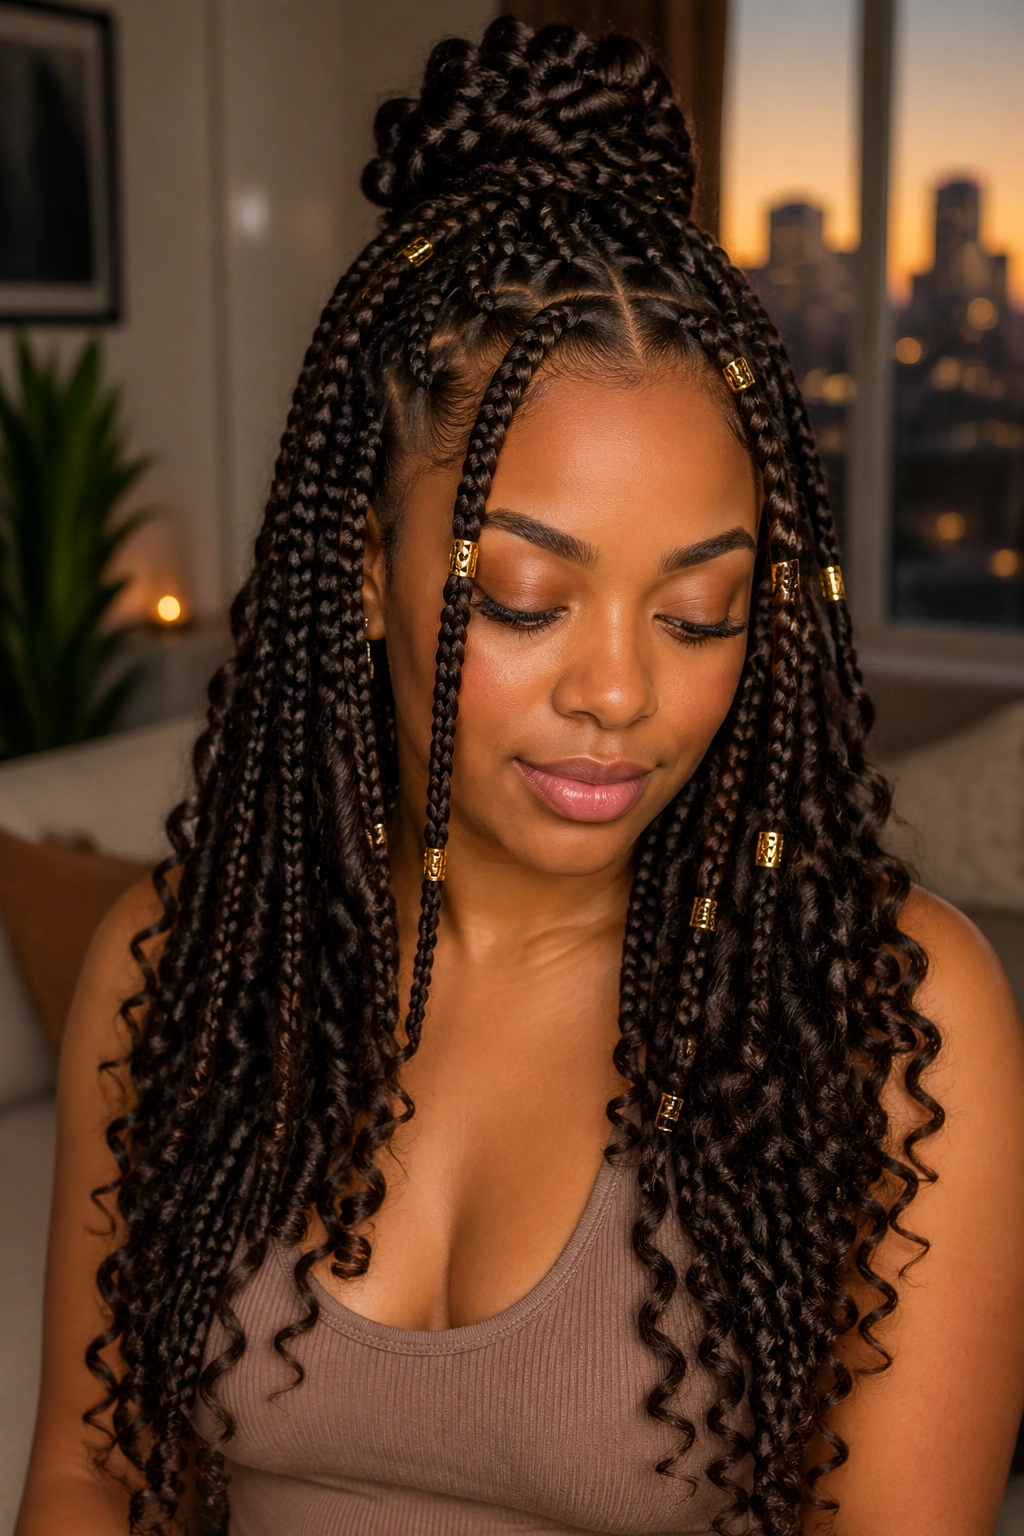
Why does a half-up style change the whole mood? Because it lifts the top section off the face and lets the rest of the braids fall in a cleaner line. That leaves more room for the gold beads to do their job. They catch the eye right away, especially when they’re placed near the front pieces and the ends of the hanging braids.
Best Bead Mix
A half-up goddess braid style can get busy fast, so the bead mix needs restraint. I’d keep the top section light and reserve the heavier shine for just a few braids near the temples.
- Use small gold beads near the front for brightness
- Add one medium bead at the end of a few hanging braids
- Leave some braids bead-free so the shape doesn’t feel crowded
- Pair with loose curls around the crown for a softer finish
The reason this look works is simple: the lifted top section gives the style structure, while the gold beads give it a point of focus. That makes it a smart pick for nights out, parties, or any day when you want your braids to feel a little more dressed up without turning them into something stiff.
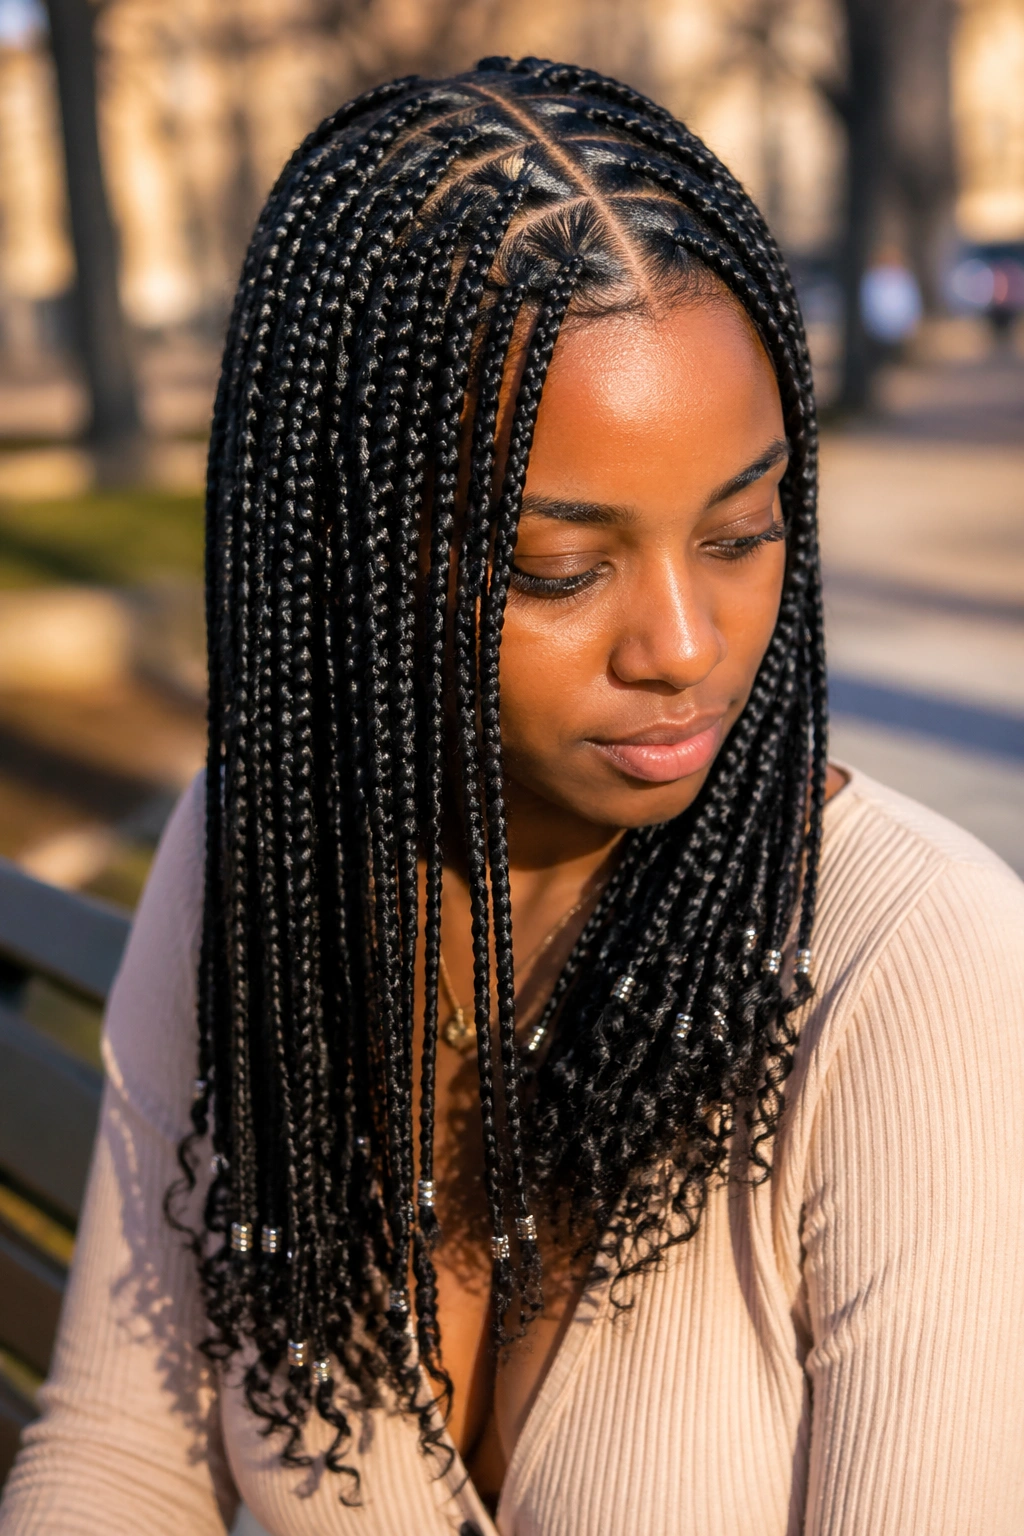
4. Shoulder-Length Goddess Box Braids With Small Glass Beads
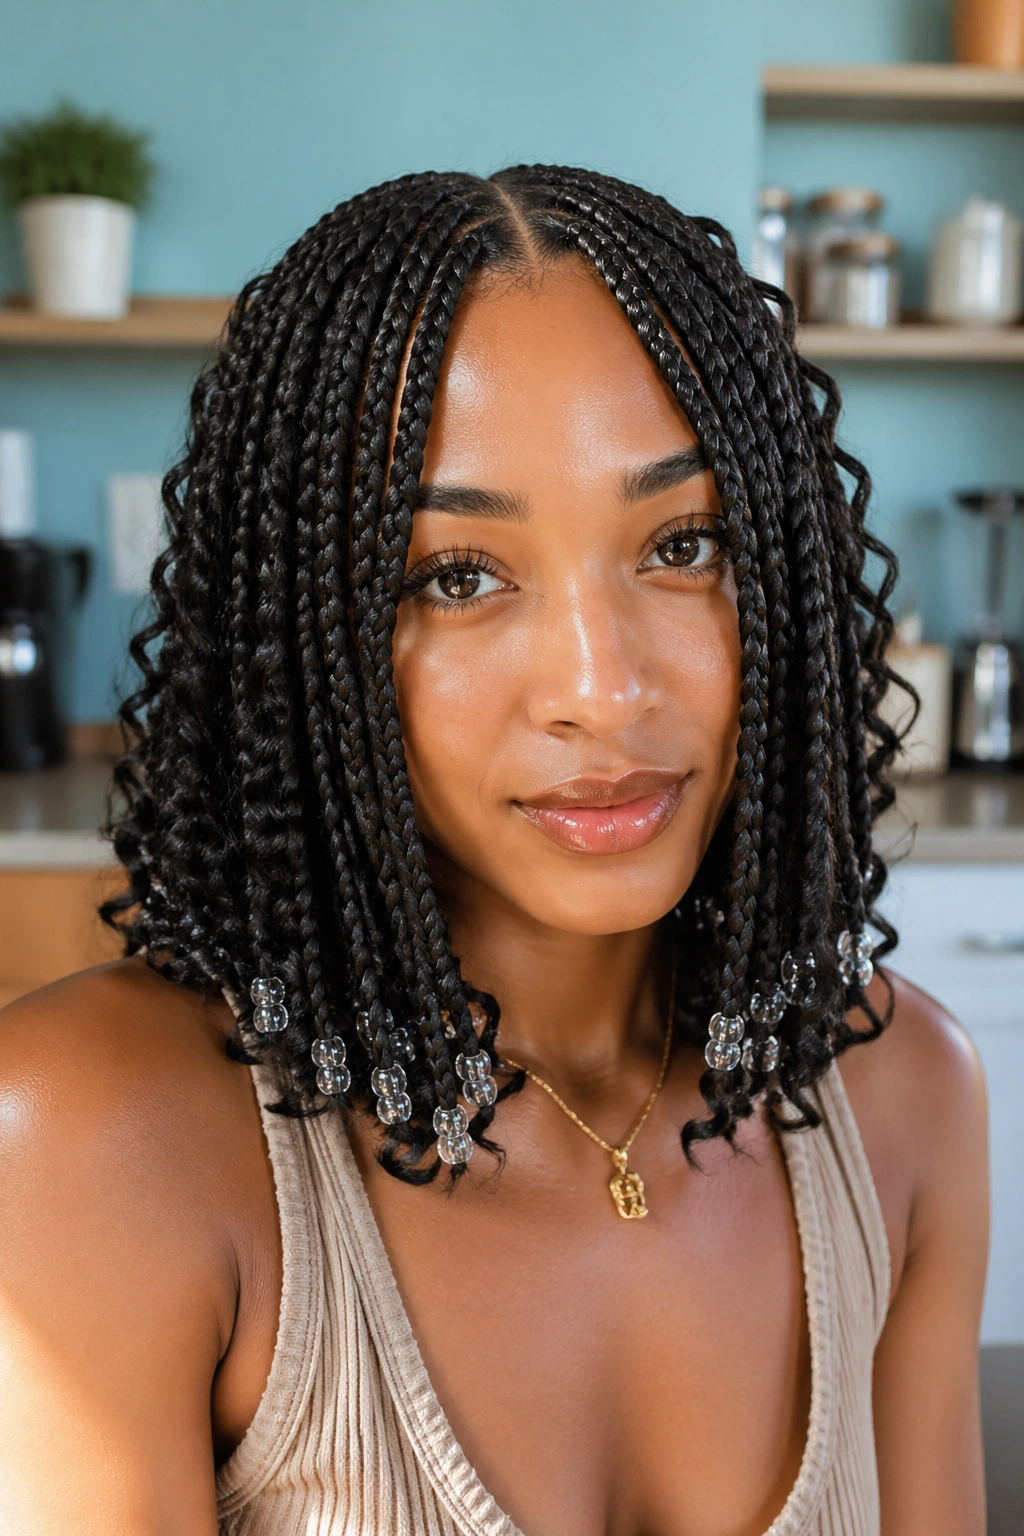
If you hate having braids brush your collar all day, shoulder-length goddess box braids are a relief. They stay out of the way, they’re easier to sleep on, and the whole look feels lighter around the neck. Add small glass beads, and the style gets this crisp little click every time you move.
The glass bead choice matters here because shorter braids can look bulky fast. Small beads keep the ends neat. They also let the loose curls remain visible, which is the whole point of goddess braids in the first place. I’d skip oversized beads on this length unless you want the ends to feel heavy. They usually do.
There’s also a nice practical side to this cut. Shoulder-length braids are easier to tuck into a coat, easier to wash, and easier to refresh on a busy morning. The parting needs to be tidy, though. Short braids do not hide sloppy sections. They show everything.
- Best for collarbone-length styles with a clean middle or side part
- Use small glass beads, not chunky ones
- Keep the curls trimmed so they don’t spread too wide
- Good pick if you want beads without extra weight
5. Jumbo Goddess Box Braids With Cowrie Shells
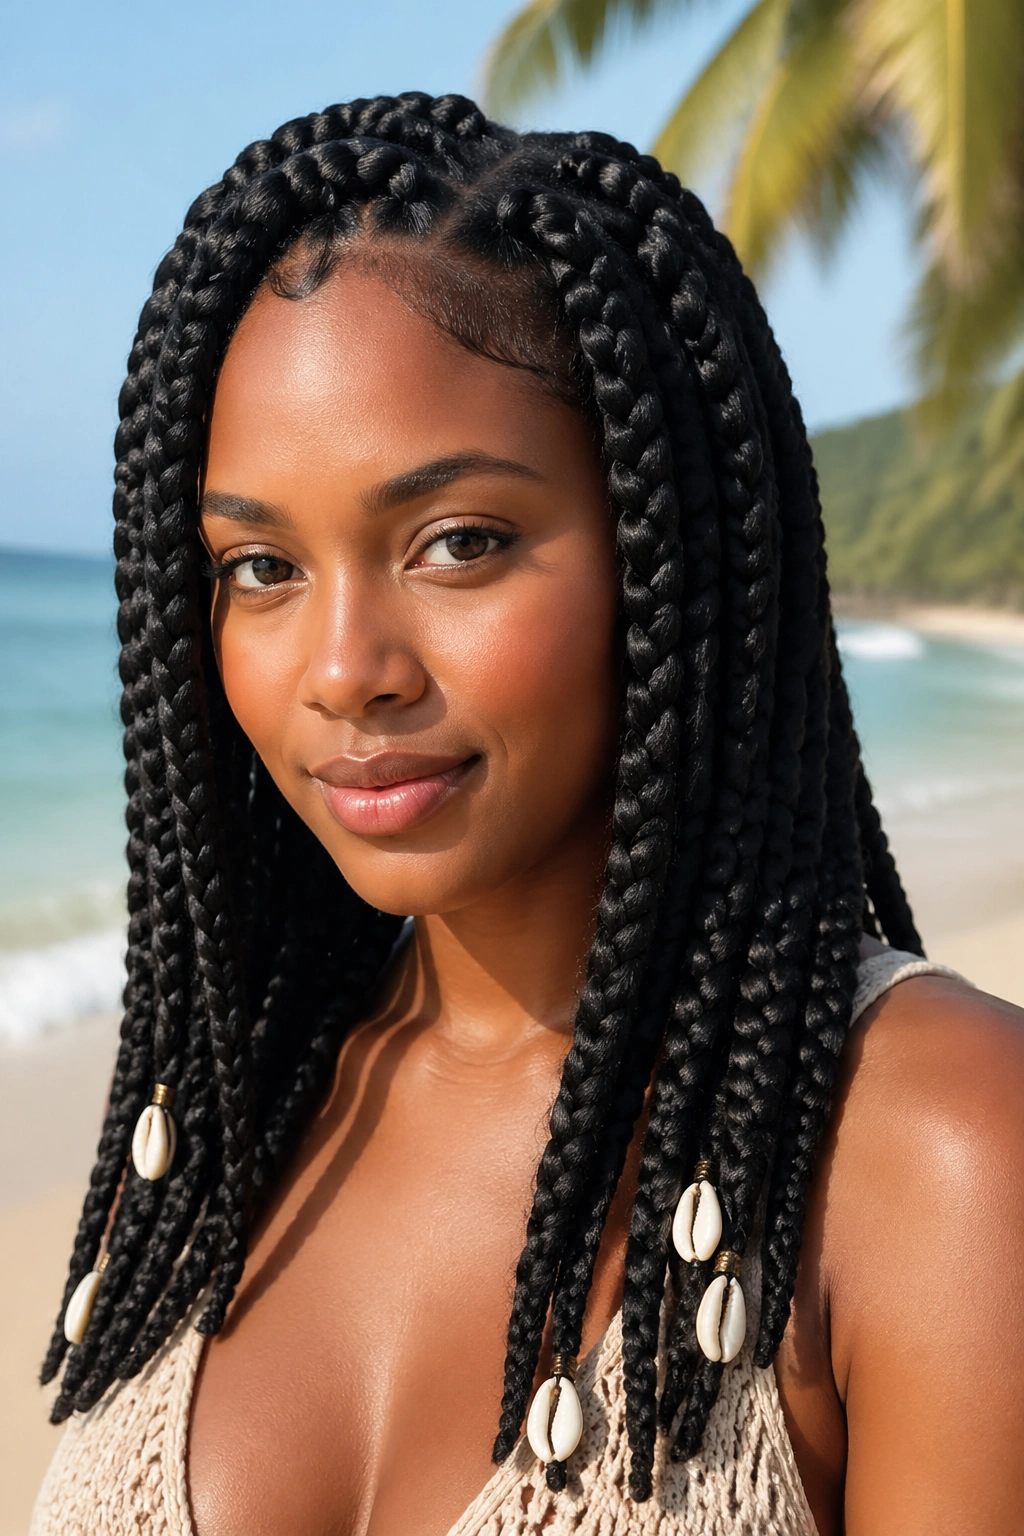
Cowrie shells bring a different kind of energy. They feel rooted, textured, and a little more symbolic than a plain bead, which is why I like them on jumbo goddess box braids. The larger braid size gives the shells room to stand out without looking crowded.
This style does best when the braid count stays low. A head full of jumbo braids already has presence. Add loose curly pieces, then place the shells near the lower ends of a few braids, and the look stays balanced. If you scatter shells everywhere, the style can start to feel busy in a way that fights the softness of the curls.
The thing I appreciate most here is the contrast. The smooth braid surface, the rougher shell texture, the soft curl pieces around the face—it all gives the style more depth. Wear it with simple hoops, plain tops, or solid colors, and the shells stay the star. Wear too many other accessories, and the whole thing loses focus.
A single cowrie near the front can be enough.
6. Triangle-Part Goddess Box Braids With Matte Black Beads
Triangle parts change the whole head shape. Square parts look neat; triangle parts look sharper. That little shift gives goddess box braids with beads a more graphic edge, especially when the beads are matte black and not shiny. The black finish stops the accessories from stealing attention from the parting pattern.
What Makes It Different
Triangle parts are one of those details people notice even if they can’t name them. The scalp pattern looks more directional, almost like the braids are moving before the hair even starts to swing. Matte black beads fit that mood because they don’t flash. They sit there and frame the ends without calling extra attention to themselves.
This is the braid style I’d choose if you like structure. It feels tidy at the root, but the loose curls keep it from looking severe. The matte beads also pair well with sharp eyeliner, hoop earrings, leather jackets, or simple monochrome outfits.
The trick is not to overdecorate it. One or two beads per braid is enough. The triangles already give the eye plenty to look at.
7. Burgundy Goddess Box Braids With Amber Beads
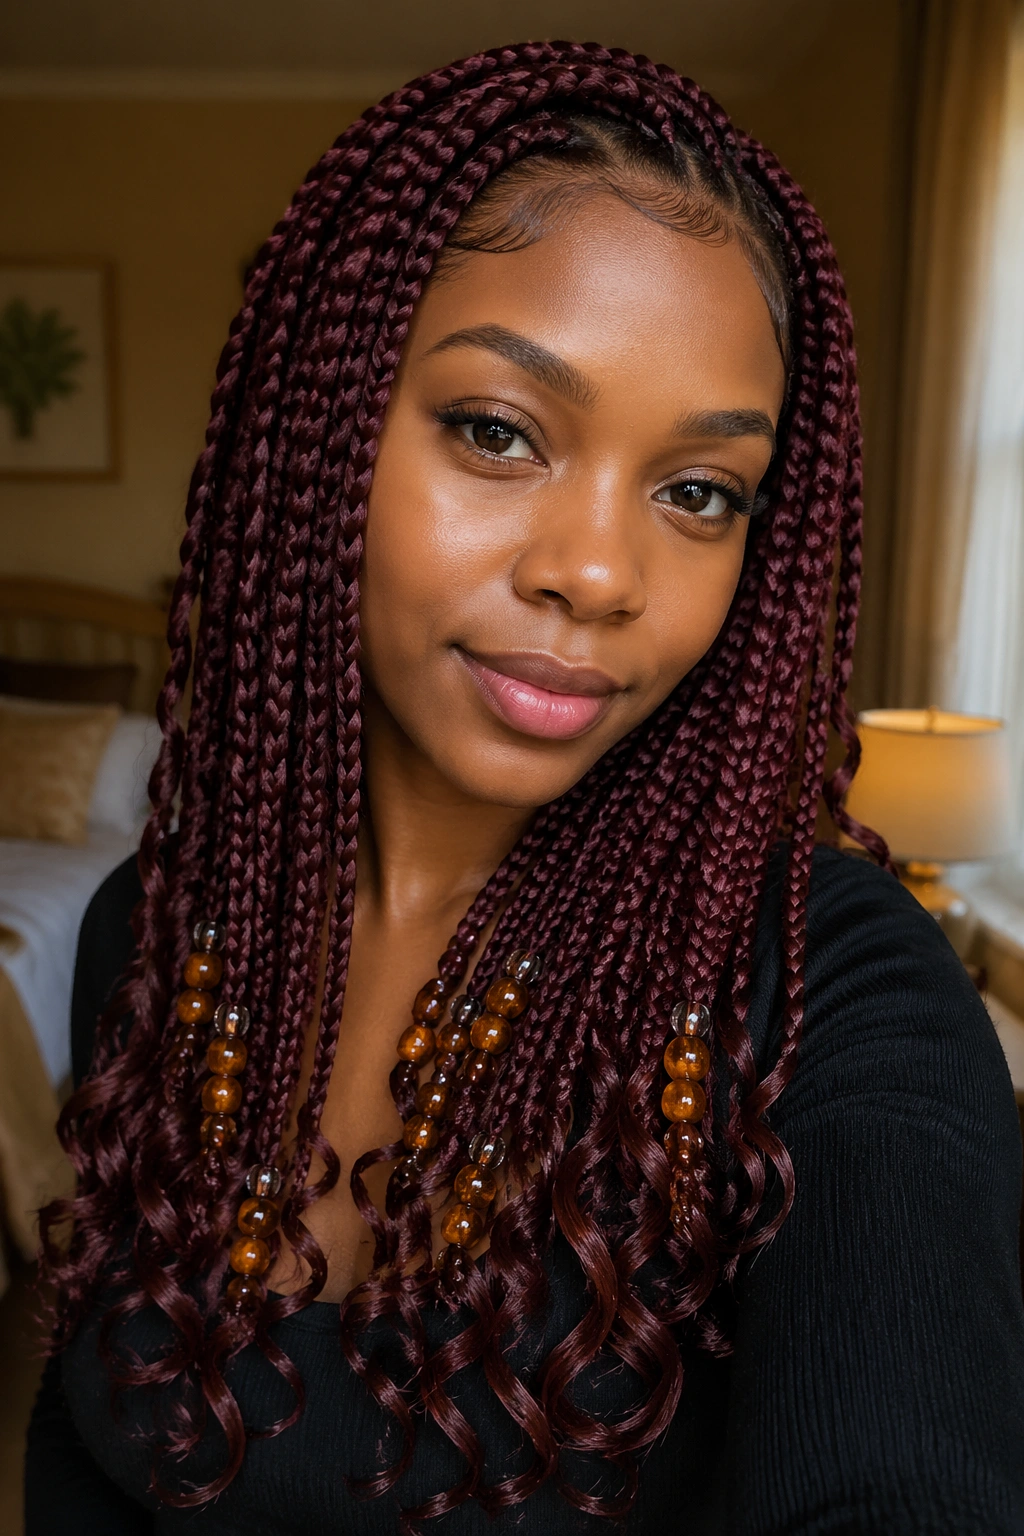
Burgundy braids already carry warmth, so amber beads make sense without even trying too hard. The color pairing feels rich, but not loud. Deep red-brown hair with honey or tobacco-toned beads reads smoother than a high-contrast mix, and that matters when the loose curls are part of the style too.
Matching the Tone
The nicest thing about burgundy is that it can lean dramatic or soft depending on what sits next to it. Amber beads keep it warm. They also stop the color from flattening out under indoor light, which can happen with deep reds if the accessories are too cool or too shiny.
Place the beads where the braids fall closest to the face or on the ends that move the most. That’s where the color shows up best. If you put amber beads on every single braid, the effect gets heavy. A few well-placed ones are stronger.
How to Keep Burgundy From Looking Flat
- Use loose curls with a little volume
- Place beads near the ends, not high on the shaft
- Keep jewelry simple so the color stays the focus
- Choose braid lengths that let the burgundy shift in the light
This is one of those styles that looks especially good when the rest of the outfit stays quiet. The hair does the work.
8. Blonde-Tipped Goddess Box Braids With Transparent Beads
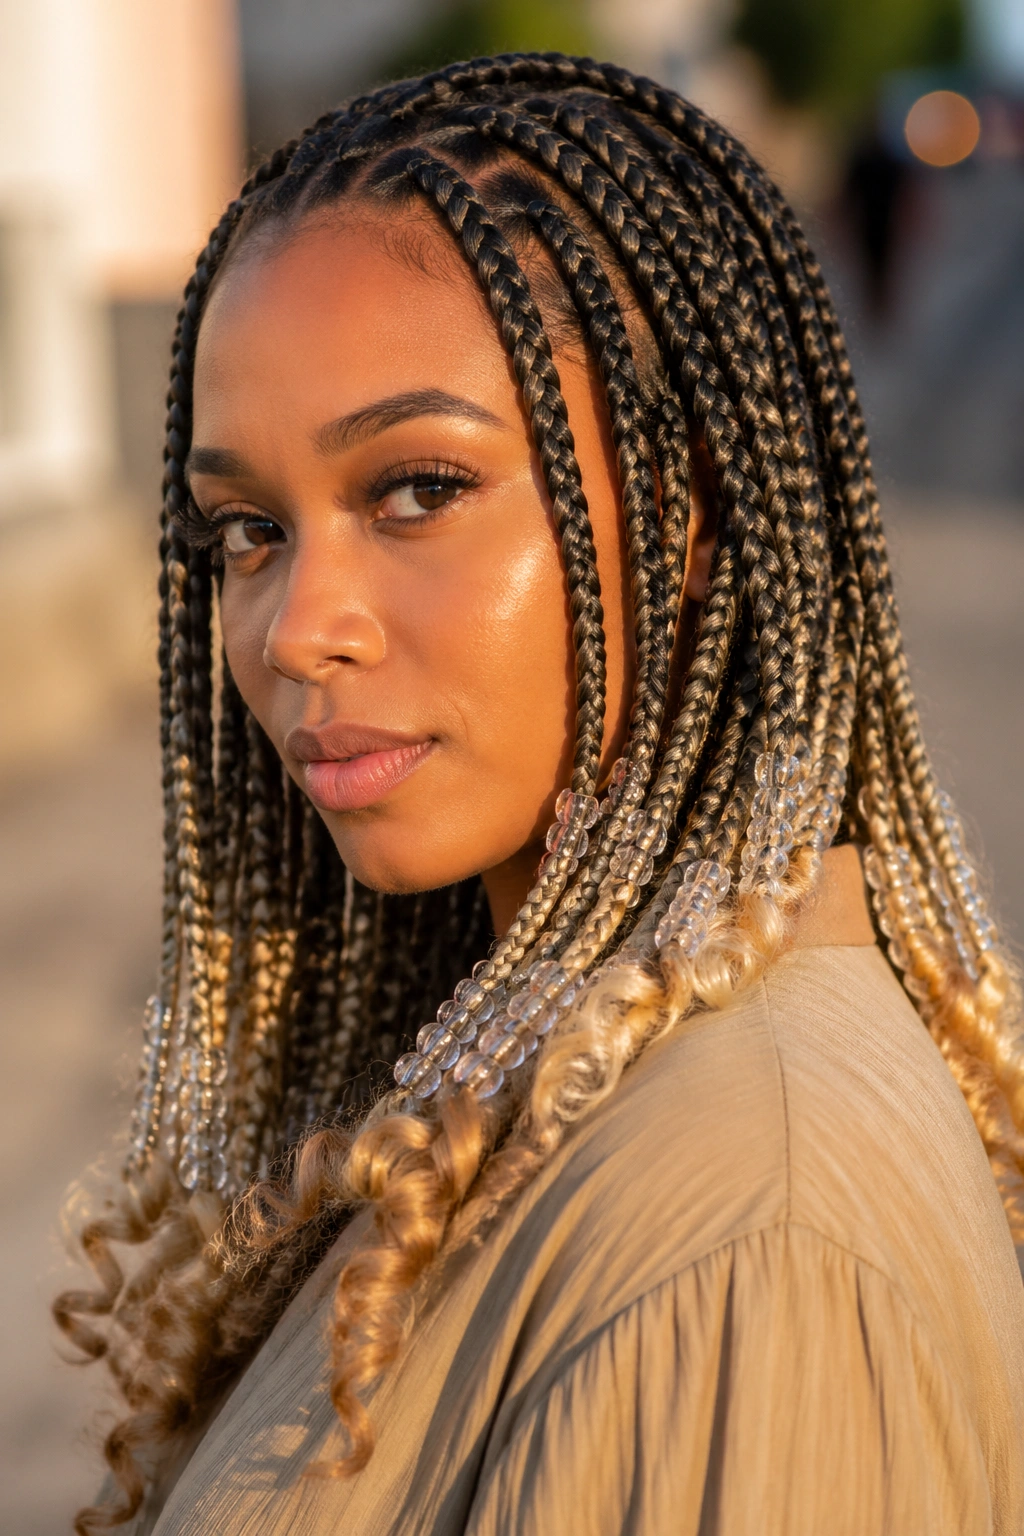
Bright braids do not need loud beads. That’s the part people get wrong. When the ends are blonde or honey-colored, transparent beads keep the eye on the braid itself instead of turning the style into an accessory contest.
The blonde tips already give you contrast. They need space. Transparent beads, especially the smoky-clear kind, let the color gradient show through while still giving the ends a little structure. I like this pairing on goddess braids because the loose curls around the face already soften the style, so the beads only need to whisper.
There’s also a practical upside. Clear beads go with everything. They don’t fight gold earrings, silver chains, warm makeup, or bright clothes. That makes the whole look easier to wear over and over again without feeling tied to one outfit.
Keep the bead count modest. A few clear beads at the tips of the front braids, maybe one or two lower down on the longer pieces, and you’re done. More than that can make blonde braids look overworked.
9. Feed-In Goddess Box Braids With Mixed Metal Beads
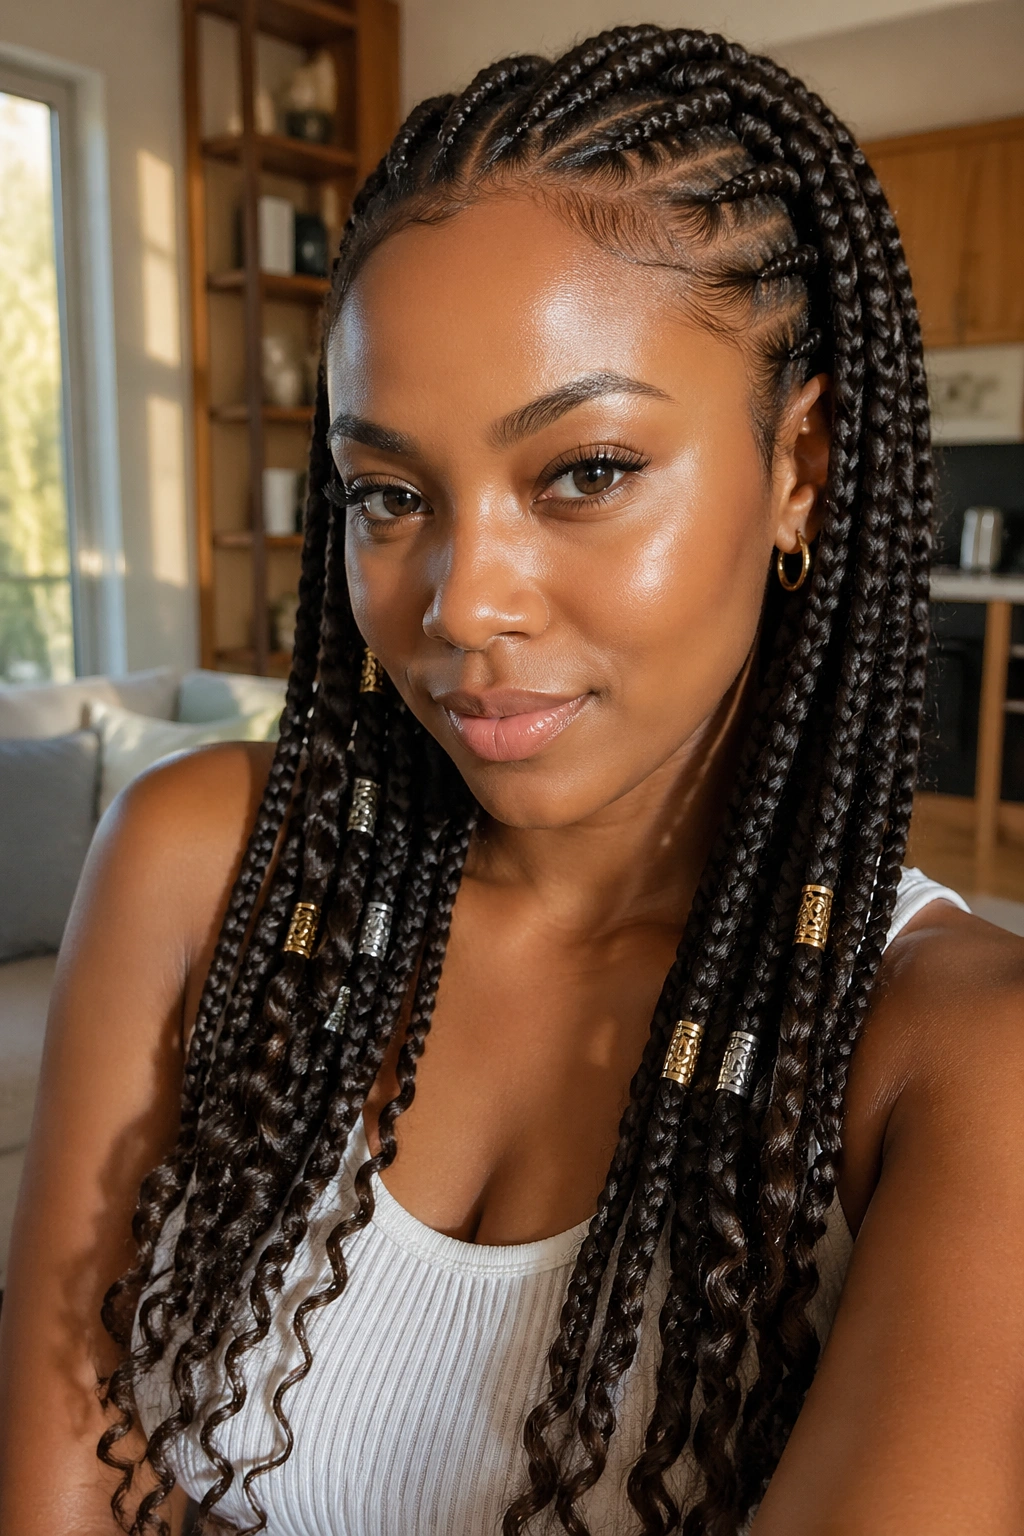
A good feed-in braid has a smooth, clean start, and that is exactly why mixed metal beads can look so sharp here. The root transitions from small to larger in a way that already feels deliberate. Add a few silver and gold beads near the ends, and the whole style gets this polished, slightly edgy finish.
I like this style when the braids are done with tight, neat feed-ins at the scalp and a little curl left out toward the front. The metal beads catch the light fast, so you do not need many. One silver bead on a braid, one gold bead on the next, then a stretch of plain braids in between—that kind of rhythm keeps the look from getting noisy.
The real trick is placement. Keep the heavy shine far from the roots. Feed-in braids are all about a clean scalp line, and bulky beads near the base can ruin that immediately. Let the metal live toward the ends, where it can move and flash a little without pulling the style down.
Small detail, big payoff.
10. Space-Bun Goddess Box Braids With Accent Beads
Space buns give goddess box braids a playful shape, but the beads need to stay on a short leash. If every braid is decked out, the buns and the hanging curls end up fighting for attention. Accent beads on just a few front pieces keep the style fun without tipping it into chaos.
Where the Beads Should Sit
The safest place for beads in this style is around the face and along the hanging braids, not on the bun itself. That keeps the top light. It also stops the buns from feeling overloaded, which is a real problem when the hair is dense or the beads are glass instead of acrylic.
How to Balance the Buns
- Keep the buns smooth at the base
- Leave two or three braids loose at the front
- Use small beads on those front braids only
- Let the curl pieces fall naturally around the cheeks
This style works best when the buns sit evenly and the hanging braids keep a little movement. The beads act like tiny anchors, not decorations scattered everywhere. I’d choose this look for concerts, casual weekends, or any day when you want the hair to feel playful but still tidy enough to last through a long afternoon.
11. Layered Shoulder-Length Goddess Box Braids With Barrel Beads
Layering changes the whole shape of shoulder-length goddess box braids. Instead of one blunt line at the bottom, you get movement at different heights, which lets the loose curls show up more clearly. Barrel beads fit that shape well because their longer form echoes the layers instead of sitting like little dots at the ends.
This is the style I reach for when I want beads, but I don’t want the ends to feel crowded. Barrel beads have presence. They look fuller than tiny round beads, but they still give the braid a neat finish. The layered cut helps too, because the beads don’t all land on the same line. That keeps the style from looking boxy.
There’s a nice practical bonus here. Layered braids move better. They swing instead of hanging as one solid block, which makes the curls around the face show up more. If you wear glasses, collared shirts, or anything structured around the neck, the layers help the hair settle without that stiff, flat look.
A blunt end can work. A layered one feels easier.
12. Crisscross-Part Goddess Box Braids With Tiny Seed Beads
Why does crisscross parting feel so different from regular sections? Because the scalp pattern becomes part of the design. The lines travel diagonally instead of sitting in straight rows, and that gives the braids a more textured, almost woven look. Tiny seed beads fit that idea because they stay light and don’t overwhelm the pattern.
Why It Feels Lighter
Big beads can fight a crisscross part. They draw attention away from the scalp work, and that’s the one thing you want people to notice here. Seed beads stay out of the way. They add a bit of shine near the ends, then let the parting keep its shape.
I like this style for people who want something detailed but not heavy. It reads artful without needing a lot of extra color. The beads should be small enough that the braid tips still look flexible. If the ends feel stiff, the whole style loses its easy movement.
- Best when the parting is crisp and the braid rows are even
- Tiny beads work better than large ones
- Keep the bead color close to the braid color for a softer finish
- Loose curls should stay visible at the crown and temple area
The whole point is to let the braid pattern do most of the talking.
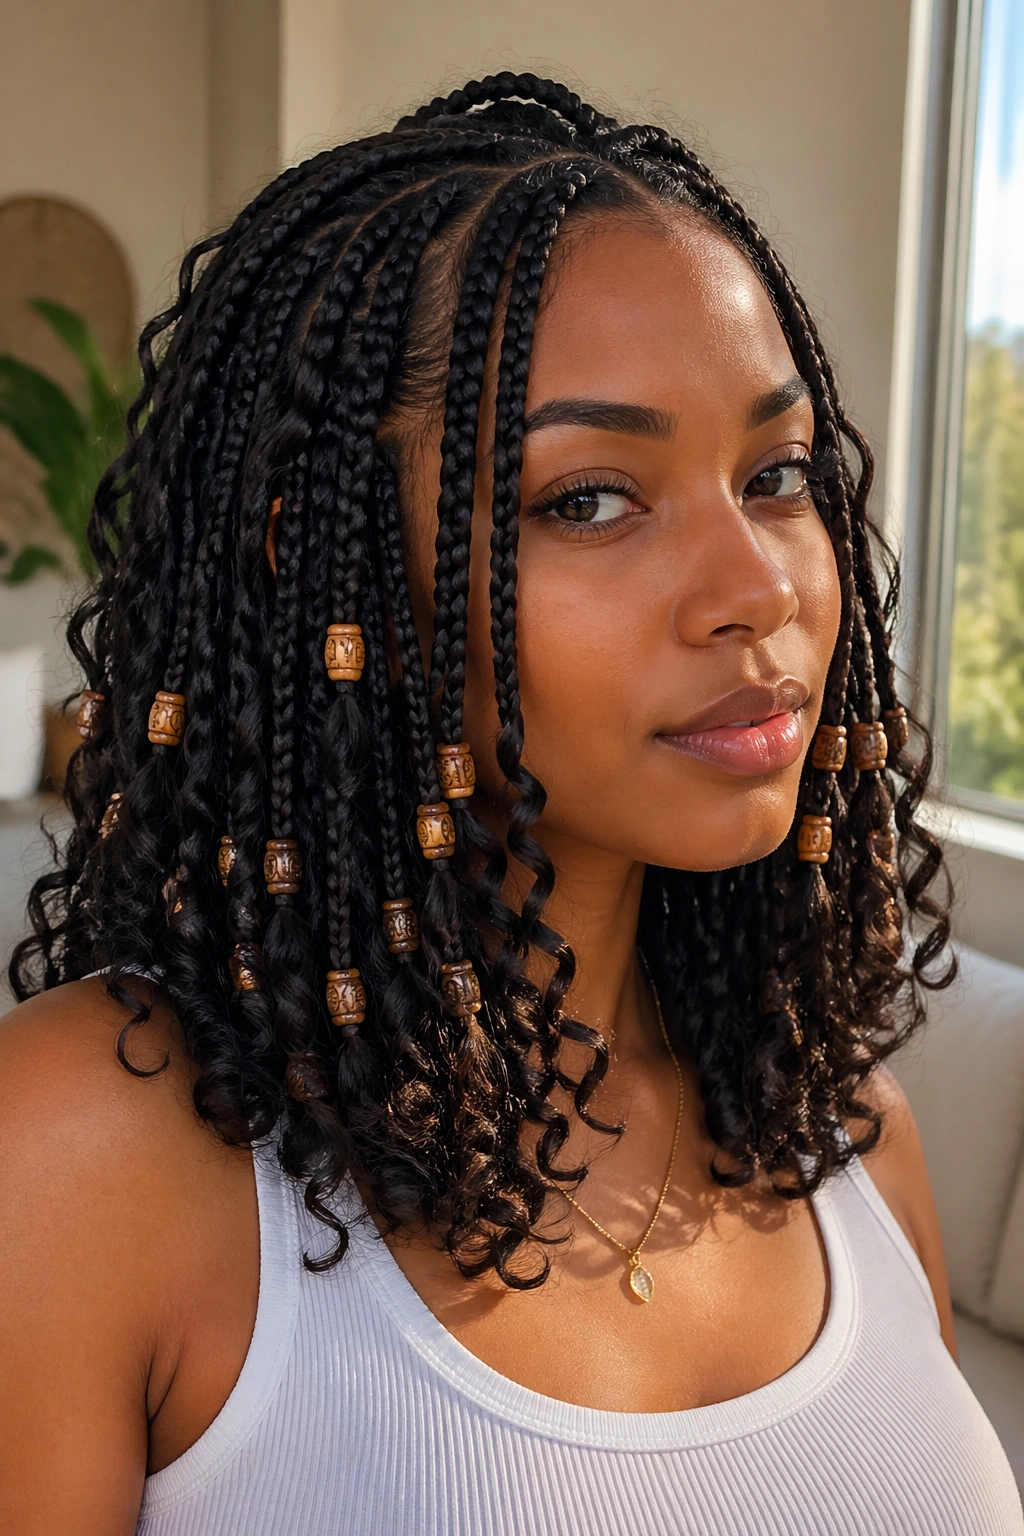
13. Knotless Goddess Box Braids With Light Beads
Knotless roots and heavy beads do not get along. The whole appeal of knotless goddess box braids is that they start lighter at the scalp and feel smoother against the head, so the bead choice should support that. Light beads—acrylic, resin, or thin wooden beads—help the style stay comfortable instead of dragging.
This is one of the better options if your scalp gets tender or if you wear braids for long stretches and want less pulling near the root. The curl pieces still give the style softness, but the knots are gone, and that changes how the ends should be handled. I would keep the bead clusters small and avoid stacking several beads on one braid unless the braid itself is fairly thick.
Quick Things to Watch
- Put beads mostly on the ends, not the upper half
- Choose lightweight material over thick glass
- Keep the braid size consistent so the beads hang evenly
- Skip oversized accessories if you want all-day comfort
There’s a plain reason this style works: less weight means less strain. Not glamorous. Very useful.
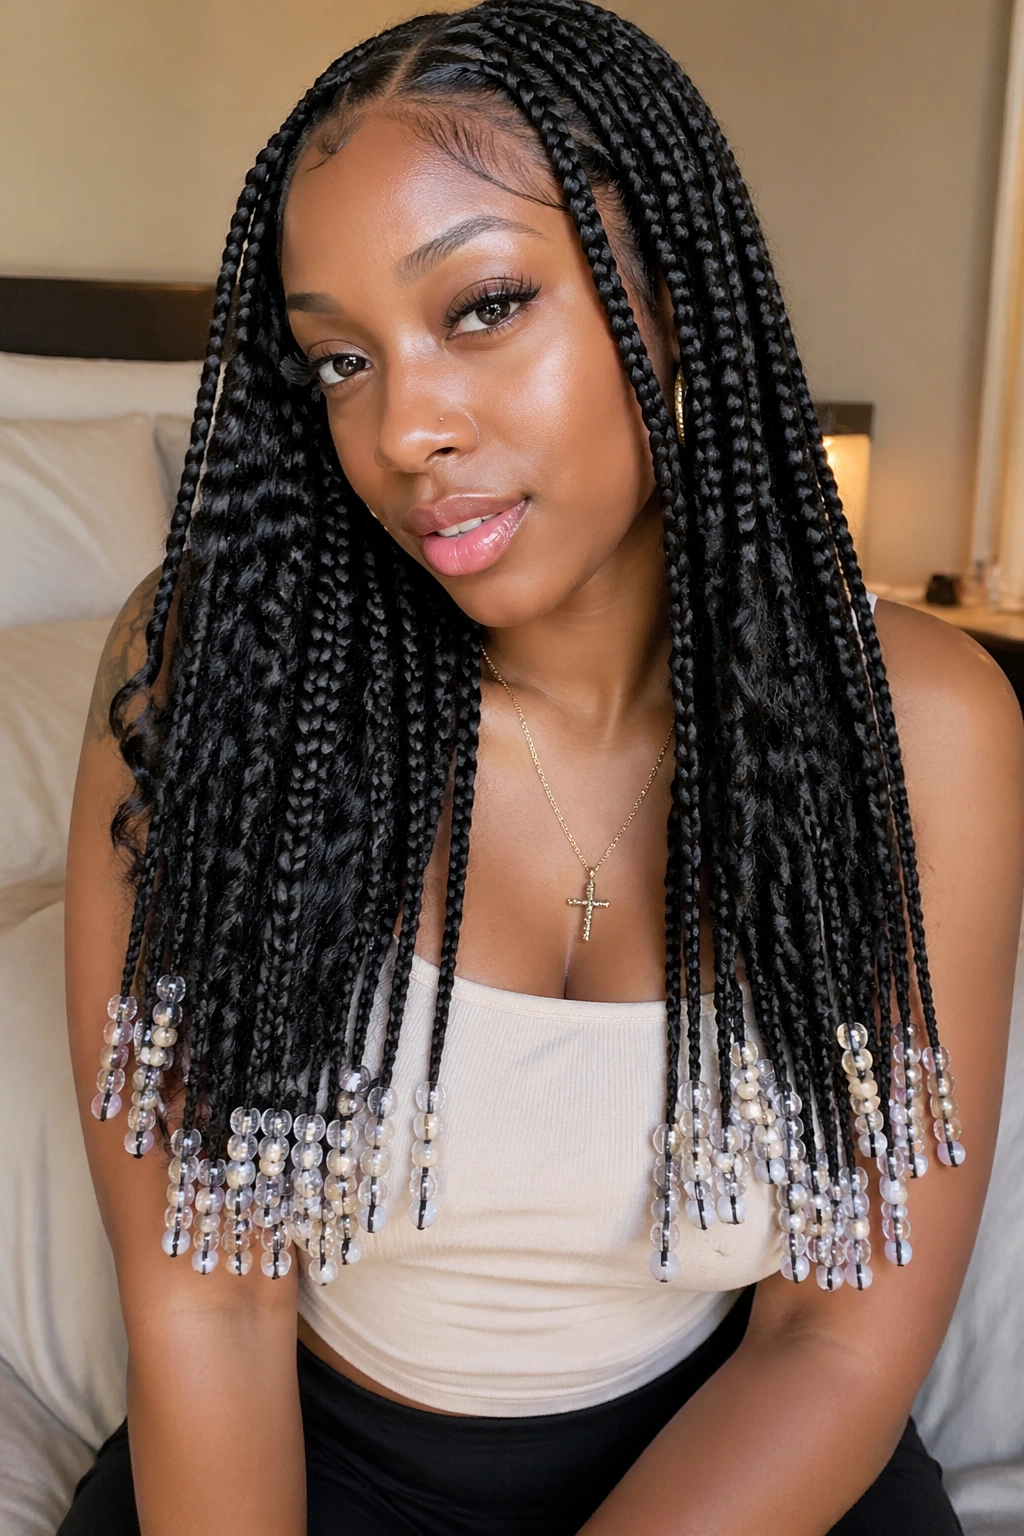
14. Boho Goddess Box Braids With Pearl Beads

Pearl beads soften everything around them. On boho goddess box braids, that softness matters because the loose curls already give the style a romantic feel. Pearls add a smooth, quiet shine that sits somewhere between casual and dressed up.
Pearls Versus Clear Beads
Clear beads are crisp. Pearls are softer. That difference sounds small until you see it on the head. Clear beads let the braid texture stay front and center, while pearls pull the look toward something gentler and more polished. If you want the style to feel a little more elegant, pearls do that with very little effort.
I prefer pearls on a few front pieces and on the lower ends of braids that frame the face. That keeps the look from drifting into costume territory. Too many pearls, especially big ones, can make the style feel overly themed. A few placed with care look much better.
Pearls also play nicely with loose cream, taupe, blush, or soft gold clothing. They don’t need much else around them. If the outfit stays simple, the braid texture and the bead finish get all the attention they need.
15. Side-Swept Goddess Box Braids With Statement Beads
A side sweep gives the beads a lane to travel in. That’s why statement beads work so well here. Instead of spreading decoration evenly across the whole head, you let one side carry the visual weight. The result feels bolder, but also more controlled.
This is the style I’d choose if you want the beads to read from across a room. Larger carved beads, patterned beads, or a single bold color can all work, but they need space. The side sweep creates that space by pushing the braids over one shoulder and letting the curls spill forward. You get movement, asymmetry, and a little drama without turning the style into a pile of accessories.
The best version is the one that knows when to stop. One strong bead near the cheek can be enough. Three can be enough. Ten usually is not. Keep the opposite side quieter, let the braid line stay clean, and the statement beads will look sharp instead of crowded.
That restraint is what makes the style hold up. A loud bead on a calm base always looks better than the other way around.